

• My Hexie Flower Quilt •
I have never been more excited to share with you a quilt than I am today!! My hexie flower quilt is done. Finally! No more basting hexies or sewing flowers together. When I initially started back in the summer of 2015, I never thought it would take me this long. In fact it was going so slow that I started calling it my “forever and ever” quilt when I would share any updates. If you’re here for oodles of pictures and all the details from start to finish, you’re in luck!! Grab your favorite drink and enjoy.

My friend Erin made the most beautiful grandmas flower garden quilt years ago for her most adorable Lunden…which she called Lunden’s Flower Garden. After seeing her quilt I wanted to make a hexie flower quilt but had no idea where to start. Erin graciously shared several tips with me and my friend Jane taught me how to make my first hexie. Above is my very first flower. I actually whip stitched it and the white thread was showing in the seams sooo bad. I asked Erin what I could do better and she told me to do small binding-like stitches. So I unpicked the flower and sewed it back together. It looks much better.
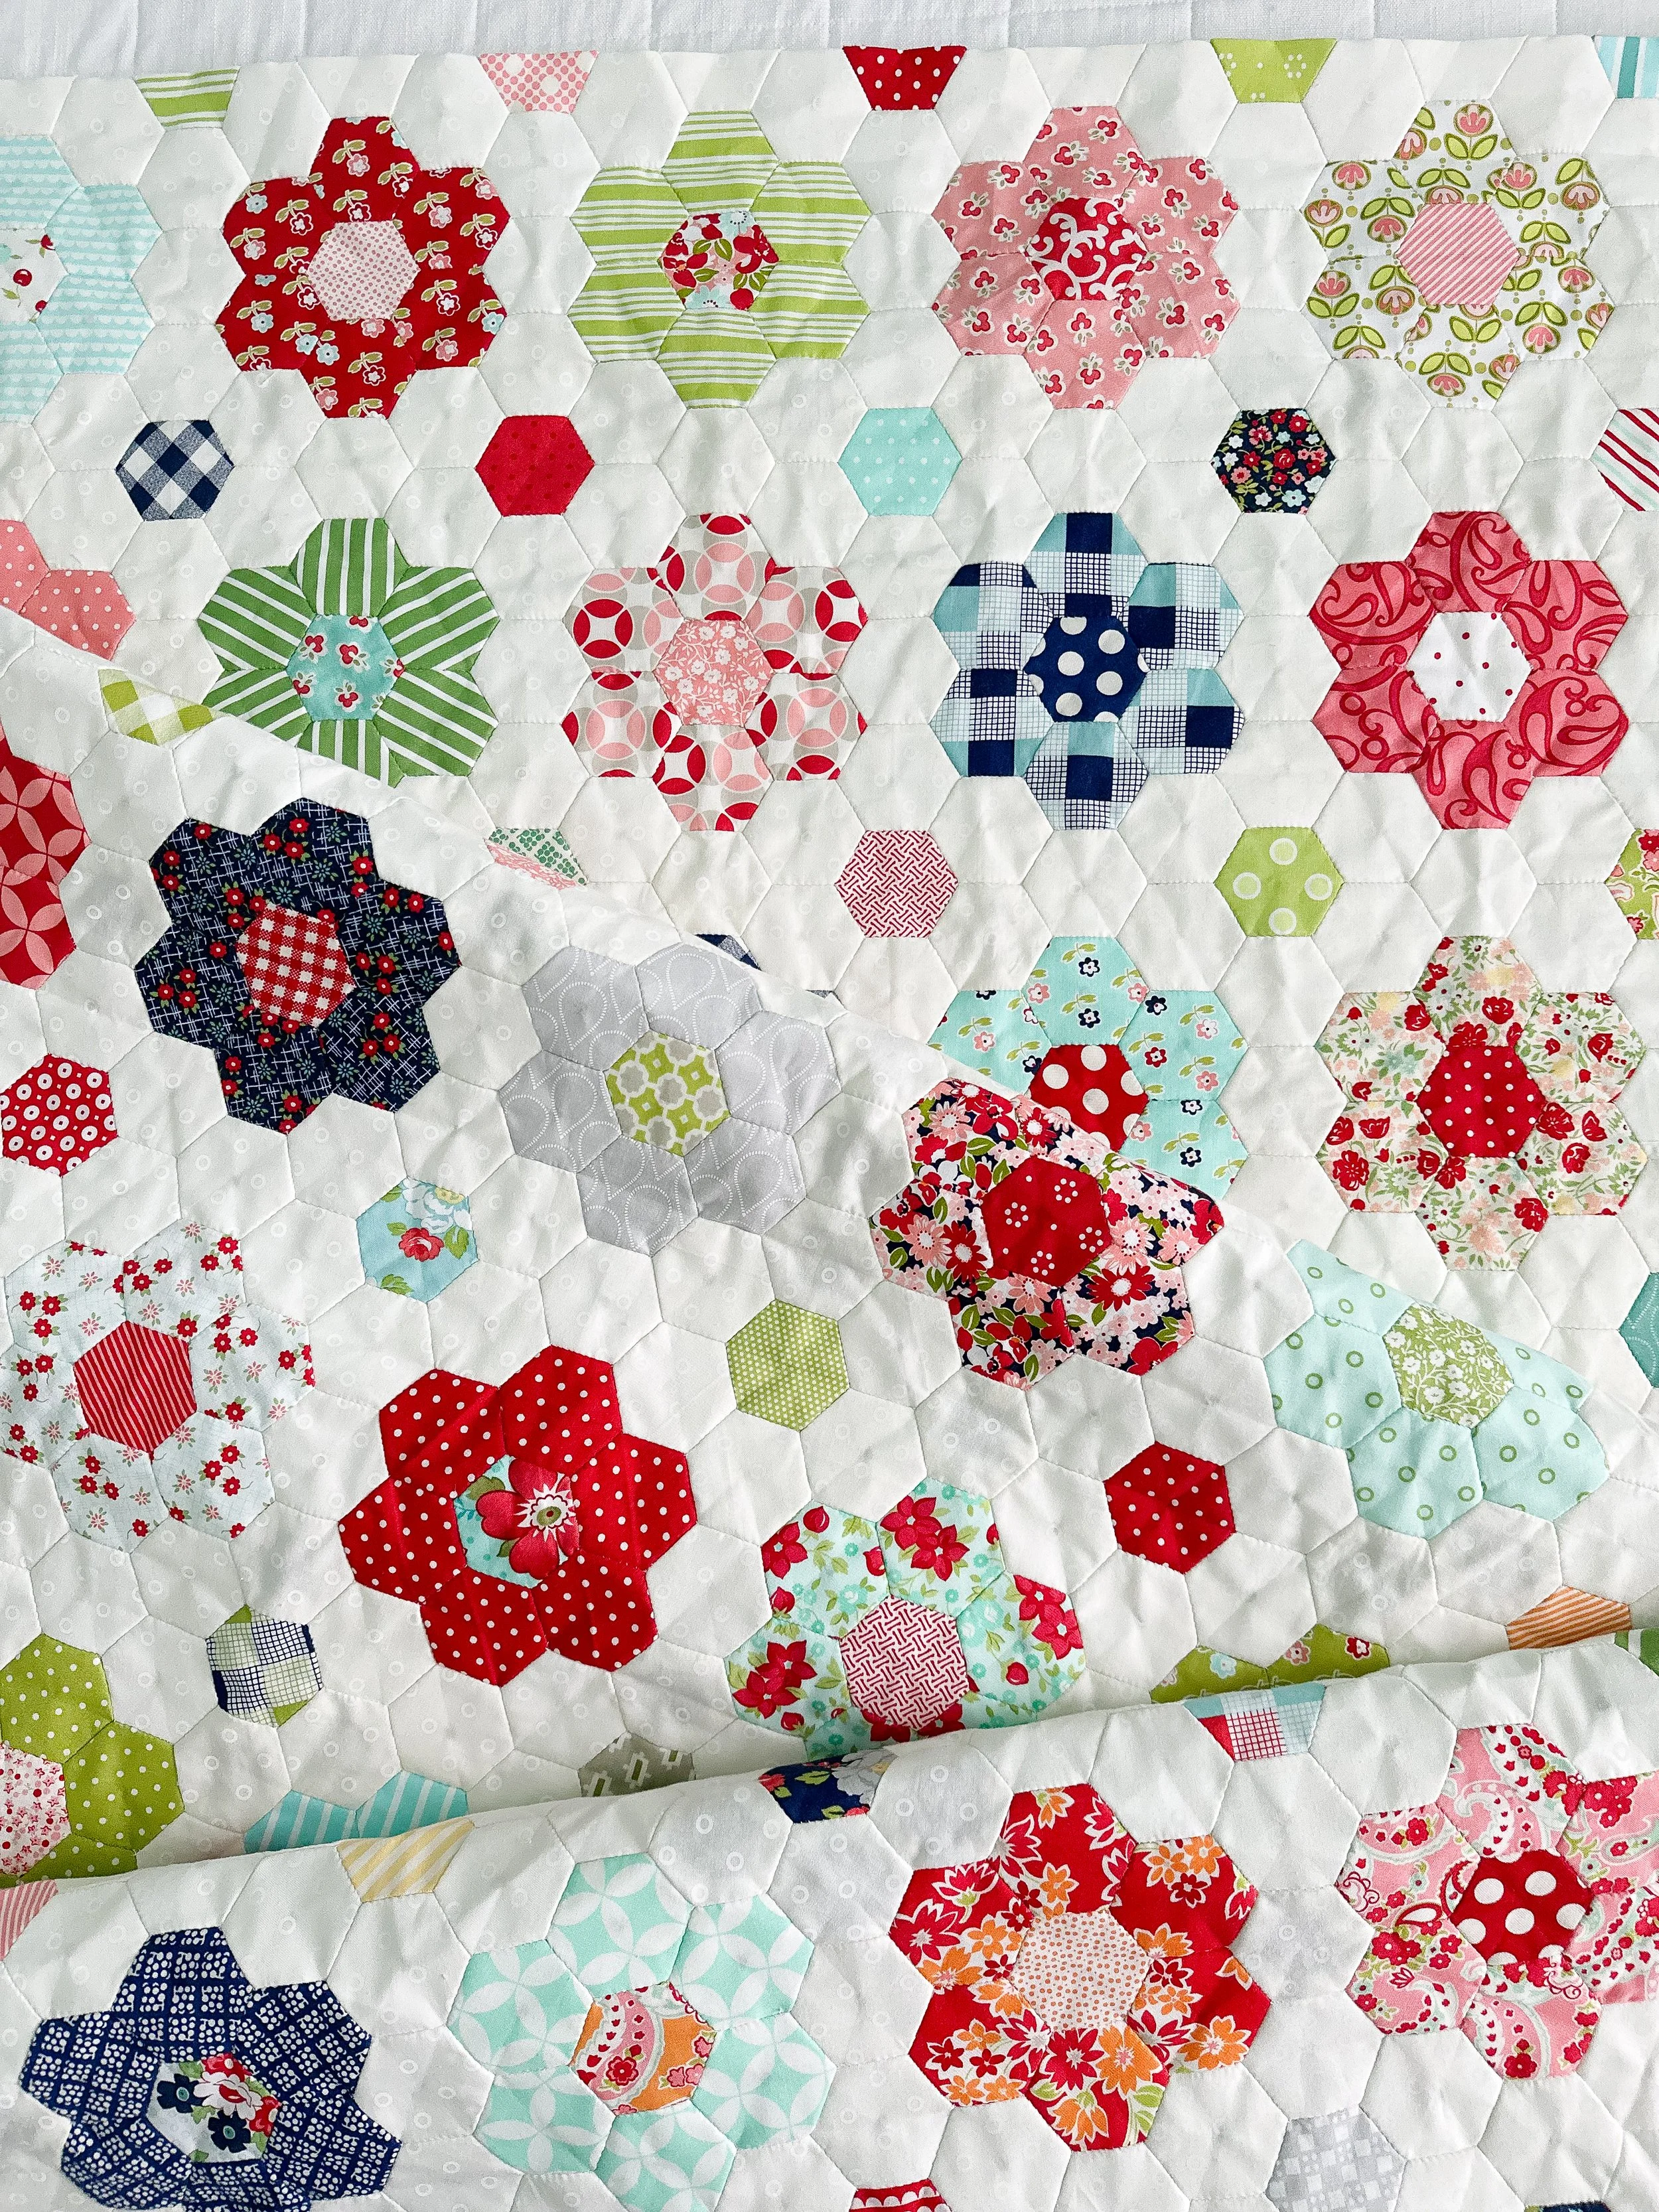
When I started this quilt I started collecting Bonnie and Camille charm packs (5” squares of a fabric line) from several of their lines. Their lines go so great together!! I bought two of each one that I wanted in order to make the flowers. I cut the 5” squares in half both ways, which gave me four 2.5” squares from each 5” square, that is why I needed two charm packs of each line. Each flower requires 6 petals. I would use the extra squares as centers for other flowers, so there was no waste. I used nearly every Bonnie and Camille line starting with Vintage Modern and ending with some of their newer lines. My very first flower was made with scraps that I had leftover from another quilt. I don’t know who the designer is for that one. There are a few other fabrics that I’ve used on other projects over the years that matched the other colors, so I added them. It is almost entirely made from Bonnie and Camille fabrics.

You can see in the image above that the needle is going through the edges of both layers of fabric but not the papers. I learned as I went along to use straw needles…the one pictured above is not a straw needle, and to do the stitches a little smaller in length. Have you made a hexie before? If not, no worries, I have some youtube videos that may help you get started with basting the hexies and sewing them together. Here is video 1…video 2…and video 3. I have also been posting tips recently over on my instagram go to @leishakaye to check them out.

Let’s talk about all the supplies that I used. One of the best tips that Erin gave me was to buy a hexie fiskars 1” punch, get some linen paper…and a lot of it, and a single hole punch. Buying pre-punched hexies is great, however you need a lot and it can get rather expensive. I was also worried about the papers being too thick for my liking and the paper being different thicknesses if I had to keep buying more. This paper is the perfect thickness to add stability to the flowers and quilt without being too thick. I actually needed 20 or so more to finish my quilt and my mom was given some papers she knew she would never use. She gave them to me and since they were the same size I used them for those last few hexies for the edges of my quilt. They were hard to use and even harder to remove. So happy that I went with the linen paper.
To make it easier I have linked all of my supplies in my Amazon storefront. All you need is some of your favorite fabrics.
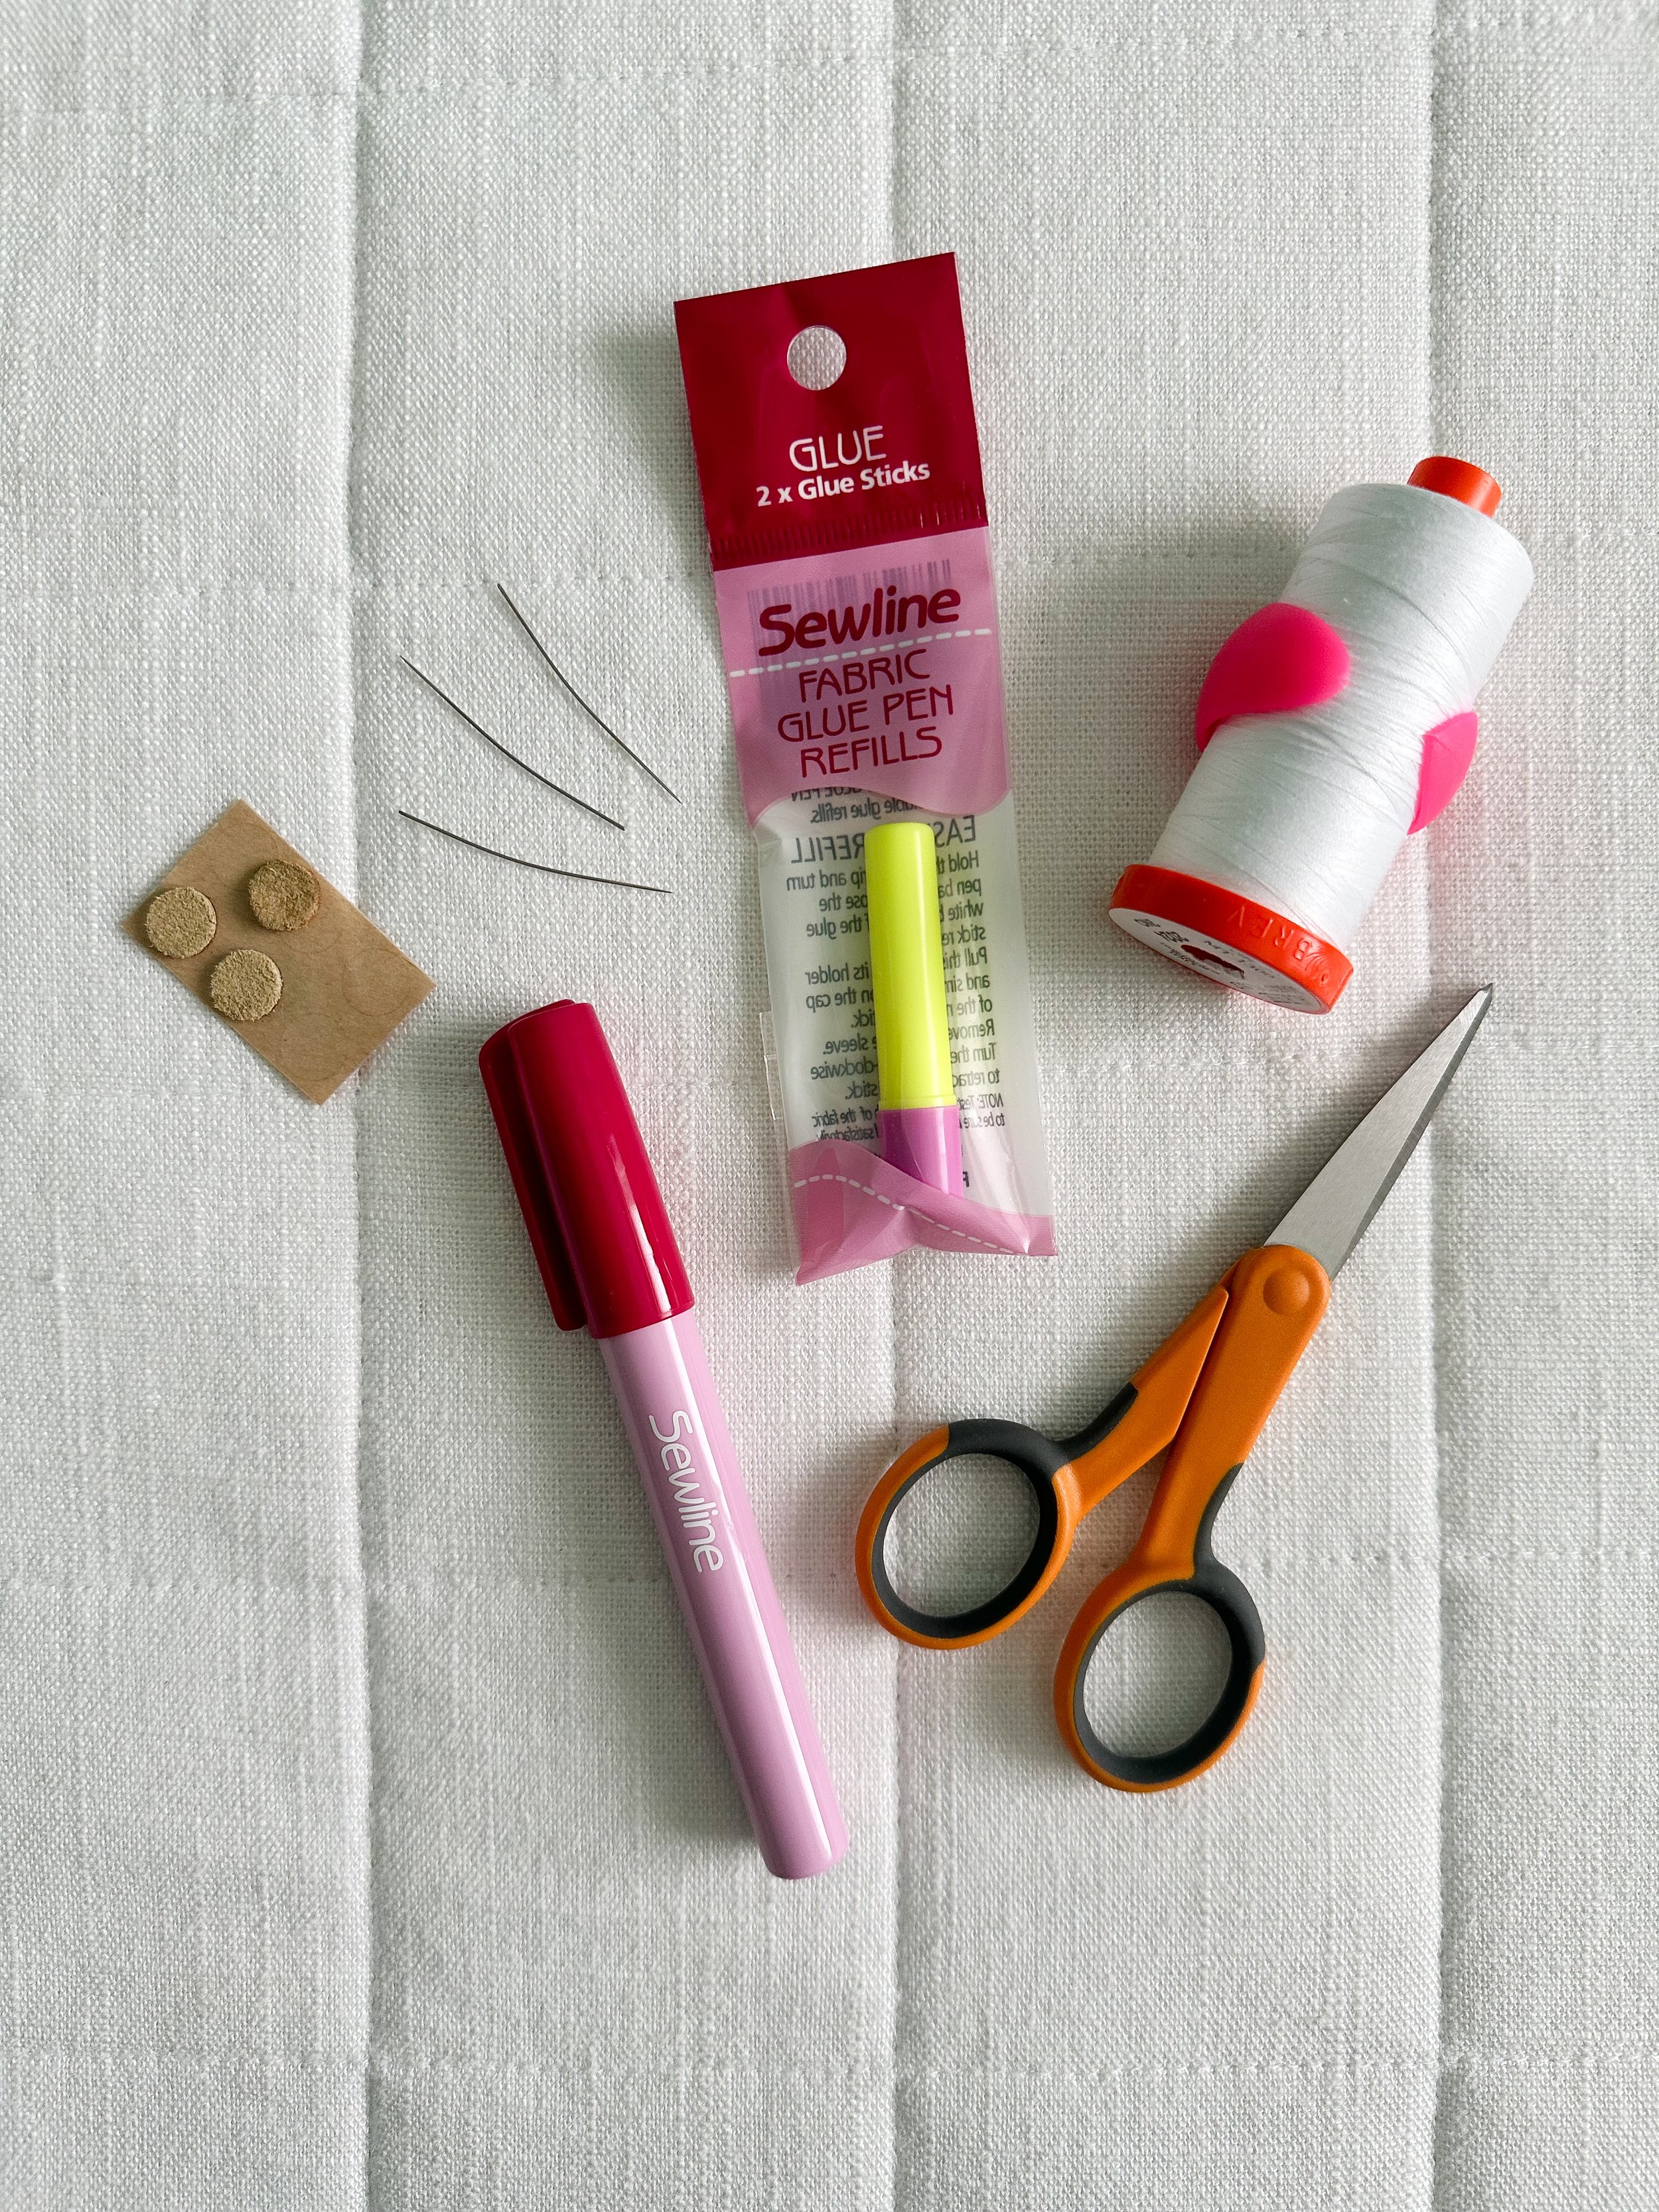
Everyone has difference preferences when doing english paper piecing, these are mine. There are a few different methods of basting…I chose to glue baste because I wanted to threads to be on the back of the hexies and I didn’t want to have to undo basting stitches on the front of my quilt when I was done. I actually never made a single hexie that was basted on the front of the fabric/hexie, so I cant give any instruction or tips on that method.
The Sewline glue pens are the perfect size. The tip is smaller than the traditional glue sticks we all used in elementary school and they are easy to refill. You can see above the super thin curved needles, those are straw needles. After I switched to those it was much easier to sew smaller stitches. Straw needles do bend, which is why mine are curved. I’ve even broke a few when I’ve put too much pressure on them. Even though that could happen, I still recommend them 100%. The Thimble Pads are the perfect addition to any sewist’s bag! I was sewing with friends last year and one of them told me about these perfectly sized little leather dots that you can stick to your finger in the exact spot that your needle is trying to put a hole in your finger every stitch that you take. Haha!! Seriously though. When you’re done using it just put it back on the sheet it came on ready to use again and again. You may be able to tell the top right one is the one that I used over and over. They come with several in a package, so I shared some with my sewing friends.
Just a reminder all of these supplies are already on an amazon list to make them easy for you to find.

I chose to use Aurifil thread because it’s high quality and thinner, which doesn’t add bulk to the seams. I used 1.5 spools for my quilt.

My sweet friend Kathy makes me little sewing pouches like this one, sorry I don’t know the name of the pattern. There are several adorable pouch patterns out there, find one that you like. I highly recommend getting the box of 50 Clover binding clips because you can get way more done than the package of 10 would allow you. I use 6 clips to hold the edges on the hexies after I’ve glued them and before I do the basting stitches. For instructions on gluing and basting head over to those youtube videos. (which I individually listed above) I love these binding clips to sew bags or any other bulky seams that I can’t pin, as well as for binding. Another must have!

This was the hexie pieces for one flower. This also gave me a little time for the glue to set before I hand basted on the backside.

Last fall I was shopping and came across this OttLite and had to get one. In the over 8.5 years I’ve been sewing this quilt my eyes have definitely gotten older. This was the perfect addition for me to finish sewing the rows together. I actually plugged in an extension cord and sat it next to me on the couch. You touch the tip of the light to turn it on and again and again if you’d like it to be the brightest. Touch it again to turn it off. The arm bends easily to get it exactly where you want it. I plan to also use in when I’m sewing with my sewing machine.

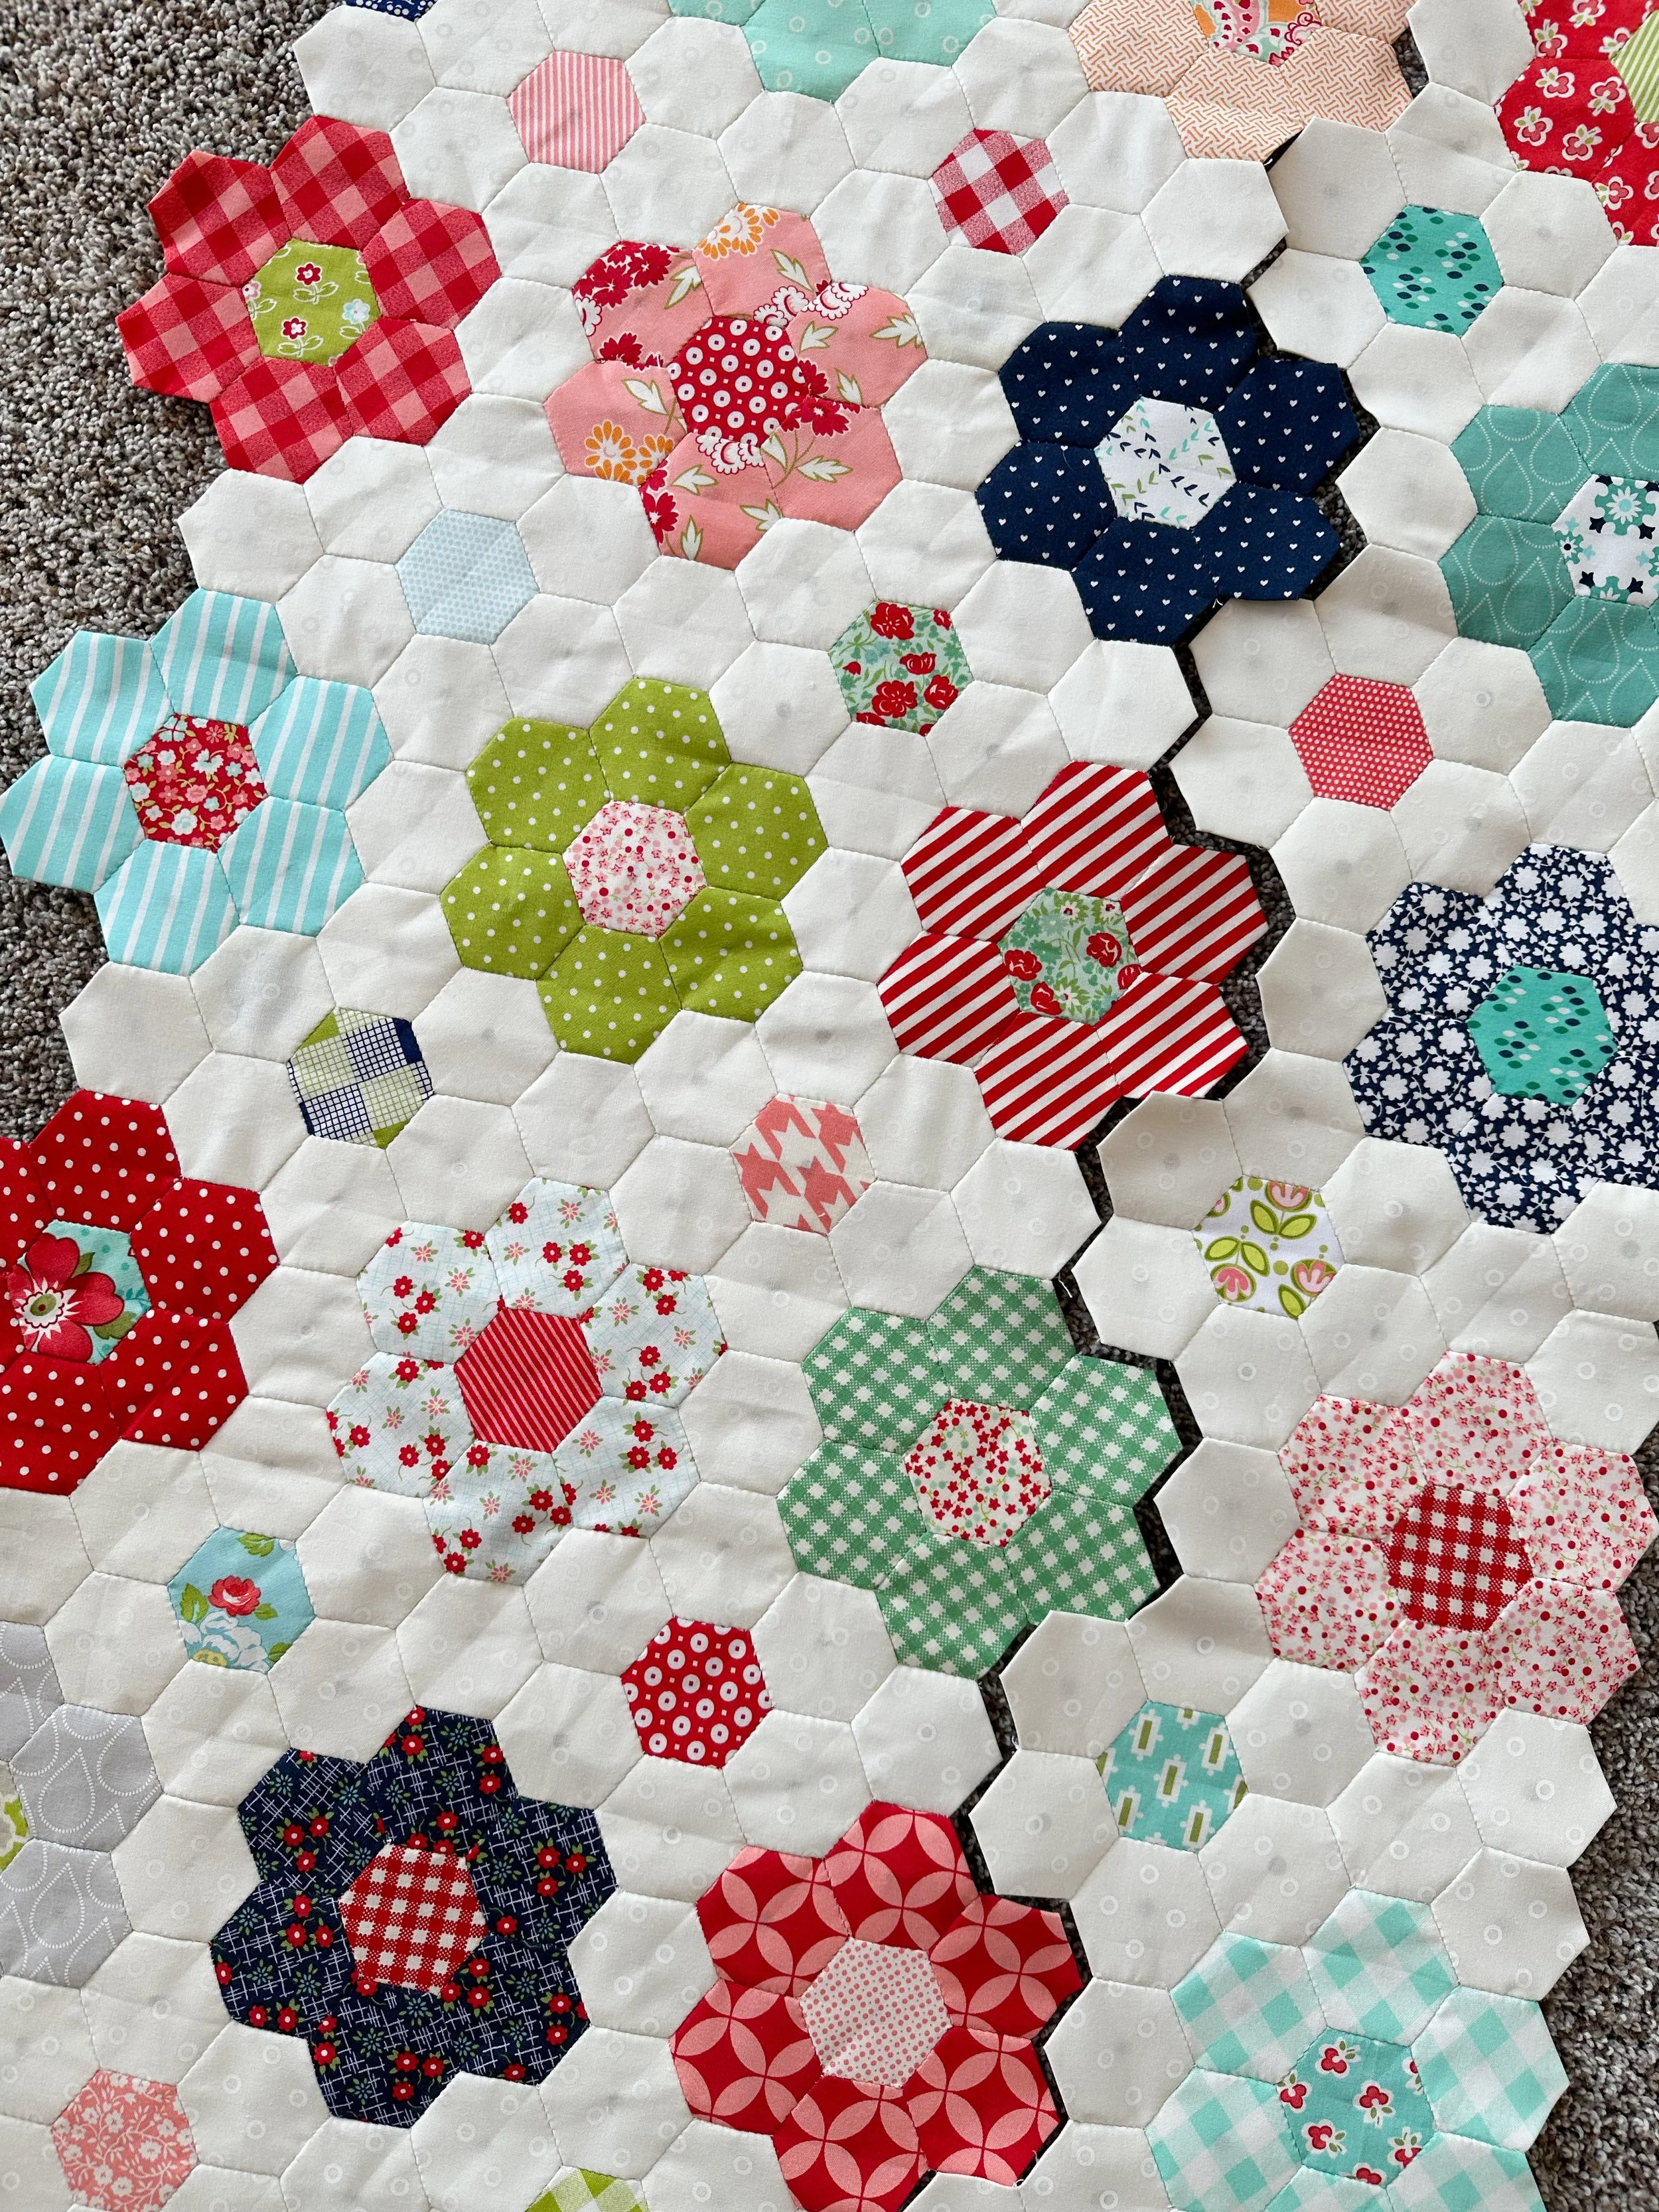
After I started, I came across a hexie flower quilt that Cat from Raspberry Rainbow posted on Pinterest that I absolutely loved. After seeing her layout I knew that’s how I wanted to make my hexie flower quilt. You can see above the colored flowers with the colored centers and the white flowers with the colored centers, with only the need for a single hexie between each hexie vertically. This made it look like there was a border of white hexies around each flower without there being a border around each one. Plus the added single colored hexie in the middle of all the white ones is so cute. Love it!

It felt so exciting to have my stack get bigger and bigger. Occasionally I would share updates on my instagram over the years on where I was. There may be a handful of posts I forgot to add the hashtag to, but its great to see them all together. To be honest this quilt sat for quite a while off and on over the years. If I didn’t have another project ready to go when I went to sew with friends, I brought my hexie flower quilt. A few of my friends also started one, too. They have encouraged me so much over the years.

It’s so fun to see the different stages over the years.
I actually did a blog post years ago when I was starting to sew the rows together. Check it out if you’d like.
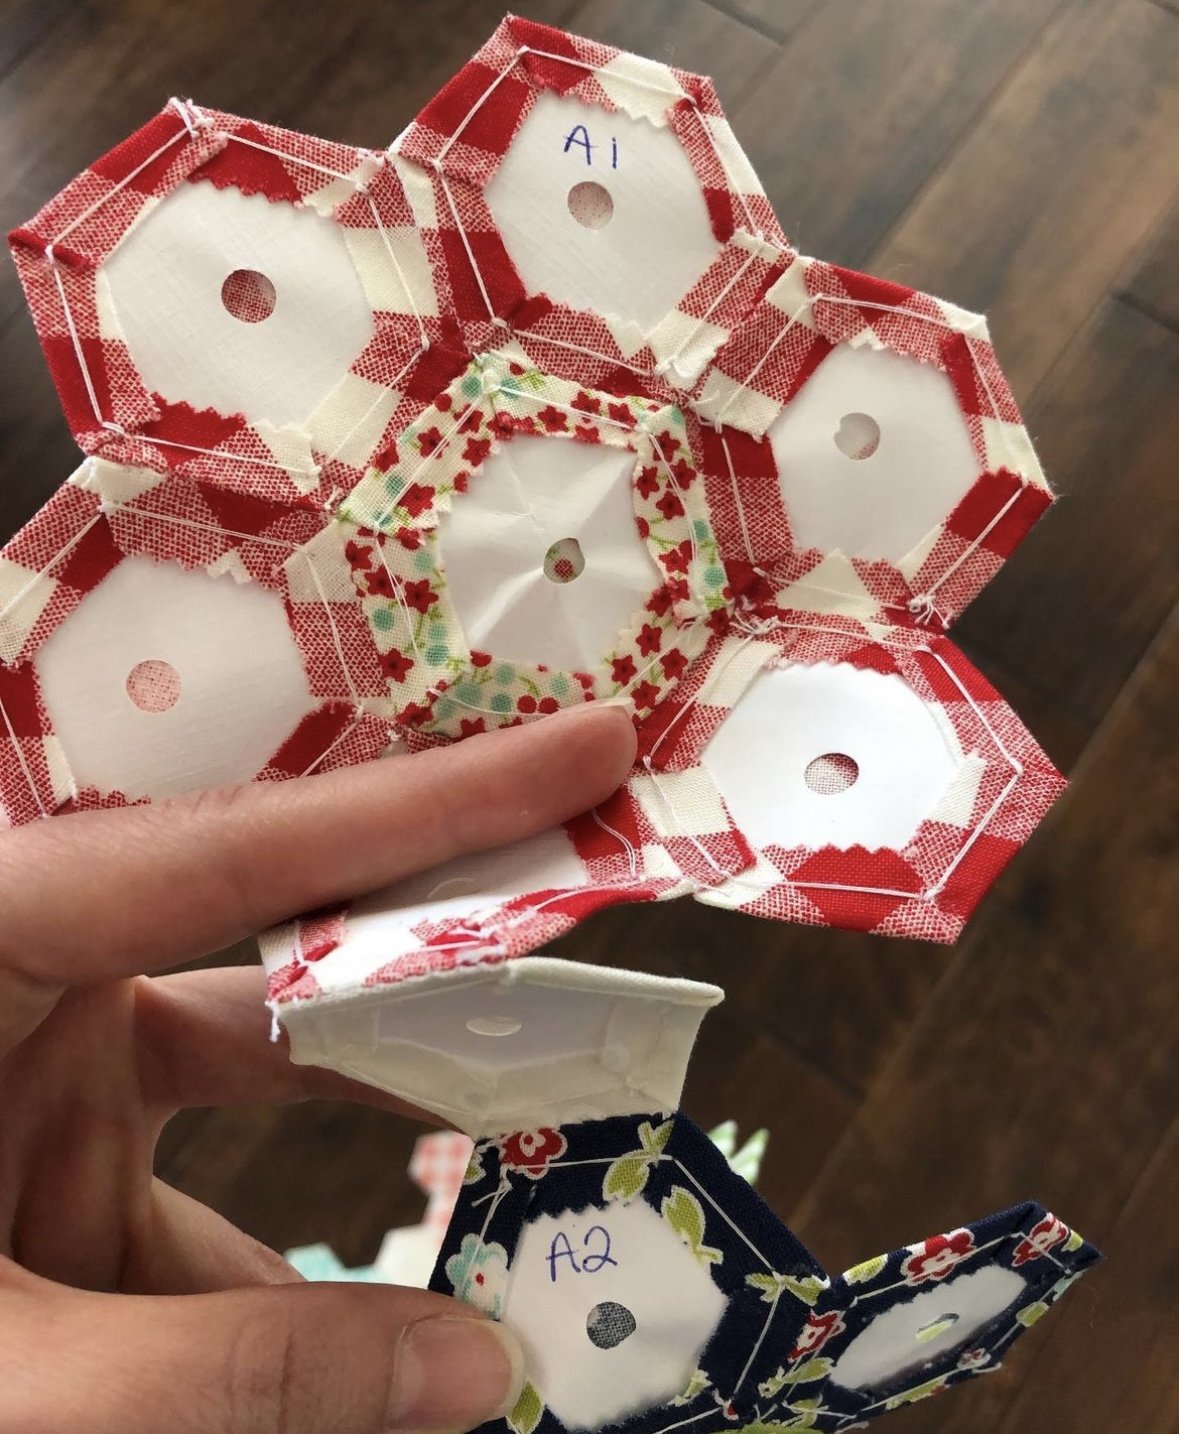
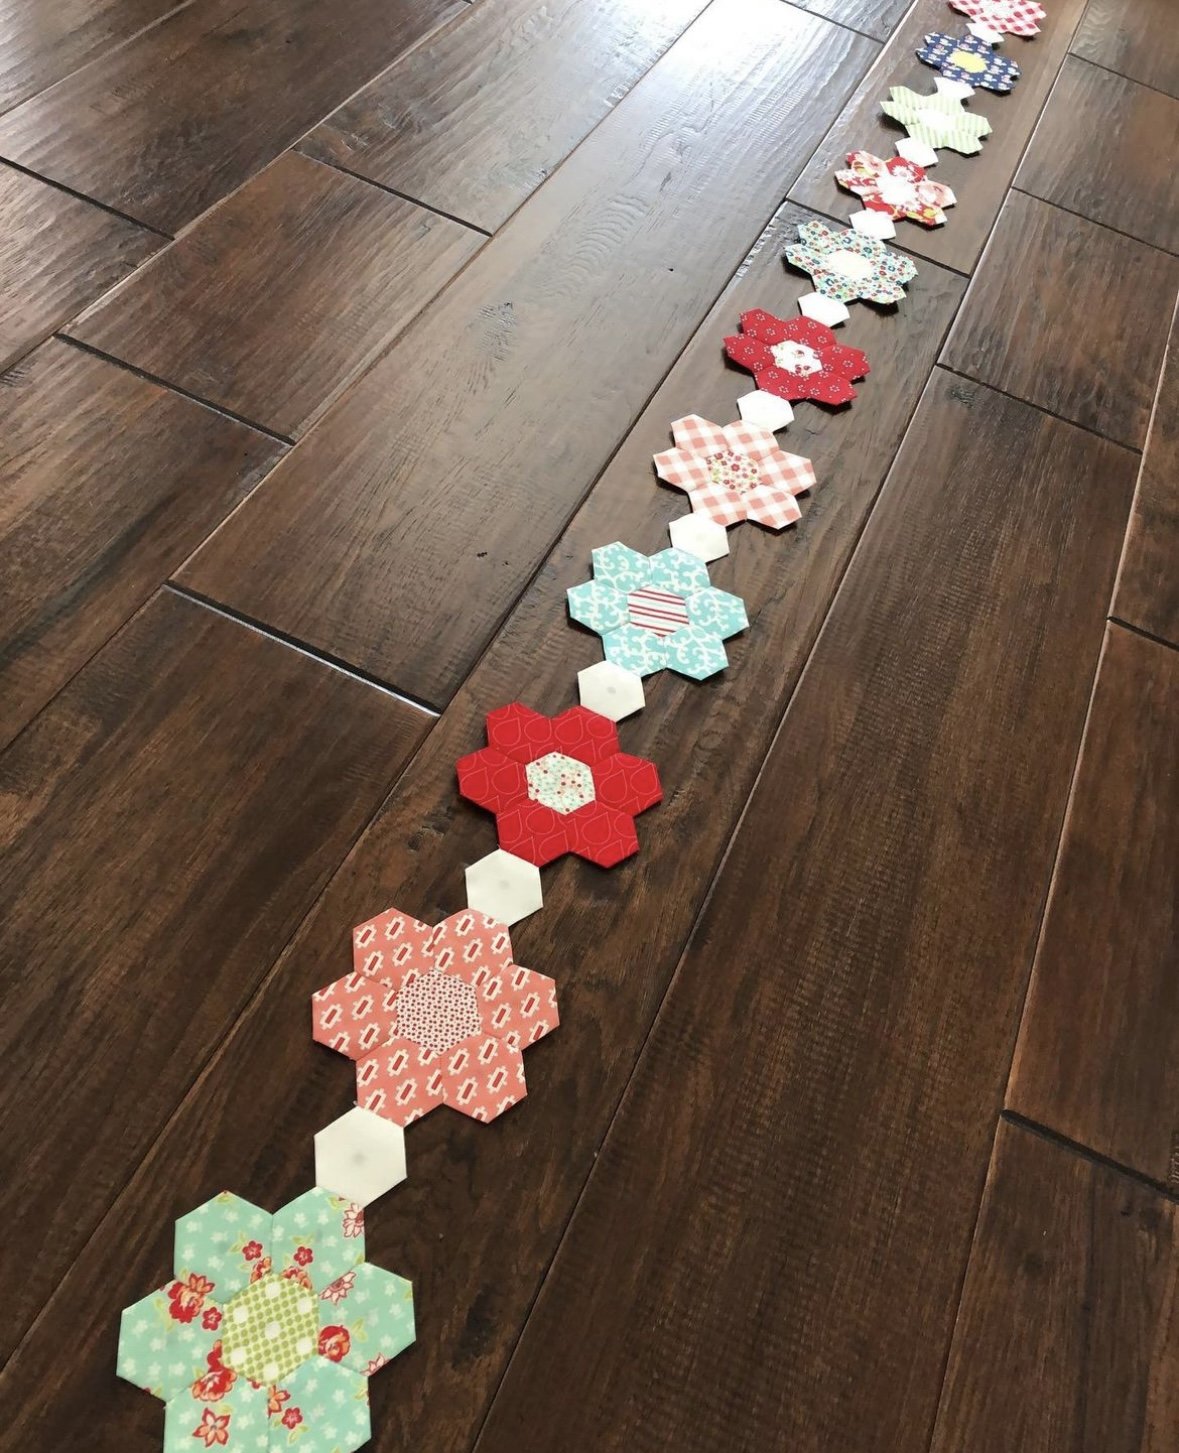
After I made all the flowers with the exception of the edges, I laid my quilt out and made sure I spread out the bold colors and patterns throughout the quilt. When I was happy with the quilt I turned each flower over and marked it. Starting with the left side of the quilt to the right. Each row was given a letter and then each flower was given a different number as I go down the row. So the top left flower was A1 then next one on the same row is A2 and so on. I wrote on the back of the paper on the top hexie in the flower what the number was. This helped me keep track of the flowers and how I laid it out, especially for directional fabrics. I stacked each row to keep them together until I could sew the rows together. I sewed one single hexie between each flower, as you can see below. The next row is row B and is all the white background with the exception of the center of the white flowers. The white rows connect perfectly between all the colored rows, they just sit 1.5 hexies down from the edge. If you look at the other pictures you should be able to see more.
After I started sewing a few rows together it started getting bigger and bigger and a little more to work with. So I sewed the first half of the quilt together and then the second half, then I sewed the two big pieces together. I did leave the papers in the quilt to have more structure but also to protect all the hand stitching. Even though it was a little more cumbersome at some points it was still doable. I got really good at folding the rows in lots of different directions as I was lining up the next seam.

I really started to make some good progress in the last couple of years. Sewing the rows together is what took me the longest.
After I started to make some great progress I wanted to figure out what I wanted the edges to look like. I used a few papers that had fallen out to help me figure it out. As you can see below.

The top and bottom edges have half of a flower and there is a single long hexie row on the left and right side. To create the half hexie flowers I cut the papers in half and punched a new hole in the center of the papers, which makes it easier to get the papers out when I’m done.

This is the entire quilt sewn together without any edges sewn on. (above)

This is a look of the right edge and back of the quilt, after the edge piece is sewn on. Time for me to remove all the papers. If you’re interested in this process I shared a couple of videos on my instagram. Why do I have the holes punched? Watch this. You may enjoy watching me “quickly” remove a lot of papers. What happens when the papers have a hard time coming out? Let me show you. These are almost all of the papers from the back of the quilt. A few got tossed as they fell out or ripped.

Below you can see the bottom straight edge of the quilt. The quilt was completely sewn together and it felt so surreal. I couldn’t believe that the time consuming part was all done.
This quilt has truly been a labor of love. I loved each step even when it seemed like I’d never finish. I was more motivated to keep working on it when it all started coming together.

Some of the background fabric may look a little different in the picture above, its because some of the papers have fallen out. In order to stitch two hexies together it is imperative to keep the papers in. The only time I was okay with some of the papers falling out is if I had already sewn everything around it together. Even then I still kept most of the papers in to help the quilt be more stiff and protect the hand stitching.

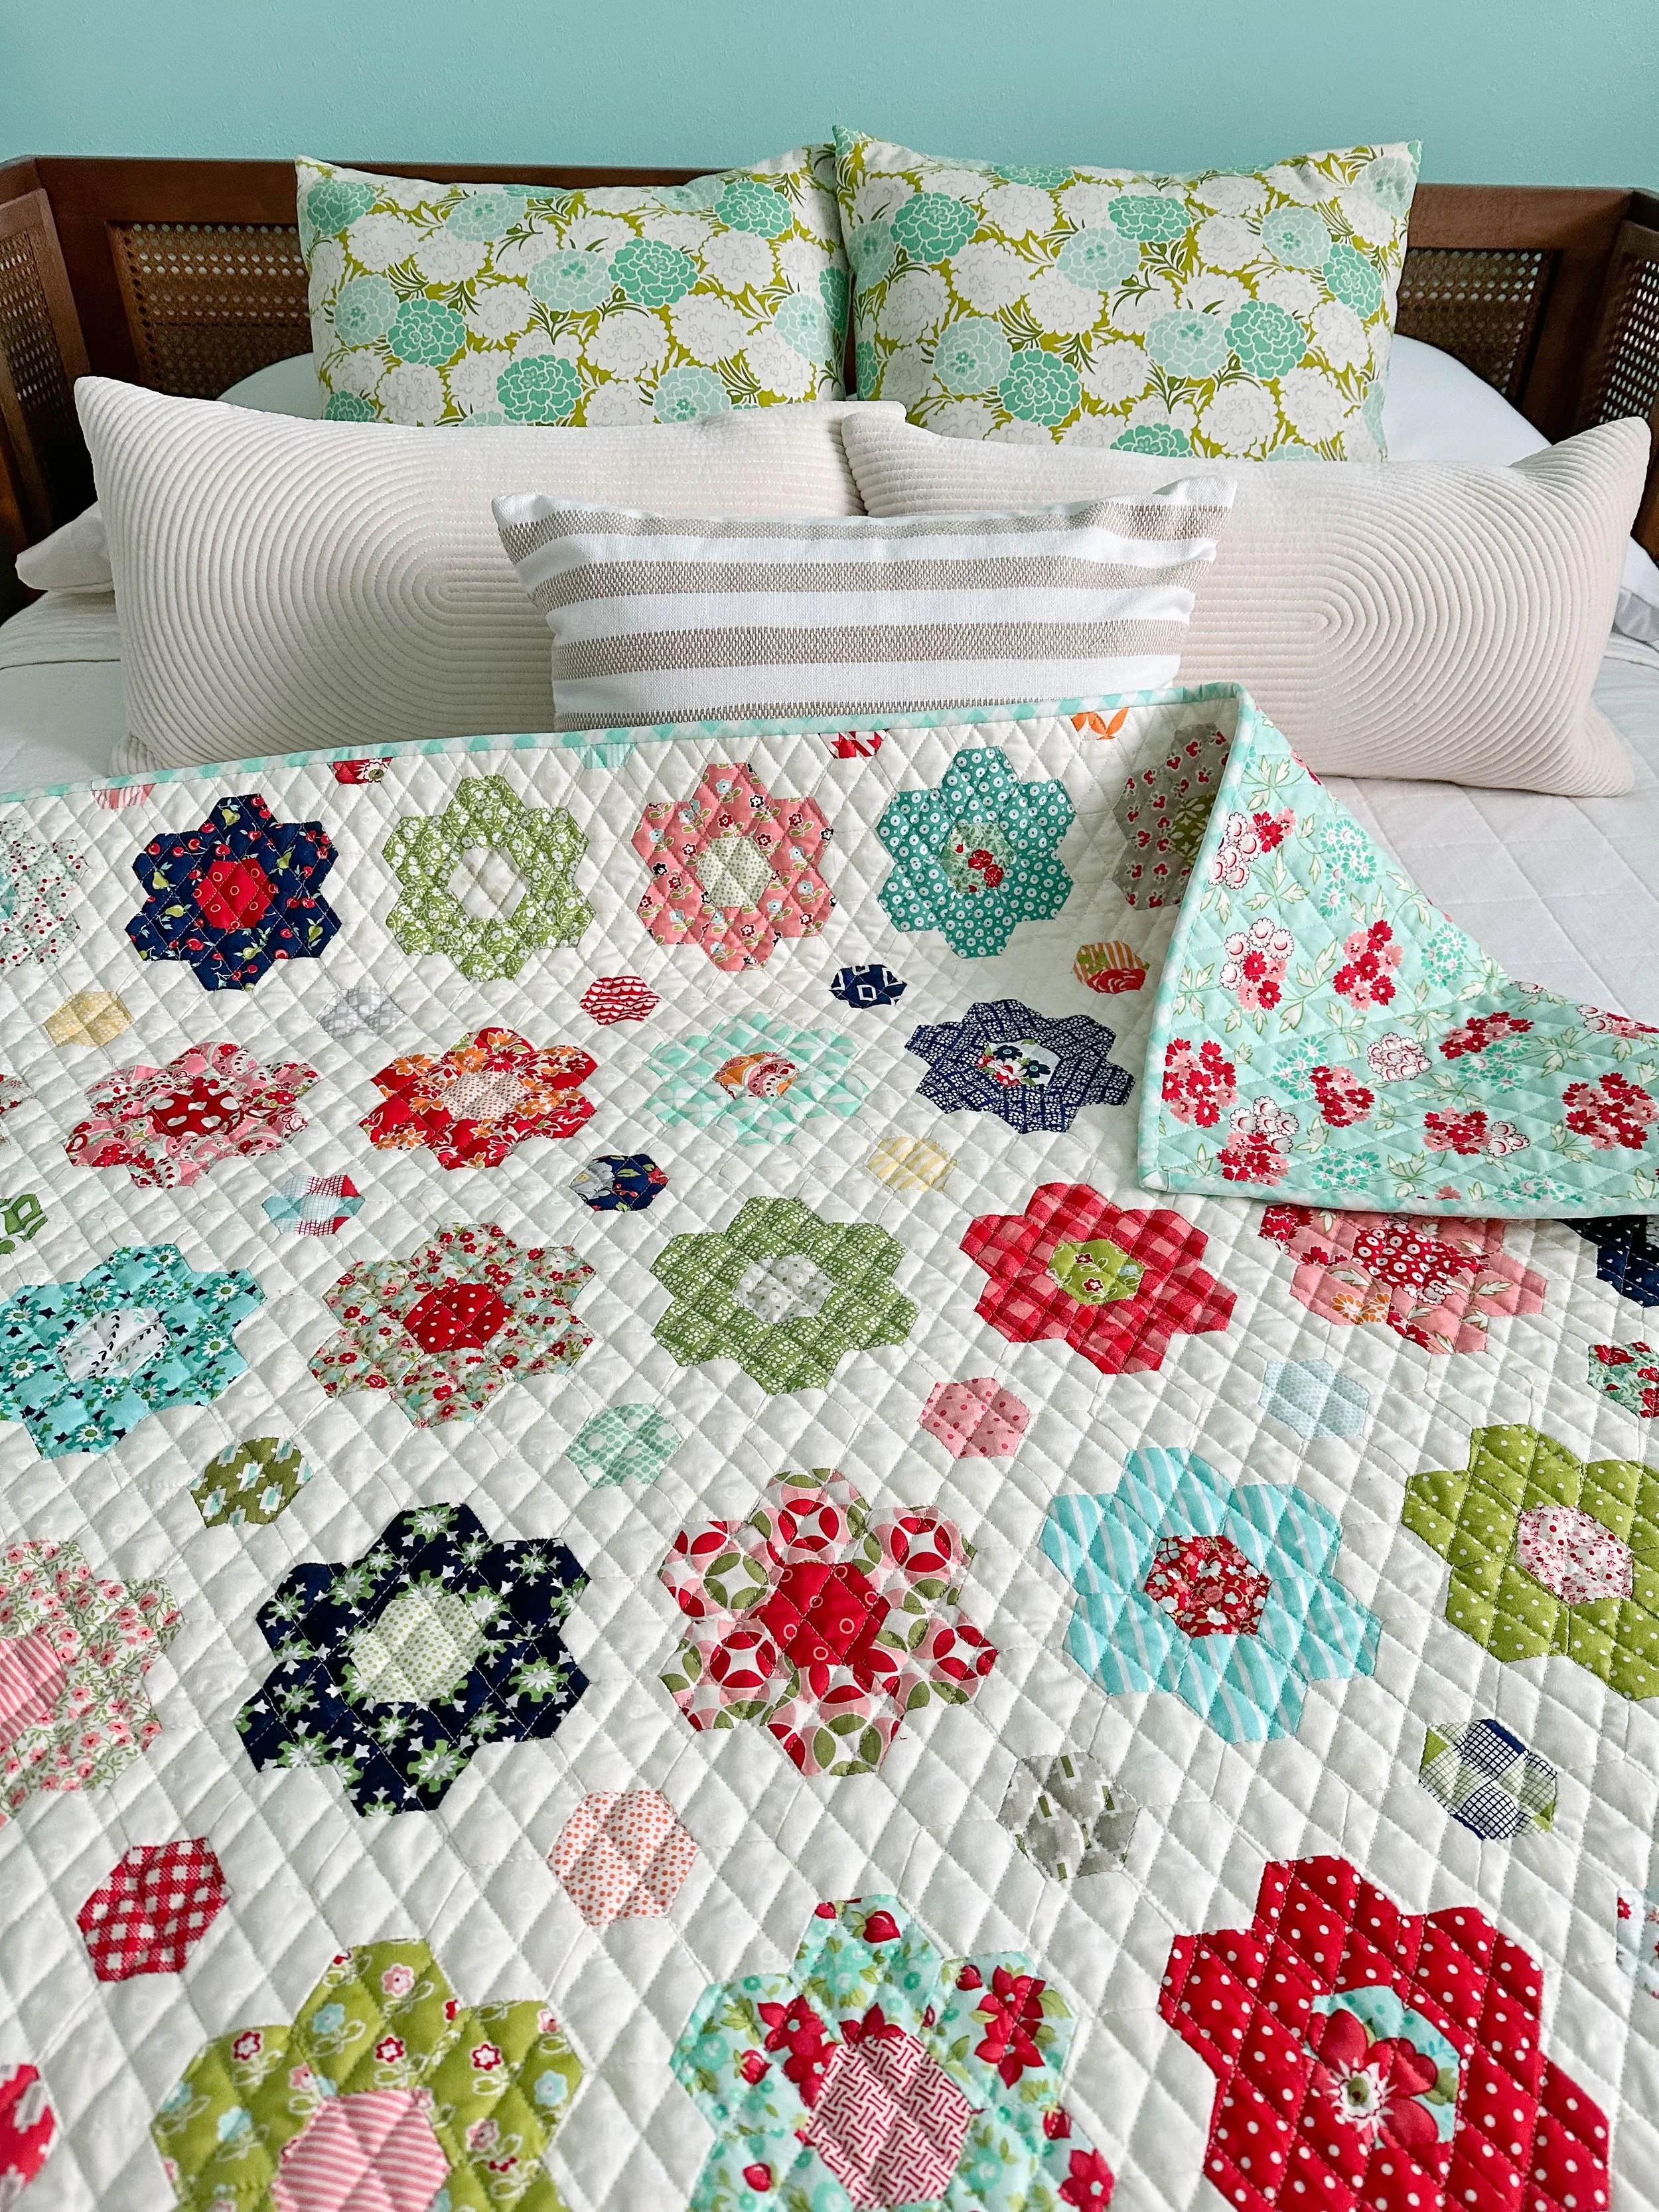
Years ago my mom and aunt got this beautiful floral in their shop, Sisters and Quilters, so I hurried and got a large enough cut for a quilt backing before it sold out. I also got the same print with the pink background. It’s from the Hello Darling line from Bonnie and Camille. I chose to put the aqua floral on the back of my hexie quilt, and I’m in love with it!!

So many people over the years asked and asked how I was going to quilt it, I knew that I wanted to crosshatch it but didn’t think about doing a diamond crosshatch until recently. I used my On Point design and set it up like normal, I just changed the design size to a 8” height and 1” width. If your software isn’t letting you change the size, see if you have a “maintain aspect ratio” box that is checked. Uncheck it and it should work beautifully. I was able to do so on my Gammill Statler. So, if you’ve bought On Point in the past, try out those measurements and you’ll love the effect. If not, go to my shop and get it. I LOVE this classic finish. One of the reasons I wanted to quilt it like this is to help secure all of the seams better, but also I didn’t want to take away from this quilt by custom quilting it.
If you struggle with quilting designs that touch, this is what I do. I make these adjustments with every design I quilt, and when necessary I touch the quilt to get the points to line up.

After it was quilted I trimmed the top and bottom along the straight edge of the quilt. For the sides I trimmed the backing and batting 1/2 of an inch outside the hexie points and then sewed the binding on overlapping the inside of the hexie point. Here is a video to explain it a little better. It was my mom’s suggestion to sew the binding on first before trimming the sides, and I’m so happy I did so to avoided any seams coming undone.


Now, are you interested in the finished quilt size…how many flowers there are…how about hexies??? Let see how it all adds up.
My quilt was 54.5”x75” before it was quilted and it shrunk about an inch. There are 179 flowers and 16 half flowers (for the top and bottom edges). There are 1610 full hexies and 38 half hexies. No wonder it took me over 8.5 years to make. I decided a lot time ago I enjoy quilting more when I’m not in a rush to make each project I start. Which might be why I enjoyed this quilt. I also knew when it was finished it would be worth the many hours that I spent hand sewing it together.

I used my favorite Natural White Omni Thread from Superior Threads to quilt it. It blends beautifully over every color of fabric without taking away from the overall look.

How cute is that backing fabric and the hexies together…and that crosshatch! My favorite.

I have a few different Bonnie and Camille fabrics that I could have used for the binding, but this on point gingham print from their Vintage Picnic line was the perfect choice. It’s great with the quilting, but I wanted a lighter binding without a bold print. I feel like a red or navy would have distracted from the overall look of the hexie flowers.
Pictured above is the bottom edge of the quilt so you can see how the half flowers look along the edge. Below is a picture of the right side after it is trimmed and bound. I love how the finished edges turned out. It was easier than I initially thought it would be.

I love all the pops of color, florals and modern prints, and texture. I couldn’t be happier.

Have you made a EPP (english paper pieced) quilt yet? If not, you should!!

Another look at the quilt, binding, and backing together.

I almost forgot to add my “handmade by leisha kaye” tag when I was sewing the binding on. This quilt is absolutely “handmade”.
I got my tags from Custom Labels 4 U. They are woven and high quality. They are great to work with to get your design just right. Plus they are pretty cute! Right?! I’ve been using them for years.

I still need to decide where to display my quilt, until then it’s looking pretty good here.
Thanks for following along and being so kind with all of your comments and encouragement.

A closer look at the tag…The navy and aqua threads in the tag couldn’t be more perfect on this quilt.

Question, do you think I have a favorite flower? Is that like picking a favorite panto design of mine or all time favorite fabric? It’s definitely hard, but this is one of my favorites.

If you’ve made any english paper pieced quilts, which one is your favorite? Maybe someday I’ll start another one. Comment below and tell me about it.

Thanks for making it through all of those details. Did I miss anything? Do you have any questions? If so, let me know below.
If you’re interested in having me quilt for you, check out my calendar and schedule a day. Thanks for being here and happy quilting. - leisha
