

Kim Diehl’s “Hope and Harmony” Quilt
Hello Friends,
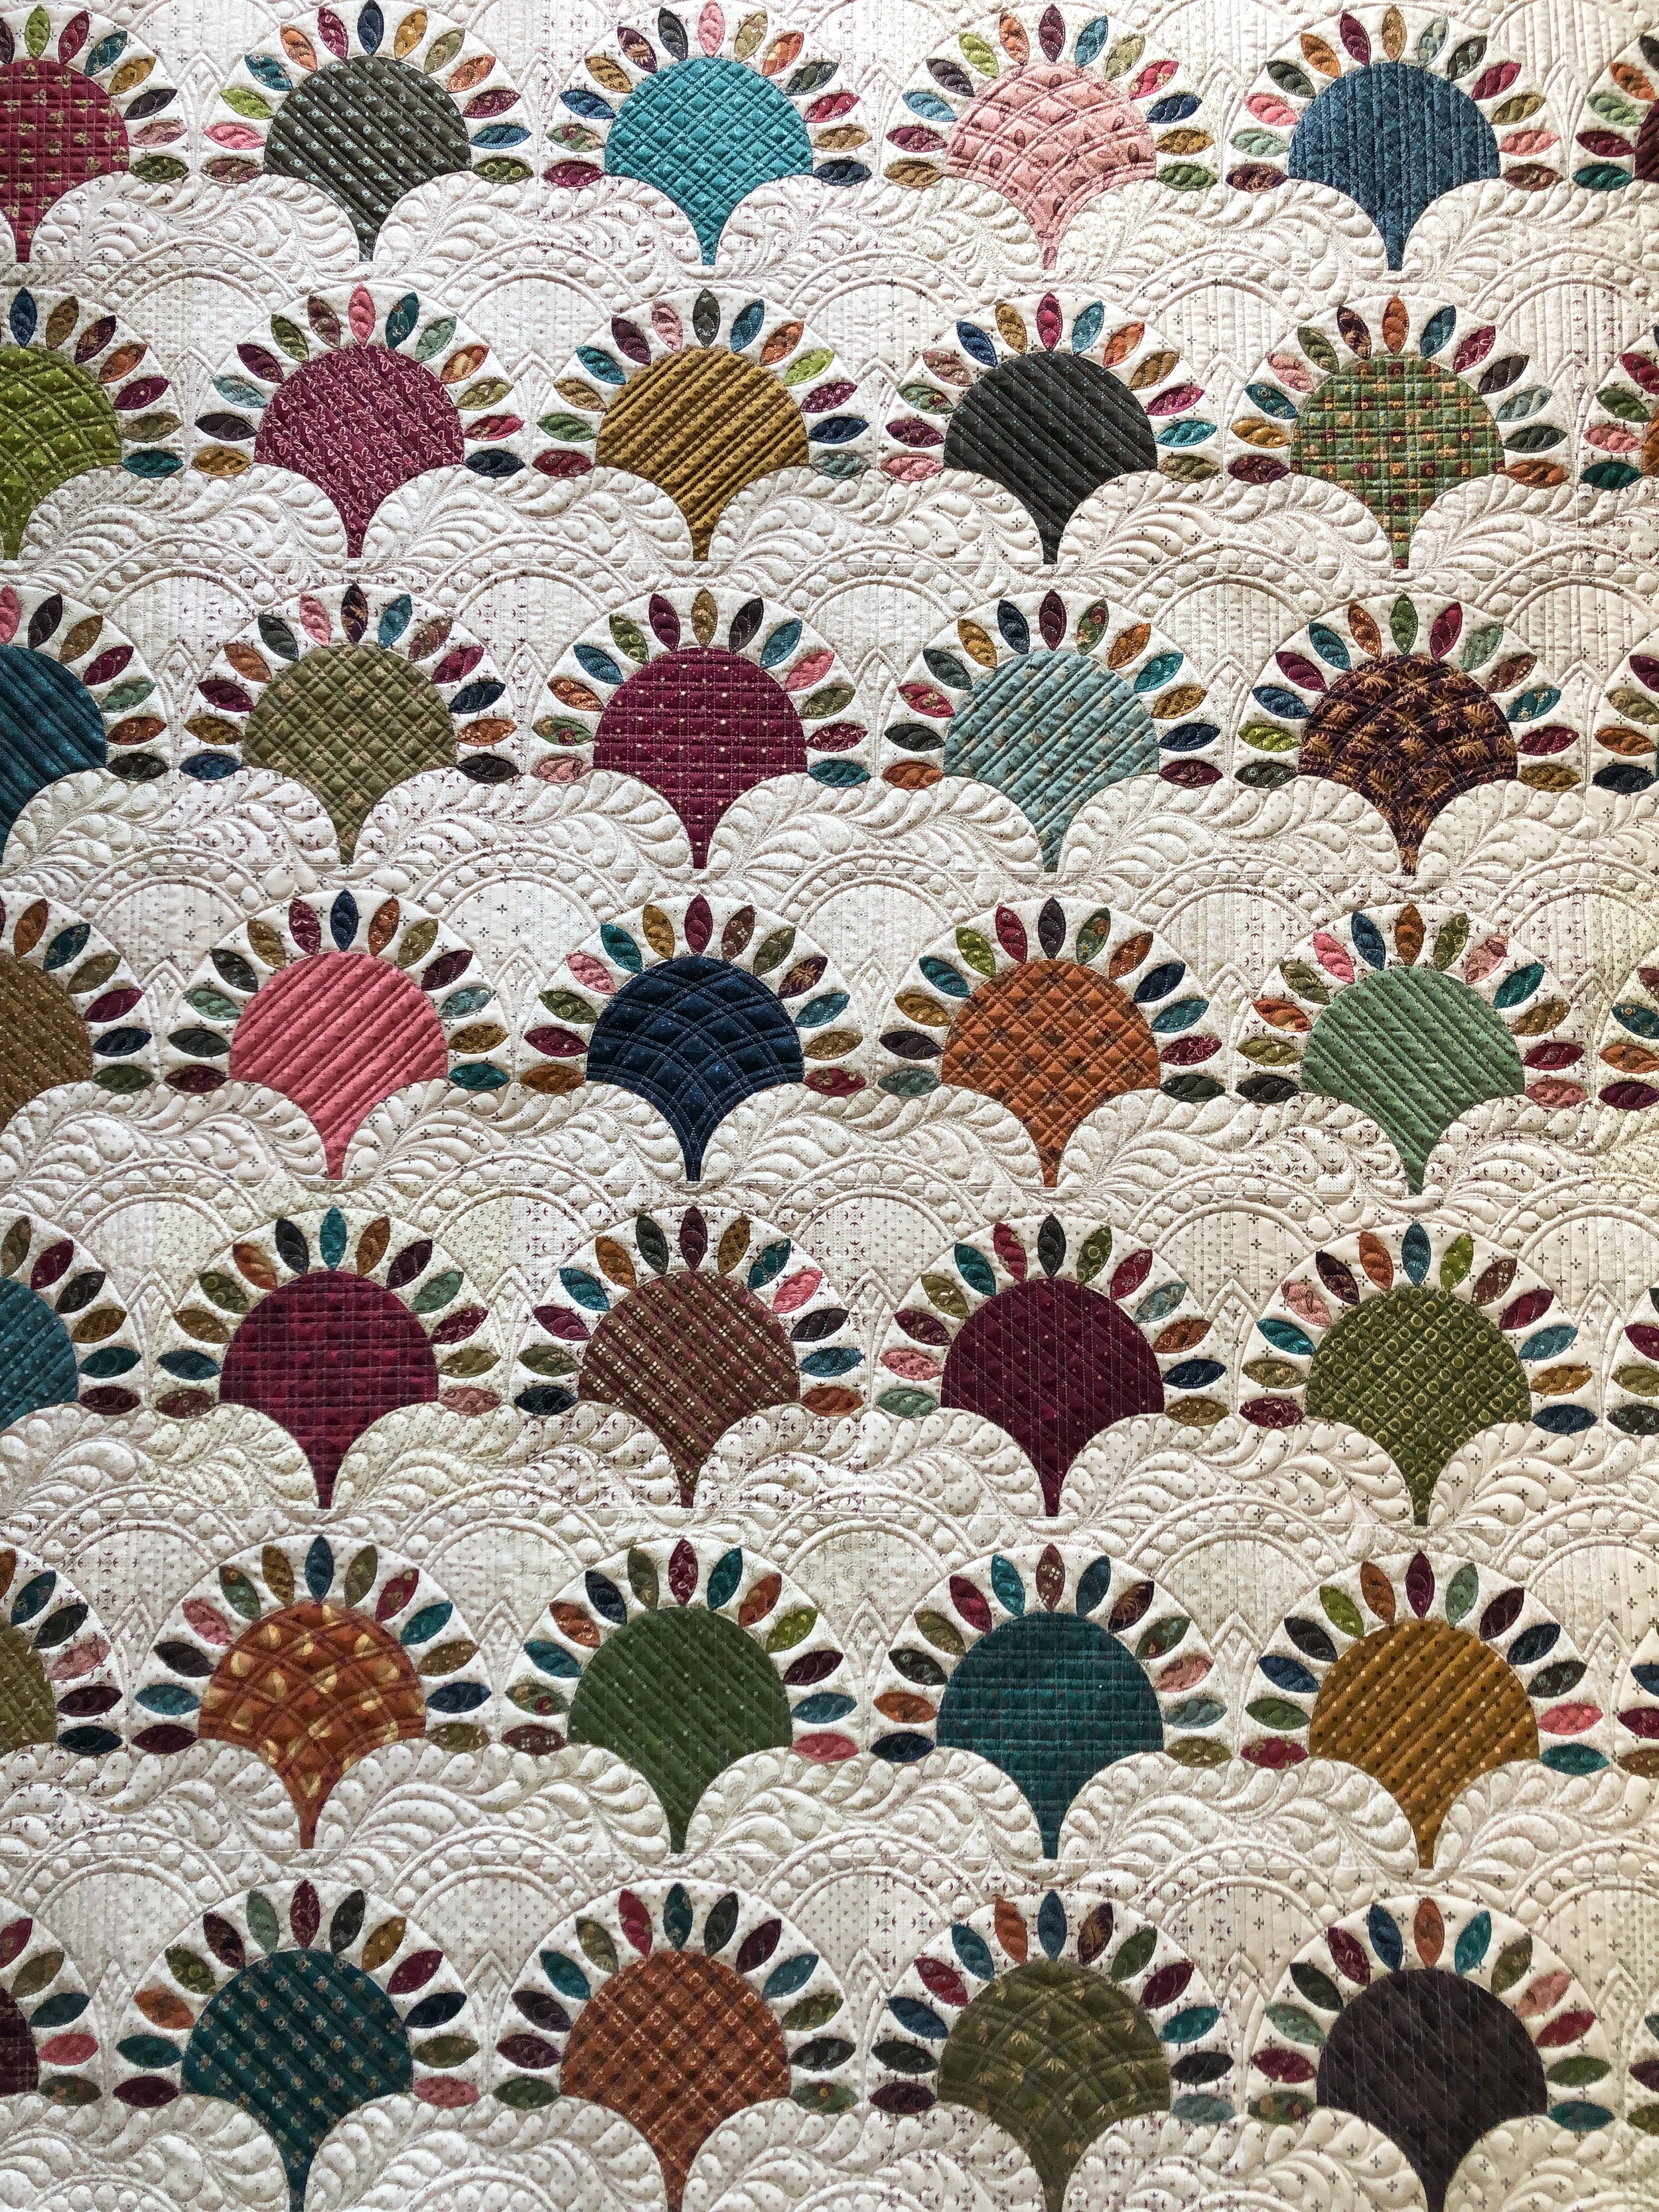
I am beyond thrilled to finally share with you a quilt that I custom quilted back in March!! I had posted on Instagram that I was almost caught up with longarm quilting, and Kim Diehl reached out to me asking if I would be available to custom quilt a quilt for her new Simple Double-Dipped Quilts book. I was absolutely thrilled to quilt for Kim! Her book is set to release the first week of October, and is available now for preorder on Amazon and it will be available soon at Shop Martingale with Kim’s other books. Kim has several gorgeous quilts in her book, this one is called Hope and Harmony. I wish you could all see it in person, its so beautiful.

Photo is courtesy of Kim Diehl
When I first started making quilts years ago, I became familiar with Kim’s beautiful timeless fabrics. The great thing about a scrappy quilt like this, you can pair a variety of Kim’s fabrics from over the years together and they harmonize so beautifully. Kim had sent me a picture of the quilt when she was done piecing it, and I was amazed, then I saw it in person and I was in awe! All of those petals!!
Kim sent me a few ideas she had for the custom quilting, and then left it up to me. She wanted to be sure that I was able to use some creativity of my own, which is what I love! It helps me to know when one of my clients has a vision of what they are wanting for the quilting, even better when they still allow me some creative liberty as well. Its such a fun process. If one of my clients isn’t quite sure what they want, first they typically specify if they want freemotion custom or edge to edge, and we go from there. I will suggest some designs or draw something out, which is a great way to collaborate on a quilt. It was such a joy to work with Kim, and I look forward to quilting for her again.
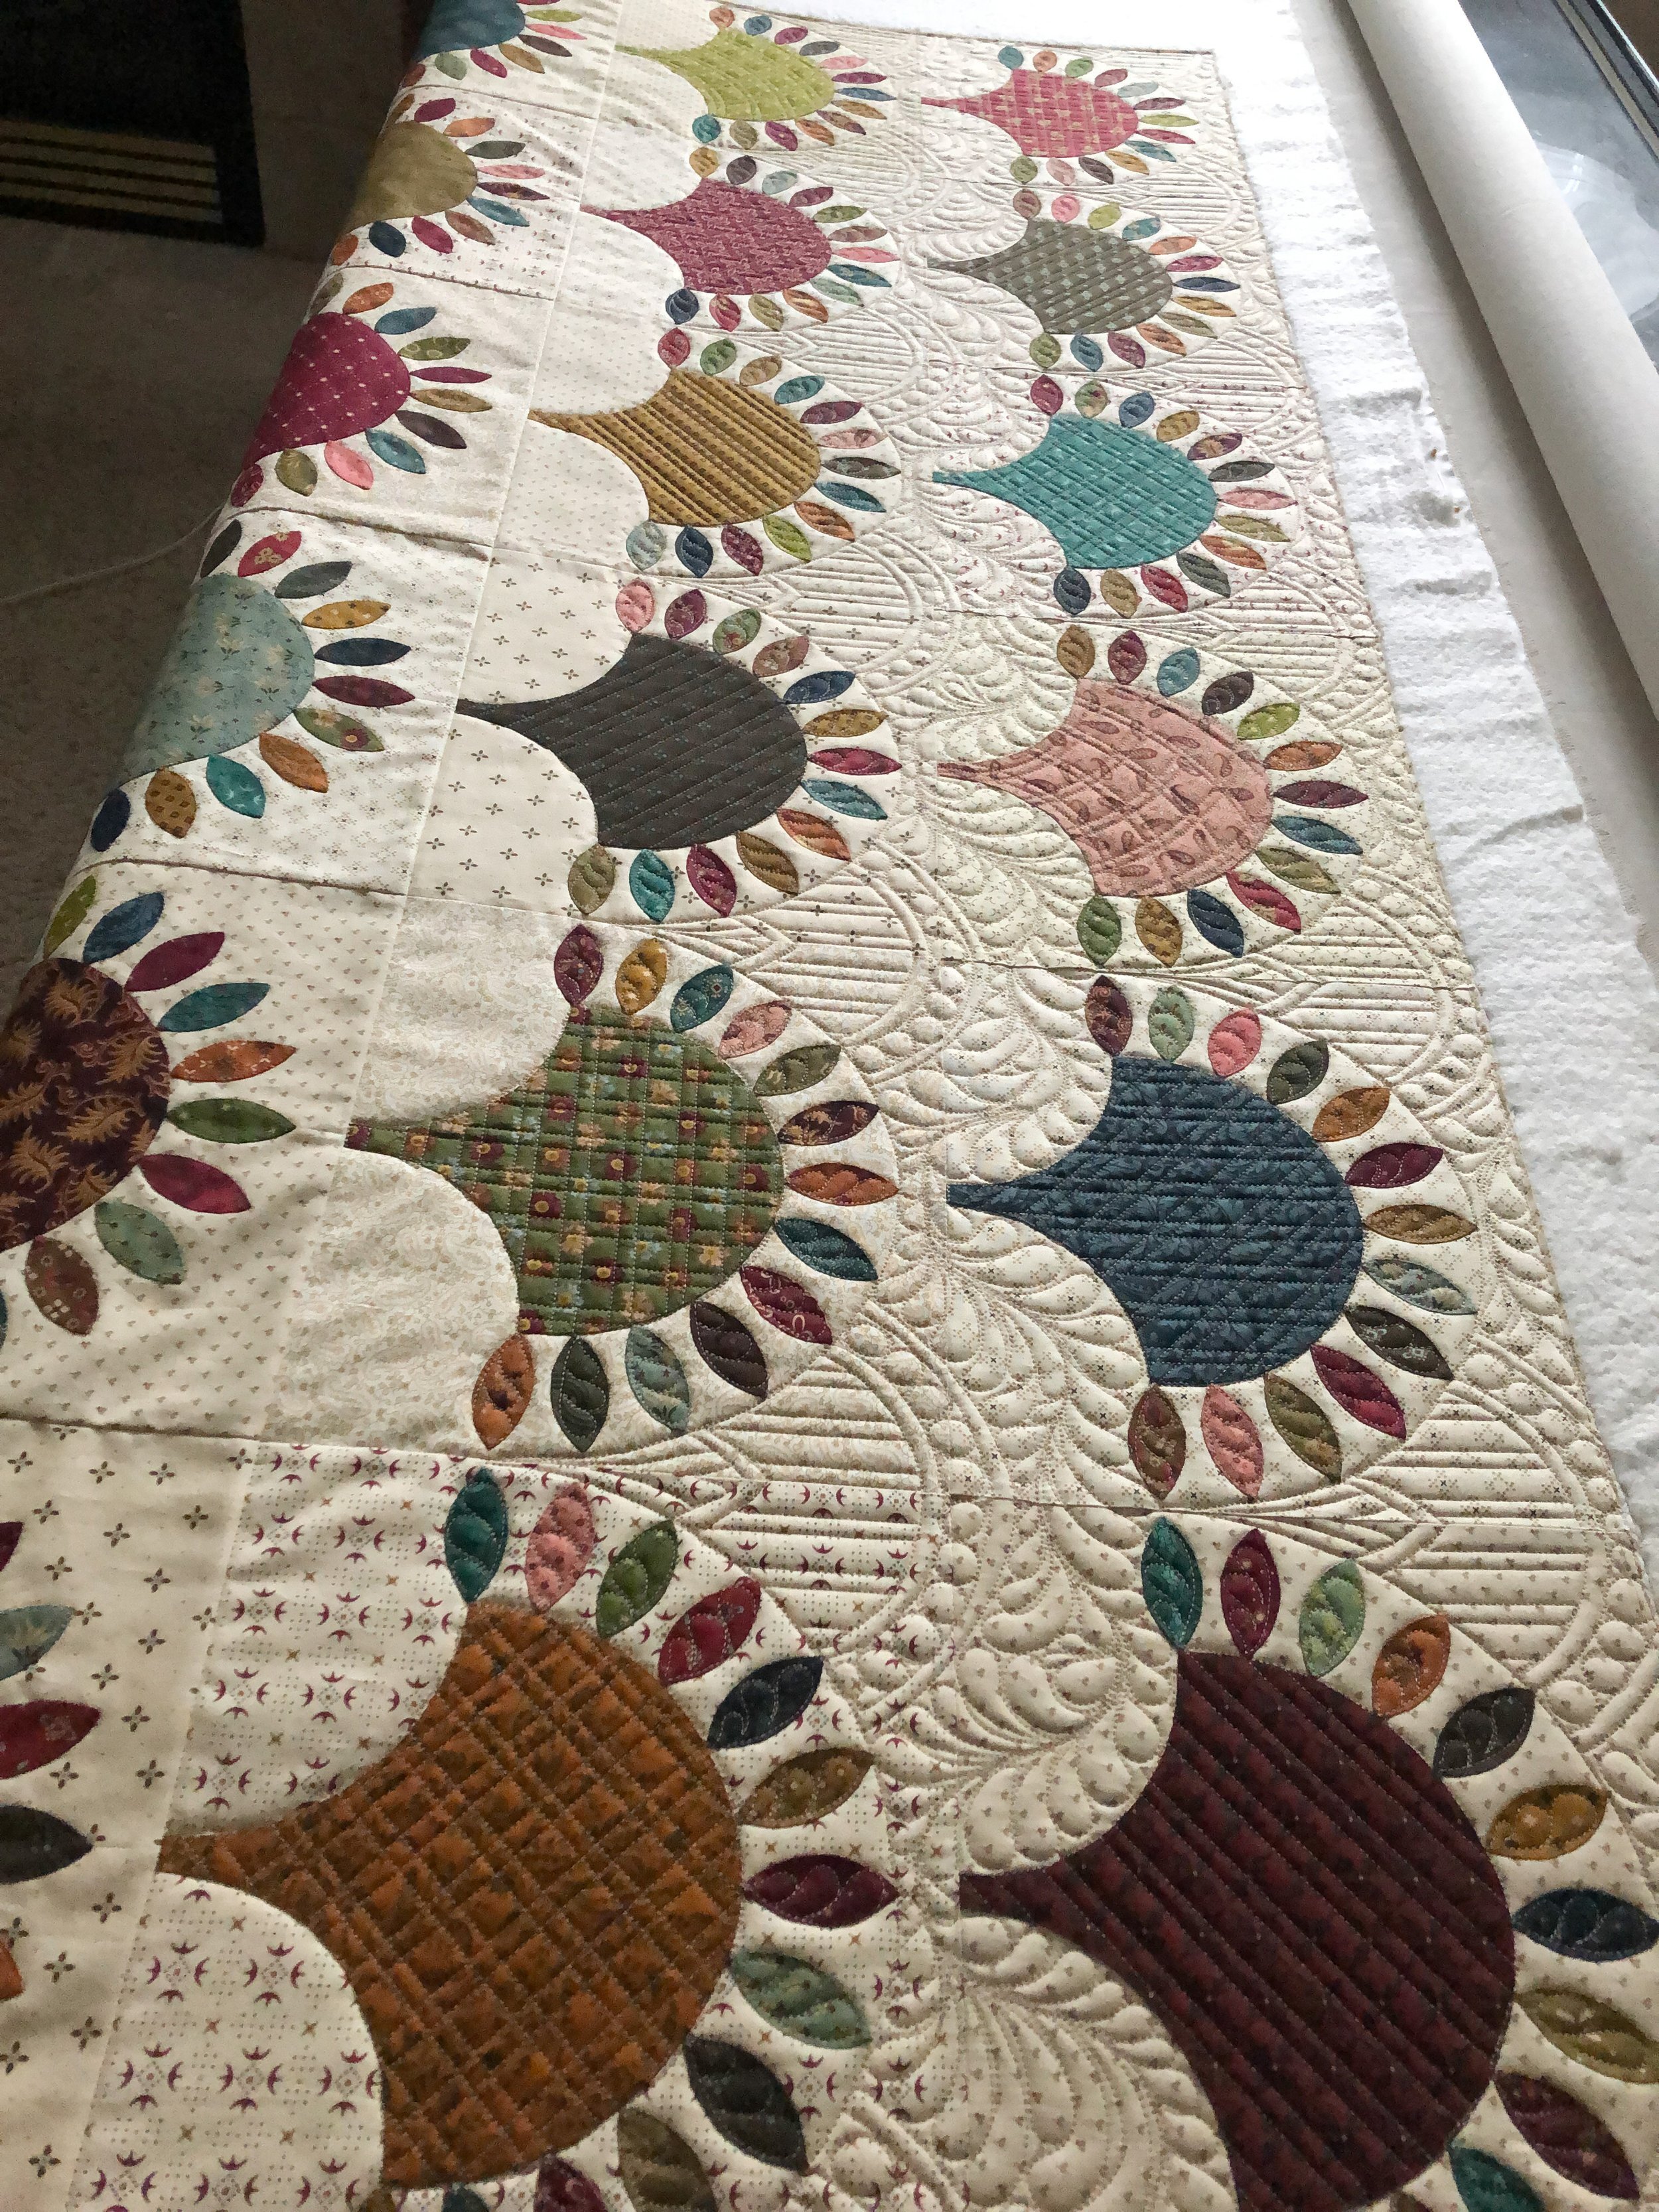
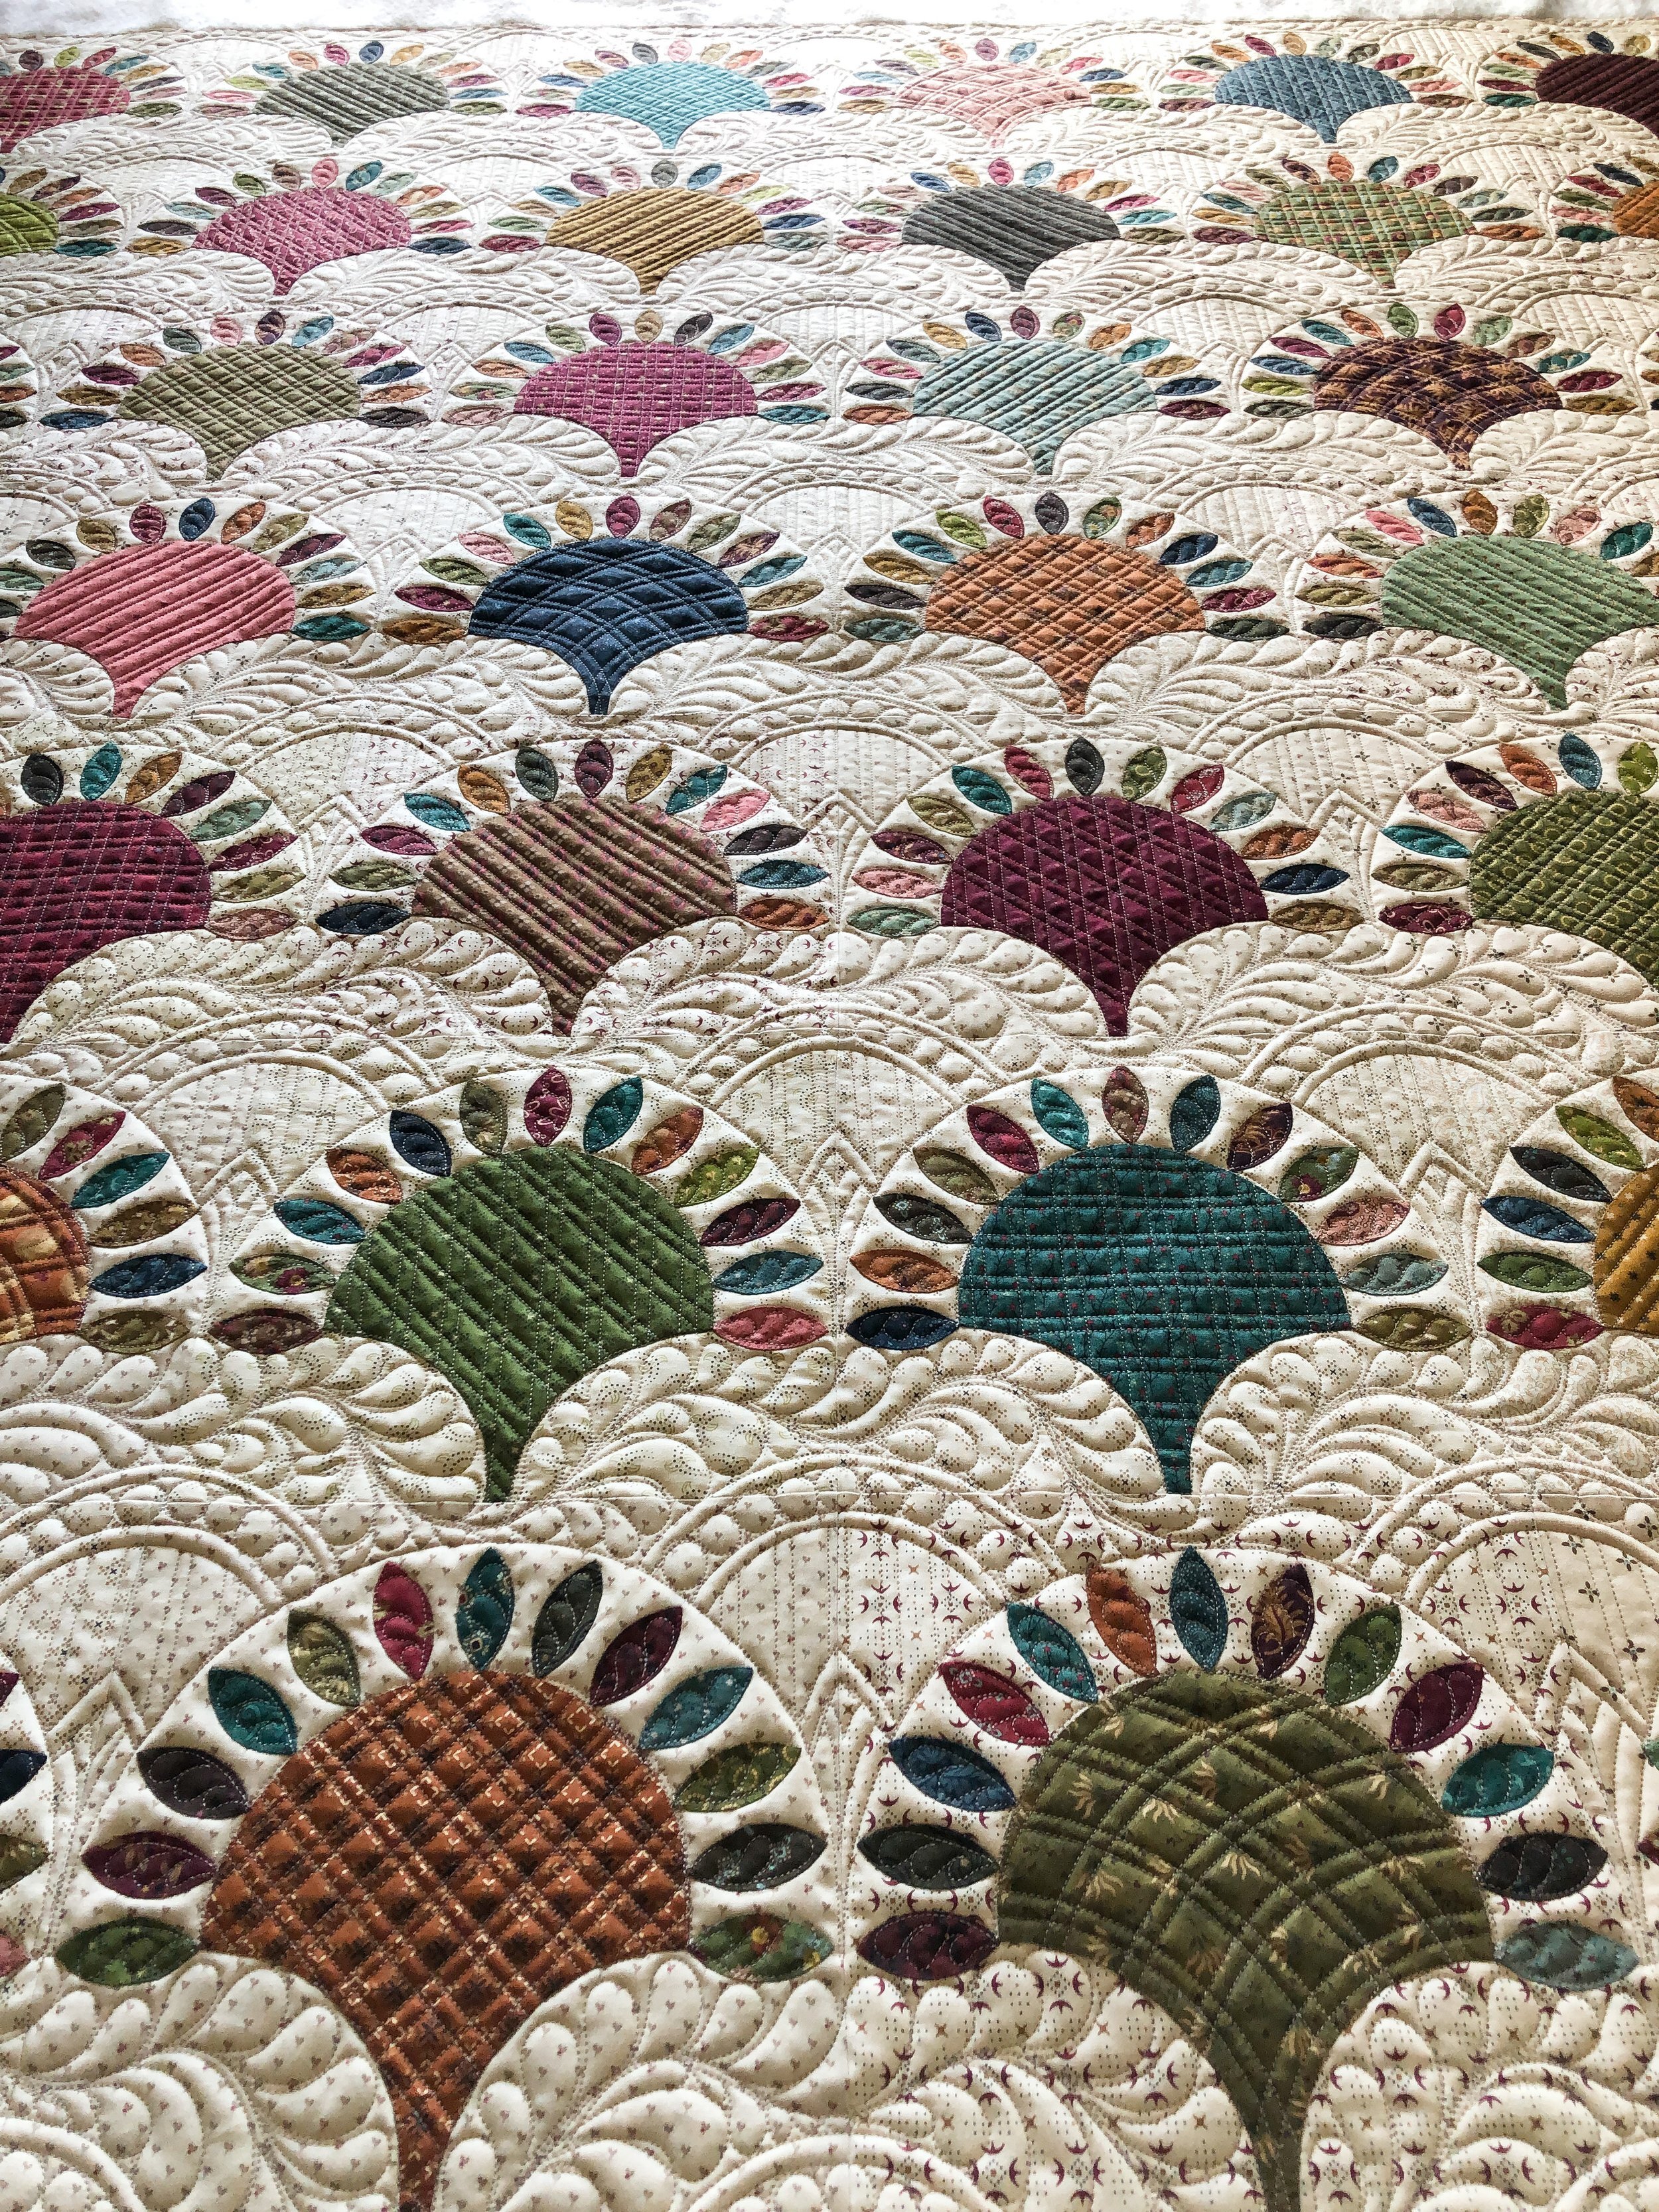
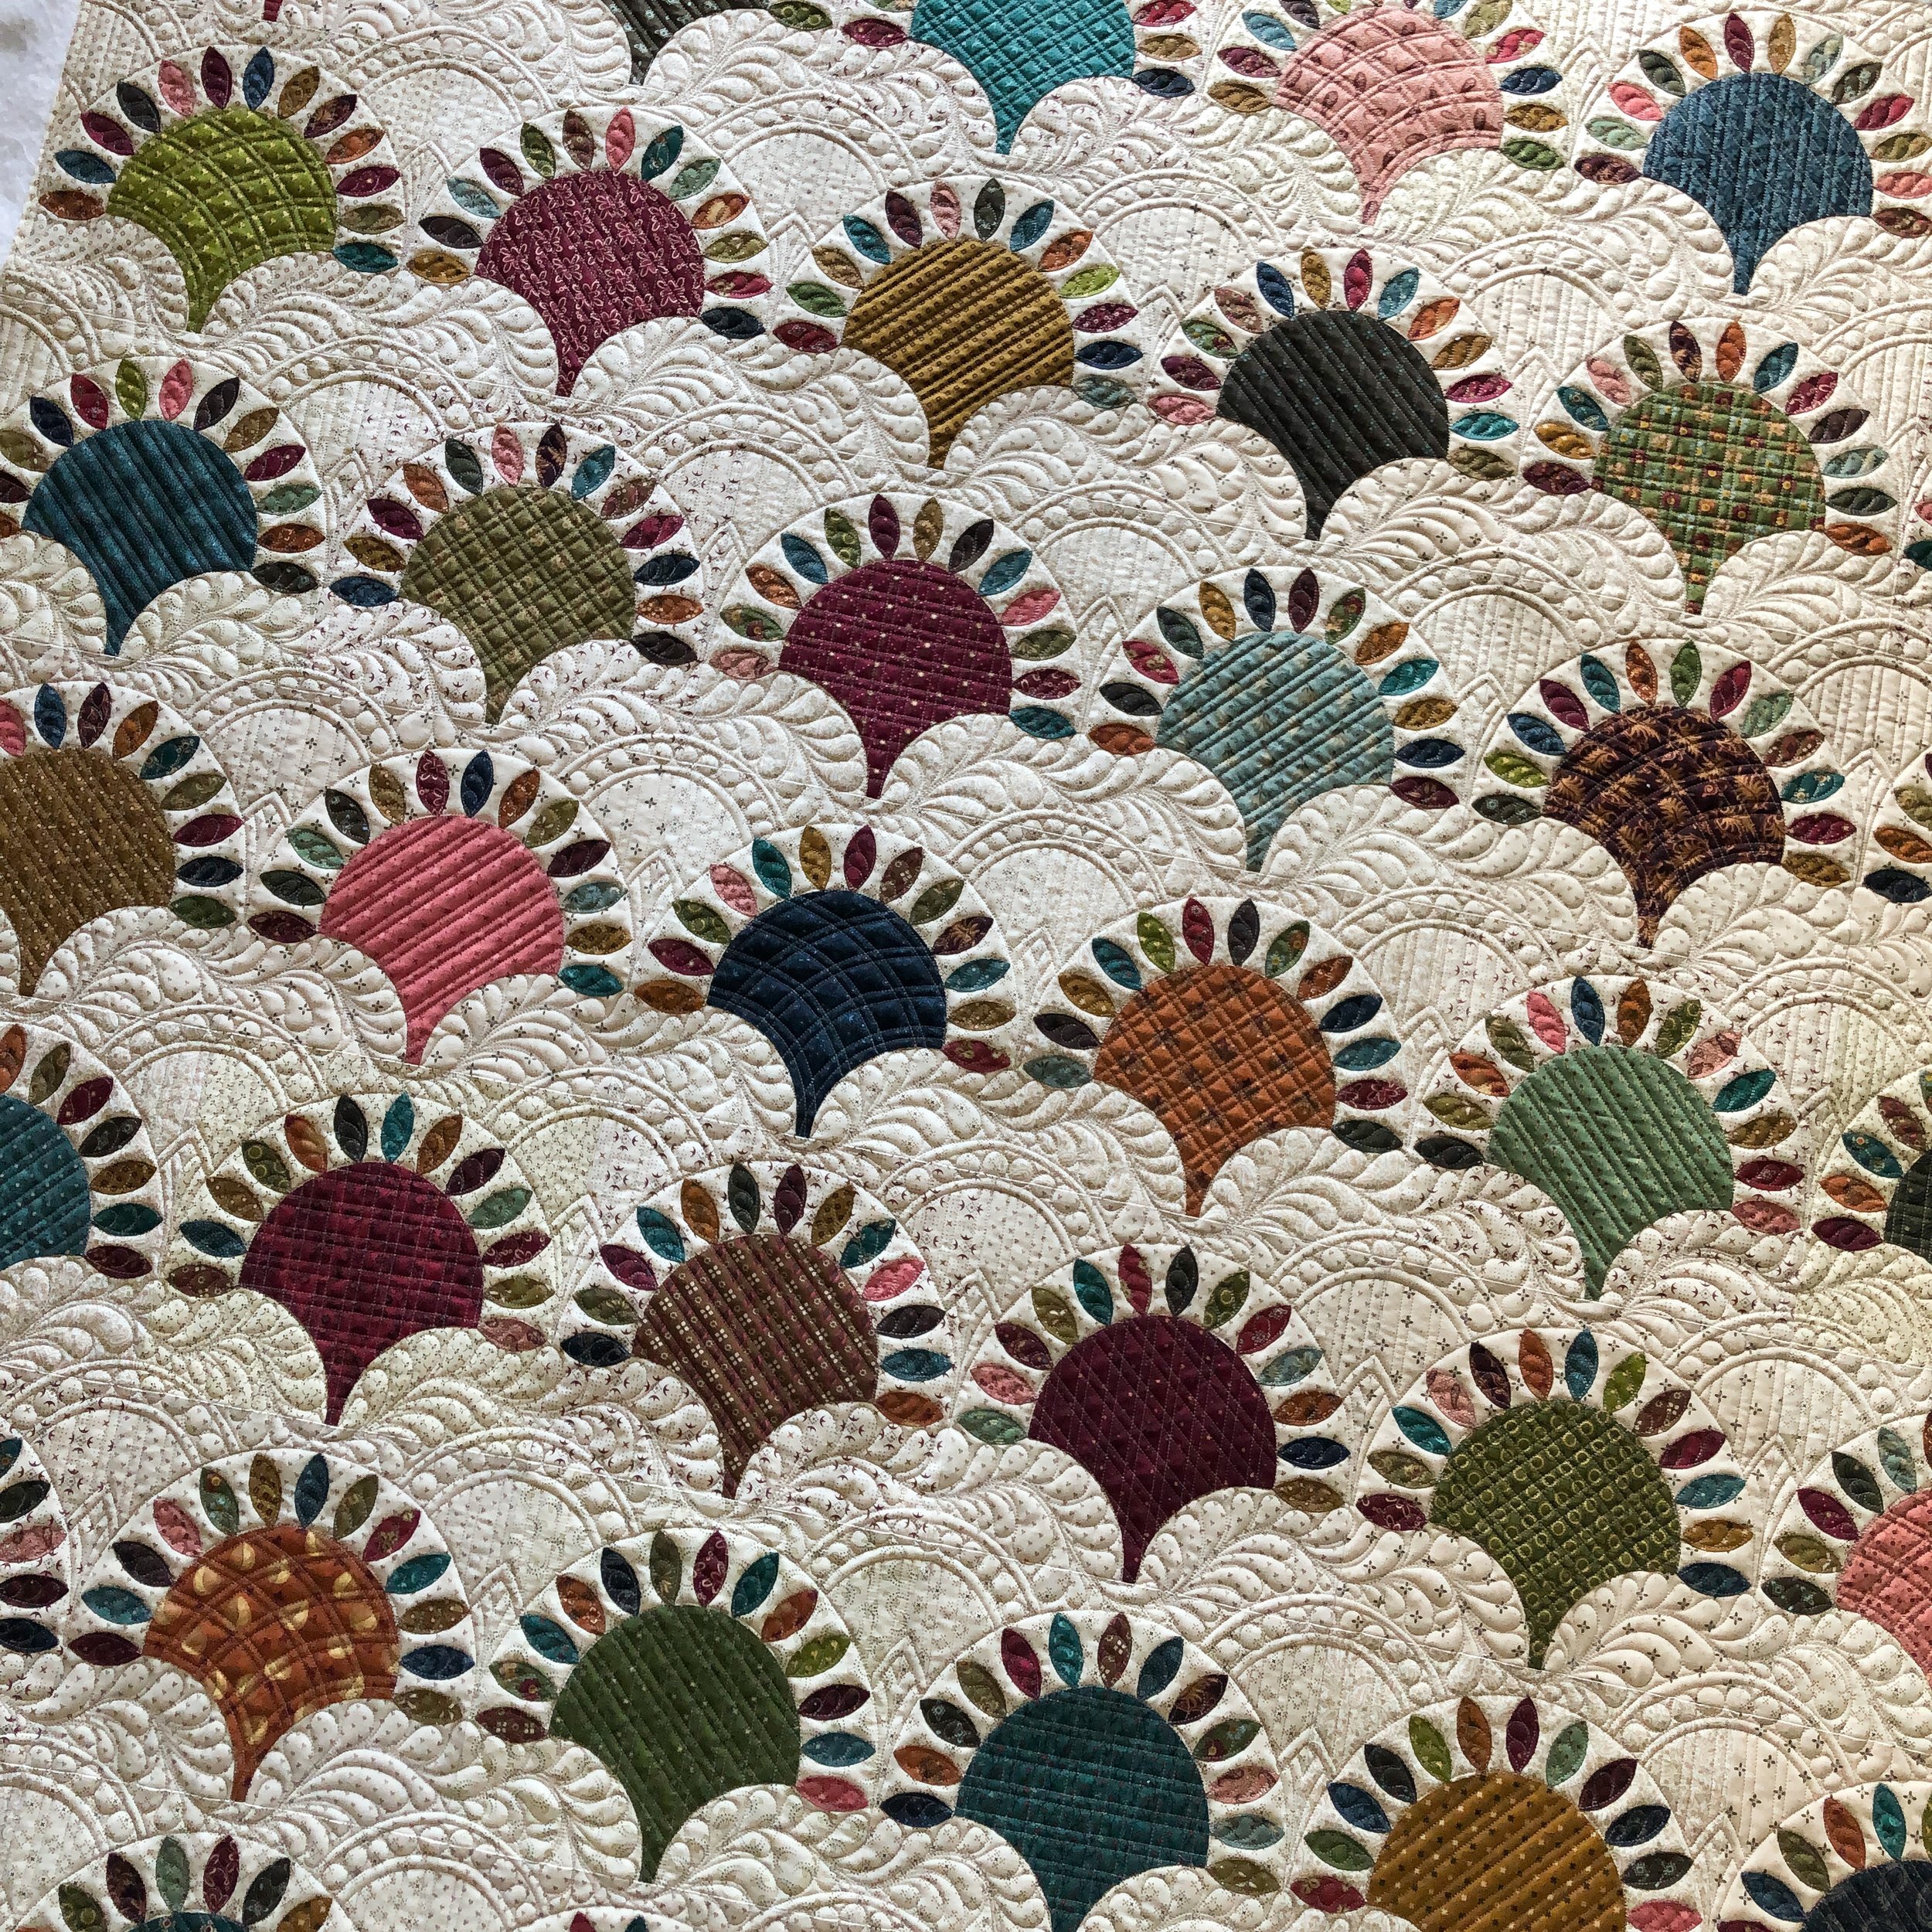
Here are a couple of pictures of the quilt when I finished quilting the first section. Kim wanted some variety in the clamshells, which I think is great! I quilted a different design inside each clamshell across the first row. Then on the proceeding rows I mixed up those designs, so that each row and column had the design once. The only row that was repeated was the very last row. It’s a great way to make your eye travel throughout the quilt.
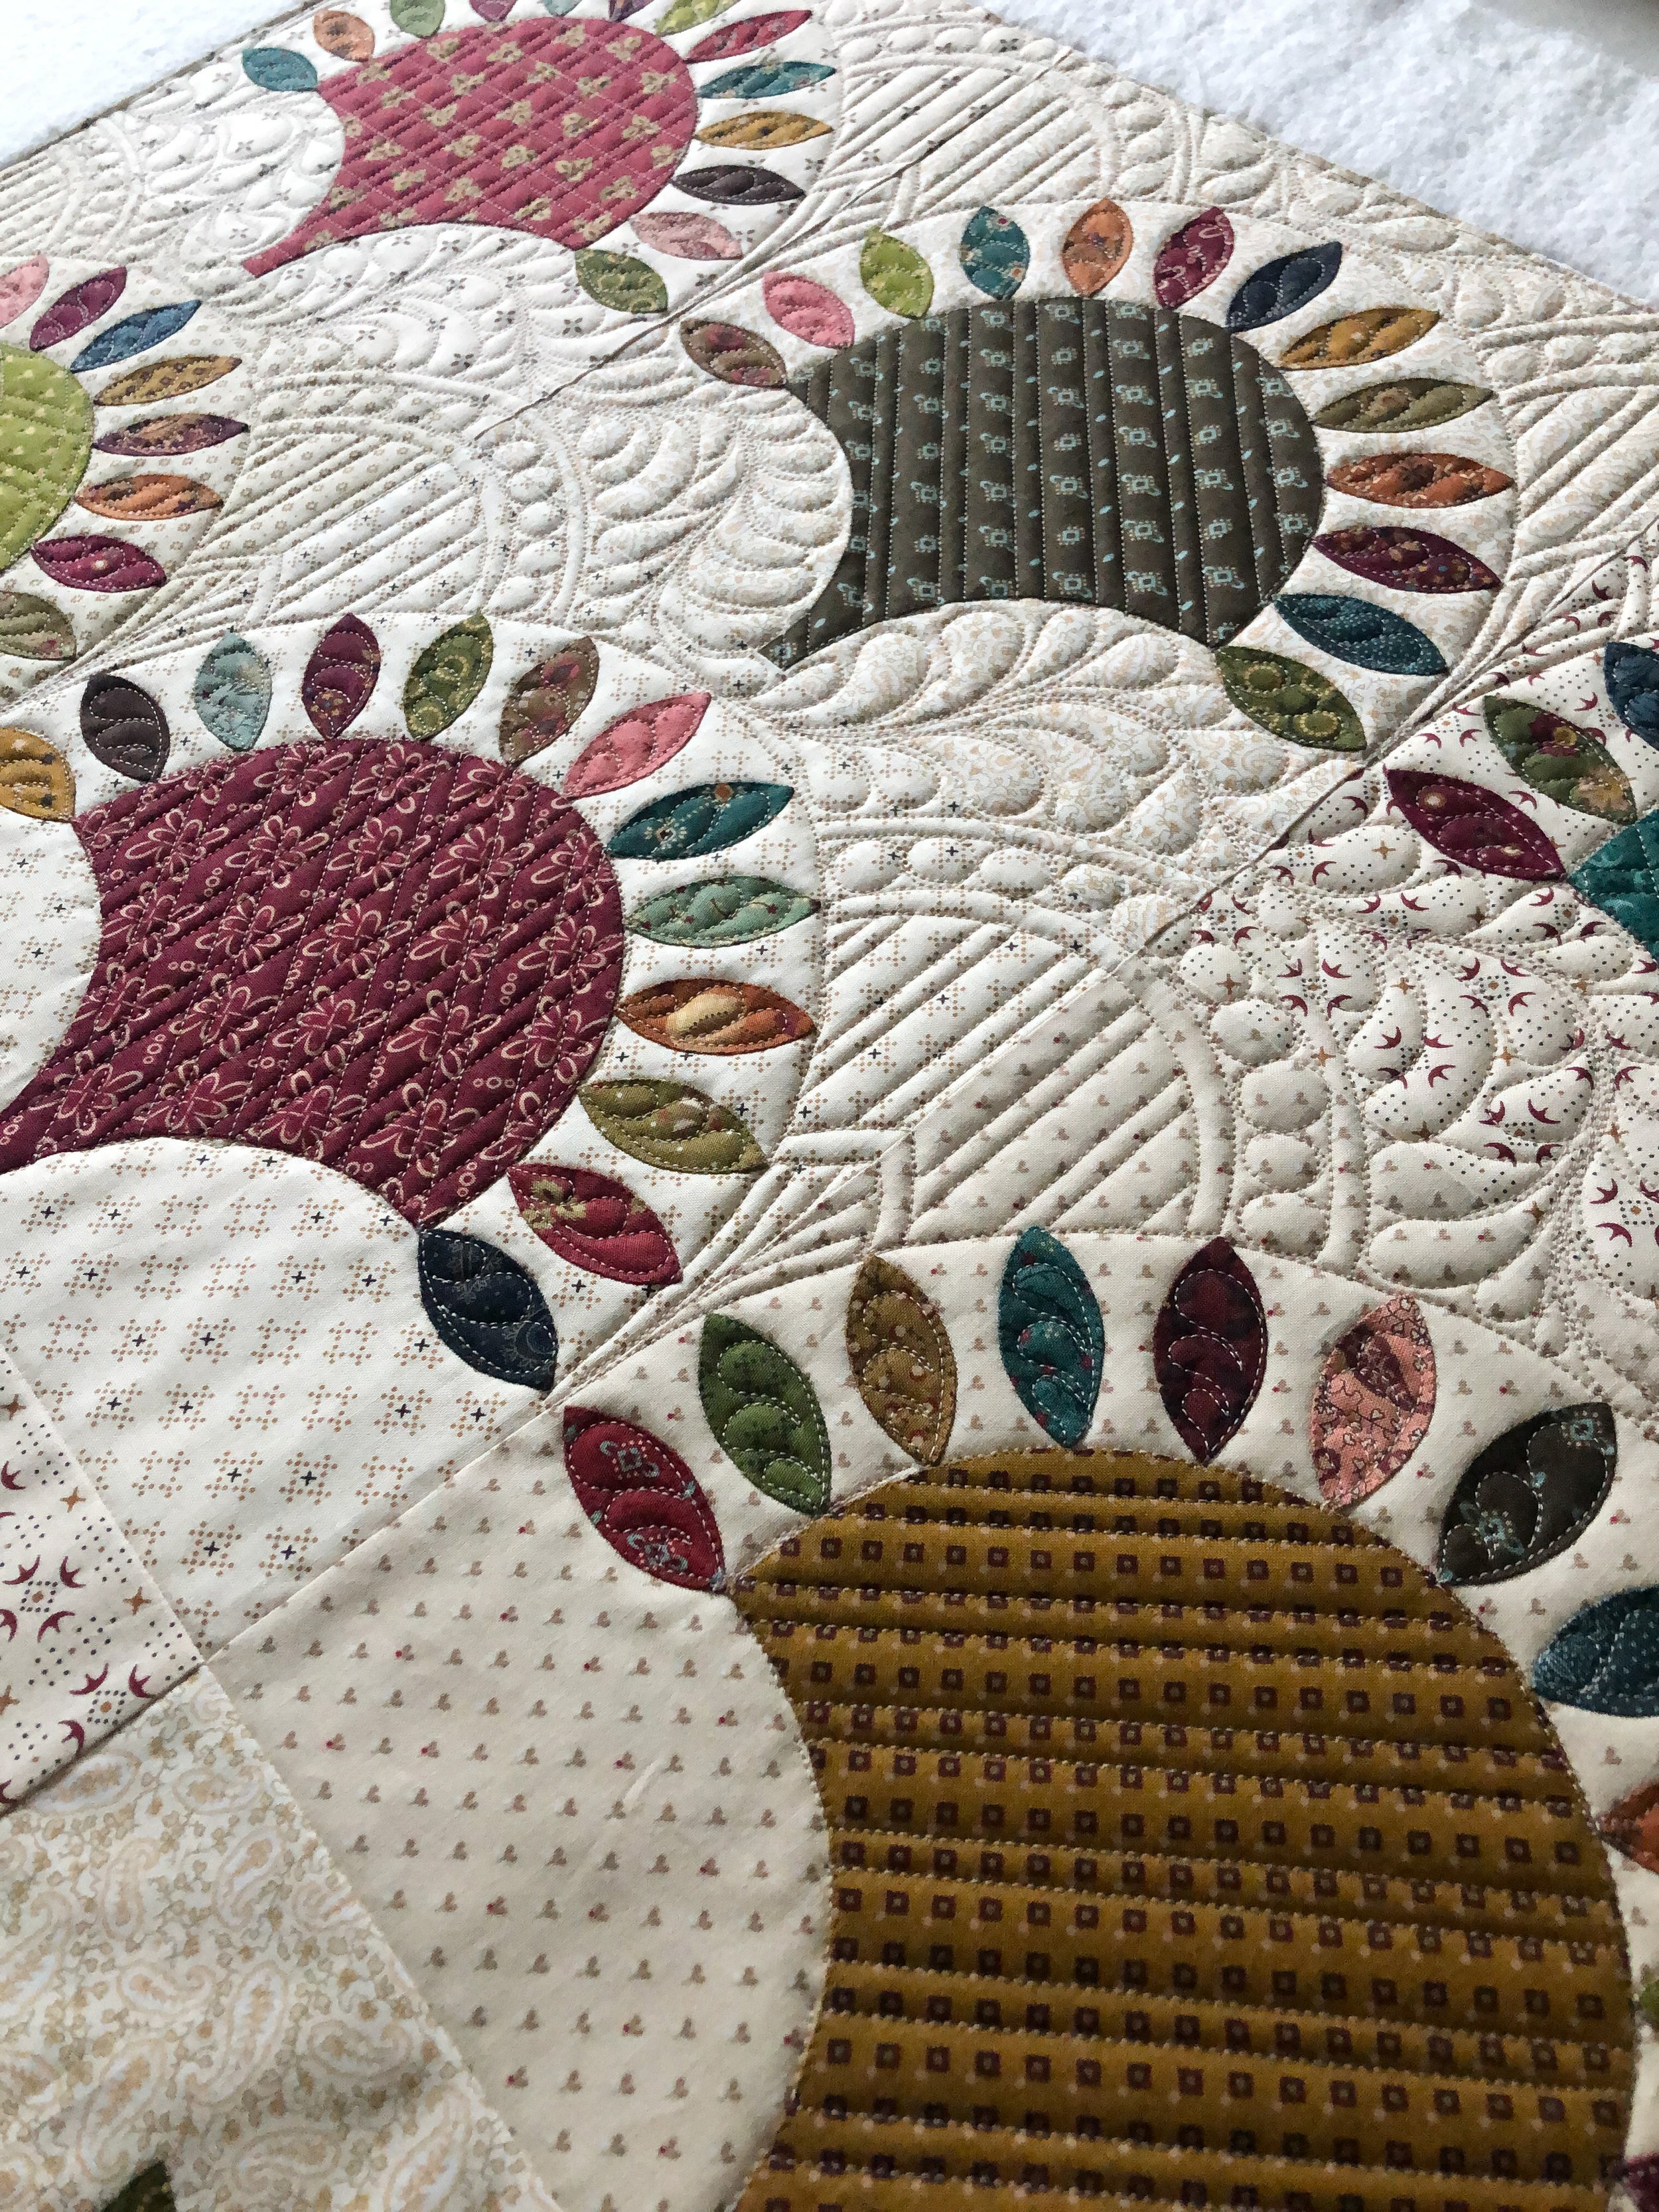
I love using my Circle2 machine quilting circle rulers when I freemotion quilt. I used my 10” and my 5” rulers to create all those beautiful curves. If you notice the curve that I quilted on the outside tips of the 13 petals on each block, I used my 10” Circle2 ruler. By quilting that curve, it helped create a boundary for all of the designs that are between the next block and it enhances the overall clamshell look. I also used the 10” ruler for the curved plaid in some of the clamshells, which I have pictured below.

I created my Circle2 machine quilting circle rulers back in 2018 because I couldn’t find anything like them on the market. They come in a set of 6, and the circles range in size from 2” up to 13”. As you can see in the pictures above and below, there are two sizes of circles per ruler. I took into consideration the 1/4” hopping foot, which means when you quilt out a 5” circle using my 5” Circle2 you’ll get a 5” circle, not a 5.5” circle that you’d get using the other rulers that are available on the market. I also love having only six rulers, instead of the twelve that I had before. The 3/4ths of a circle design makes it easier to handle the ruler as you freemotion quilt. My Circle2 rulers are made in America from high quality 1/4” acrylic, and can be used on a longarm or a domestic machine (if you have the correct quilting foot for it.) The rulers come in clear or green, and are available in my shop.
- Design Patent D875,574 -

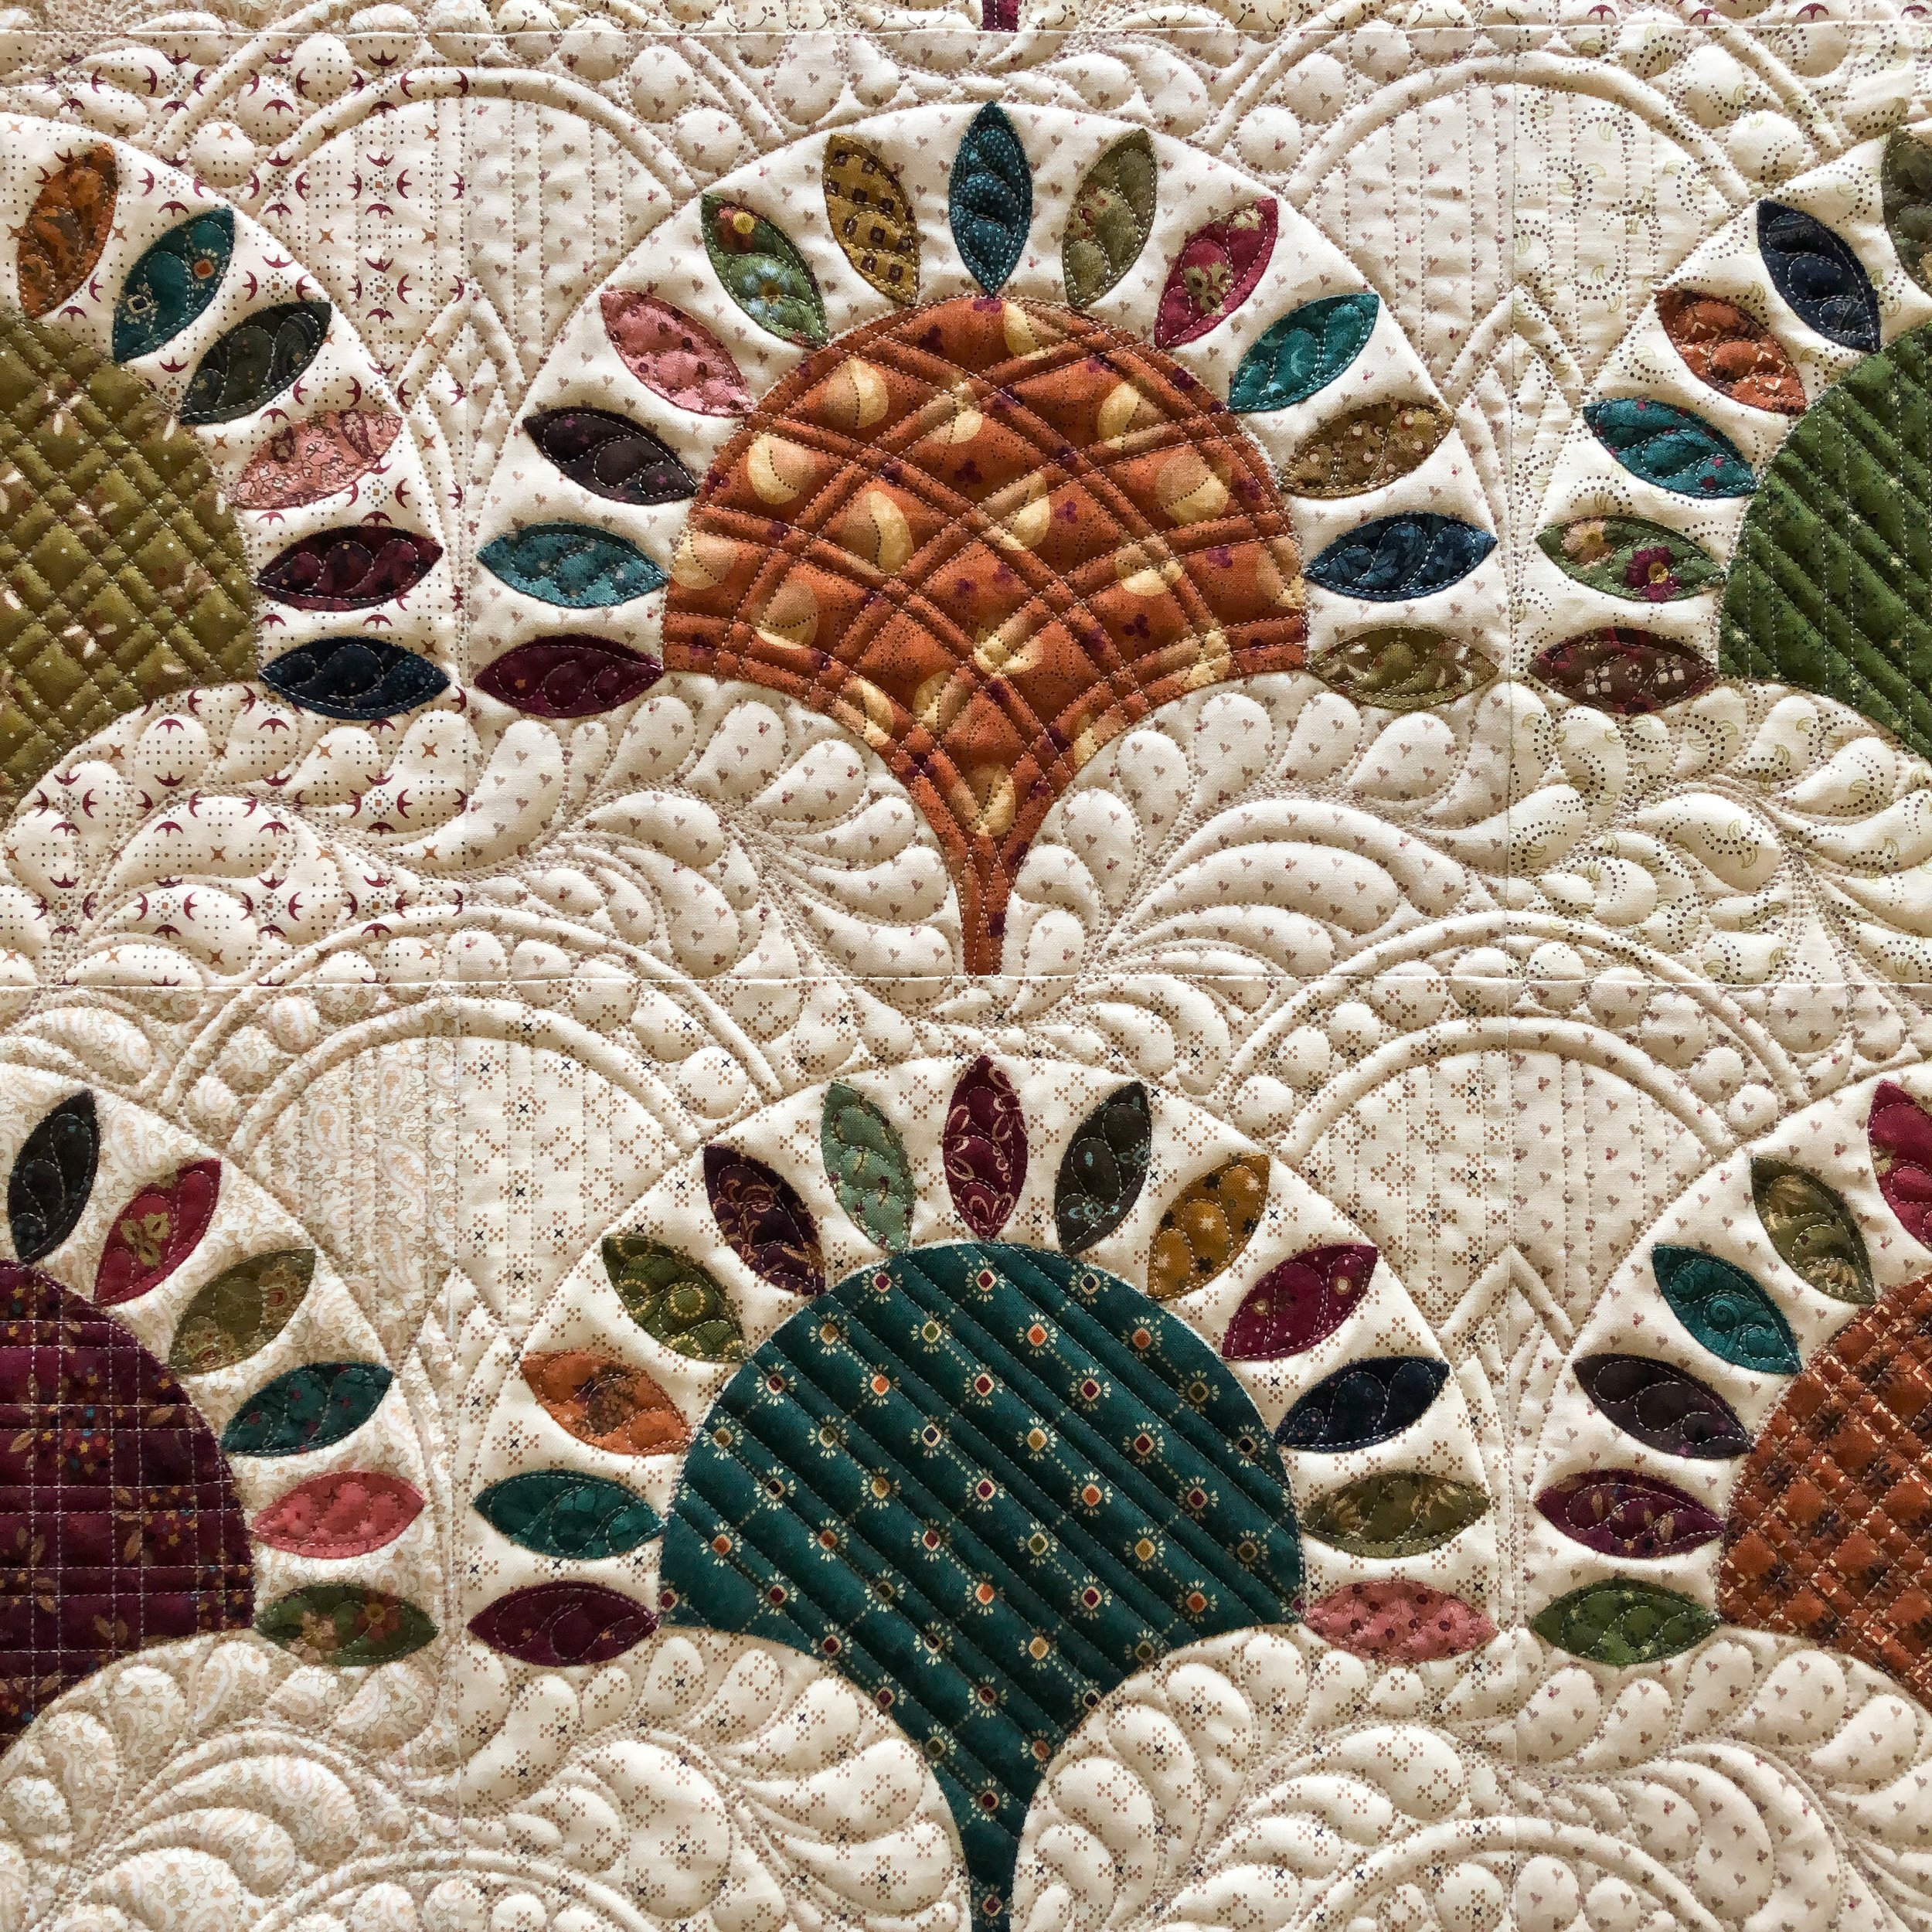
I used the 5” Circle2 ruler for the curves that arc on top between the two clamshells. I loved creating that secondary design. I used the handy lines on the rulers for the spacing and the filled in with pebbles or other curves. All of the lines were quilted using an Edge ruler from Linda at The Quilted Pineapple. Her straight rulers are my absolute favorite!!
Can you see the curved plaid in the rose colored clamshell below? That is how I used the 10” Circle2 ruler inside the clamshells. Also while you can see a closeup, I wanted to point out the simple feathers inside of the petals. They all start facing up on the bottom right side and end face down on the bottom left side. Those feathers also tie in the feathers below each clamshell block. You will also noticed that I didn’t quilt anything around each petal. Sometimes quilts need parts left unquilted so the quilting can breathe, which enhances parts of the quilt block. Too much quilting, can be too much. Of course this is my personal opinion. I also don’t quilt in the ditch around everything, either. I don’t think that it is necessary. You may disagree, and that is totally fine. My goal with custom quilting is to create a cohesive design that looks beautiful with the quilt pattern. This is definitely one of my all time favorites!

After figuring out the first section, then I just repeated my quilty plan throughout the rest of the quilt.

Can you see all the beautiful textures?!?!?!

Here is another glimpse of all of the quilty goodness.
I used my favorite 8020 cotton/poly blend batting from Winline Textiles out of Ogden Utah, and an Omni tan thread #3008 called Sesame Seeds from Superior Threads which I used on the entire quilt. Kim actually requested the thread color to match the darker color in her cream on cream background fabric. By doing this it helps the quilting to stand out a little more, instead of blend in so much it’s not even noticeable. After 17+ years of longarm quilting, I’m still learning new things. I love it!
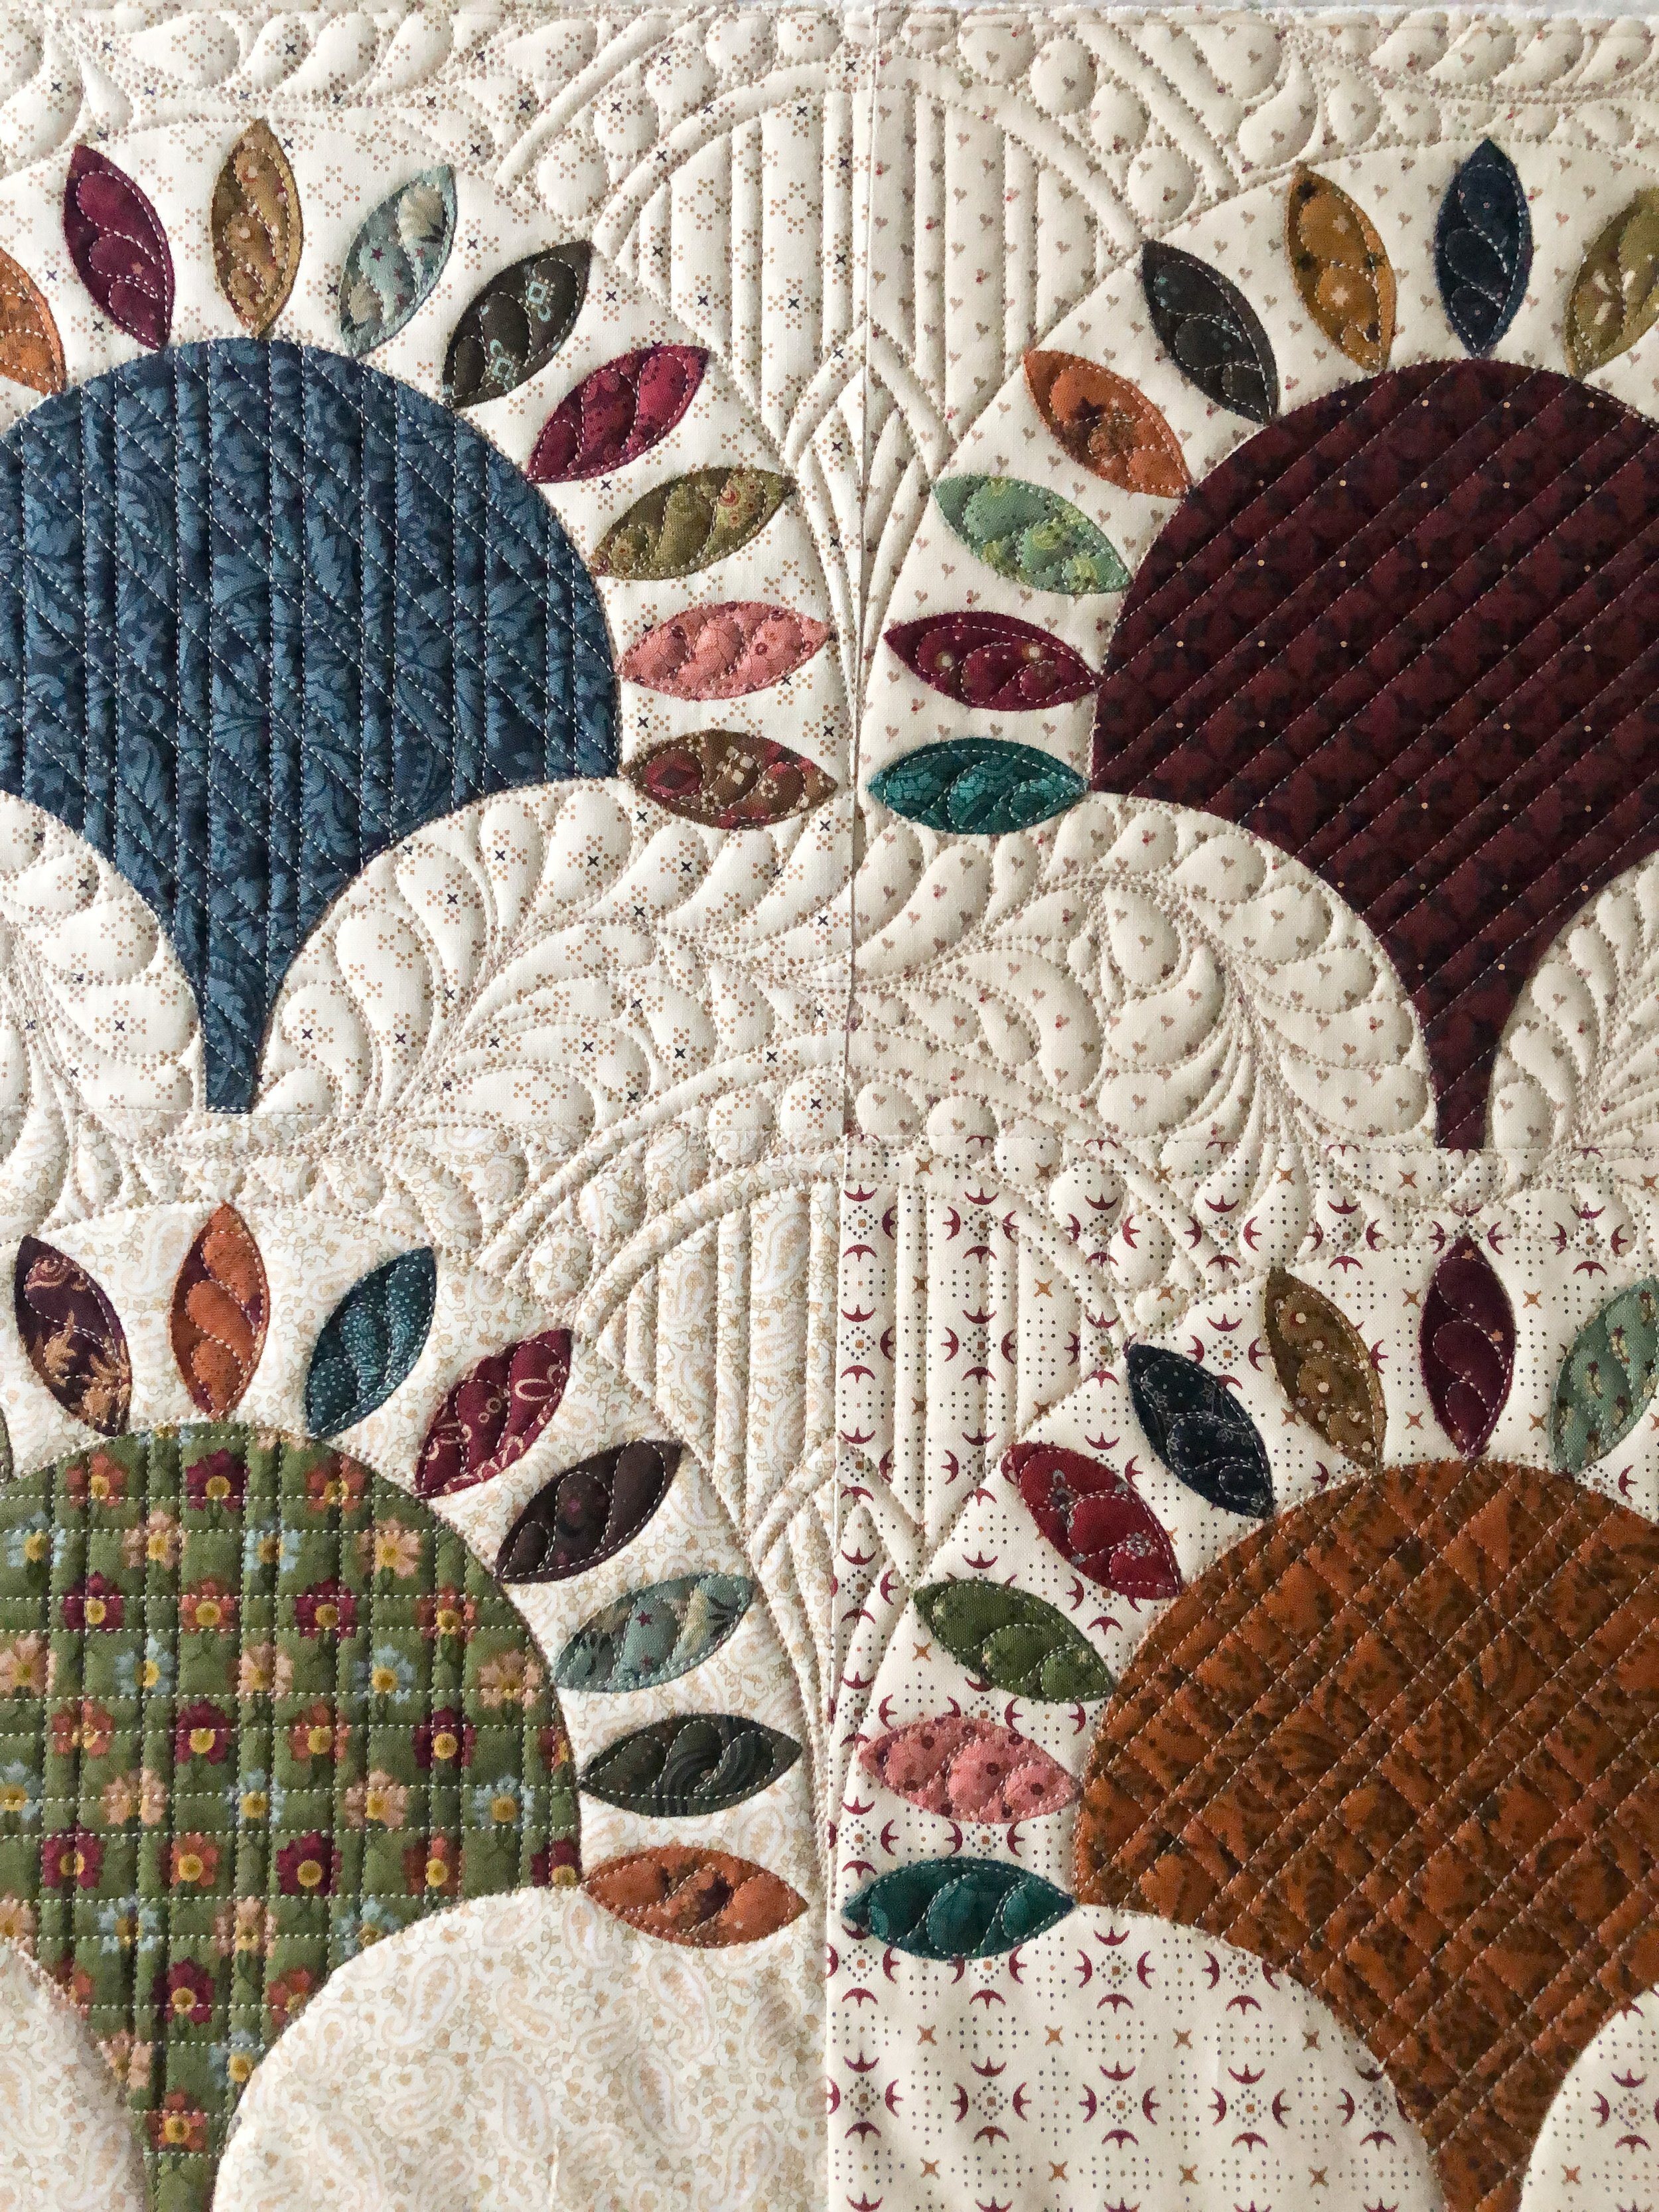
Here are some more closeups of the quilting in the clamshells. Angled lines, plaids, pinstripes, and I love how beautifully they are play together. I love mixing curves, lines, some freehand designs…and this is the result! I love what I do.
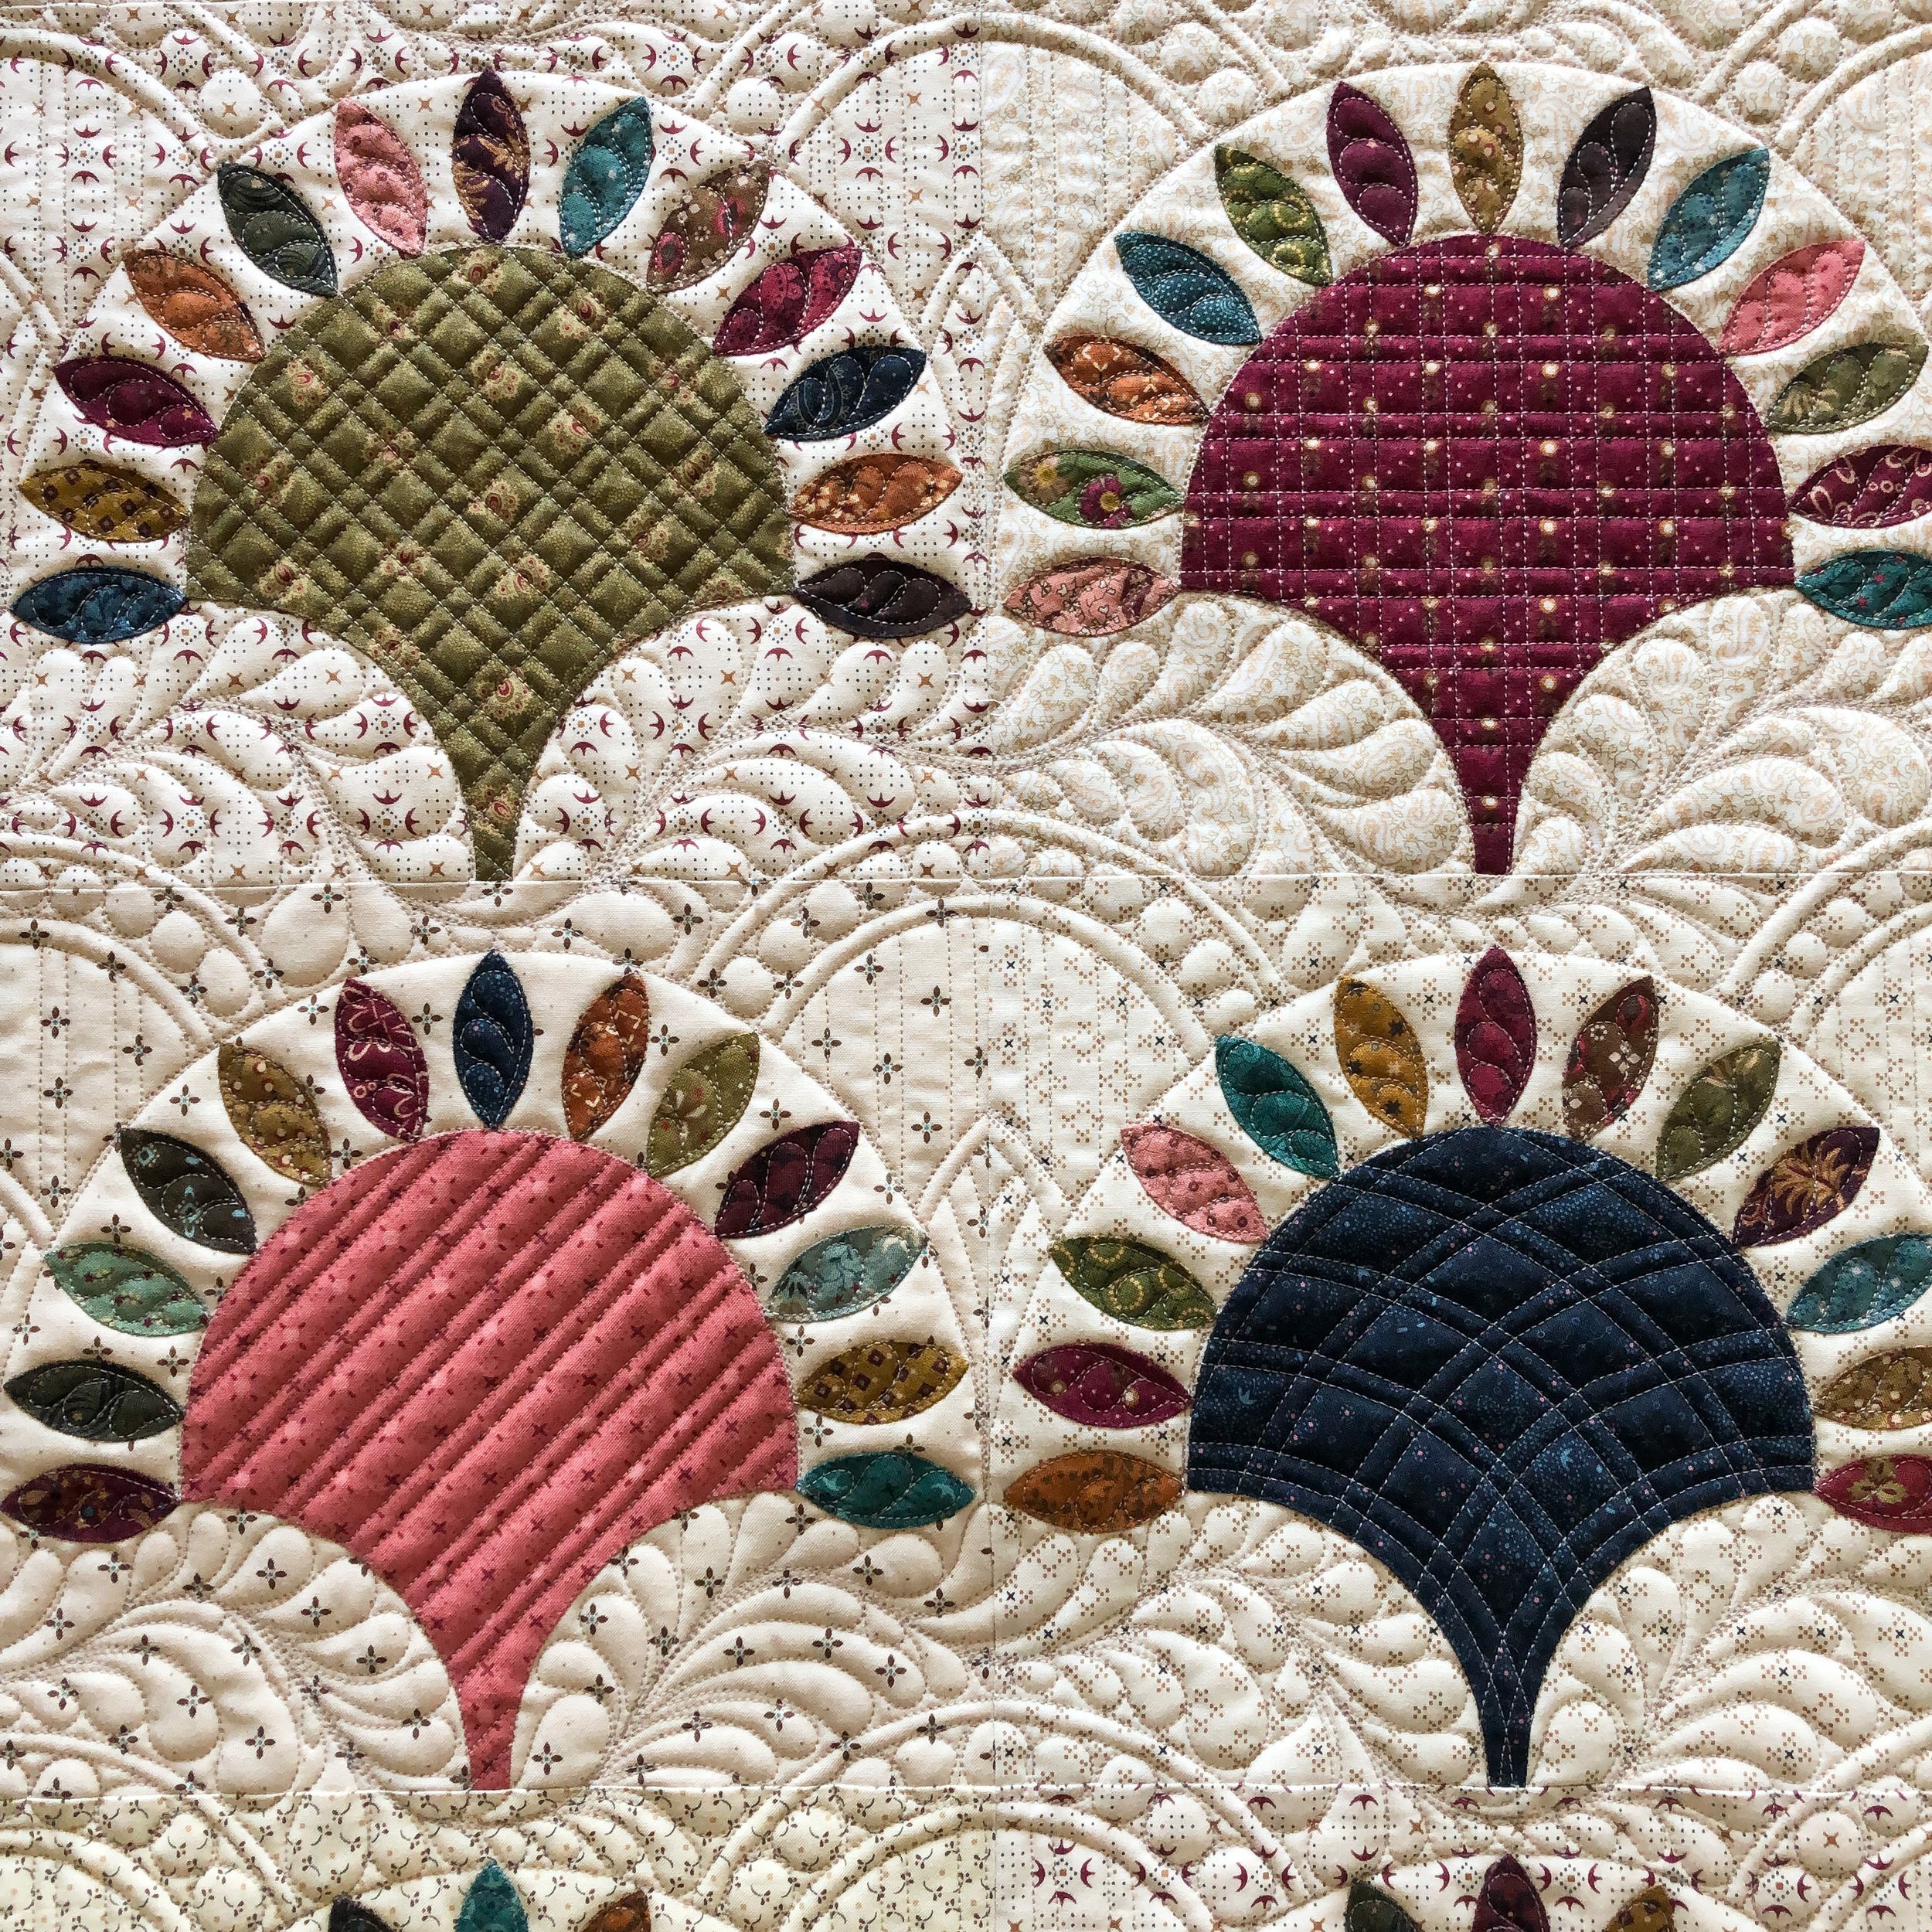
Another closeup.
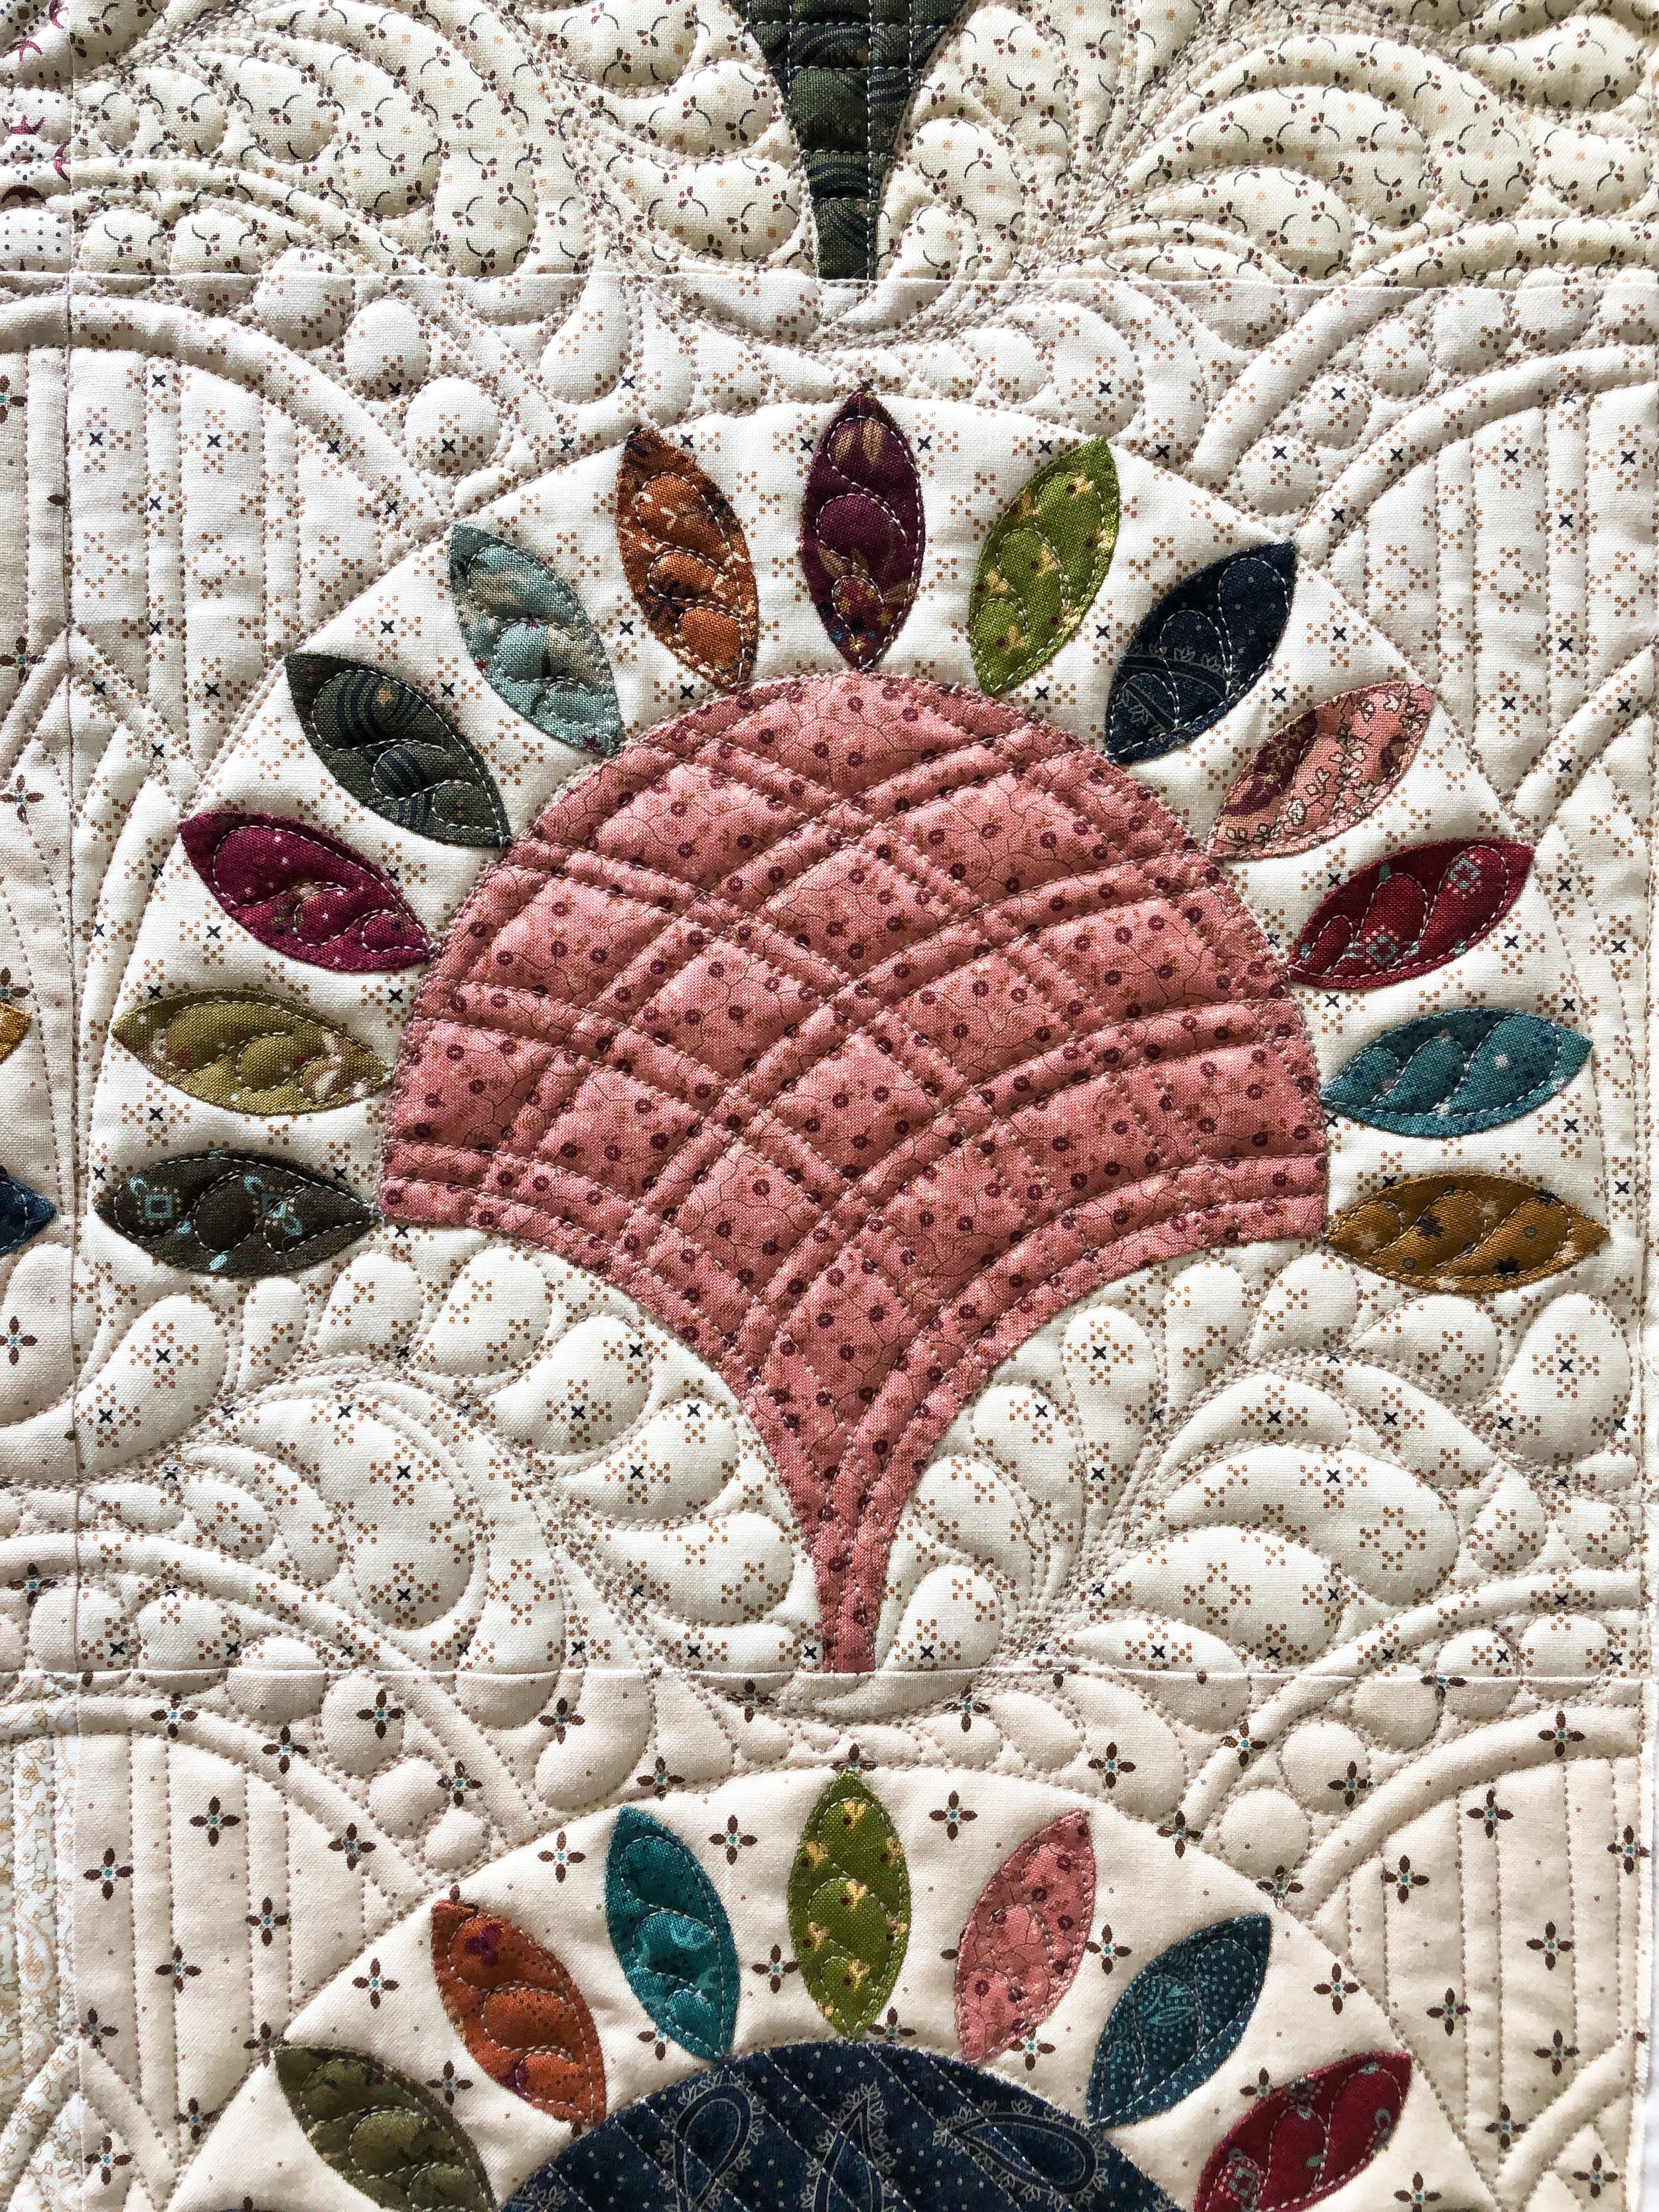
The diamond plaid design, pictured below, in the clamshell is an easy one to create. I typically start with vertical pinstripes with a 1/2” space between the pinstripes, and then I do the same kind of thing working from the bottom left and going to the top right at a 45 degree angle. I love love love how sharp that design looks.
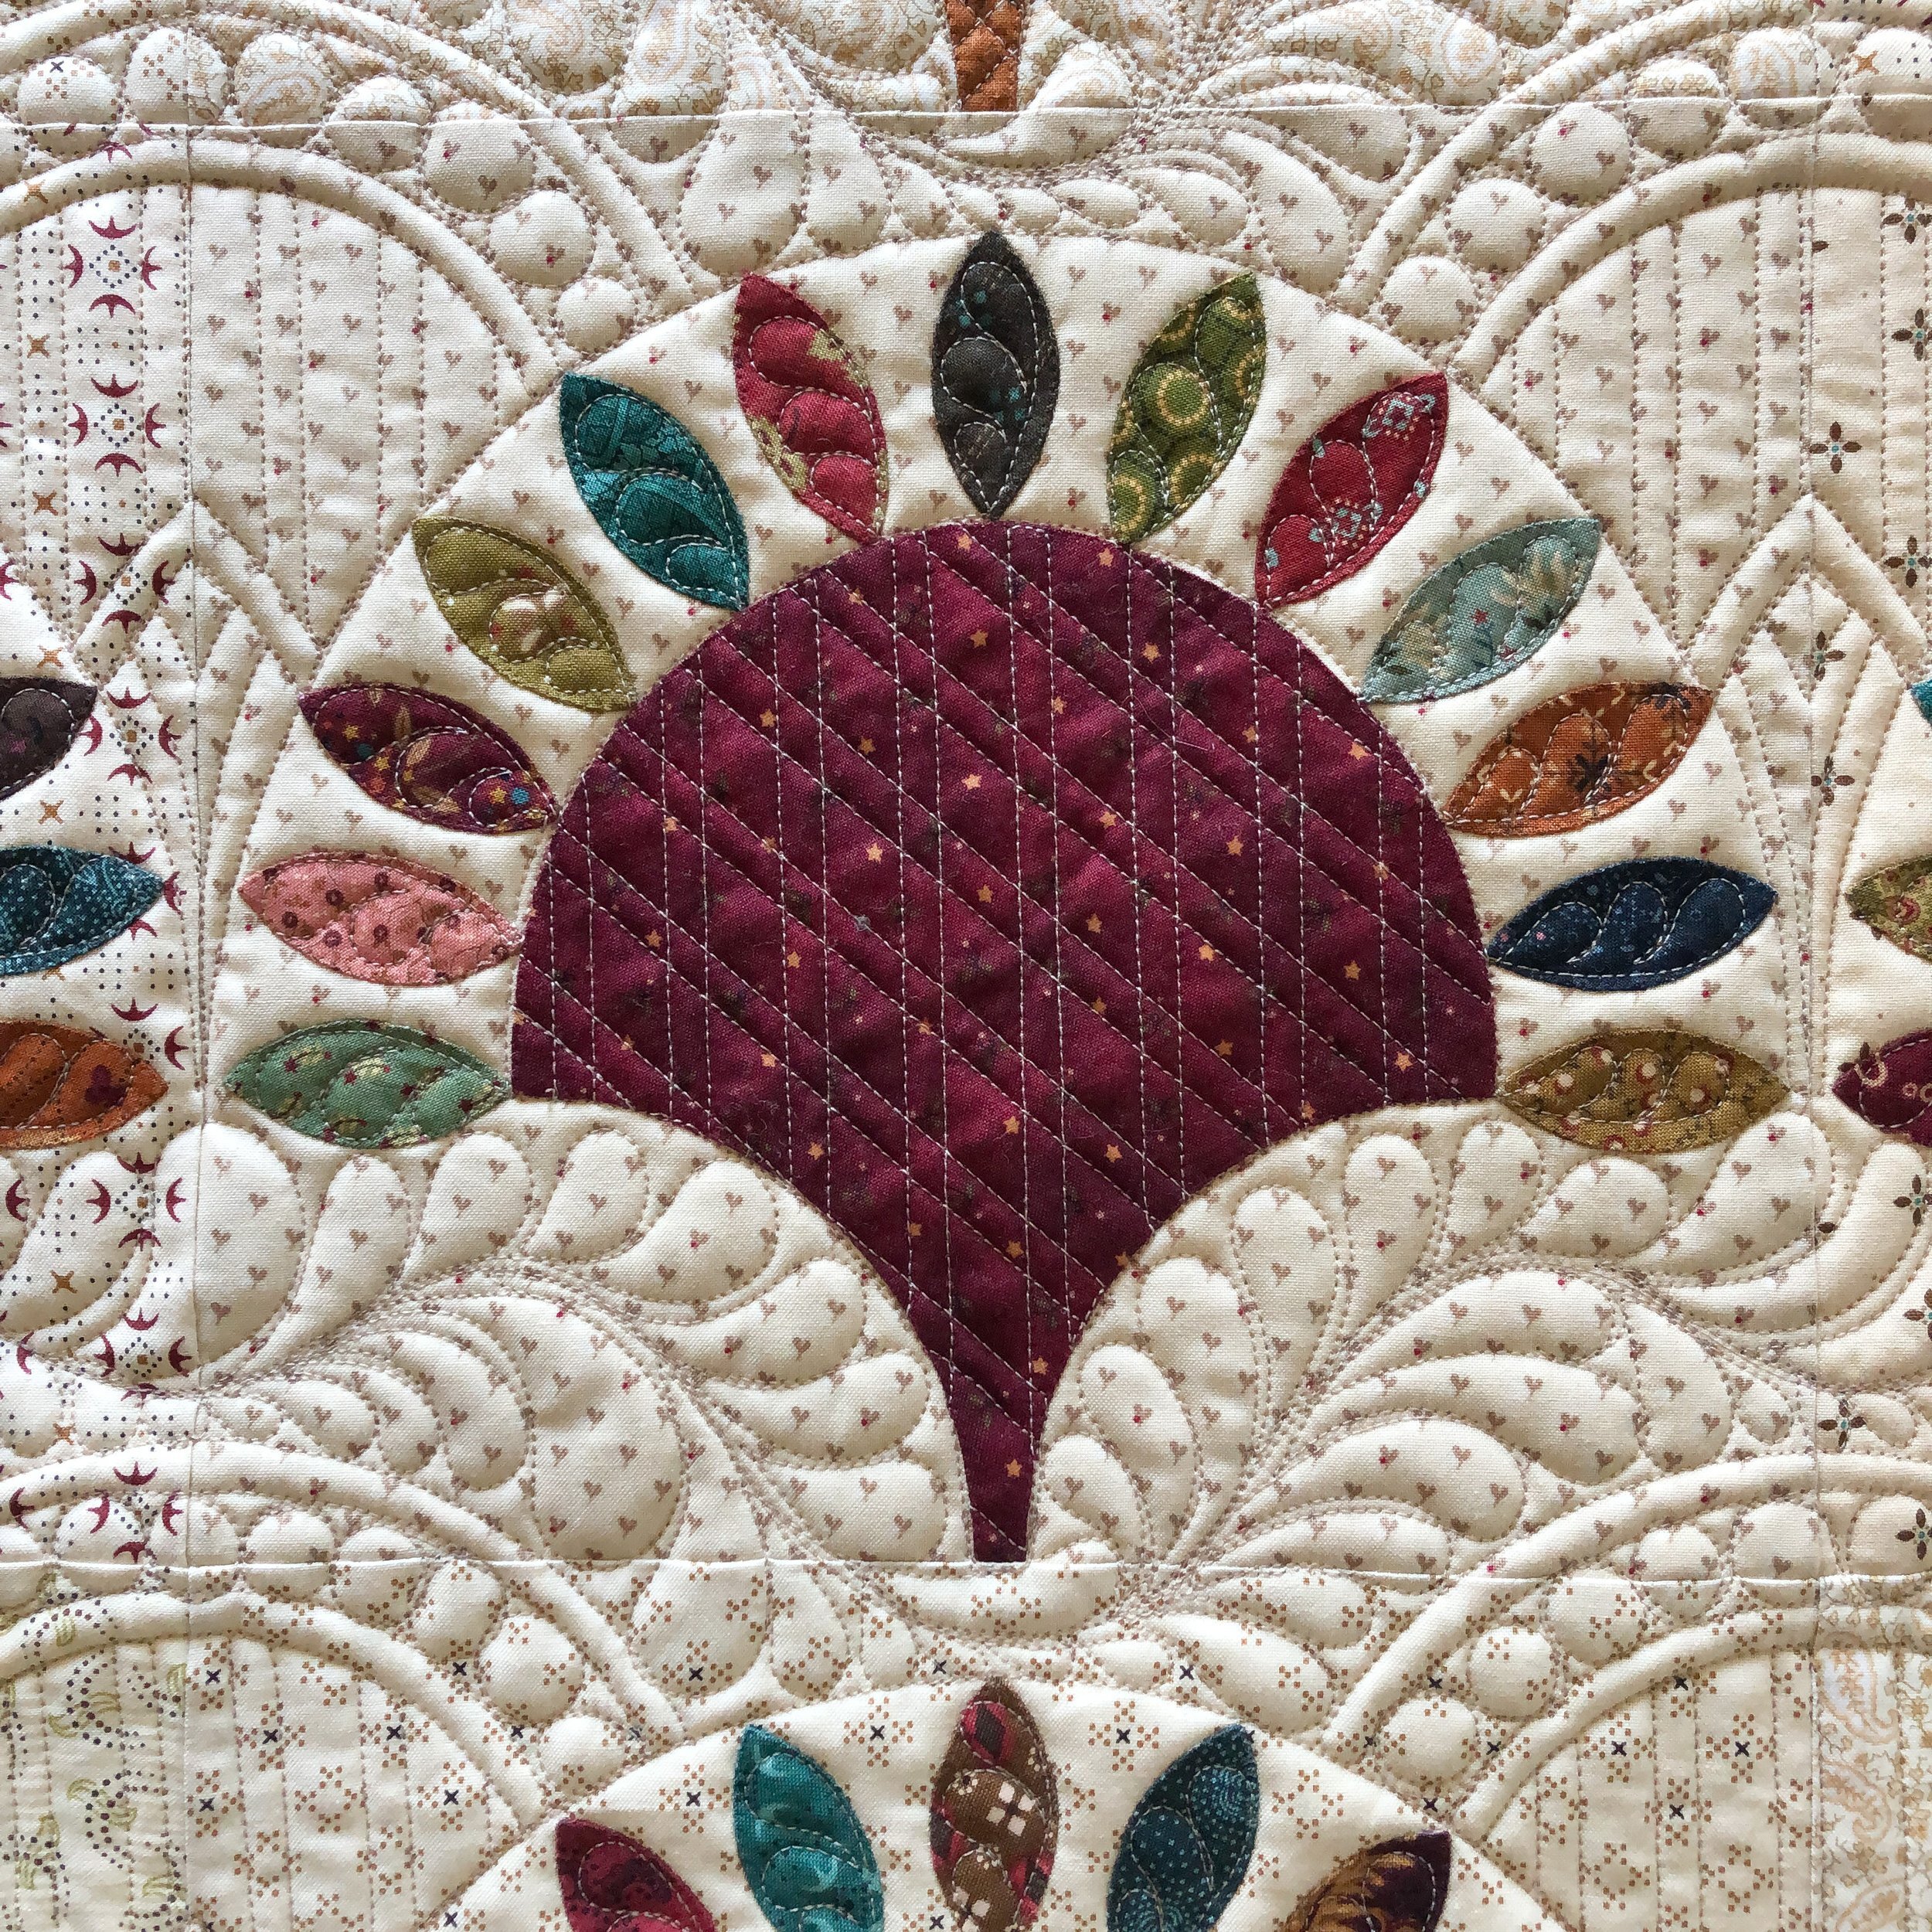
For the background design pictured below, I started by quilting the first curve that is located right below the pebbles, which if you notice is starting at the tip of one of the petals and going to the tip of another petal, the 5th petals on each side. I then quilted the next line 3/4” above using the 1/2” mark on my 5” Circle2 ruler, which then gave me a boundary for the freehand pebbles. I then quilted the 1/4” curve above and below those “boundary” curves, to add some more detail to the overall design. When you’re looking to enhance a shape, adding that extra 1/4” line adds so much! Try it when you’re custom quilting sometime. Then I headed down into the tip between the clamshells to create the curved V. I used the 3rd petal on each side to start the curve, echoed it 1/4” above and then added the V. After that I filled in with the pinstripes. Last but certainly not least, the feathers. I quilted the stem from left to right, then quilted the feathers on both sides of the stem as I worked my way back to the left…which is definitely efficient but also fun! My biggest tip when custom quilting a variety of designs in the same area, first create some “boundaries” then fill in…create some more and fill in some more, until you get your desired result. Then, of course have fun with it. When I’m quilting such a detailed quilt, I actually enjoy listening to music. It makes it go by faster some how, or I just get into a really great groove. Haha! Pun intended.
Do you have any questions??? Comment below and ask away!

One of my favorite parts about custom quilting a quilt is pulling it off of the machine, and seeing the overall look. It’s incredible for me to see it all together, and its so rewarding.
I hope that you loved the more detailed look into the quilting process for me. Its fun to share!

What is your favorite element of the quilt? And, the quilting? Comment below, Kim and I would love to know.

Layers of quilty goodness…

And, of course a glimpse at the backing. Seeing all of that stitching makes my heart so happy!

I am going to do an exciting giveaway with Kim when her book is released in October!! Make sure you’re following me on my instagram, so you don’t miss out. Happy quilting… Take care, - Leisha
