

Make Yourself at Home + Pillows
Hope you’ve had a great week!! I spent most of mine with my baby sister and her husband moving and decorating their new townhome. It was so much fun!! I graduated in interior design, even though I fill my work time with quilting, it’s great to do some decorating every once in awhile.
So, I don’t have much to share with you in this week’s post. A wall hanging and some pillow fronts. I did freehand and or free-motion quilt them all. I do have lots of pictures!
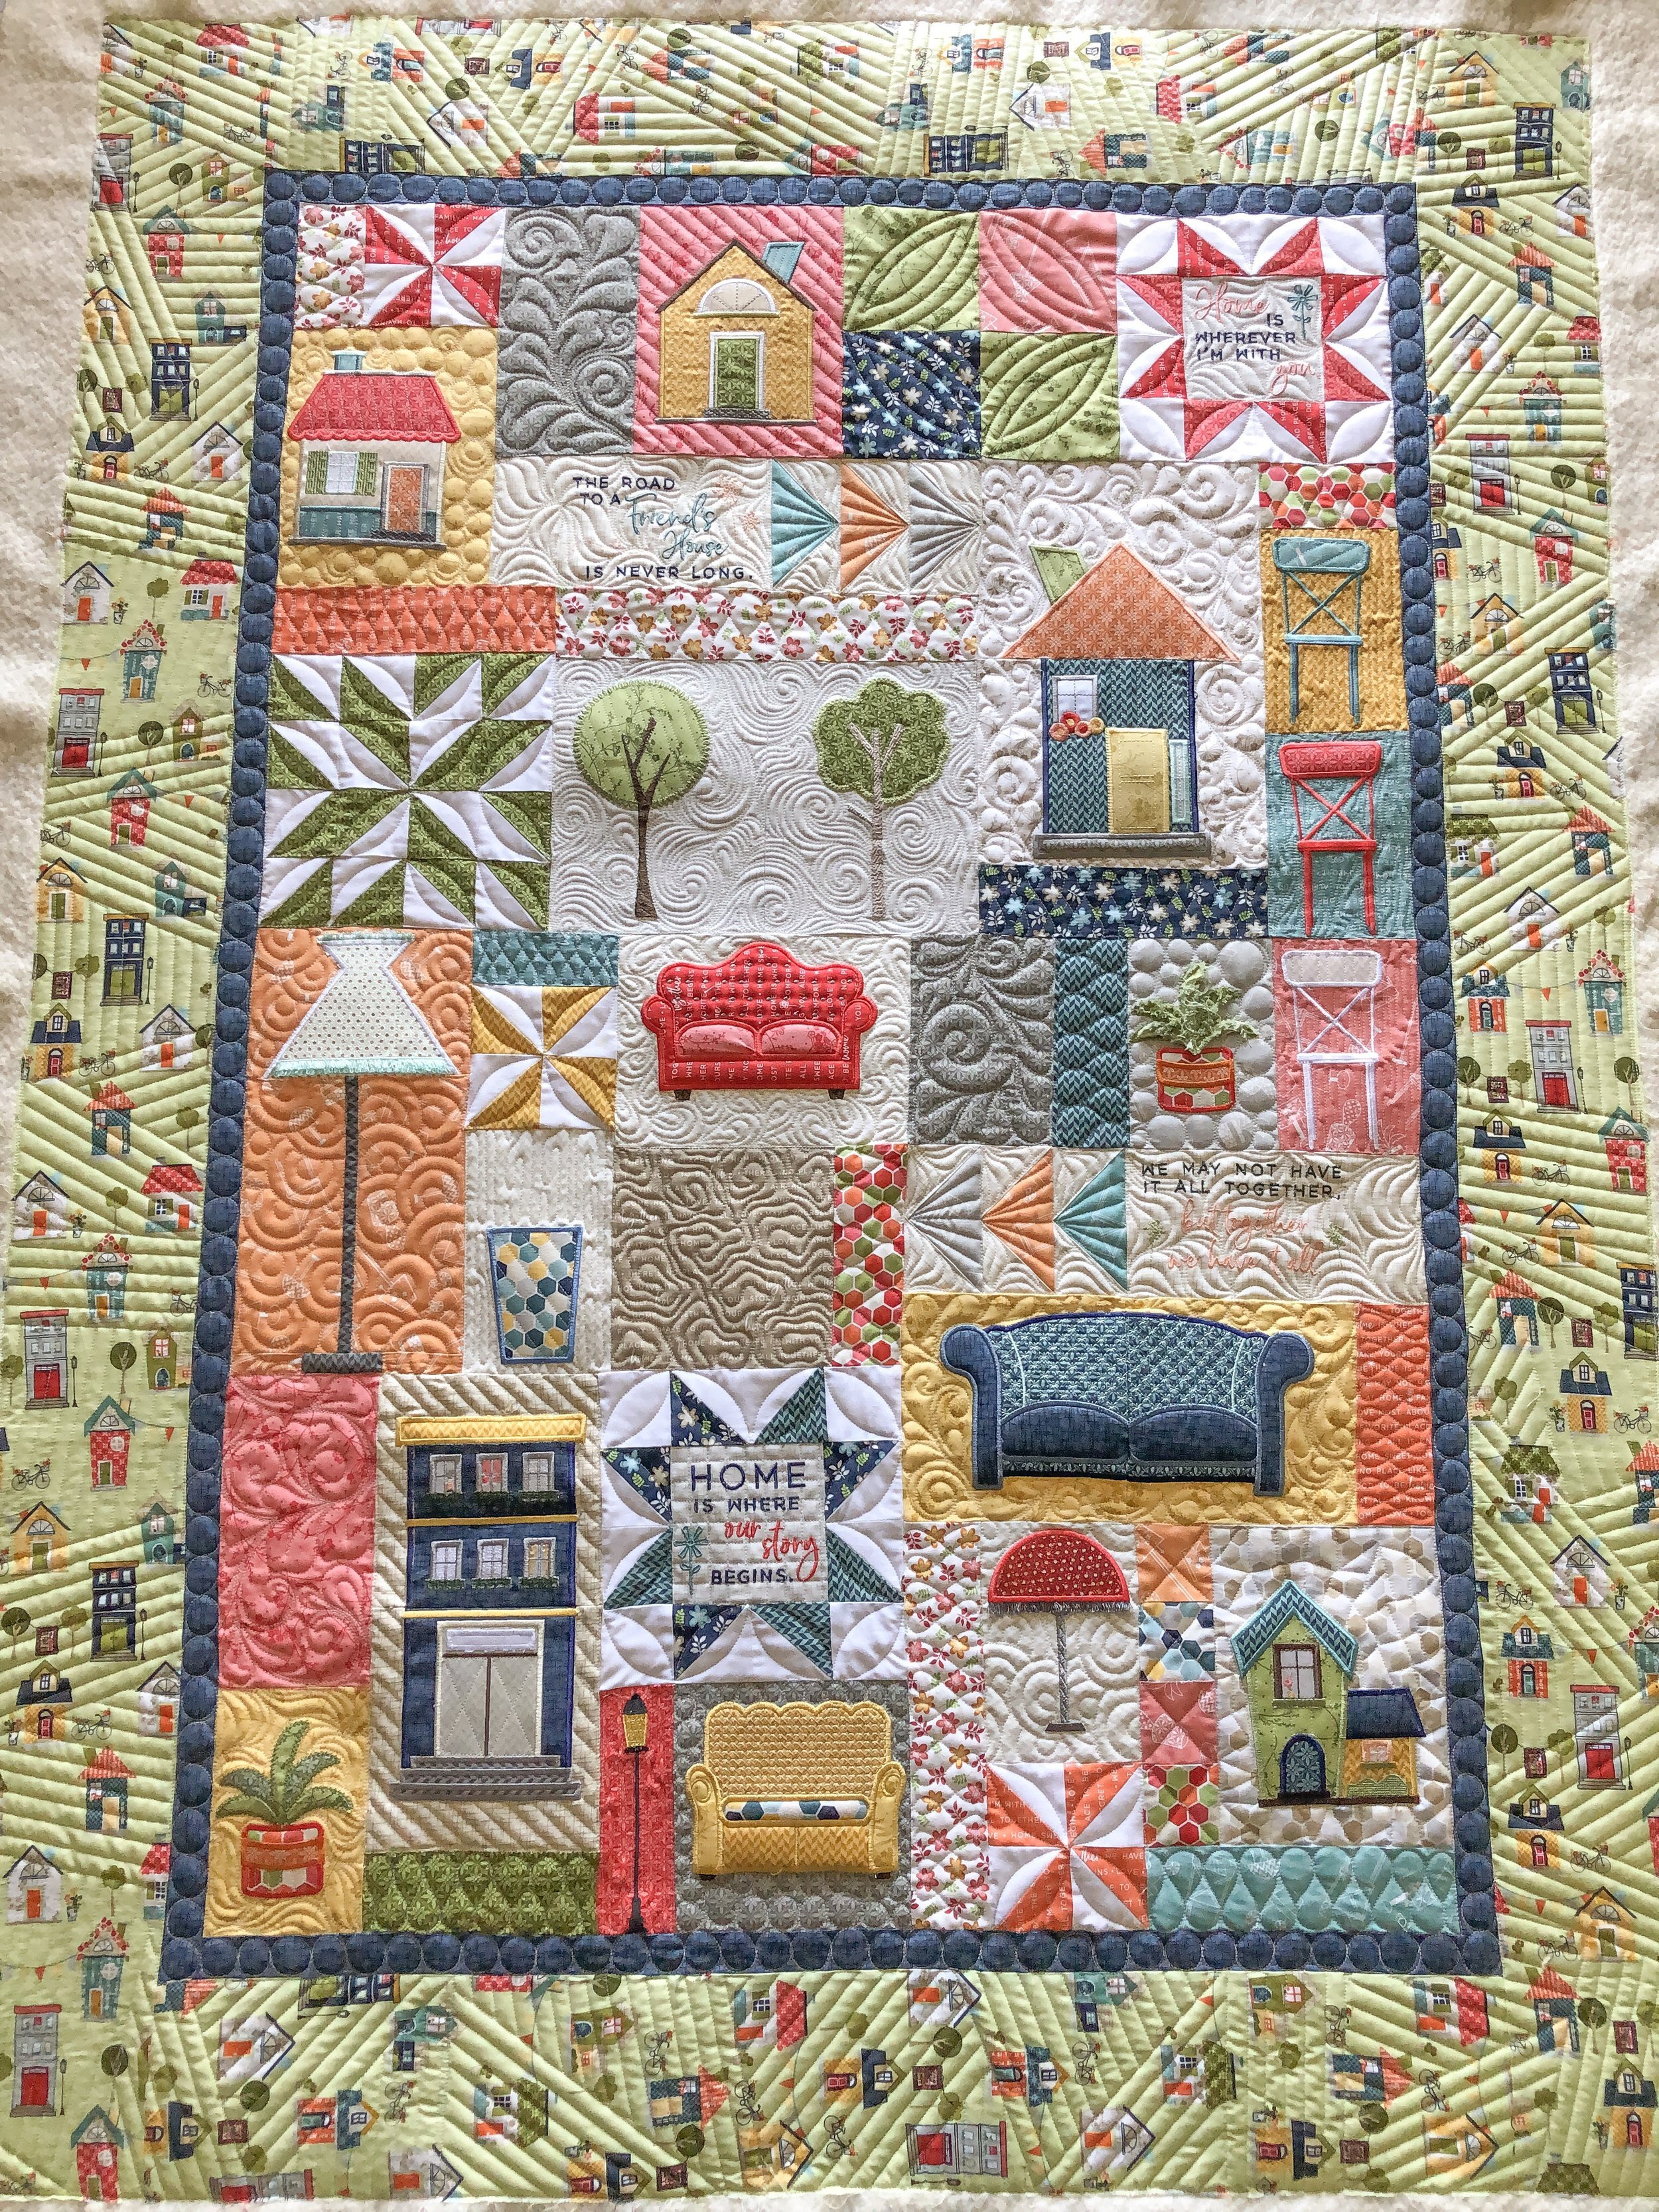
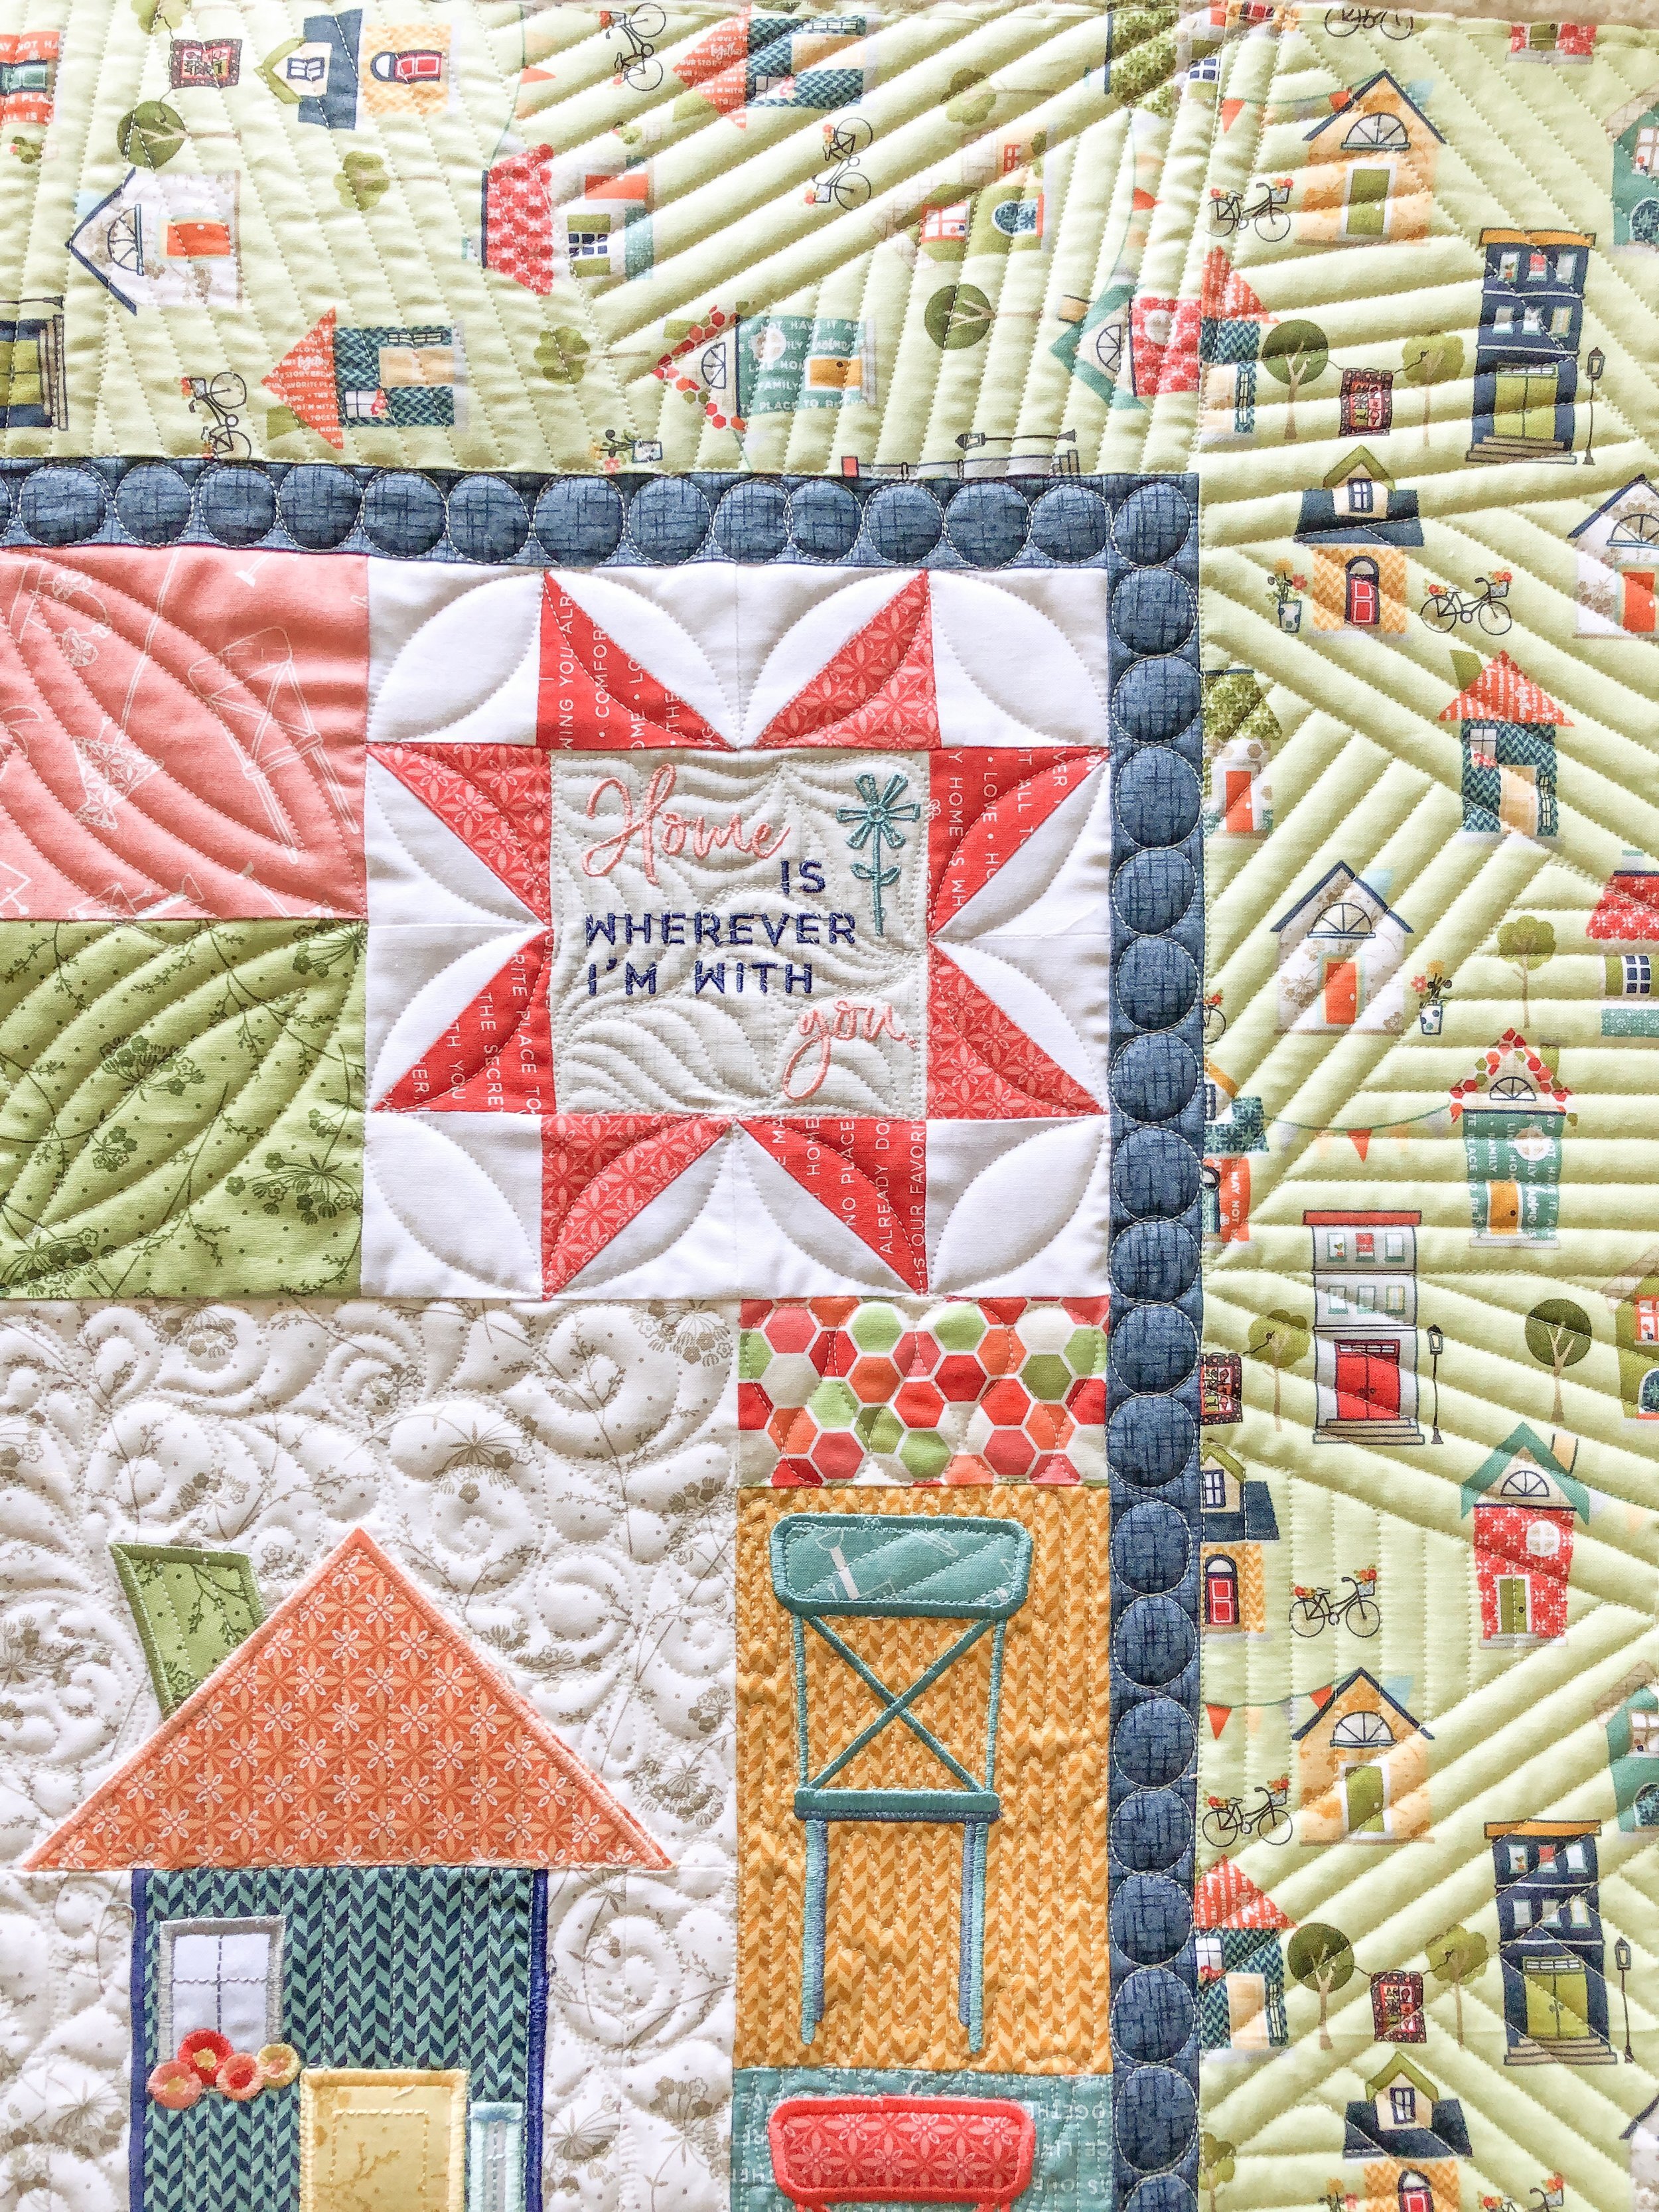
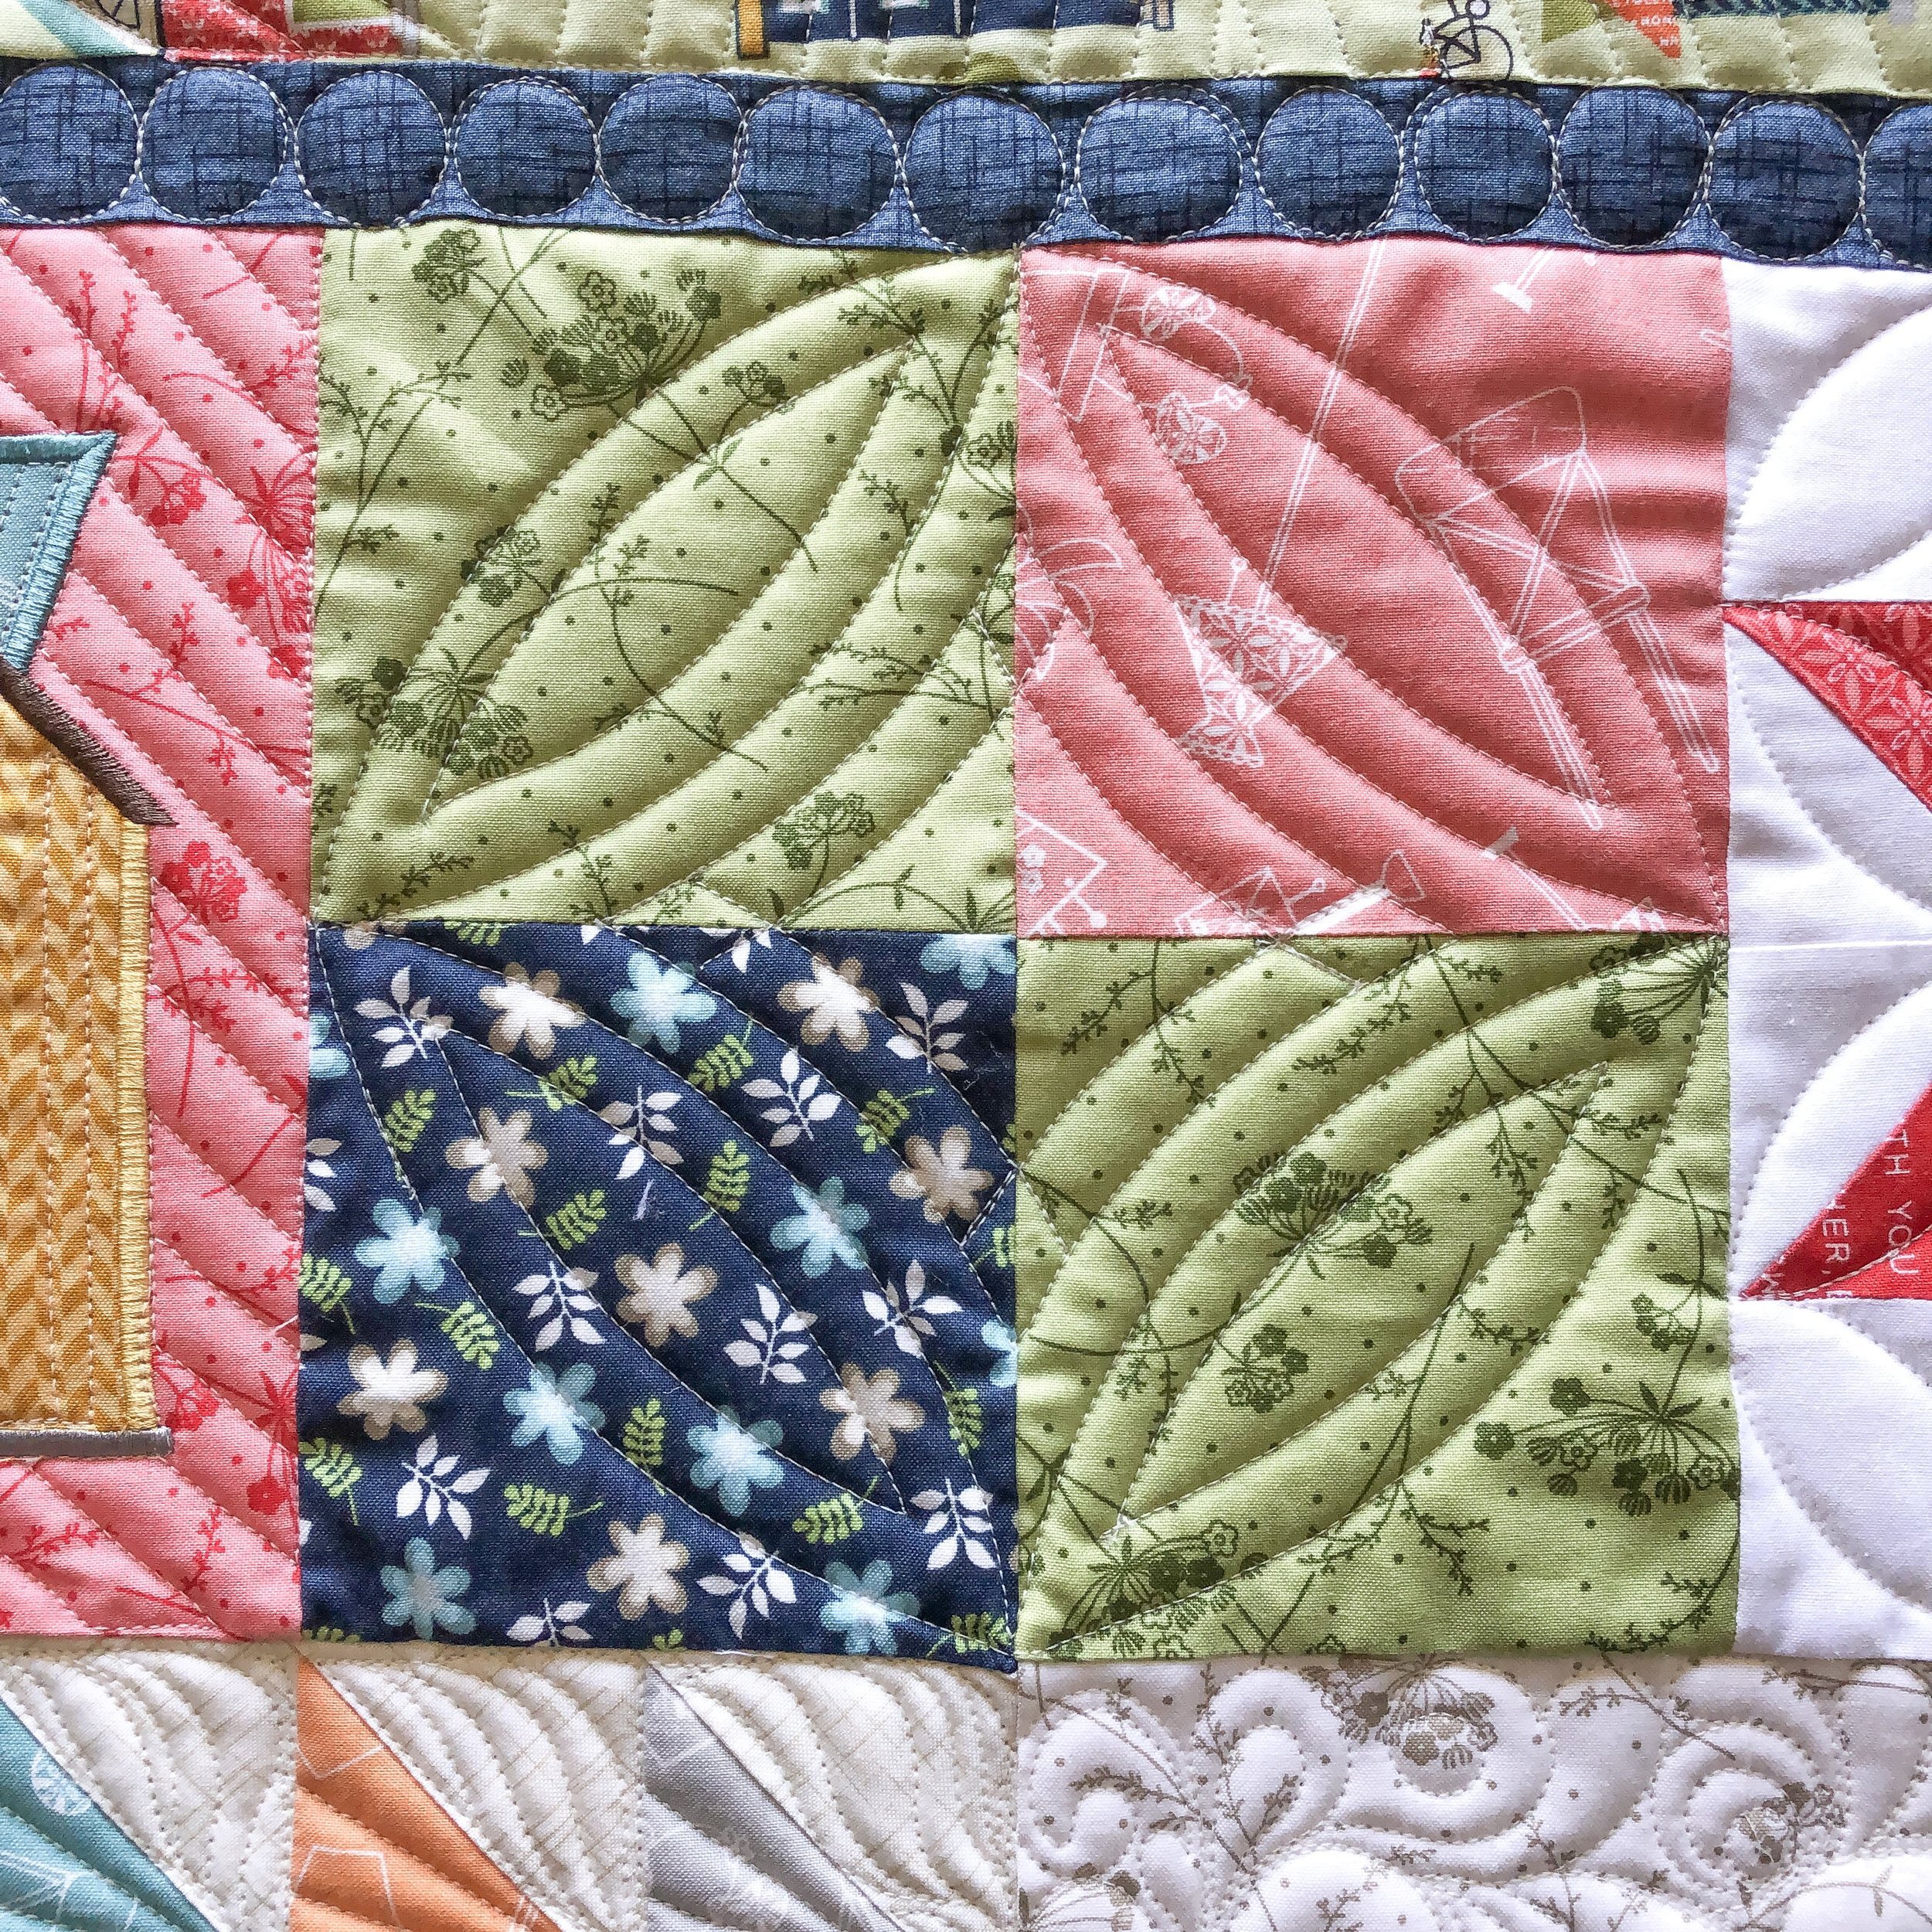
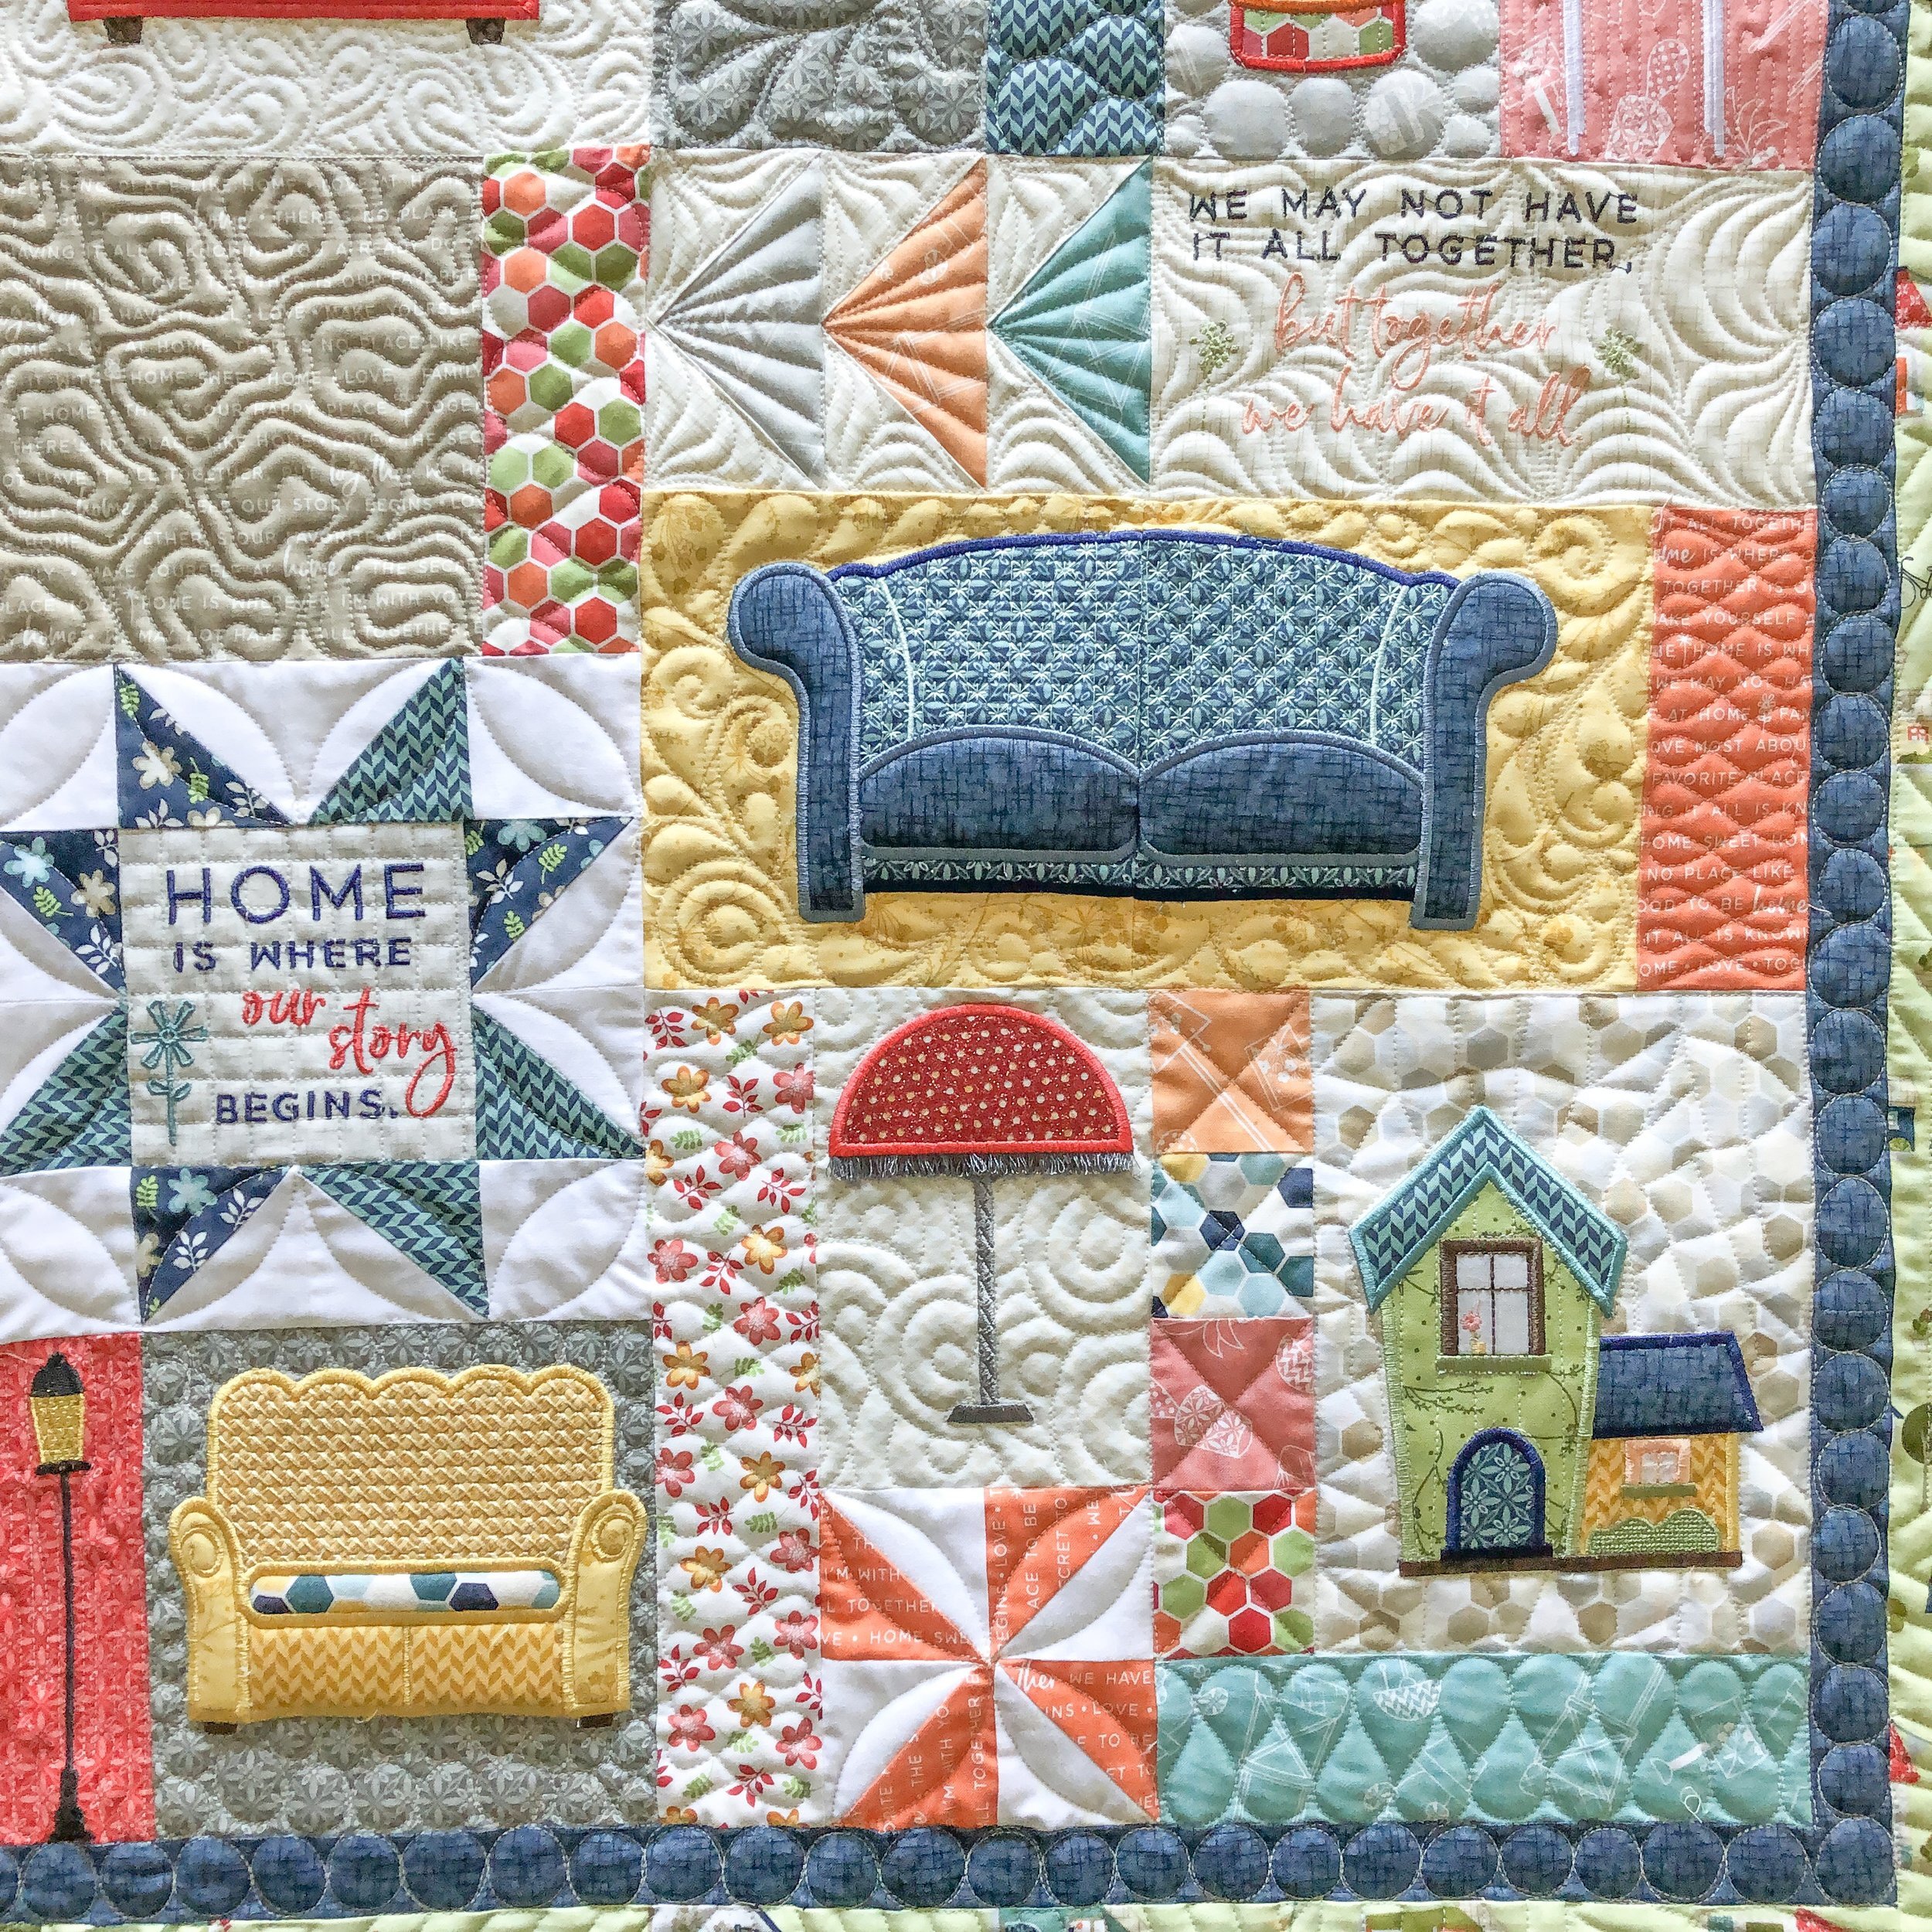
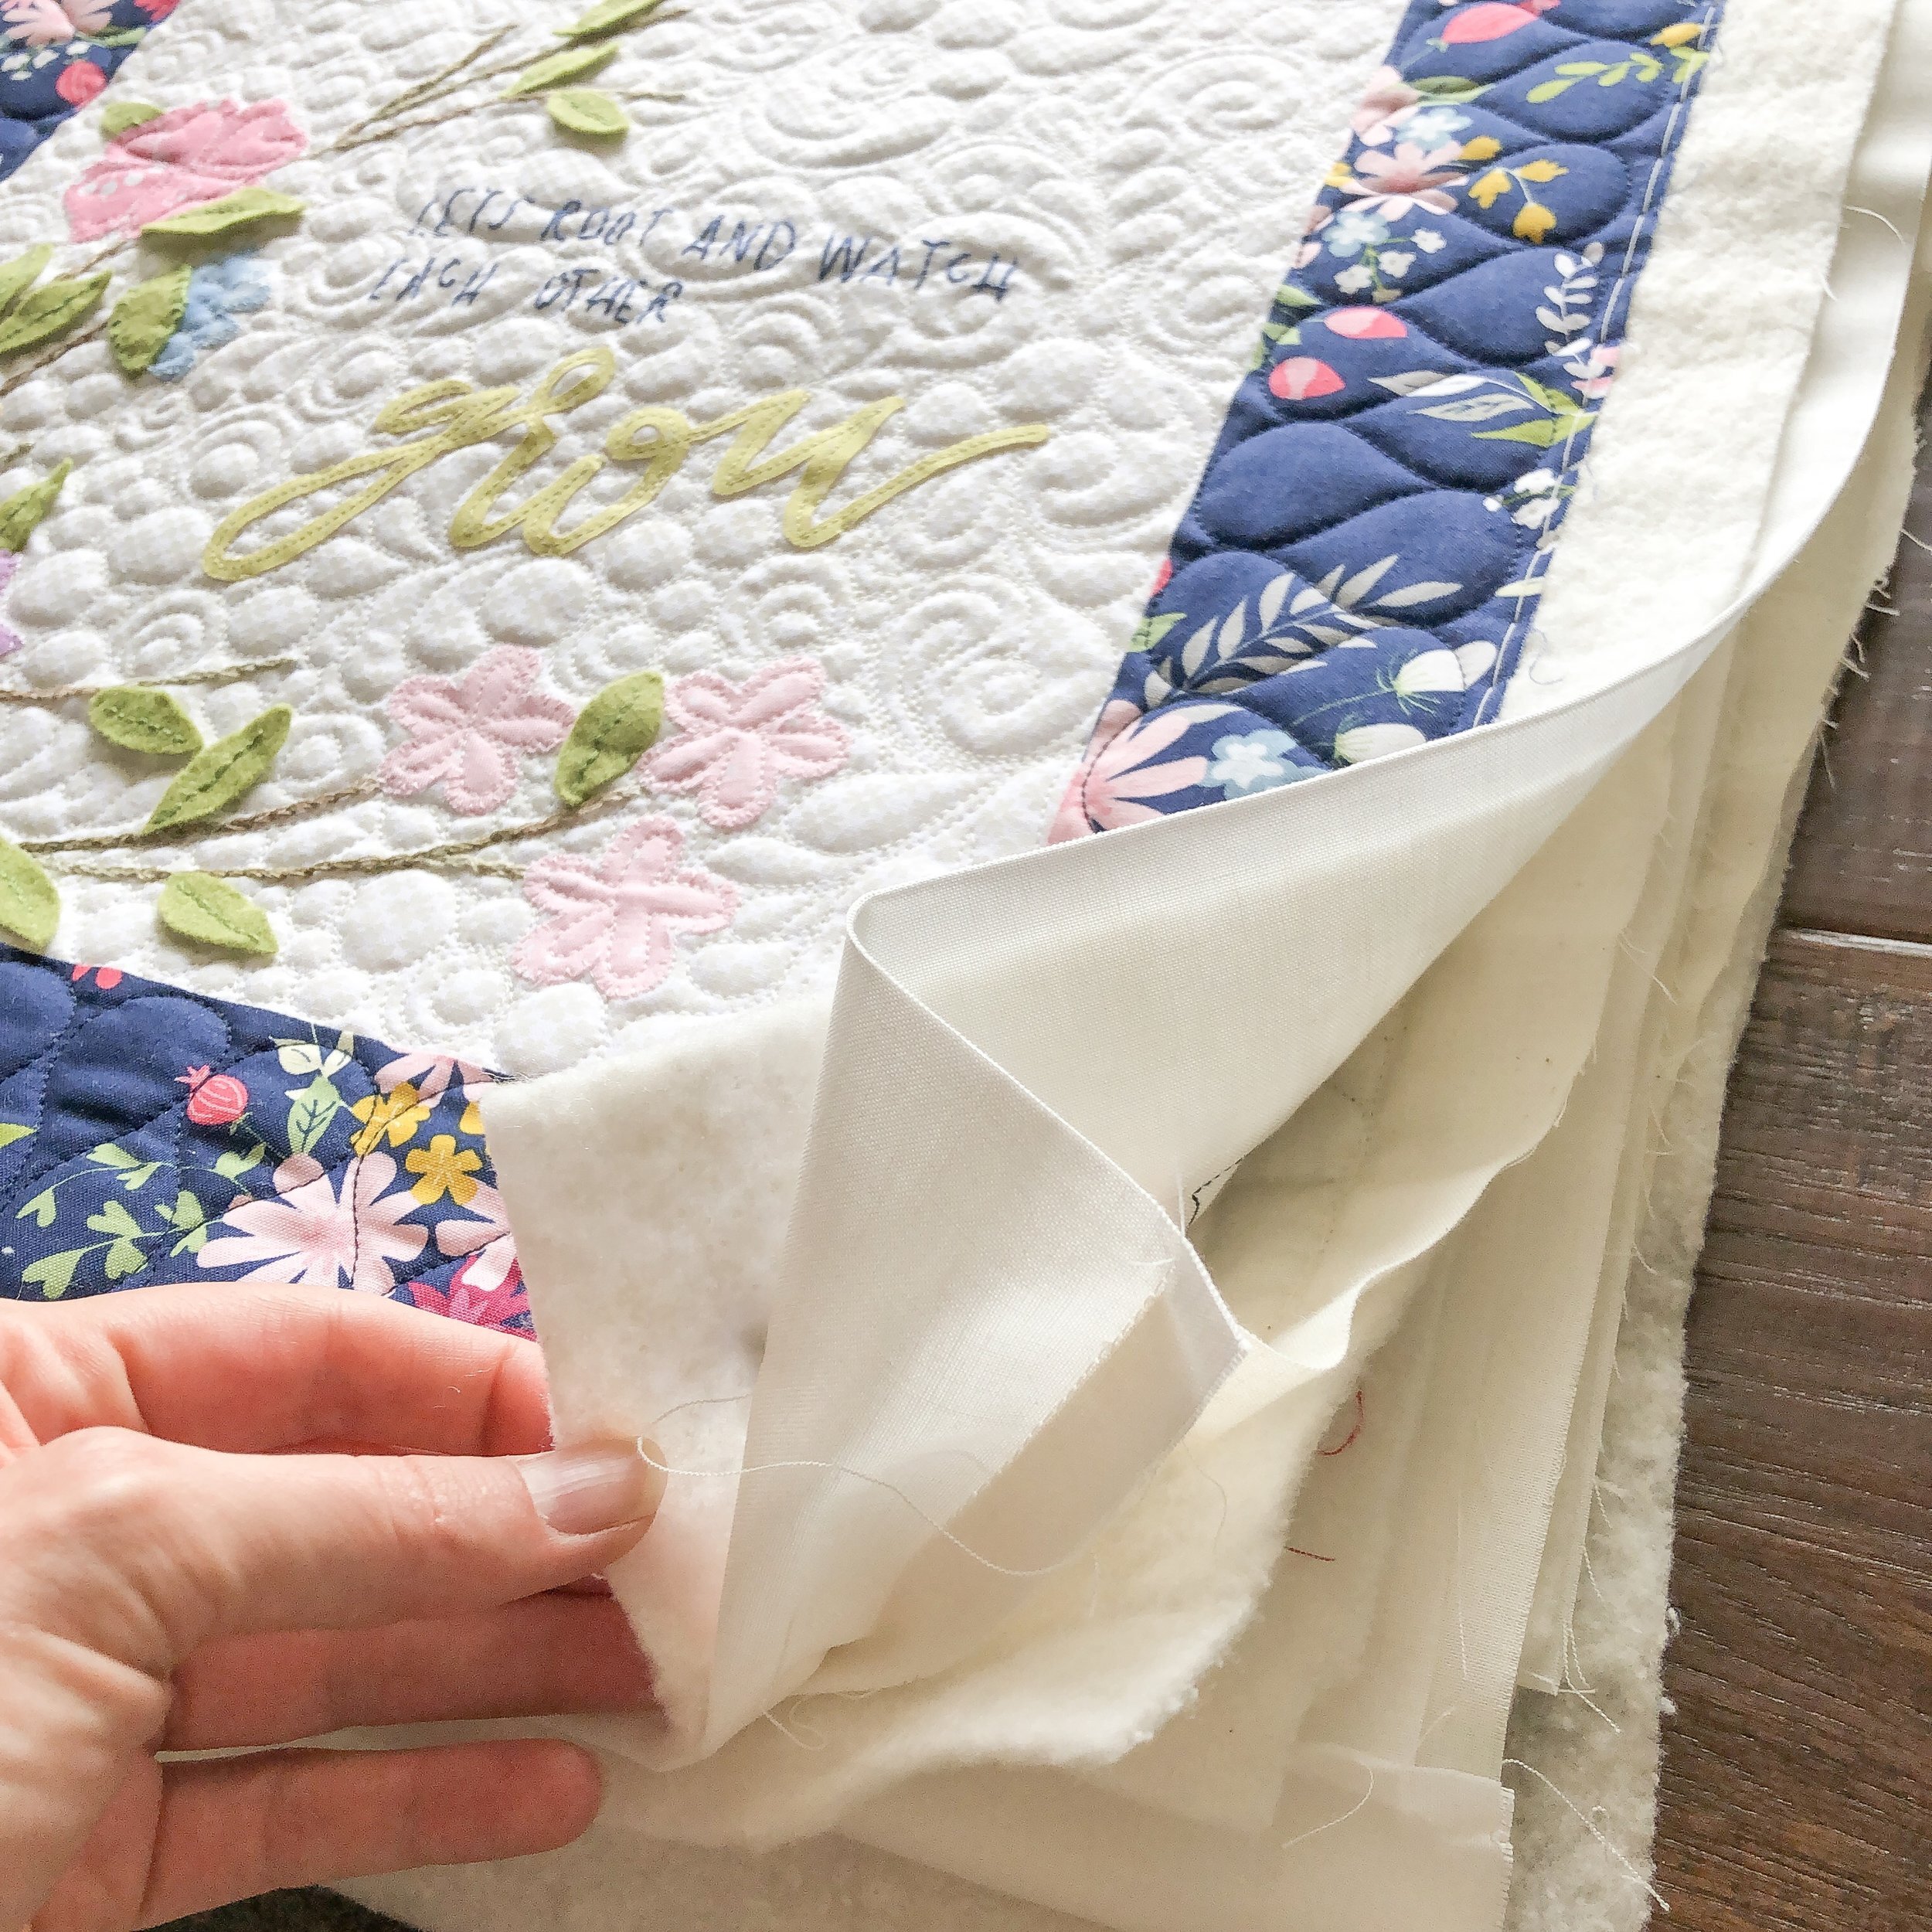
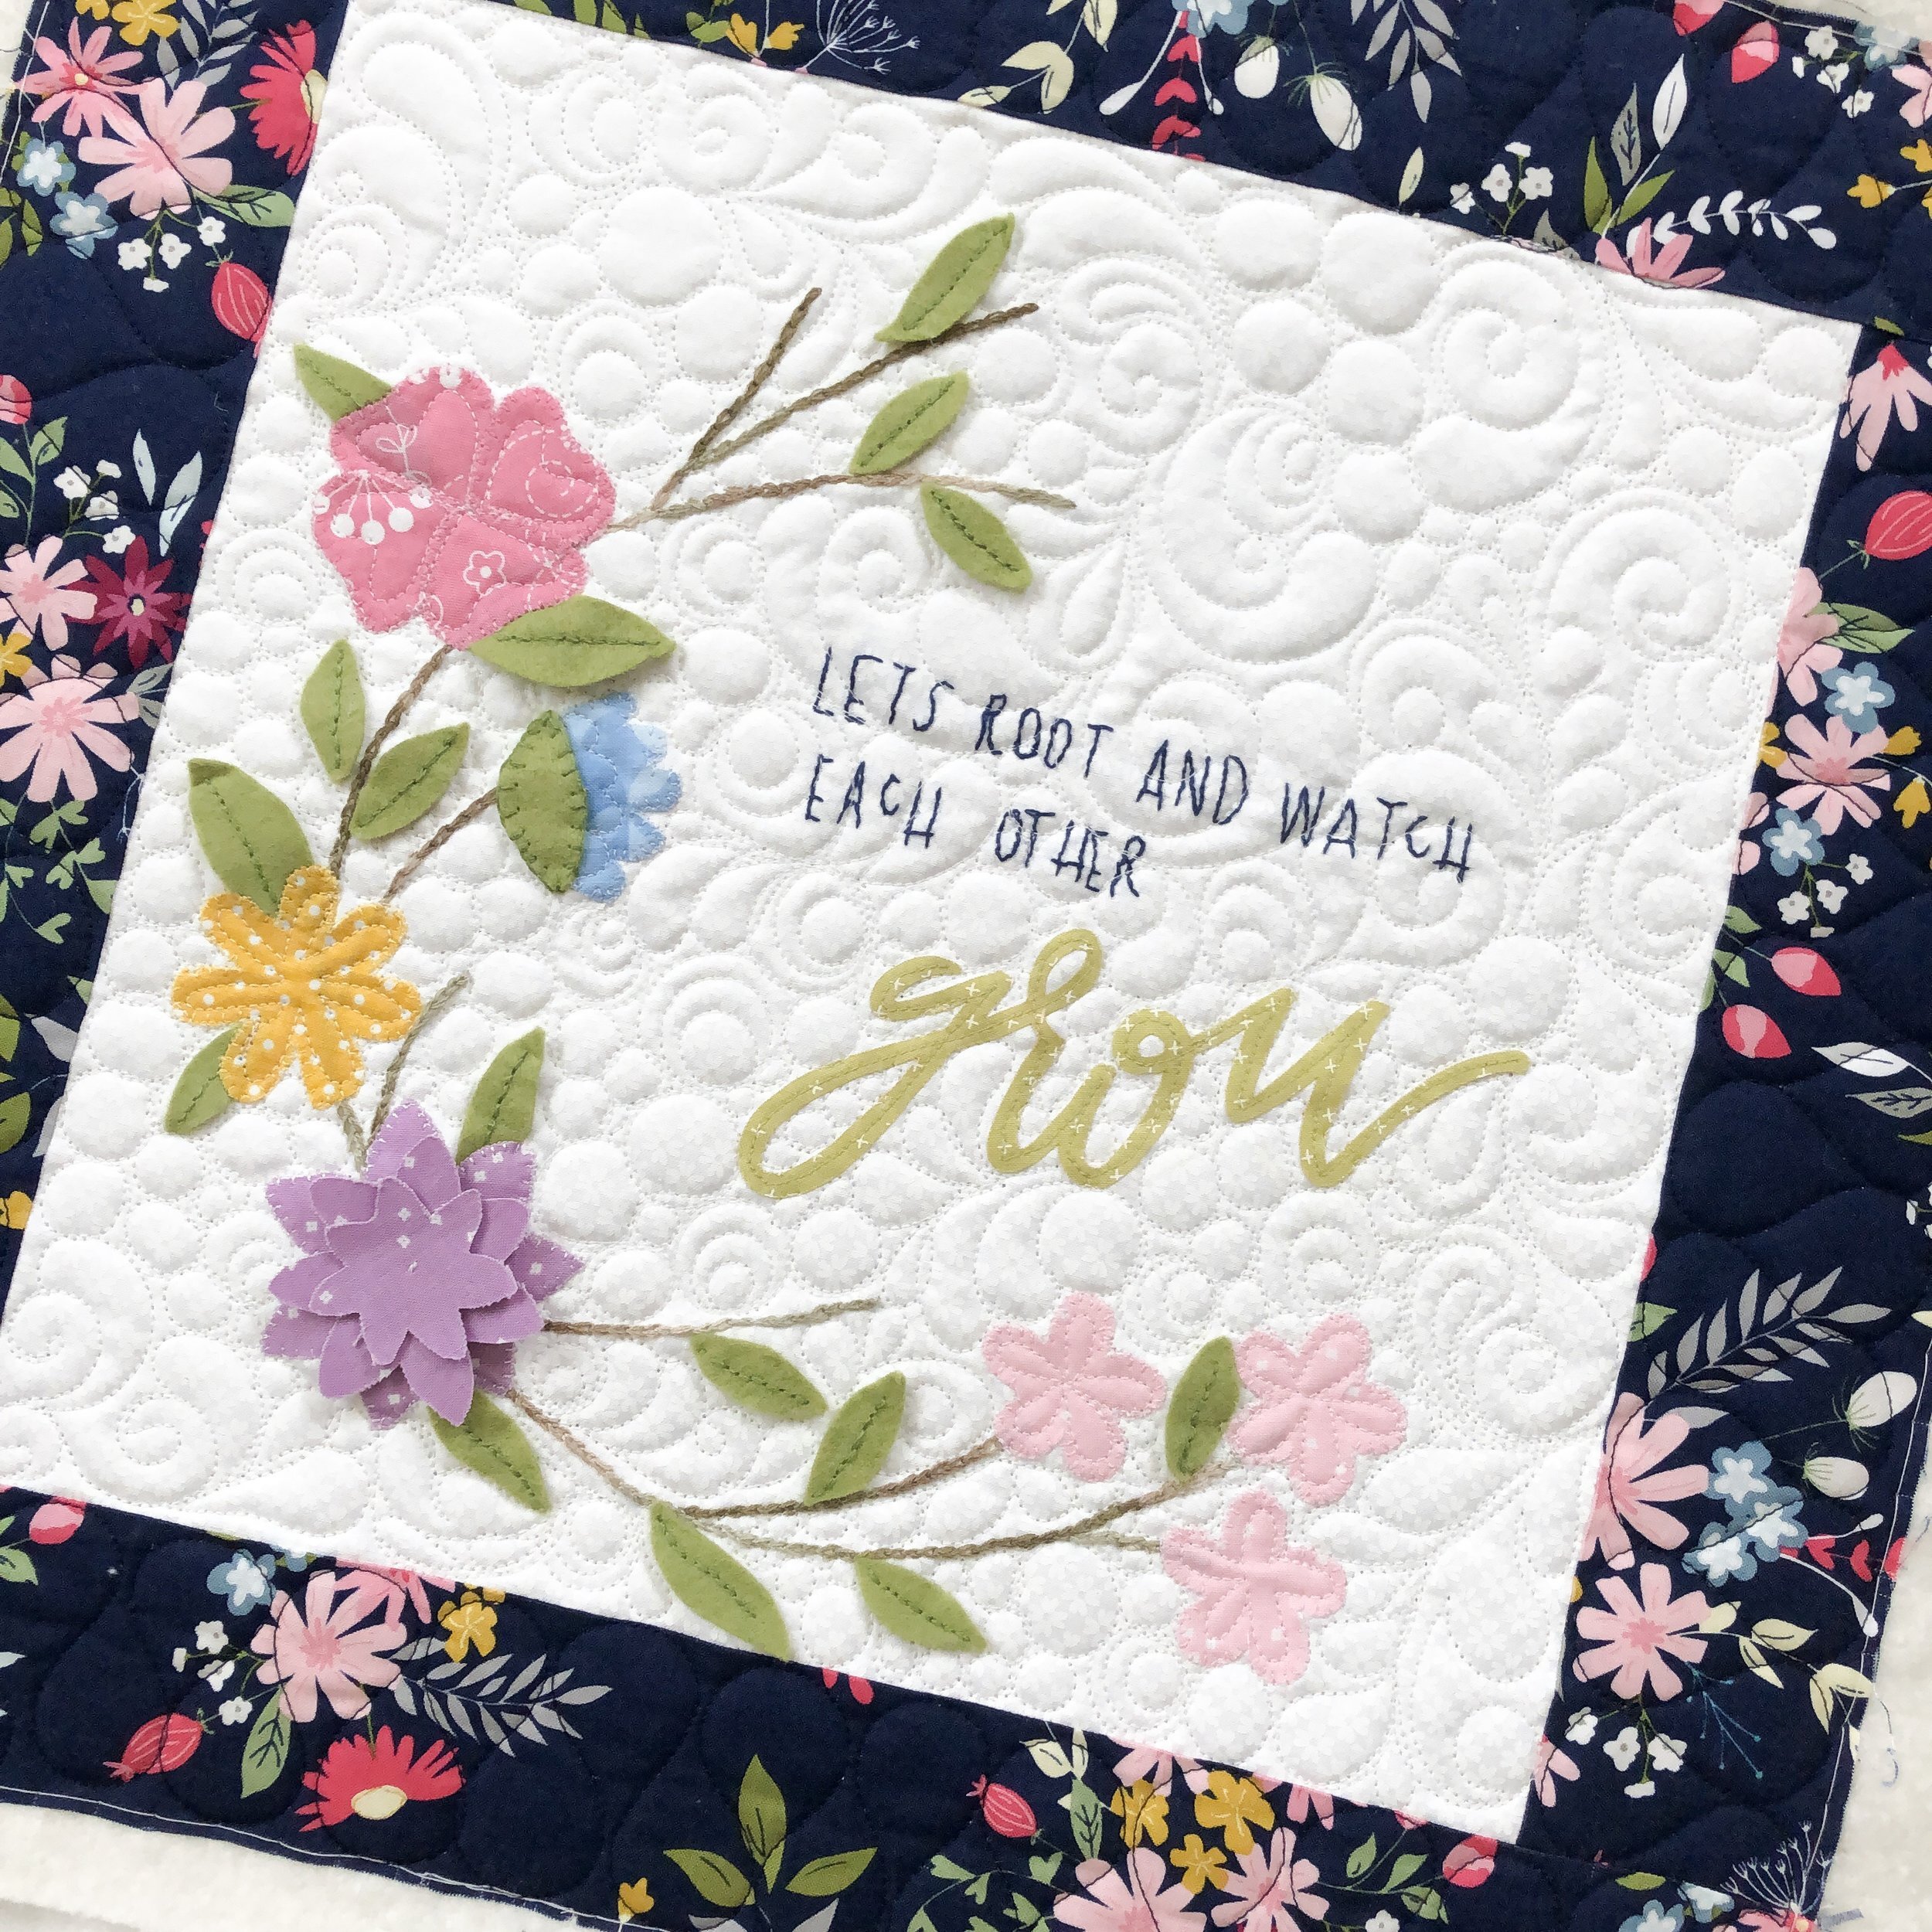
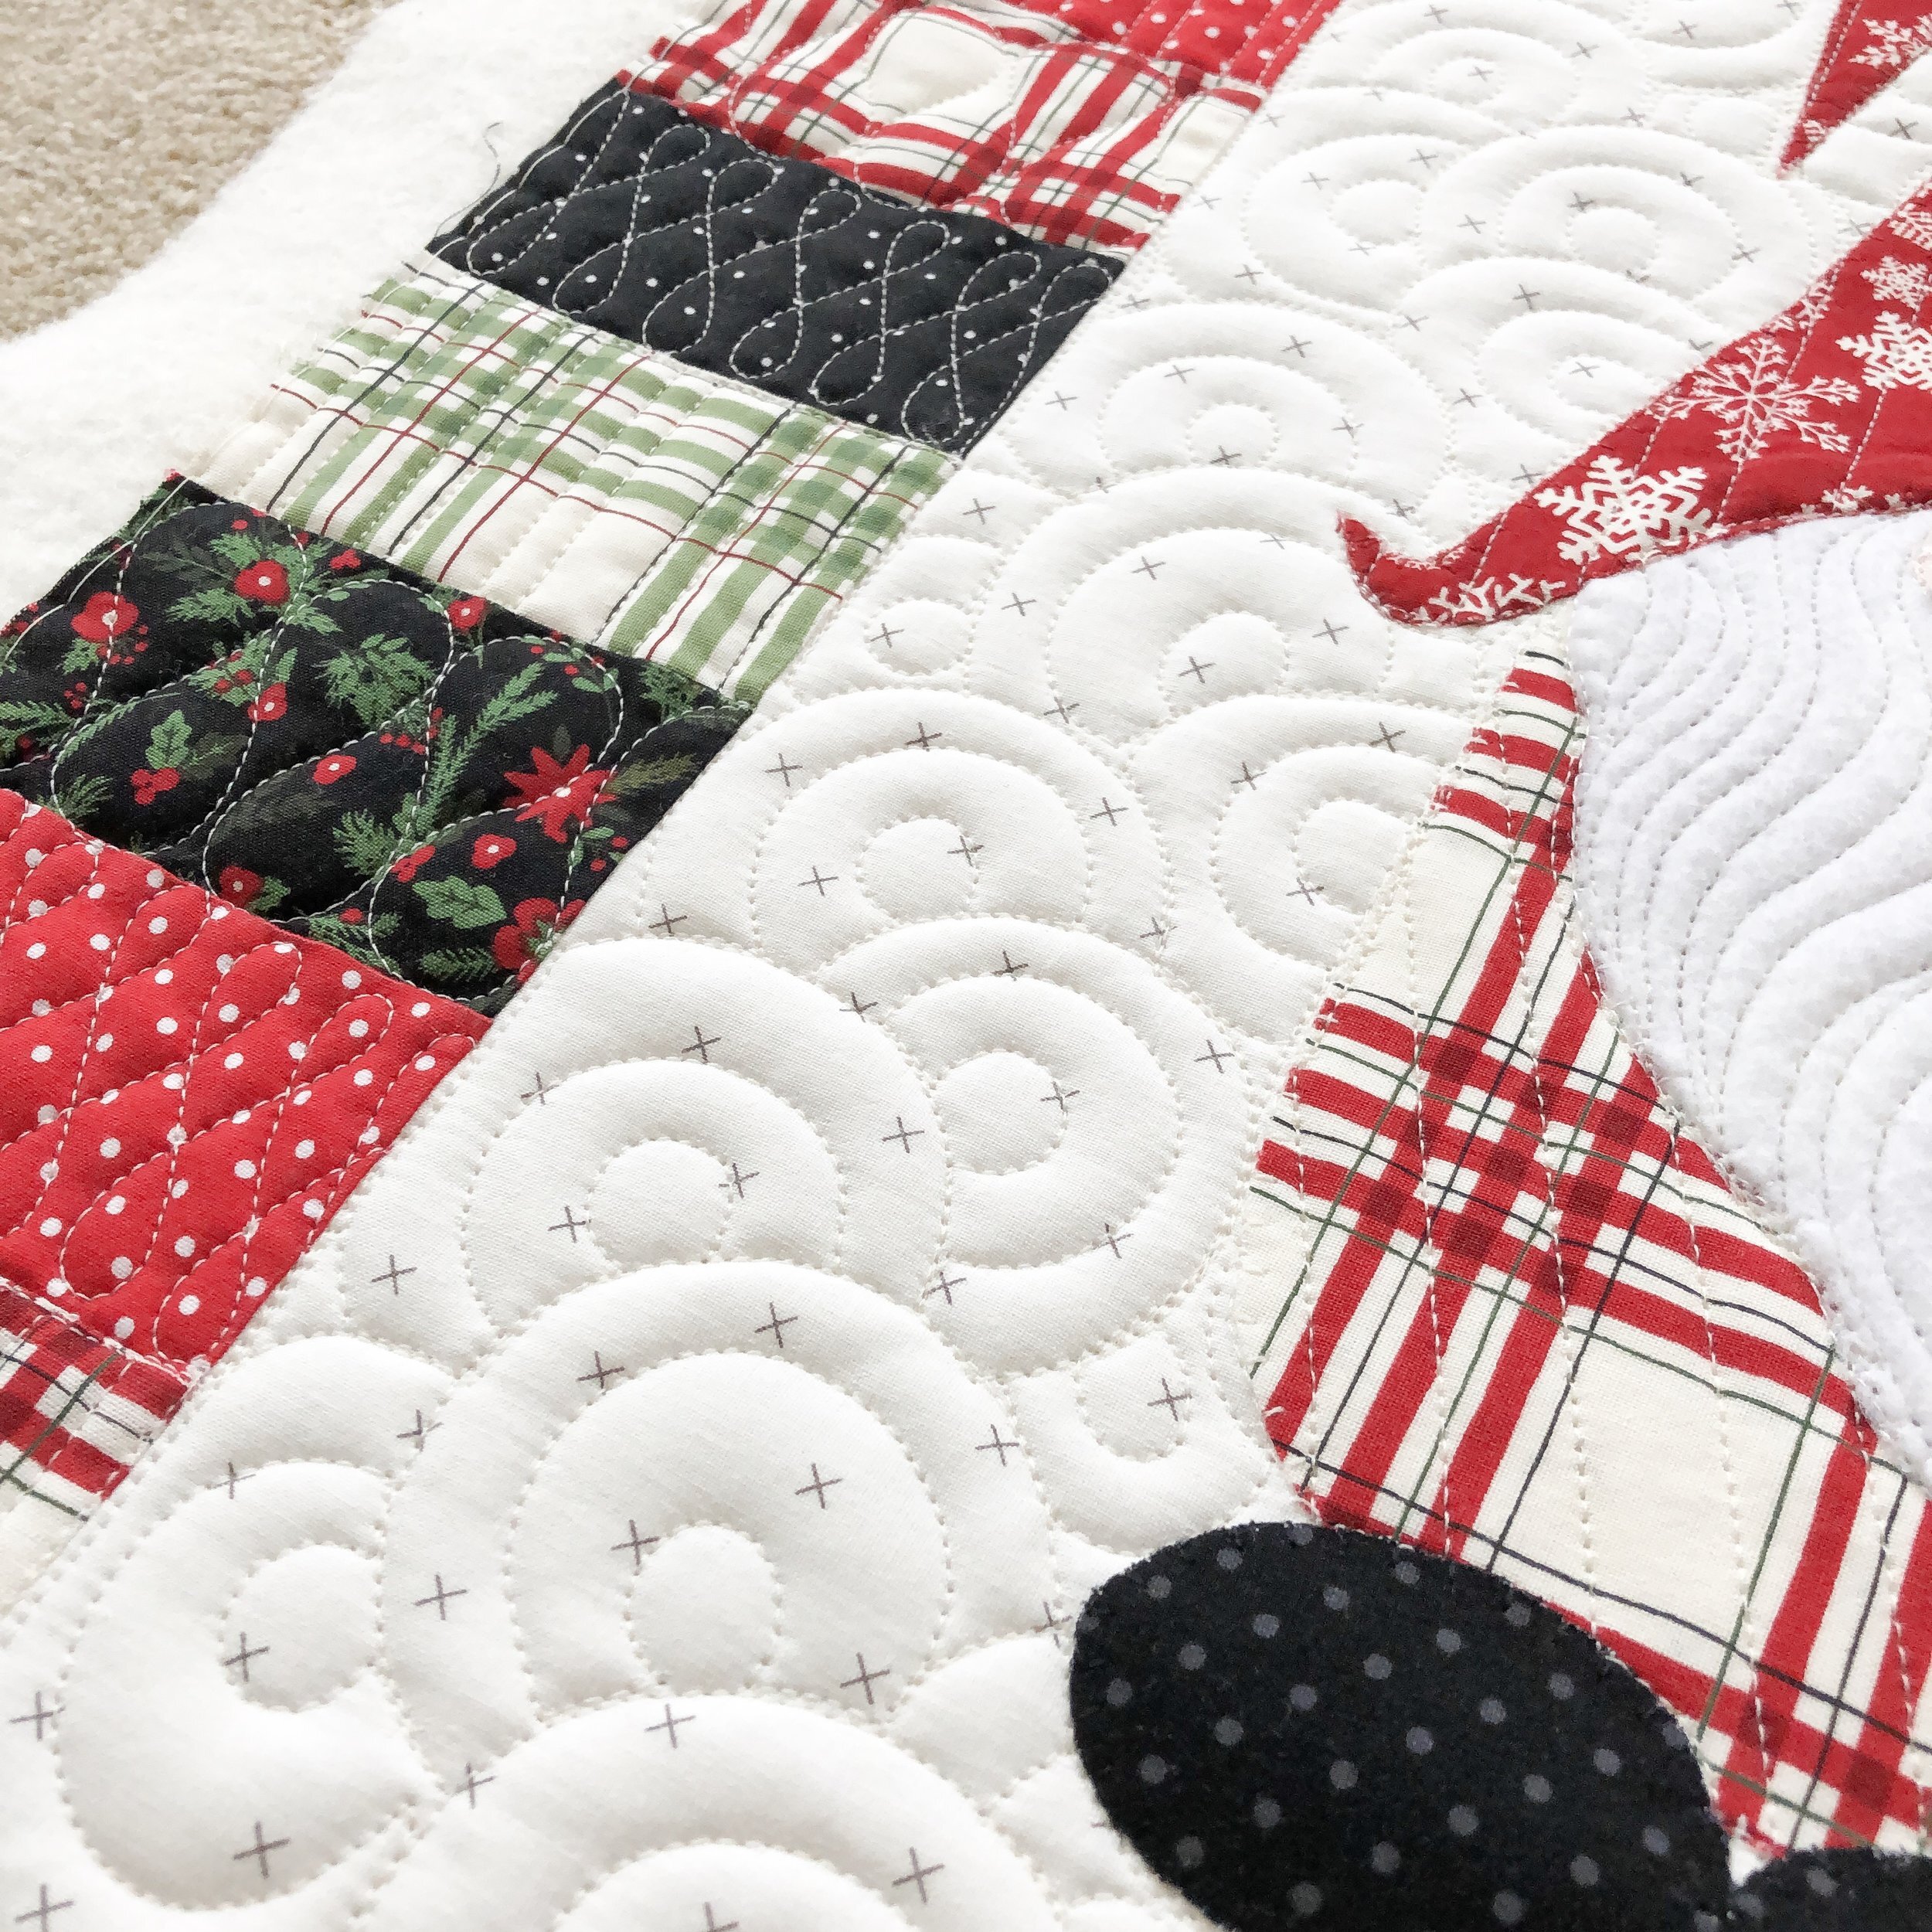
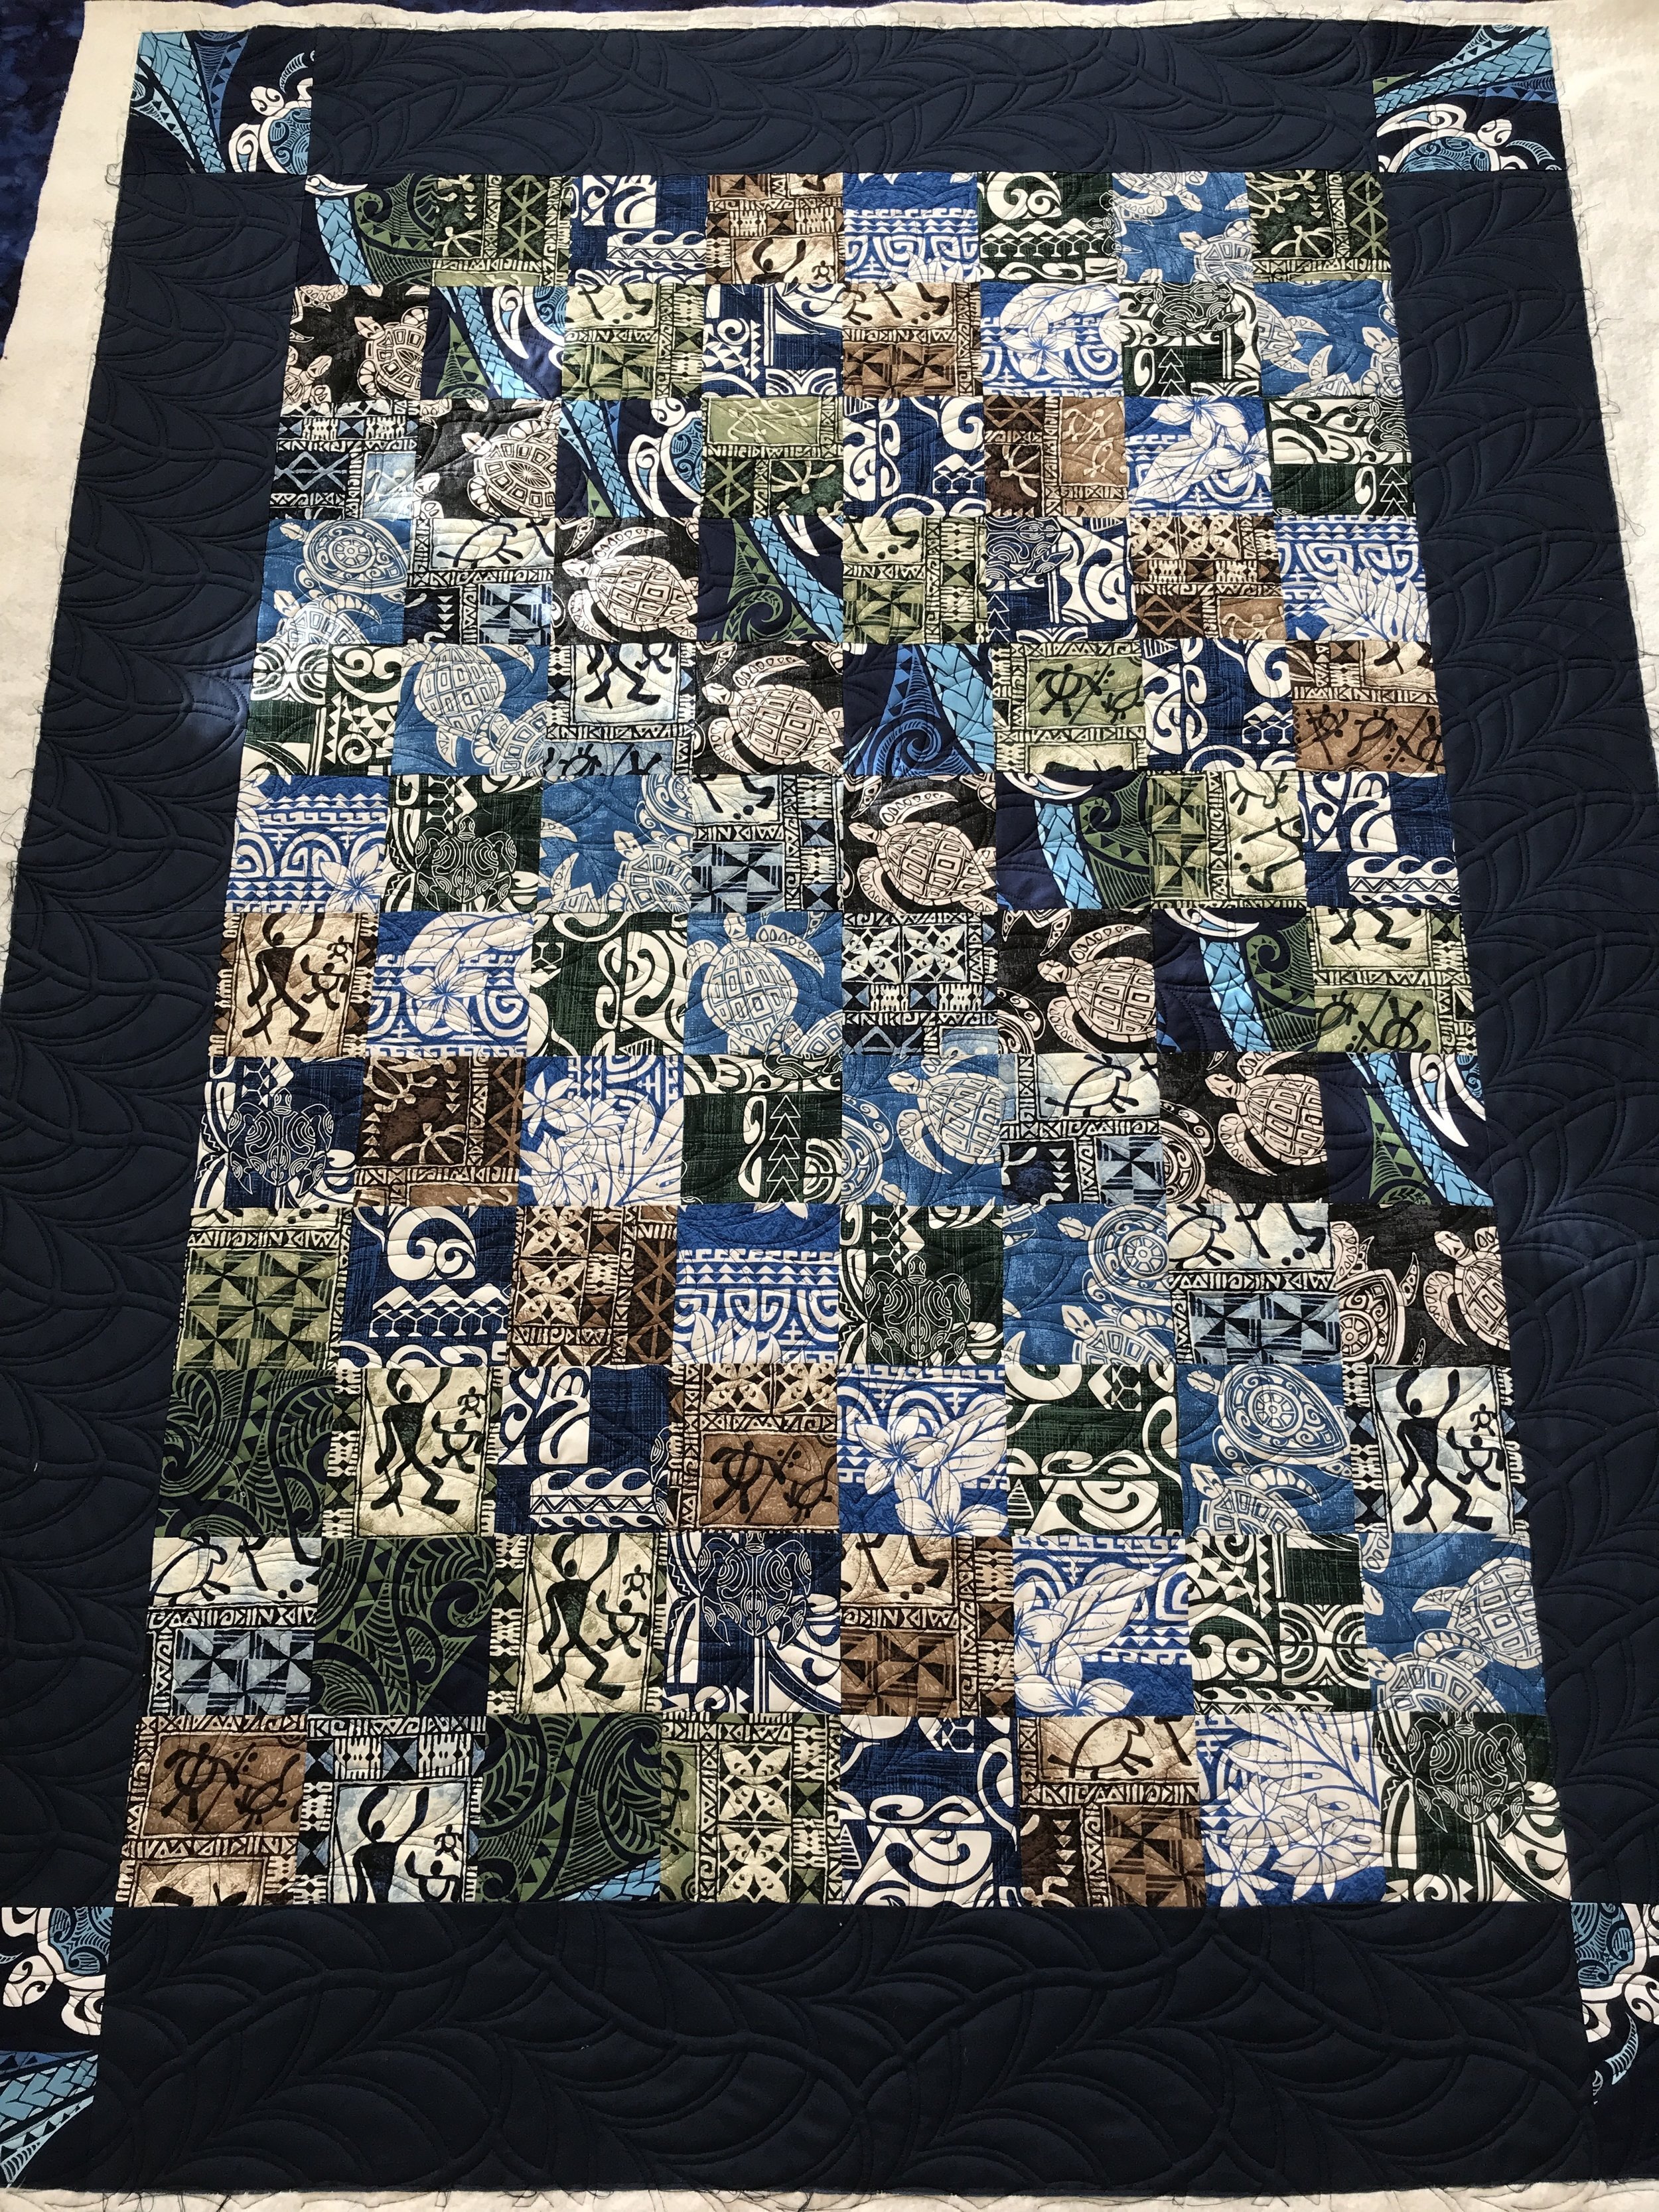
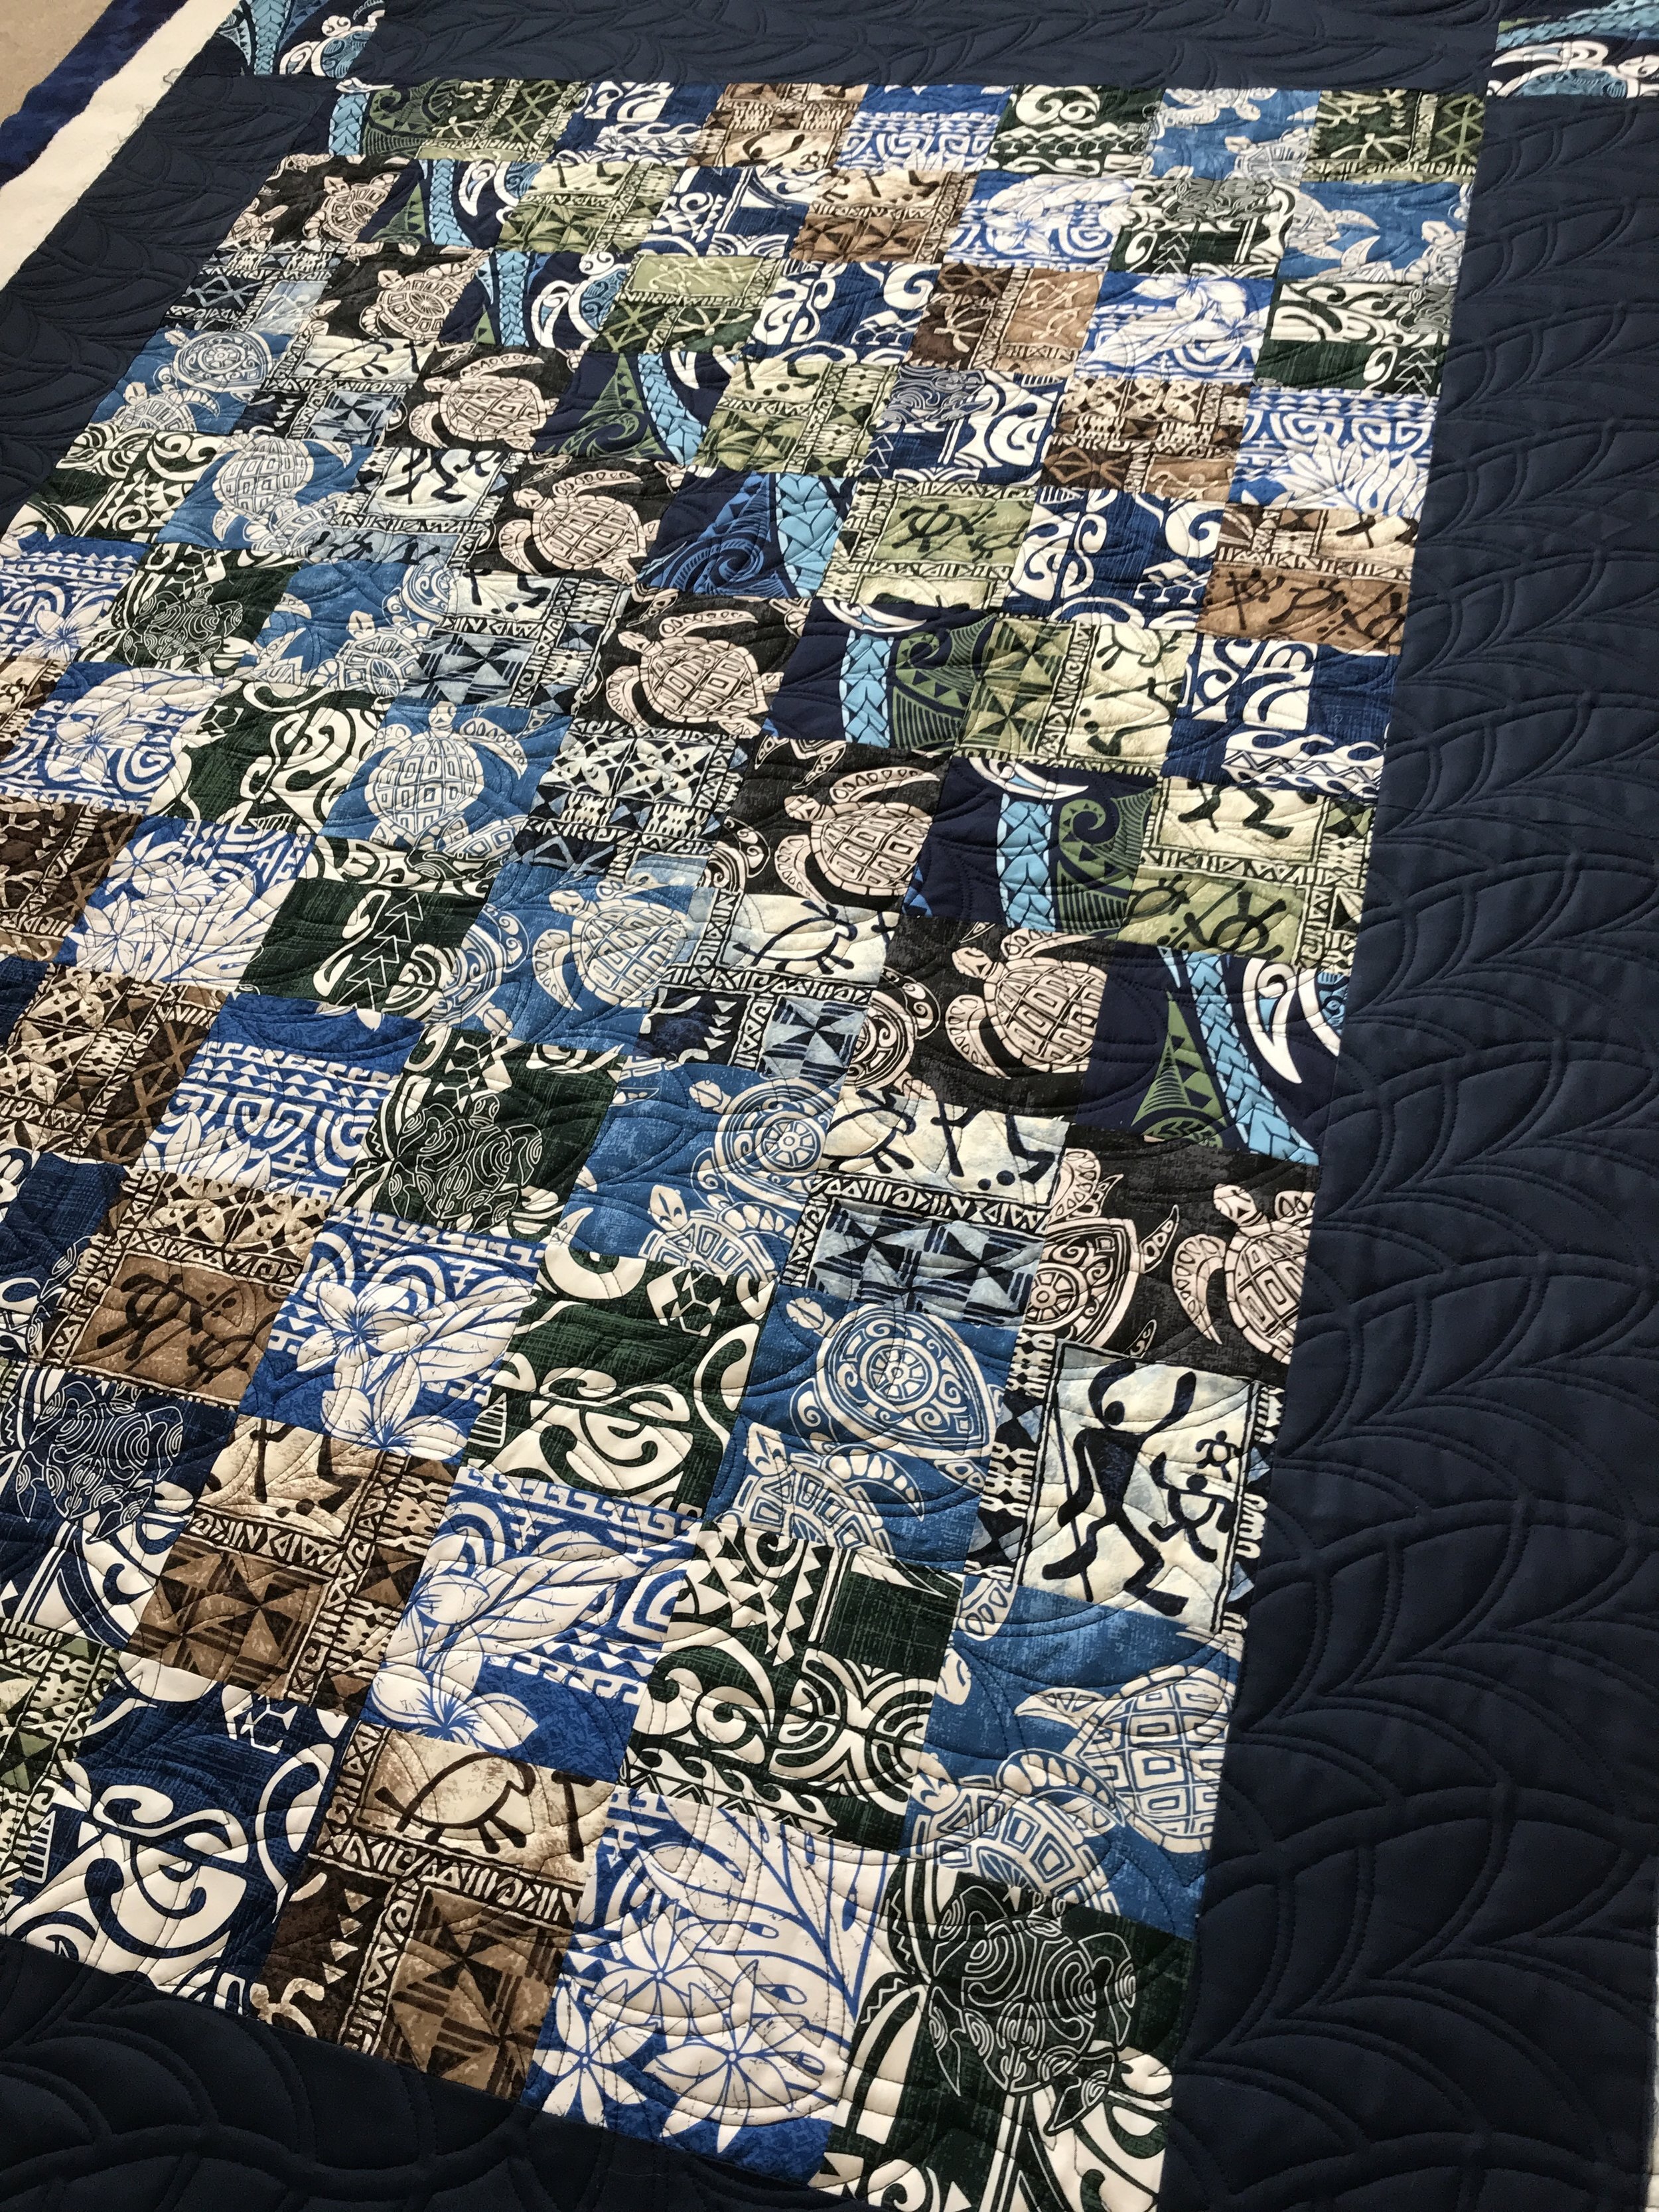
First up...this amazing quilt made by Jeanenne!! It’s called Make Yourself at Home by Kimberbell Designs. This pattern, like several of Kim’s patterns, is available in a machine embroidery or hand embroidery option. Jeanenne did the machine embroidery version.

My goal with the quilting on quilts like this, is to create lots of different textures that compliment one another. Curves, pebbles, lines, ribbon candy, leaves with swirls, and grassy texture. Love it all together!!
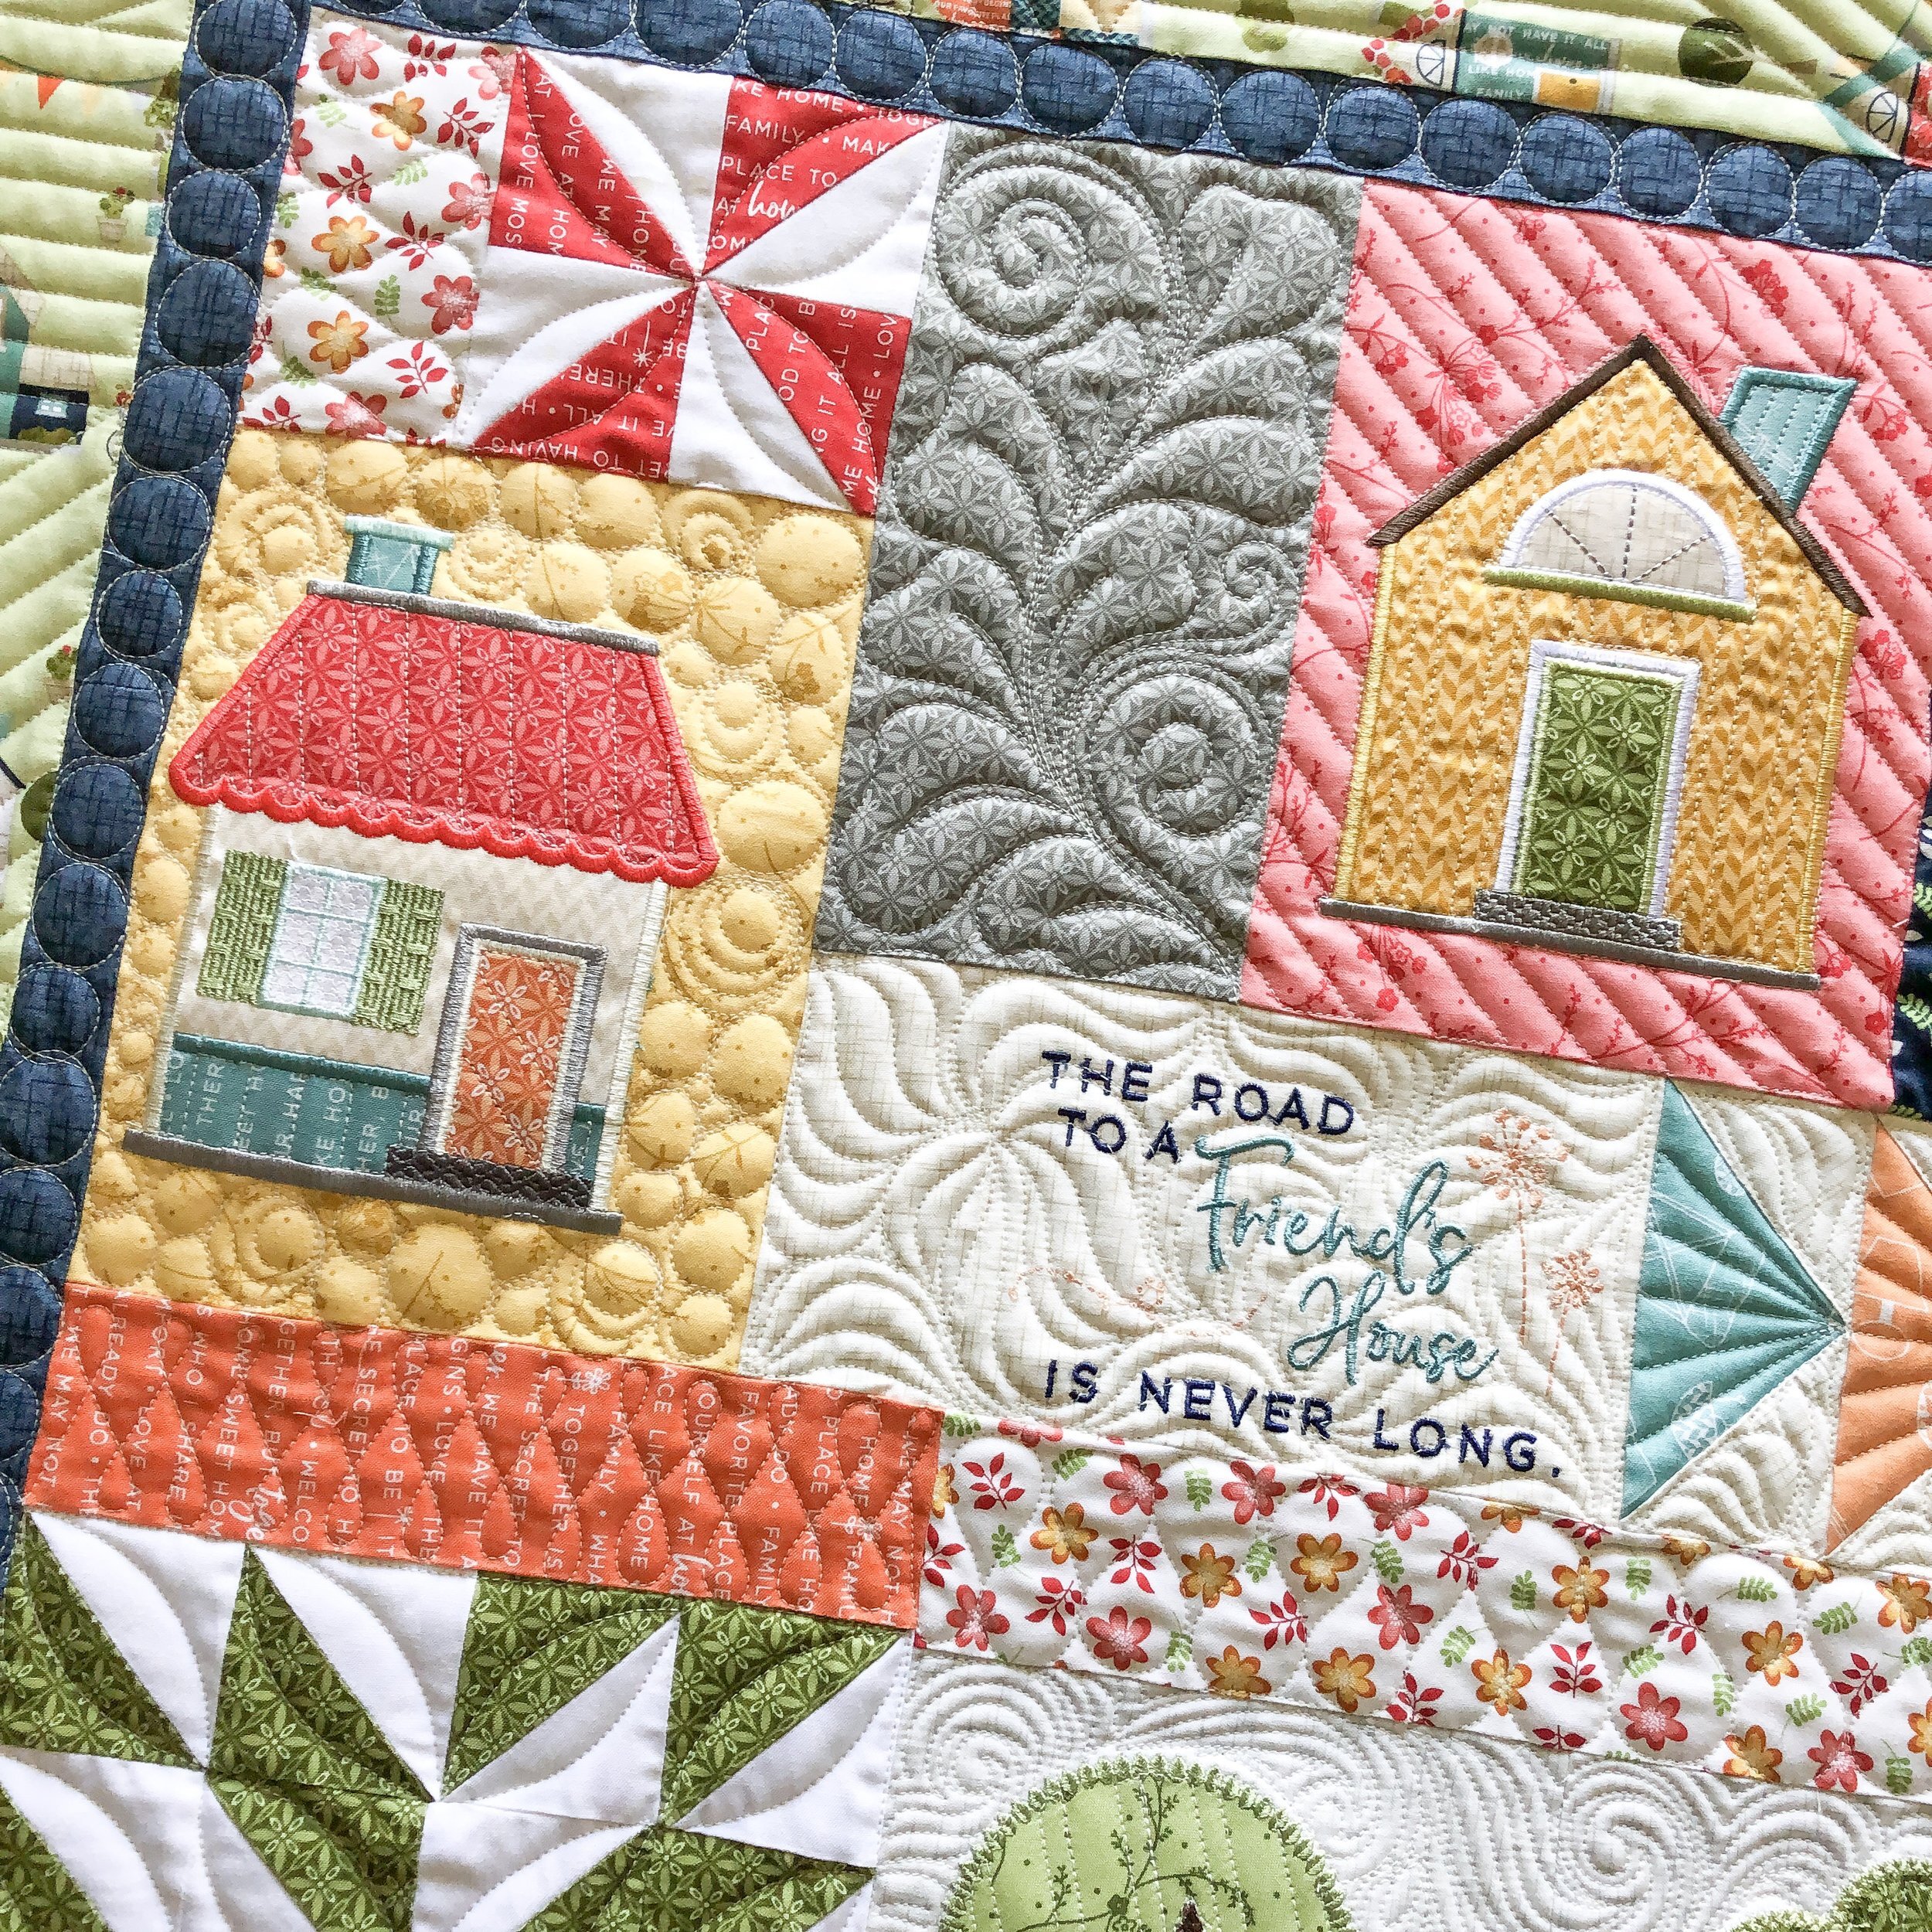
My favorite texture has to be the 1/2” inch random angular lines in the border. I just love doing that on a border. It makes such a statement. I used Edge rulers from Linda at The Quilted Pineapple, to quilt the lines. I did a video tutorial on quilting out these lines awhile back. Head here to check it out: https://youtu.be/m5UXfRD_ujY
Its also a great way to fill a large border, or random borders and sashing like I did in the video.
Aren’t all those different angles so fun!! Yes, I do them randomly. No need to mark anything, just vary the angles from the ones you’ve already quilted.

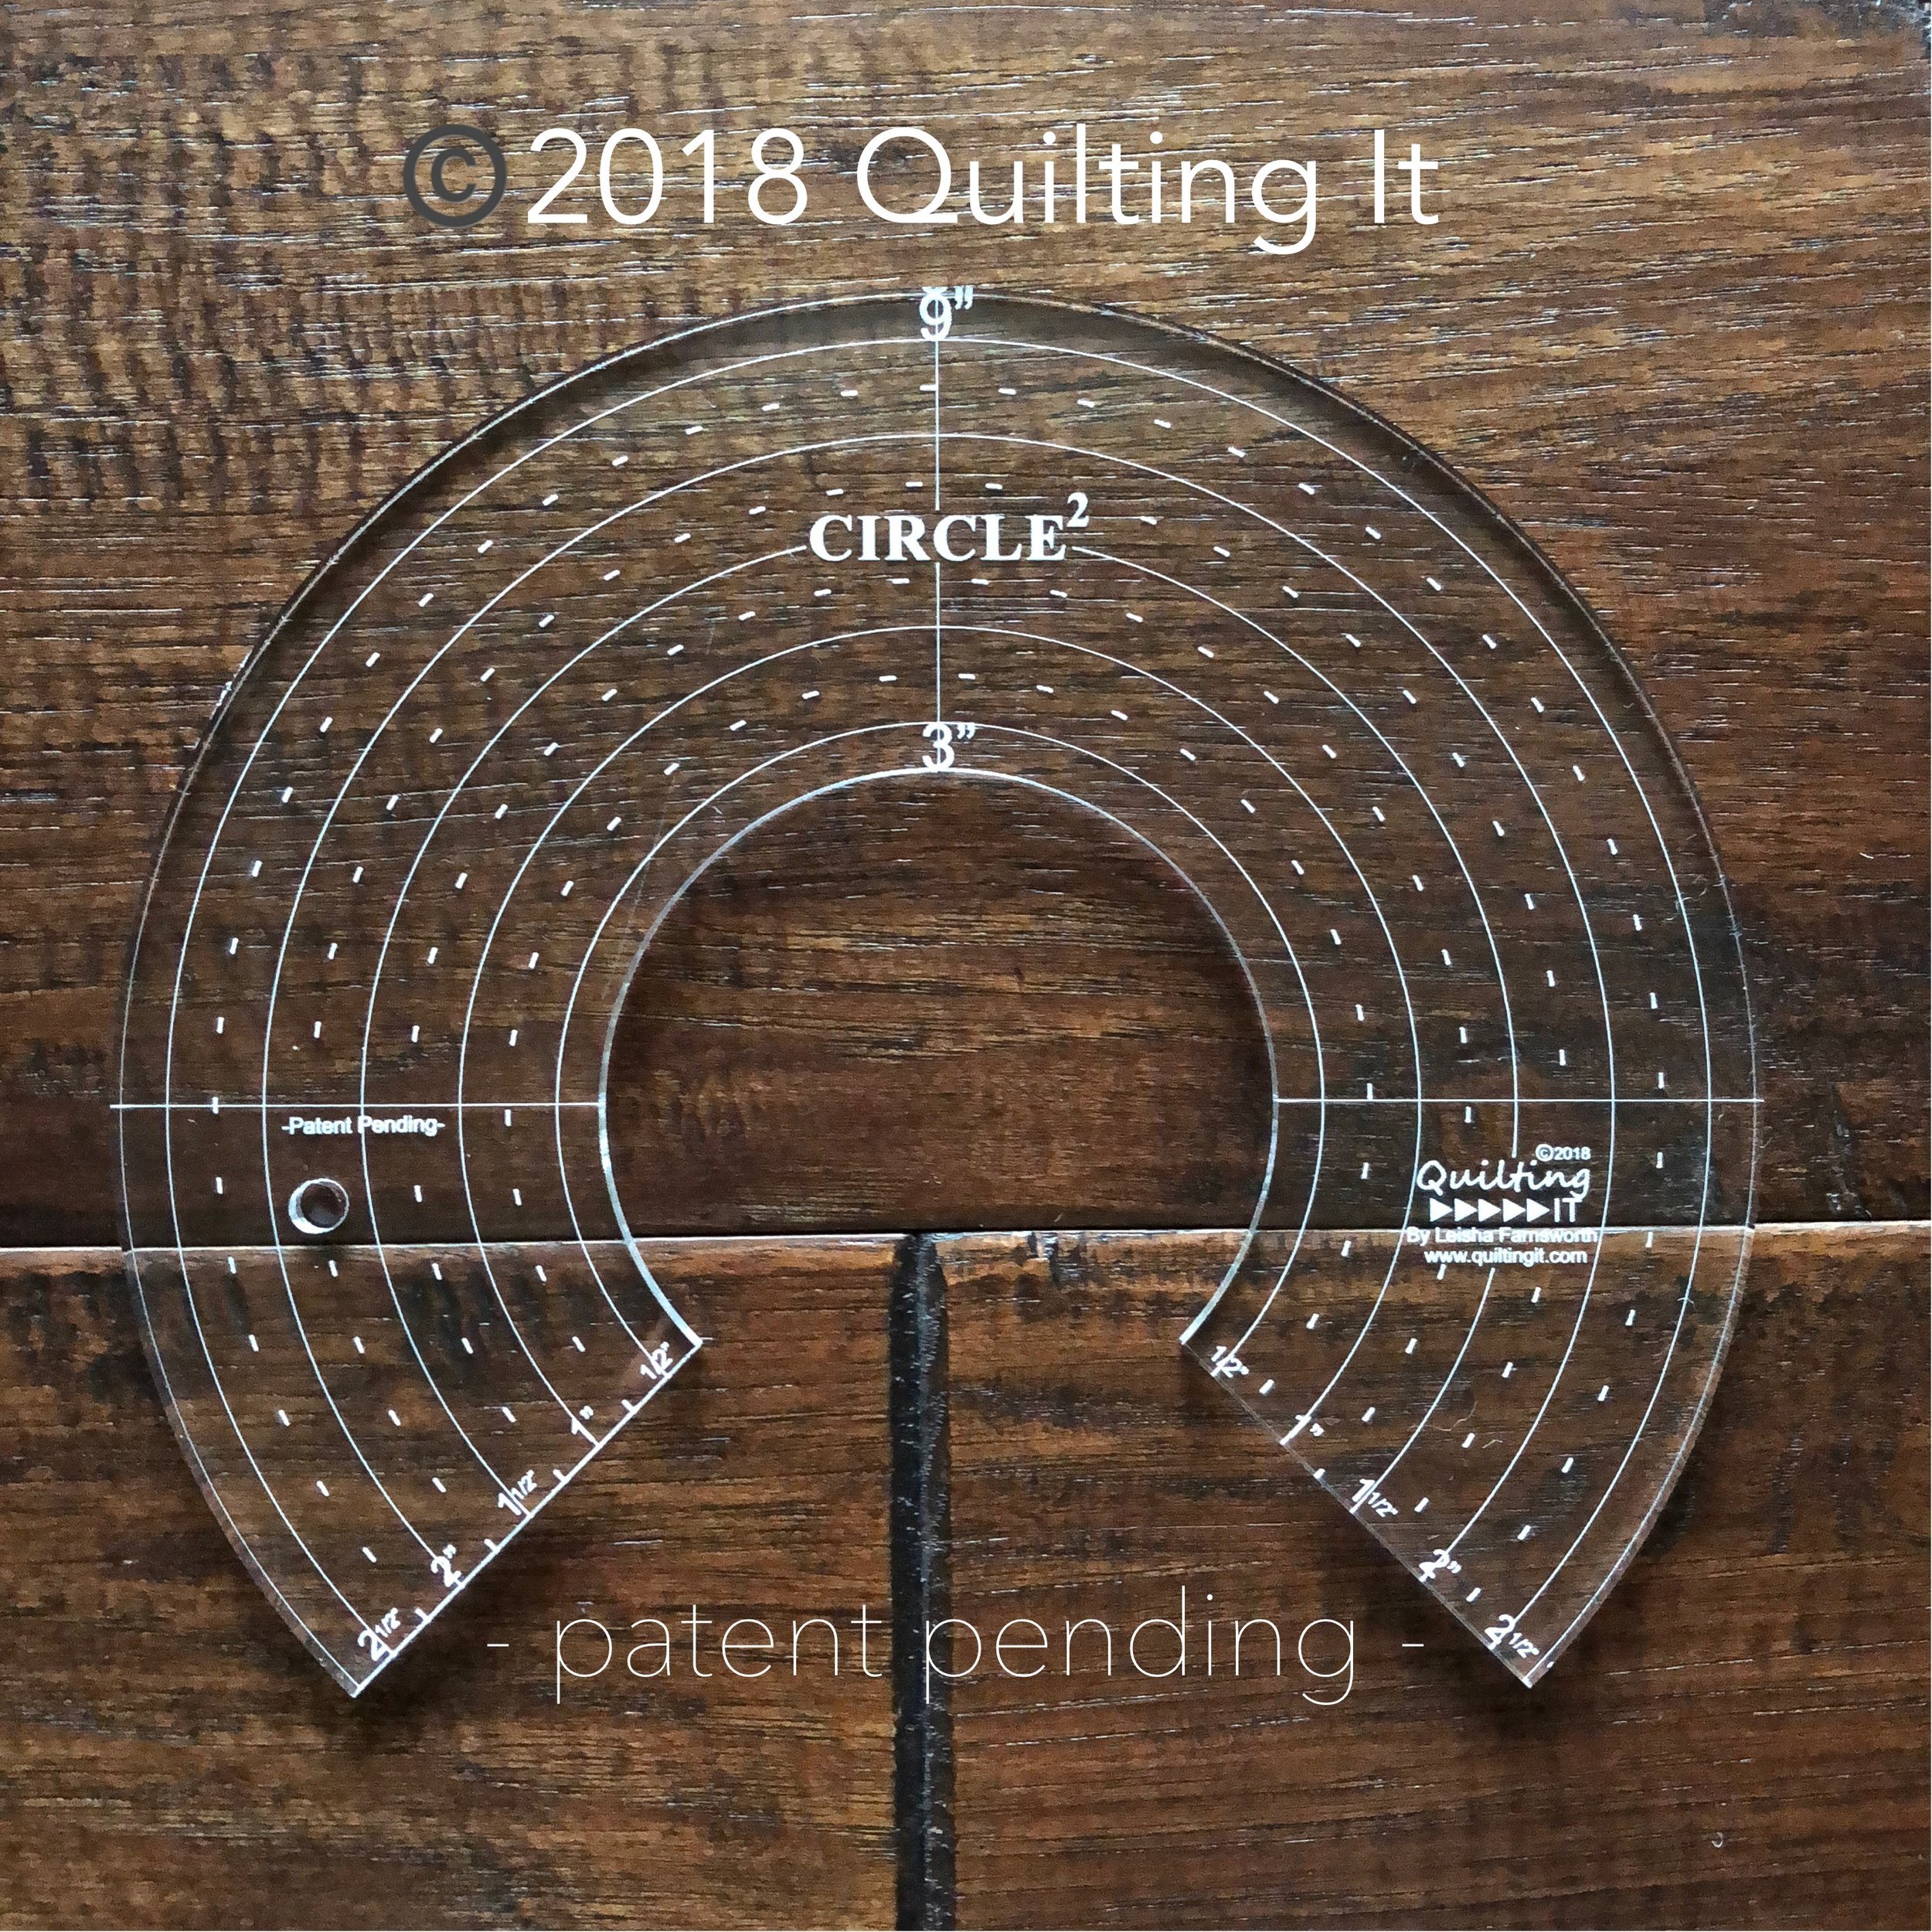
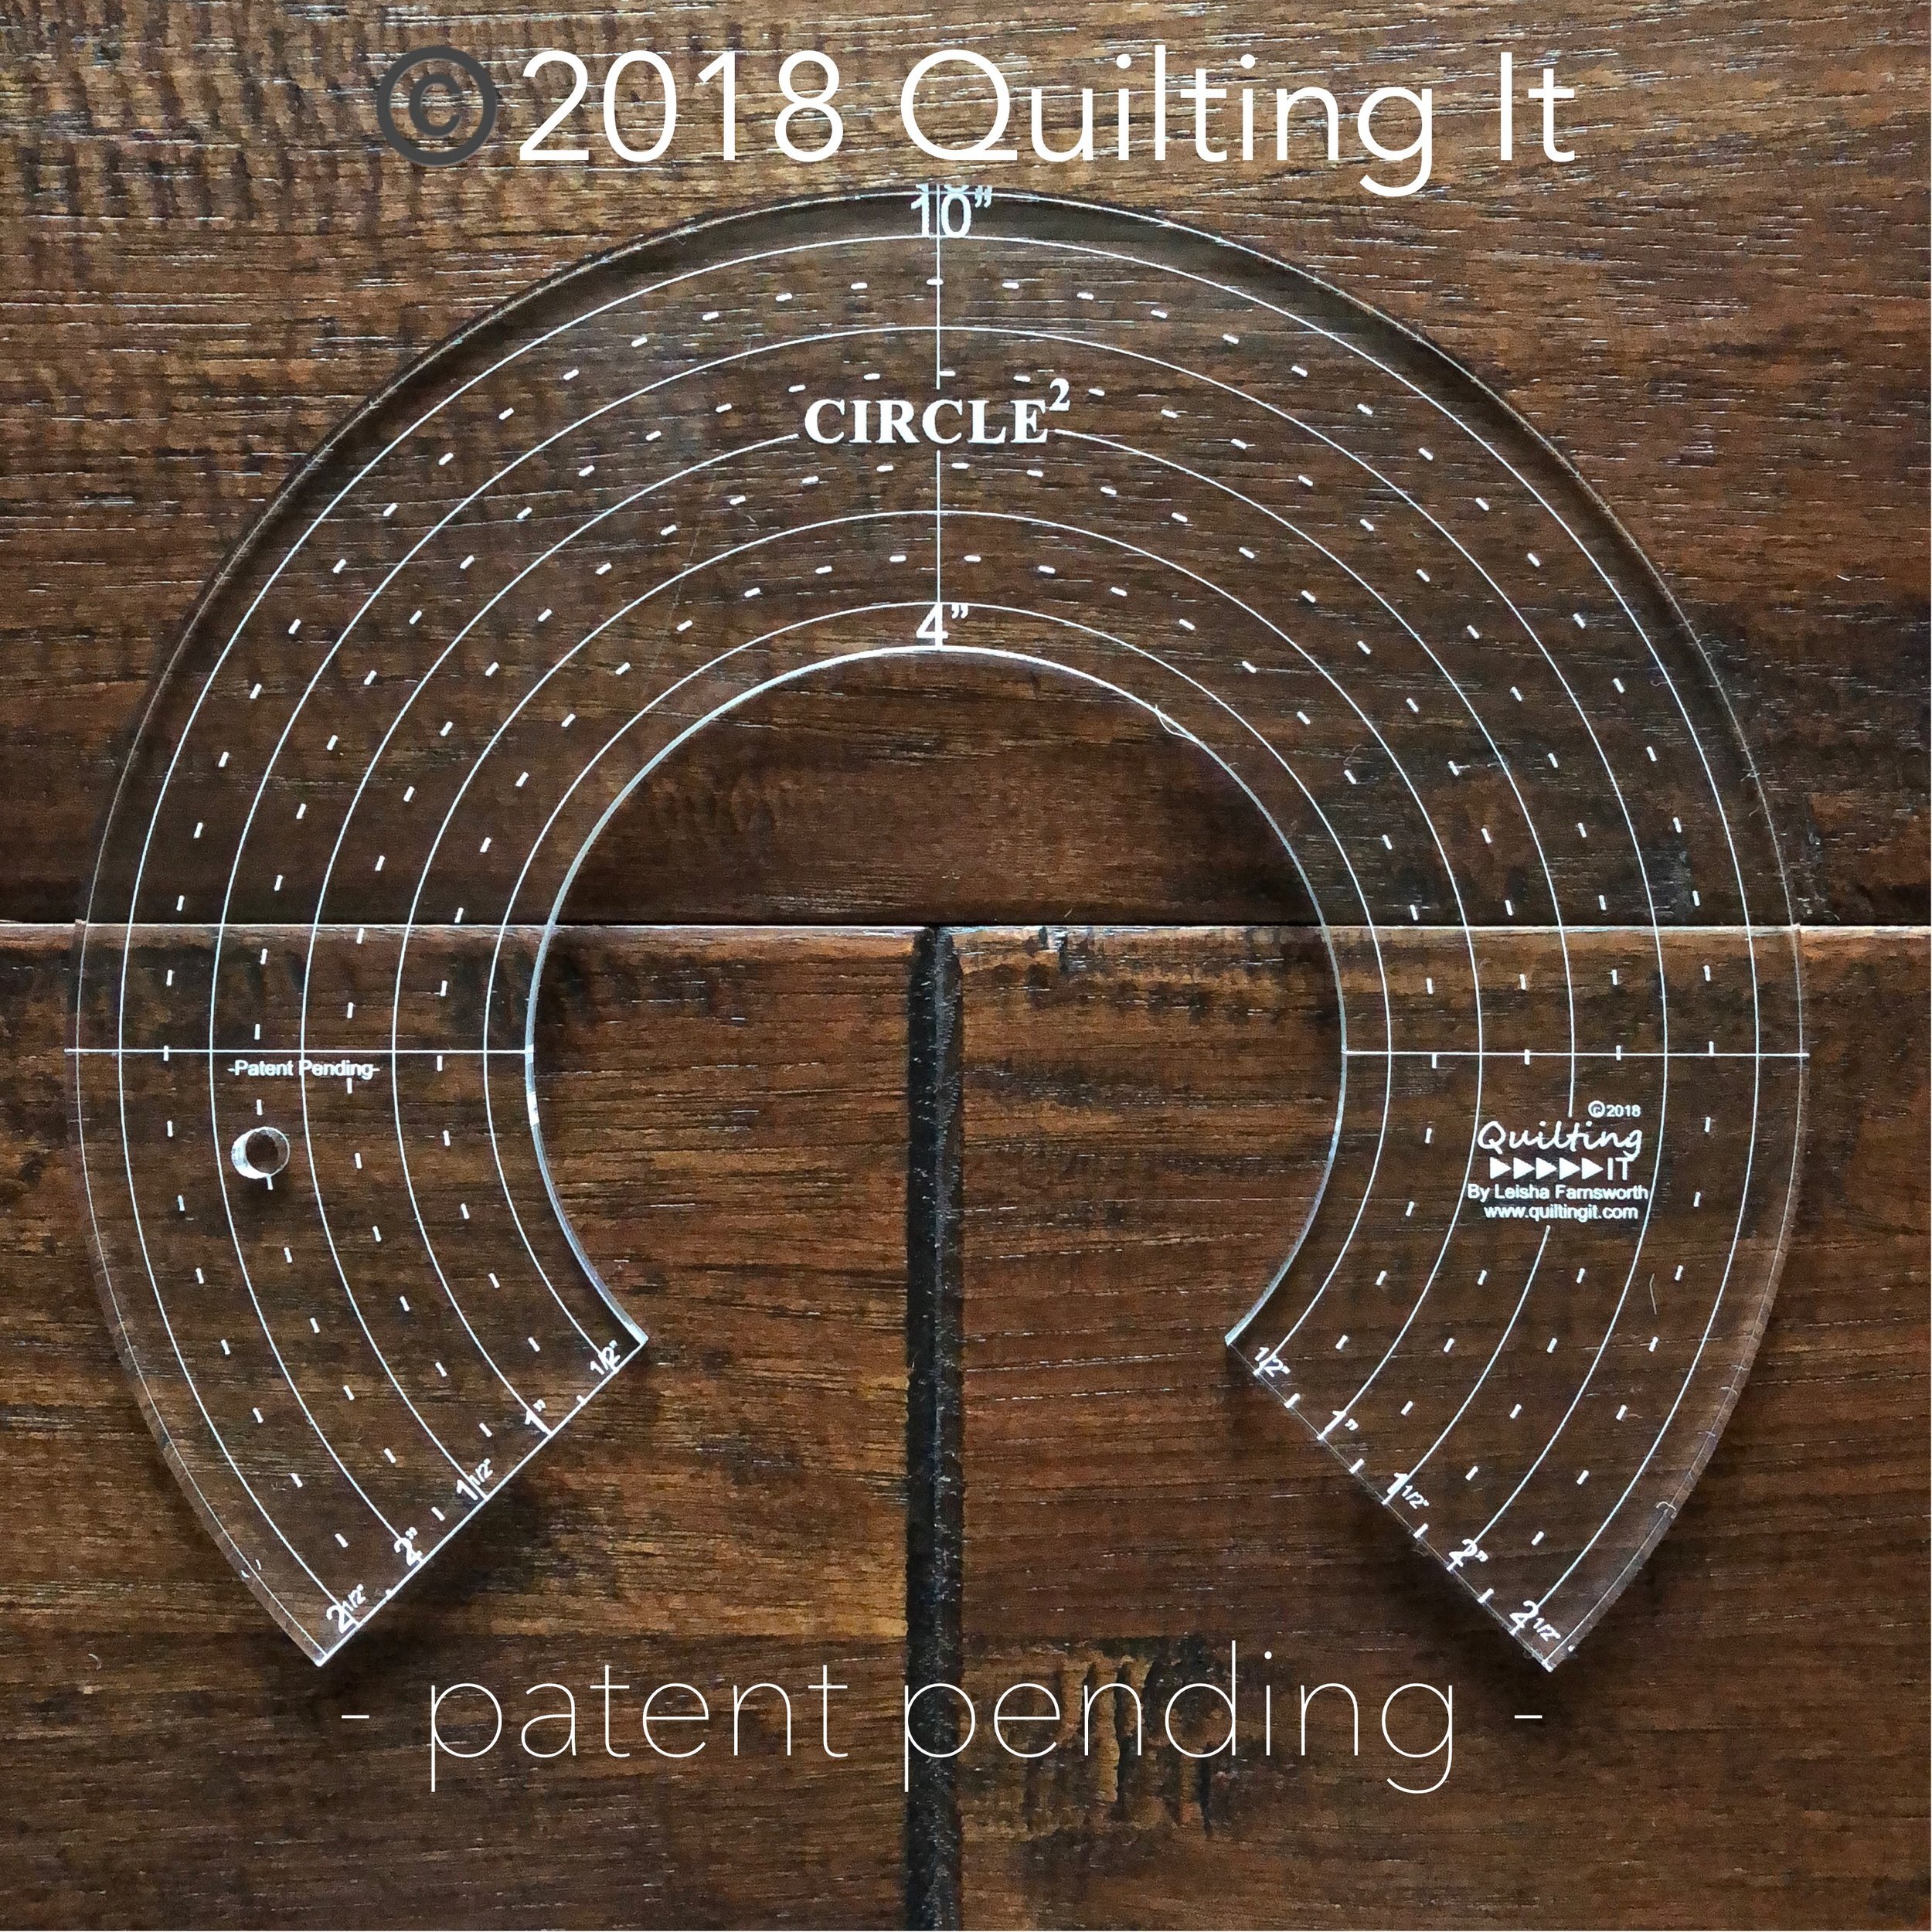
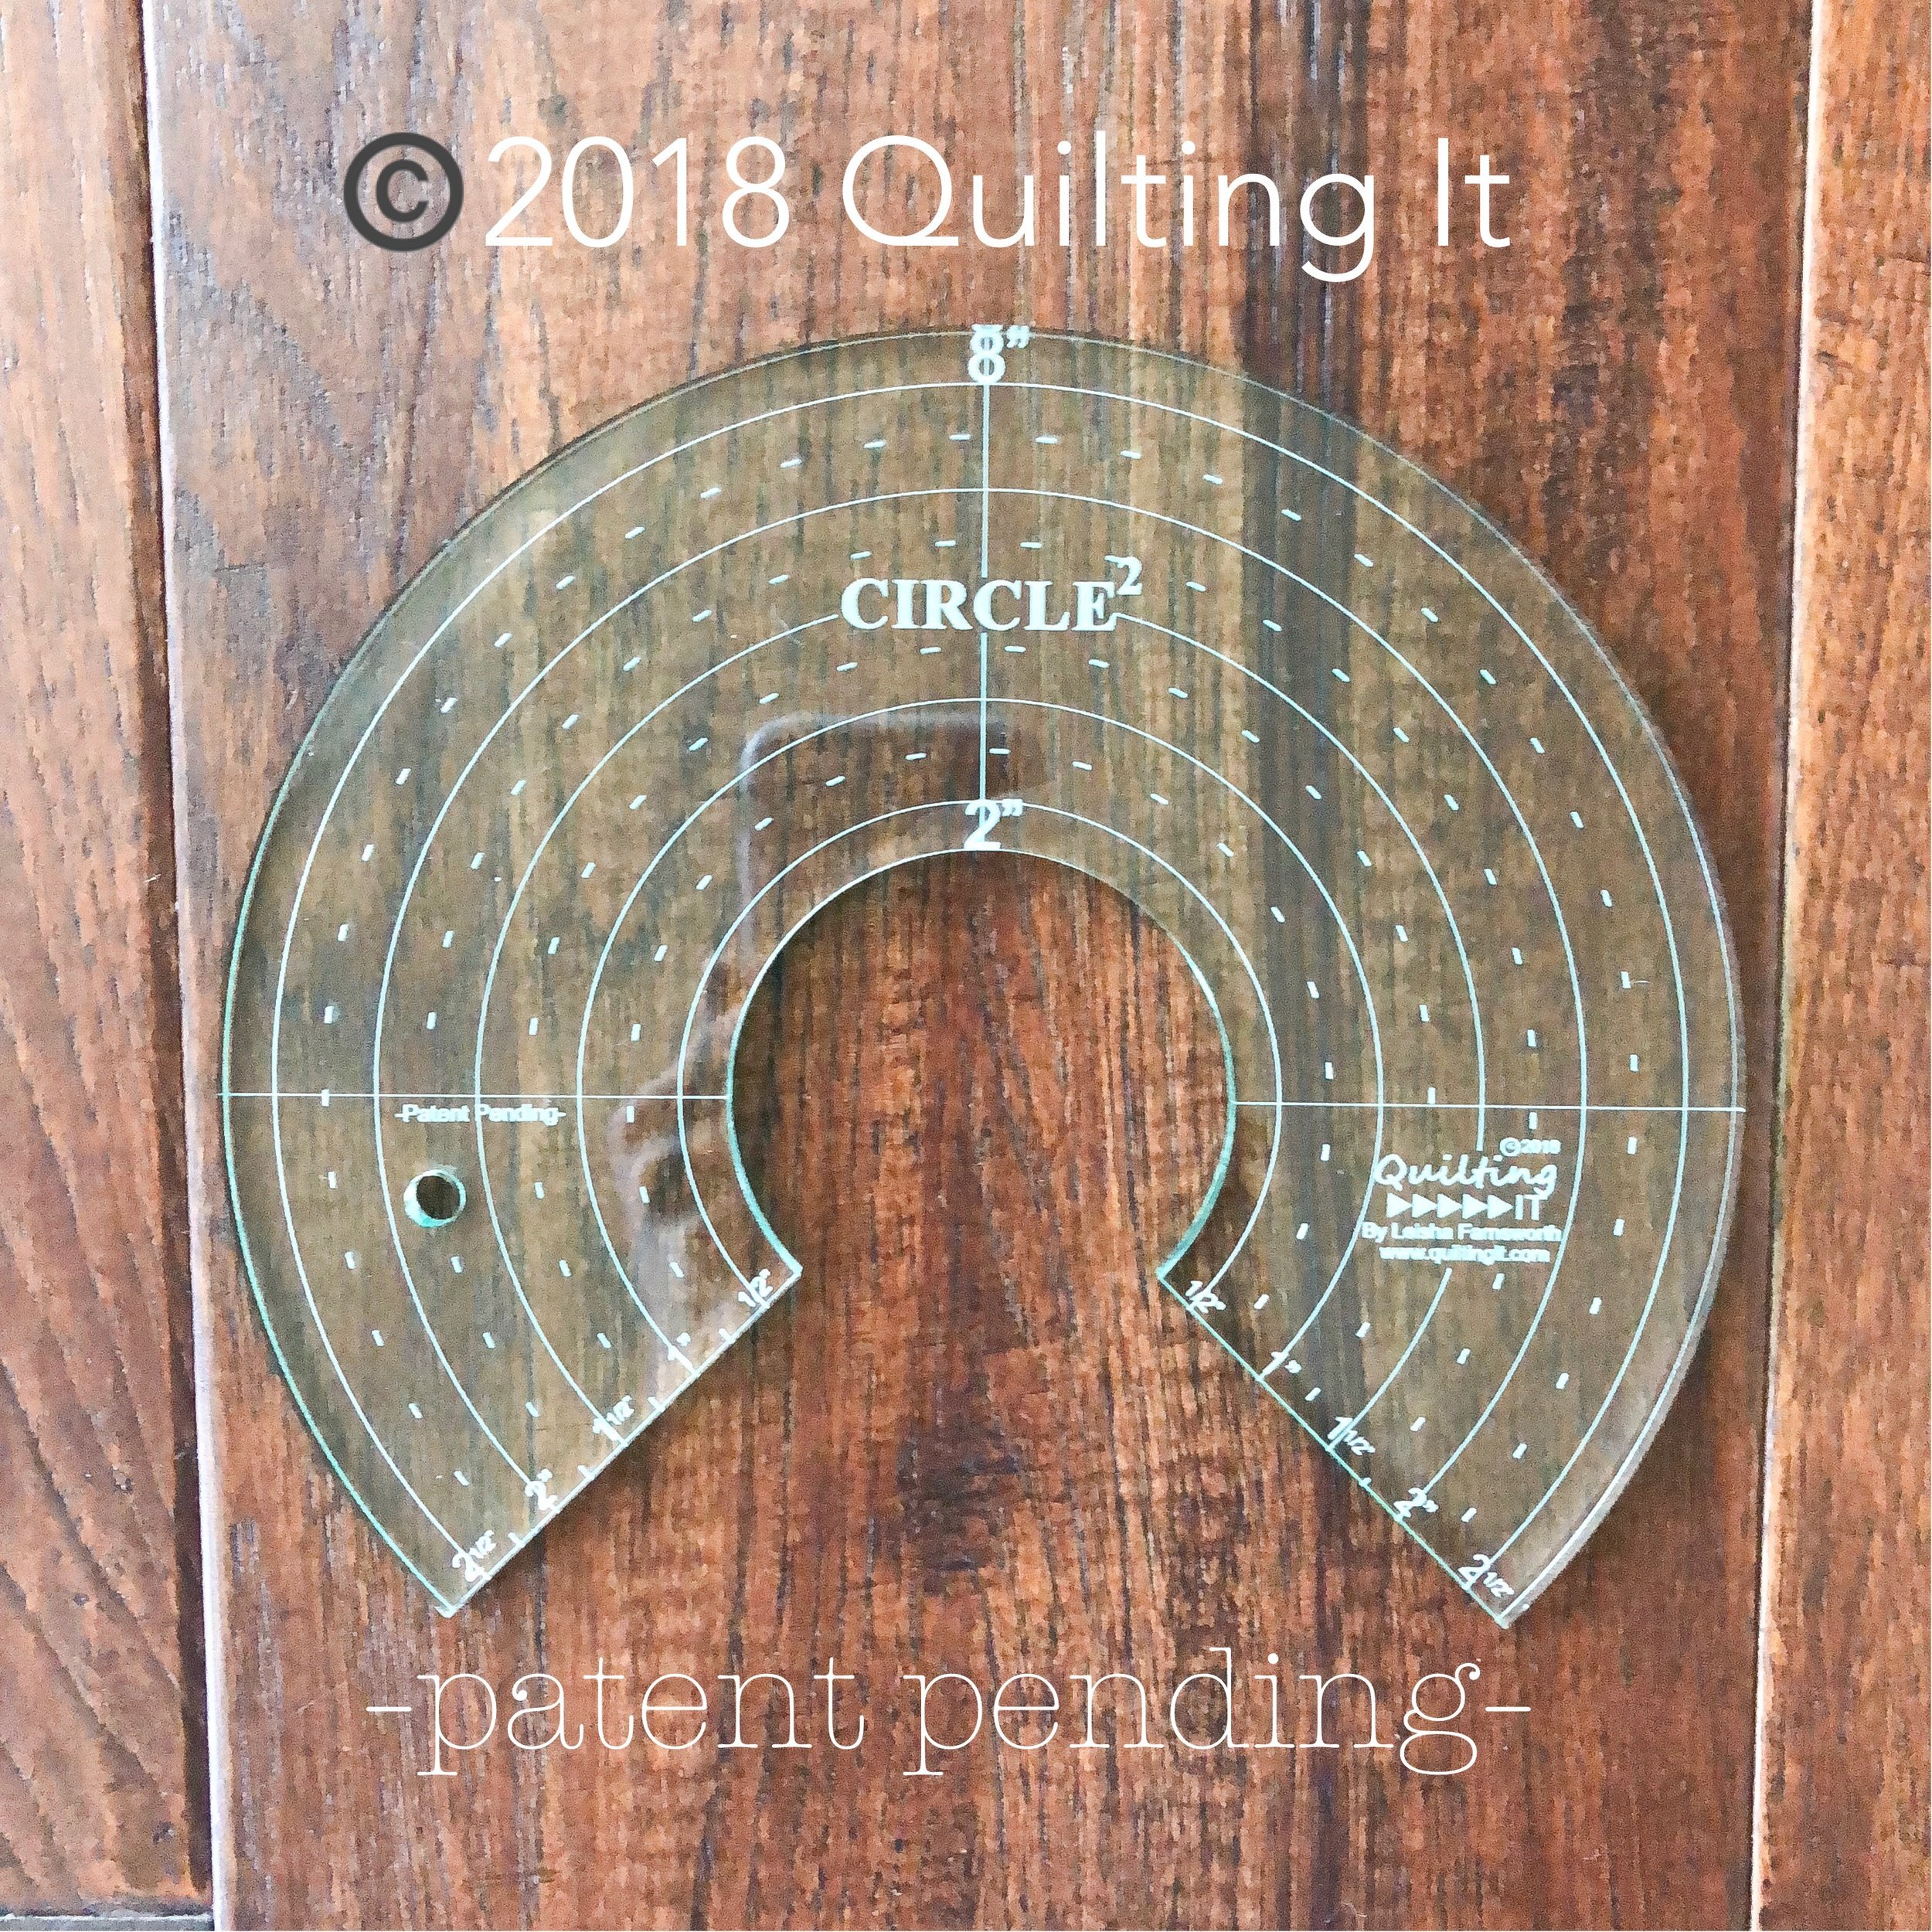
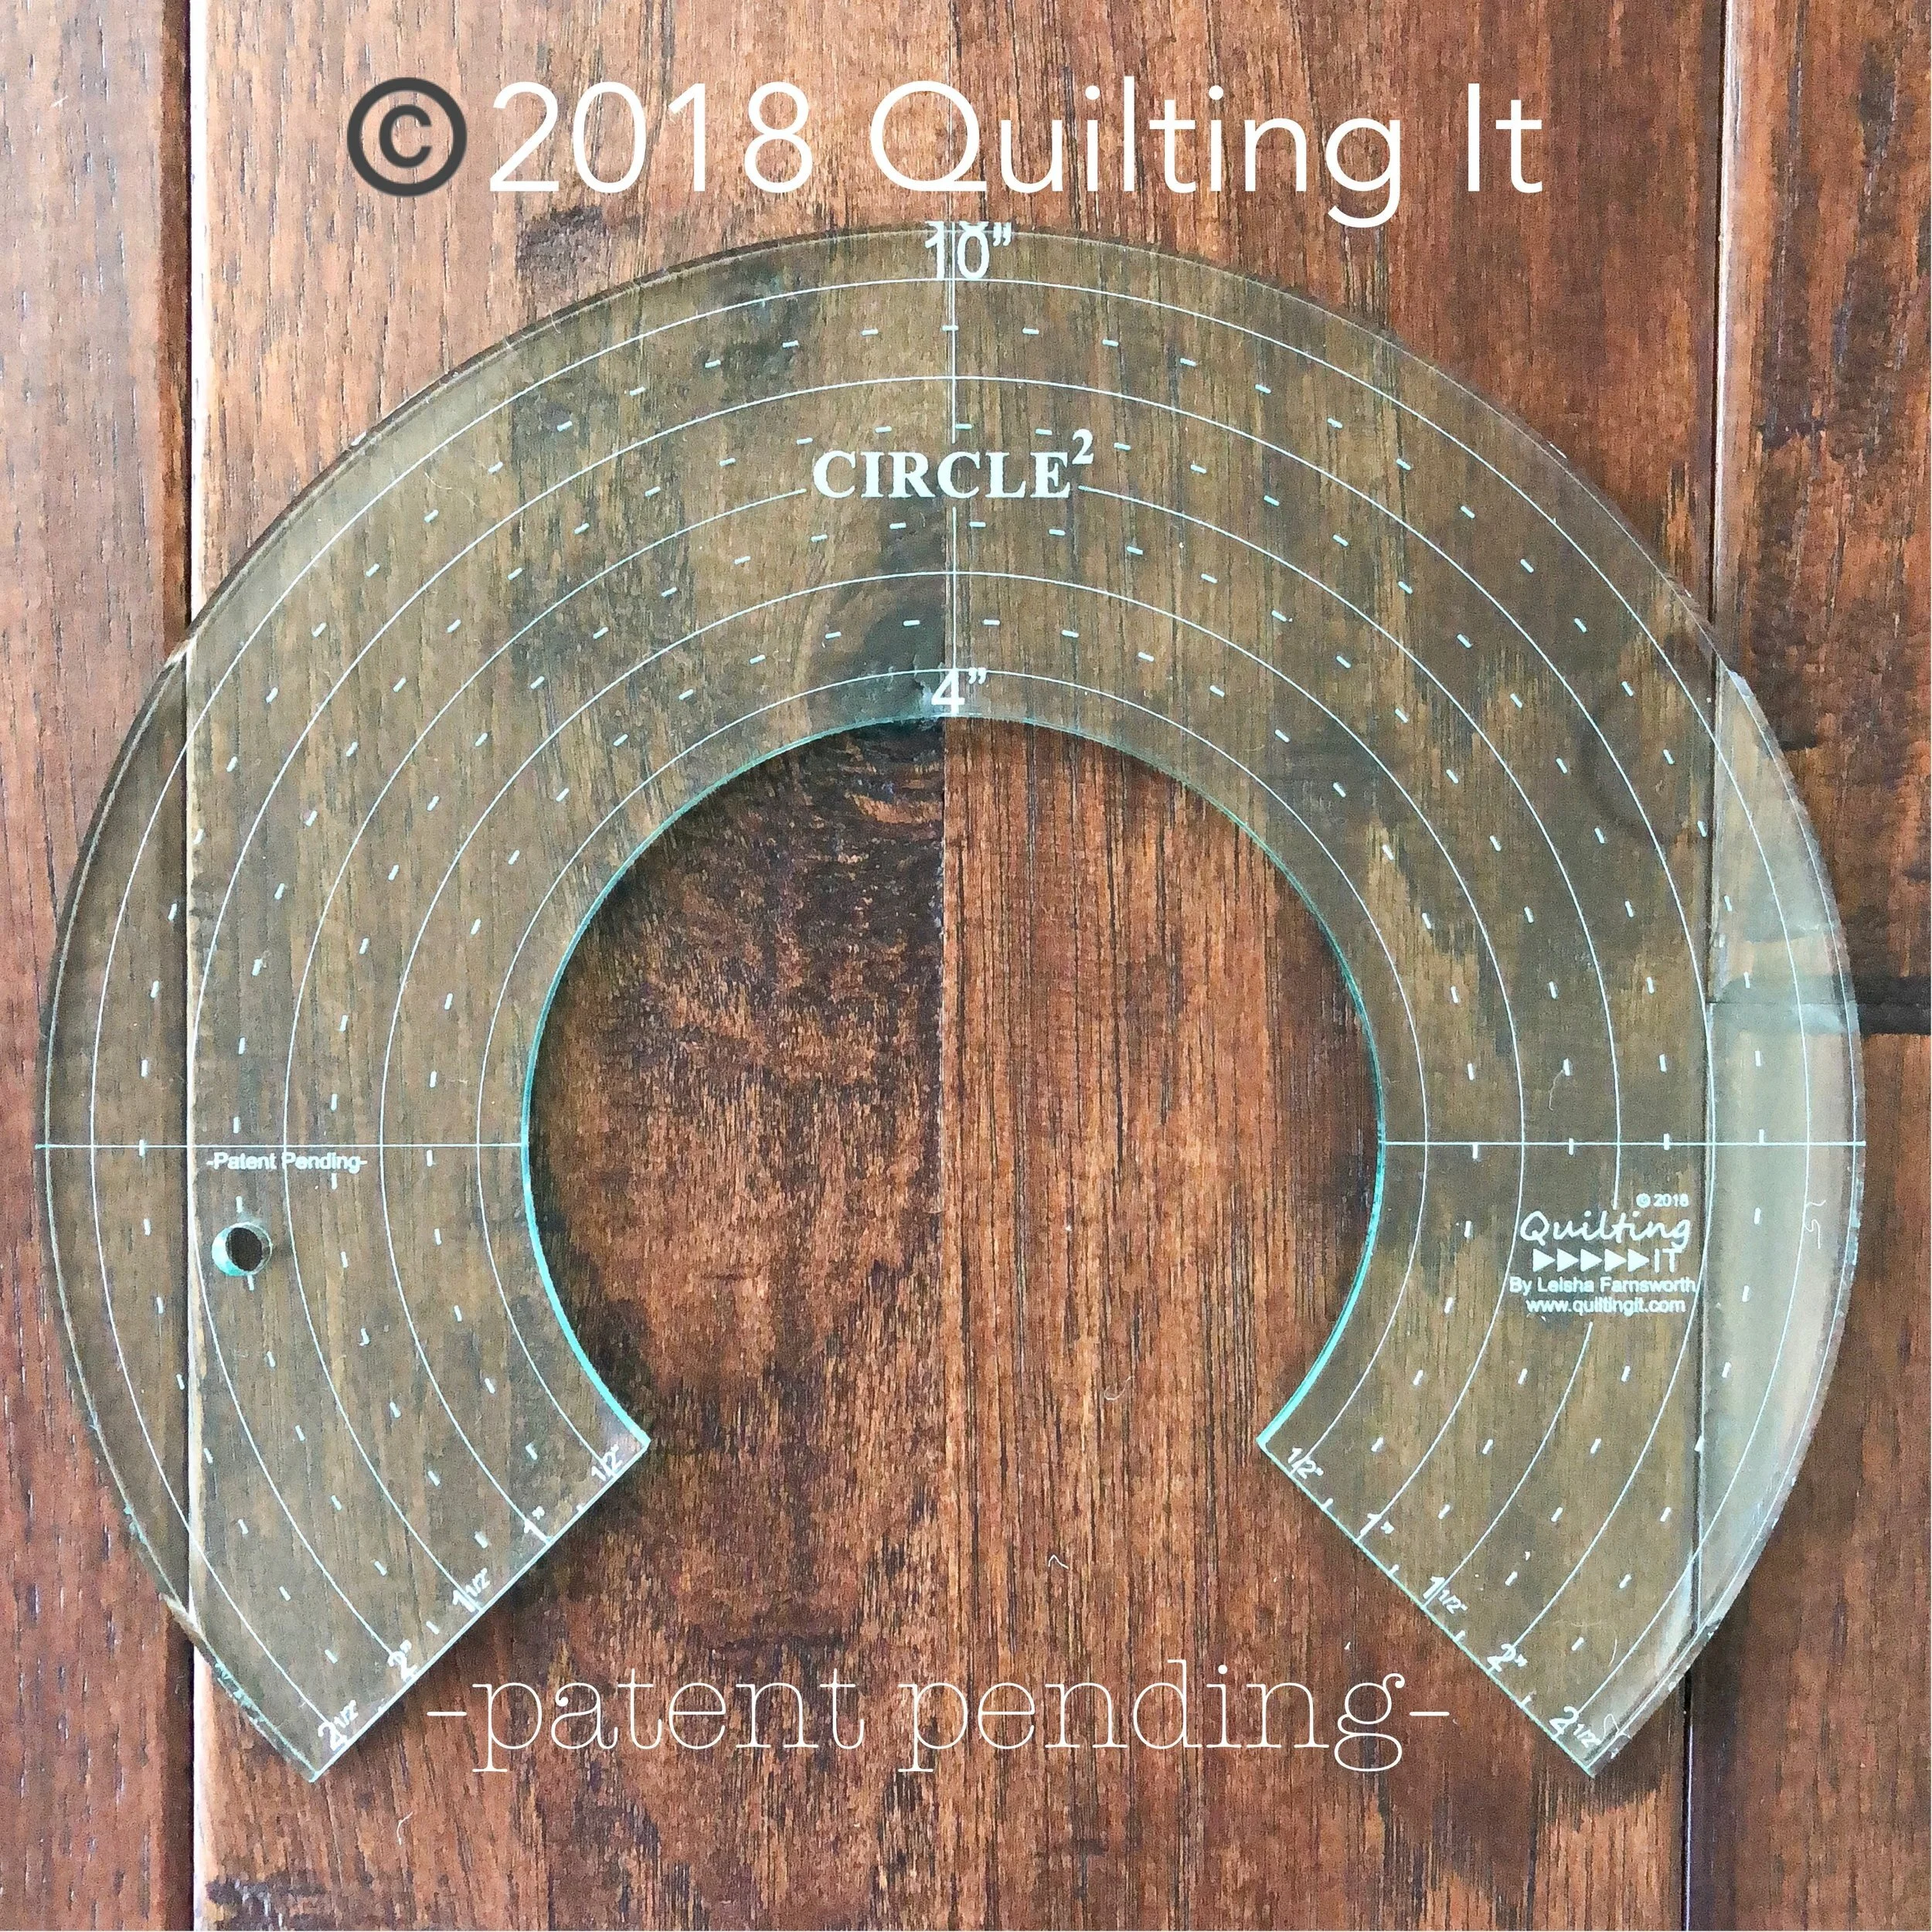
I used my 4” and 10” Circle2™ (said...Circle Squared) rulers on the star blocks, pinwheels, the green quilt block, and the circular design in the 4 patch. My Circle2™ (machine quilting circle rulers) are so versatile. Let your creativity run...and you’ll create some amazing designs with them.
My Circle2™ rulers are only available in my shop in a set of 6 ranging in size from 2”-13”: https://www.quiltingit.com/shop For more info on them, check out this post: https://www.quiltingit.com/blog/2018/10/10/introducing-my-circle2-longarm-circle-ruler-set They are available in green and clear, high quality 1/4” acrylic. They can be used on a longarm or on a sewing machine with a quilting foot.

Aren’t all those textures great together?!?!?!!! And below is a closer look at the fun design I quilted in the 4 patch.
I decided on a windy background for the trees...and if wind is anything like it is here, it’s going in all different directions. Wind is fun to freehand quilt...here is another video on my YouTube channel: https://youtu.be/qsLJOyP62sc

I’m trying to share enough pictures, so you can see all the great designs together. That overlapping swirl design, behind the lamp, is also a favorite of mine. Go to this video to see how I quilt out this design: https://youtu.be/x0UNyEJdm9Y

When I quilt a design on a quilt like this, I try to do it again at least once if not twice. By doing so it makes the designs compliment one another and helps your eye travel as you look at it.
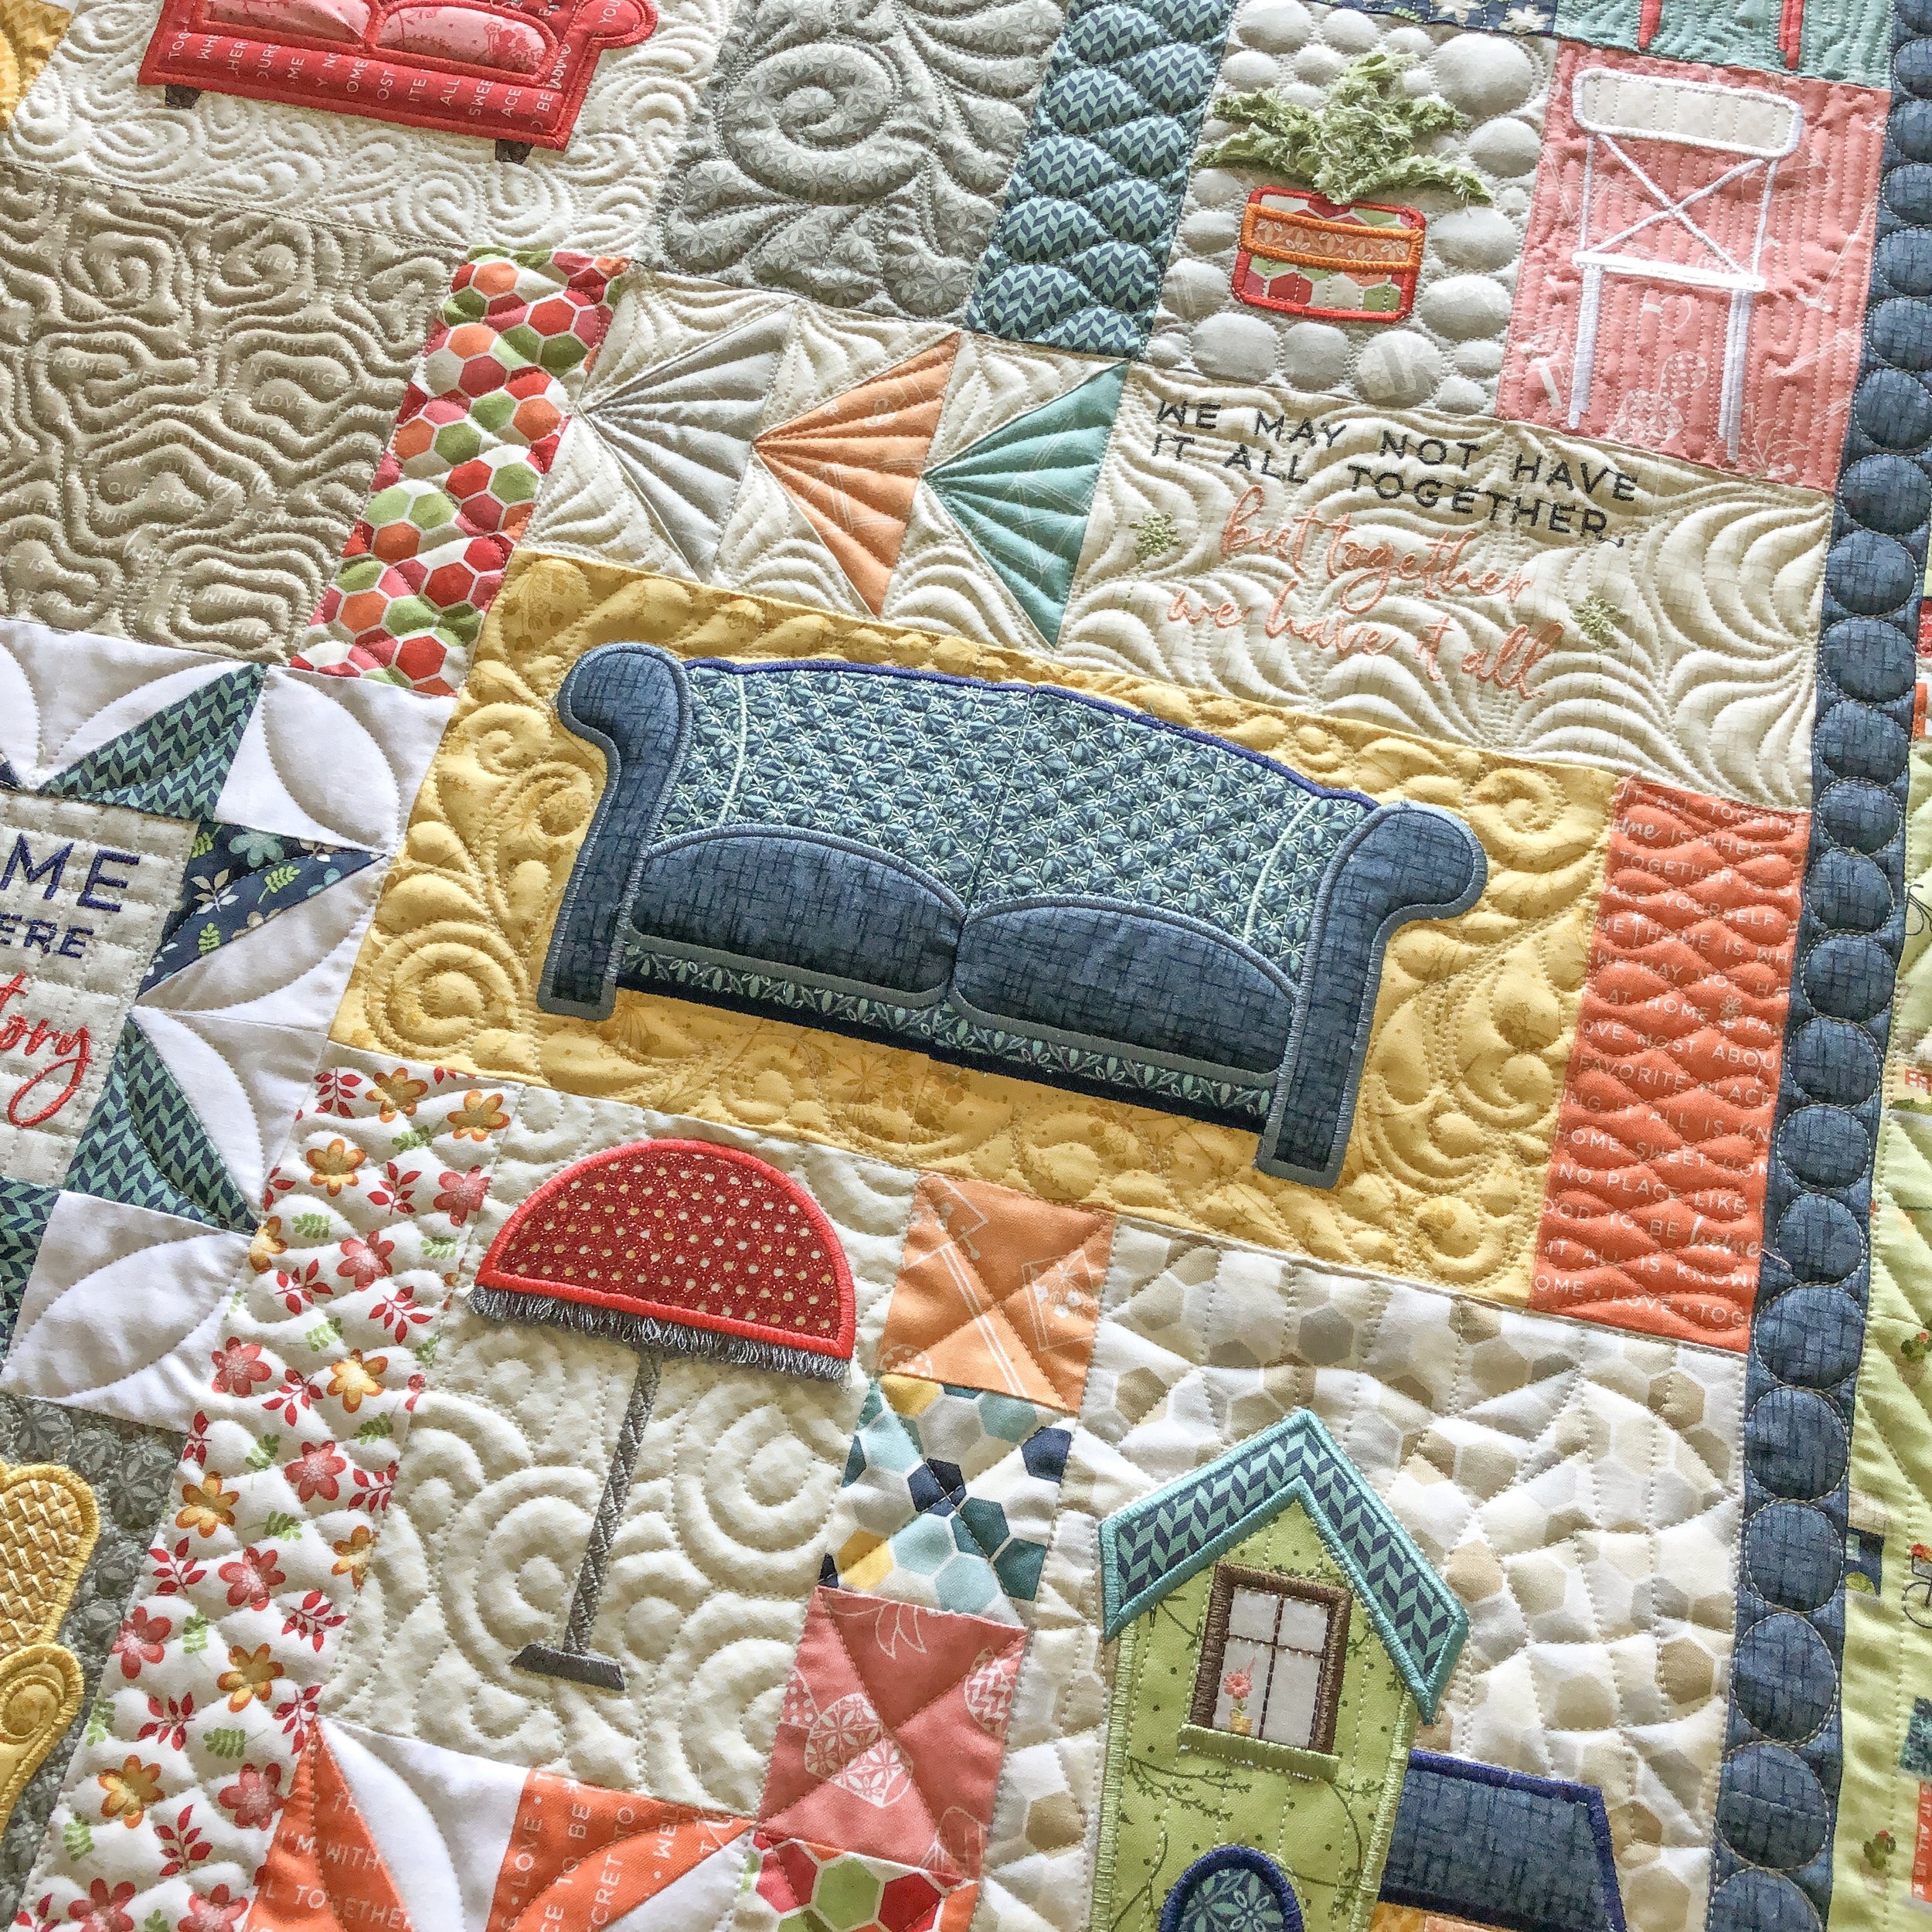
I used my favorite 8020 cotton poly blend batting from Winline, and Antique Cream 30 tex A&E Perma Core thread on the entire quilt.
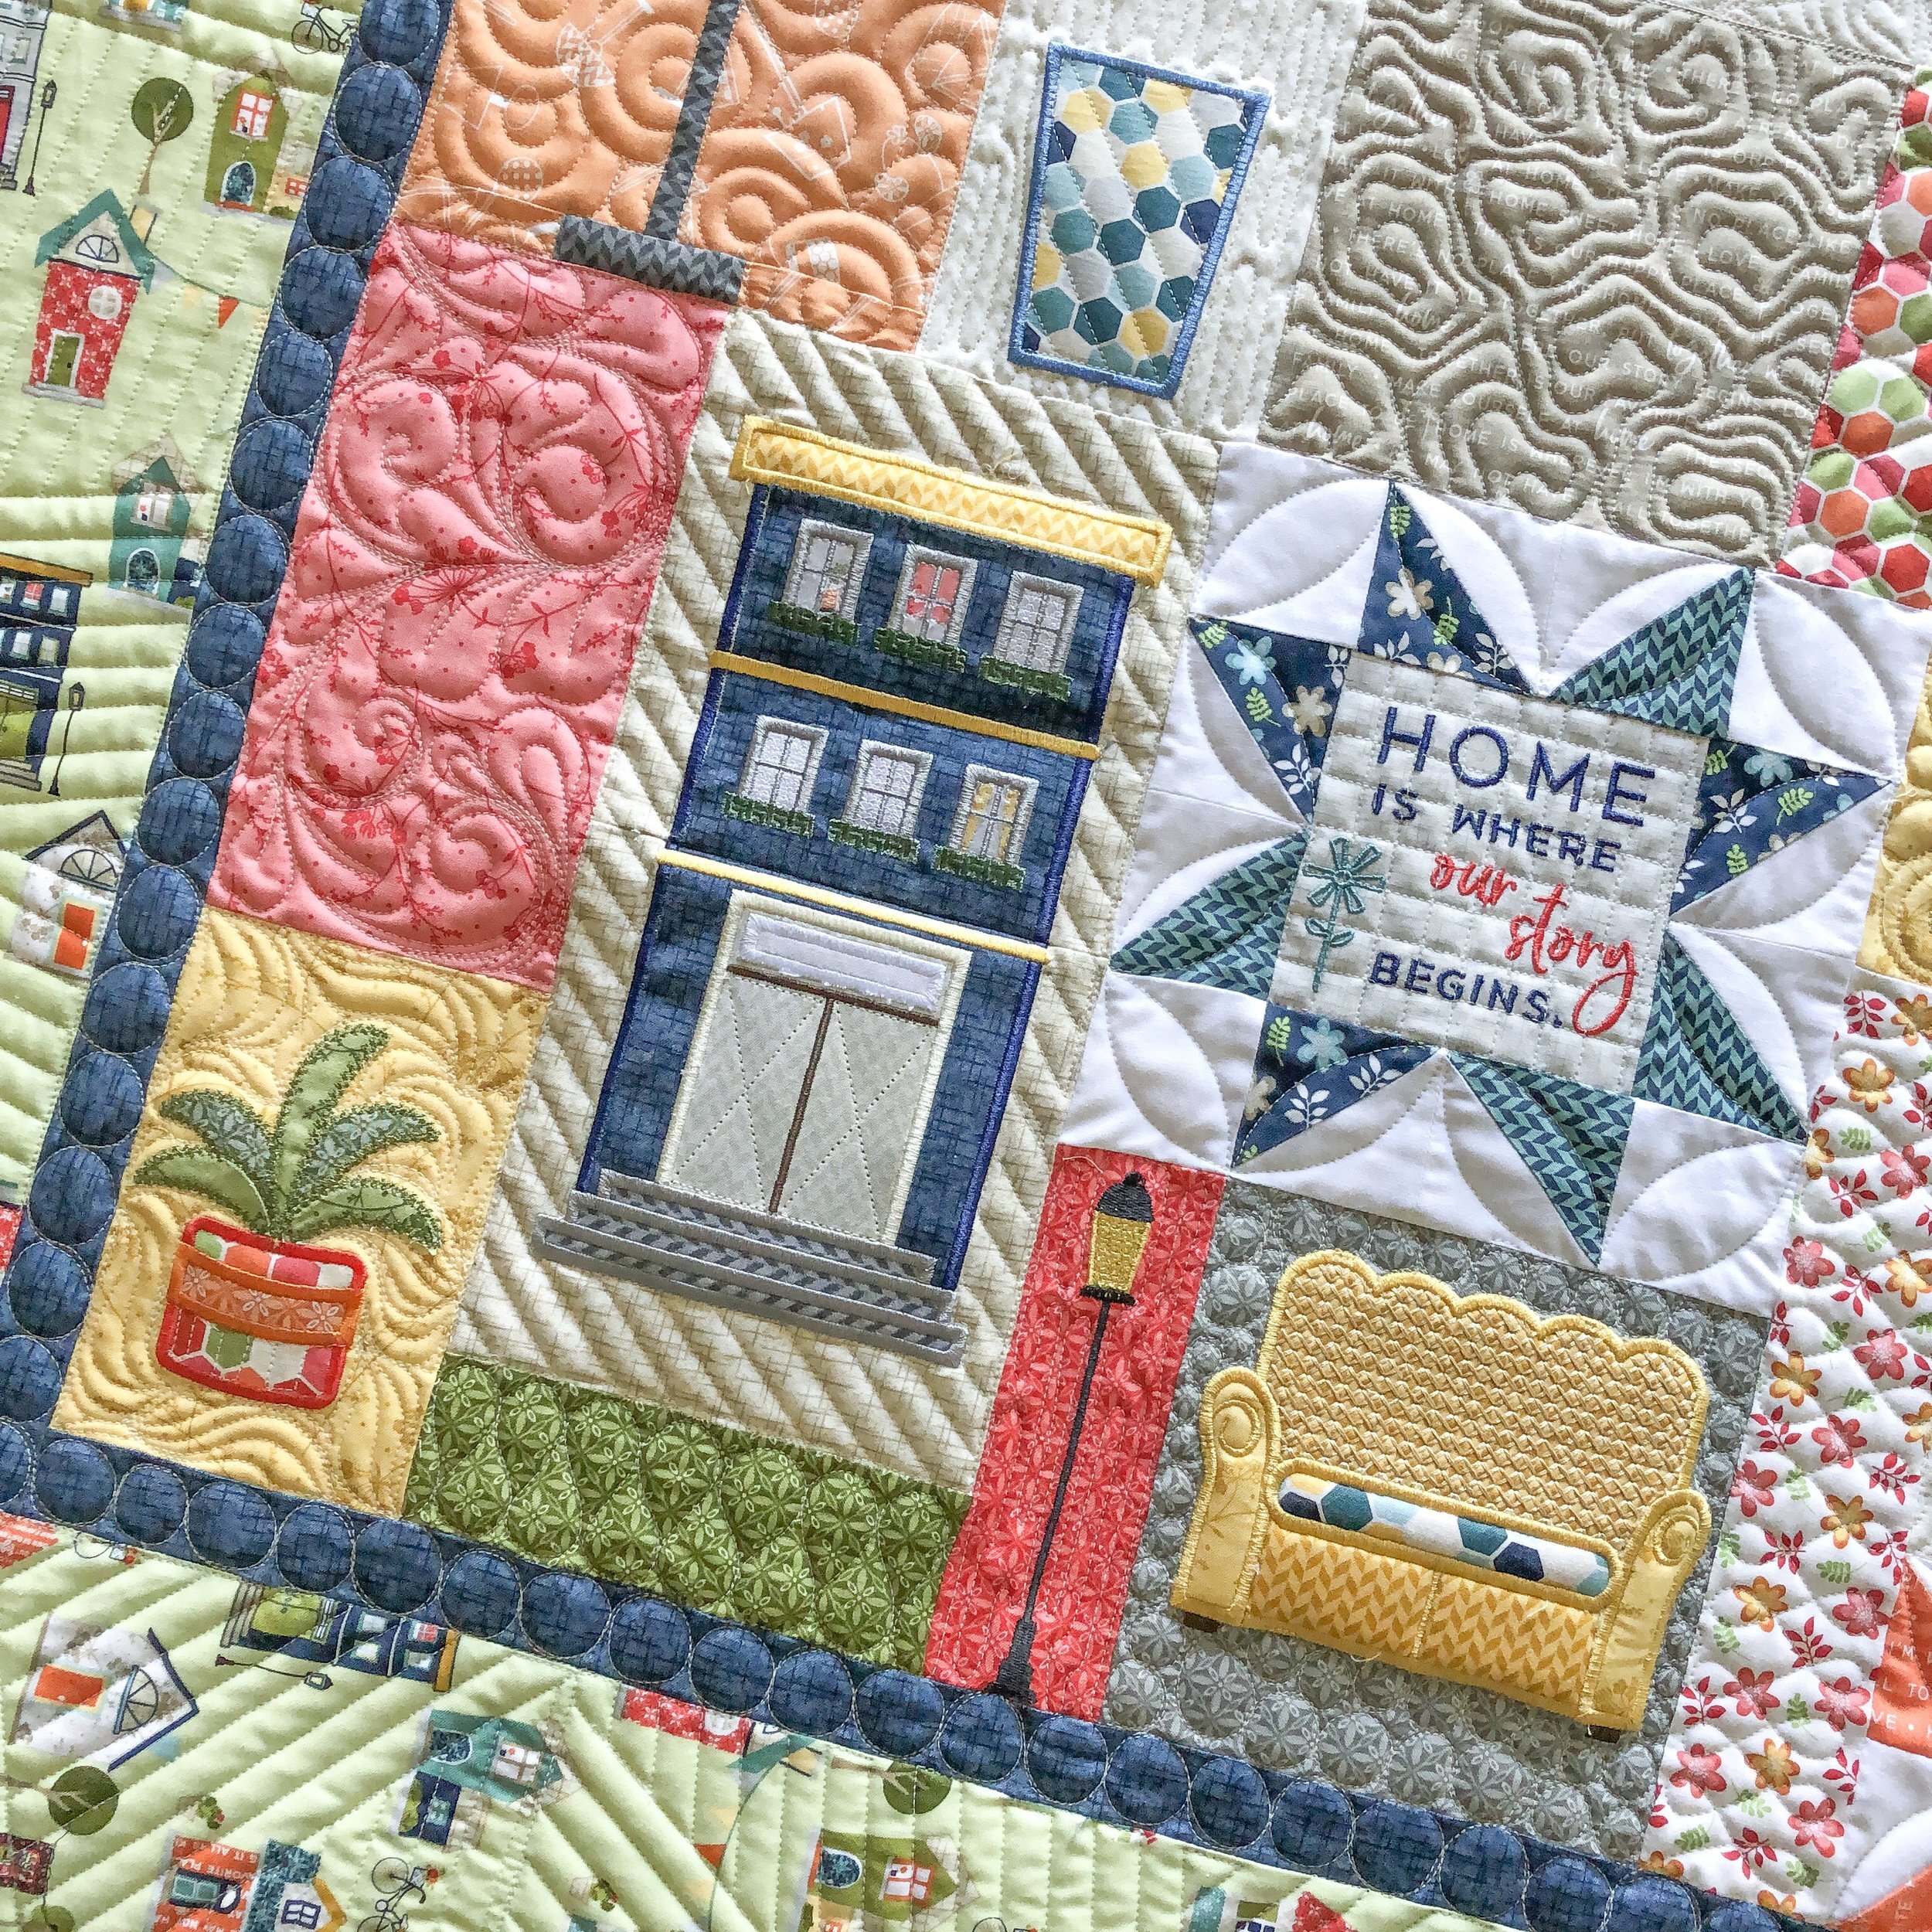
I don’t like to quilt a ton inside the appliqués...the couches on this quilt got no quilting at all...yet I quilted the pot on the plants and doors on the house above. My rule of thumb for quilting in appliqué pieces, only do it if they need it. If they aren’t laying flat or are too big, I definitely quilt something, even if it’s just simple lines.
I hope you’ve enjoyed this quilt!! It’s definitely a fun quilt.

Next up...pillows!! Lots of them! I actually sewed the backs together in one long piece, because they weren’t big enough to pin to the machine. It’s also faster to quilt them all on one backing. Below you are looking at 7 pillow fronts all in one piece because of the backings being sewn together. I just center the pillow front on the backing, so the seam doesn’t end up on the back of the pillow. Sherry will cut them on the seam, so then she can trim them.
These are part of the pillow of the month kits that My Girlfriends Quilt Shoppe has been doing for the past 8 months. They may still have some of the kits available, if not, I’m sure they have the patterns. Here is their website: https://mygirlfriendsquiltshoppe.com/

These were made by Sherry. A lot of these pillows will get more dimensional items added to them now that they are quilted.
Pebbles, swirls, and feathers for the background with a ribbon candy border.
She brought batting scraps for each of these, I think it’s an 8020 cotton poly blend. I used a white and a navy 30 tex Perma Core thread on this one, from A&E.
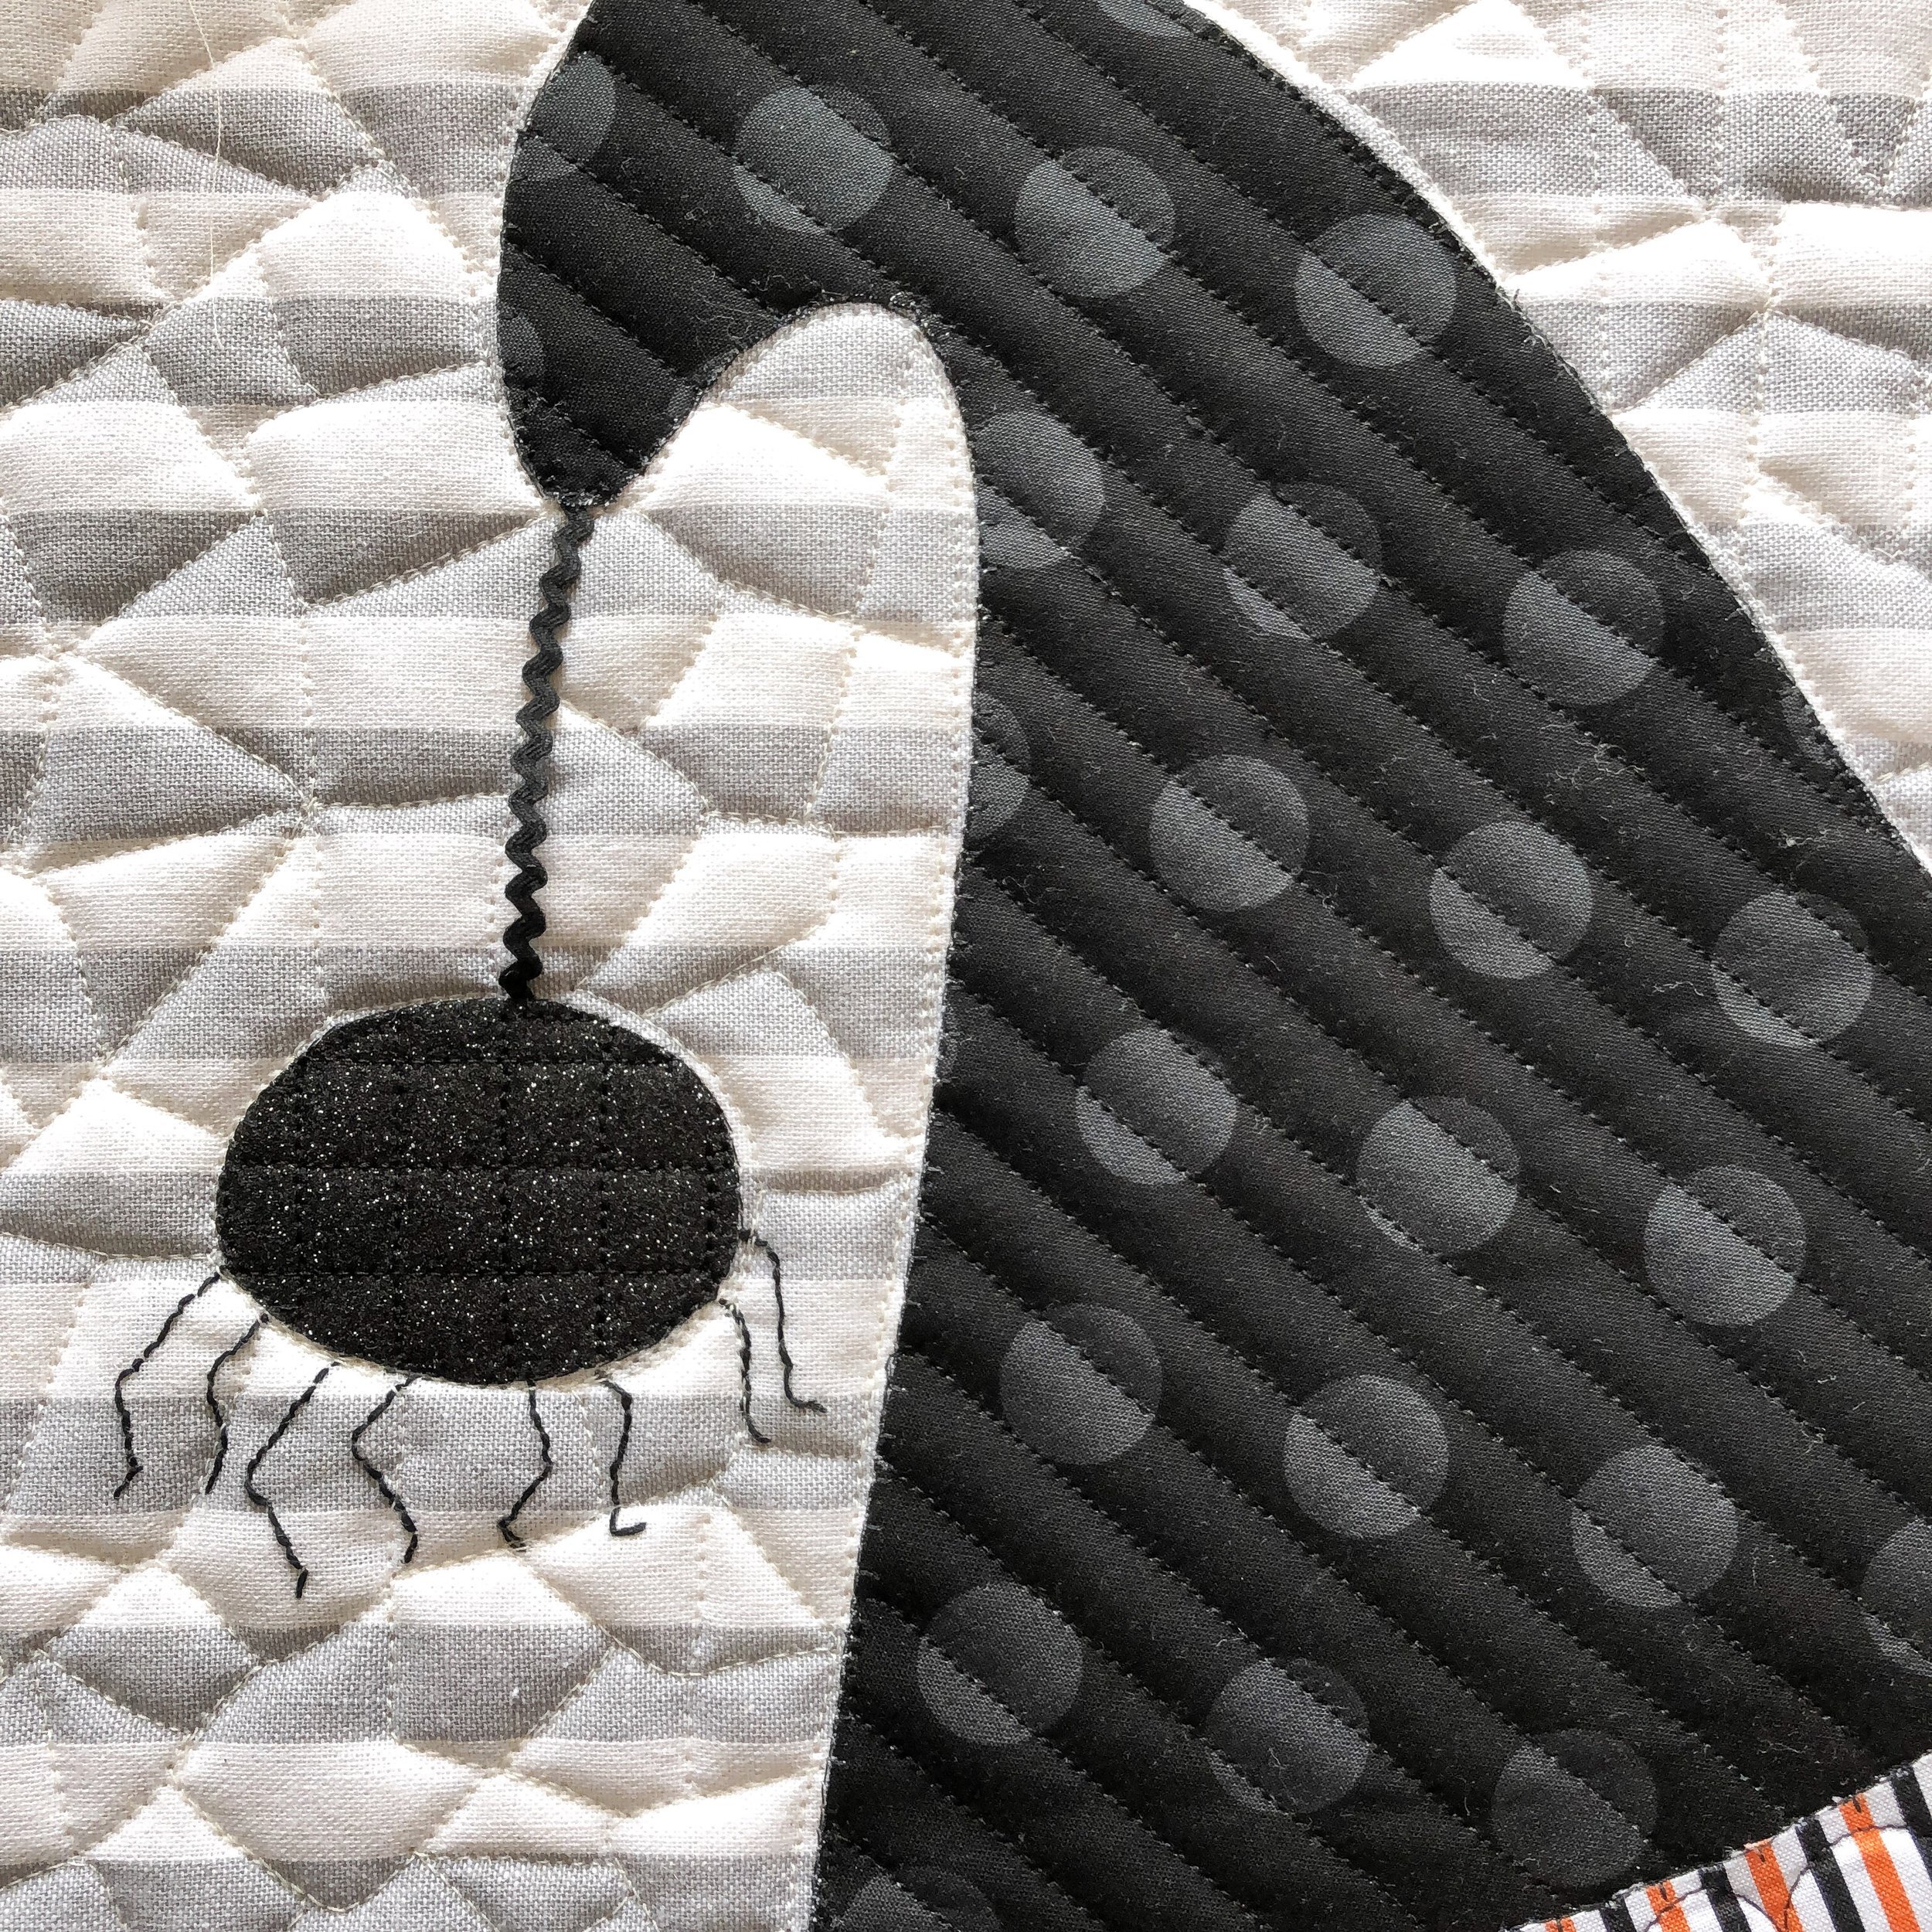
Next a cute witch hat! This one is quite simple, so creating great texture was important. I did that same line design, that I did on the border of the quilt above, on the brim of the hat. Add some crackle, 1/2” angled lines, 1/2” squares in the spider body, and ribbon candy sashing...a great combination! I used black and Antique Cream 30 tex Perma Core thread from A&E.
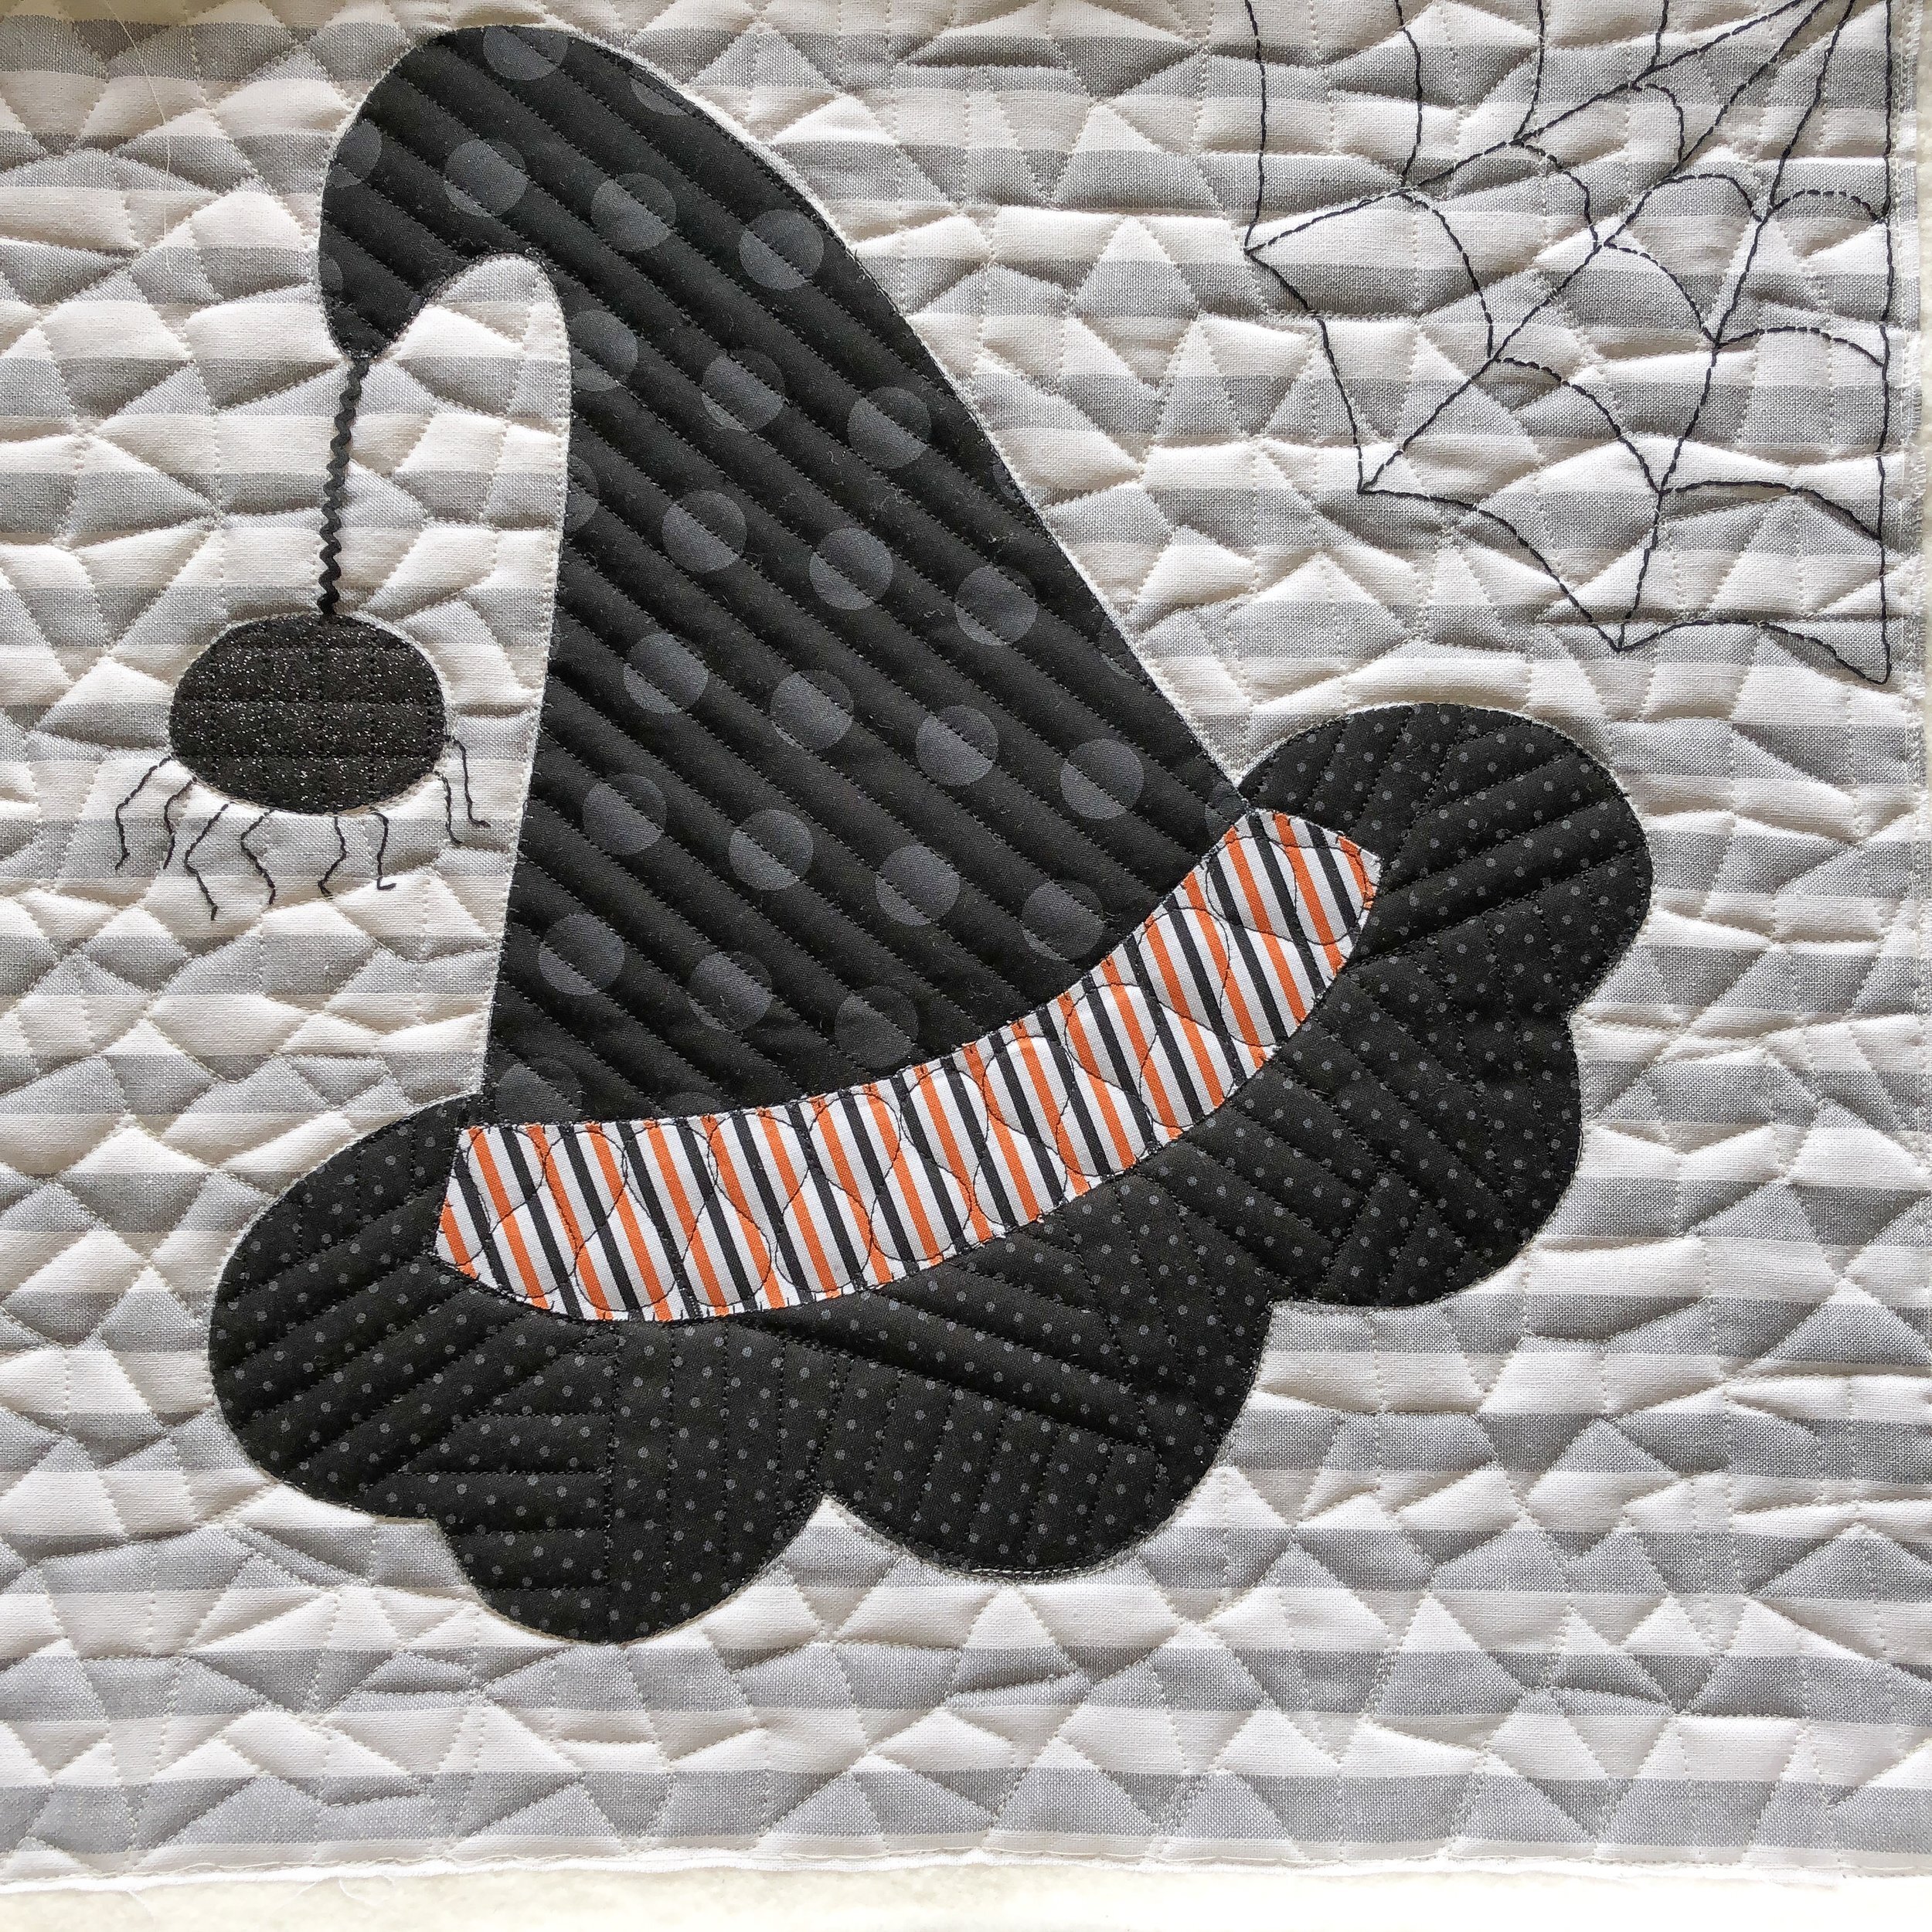
A closer look at the angled lines on the brim.
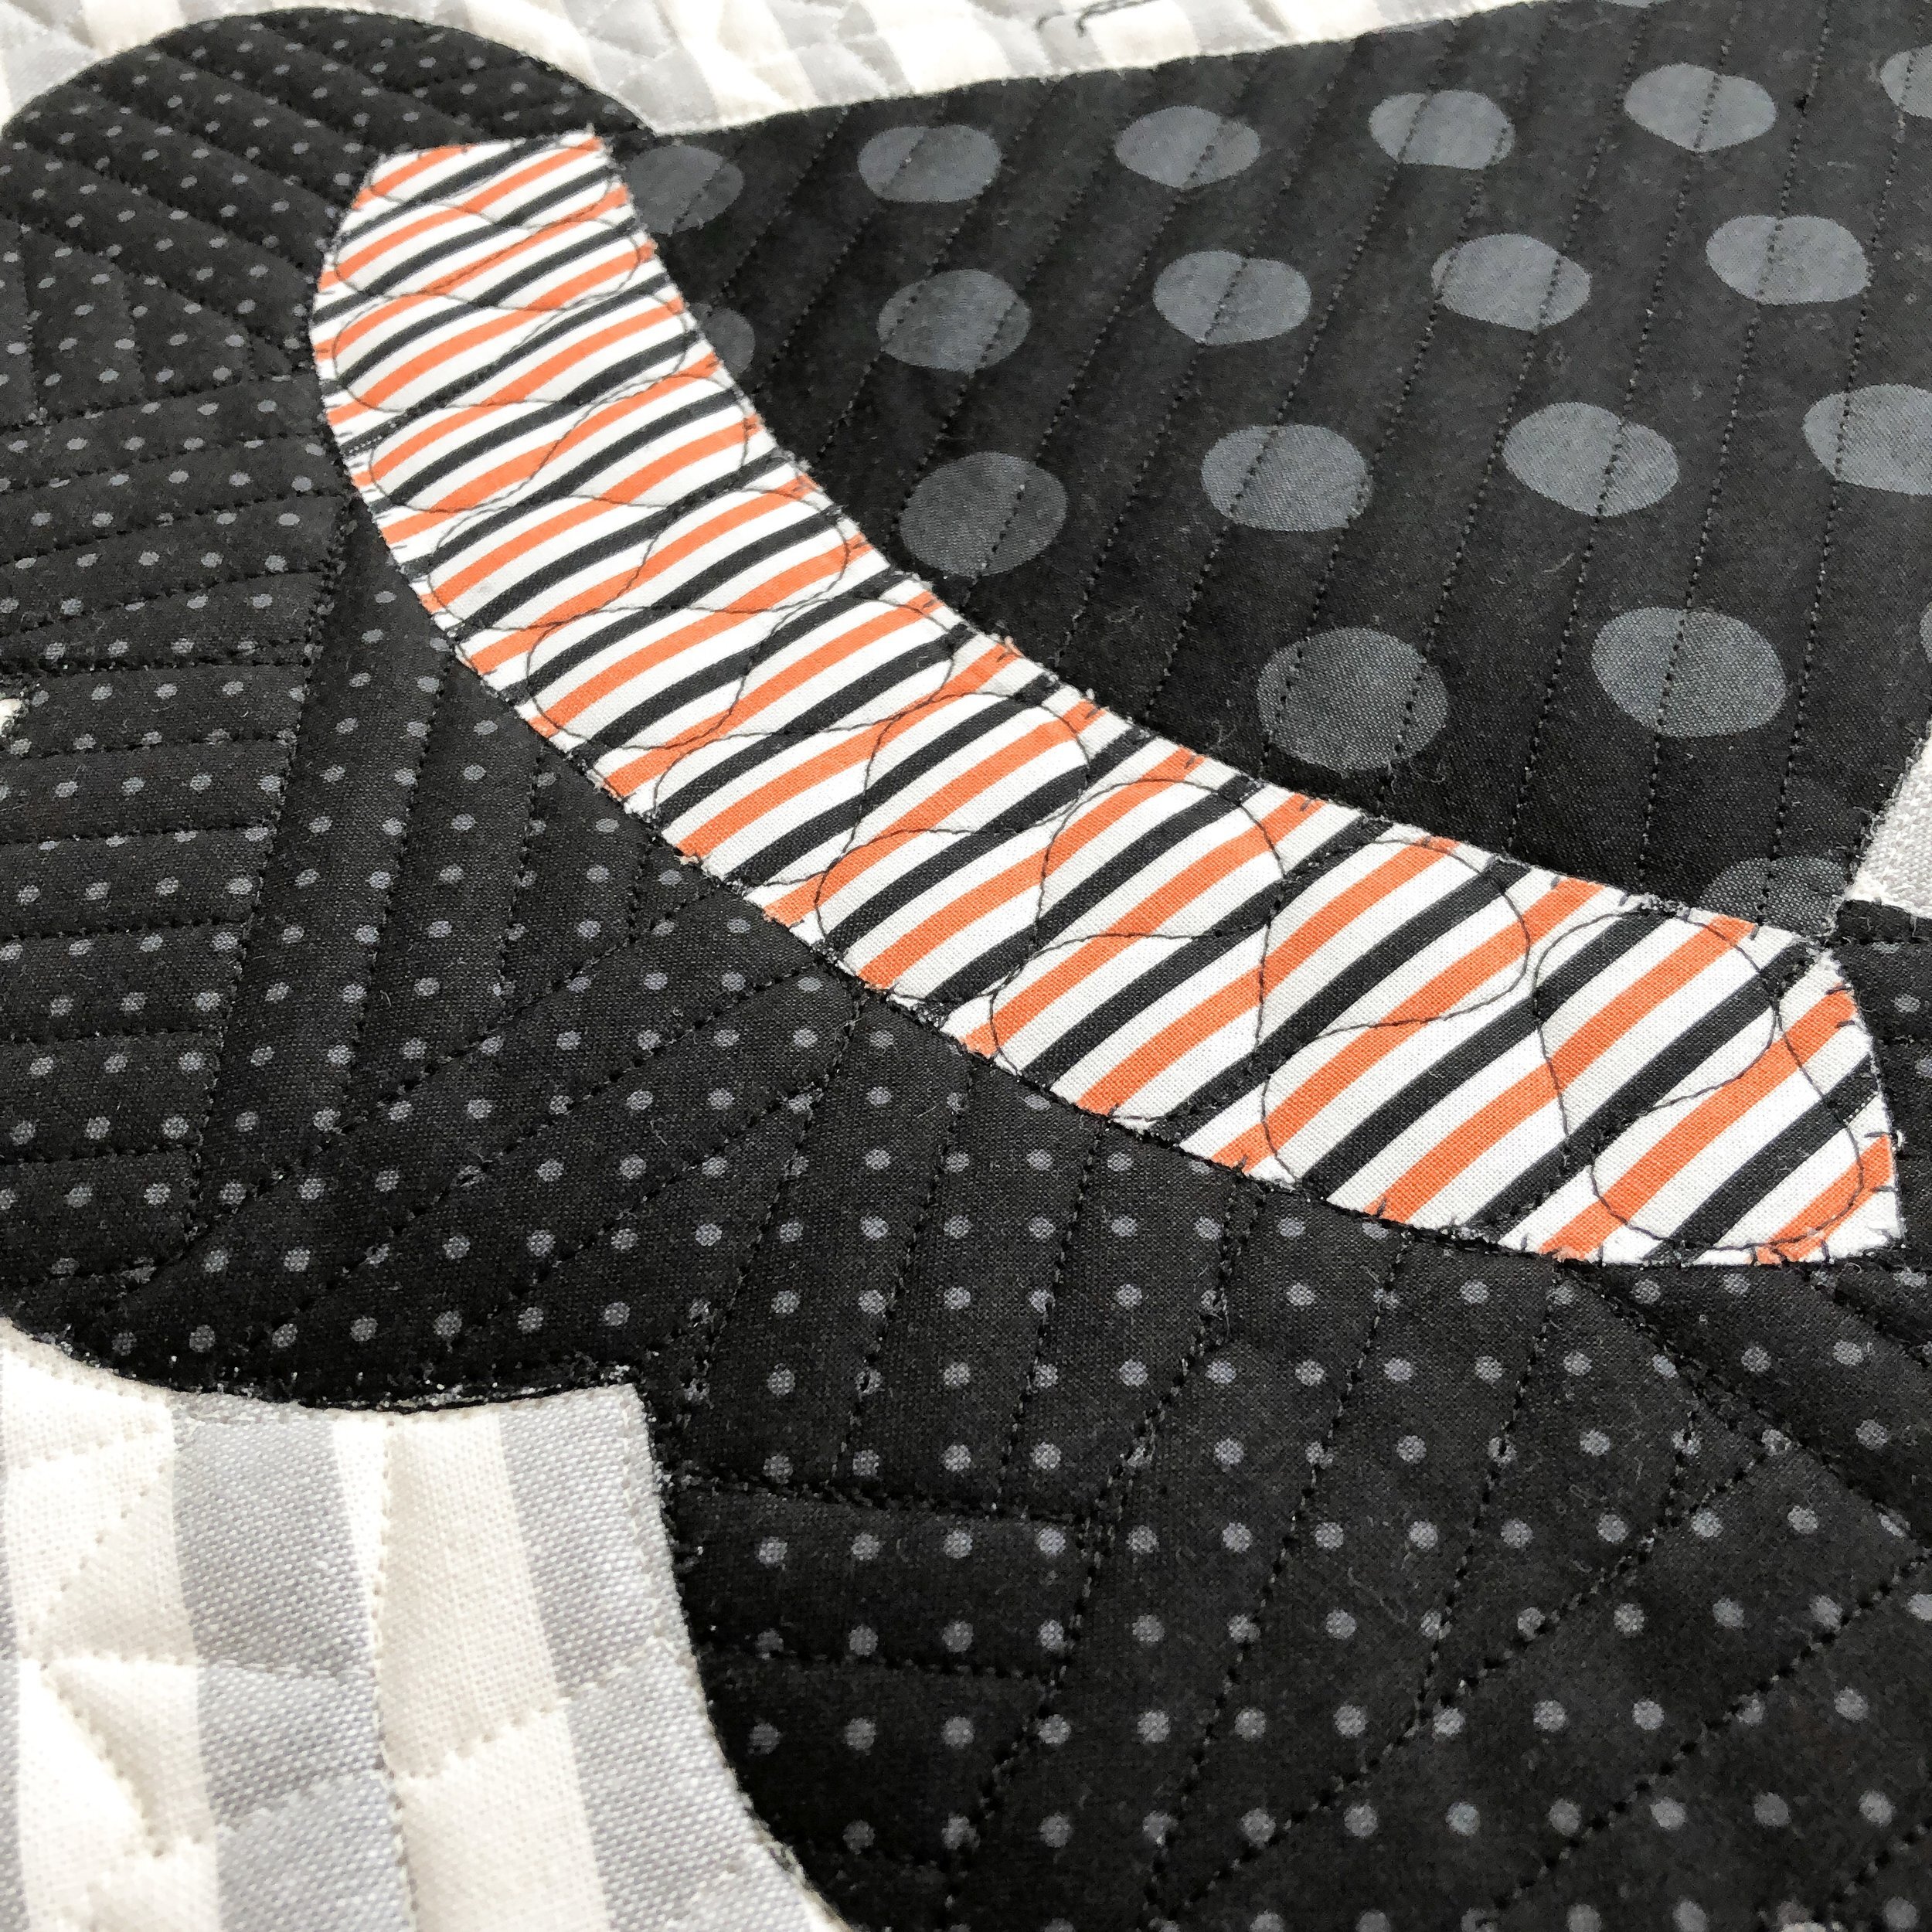
And squares on the spider.
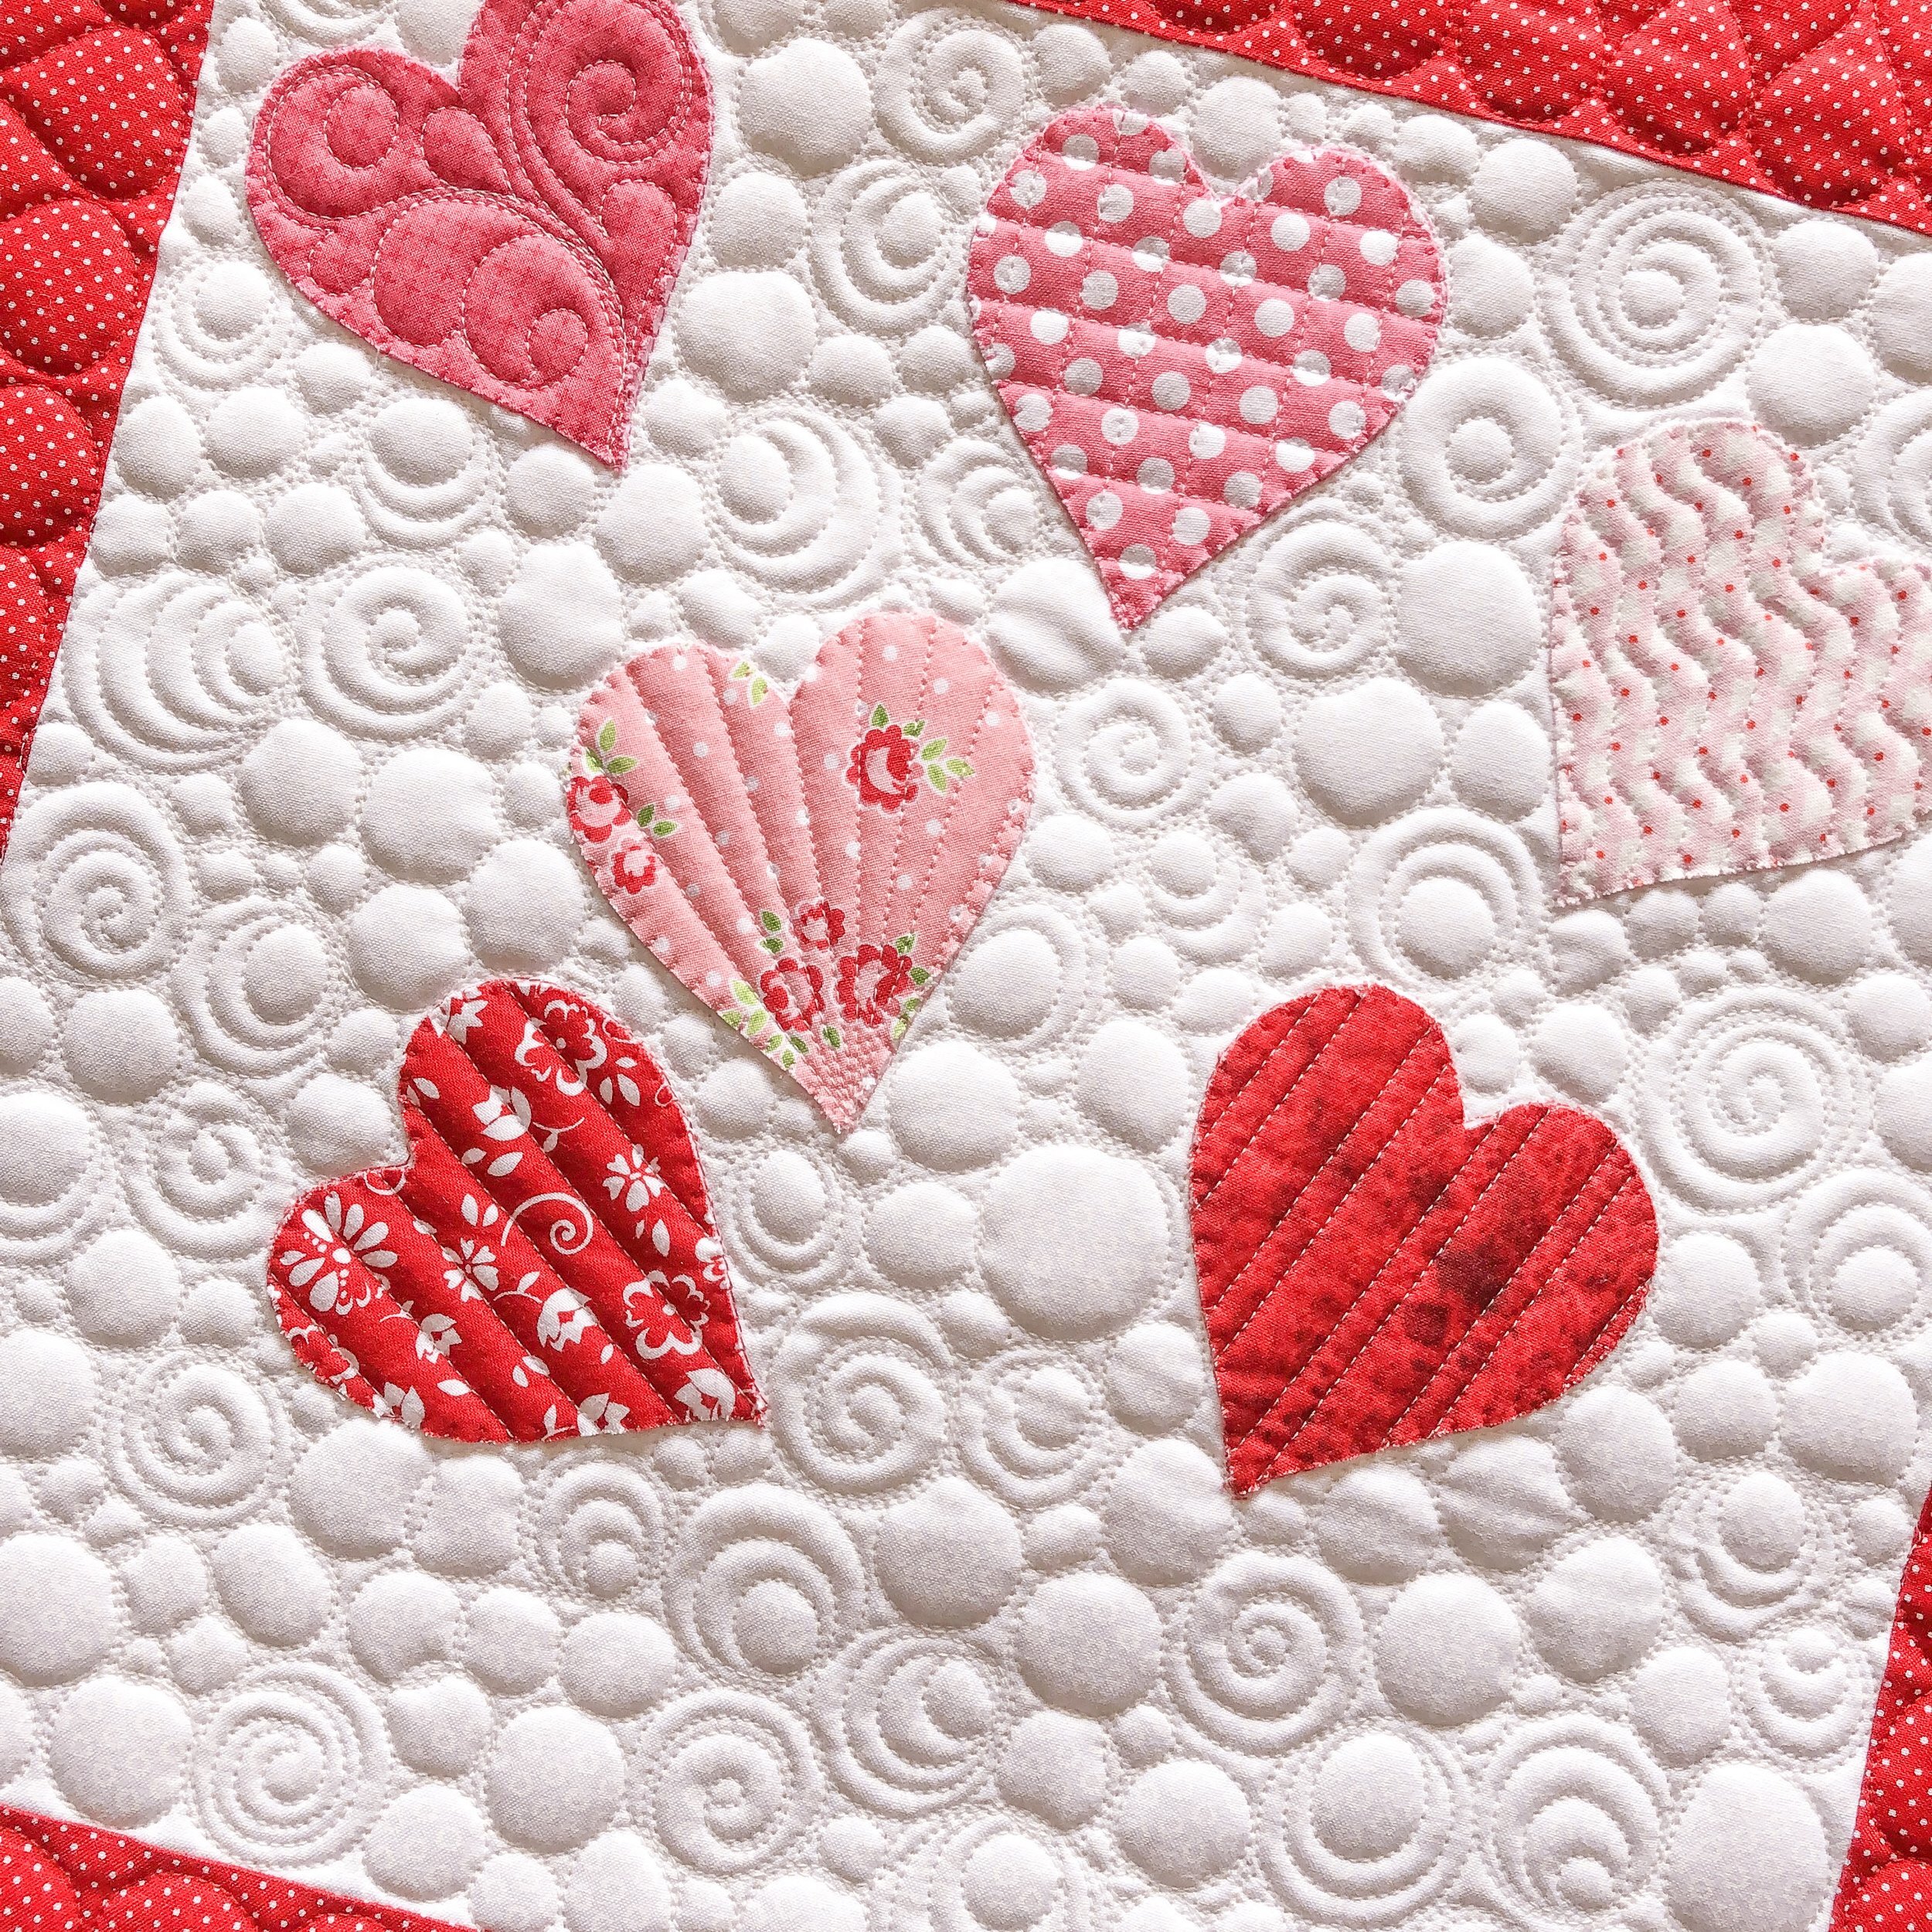
Next the Valentine pillow. This one will have ribbons, like a bouquet of heart balloons.
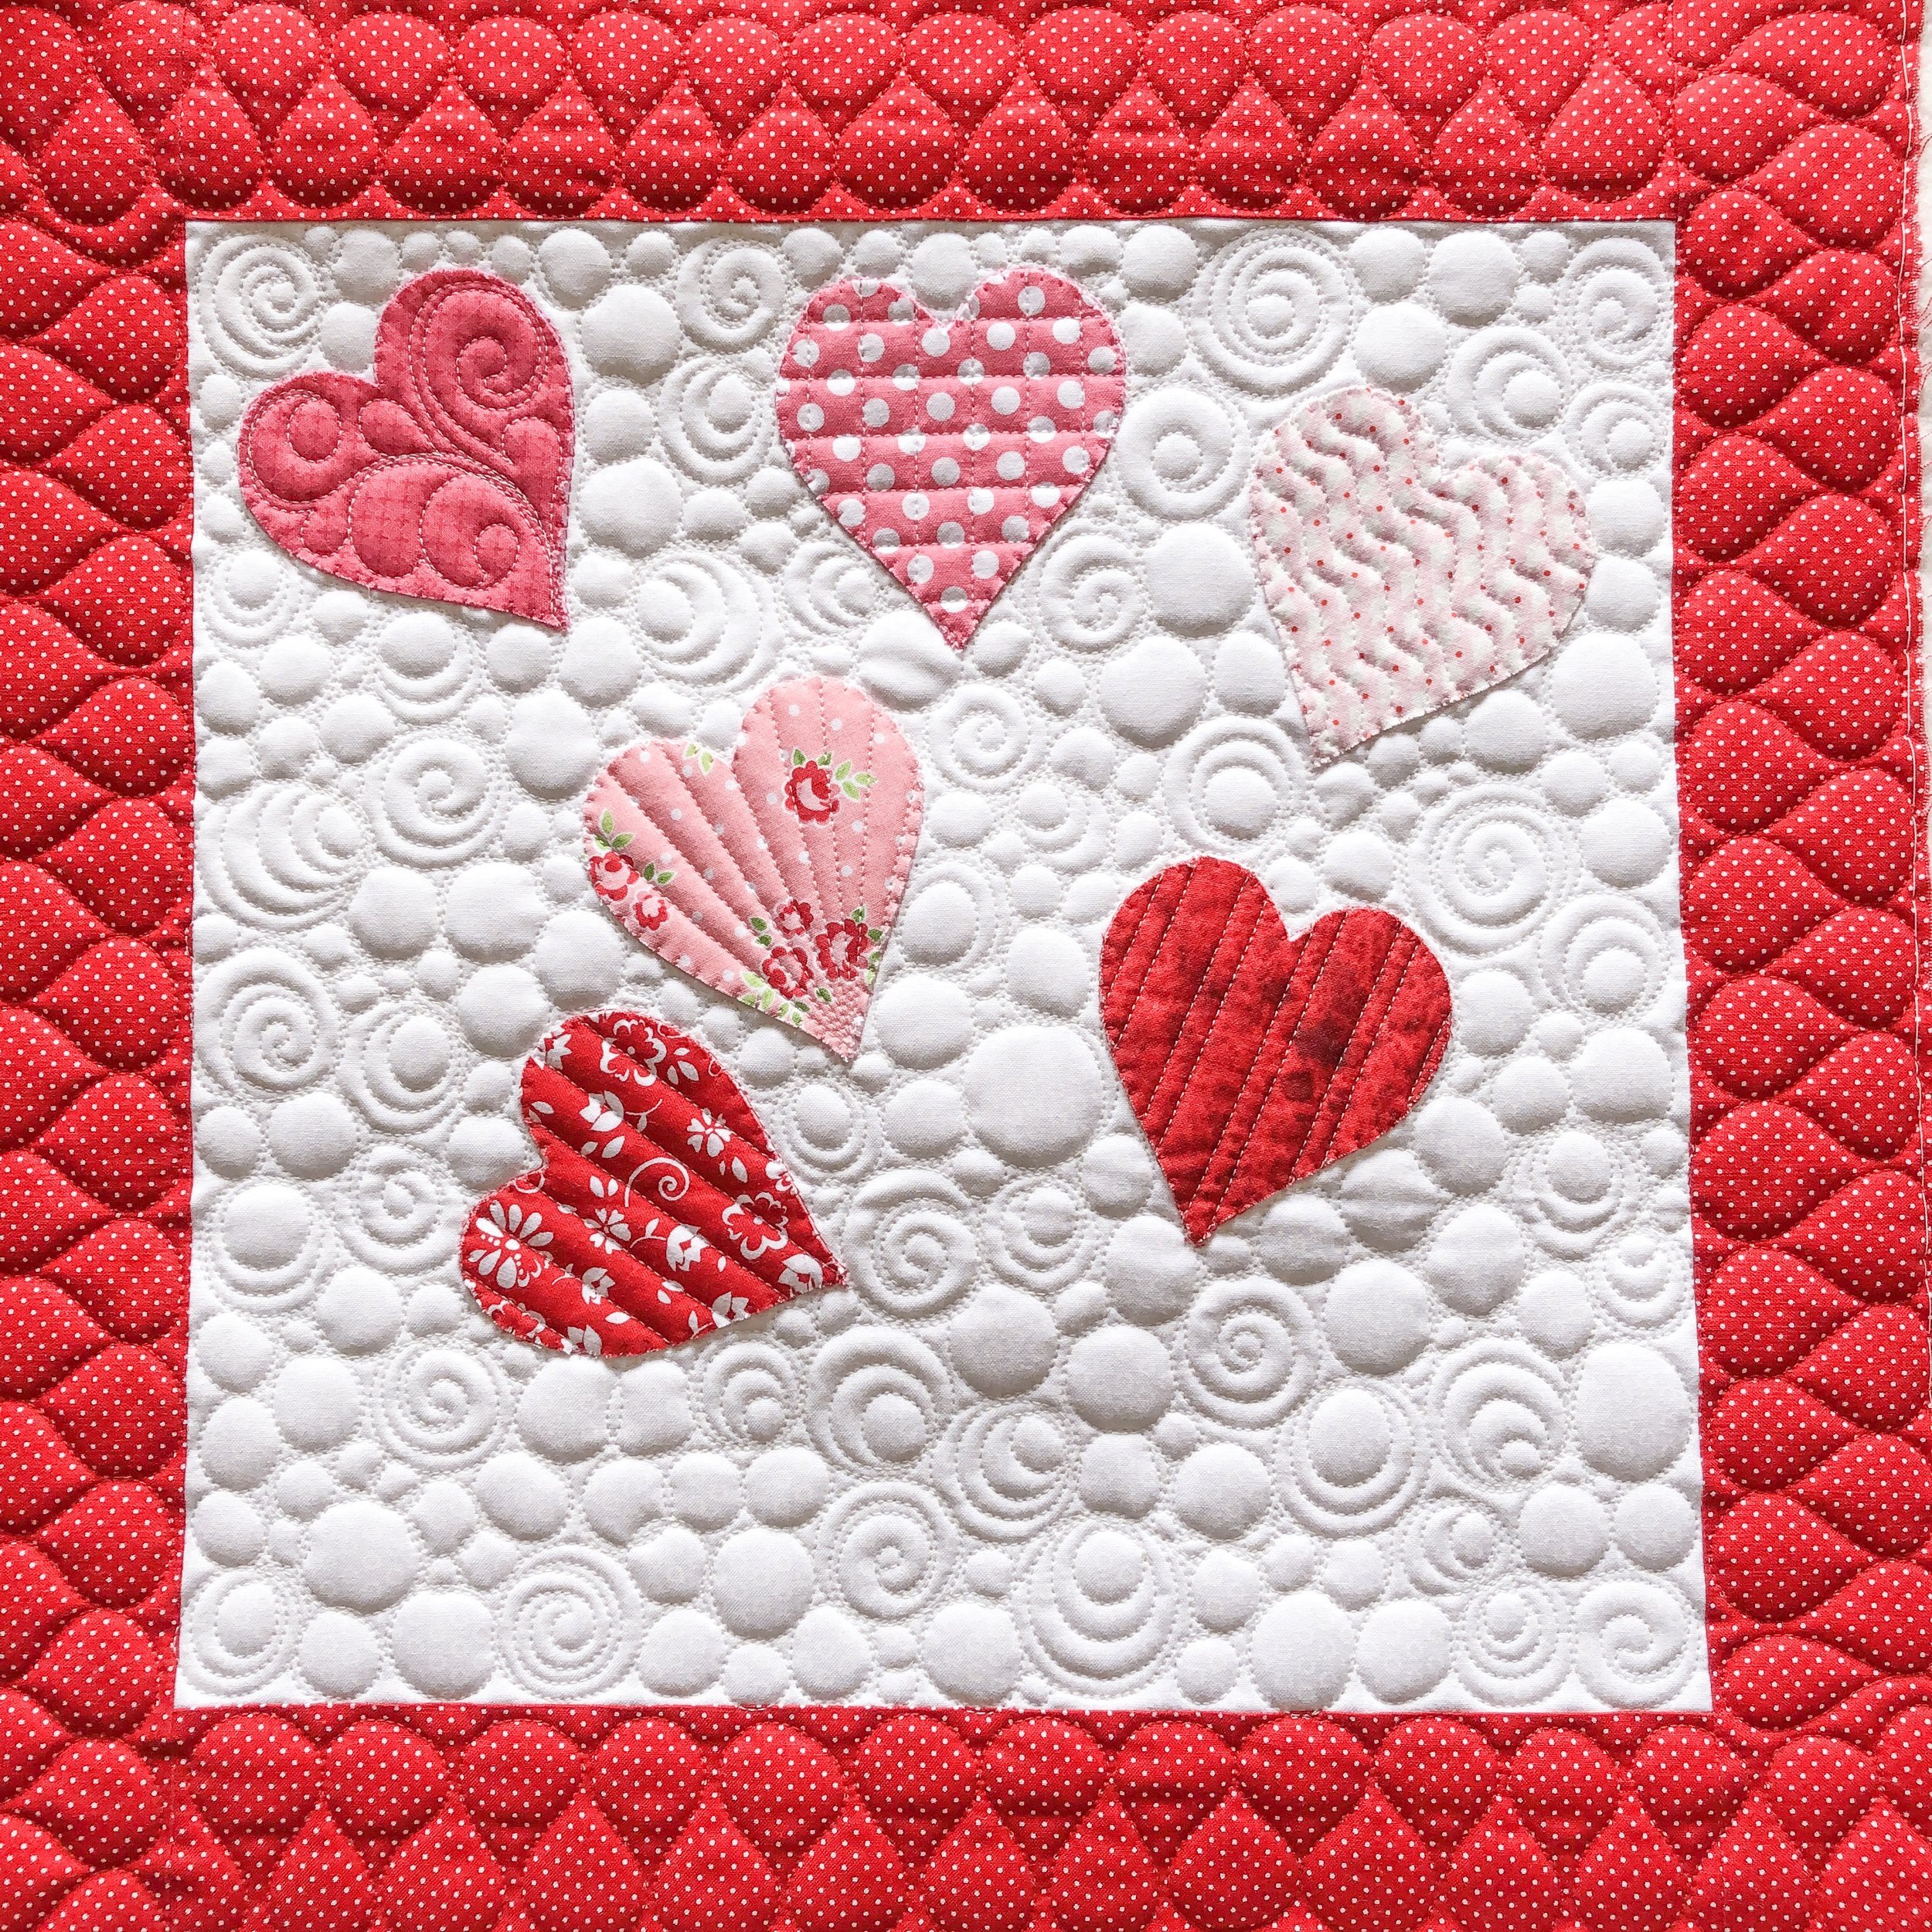
Different quilty textures in the hearts with the pebbles in the background, add interest to this pillow. Bordering it with ribbon candy.
Next up...this cute gnome Santa!! He’s my favorite of the bunch. Sherry made four of these, which makes 7 pillow fronts in total.

I quilted that same freehand overlapping circle design in this background, link to the video is above. (With the lamp on the quilt). I added some vertical lines at 1/2”, in the hat and angled lines in the body. The beard has a wavy design and nothing is needed for the nose and the shoes.
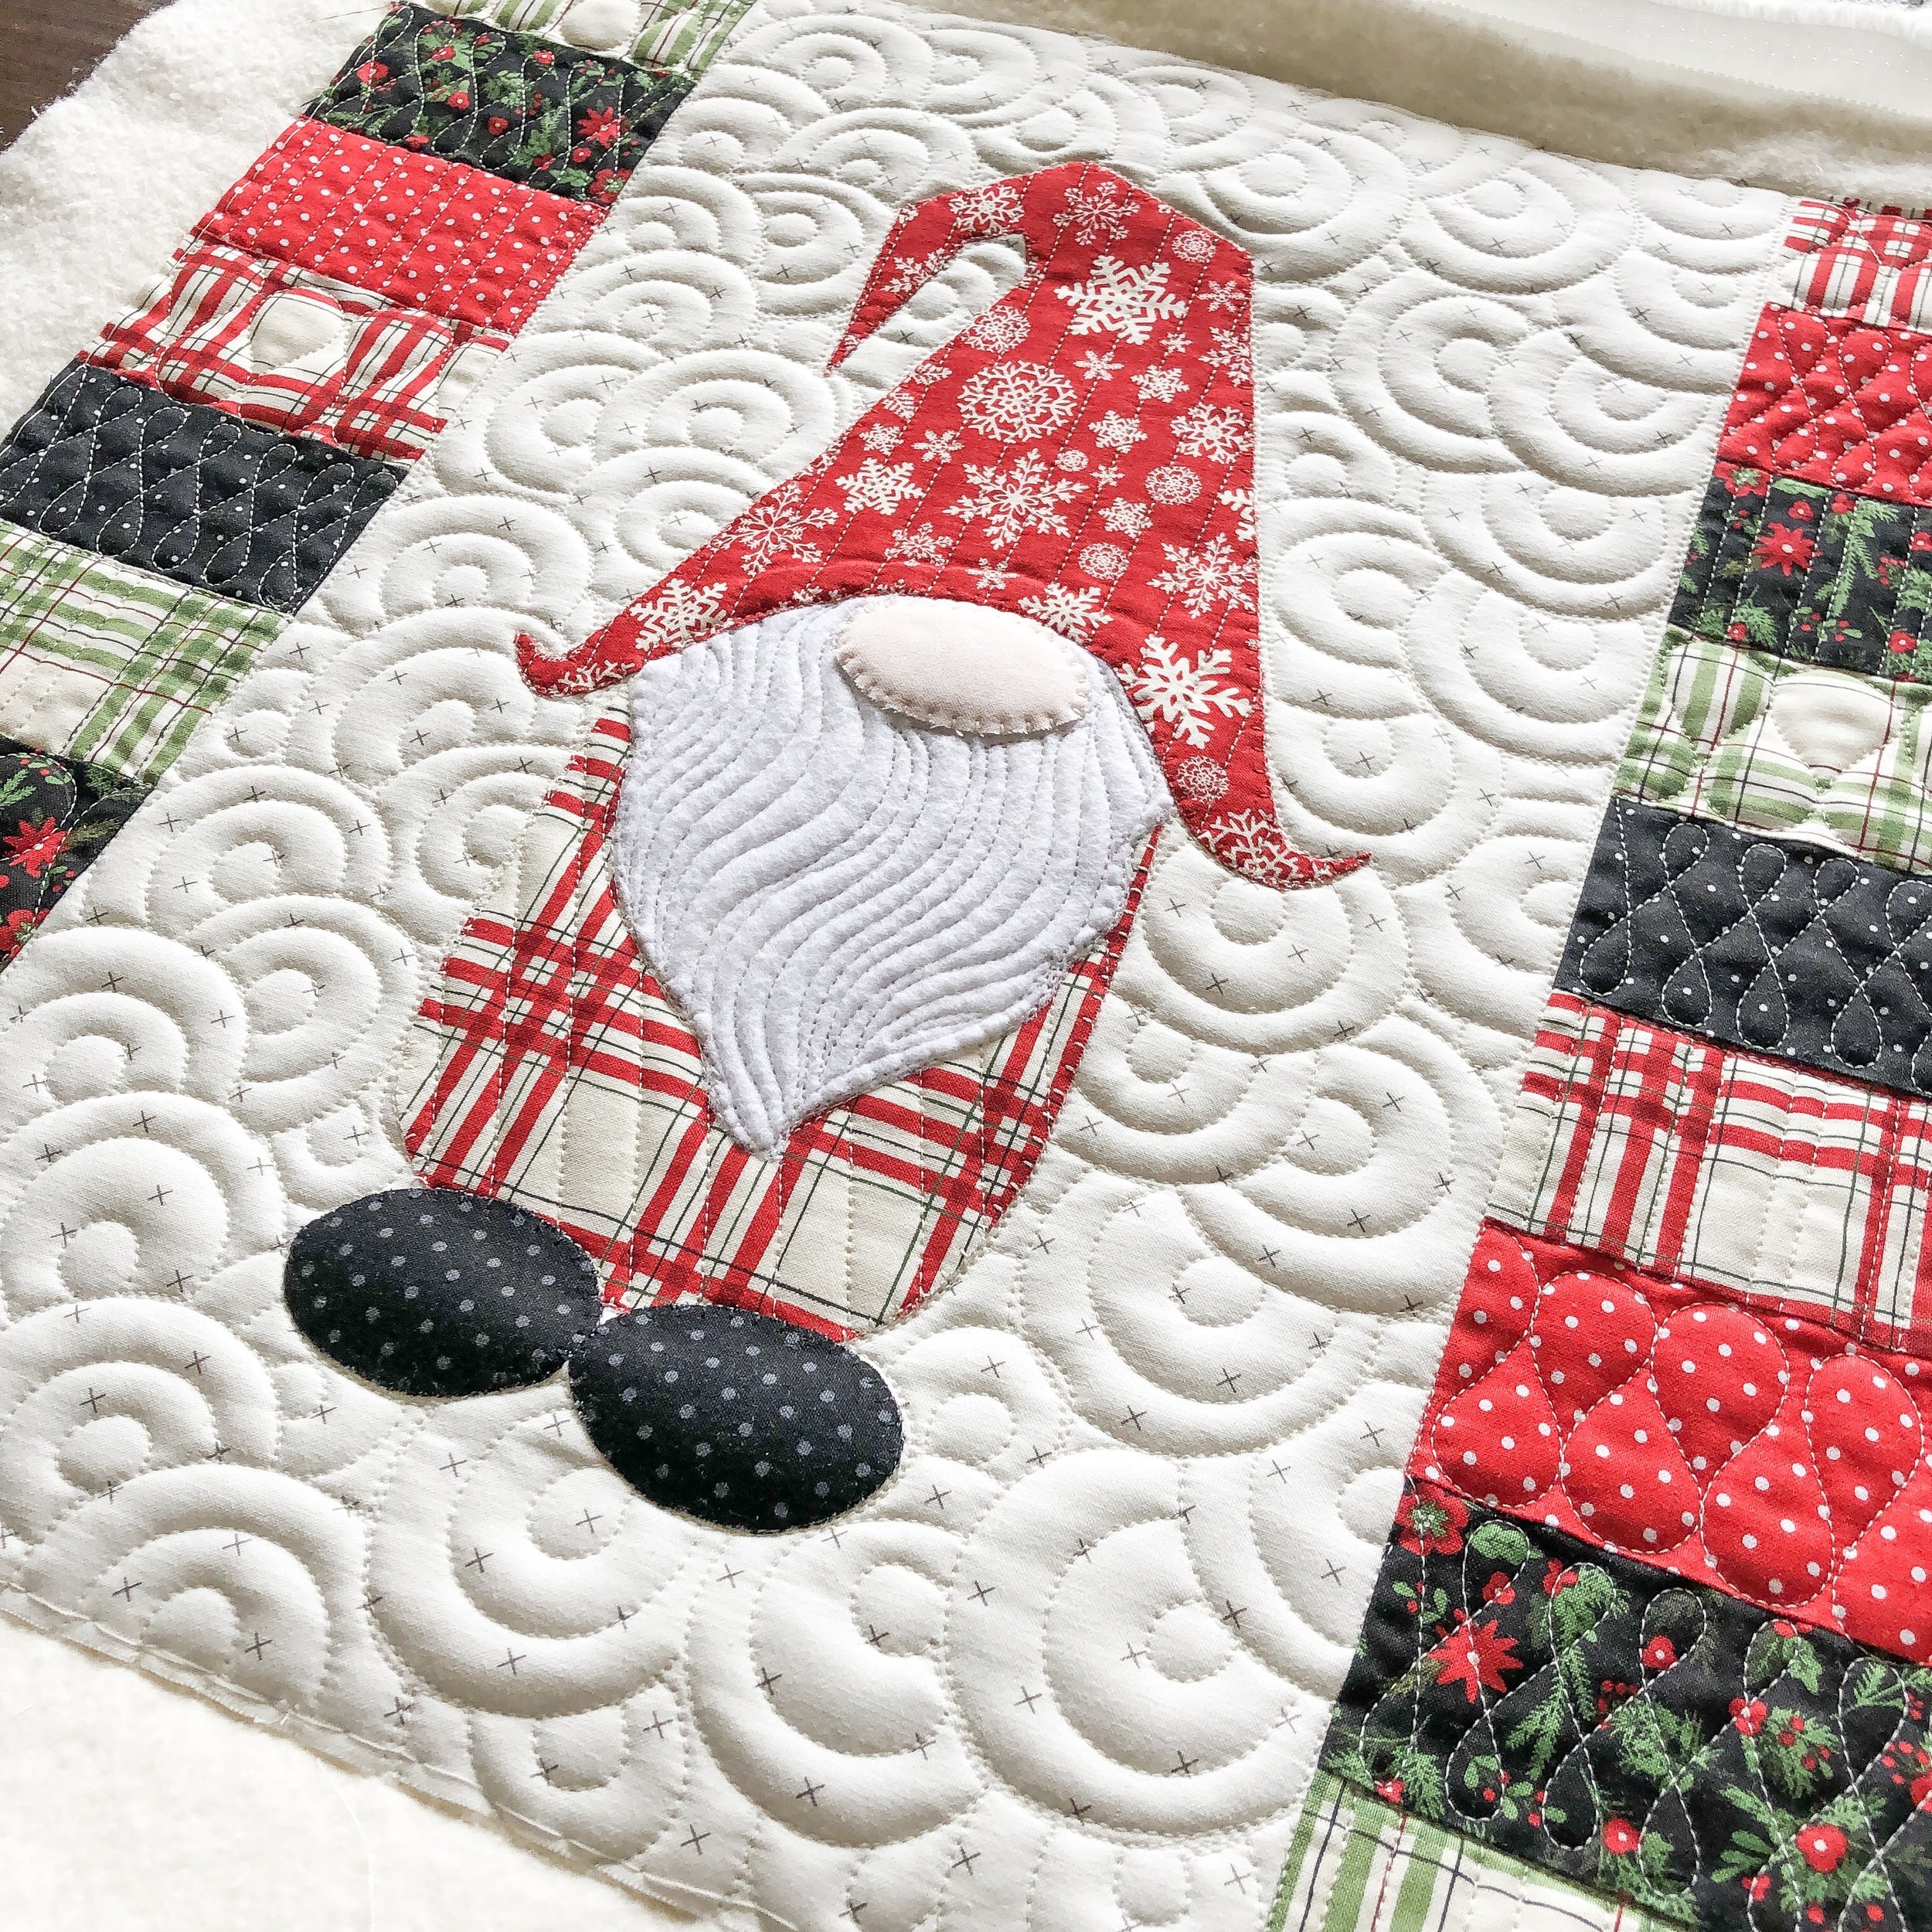
The border has a repeat of these three designs, down both sides.

I used Antique Cream 30 tex A&E Perma Core thread on all 4 of these pillows.
For those who are wondering I have a $35 minimum, and so each of these pillows are $35 to quilt.
I’m off to quilt another quilt!! I have some fun quilts to quilt in the next few weeks, that I’m excited to share with you. Have a great weekend!!
- Leisha

Sherry’s Adorable Easter Pillows
Sherry has me quilt a few of these bench pillow fronts, and they turned out so cute!! The pattern is by Kimberbell Designs, and she has a digitized version if you do machine embroidery.
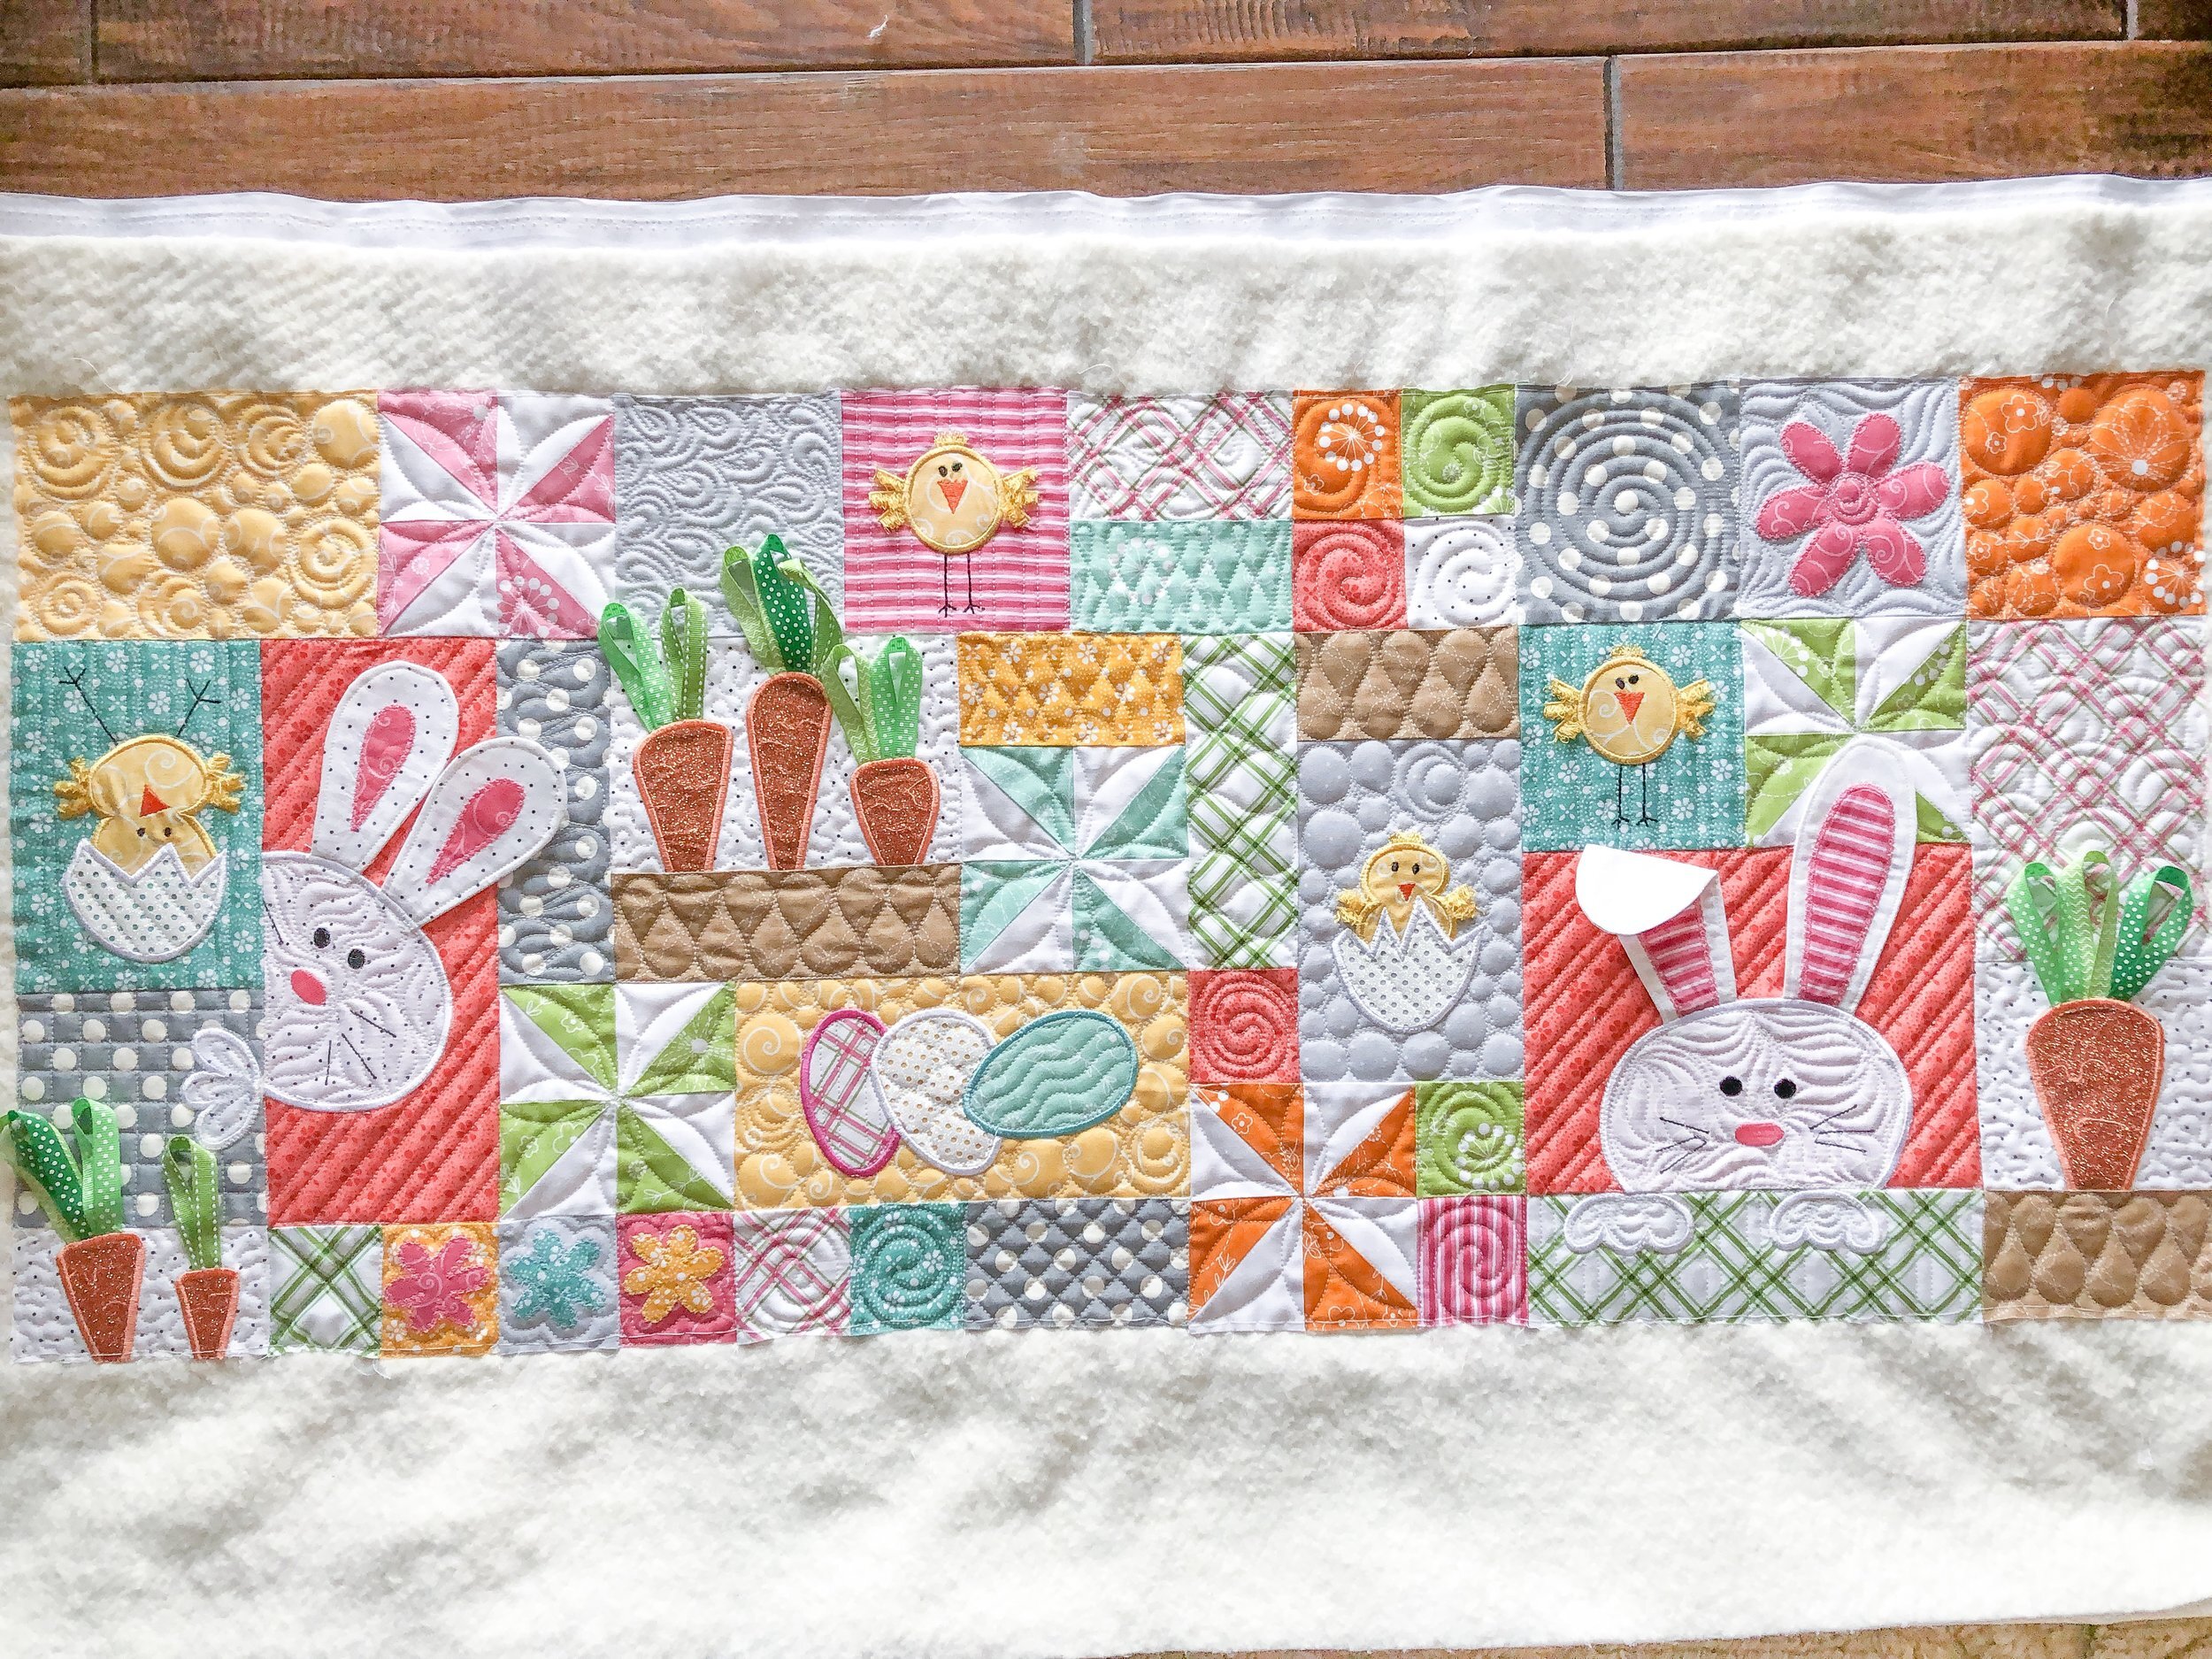
It’s so fun to add all these fun little details to these bench pillows.
I used white 30 Tex A&E Perma Core thread and 8020 cotton poly blend batting from Winline.
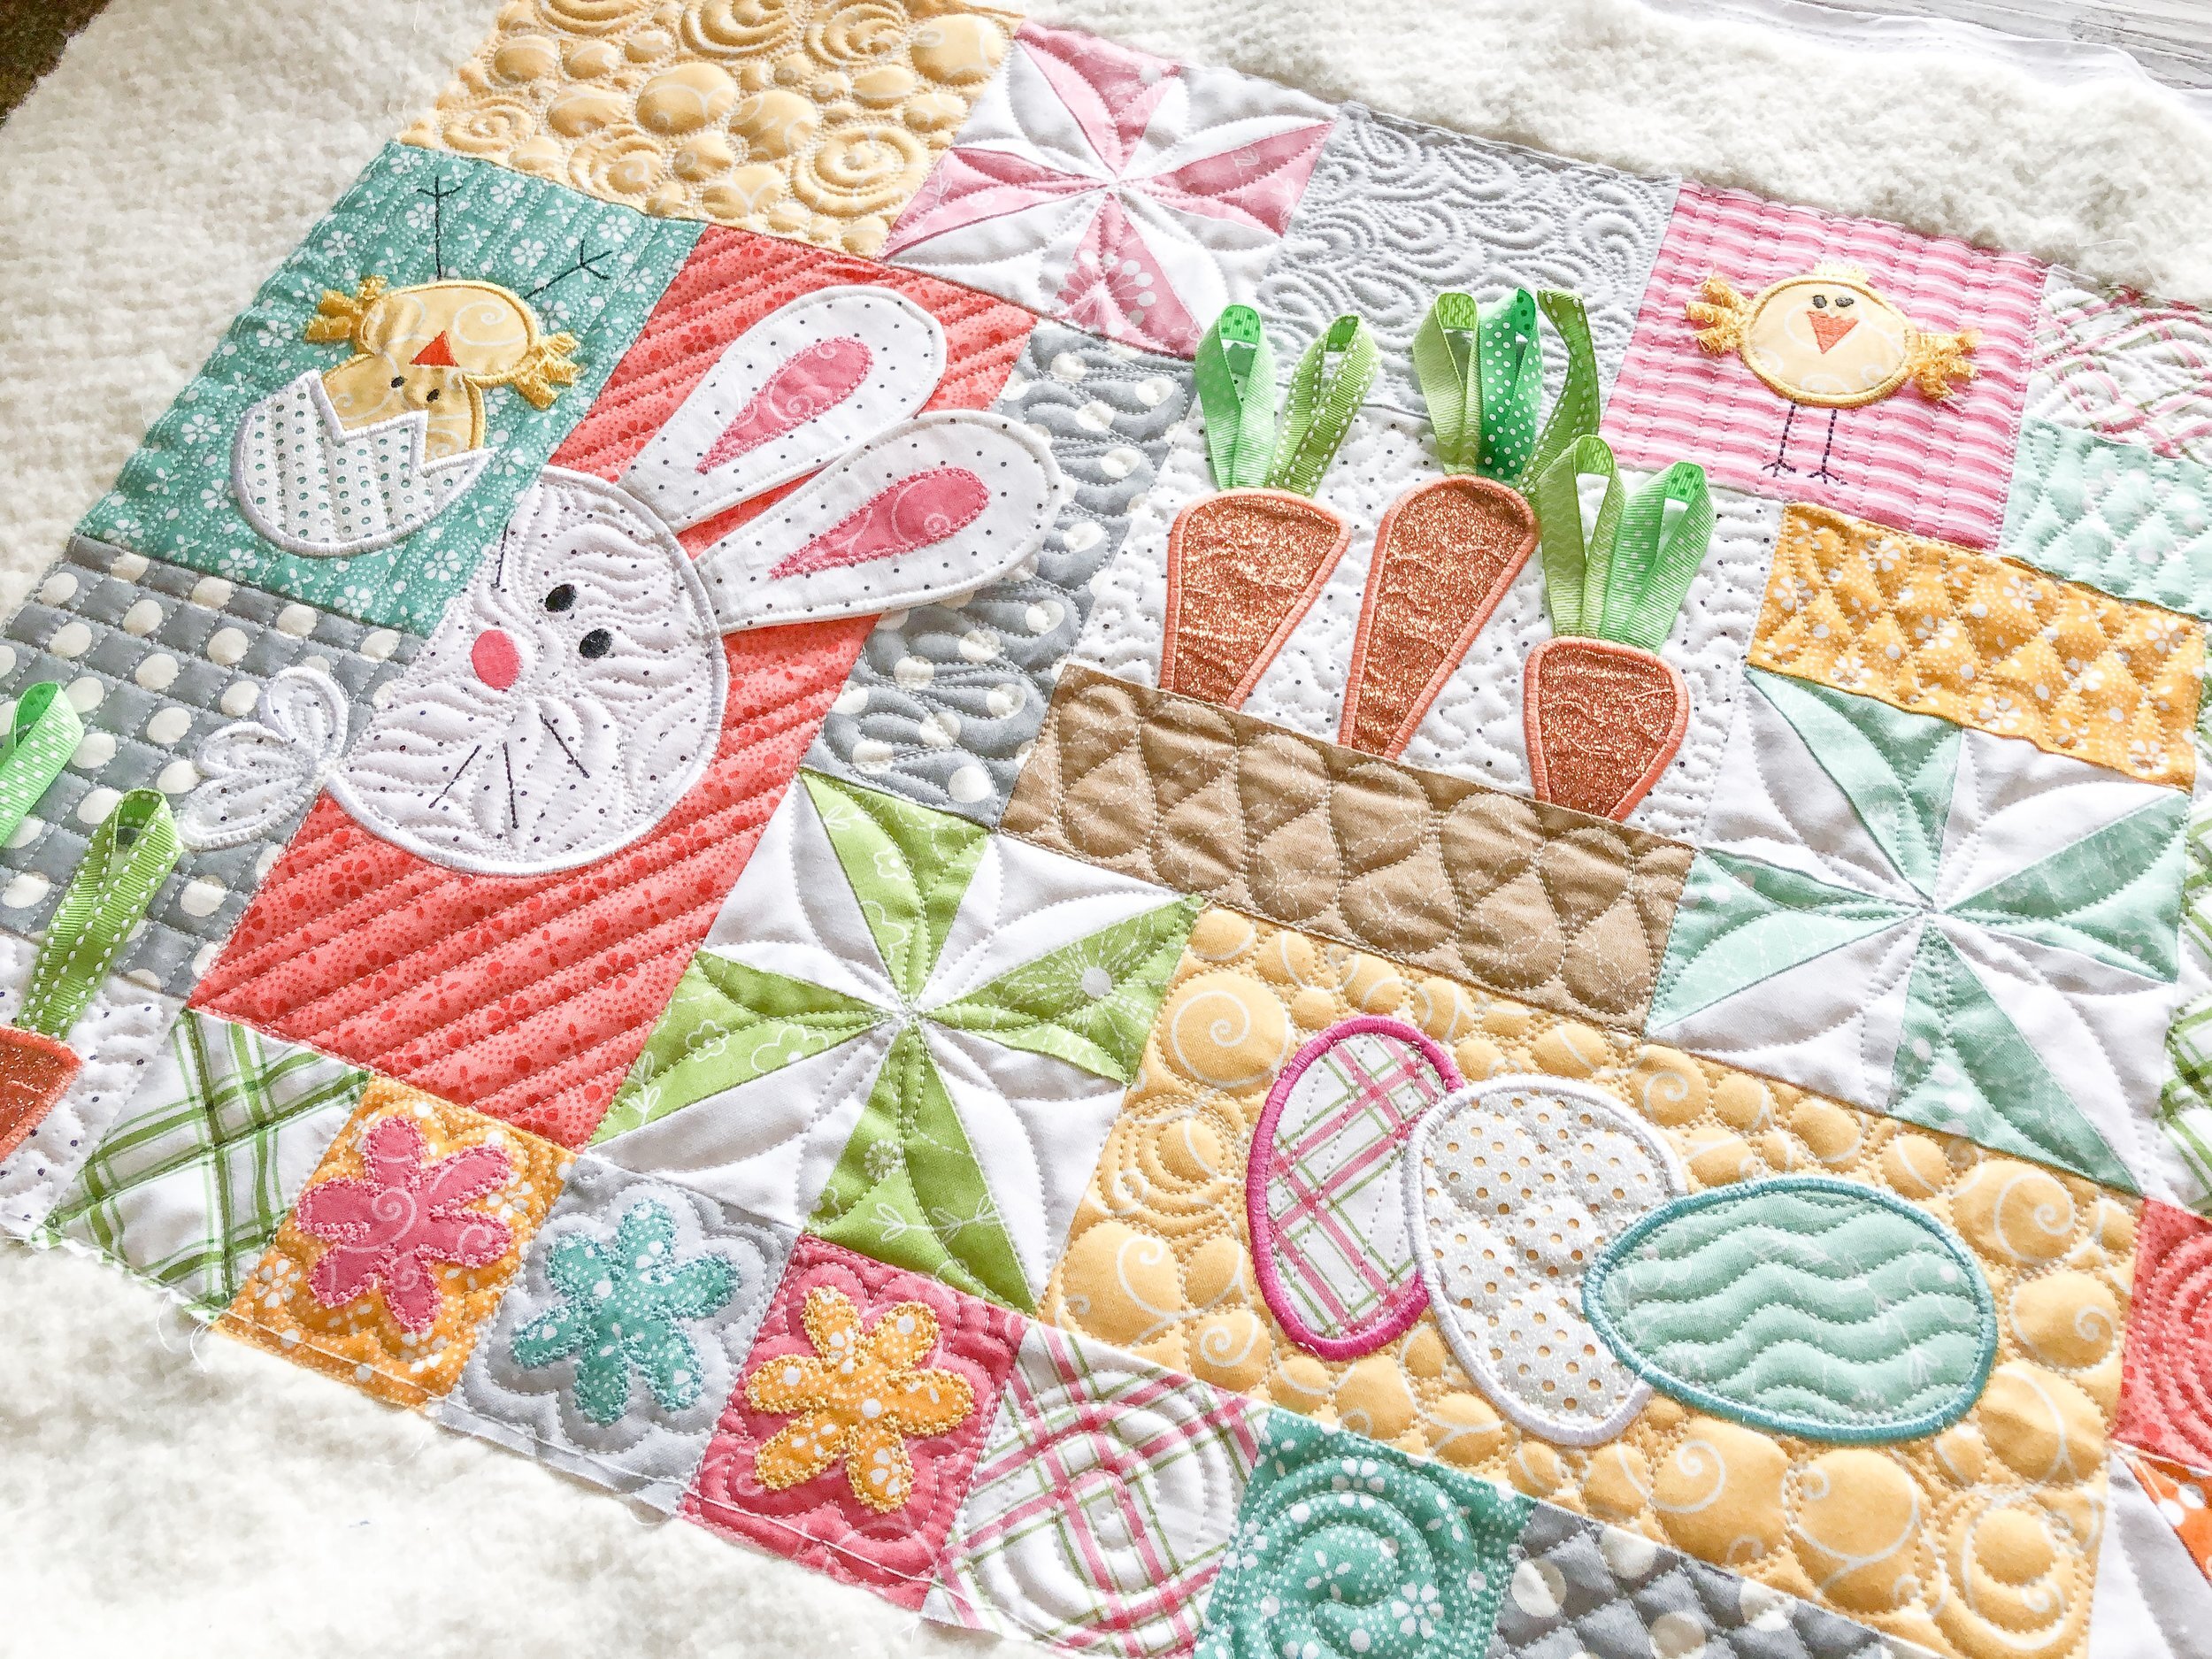
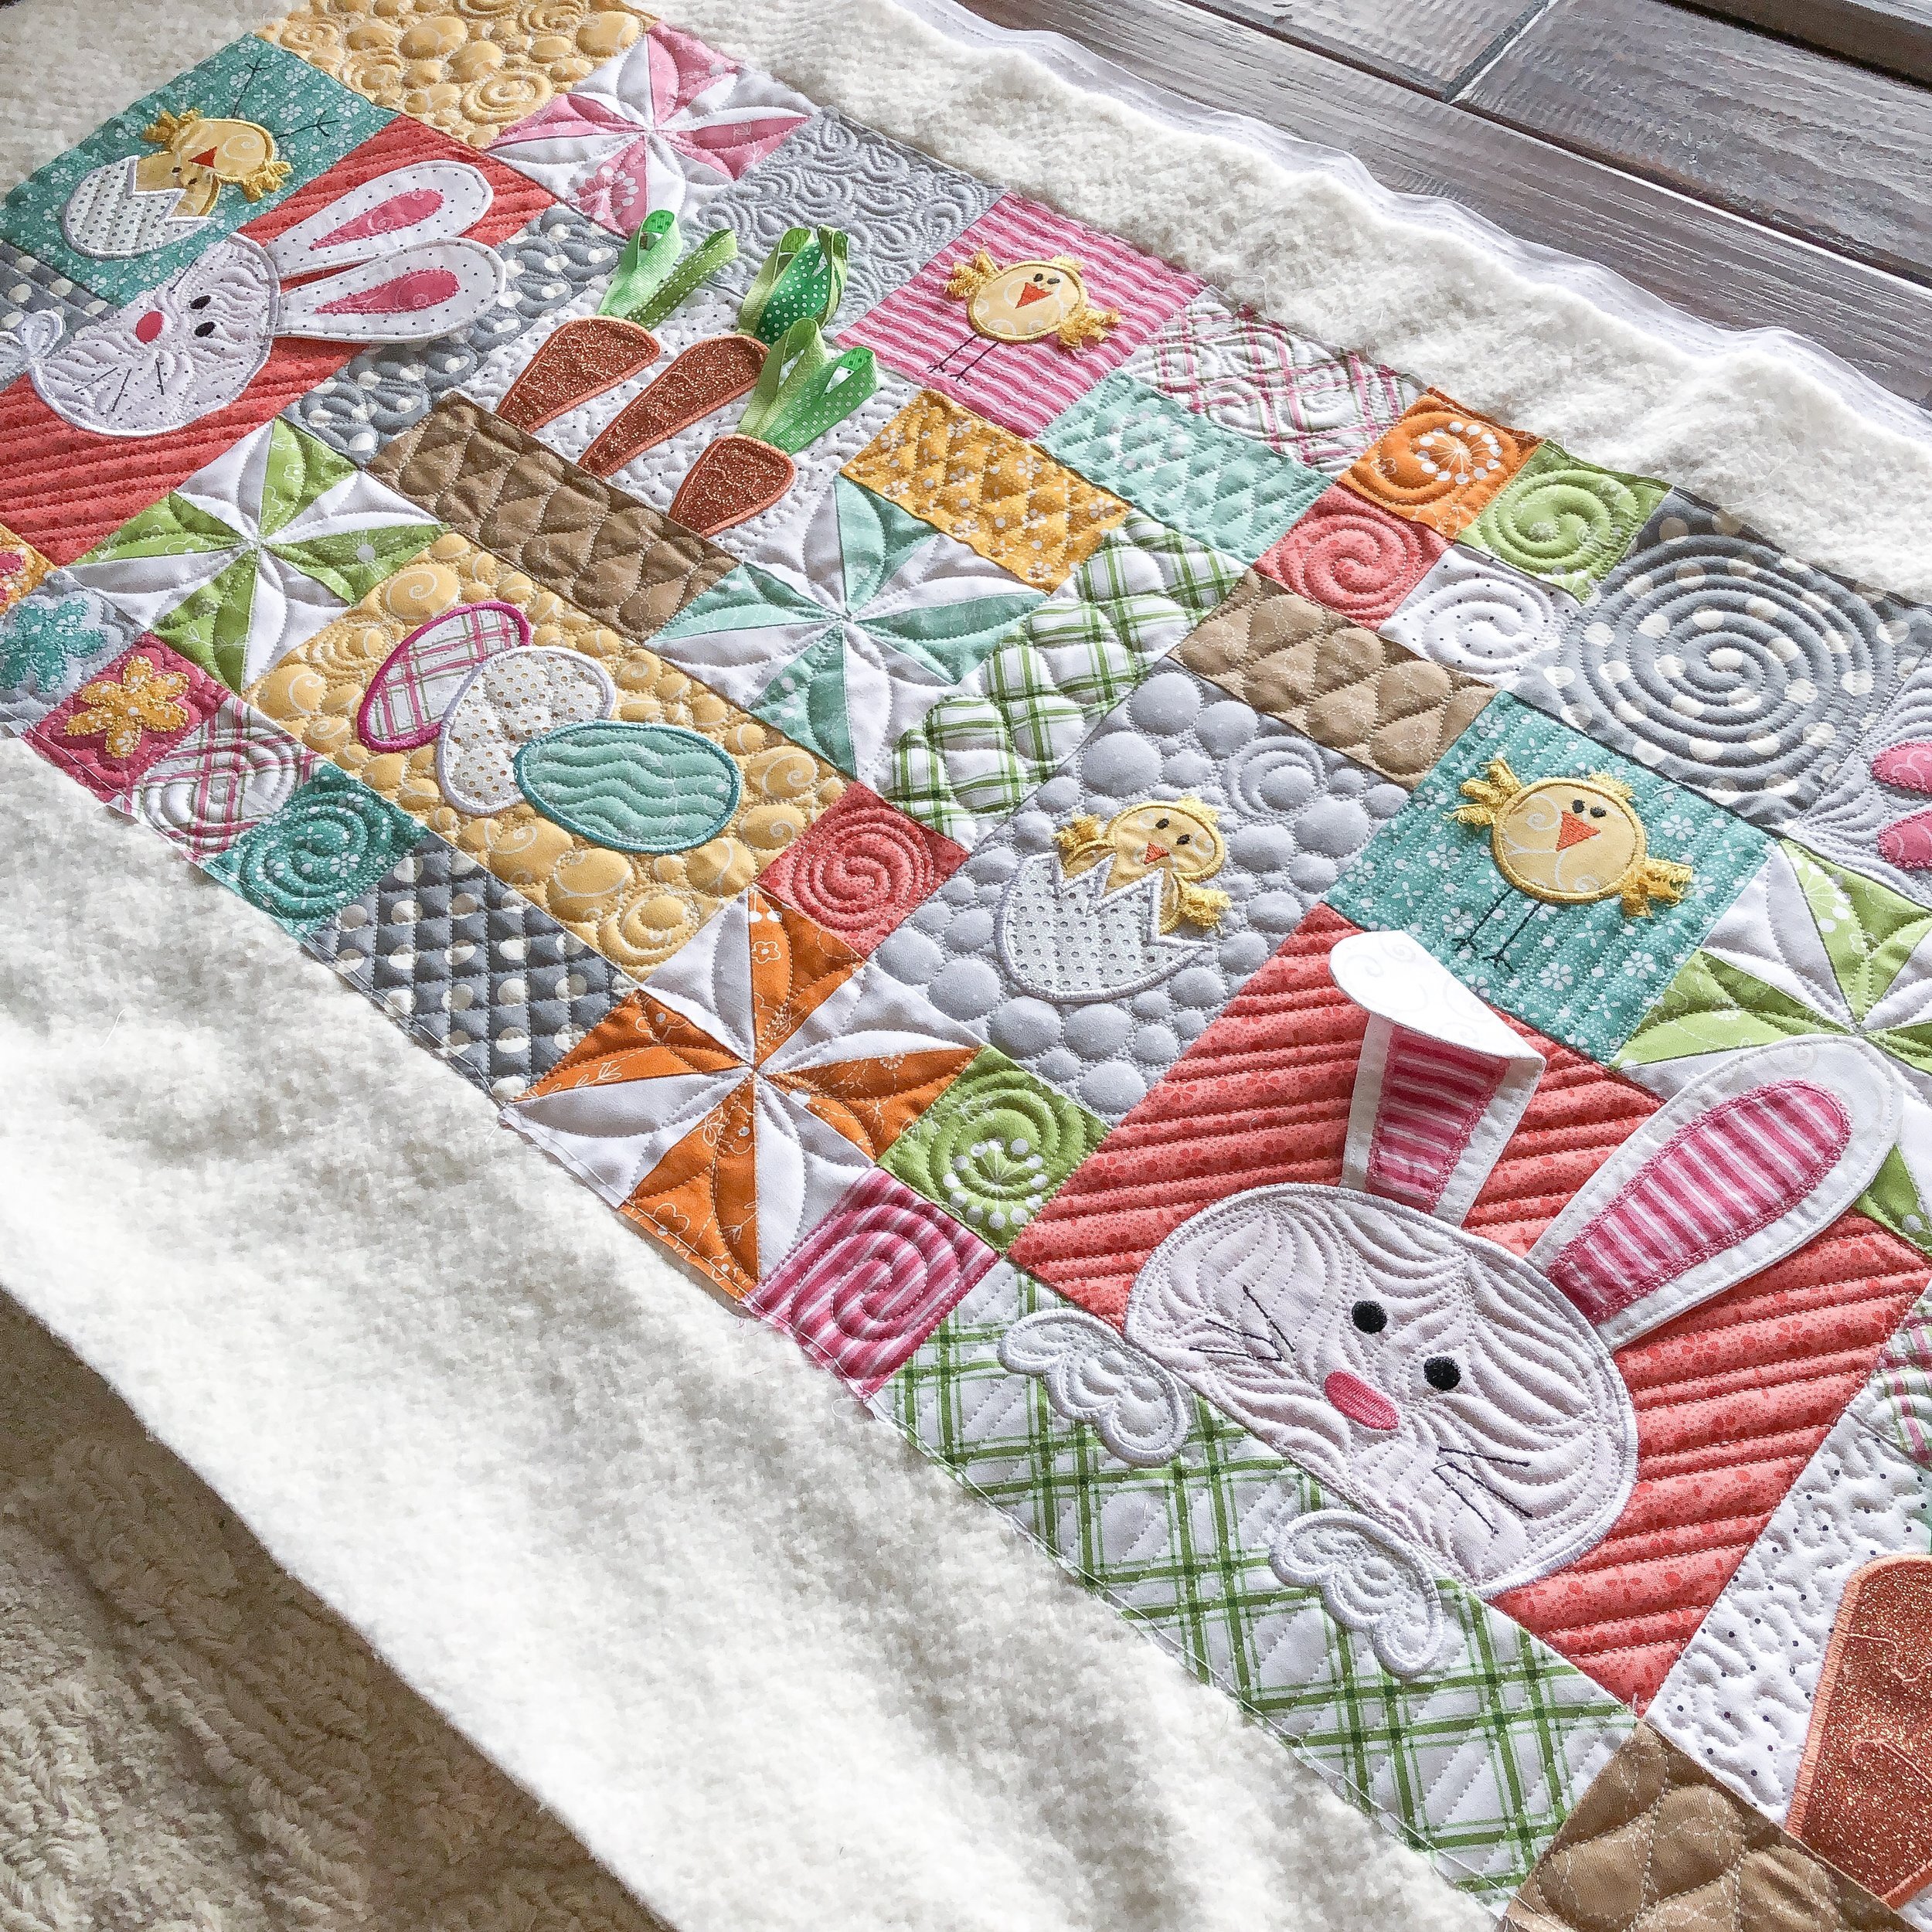
See that flower quilted on the green windmill block??? I quilted that using my 3” and 4” Circle2™ rulers.
My Circle2™ rulers can be used on a longarm and sewing machine (with a quilting foot). The circles range in size from 2” to 13”. They come in green or clear, and are made in America with high quality acrylic. AND right now they are 10% off, use code “THANKYOU10” at checkout. https://www.quiltingit.com/shop?category=Rulers
I also used Linda from https://thequiltedpineapple.bigcartel.com/ Edge rulers to quilt the lines throughout.
I love all the details...from the fabrics, to the embellishments, to the colors...it helps the quilting pop!

This overlapping circle design is something I just started quilting recently...and it’s so fun to do. I actually have a large quilt to do soon, and it will be the entire background filler. So excited!! Below is a video of me freehand quilting this design.
I will blog about this lamb quilt soon.

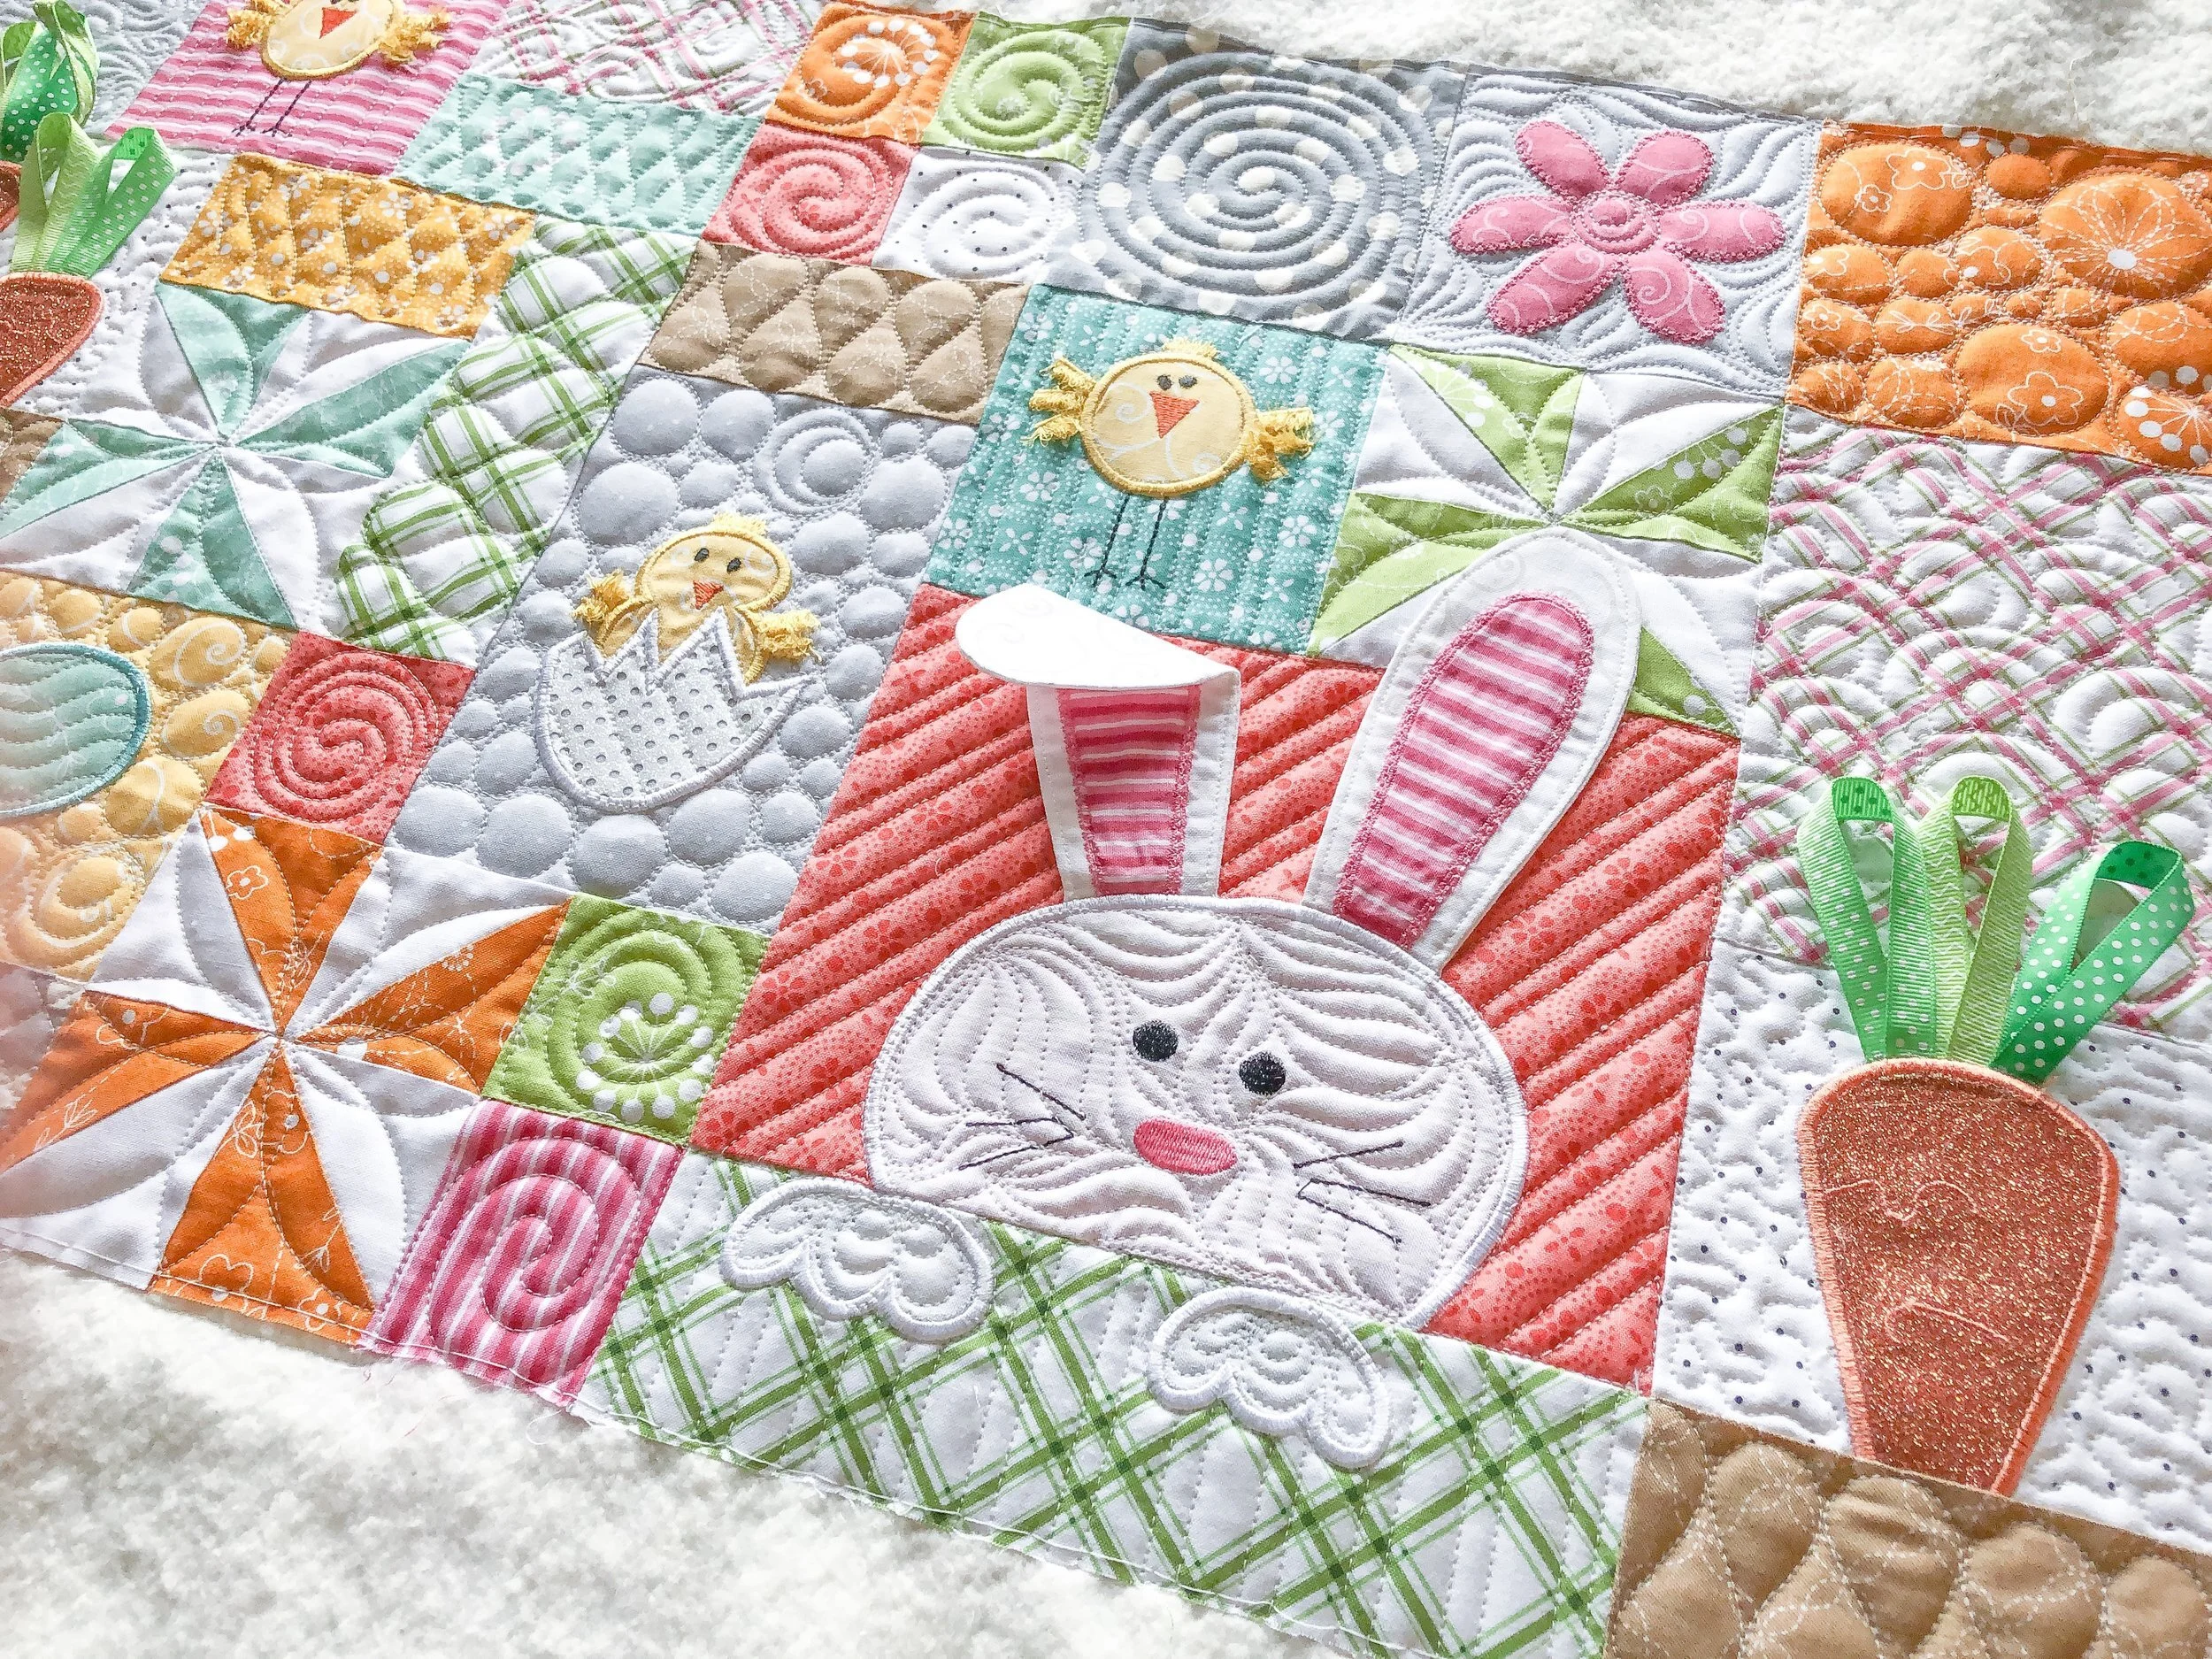
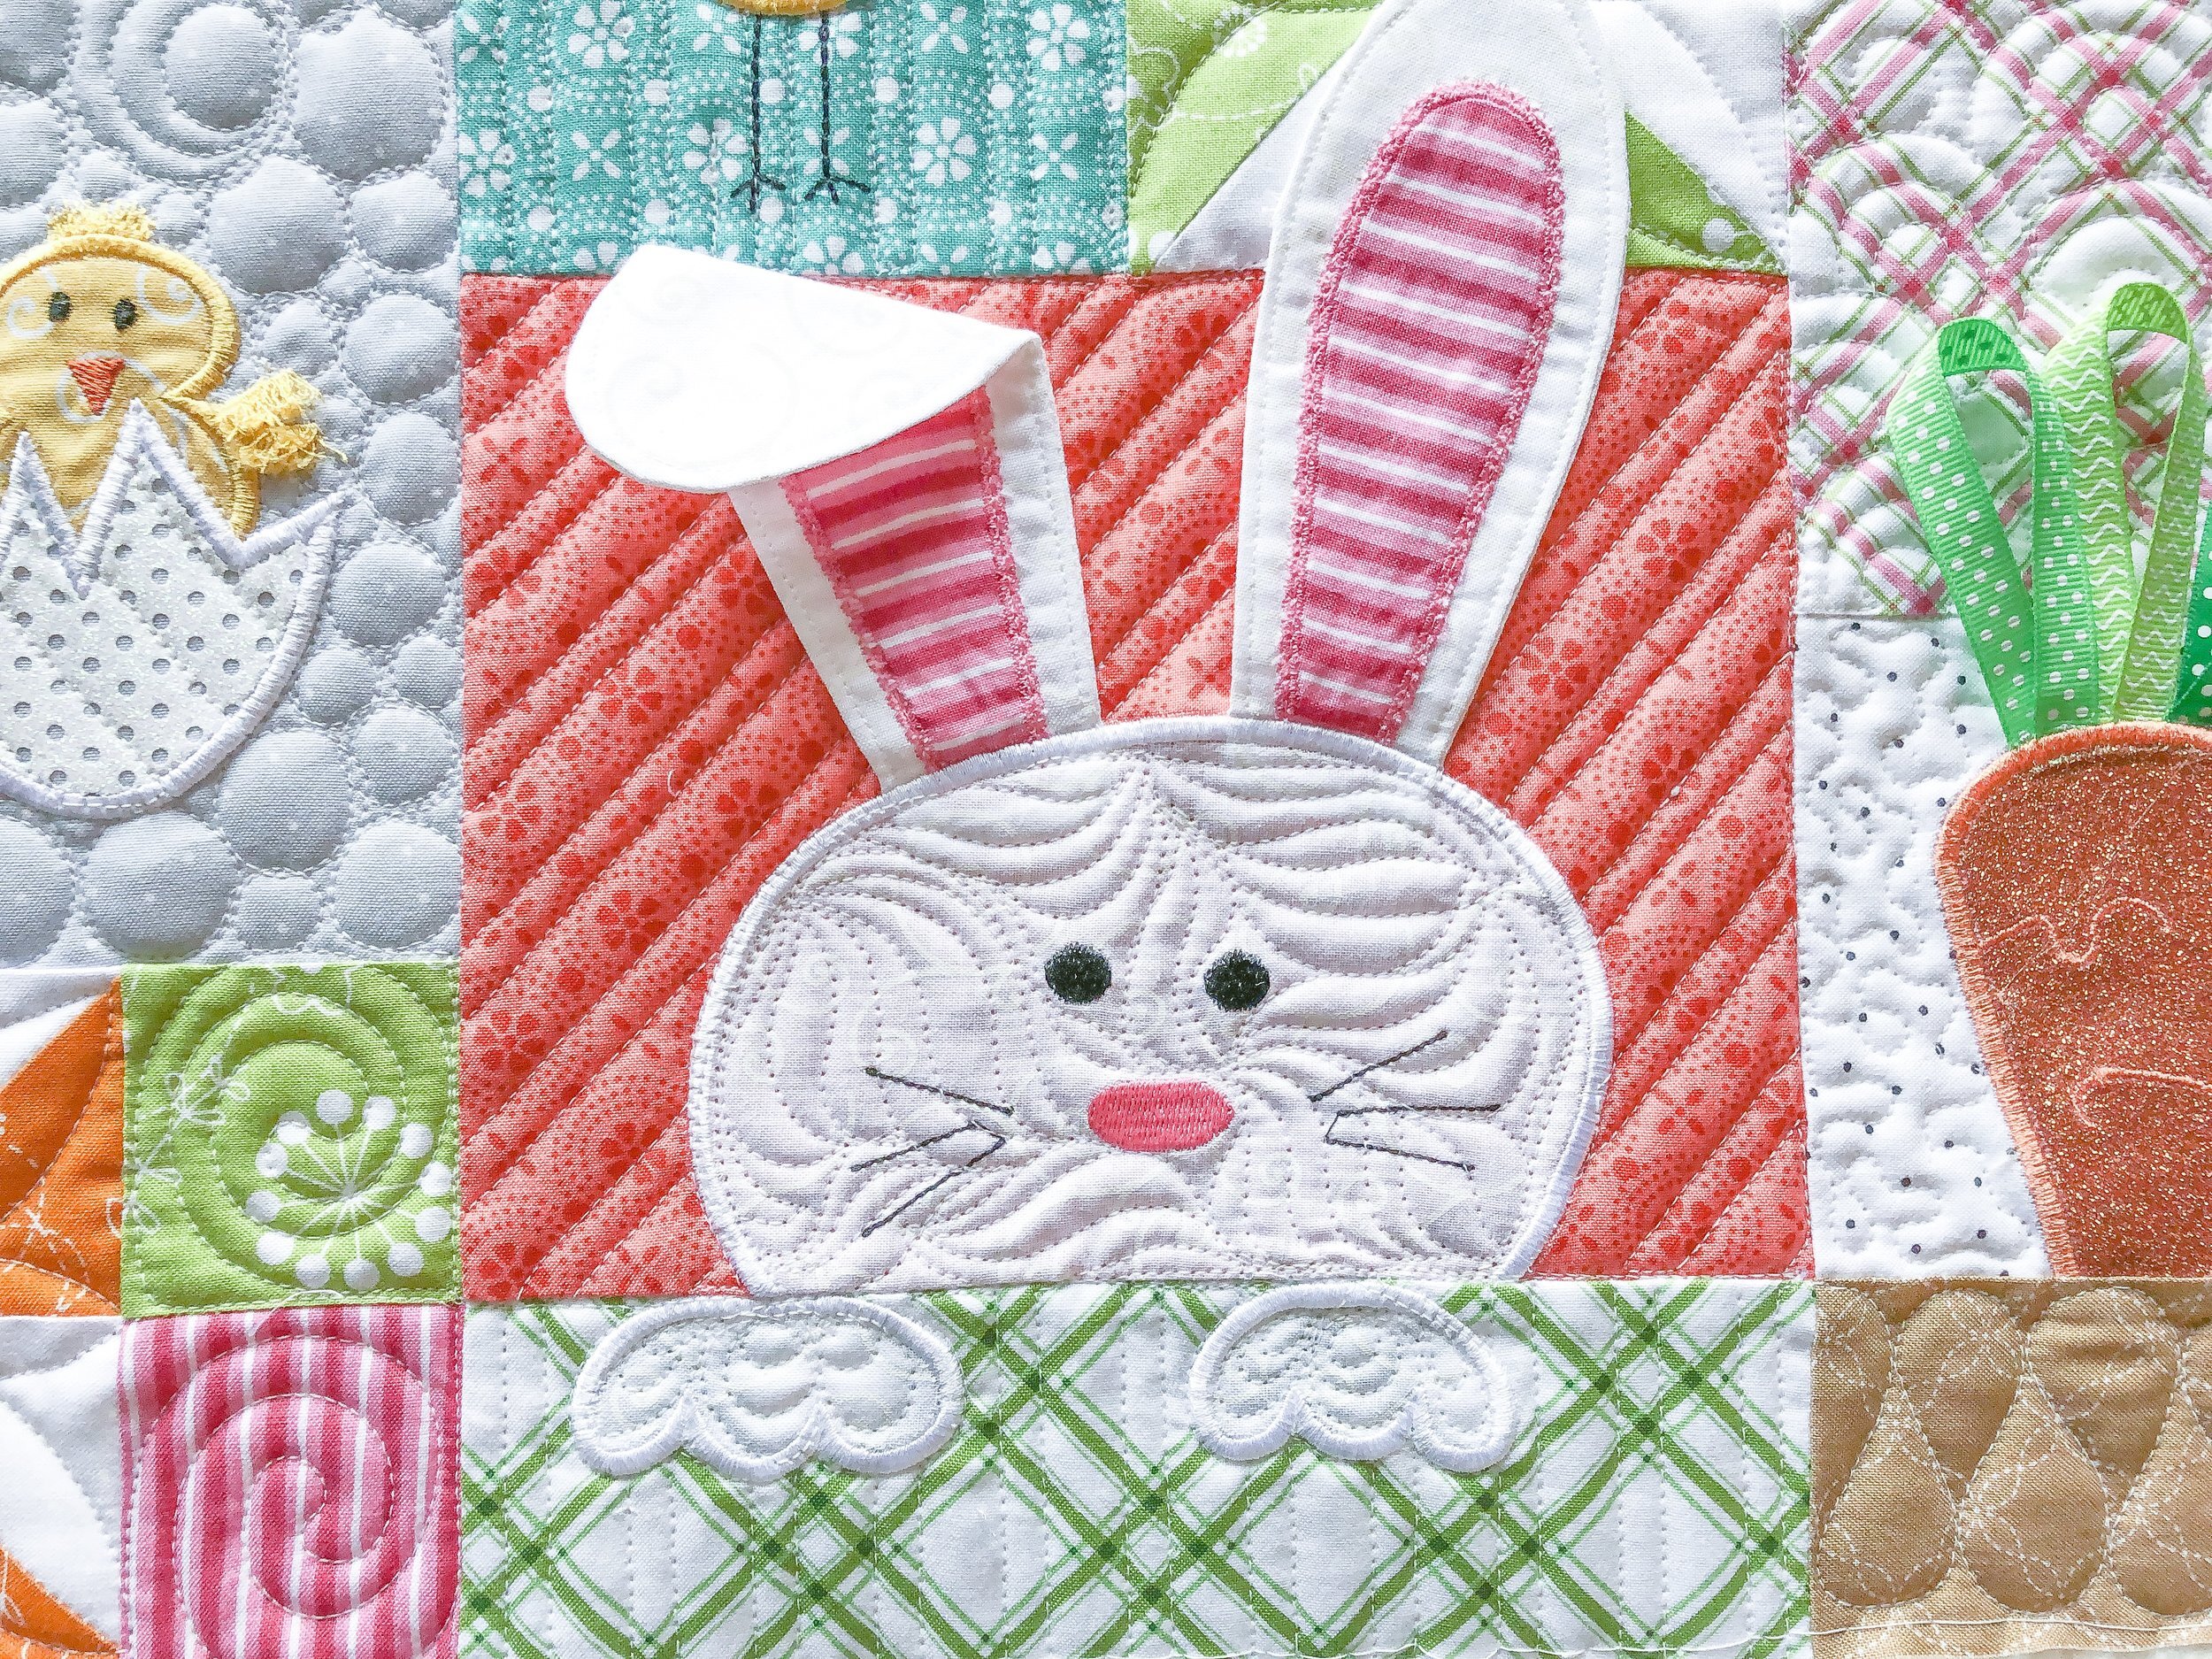
Okay, so how cute is mr. bunny??? I wanted to add some fur looking texture to his face. Check out the video below to see how to quilt this freehand grassy design.
I love how forgiving this design is, and it works on a variety of different quilts. Here are a couple of quilts I’ve quilted it on recently: behind Little Boy Blue - https://www.quiltingit.com/blog/2019/1/1/beckys-nursery-rhyme-quilt?rq=Becky and behind a couple of umbrellas on this fun quilt - https://www.quiltingit.com/blog/2018/11/17/cindys-raincheck-quilt-including-28-different-background-quilting-designs?rq=Raincheck
The great thing about starting to see Easter projects...spring is coming!!! Yay!!
Hoppy quilting!! - Leisha

Quilting Tutorials
Hello friends!!
I’ve had some requests for some freehand quilting tutorials. I’m going to do them as I have the opportunity to quilt designs on my clients quilts. I’m also hoping to keep them short, like this one. If there is anything you’d like me to video as I quilt, let me know. Check out my recent blog posts to see if there is anything you’d like me to video: https://www.quiltingit.com/blog/2019/1/1/beckys-nursery-rhyme-quilt and https://www.quiltingit.com/blog/2018/11/17/cindys-raincheck-quilt-including-28-different-background-quilting-designs
If you’d like to subscribe to my YouTube channel, I would appreciate it!! Go to: https://www.youtube.com/user/QuiltingIt
Thanks for following along in my quilting journey!!
happy quilting! - Leisha

Sherry’s “Kimberbell” pillows and runners...
All of these lovely patterns are by Kimberbell Designs, and she’s made them even available for those who machine embroidery. Sherry made all of these beautiful pillow fronts and runners, she actually made multiple of each...one for her, her daughter, and mother. That’s why you’ll see multiples.

Speaking of multiples...there is also one more. I used Linda from thequiltedpineapple.com Edge rulersto quilt the 1/2” Diagonal lines along the two side vertical borders. The lines on the rulers make it easy to quilt the lines with no marking.

I love the texture that the grassy freehand design, gives behind the leaf wreath. The swirly feather design along the herringbone borders, is such a fun freehand design to quilt. It’s perfect for borders, and adds a modern traditional touch.
Let’s talk about backgrounds!! When it comes to quilting behind appliquéd words, it isn’t always easy to know what to do. Stippling can be great...but there’s soooo much more that you could do. The crackle above or the 1” squares below, help the letters shine, giving the background texture and help them be the focal point.
The combination of textures is just enough to give these pillow fronts more personality.
I used a cream and tan Perma Core 30 tex A&E thread, and 8020 cotton poly blend batting.

A little swirl, feather, and curly cues...are my favorite thing to quilt inside every pumpkin.

Those bugs in those vinyl jars, are every little boys dream. I quilted a crackle around the jars...which I do freehand, no need for a ruler, unless you do them jumbo sized. Who would be interested in a tutorial on how to freehand the crackle??? Comment below.

I used a white 30 tex A&E Perma Core thread, and my favorite winline 8020 cotton poly blend batting.

I was trying to figure out what to do in the borders, and it hit me...webs coming from all different directions. It was such a fun way to quilt a border...try it sometime. I used the 8” Edge ruler from Linda at thequiltedpineapple.com to quilt the webs.

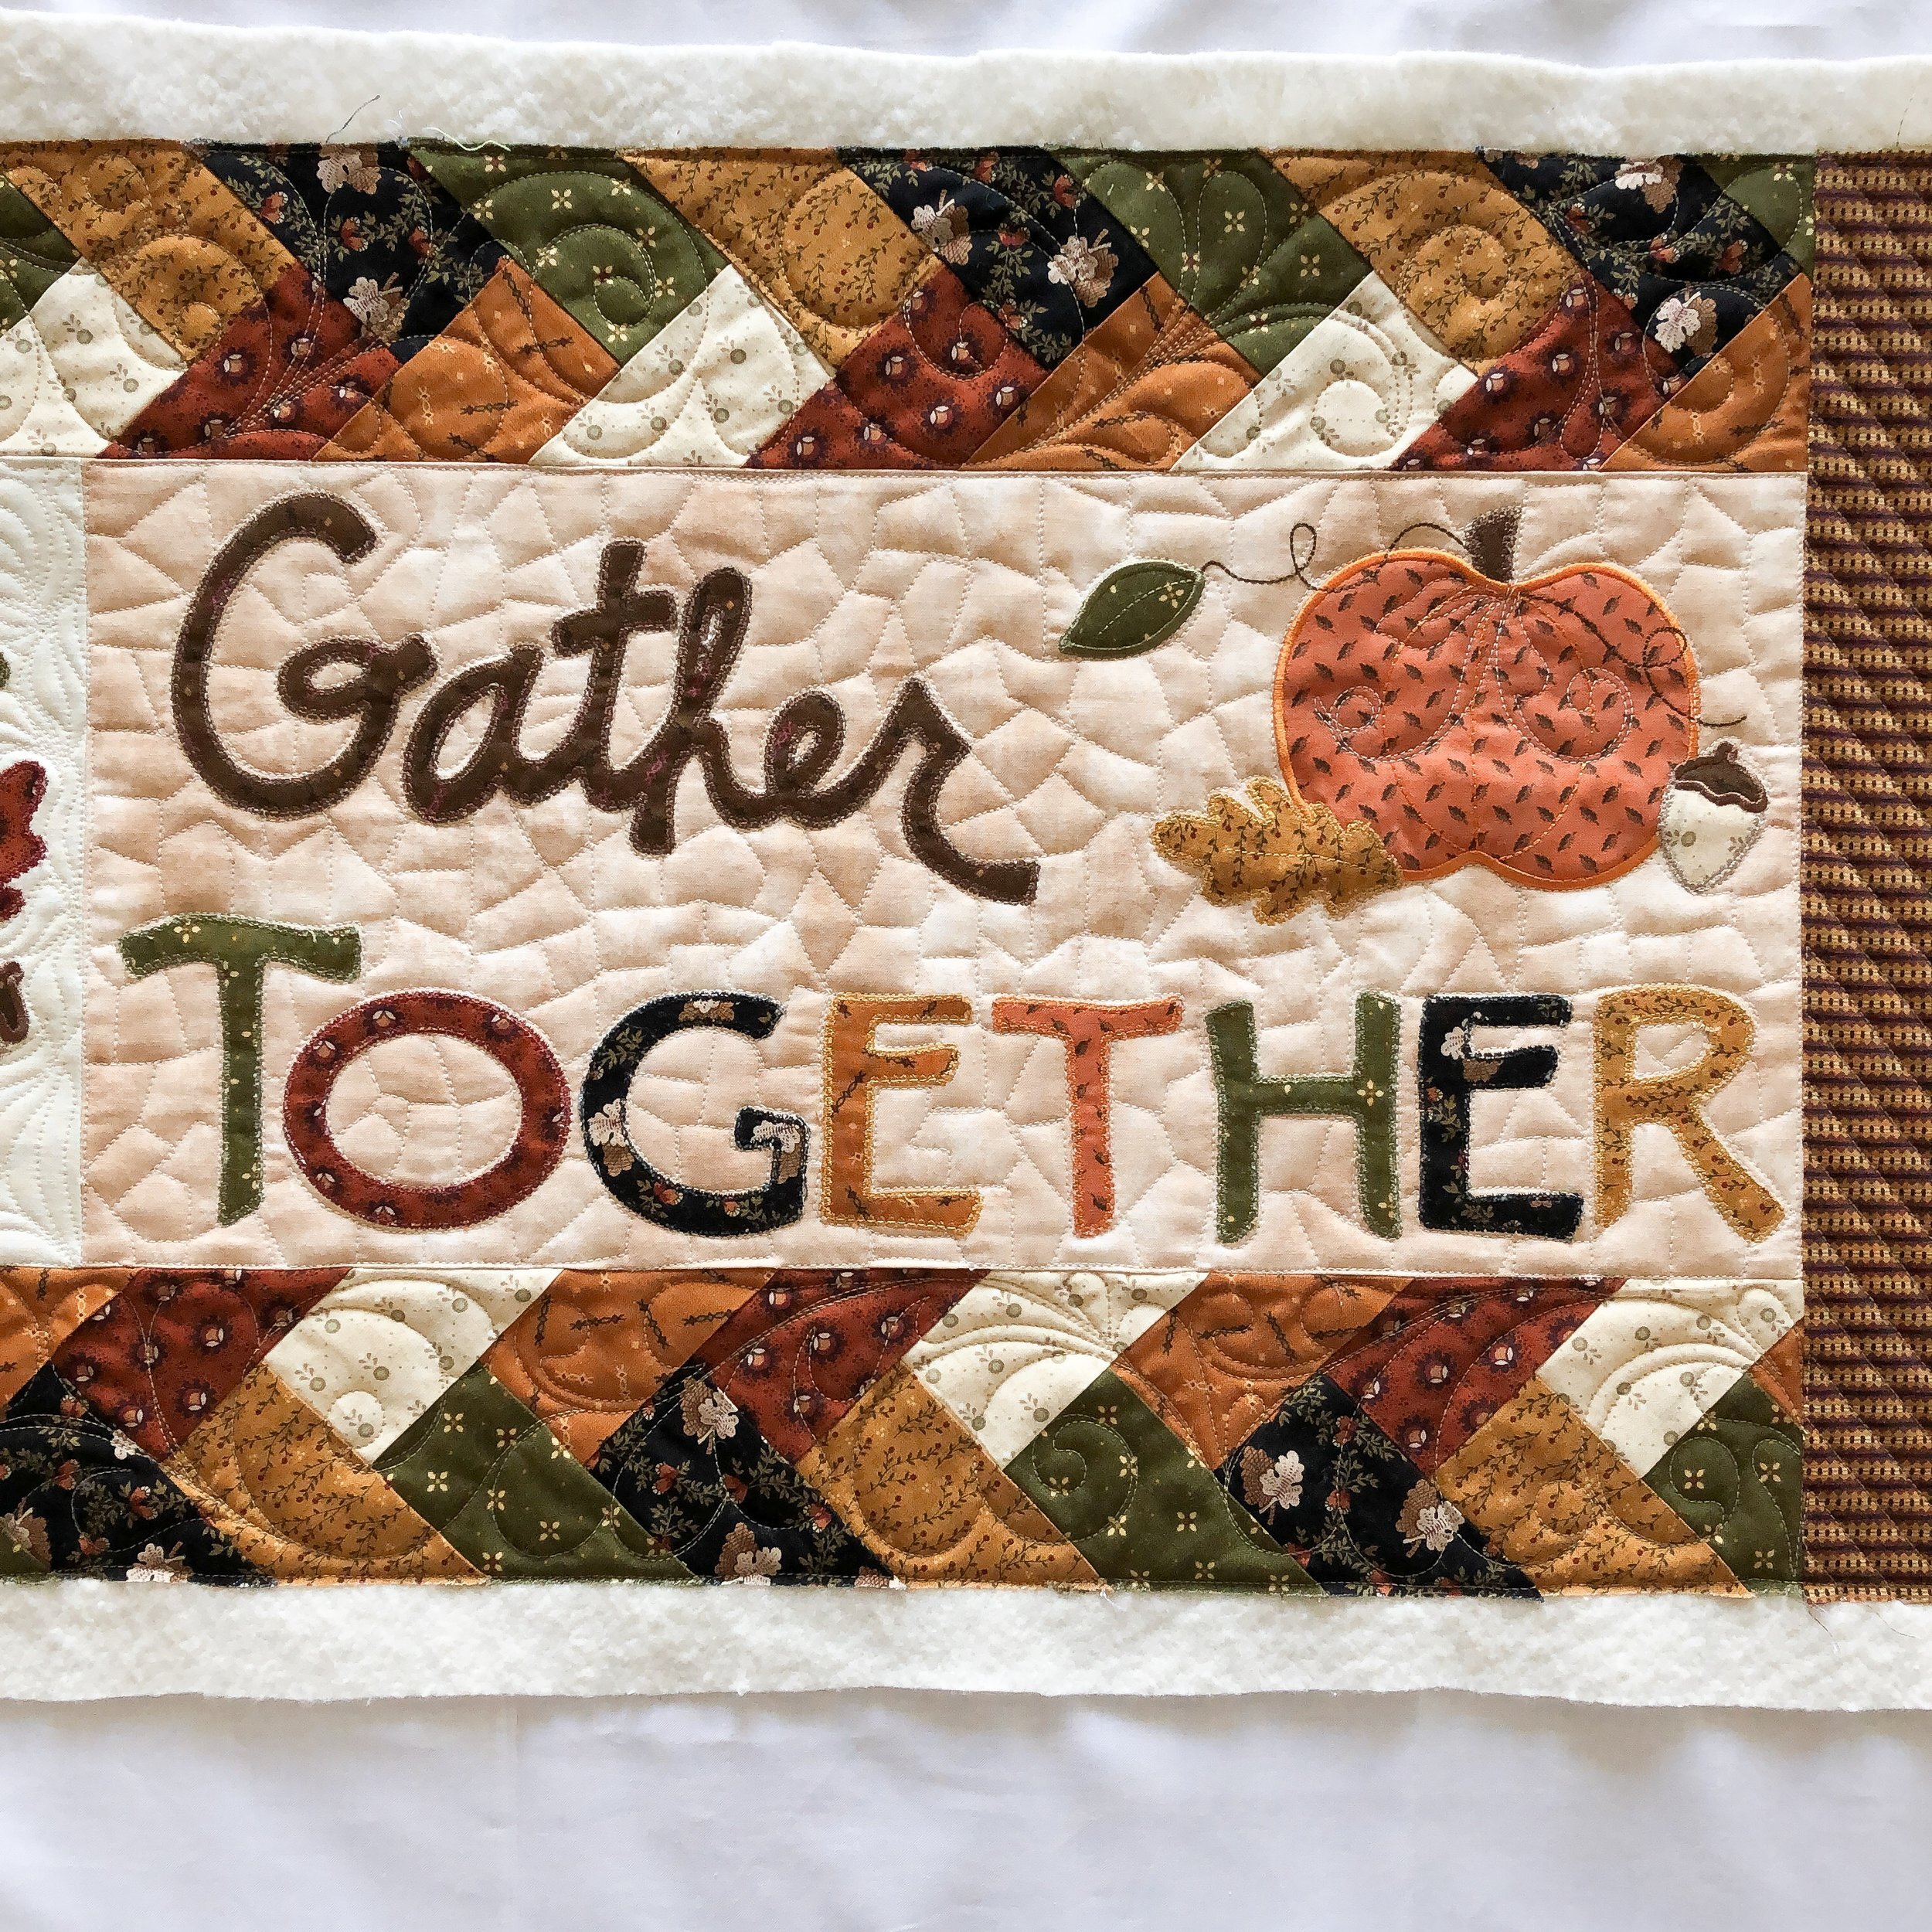
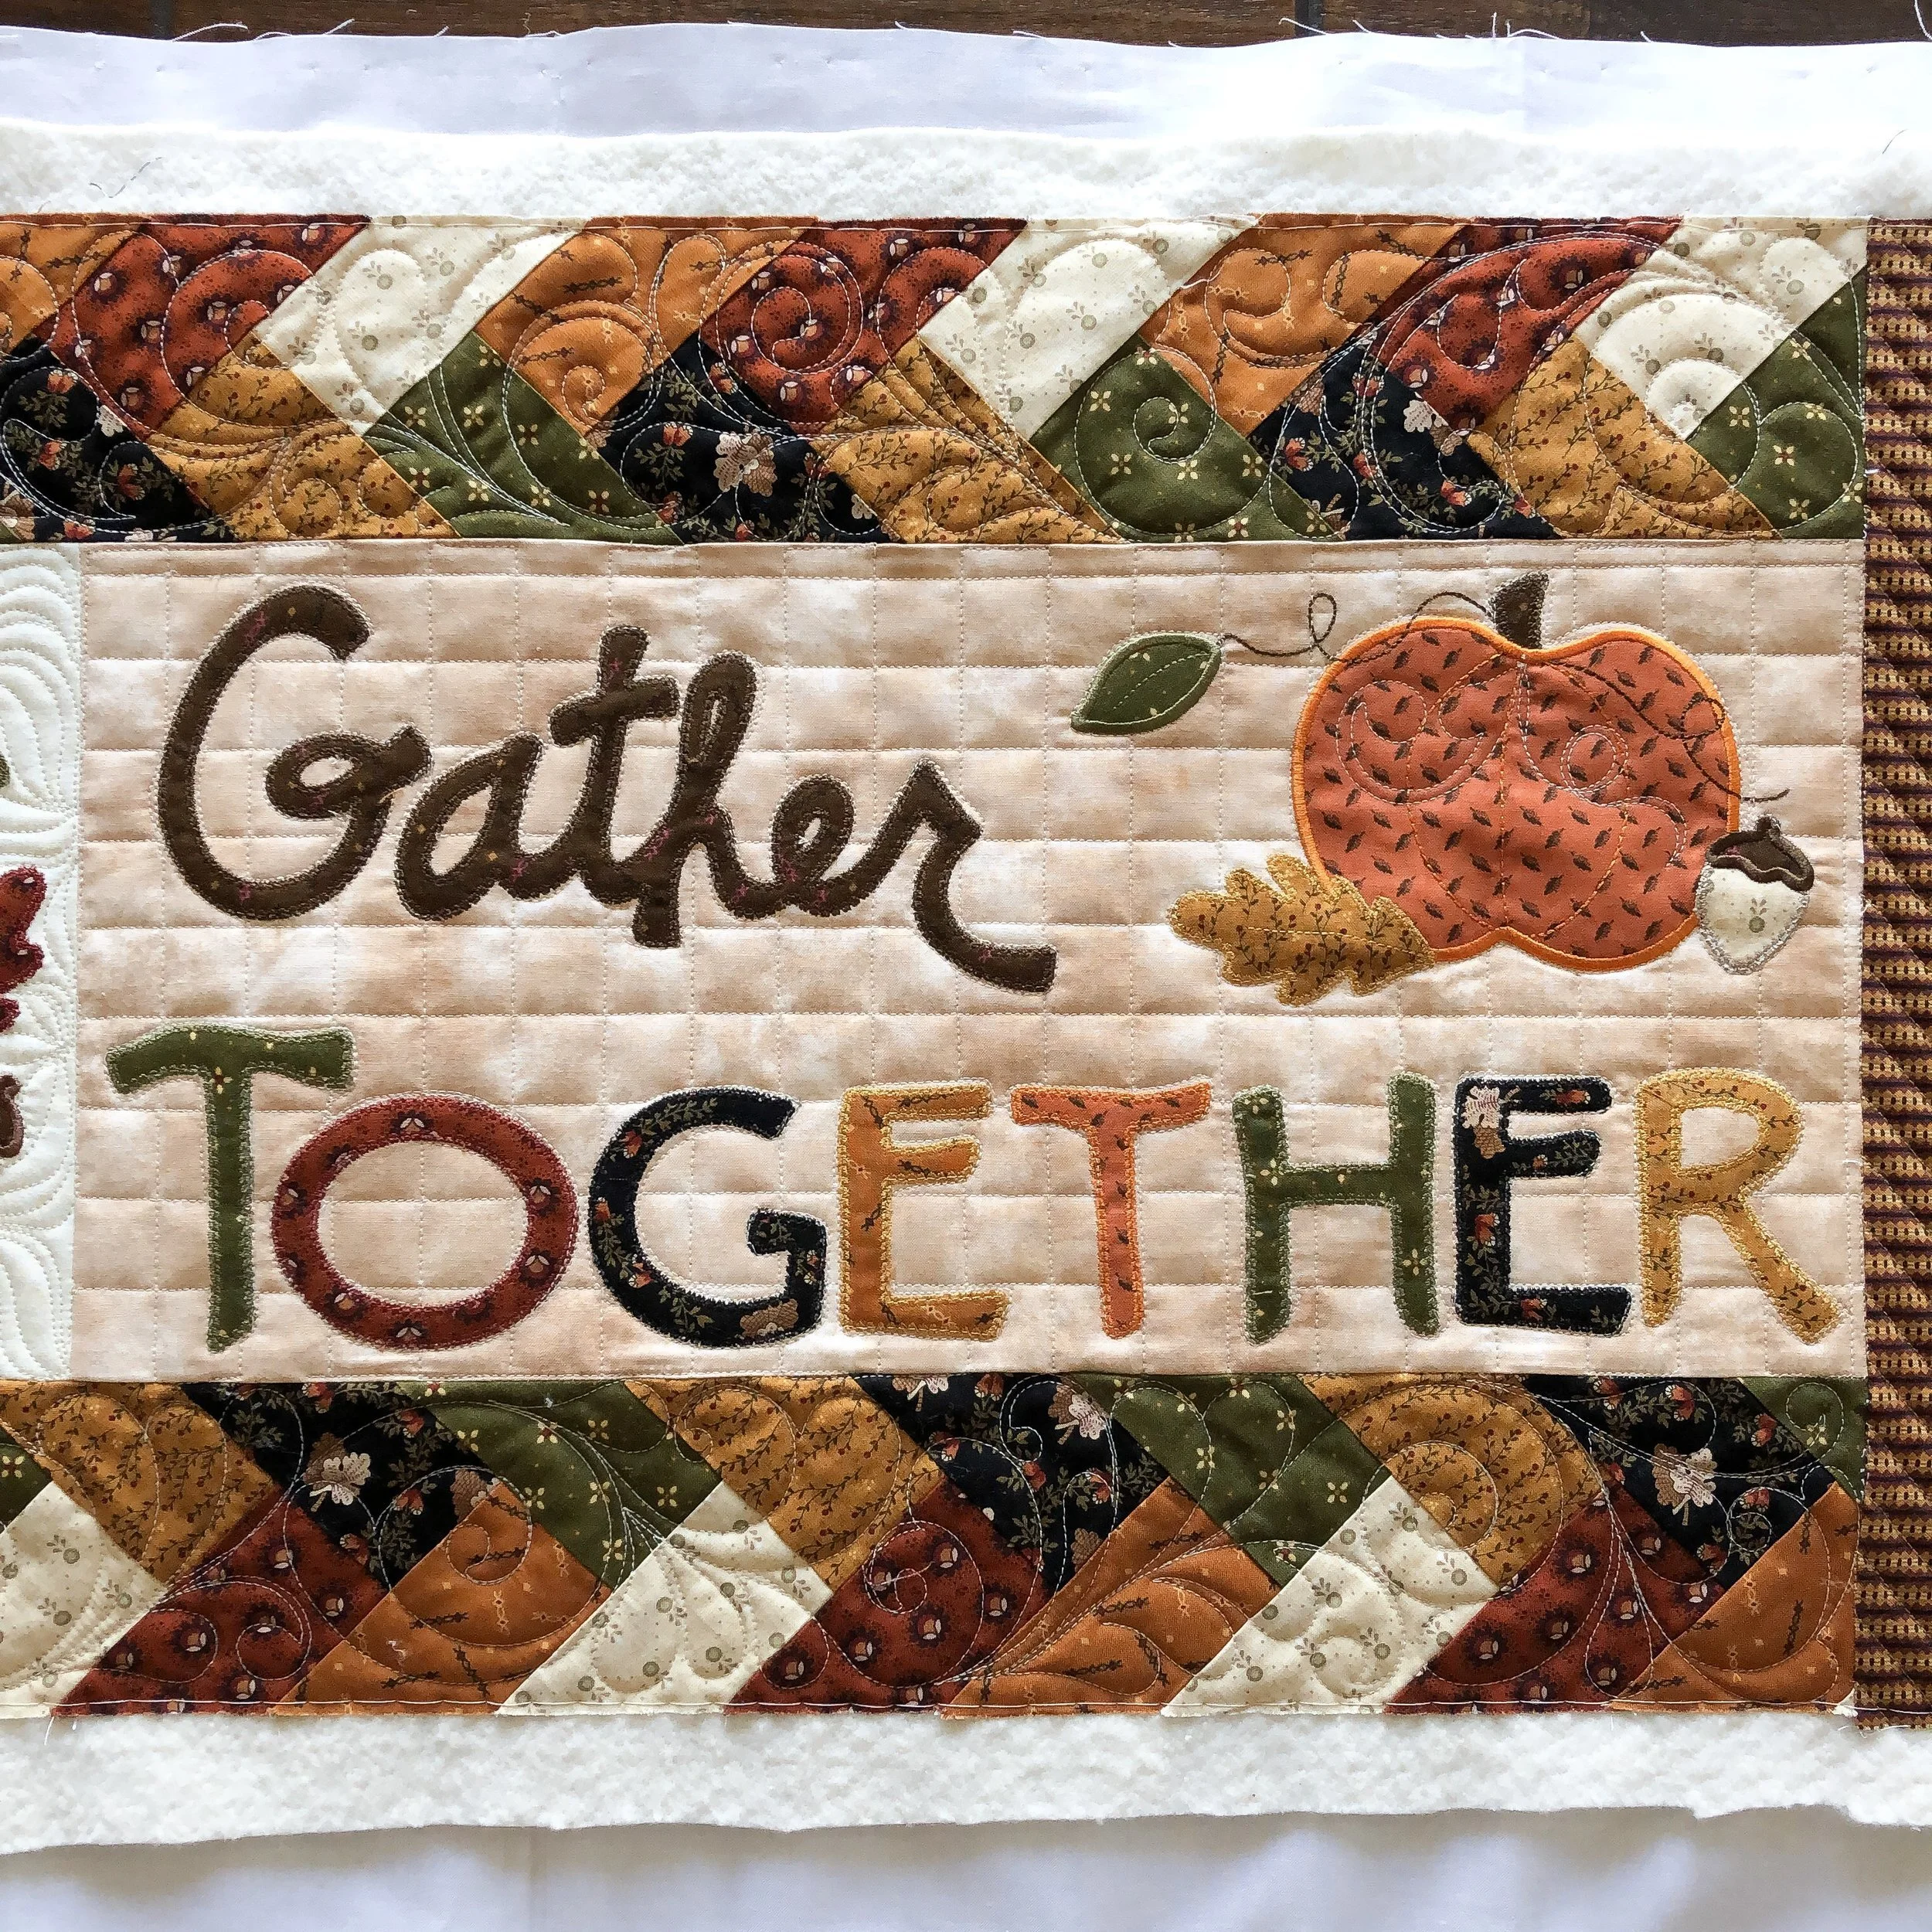
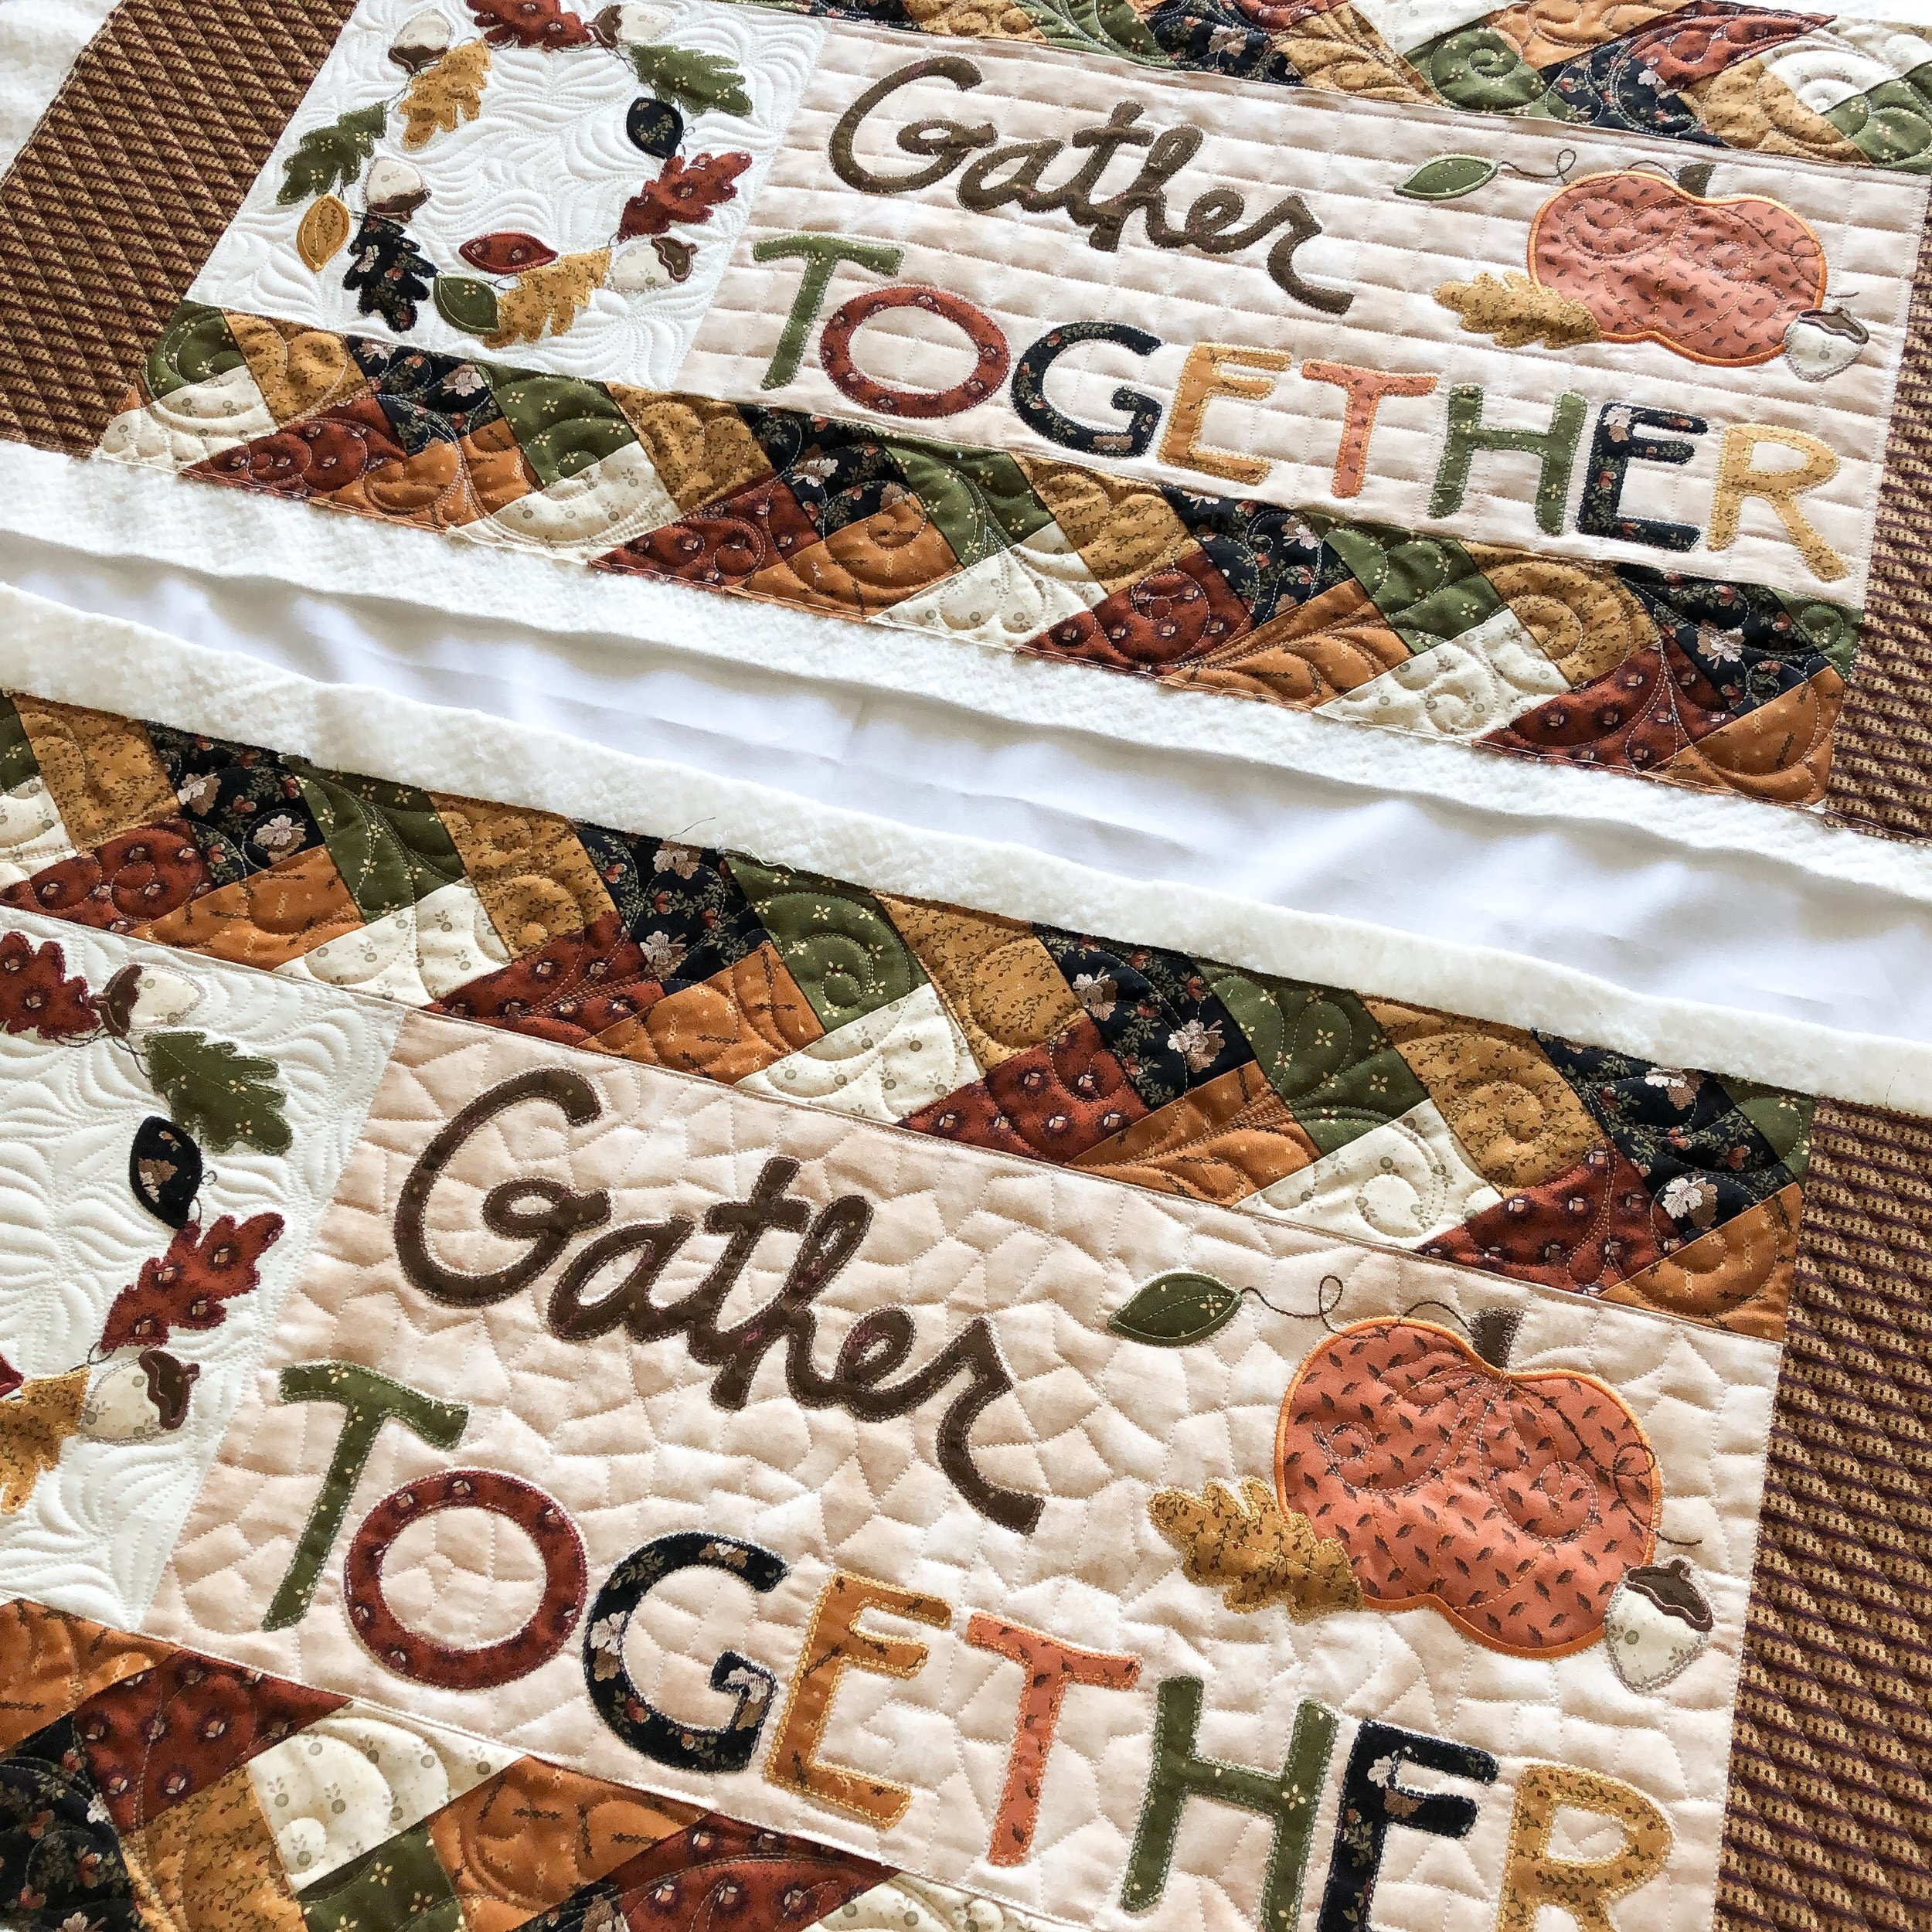
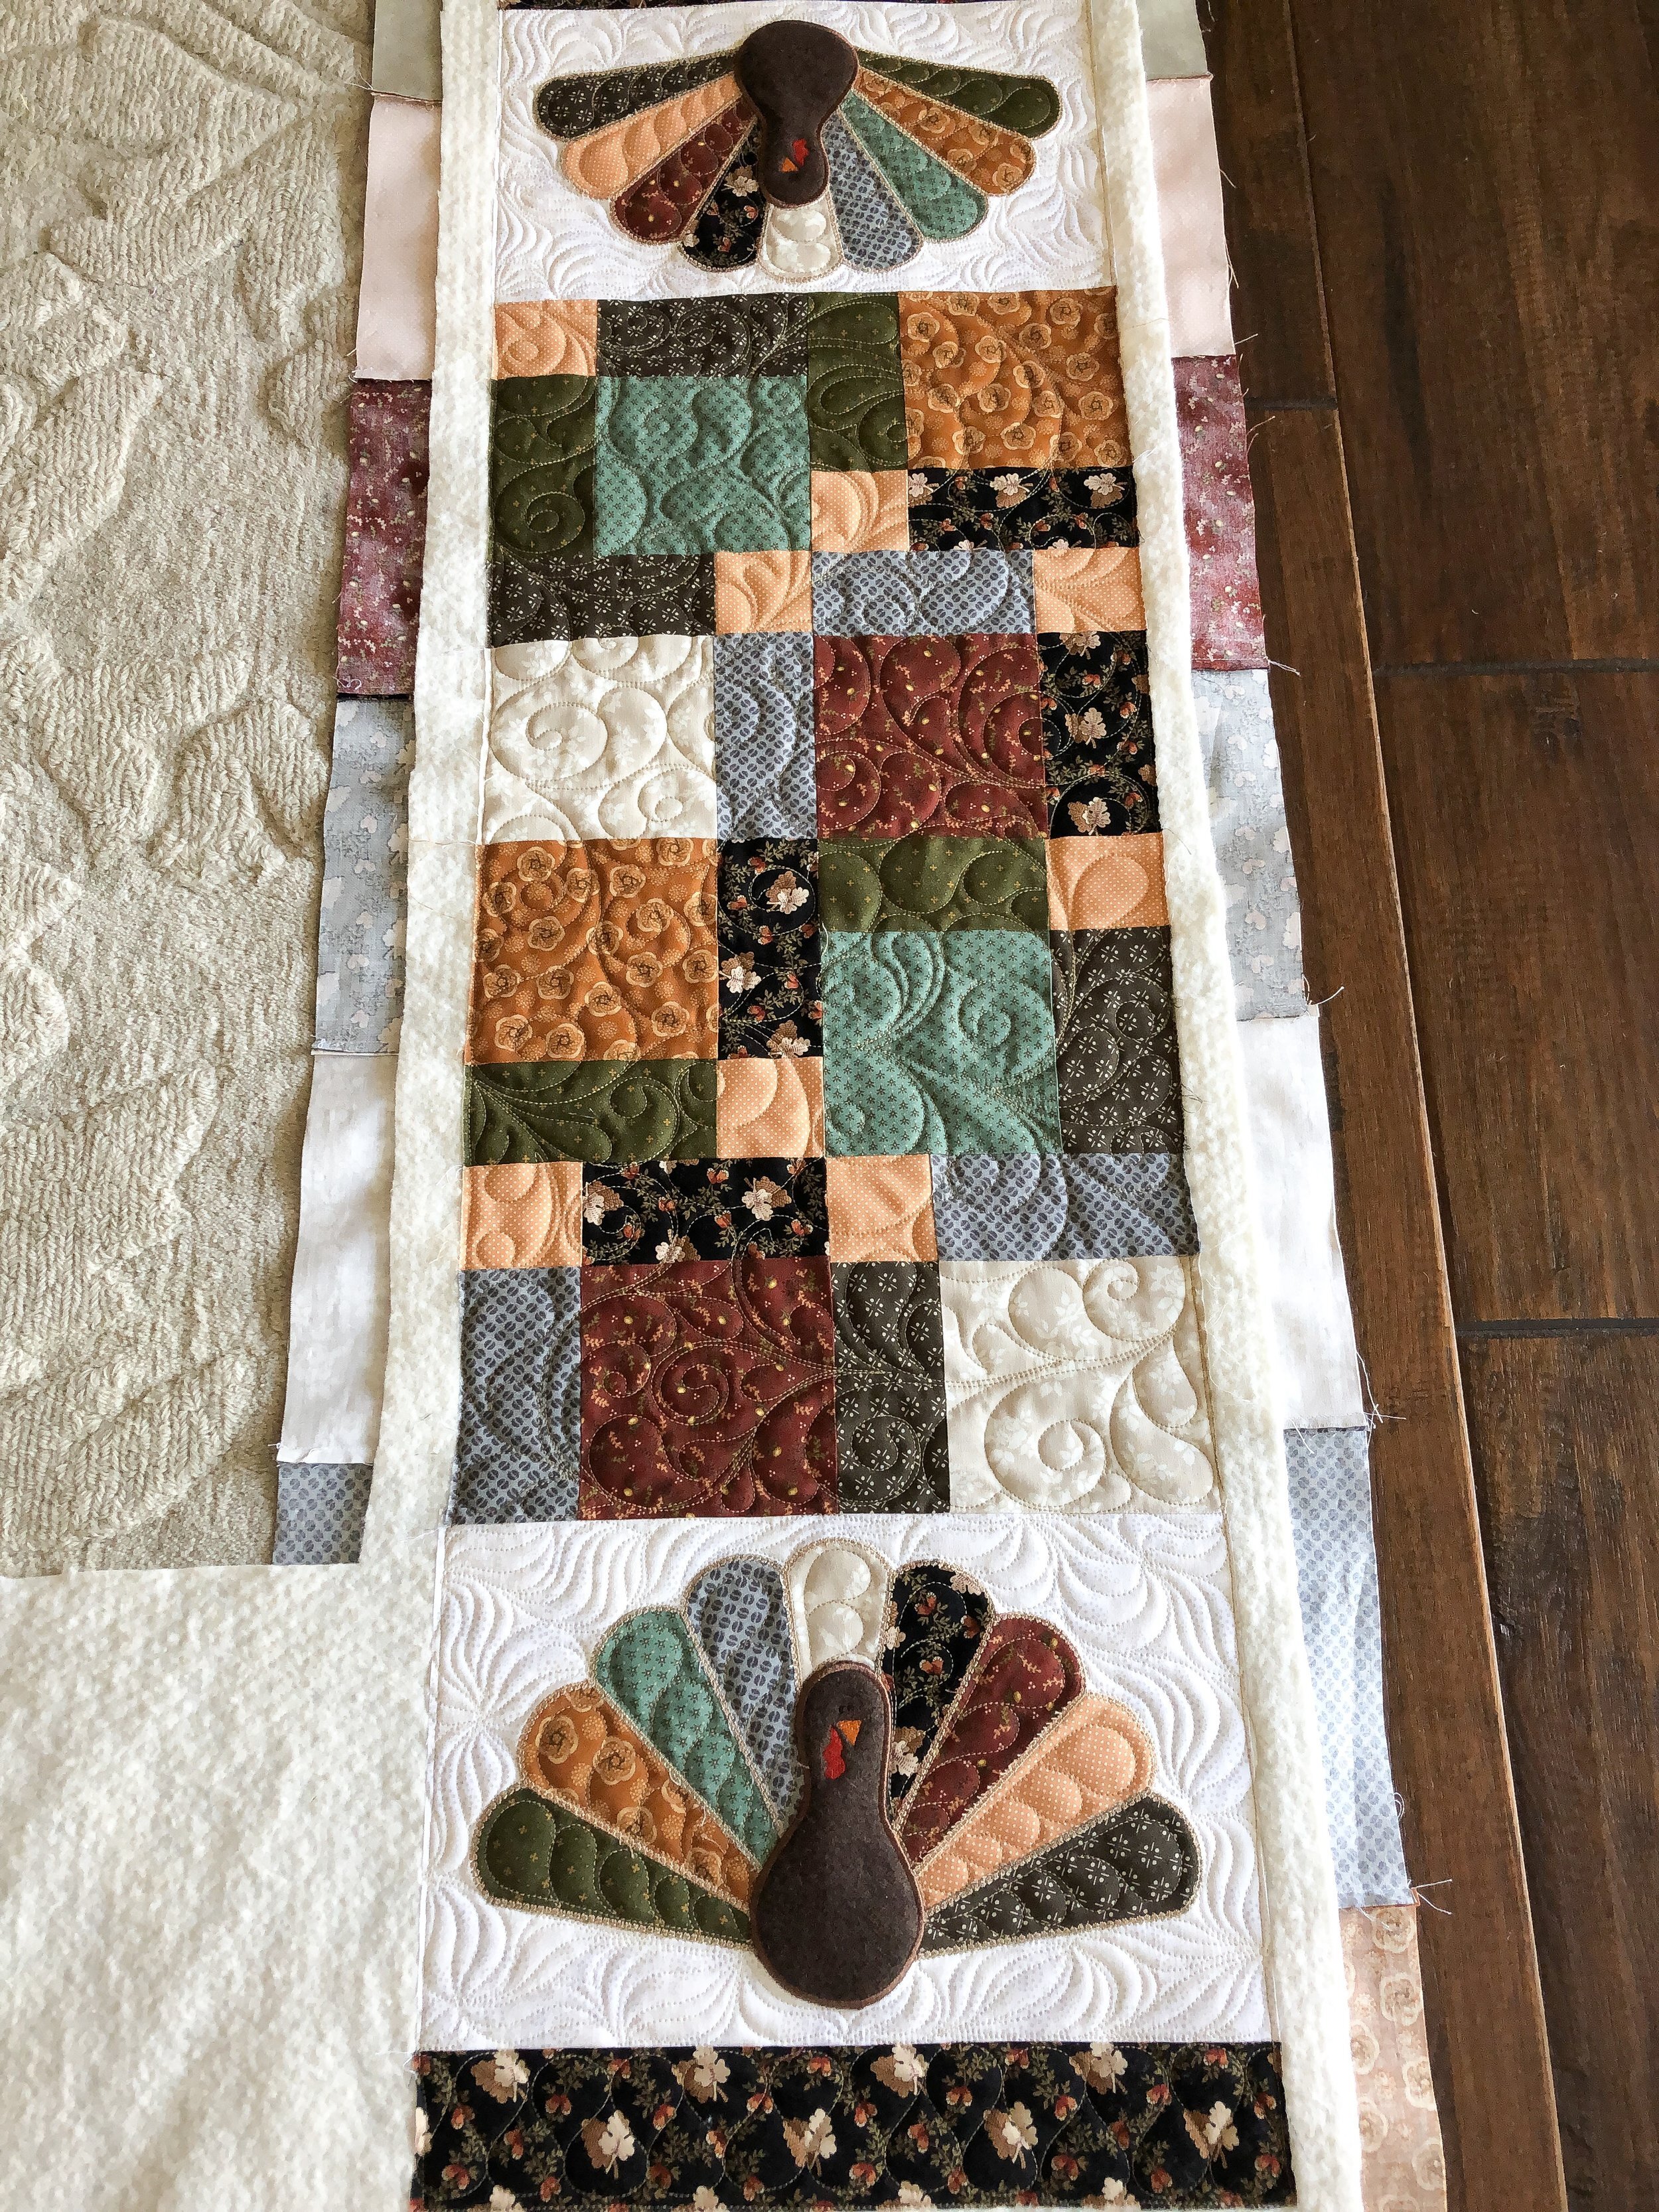
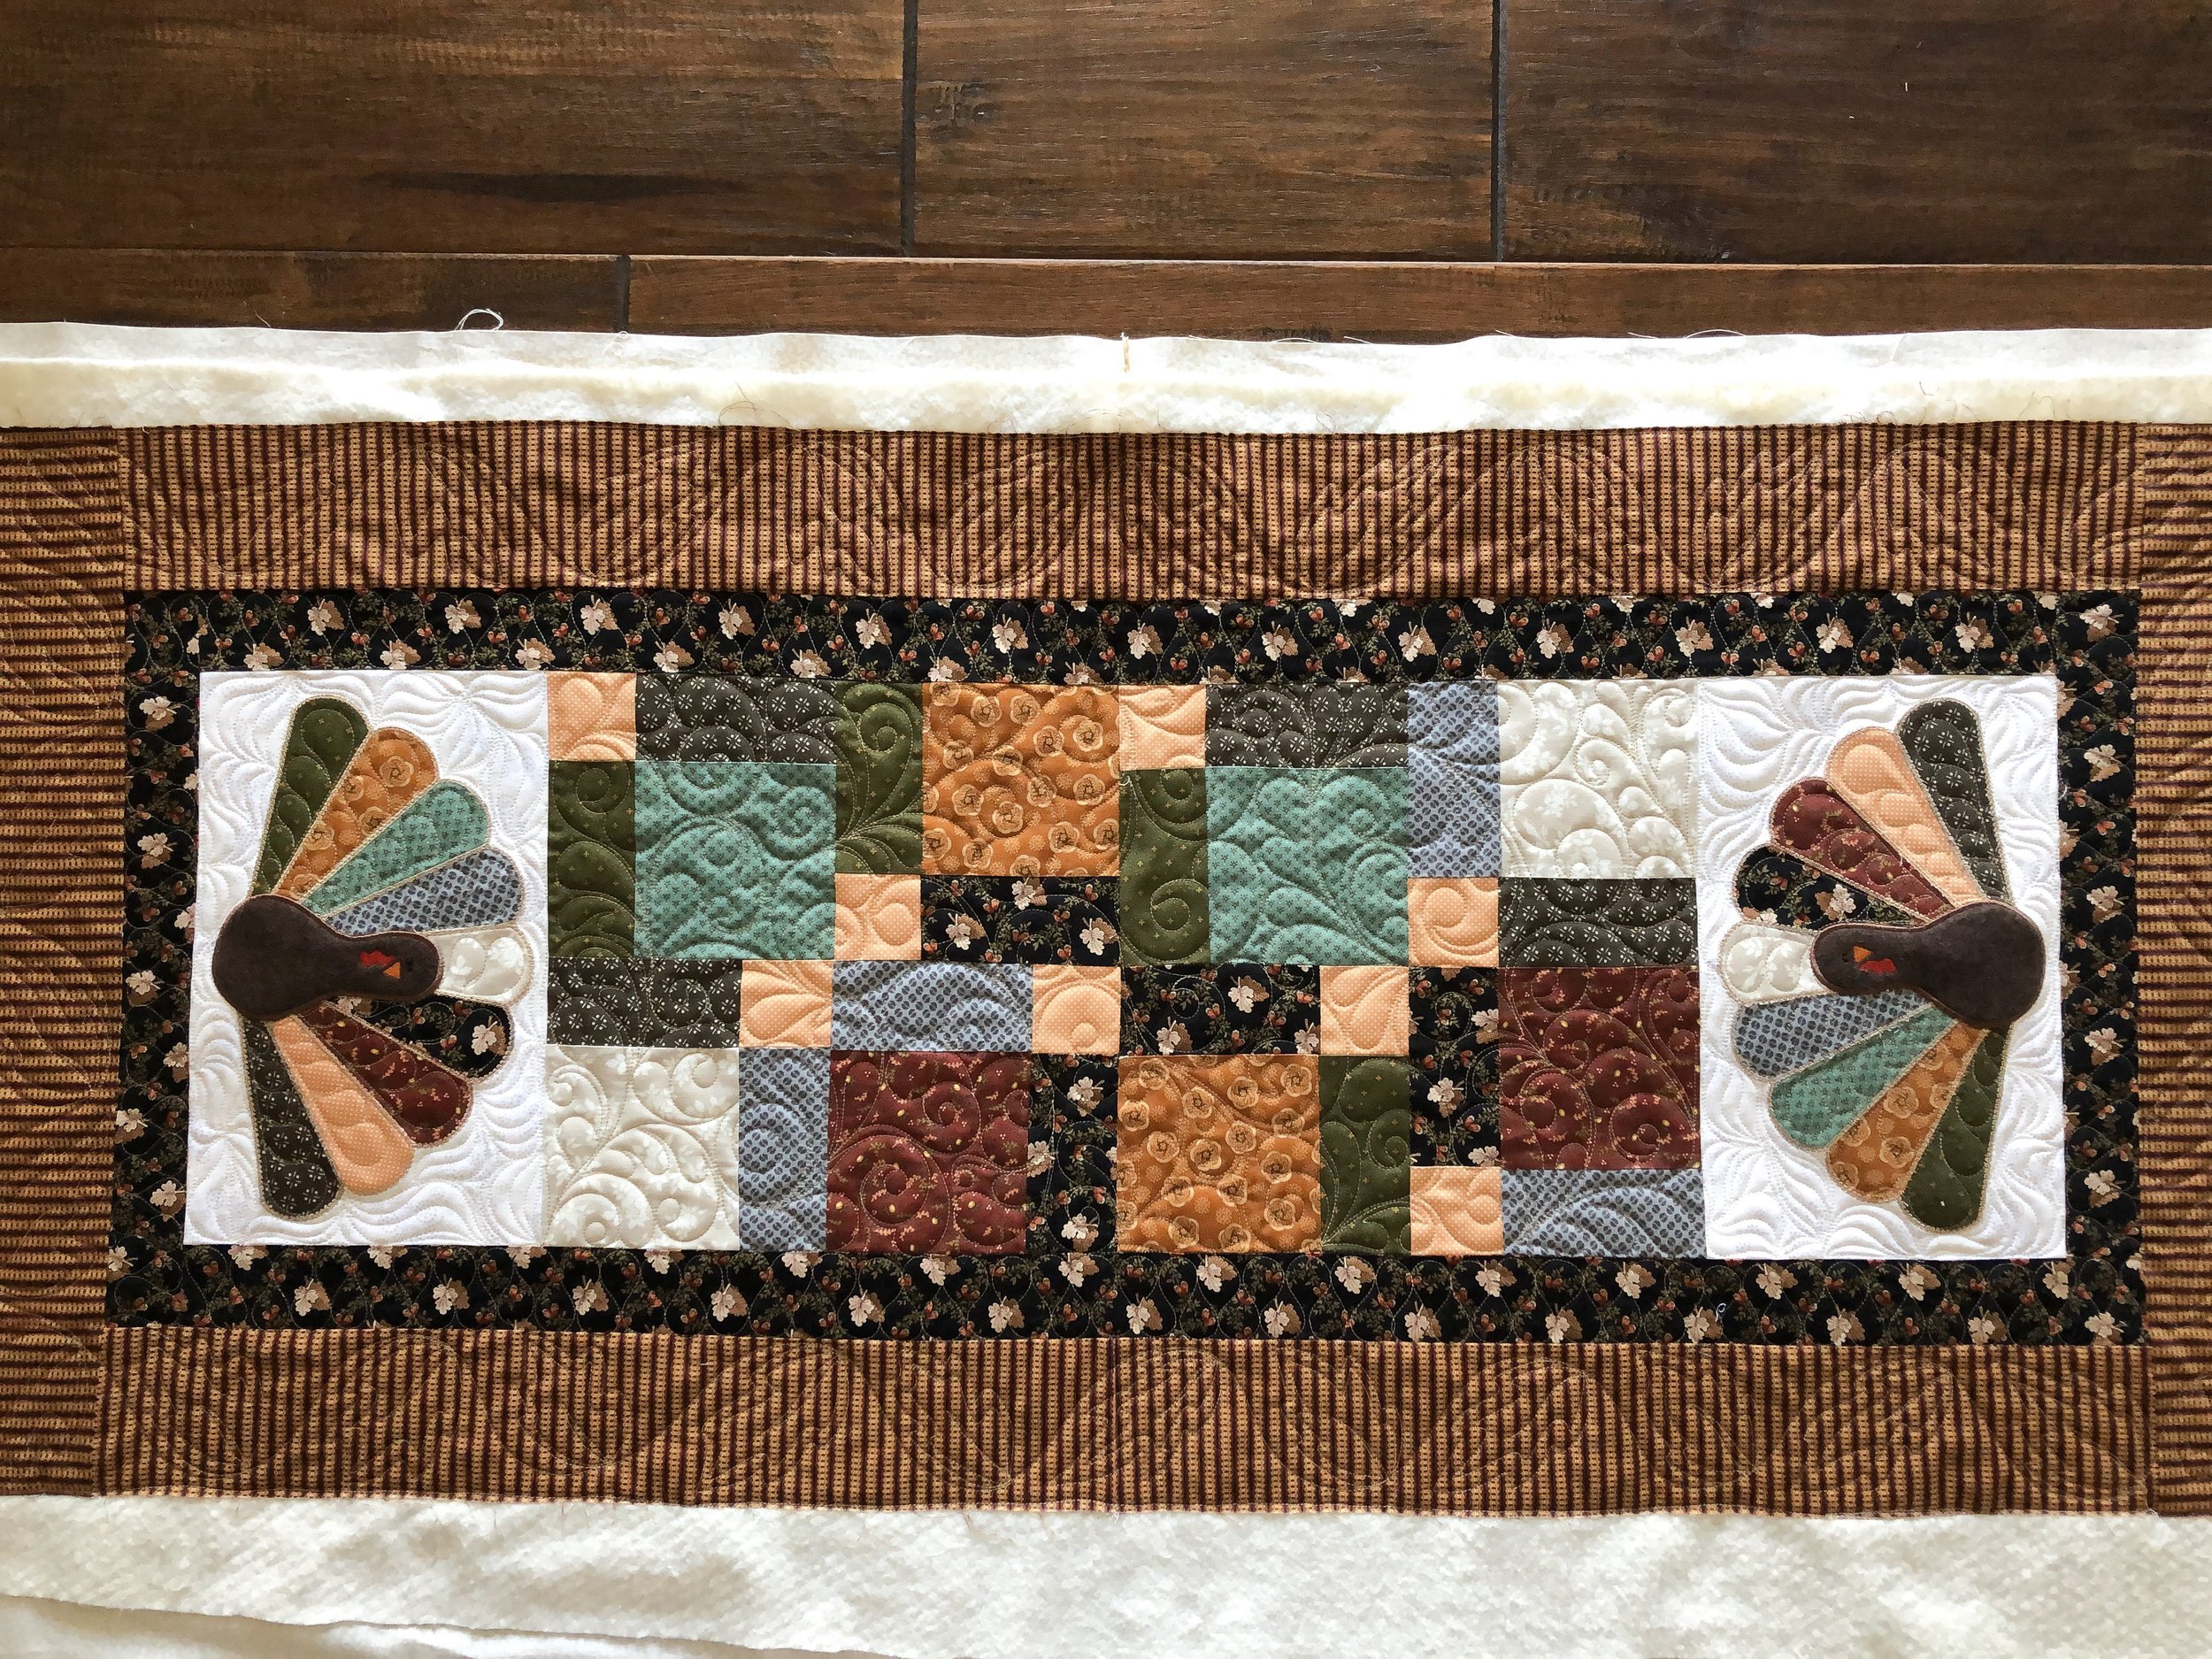
Gobble gobble!! I can believe it’s almost thanksgiving again, this year has flown by.
I used a soft cream 30 tex A&E Perma Core thread, I think it was Dyed Natural. More winline batting was used. You’ll see that extra piece of batting hanging off. I cut the batting to the length of the biggest table runner, and then laid out the batting, placing each item on the batting to use it up in the best way. It worked beautifully. I just trimmed around the runner or pillow front, so I could quilt everything separate and save on batting.

There is more of the swirly feather and grassy designs, with some added feathers in the turkey feathers, and ribbon candy in the black strip.

Close ups!

This swirly feather design is random, yet similar bey repeating the design out in different shapes, or sizes, or direction. Who would be interested in me doing a swirly feather video tutorial??? Comment below.
This is the biggest runner...like the last one, she just added borders. Everything was quilted the same as the previous runner, I just added leafs in the outside border.

Feathers like these are easy. I start on one side of the turkey feathers, and quilt feathers...traveling up towards the tops of the turkey feather, and then feathering back down towards the body. Then I move up towards the next feather, along the body of the turkey. It works great. No need to stop and cut the thread.

I used a tan/golden and cream thread to quilt this. 30 Tex from A&E.
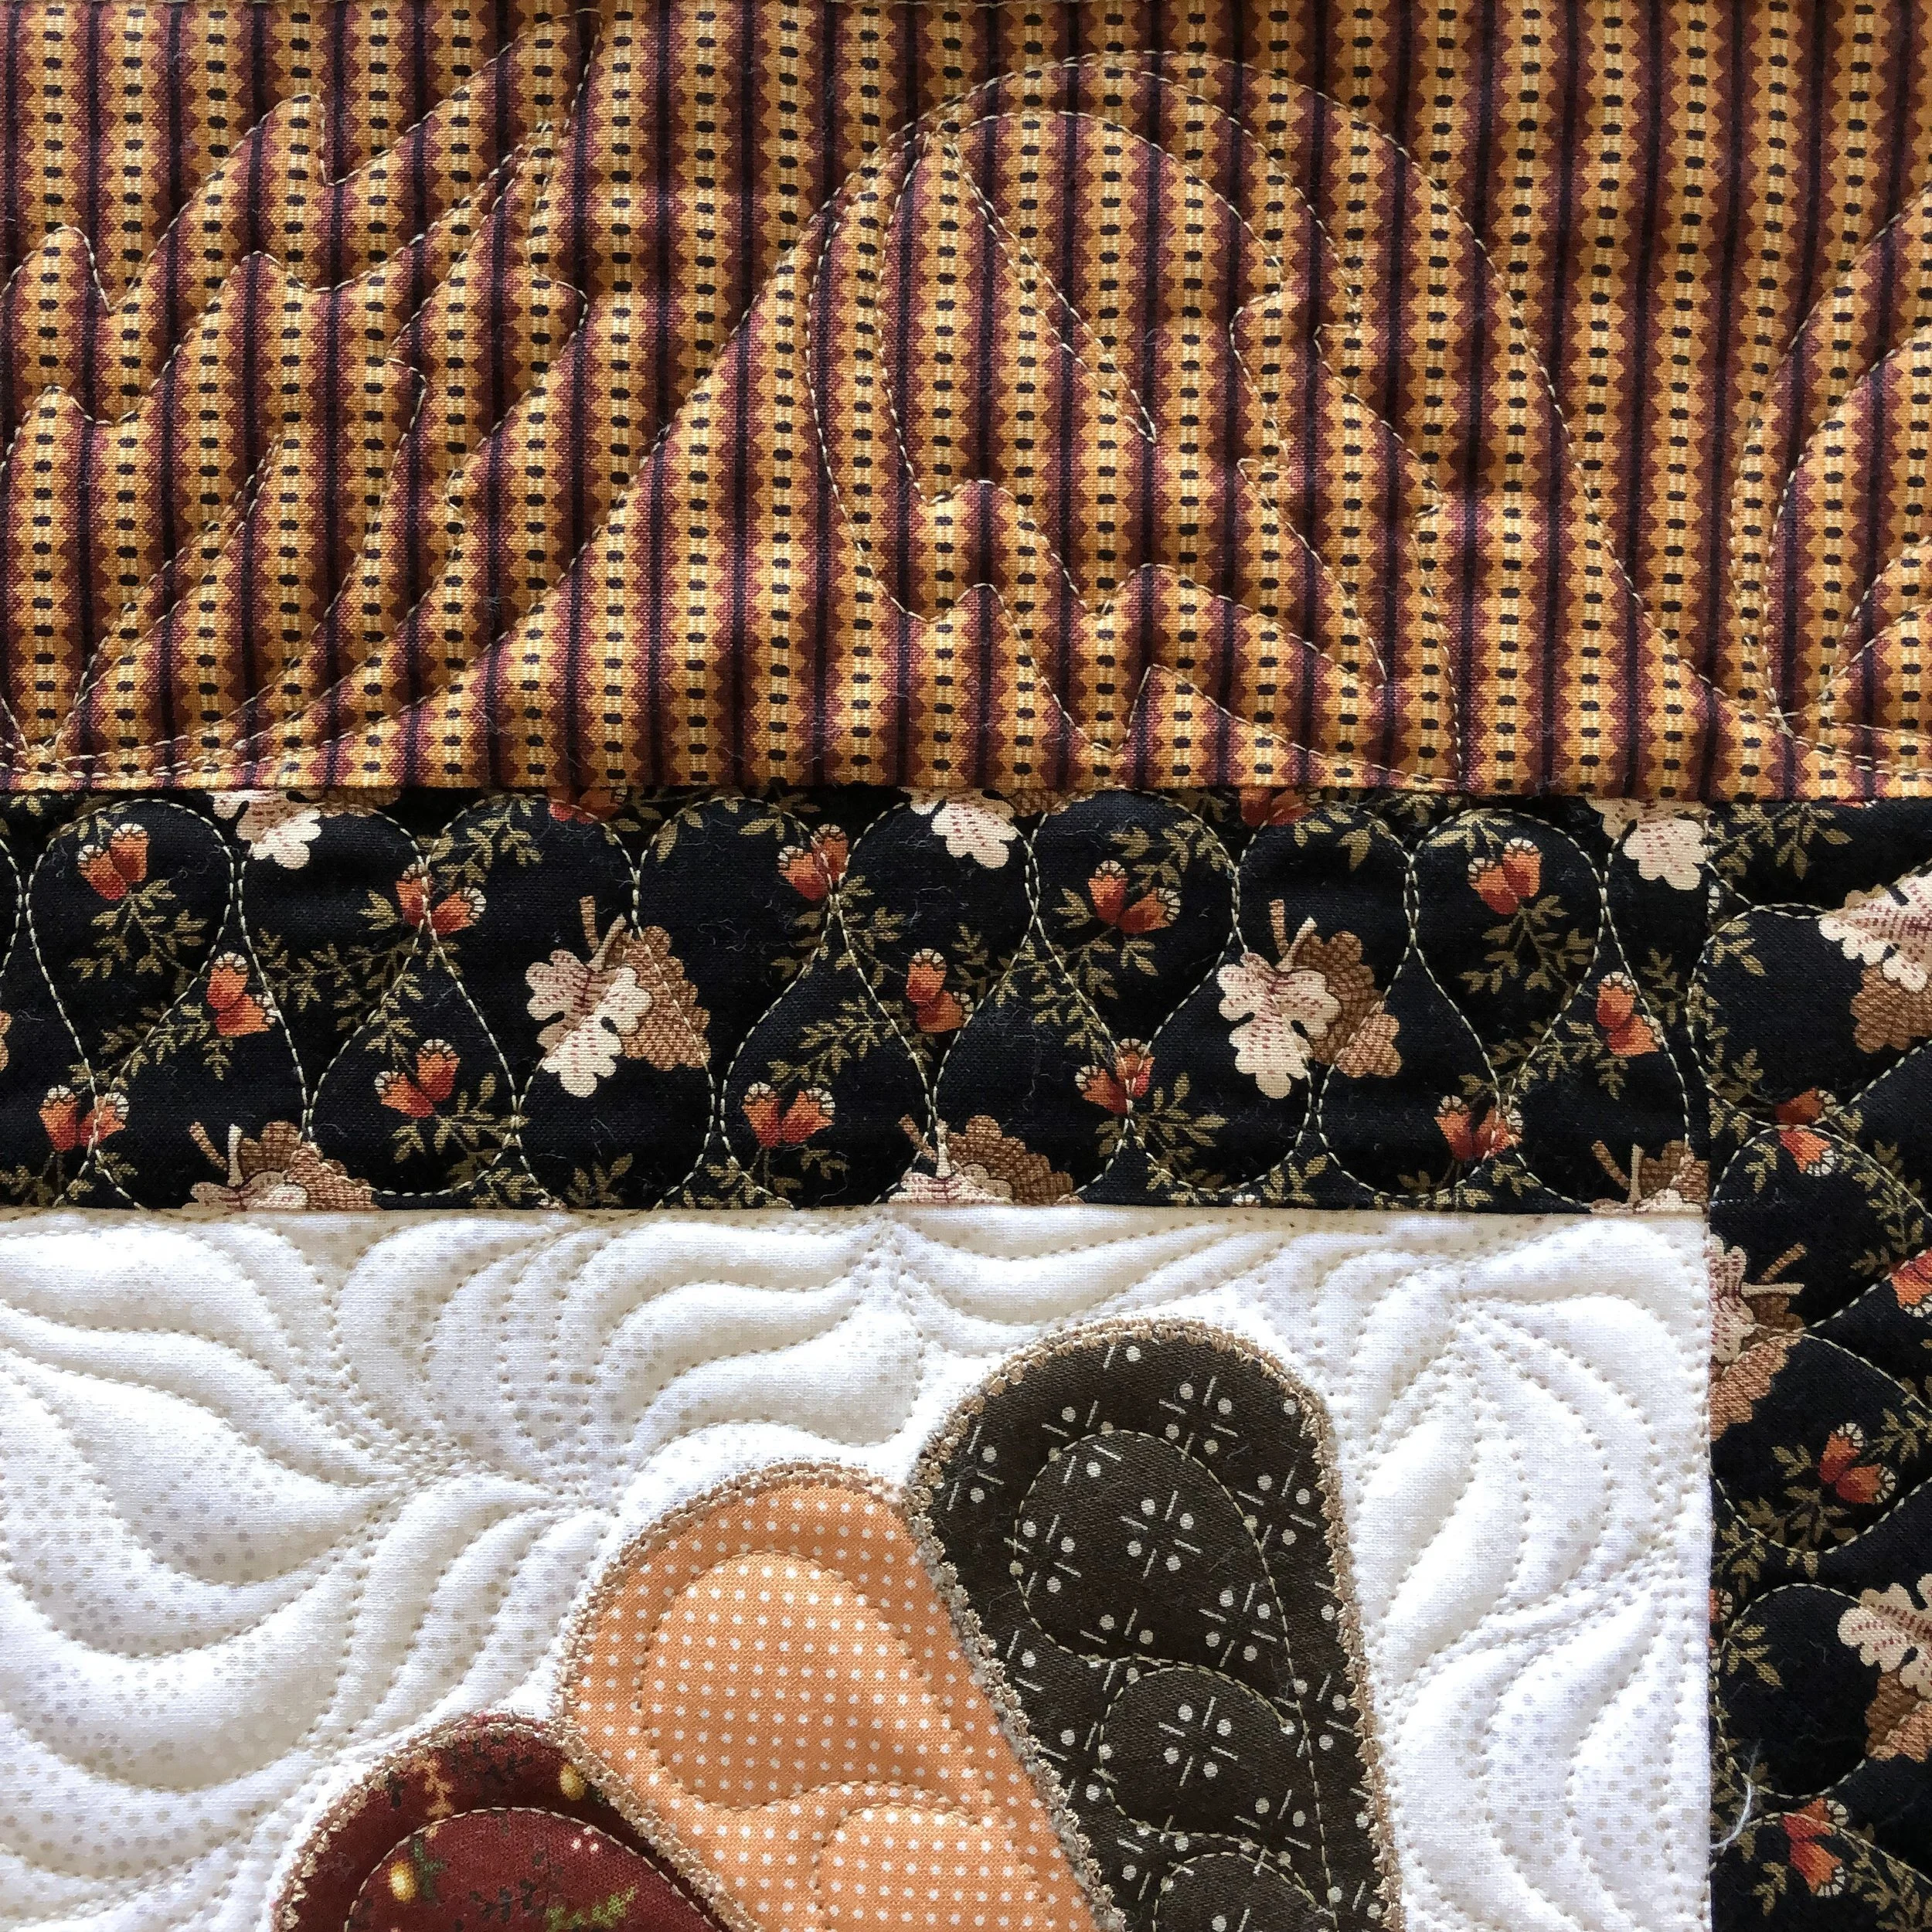
Here is a close up on my leafs in the outside border. It’s fun to quilt something new.
Thank you for stopping by!
- Leisha

Sherry’s Halloween Boo bench pillows
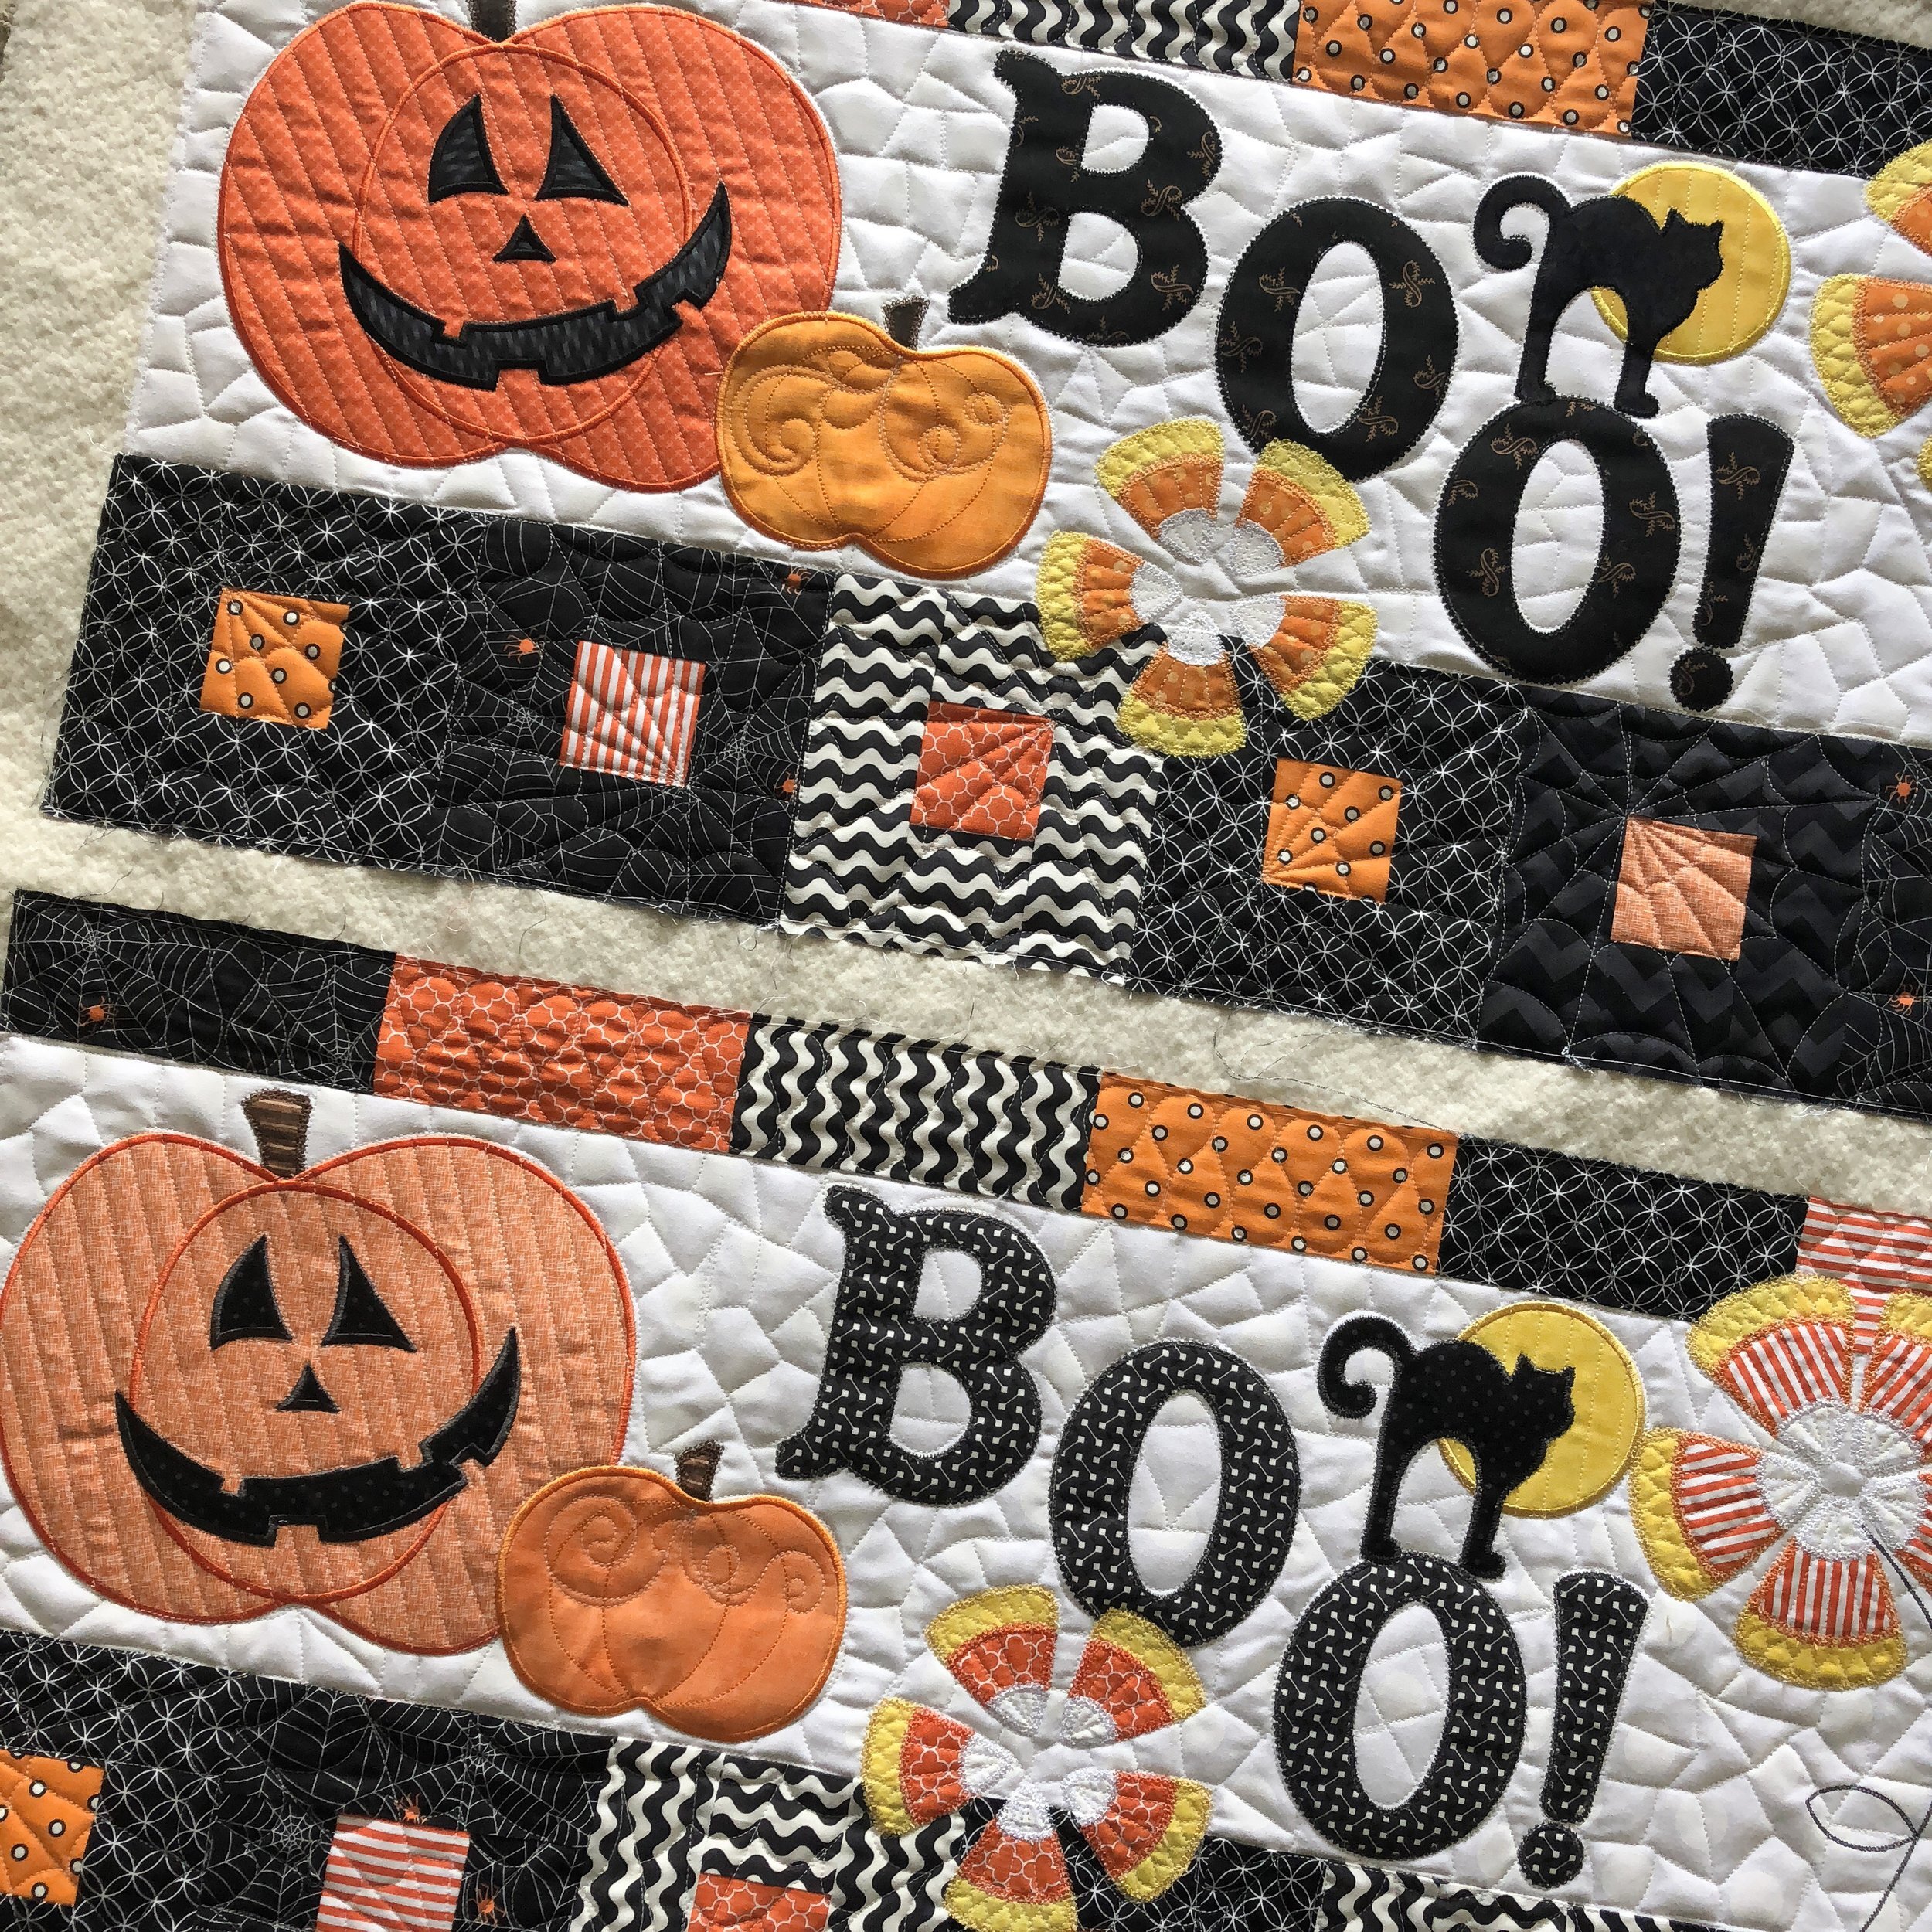
These super cute bench pillows, made by Sherry, are 2 of the 3 she made.
The pattern for this bench pillow is by Kimberbell Designs and is called Halloween Boo. Go to this link to find more details. https://www.kimberbelldesigns.com/product/halloween-boo-bench-pillow/ If you have an embroidery machine, you need to check out Kimberbell’s patterns, they have so many fun things to make!!

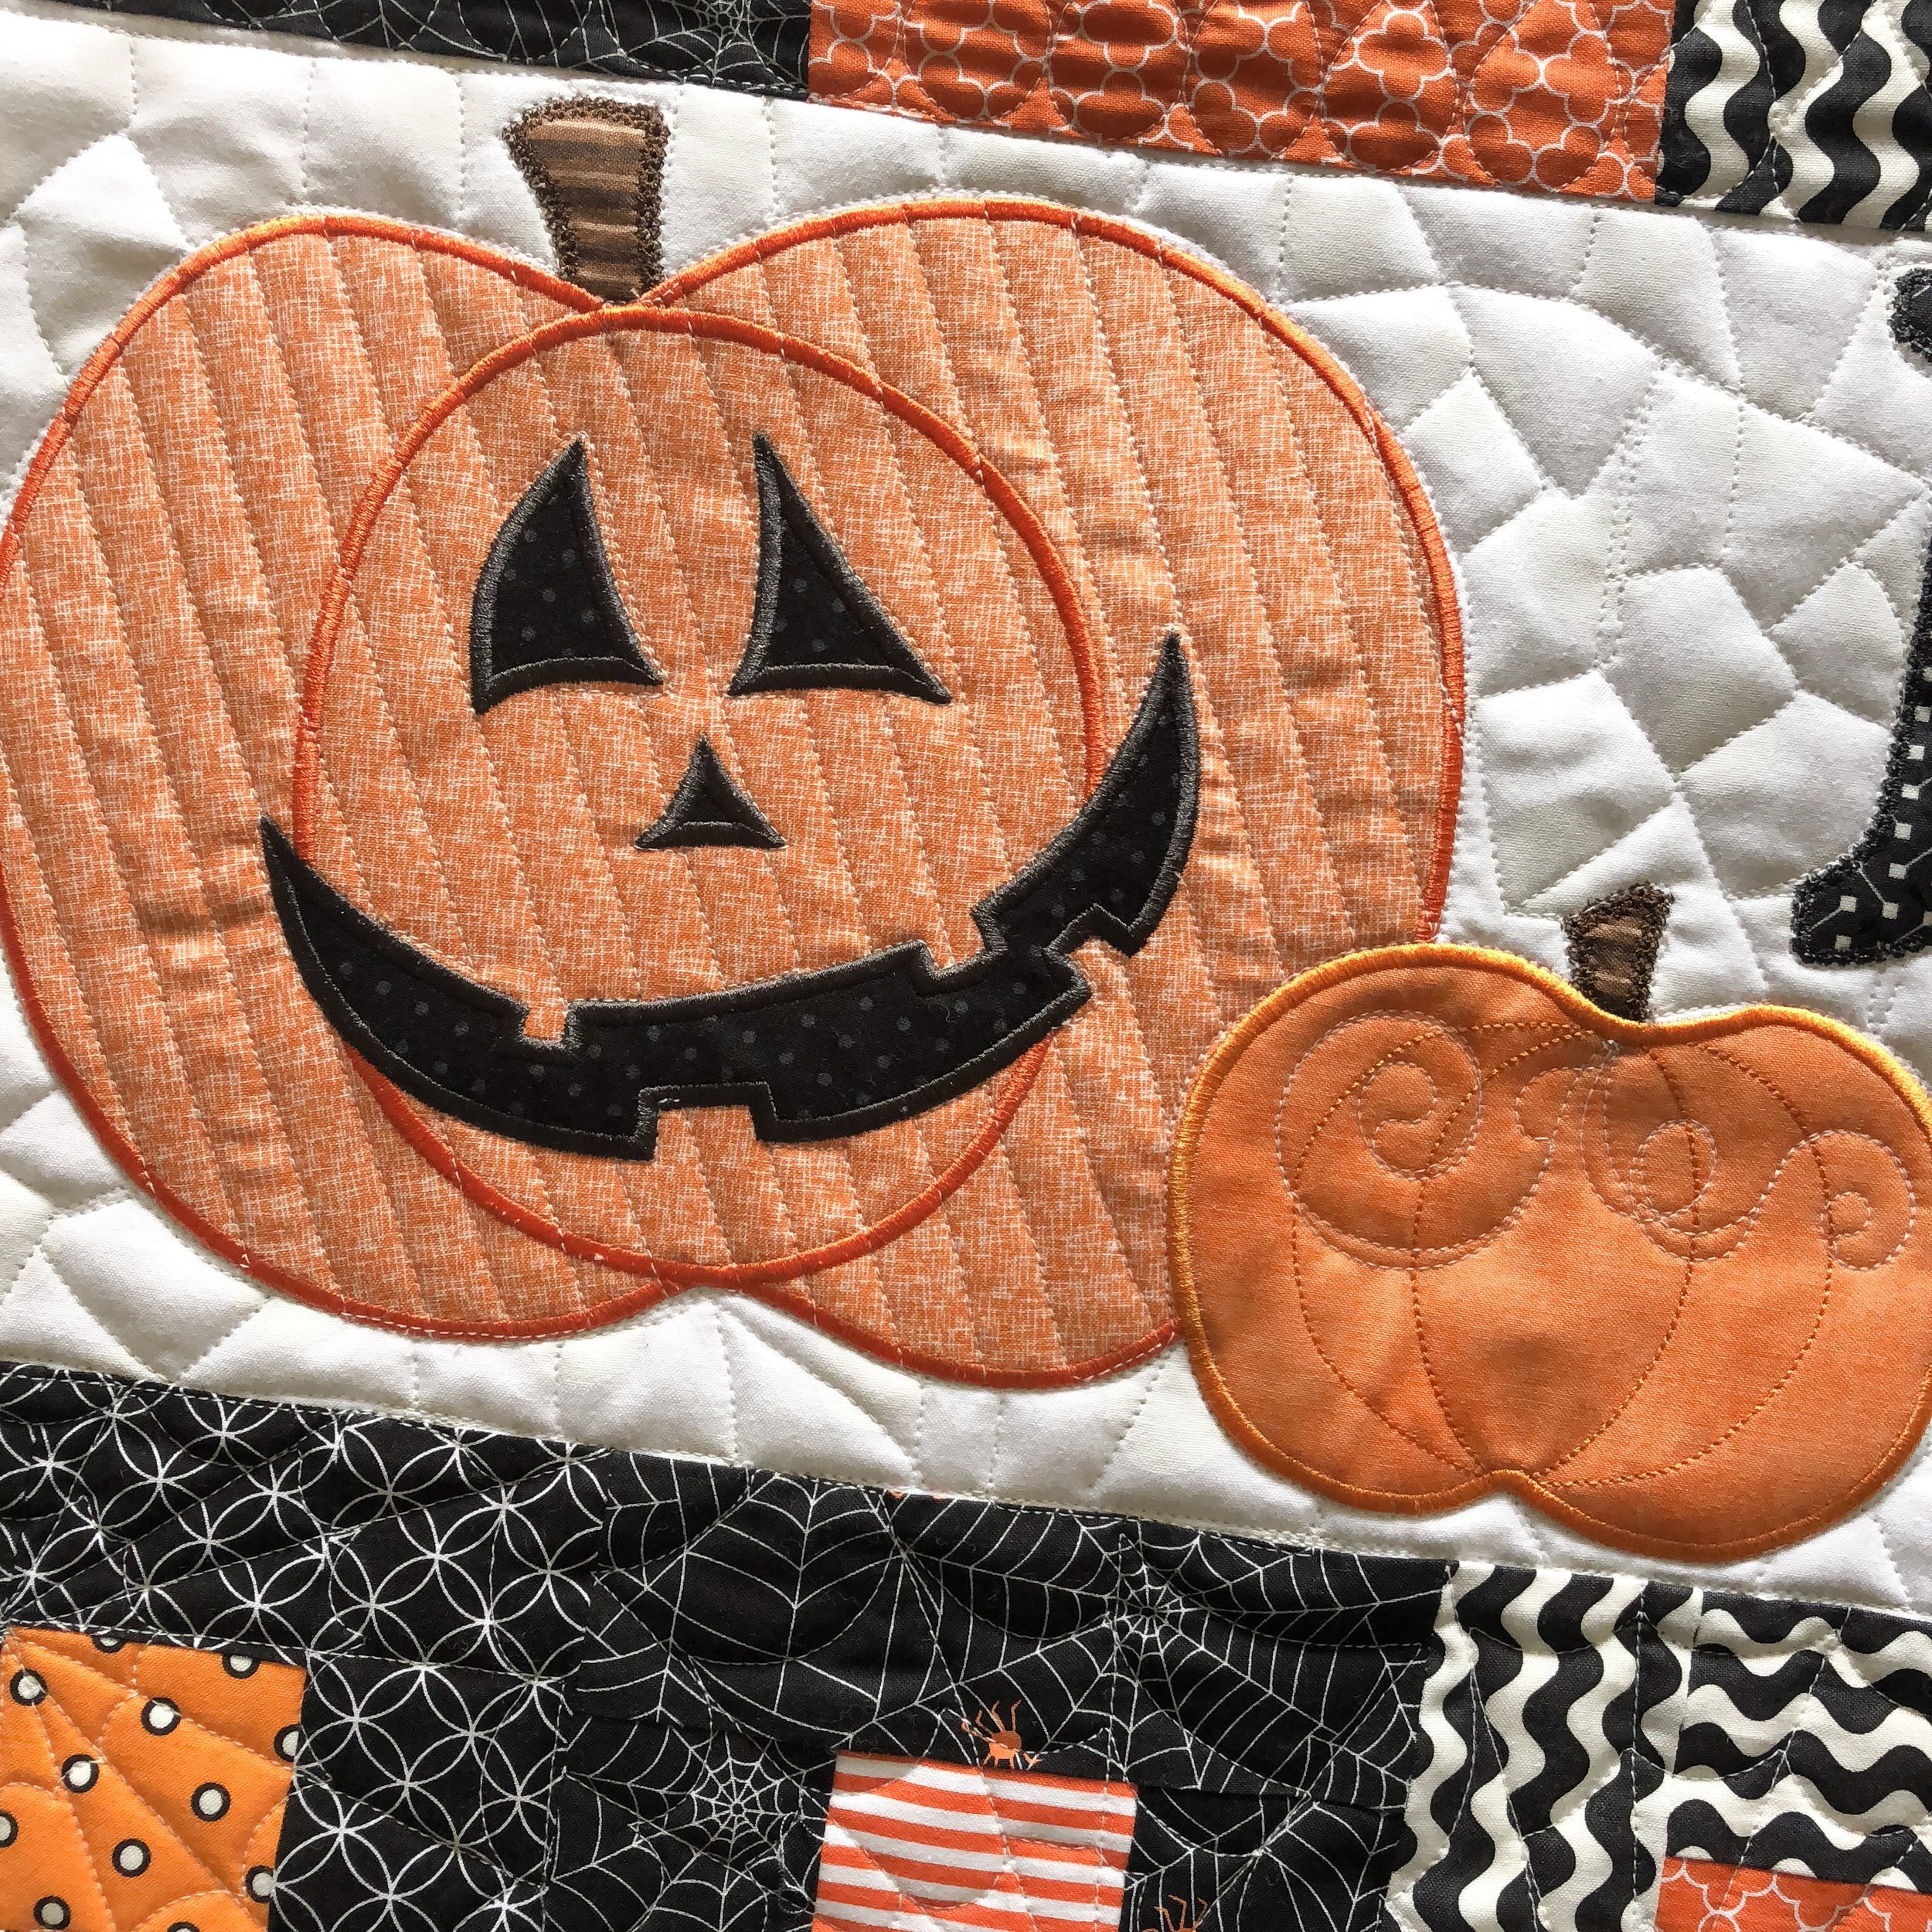
Yes, you’re seeing double!! When I have multiple things to quilt, that are small and the same size, I like to have one quilt back. The first of the 3, I quilted for Sherry, is quilted at the top of the quilt backing, with a scrap piece of batting...so it wasn’t easy to get a picture. I quilted all three the extact same. Quilting the crackle in the background is easy and I love how it makes all the appliqué stand out. I quilted ribbon candy in the top border. Lines in the big pumpkin and moon, using Edge rulers from Linda at thequiltedpineapple.com (her rulers have been my favorite for years!!!). Swirls and curly cues in the smaller pumpkin, give it just a little texture and personality!
I used my favorite 8020 Winline cotton poly blend batting, and white 30 tex Perma Core A&E thread.
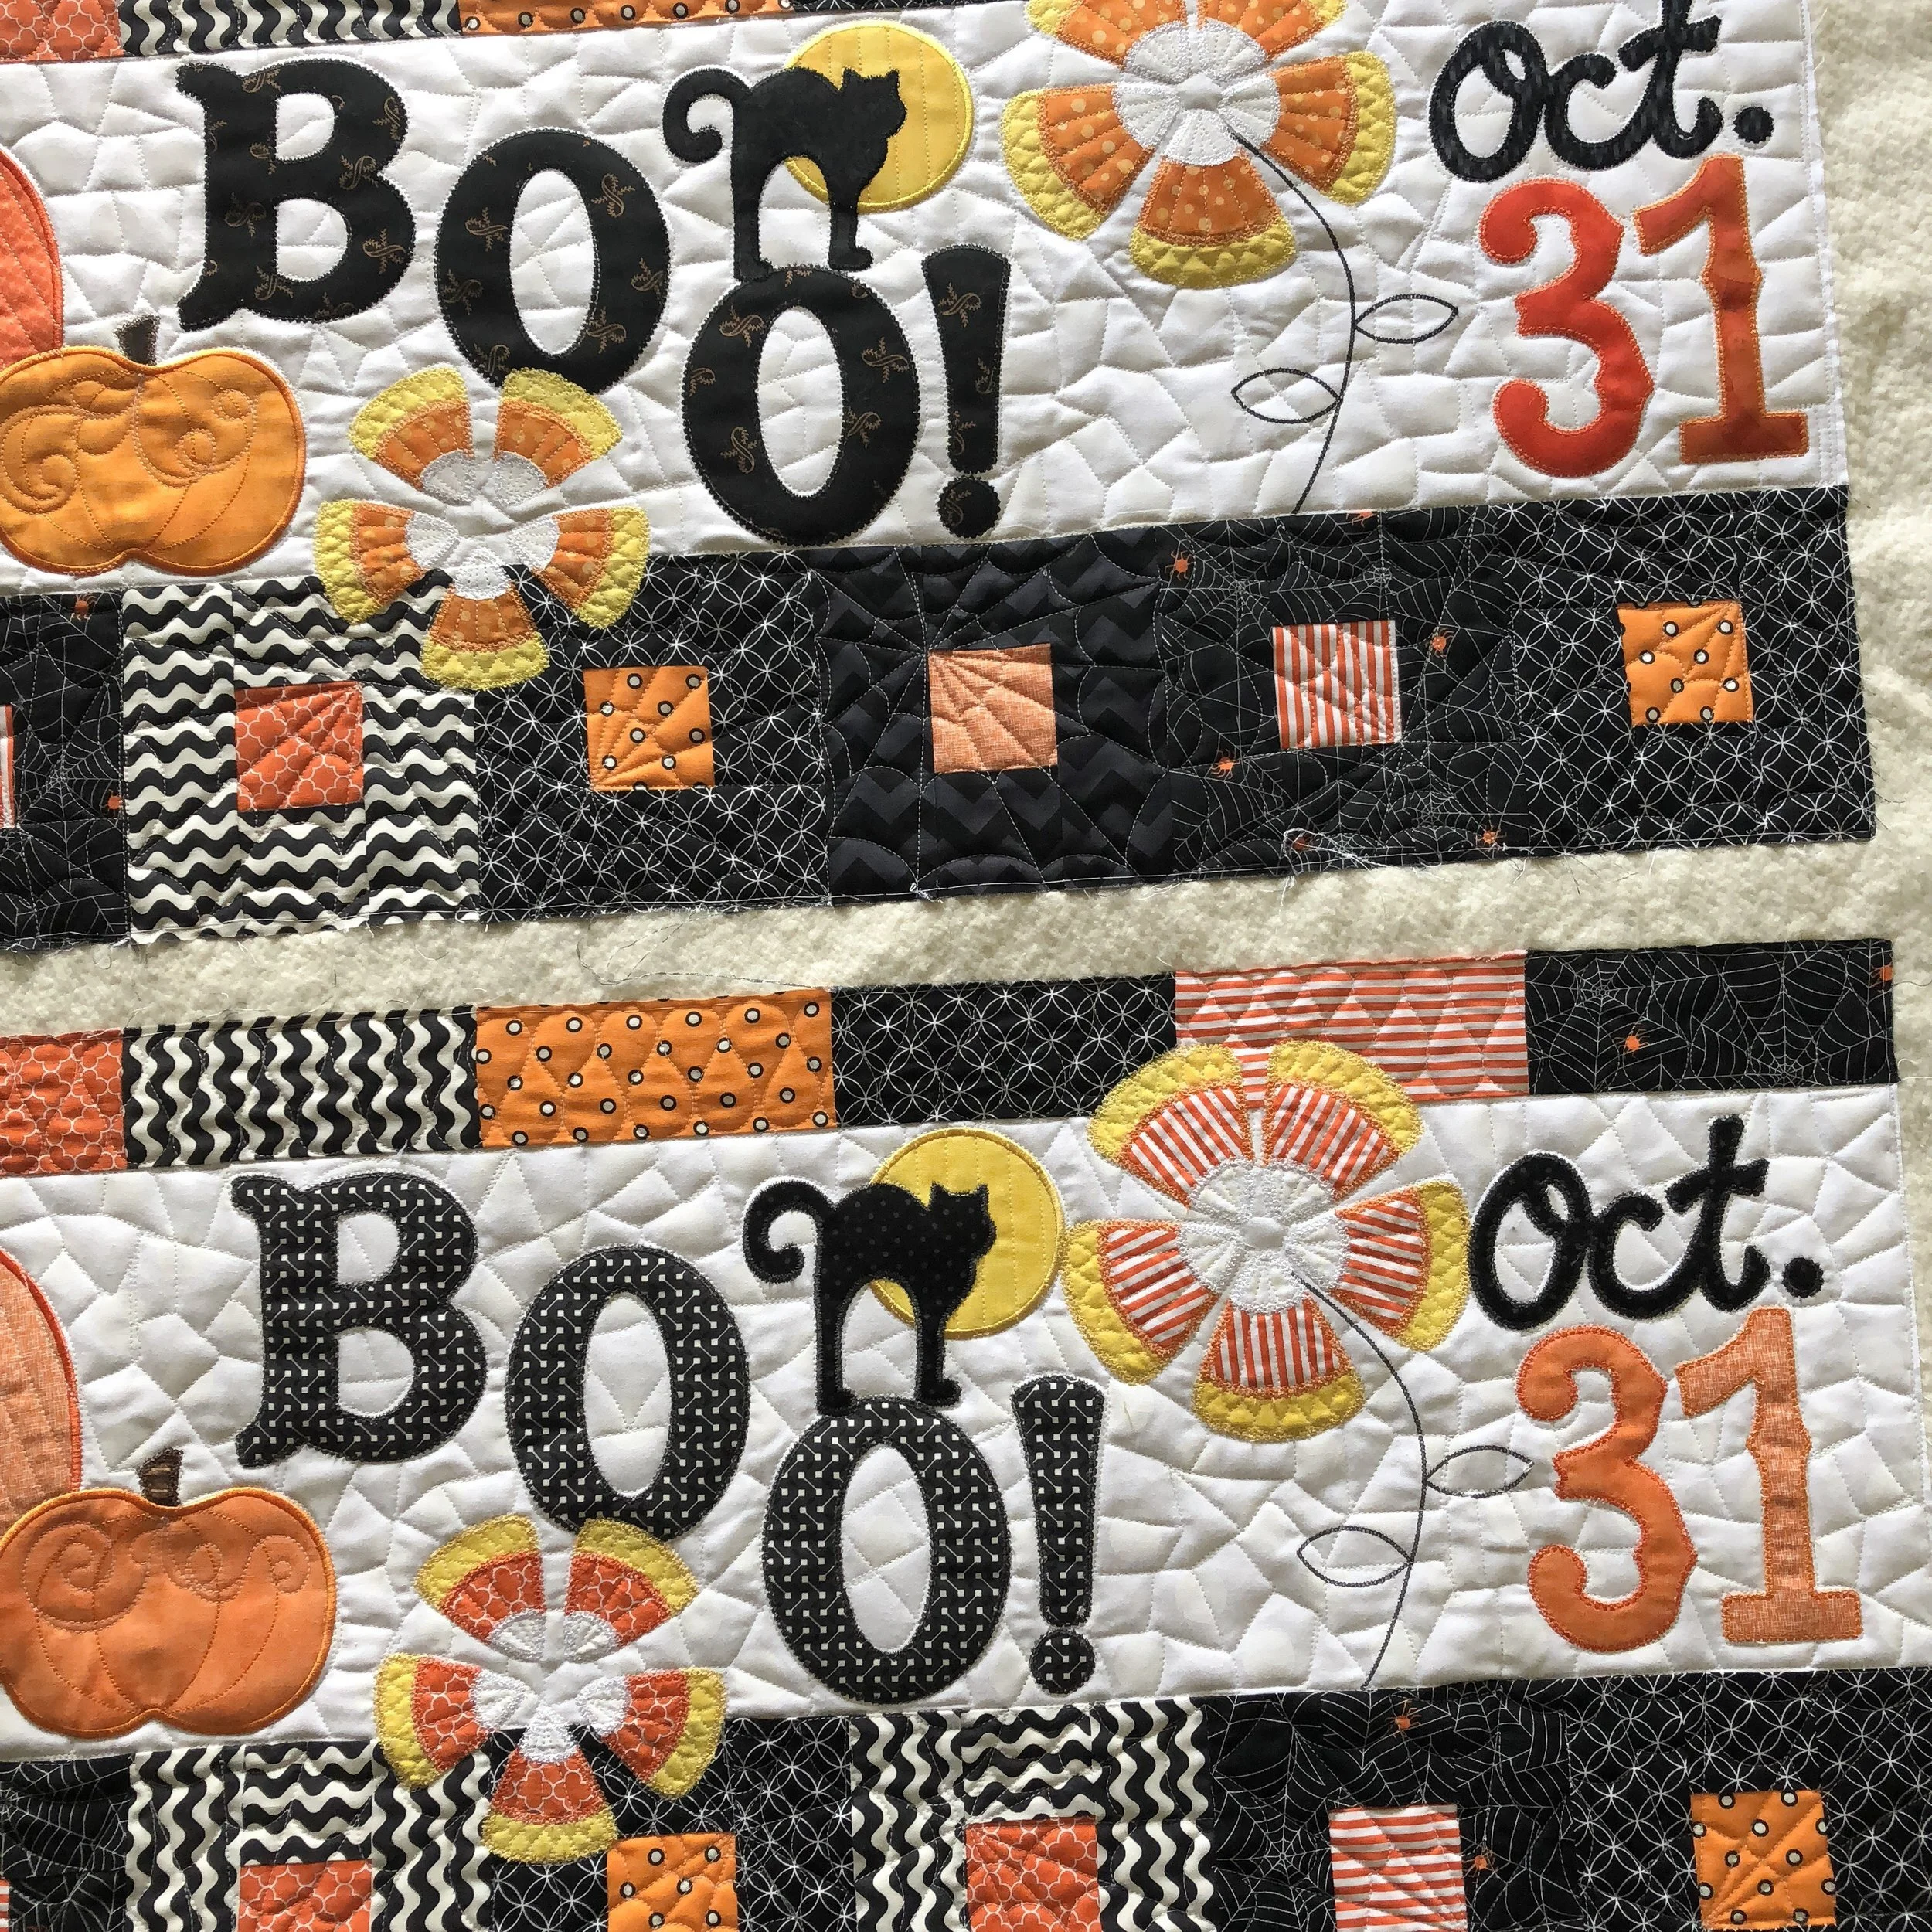
I quilted spiderwebs 🕸 in the blocks along the bottom, also used Linda’s Edge rulers to do those lines.

Whether you are a Halloween lover or not, that jack-o’-lantern is pretty cute!
happy quilting!!
- Leisha
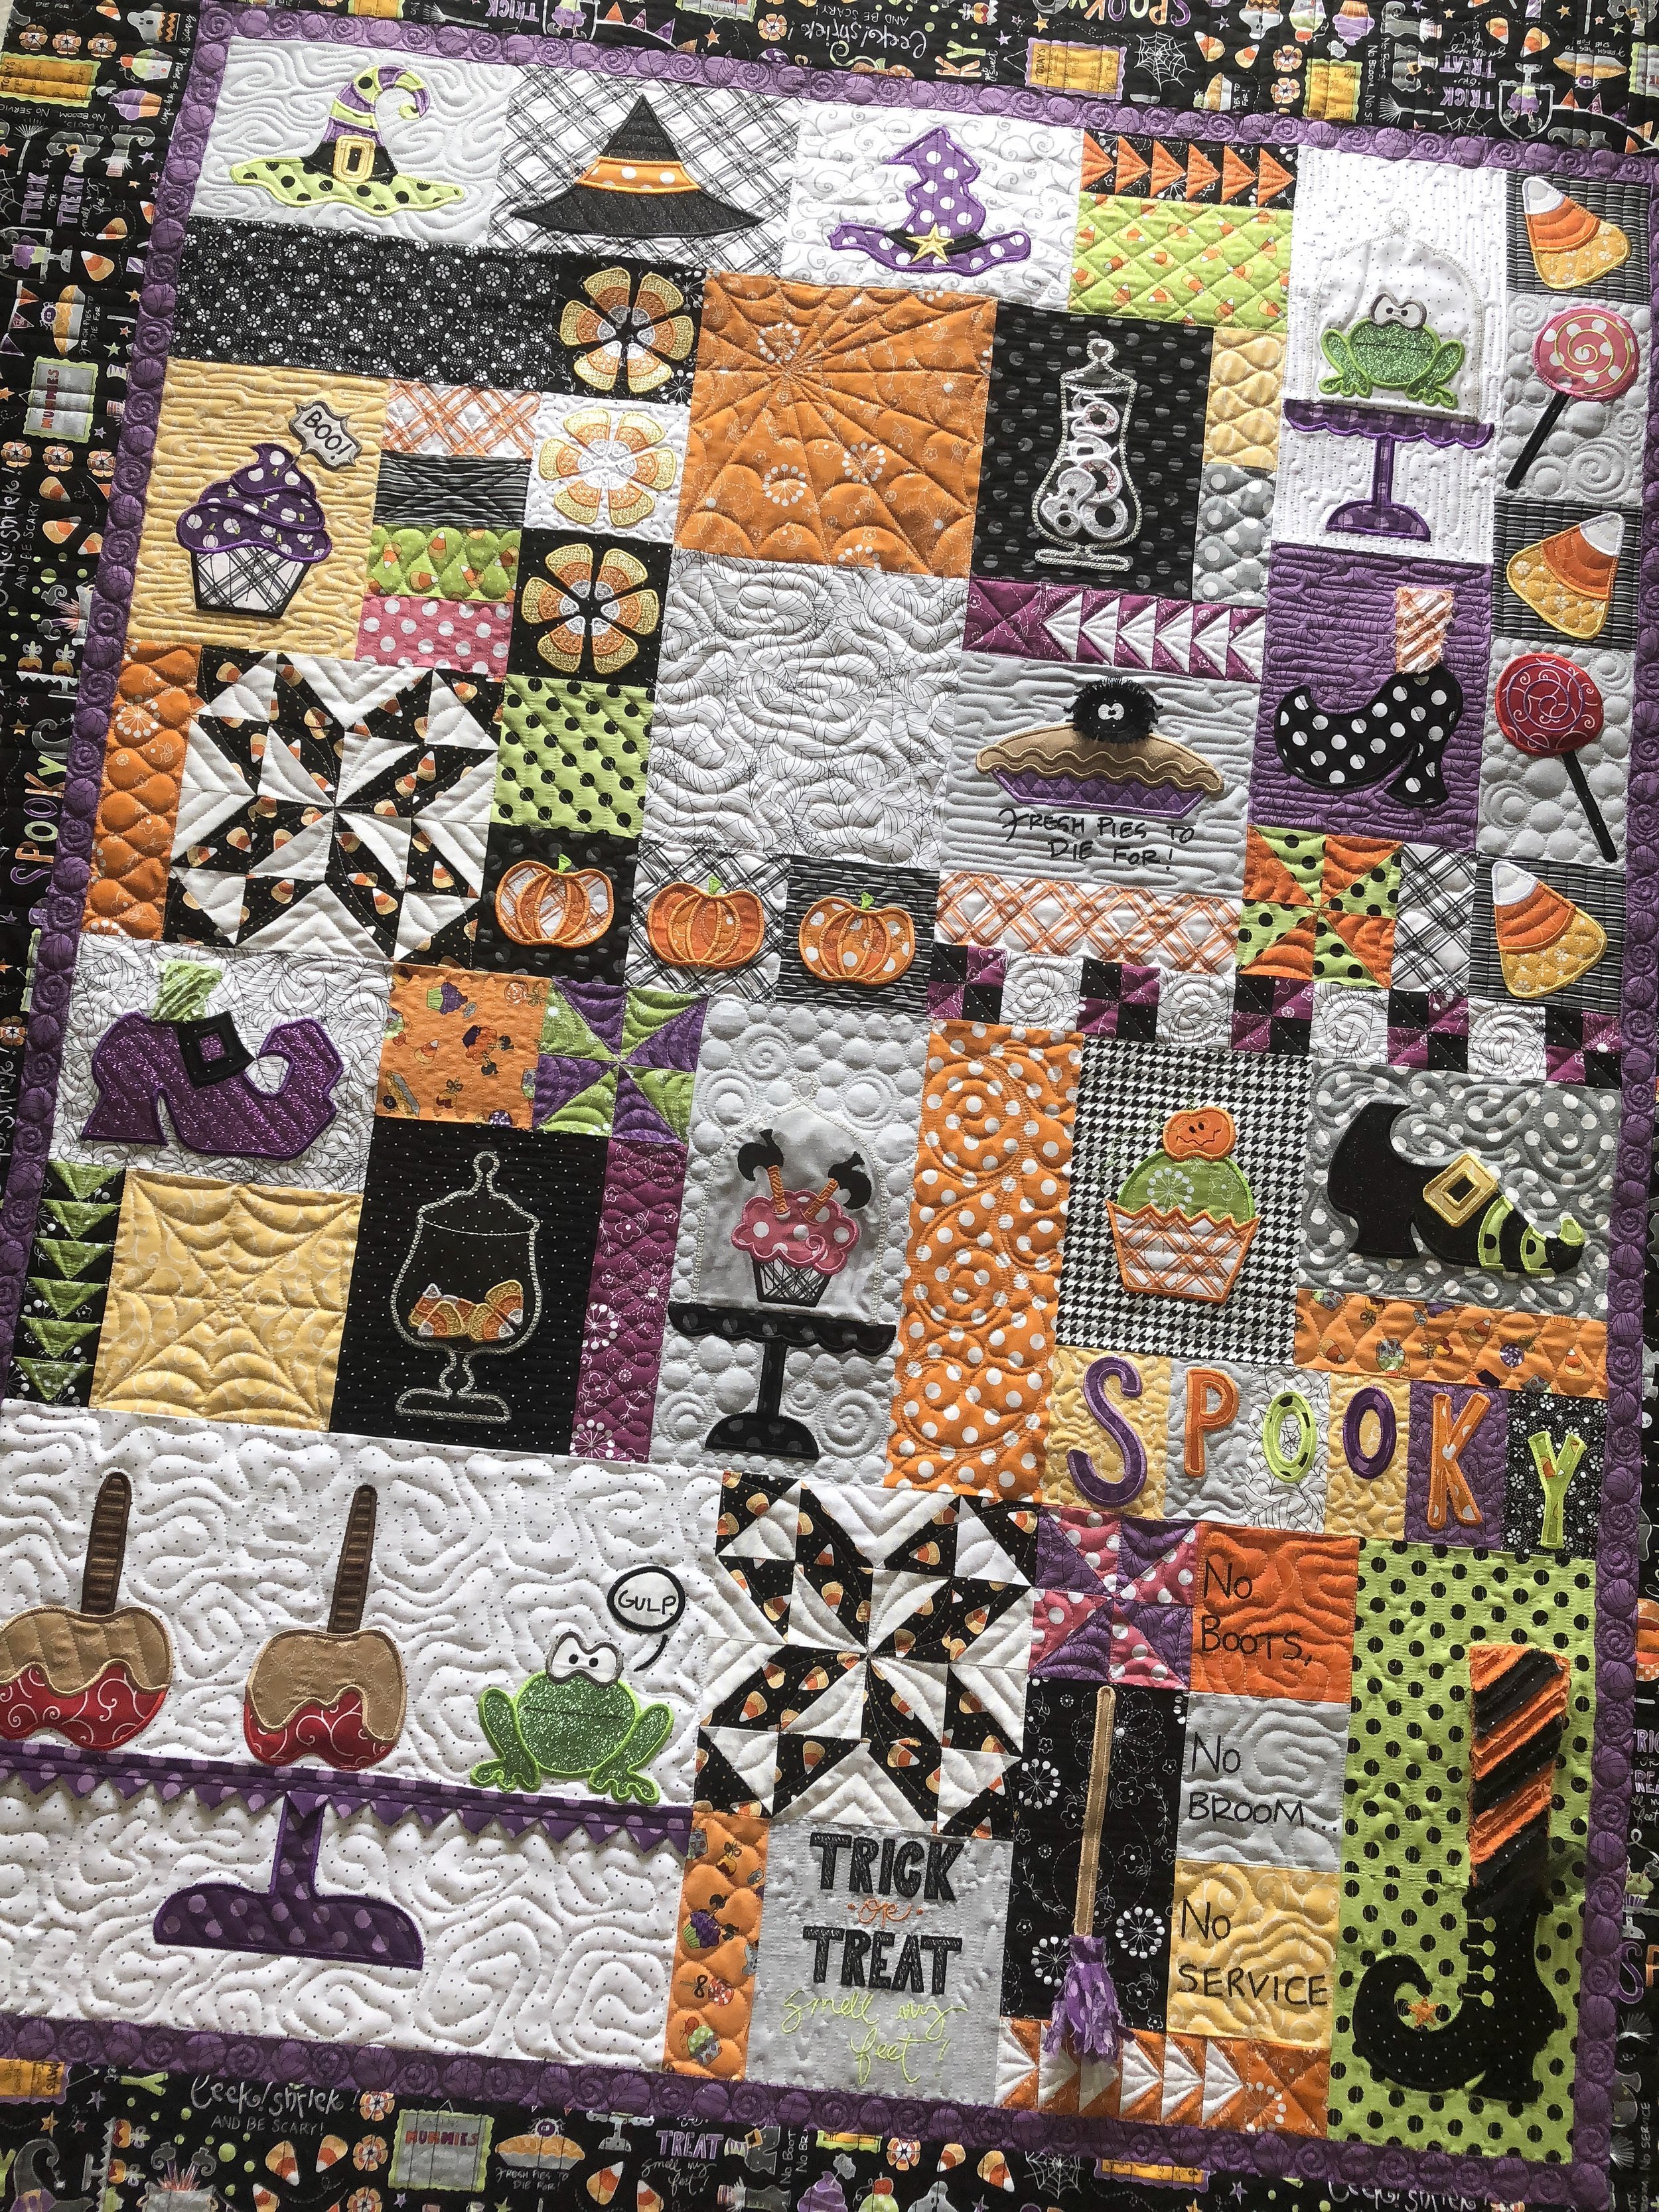
Sherry’s Broomhilda's Bakery quilt!
Sherry made this amazing Broomhilda Bakery quilt, pattern by Kimberbell Designs. The amazing thing about Kimberbell’s patterns, most of them are for those who machine embroider and she has great digital files for each block. There is even some clear vinyl on some of them...look closely...like that jar of eye balls.

I wanted to add lots of textures throughout, repeating them here and there, to tie the quilting together.
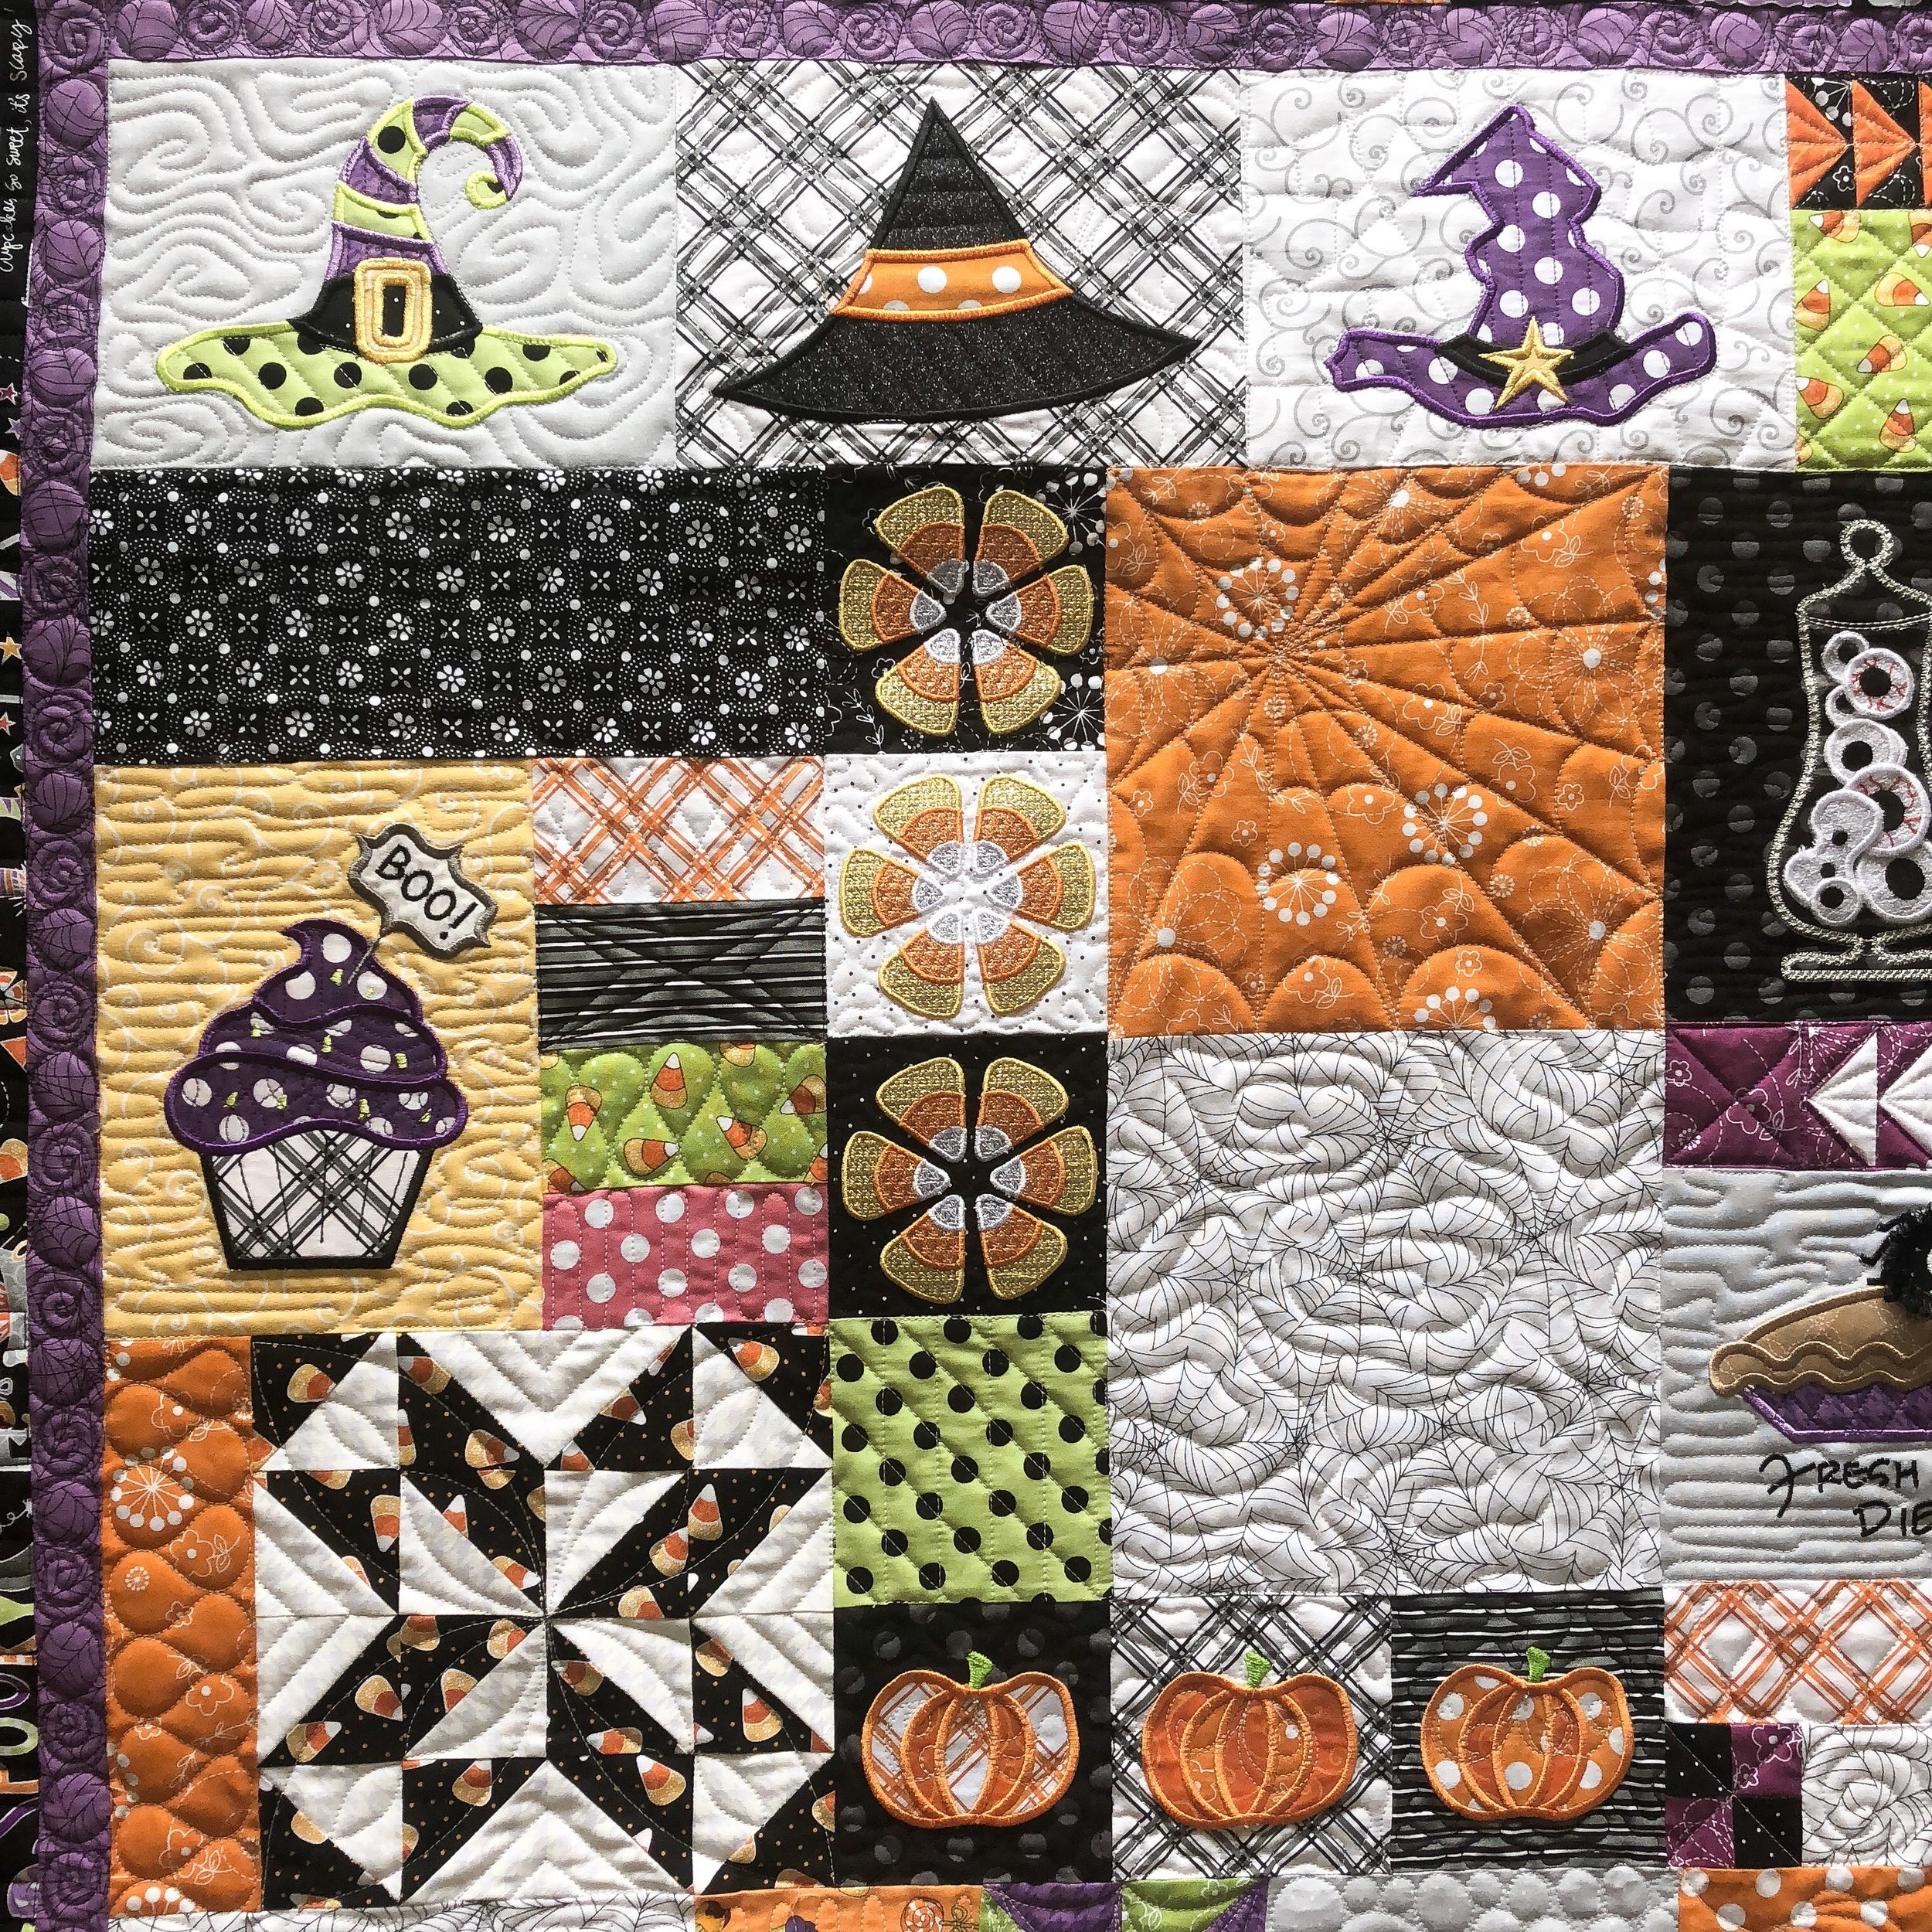
I used 3 colors of thread. White, black, and purple. I know the white and black are 30 tex A&E Perma Core thread, I don’t remember if the purple is as well...or if it’s Signature thread. I used an 8020 cotton poly blend batting.
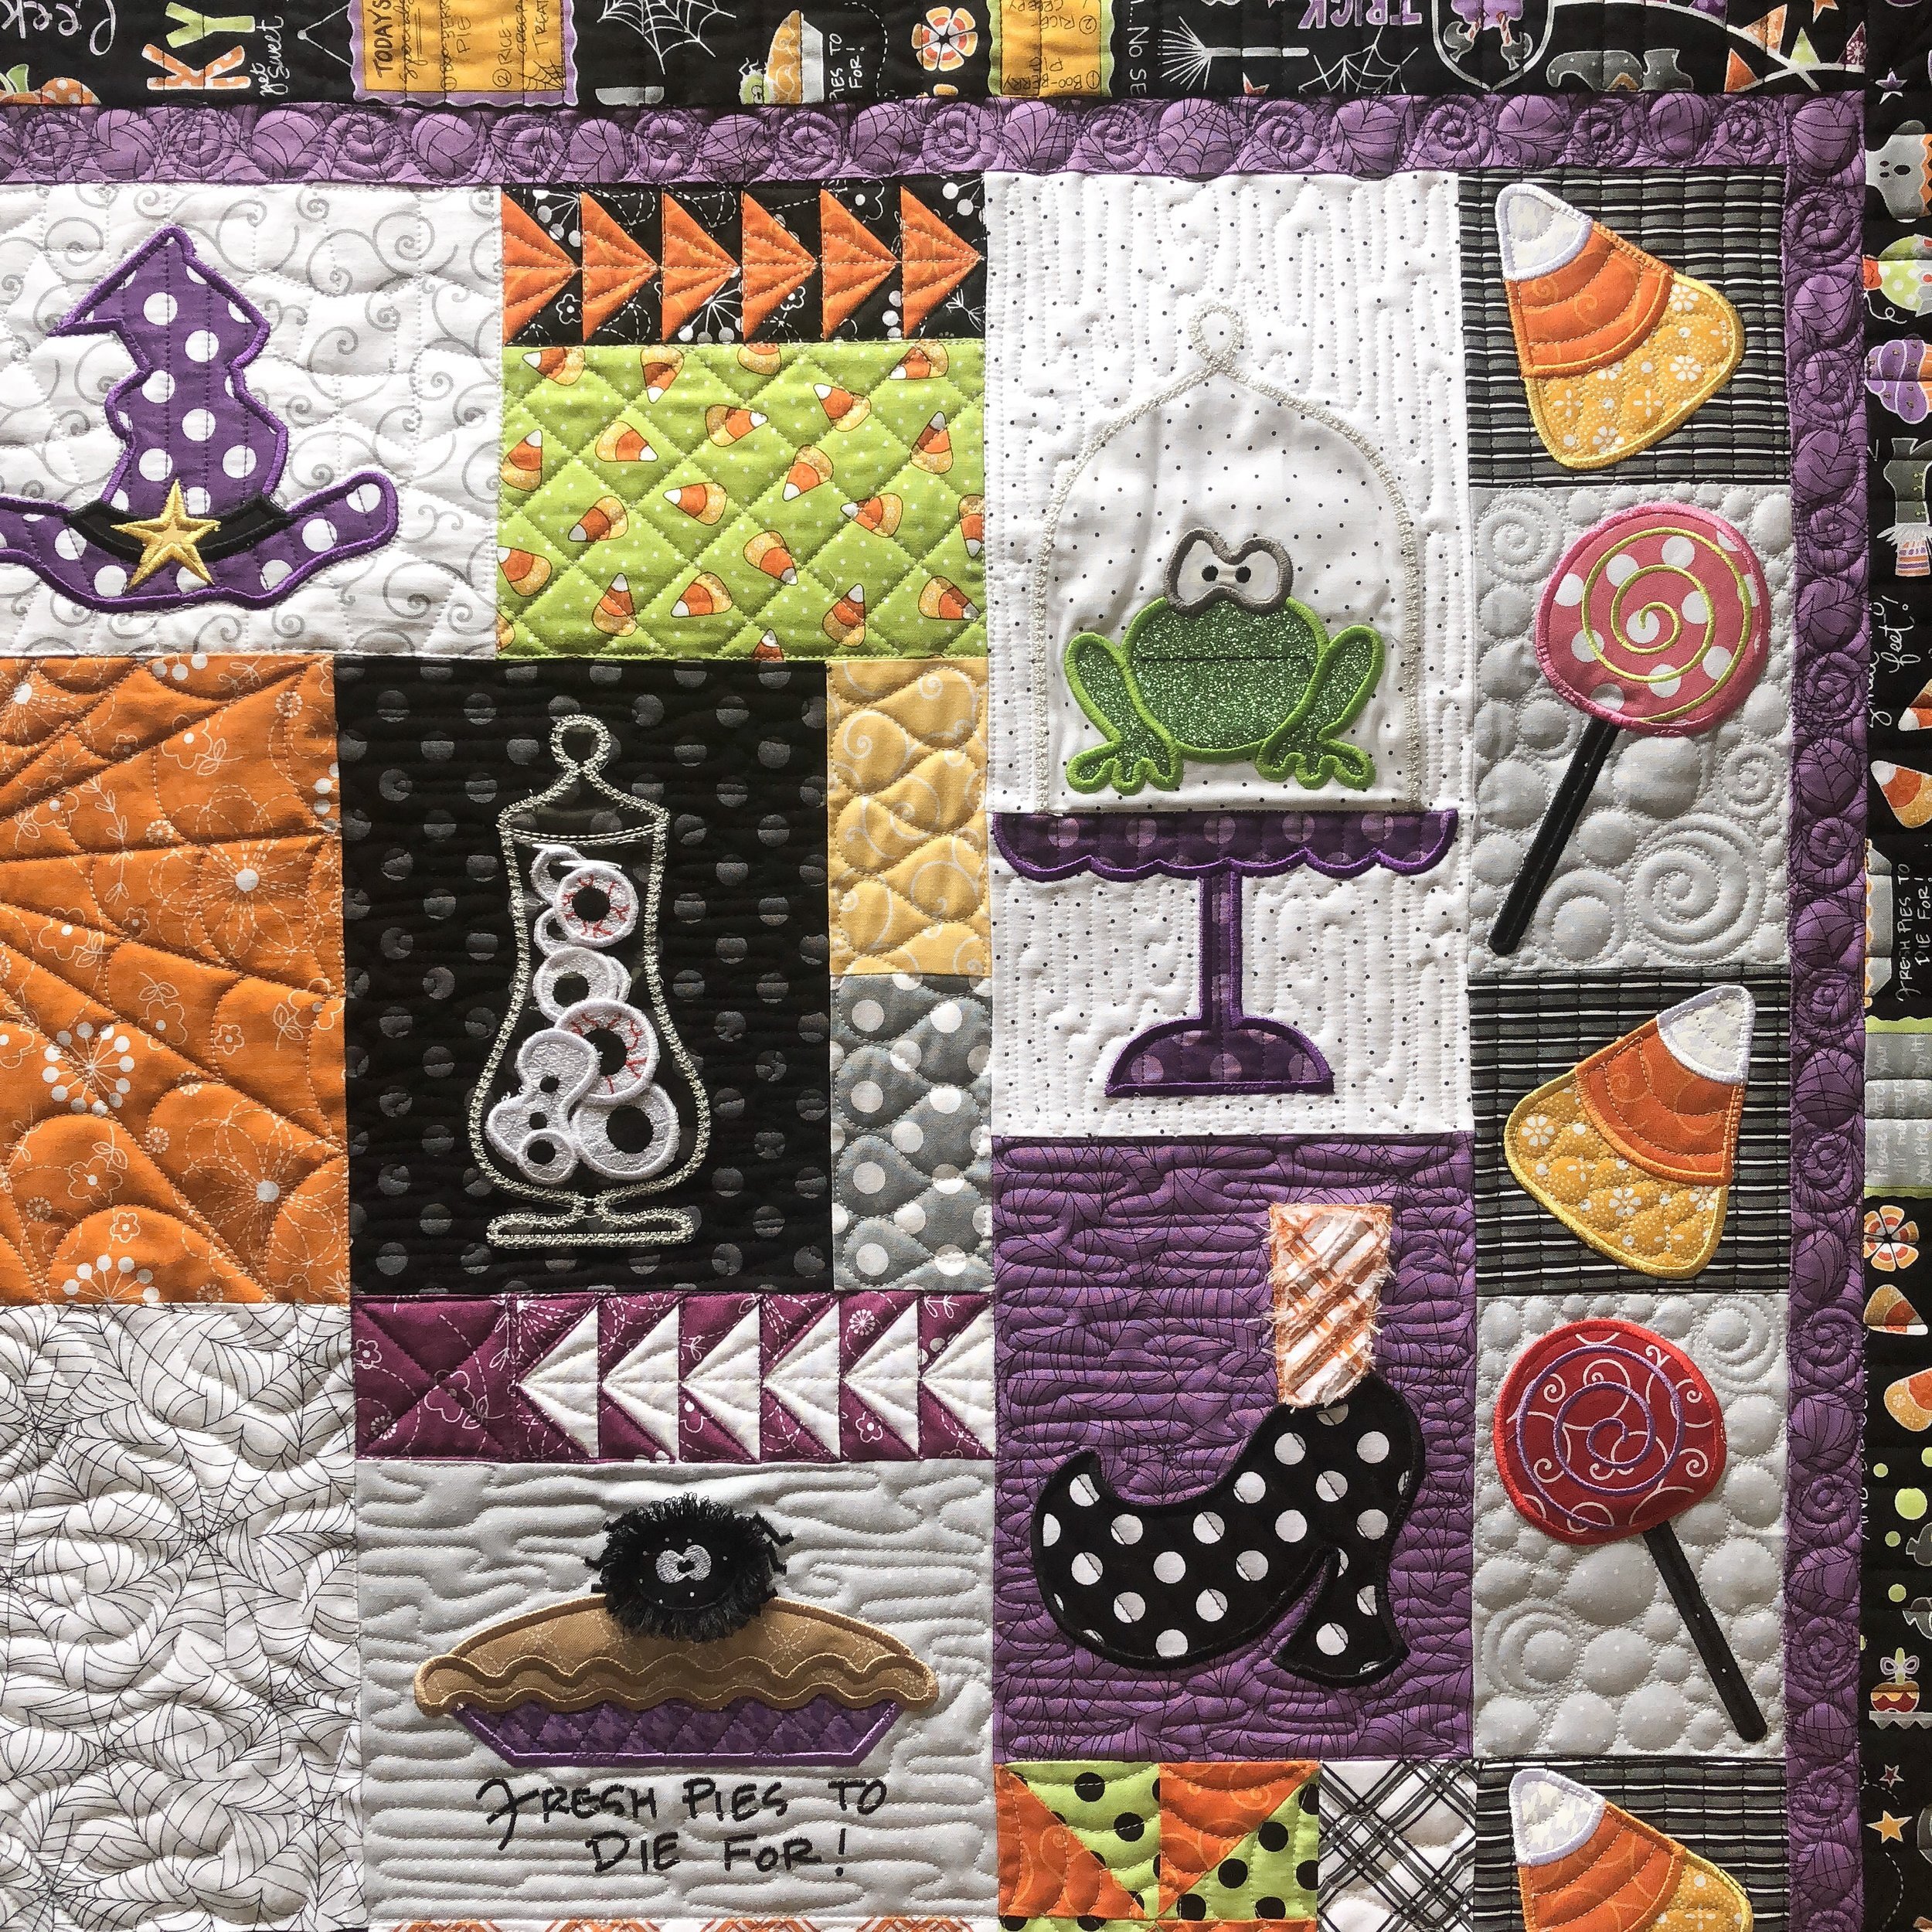
Some close ups on all the quilty texture, on all the different blocks.

I used 2 of my Circle2™ rulers, to quilt this block. The 2”/8” (both sizes) and if I remember right, the 4”. To check out my rulers here is a blog post: https://www.quiltingit.com/blog/2018/10/10/introducing-my-circle2-longarm-circle-ruler-set or the link to them in my shop https://www.quiltingit.com/shop/circle2-longarm-ruler-set-green-acrylic

Even those some of the designs I quilted aren’t necessarily Halloweeny, they go really well with the overall design of the quilt!! The quilty texture is a perfect combo with all the fun blocks on this quilt.

Kimberbell Designs is known for 3D elements added to their quilts or patterns.
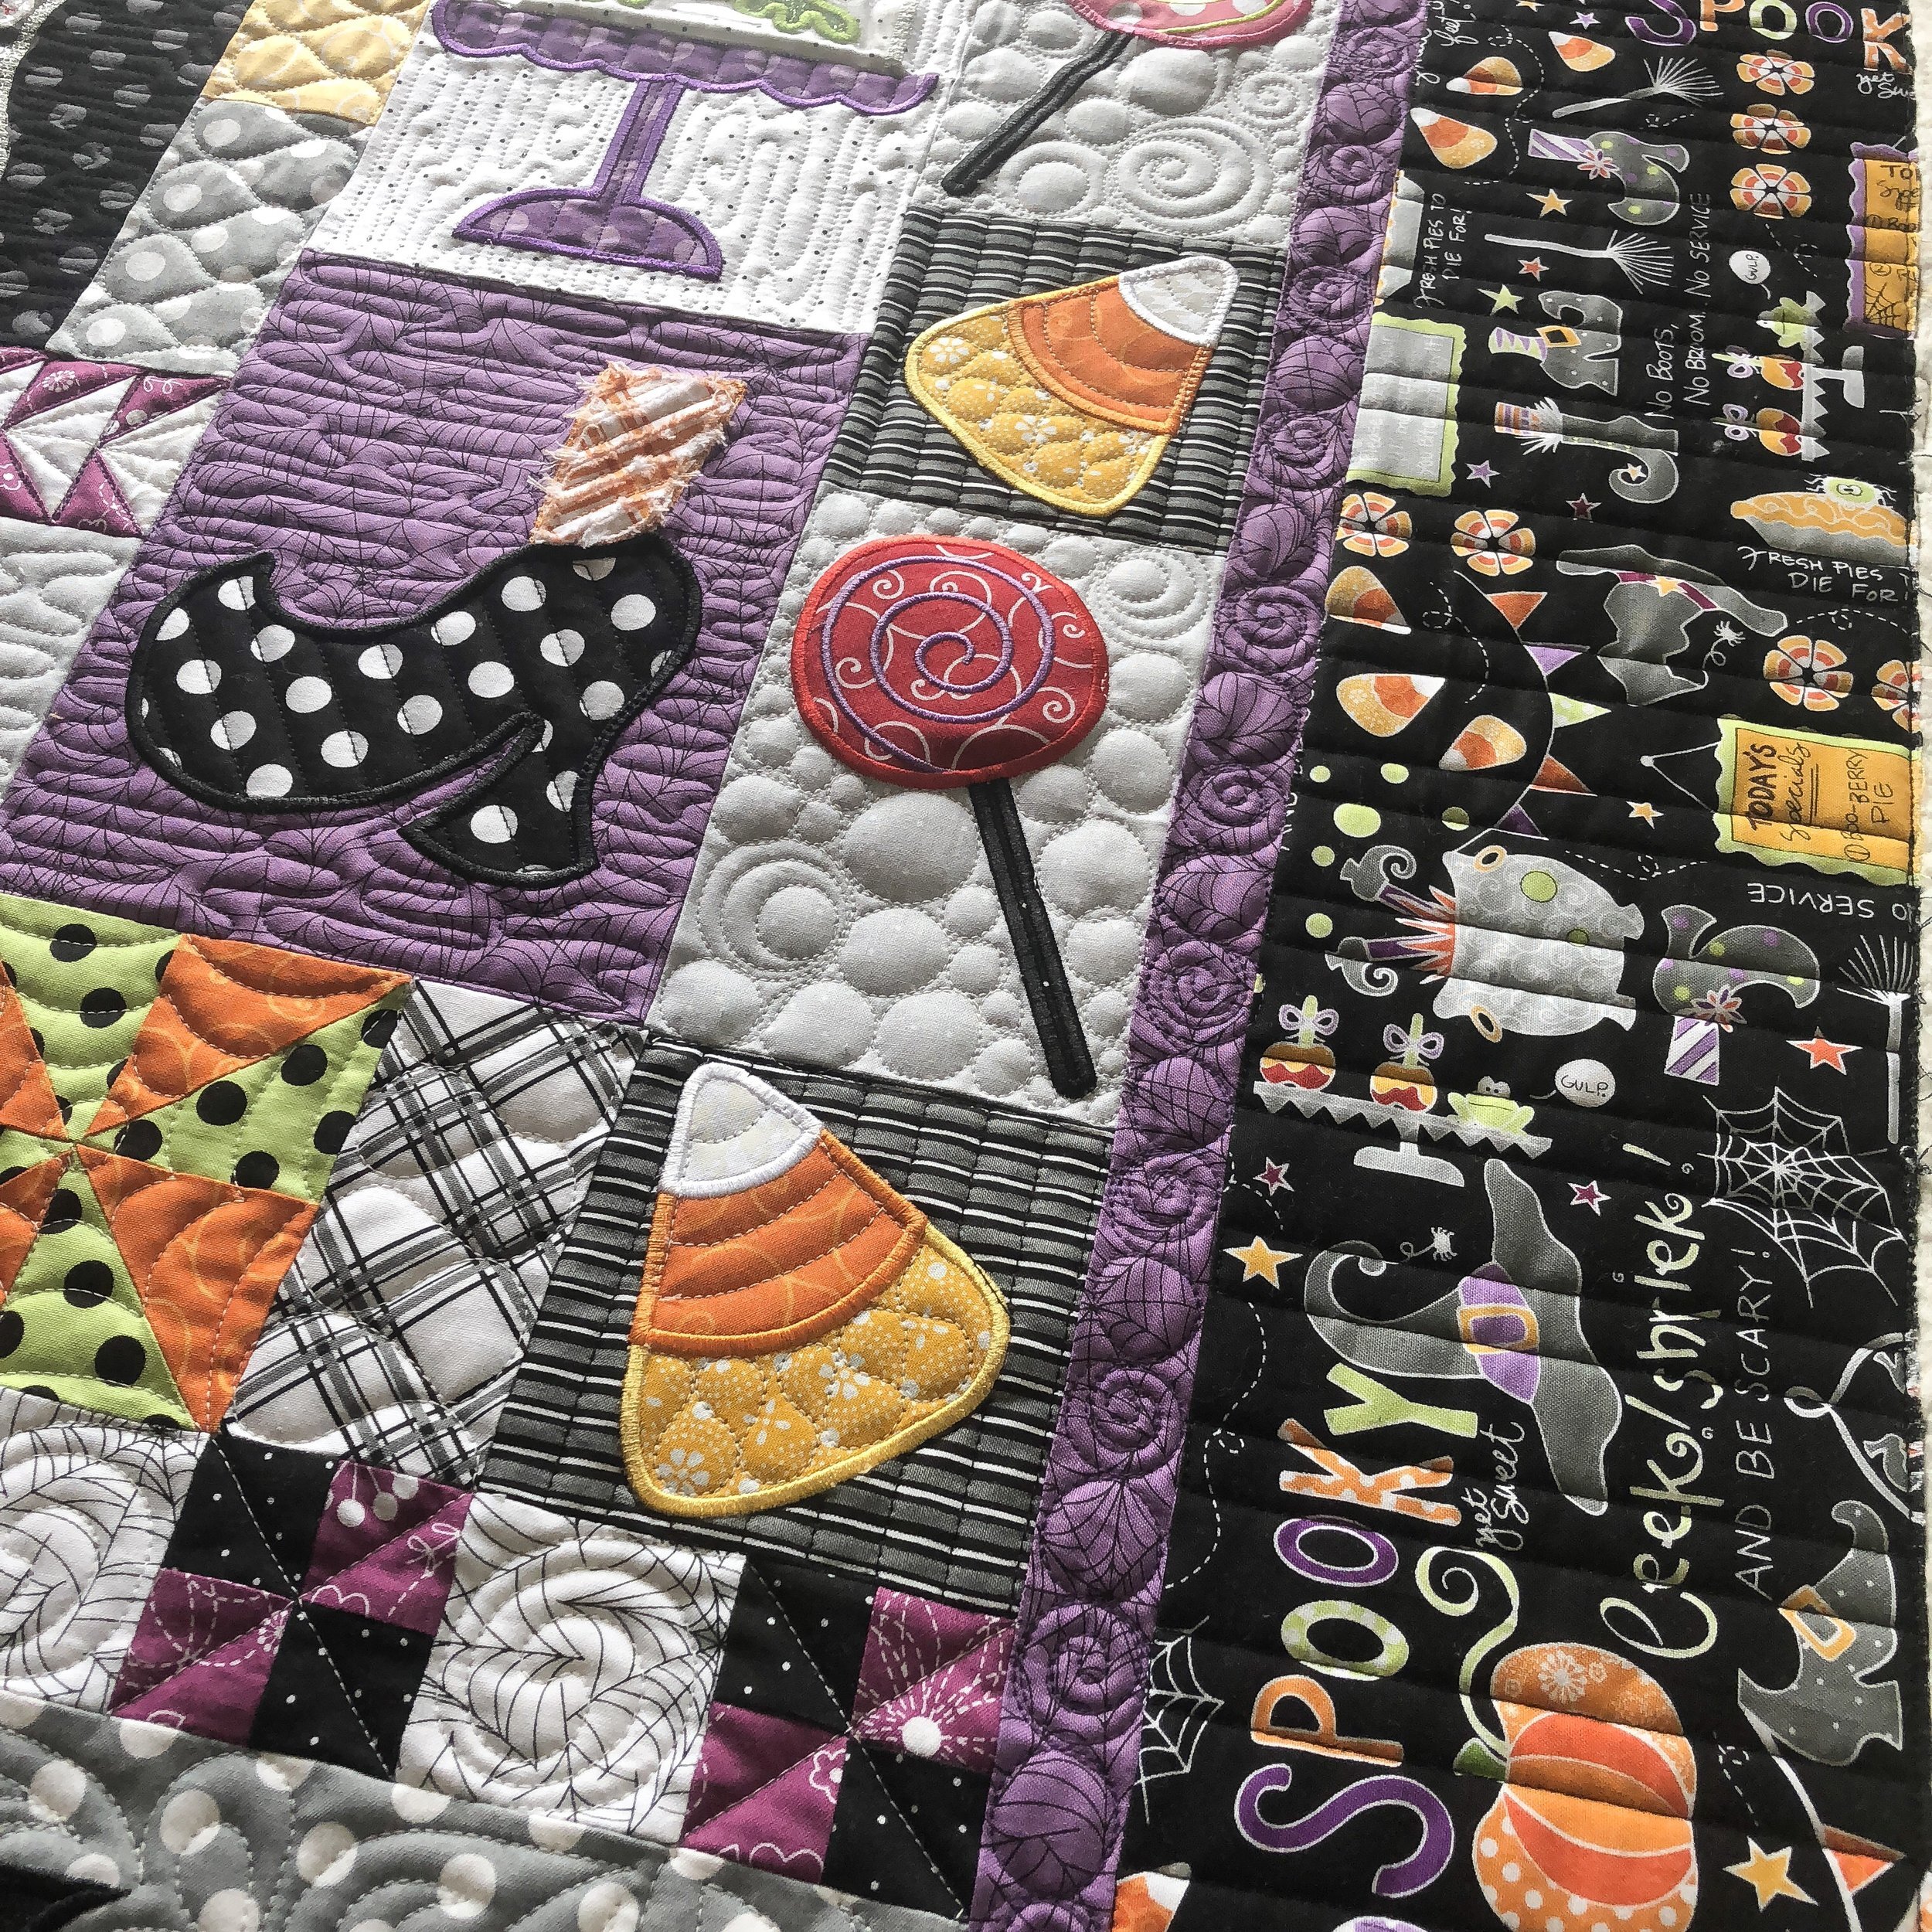
It’s hard to see, unless you look closely...I quilted a pinstripe in the black border. I used the 8” edge ruler from Linda at The Quilted Pineapple. I used a couple of her other edge rulers, when I quilted different blocks inside the quilt as well. You can never know which size you’ll use the most, so I encourage you to get her set.
Thank you for coming by!! I have more quilty Halloween stuff coming your way soon.
Happy quilting!!
- leisha
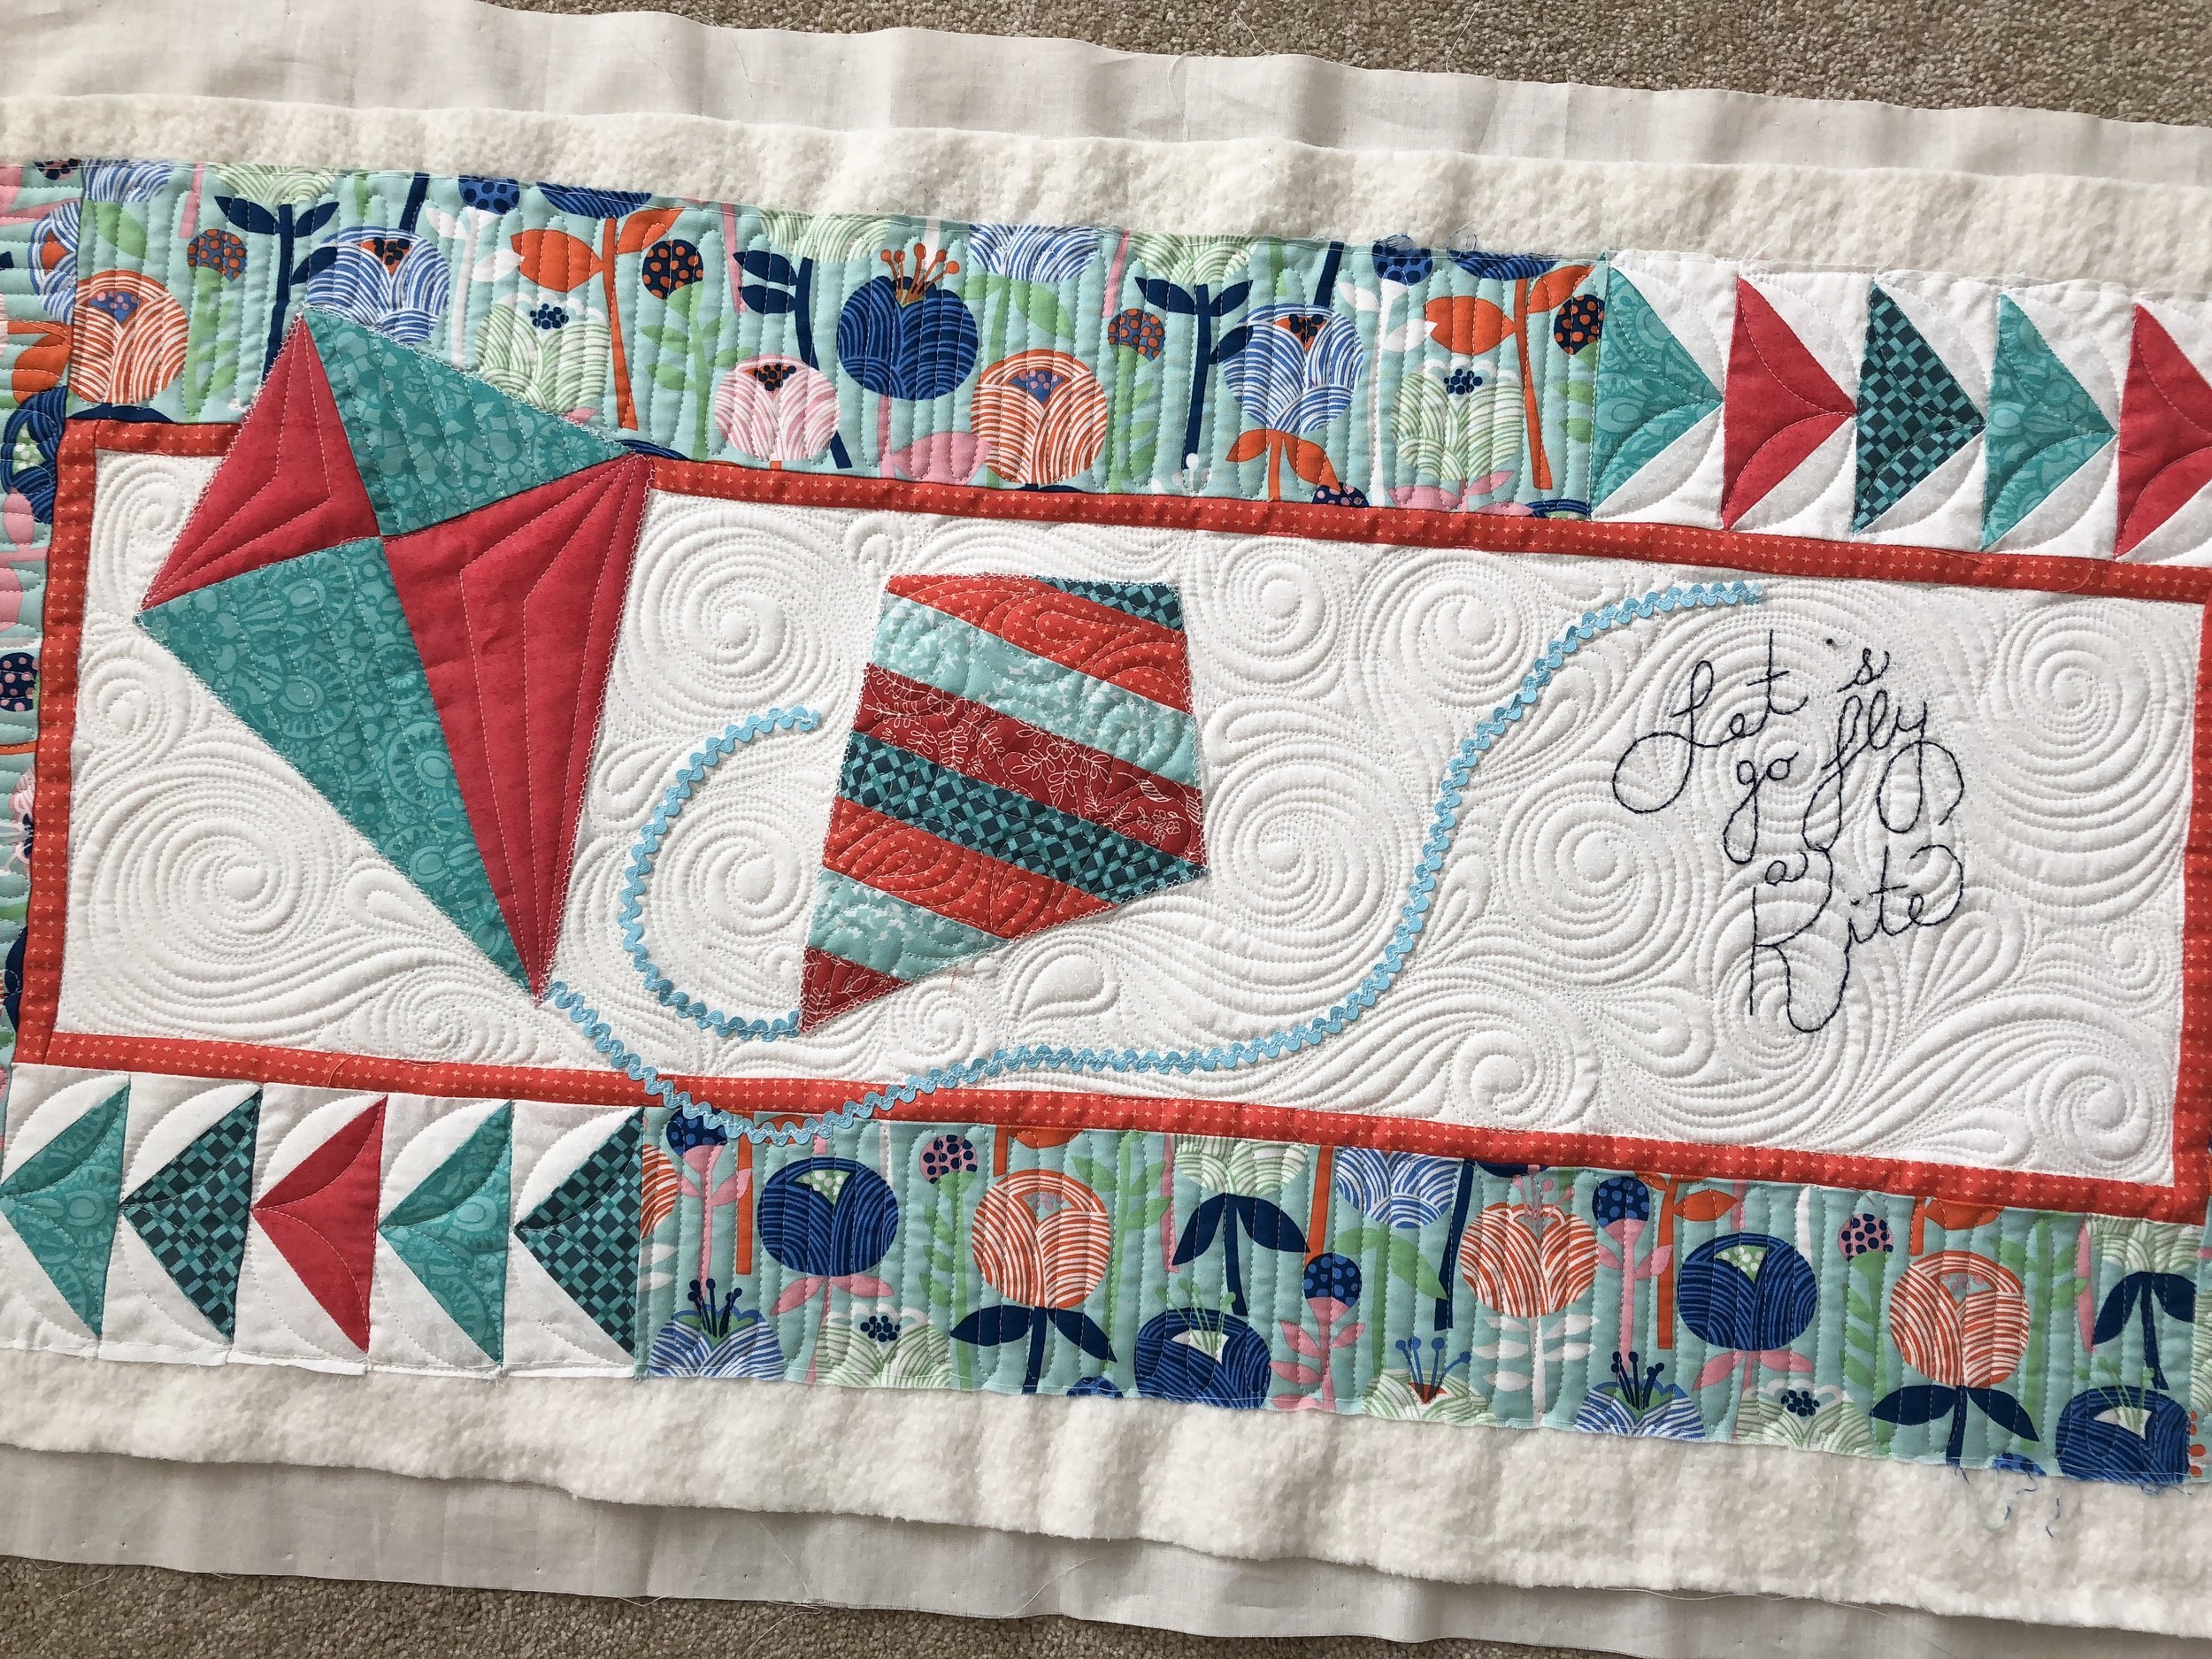
Ramona’s ~ Let’s Go Fly a Kite
Our great friend Ramona comes to sew with us every week, which I’m so grateful for. She recently finished the front of this super cute kite bench pillow, pattern by Kimberbell Designs. She added the cute hand embroidered words “Let’s Go Fly a Kite”, to the open space. I love it!!! If you haven’t heard about Kimberbell’s bench pillows, head on over to her website. If you love machine embroidery...you’ve got to see the amazing things Kim and her team create. Link to the bench pillows.... https://www.kimberbelldesigns.com/product-category/collections/sewing-and-quilting/bench-pillows-sewing/
link to the machine embroidery... https://www.kimberbelldesigns.com/product-category/collections/machine-embroidery/
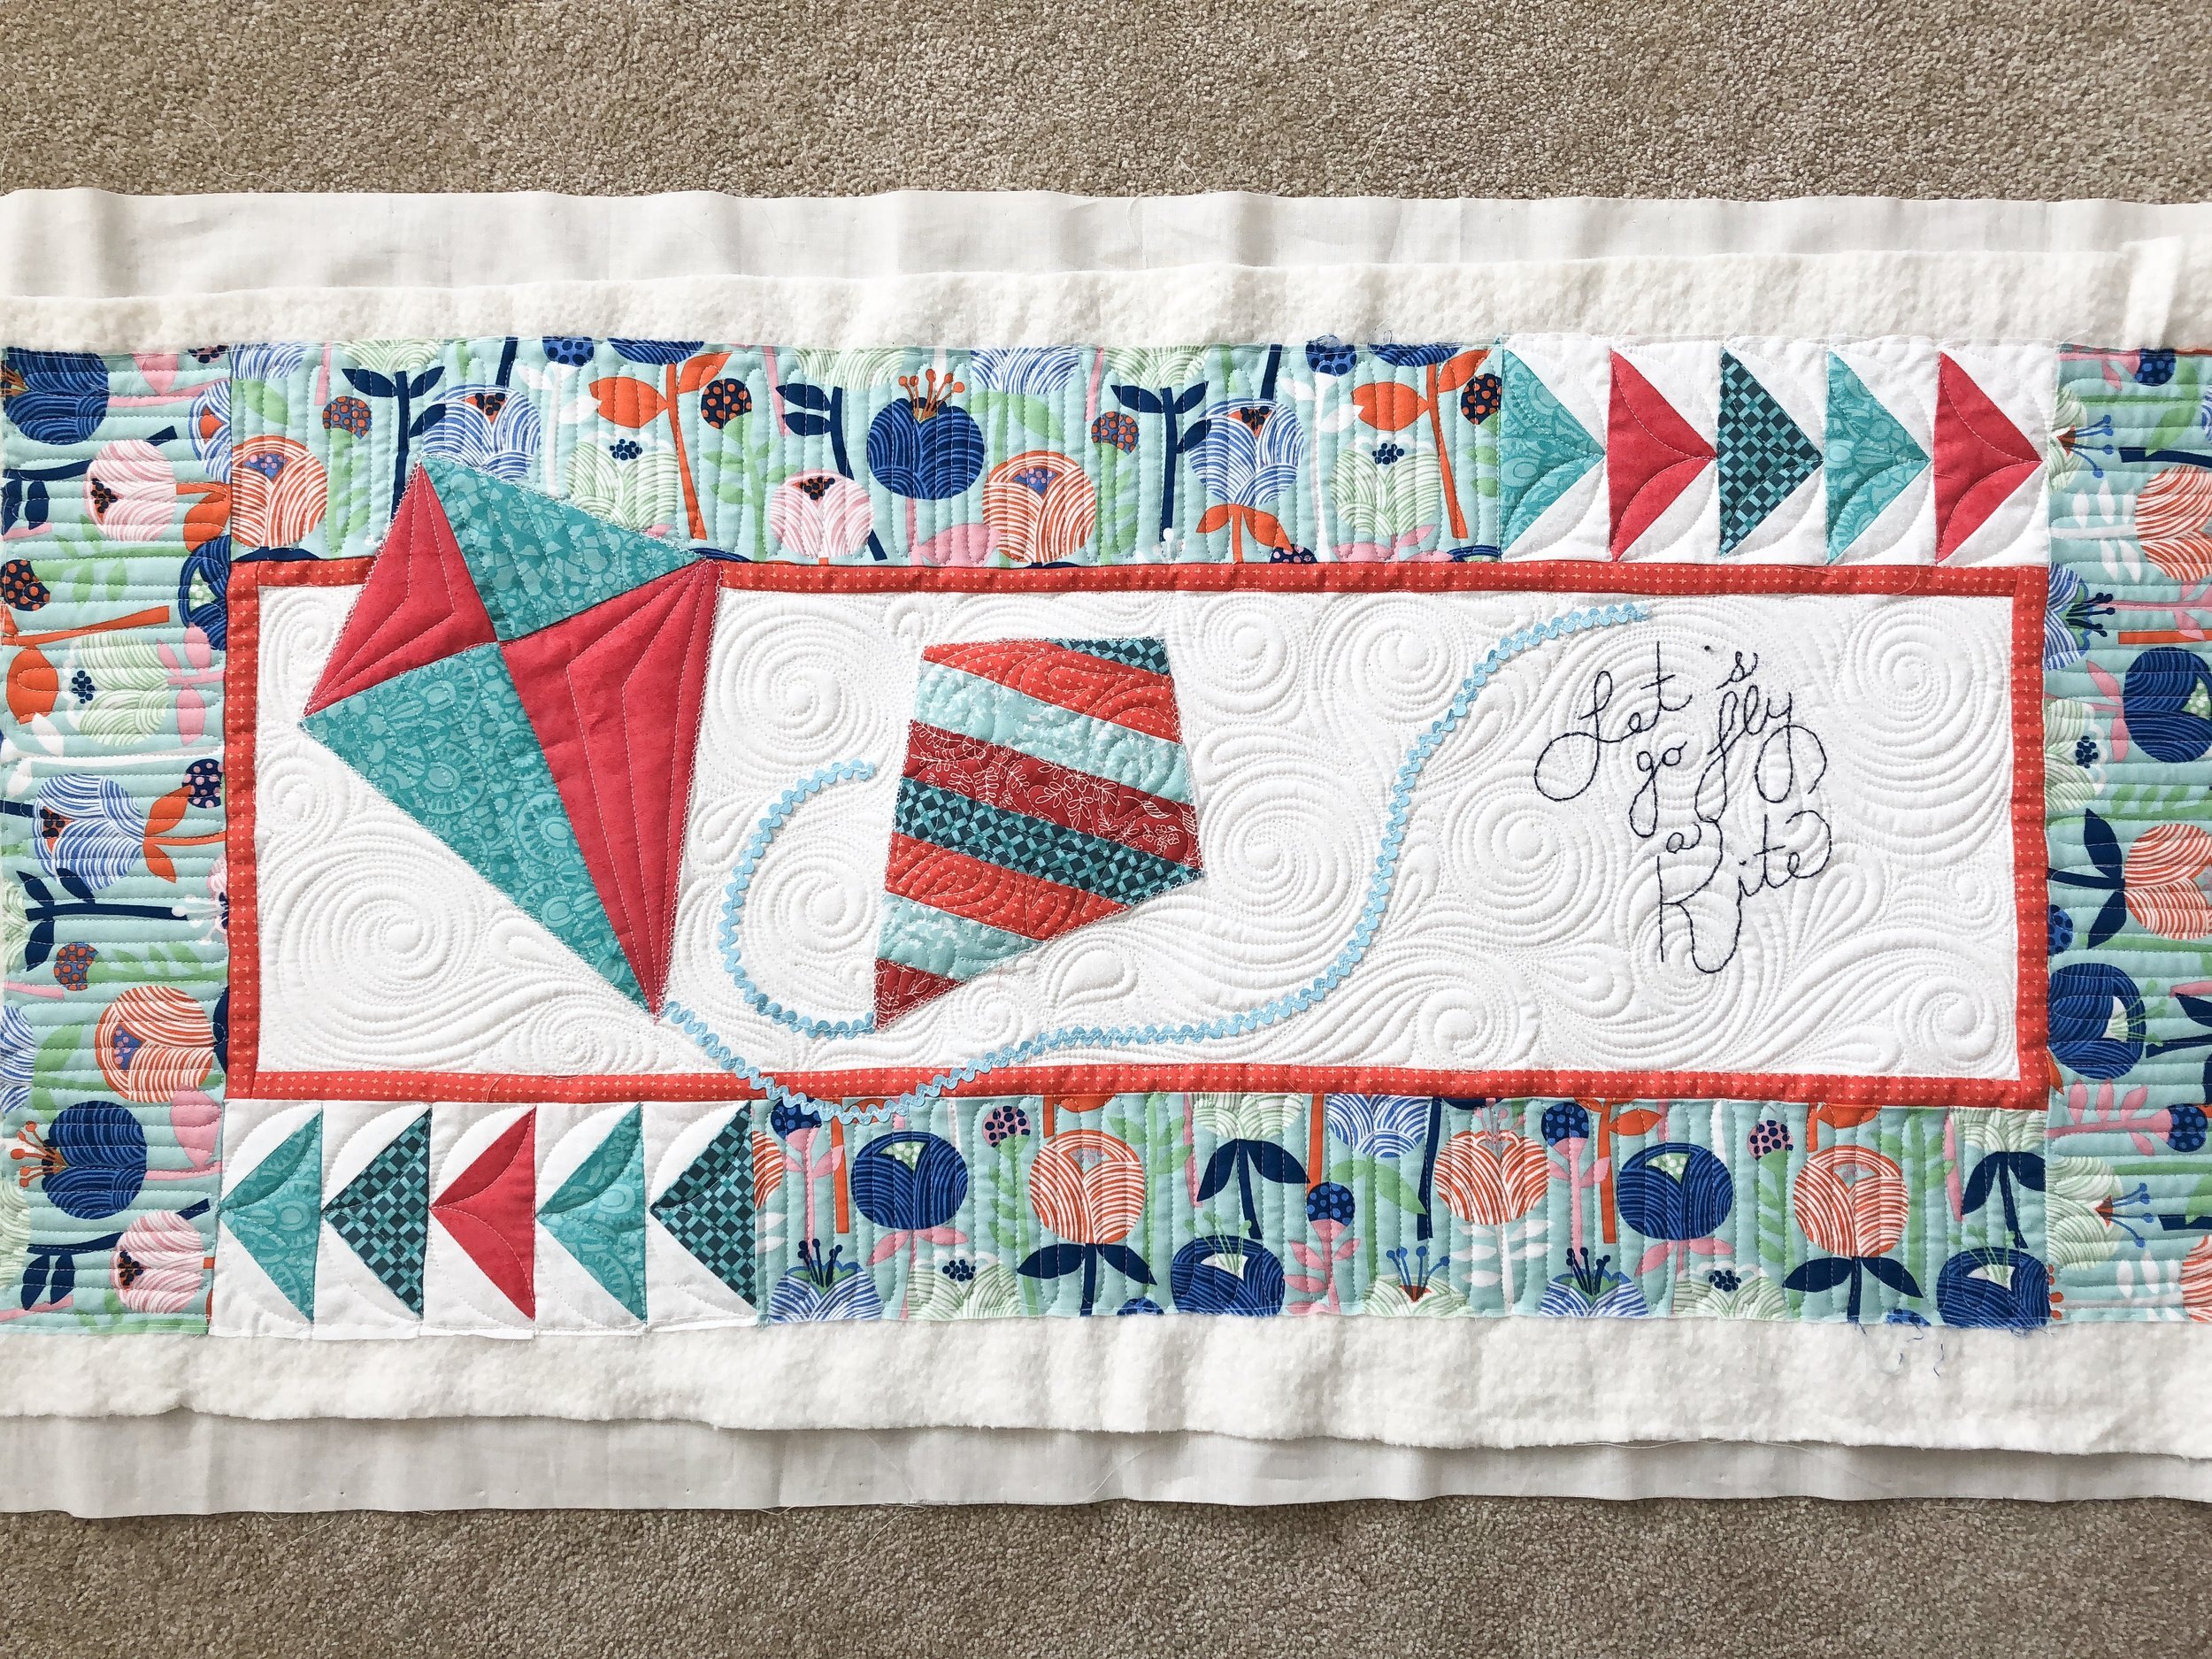
I love quilting the freehand swirls to look like wind...it’s one of my most favorite textures.
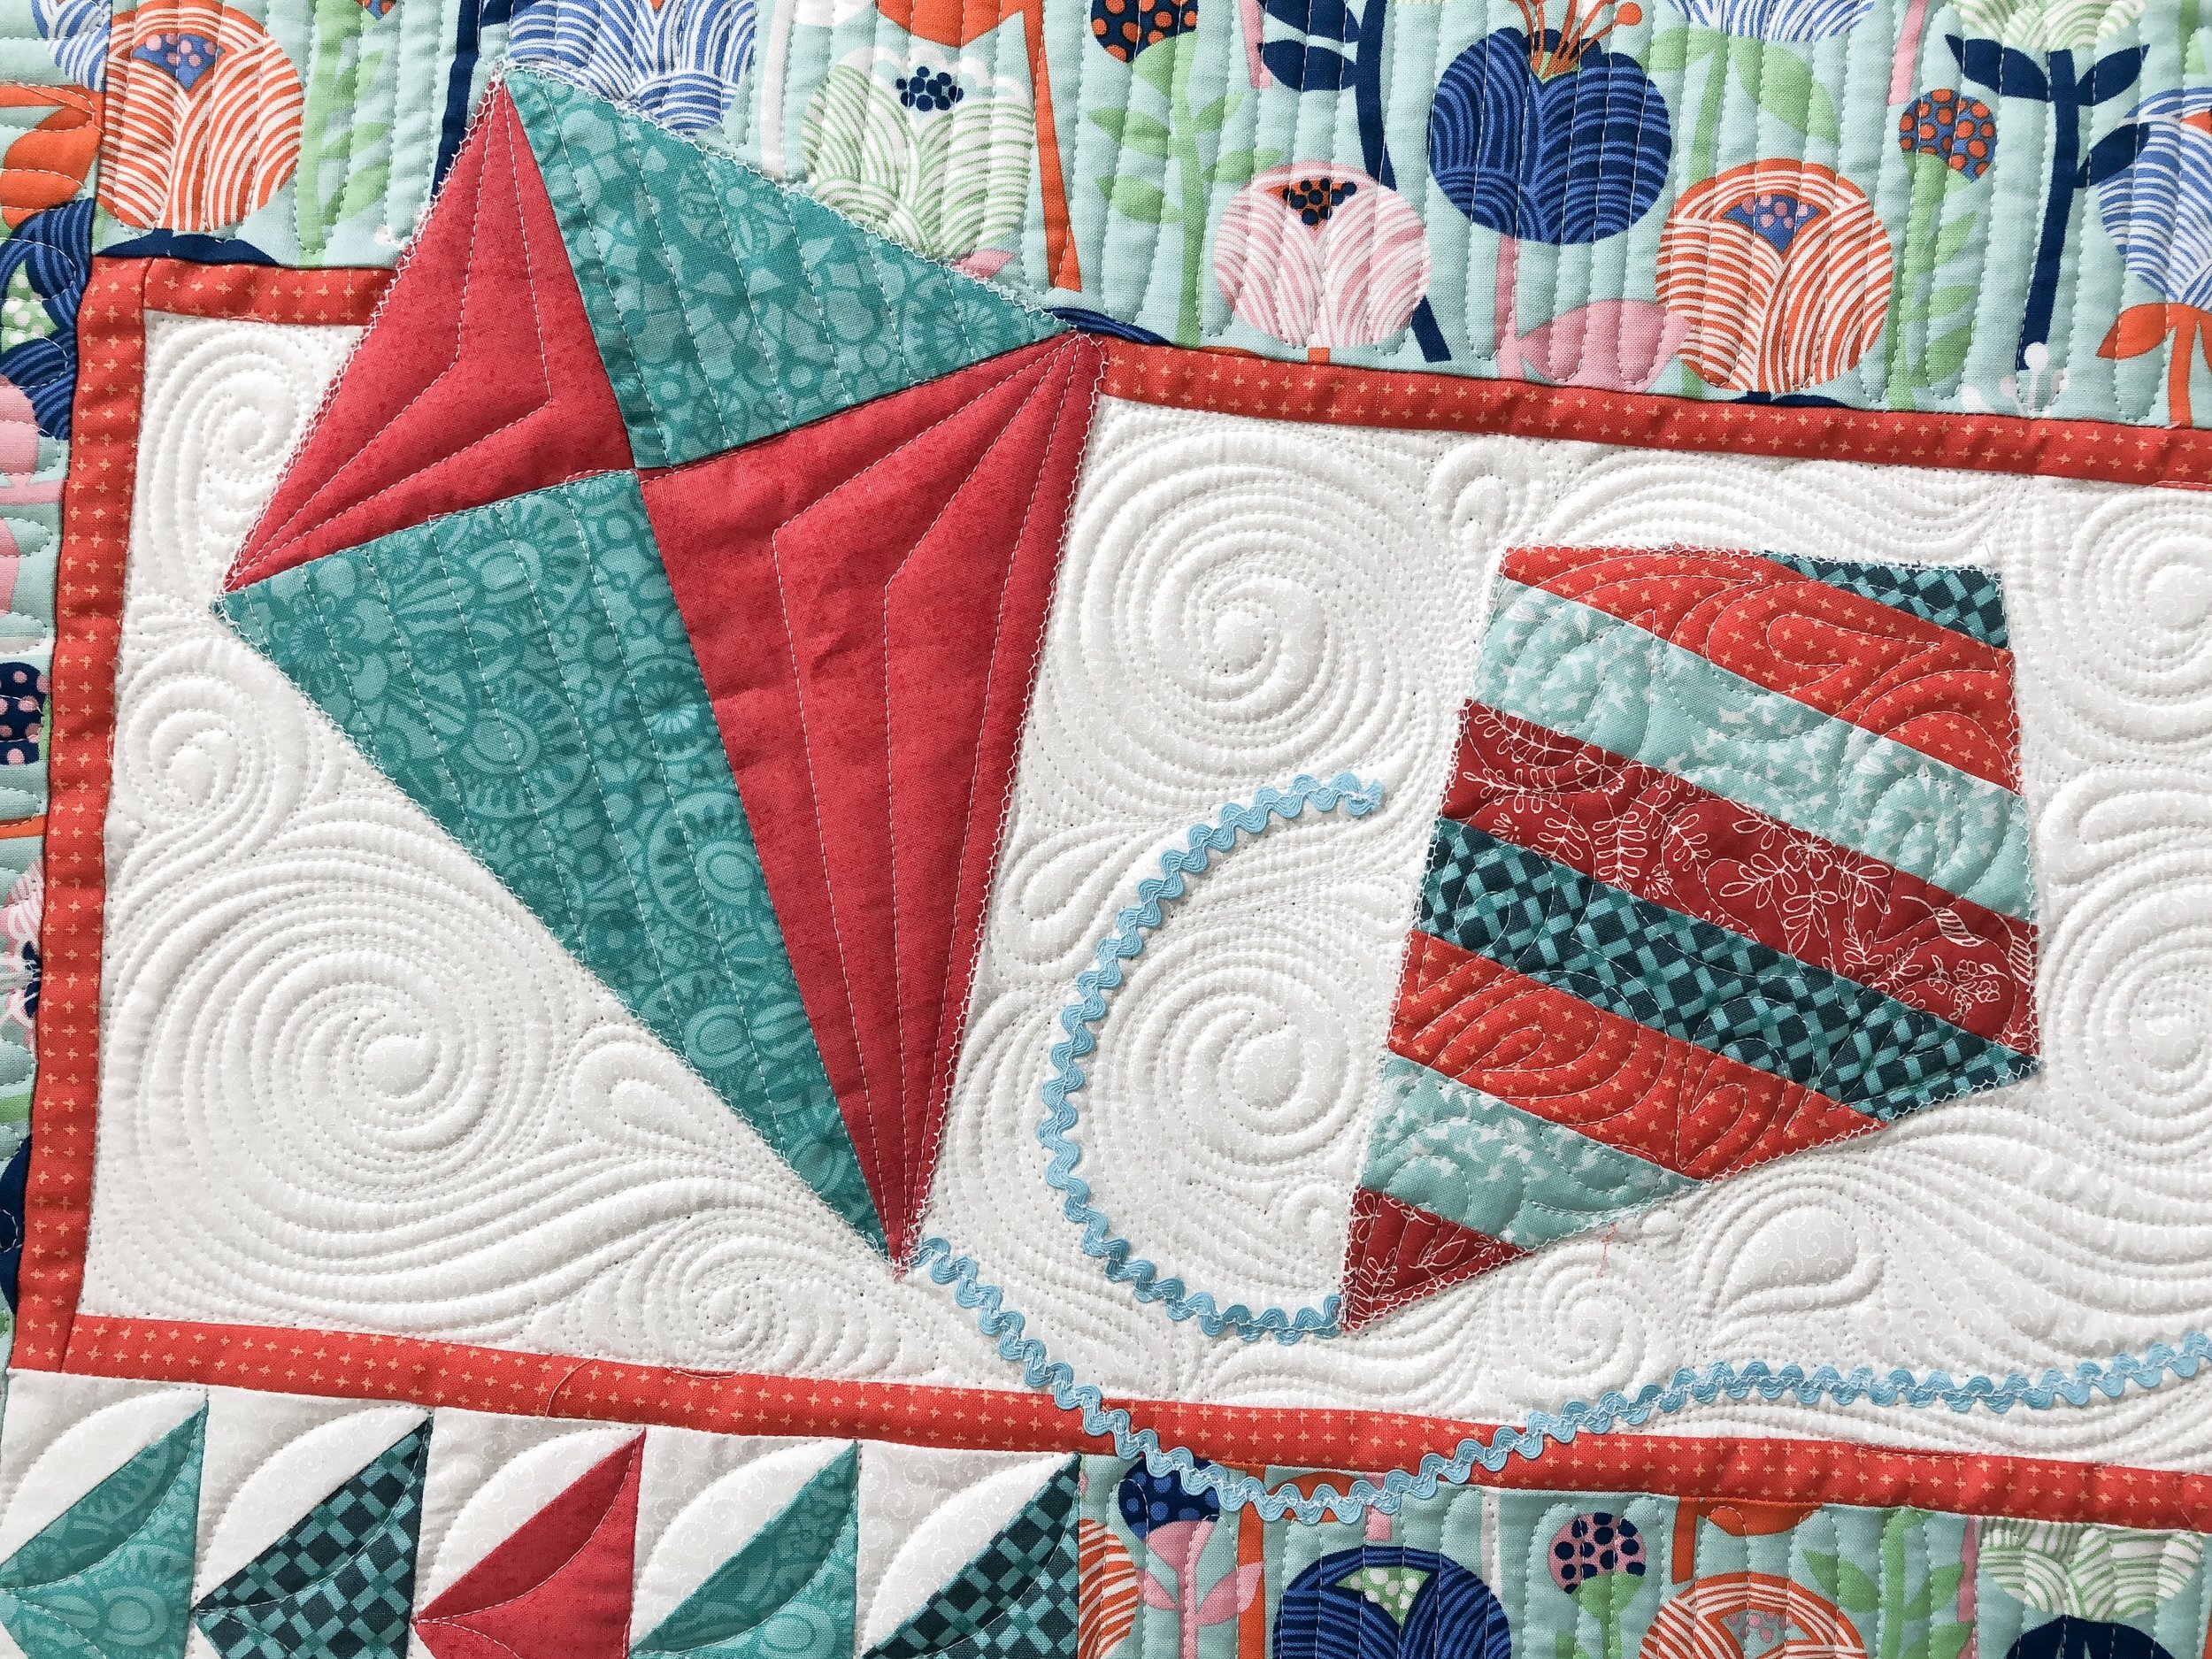
In the larger kite I used Linda from The Quilted Pineapple’s 12” edge ruler. Her rulers are my absolute favorites!!! I also used a 3” circle ruler, made by a company that’s no longer in business, to quilt the petals in the flying geese. Everything else was done freehand. I also used my favorite Winline 8020 batting, and a 30 tex Perma Core A&E white thread.
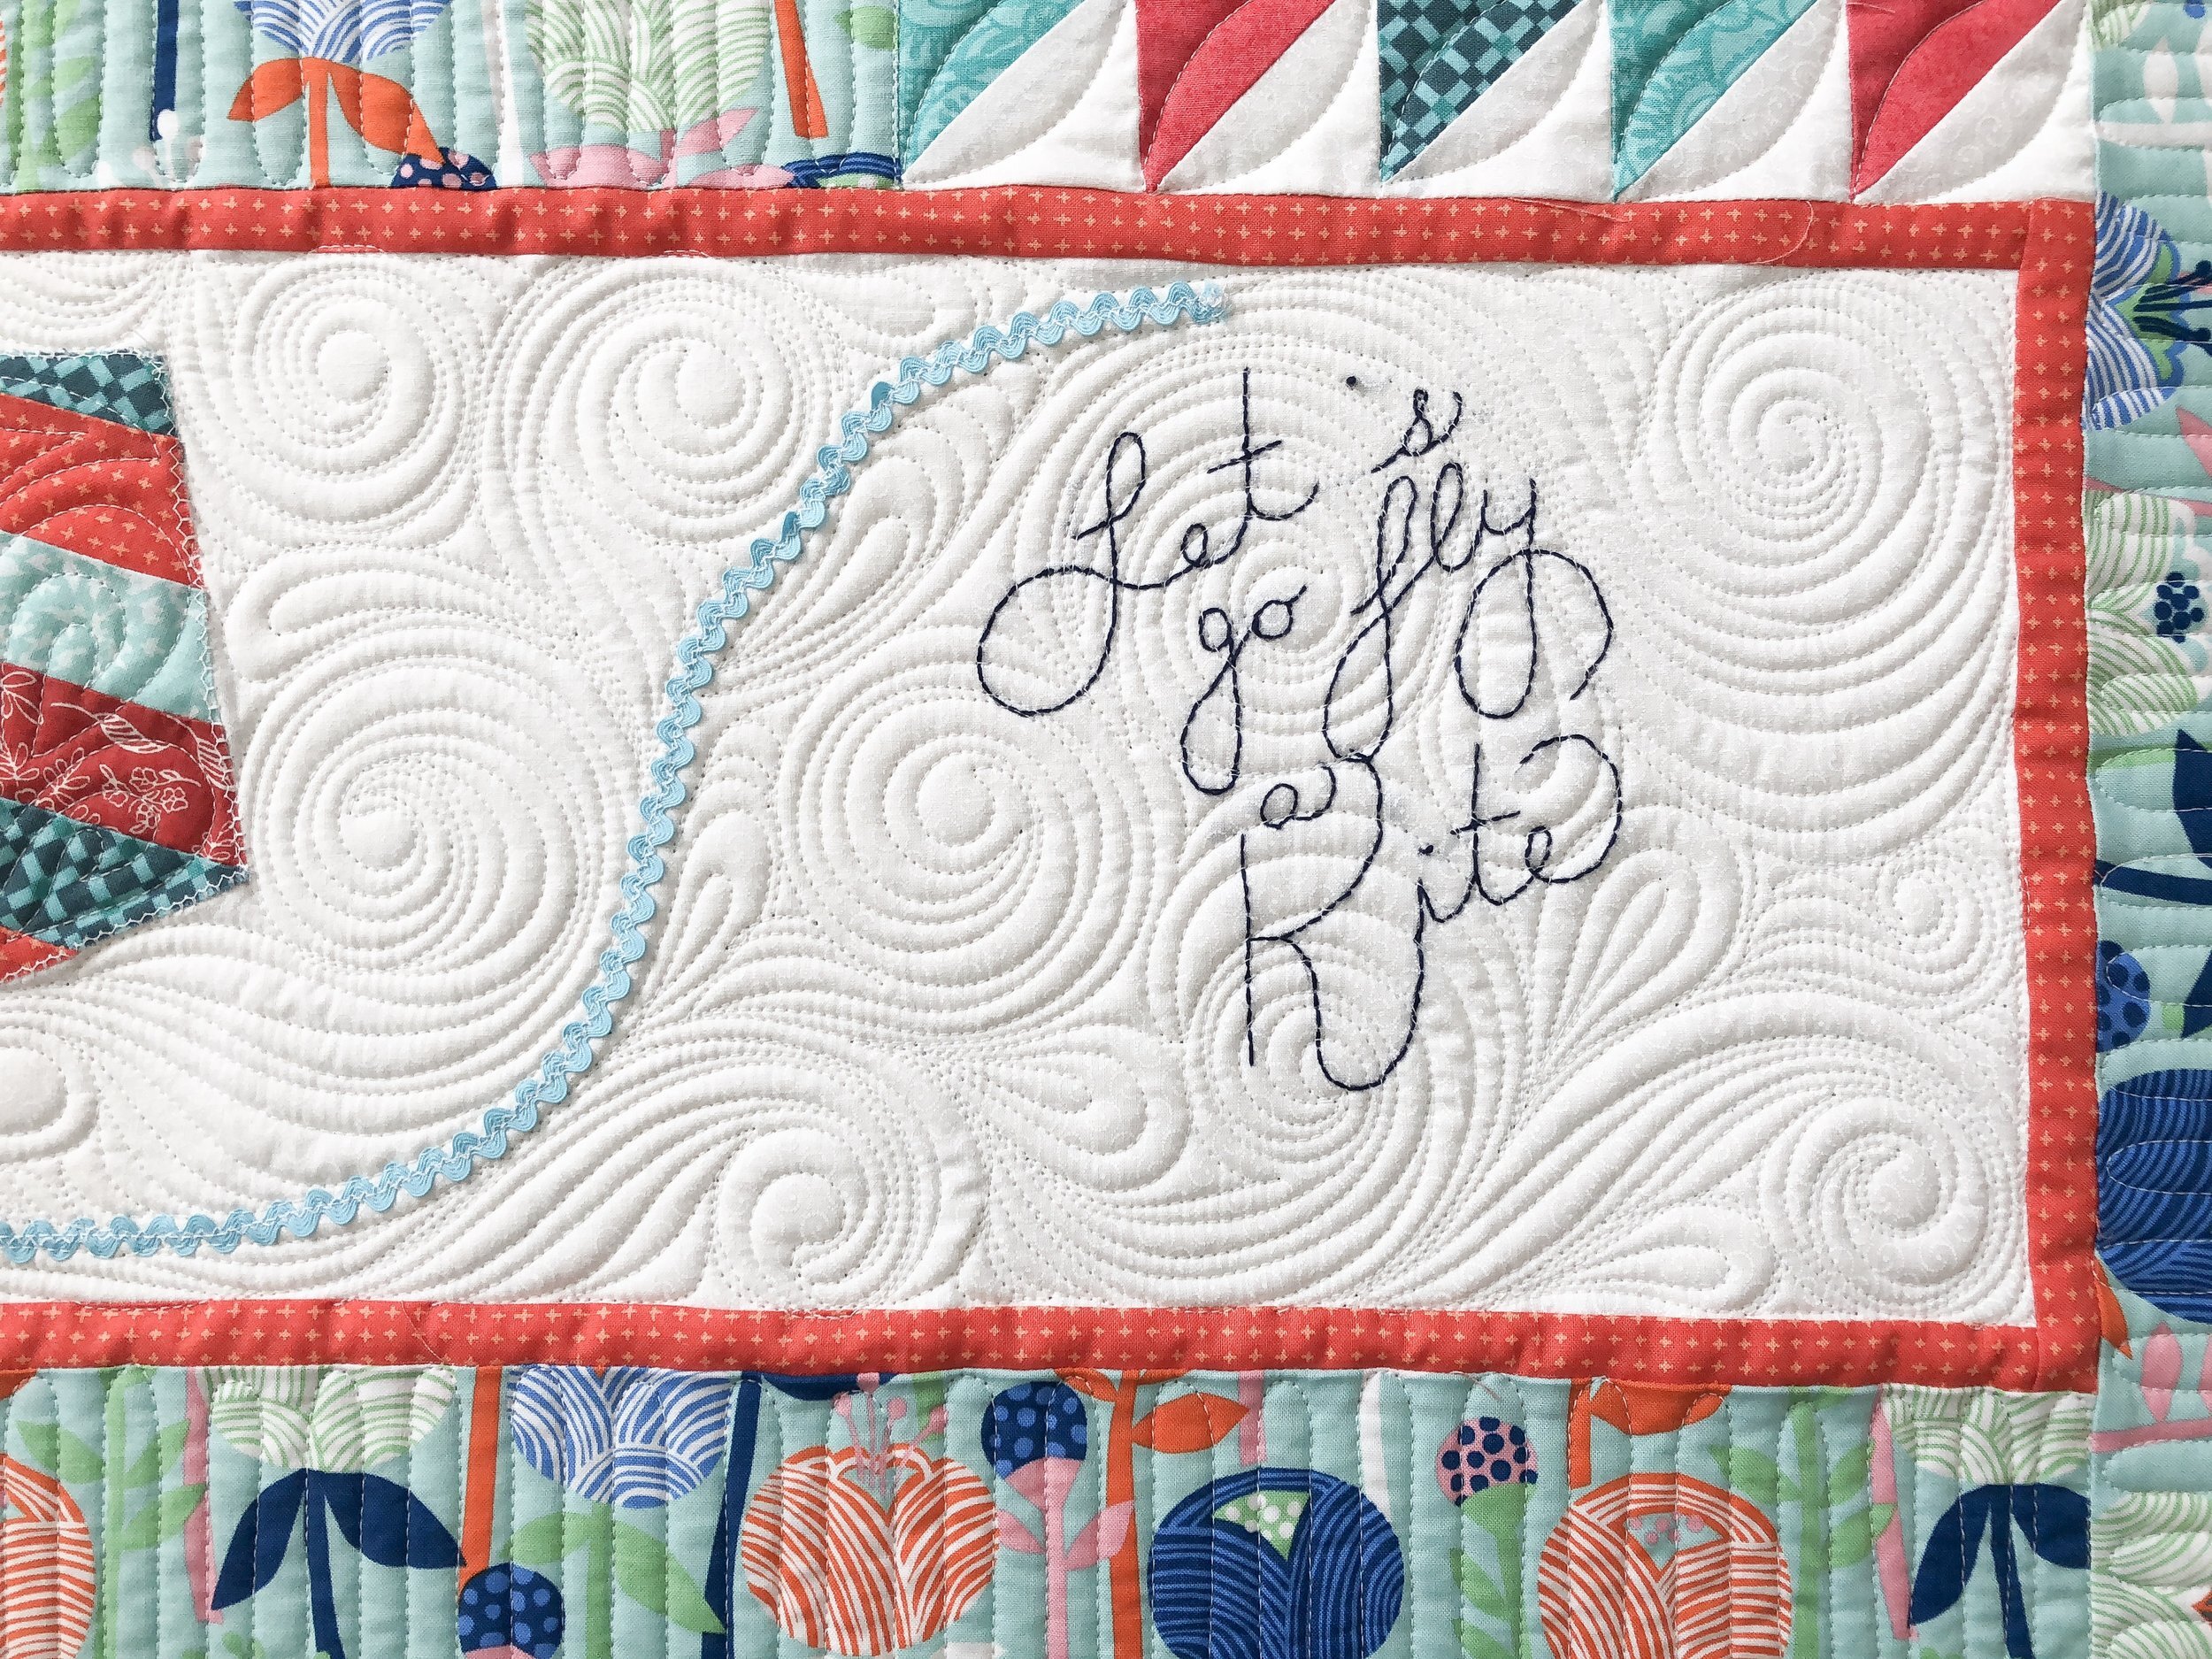
Isn’t that Let’s Go Fly a Kite, such a great addition!!! I love it!
Hope you’re having a great summer.
- Leisha
Chris’ beautiful makes!
All of these beautiful makes were done by Chris, except for this first quilt, her husband made his Frits quilt. I think it’s fun that he wanted to see what the quilting process is all about. Chris brought over 7 things for me to quilt. I know that there are tons of pictures, but this is the perfect place for them. Let me know if you have any questions.
When I saw the fabrics on her husband’s quilt, I suggested Patricia Ritter and my Cedar©️ design, which I haven’t quilted out yet. I was so excited when he gave me the go ahead. Cedar is available in a paper and digital formats at UrbanElementz.com or click here: https://www.urbanelementz.com/cedar.html He requested navy thread. All the batting and thread used on all of these projects is 30 Tex A&E Perma Core poly wrapped poly thread...except for the Kaffe quilt, and 8020 cotton poly batting.

I love the movement and texture of this design, it couldn’t be a better fit with the fabrics.
Here is a view of the back...isn’t that awesome!
Chris made this beautiful log cabin quilt to add some fun color to their trailer to enjoy when they go camping. She used Kaffe Fassett fabrics.
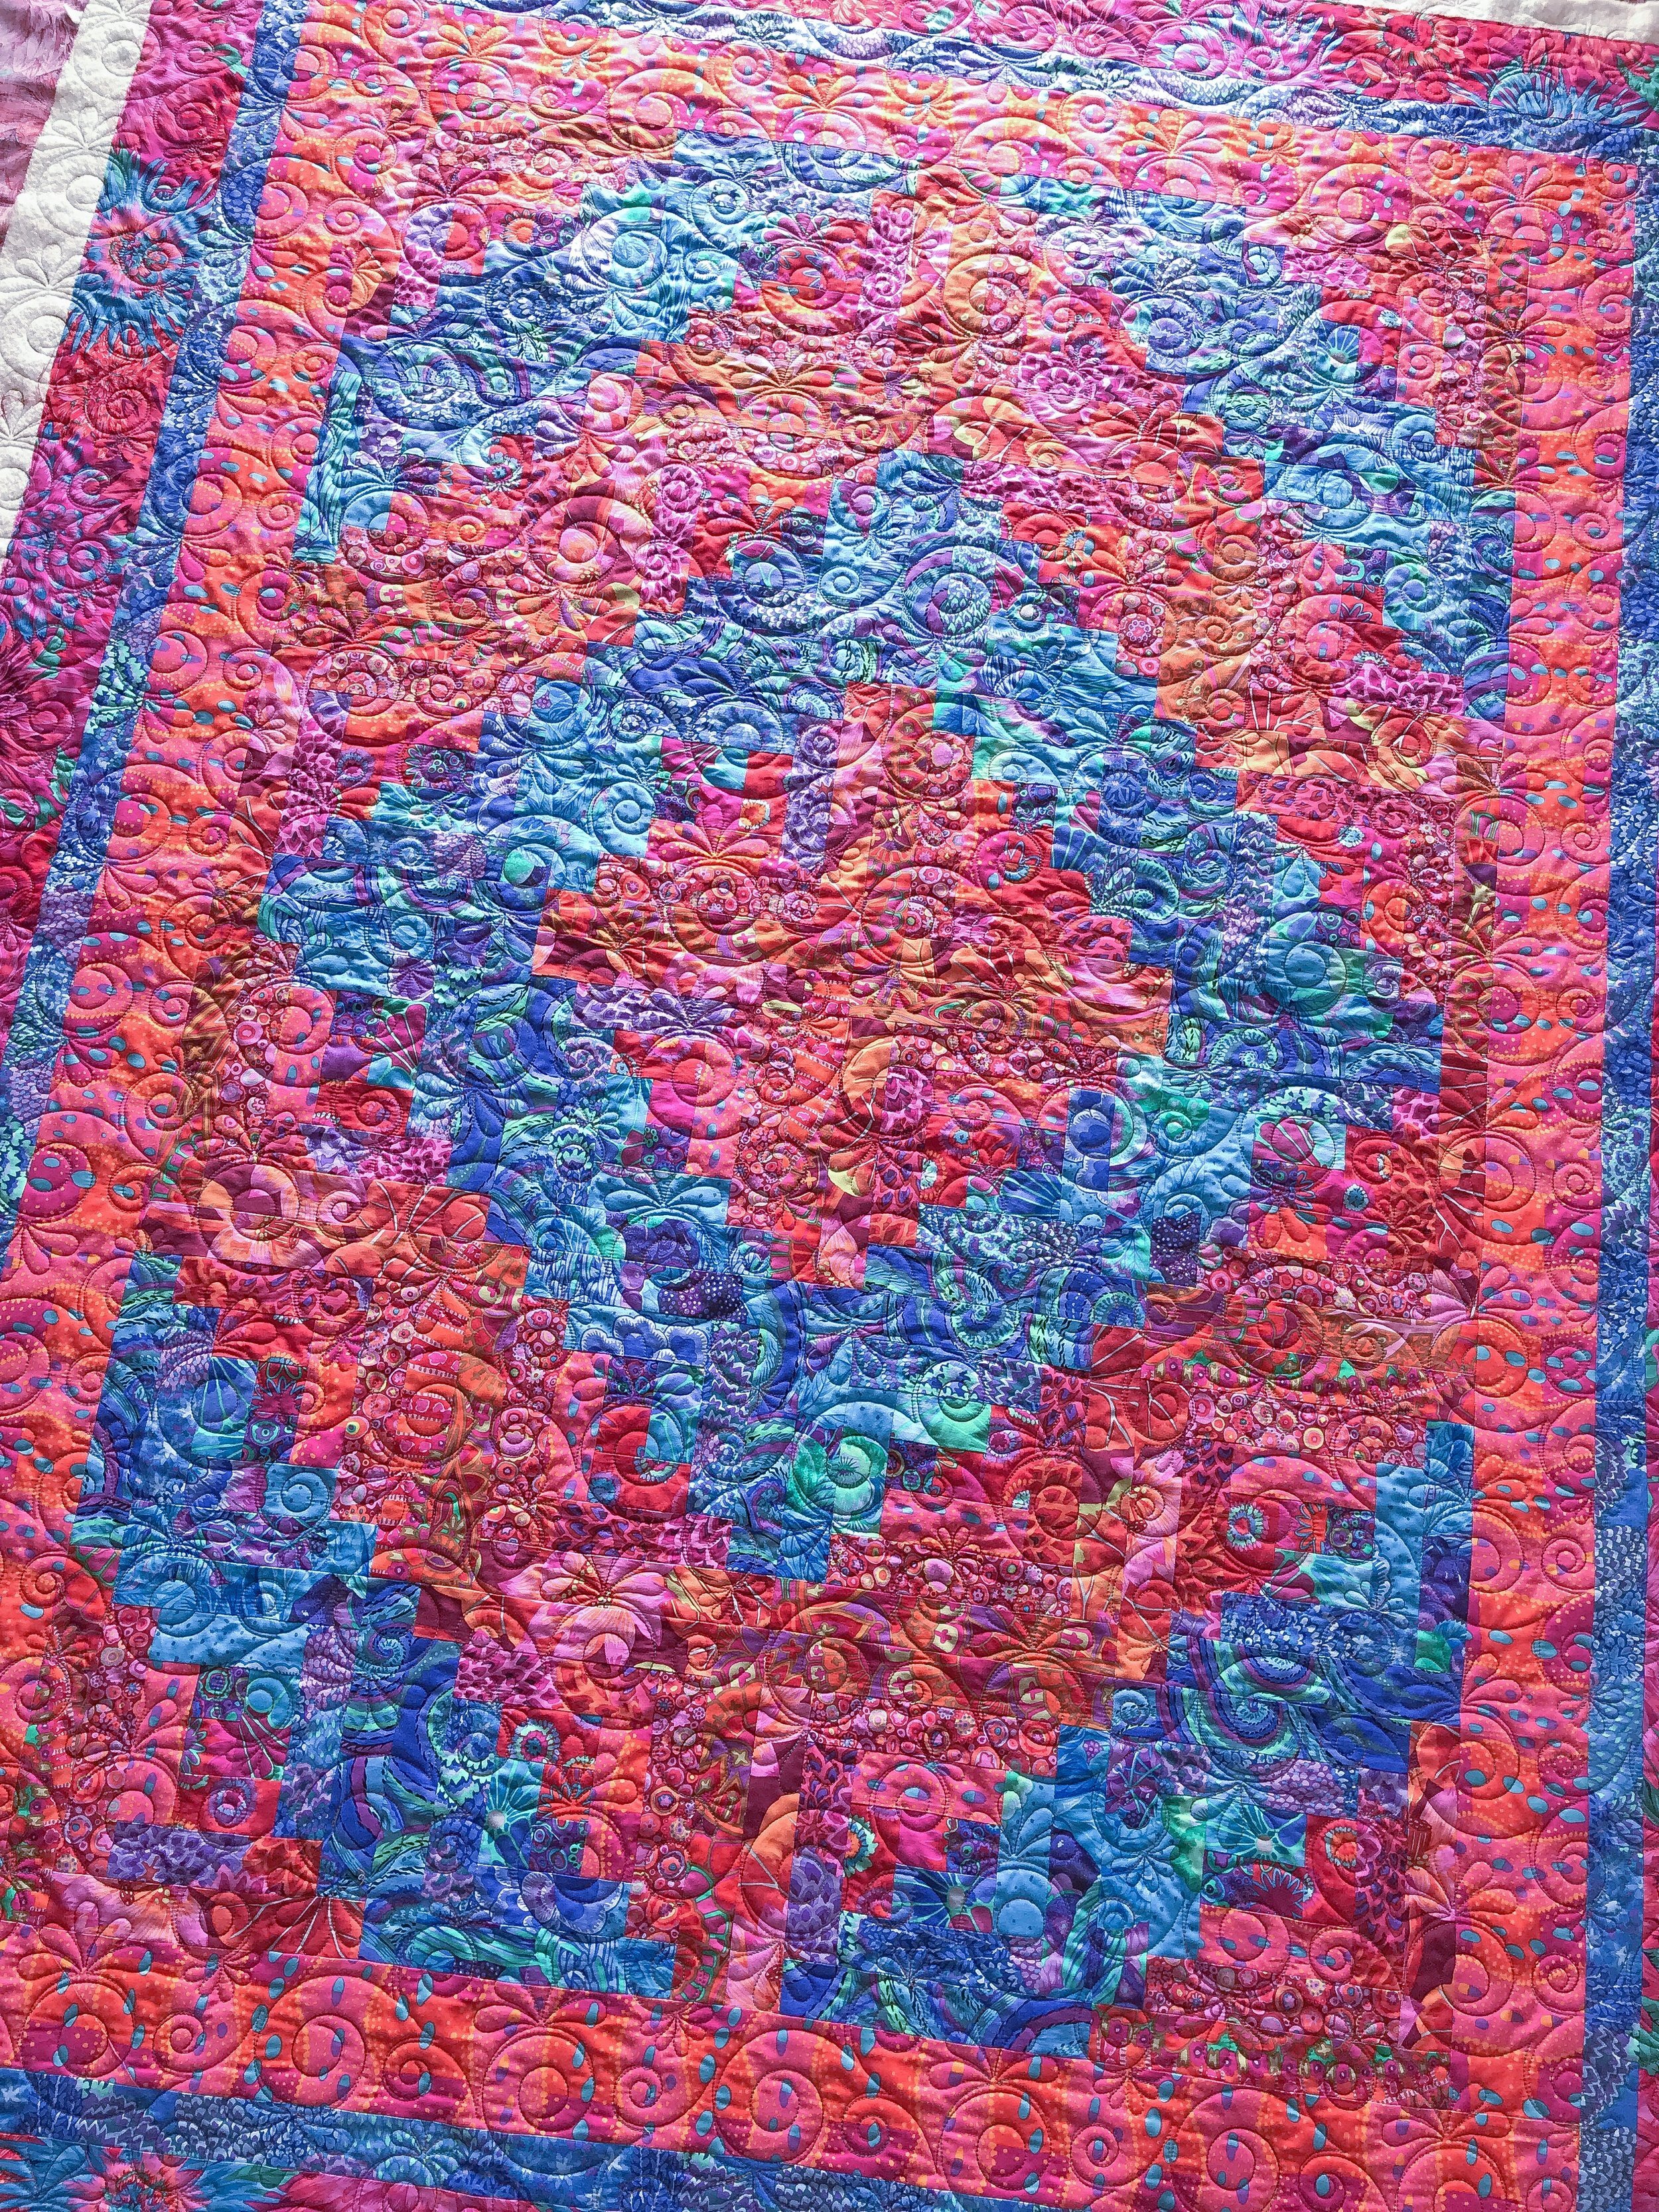
She requested Patricia Ritter and my Chantilly©️ quilting design. It’s also available at UrbanElementz.com or click here: https://www.urbanelementz.com/chantilly.html

I did use a variegated thread on this quilt by A&E it’s one of their Signature threads that is 100% cotton and 40 Tex. It’s always fun to try and match variegated thread on such colorful quilts.


Next up are these three cute bench pillow fronts, patterns by Kimberbell Designs. I’ve quilted many of these before. My clients use muslin or a cream or white cotton fabric for the backing because they’ll attach the backing fabric and stuff their bench pillow inside. Each of these pillows come with additional dimensional pieces to add more texture. They are added after quilting is done, so that is why they aren’t pictured here. Check Kimberbell’s website for pictures on those details. https://www.kimberbelldesigns.com/ These pillows started out as traditional appliqué, now Kim has them also in machine embroidery patterns as well. You’ll have to check on her website for all the details. Each of these pieces was made using the embroidery patterns.
I do love to use one piece of backing fabric, if I can, especially when the pieces being quilted are so small. So, I baste one on...quilt it...roll the backing on the quilt frame...baste another one on...and so on until I have everything added on and quilted. I have even done this with 3 throws that have a minky backing. There is some great space in the throat of the longarm, which allows this.
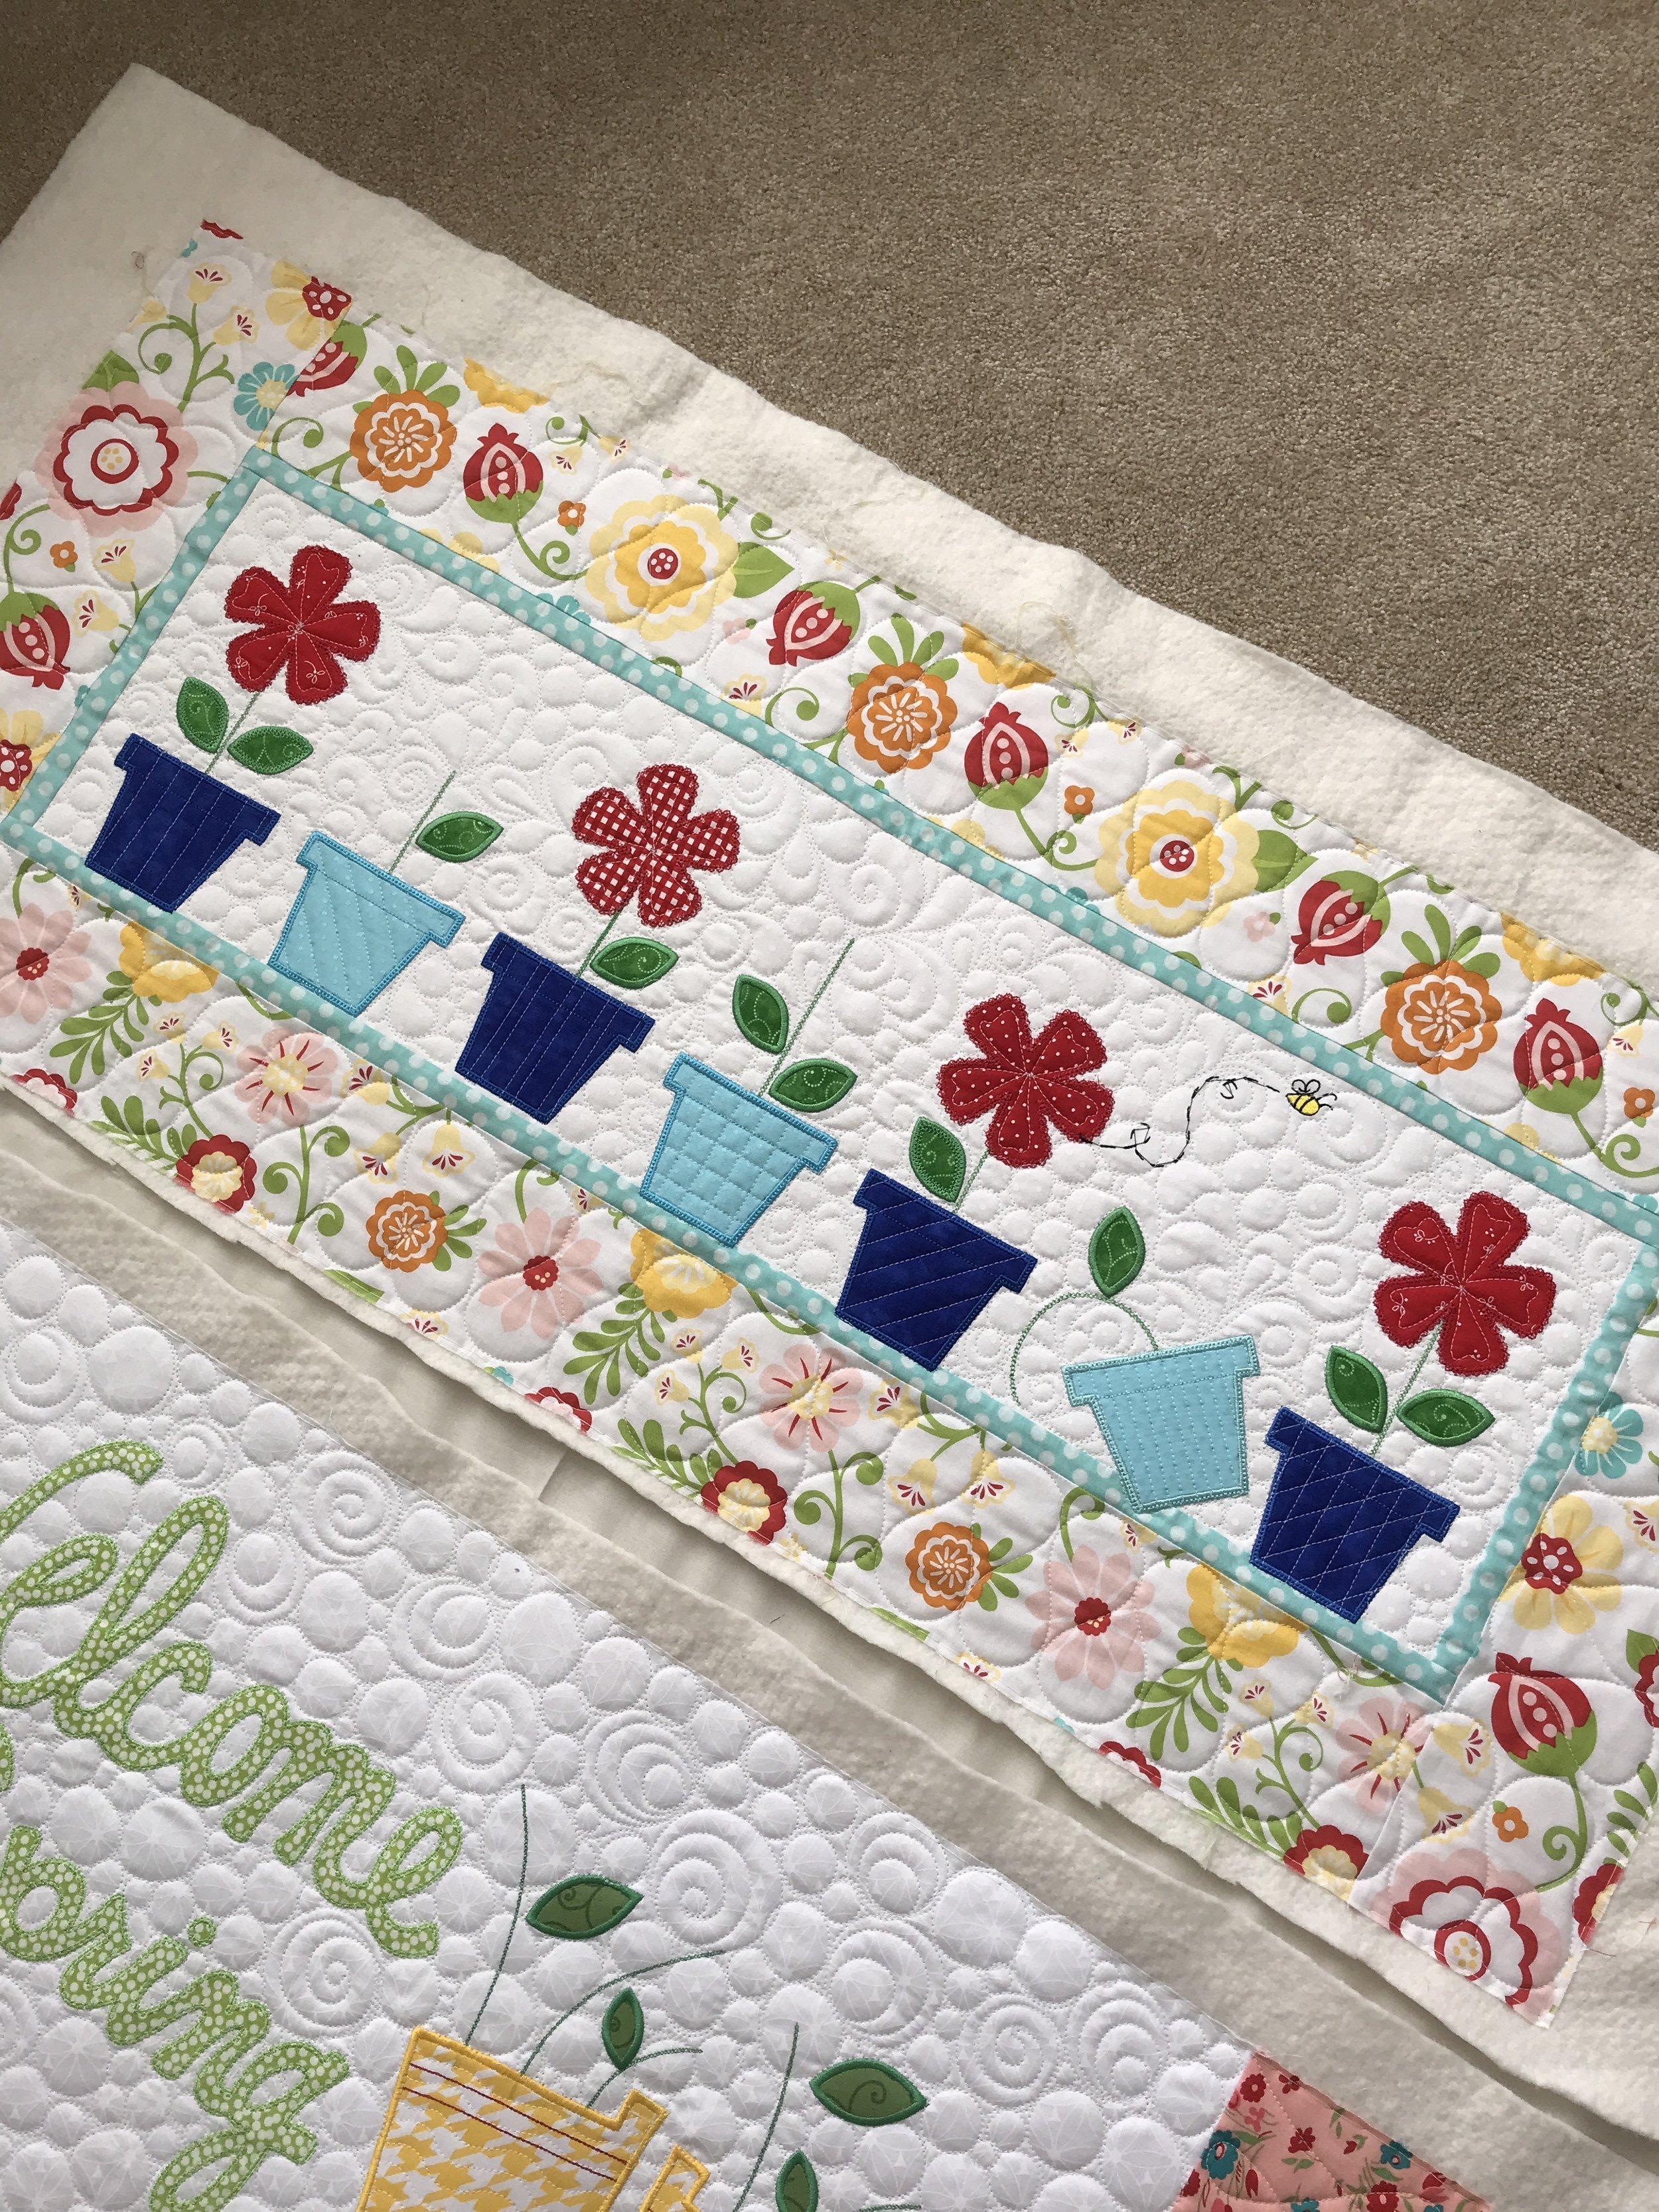
First up...the flower pots...Chris made them to match the pots that she has on her front porch, which I think is clever.

All the quilting done on the rest of these projects is free motion, meaning it’s hand guided. No computer. I used my favorite 8” edge ruler from Linda at TheQuiltedPineapple.com to quilt the flower pots in a variety of different line designs. I did an all over swirly feather in the background of the pots and ribbon candy border design.

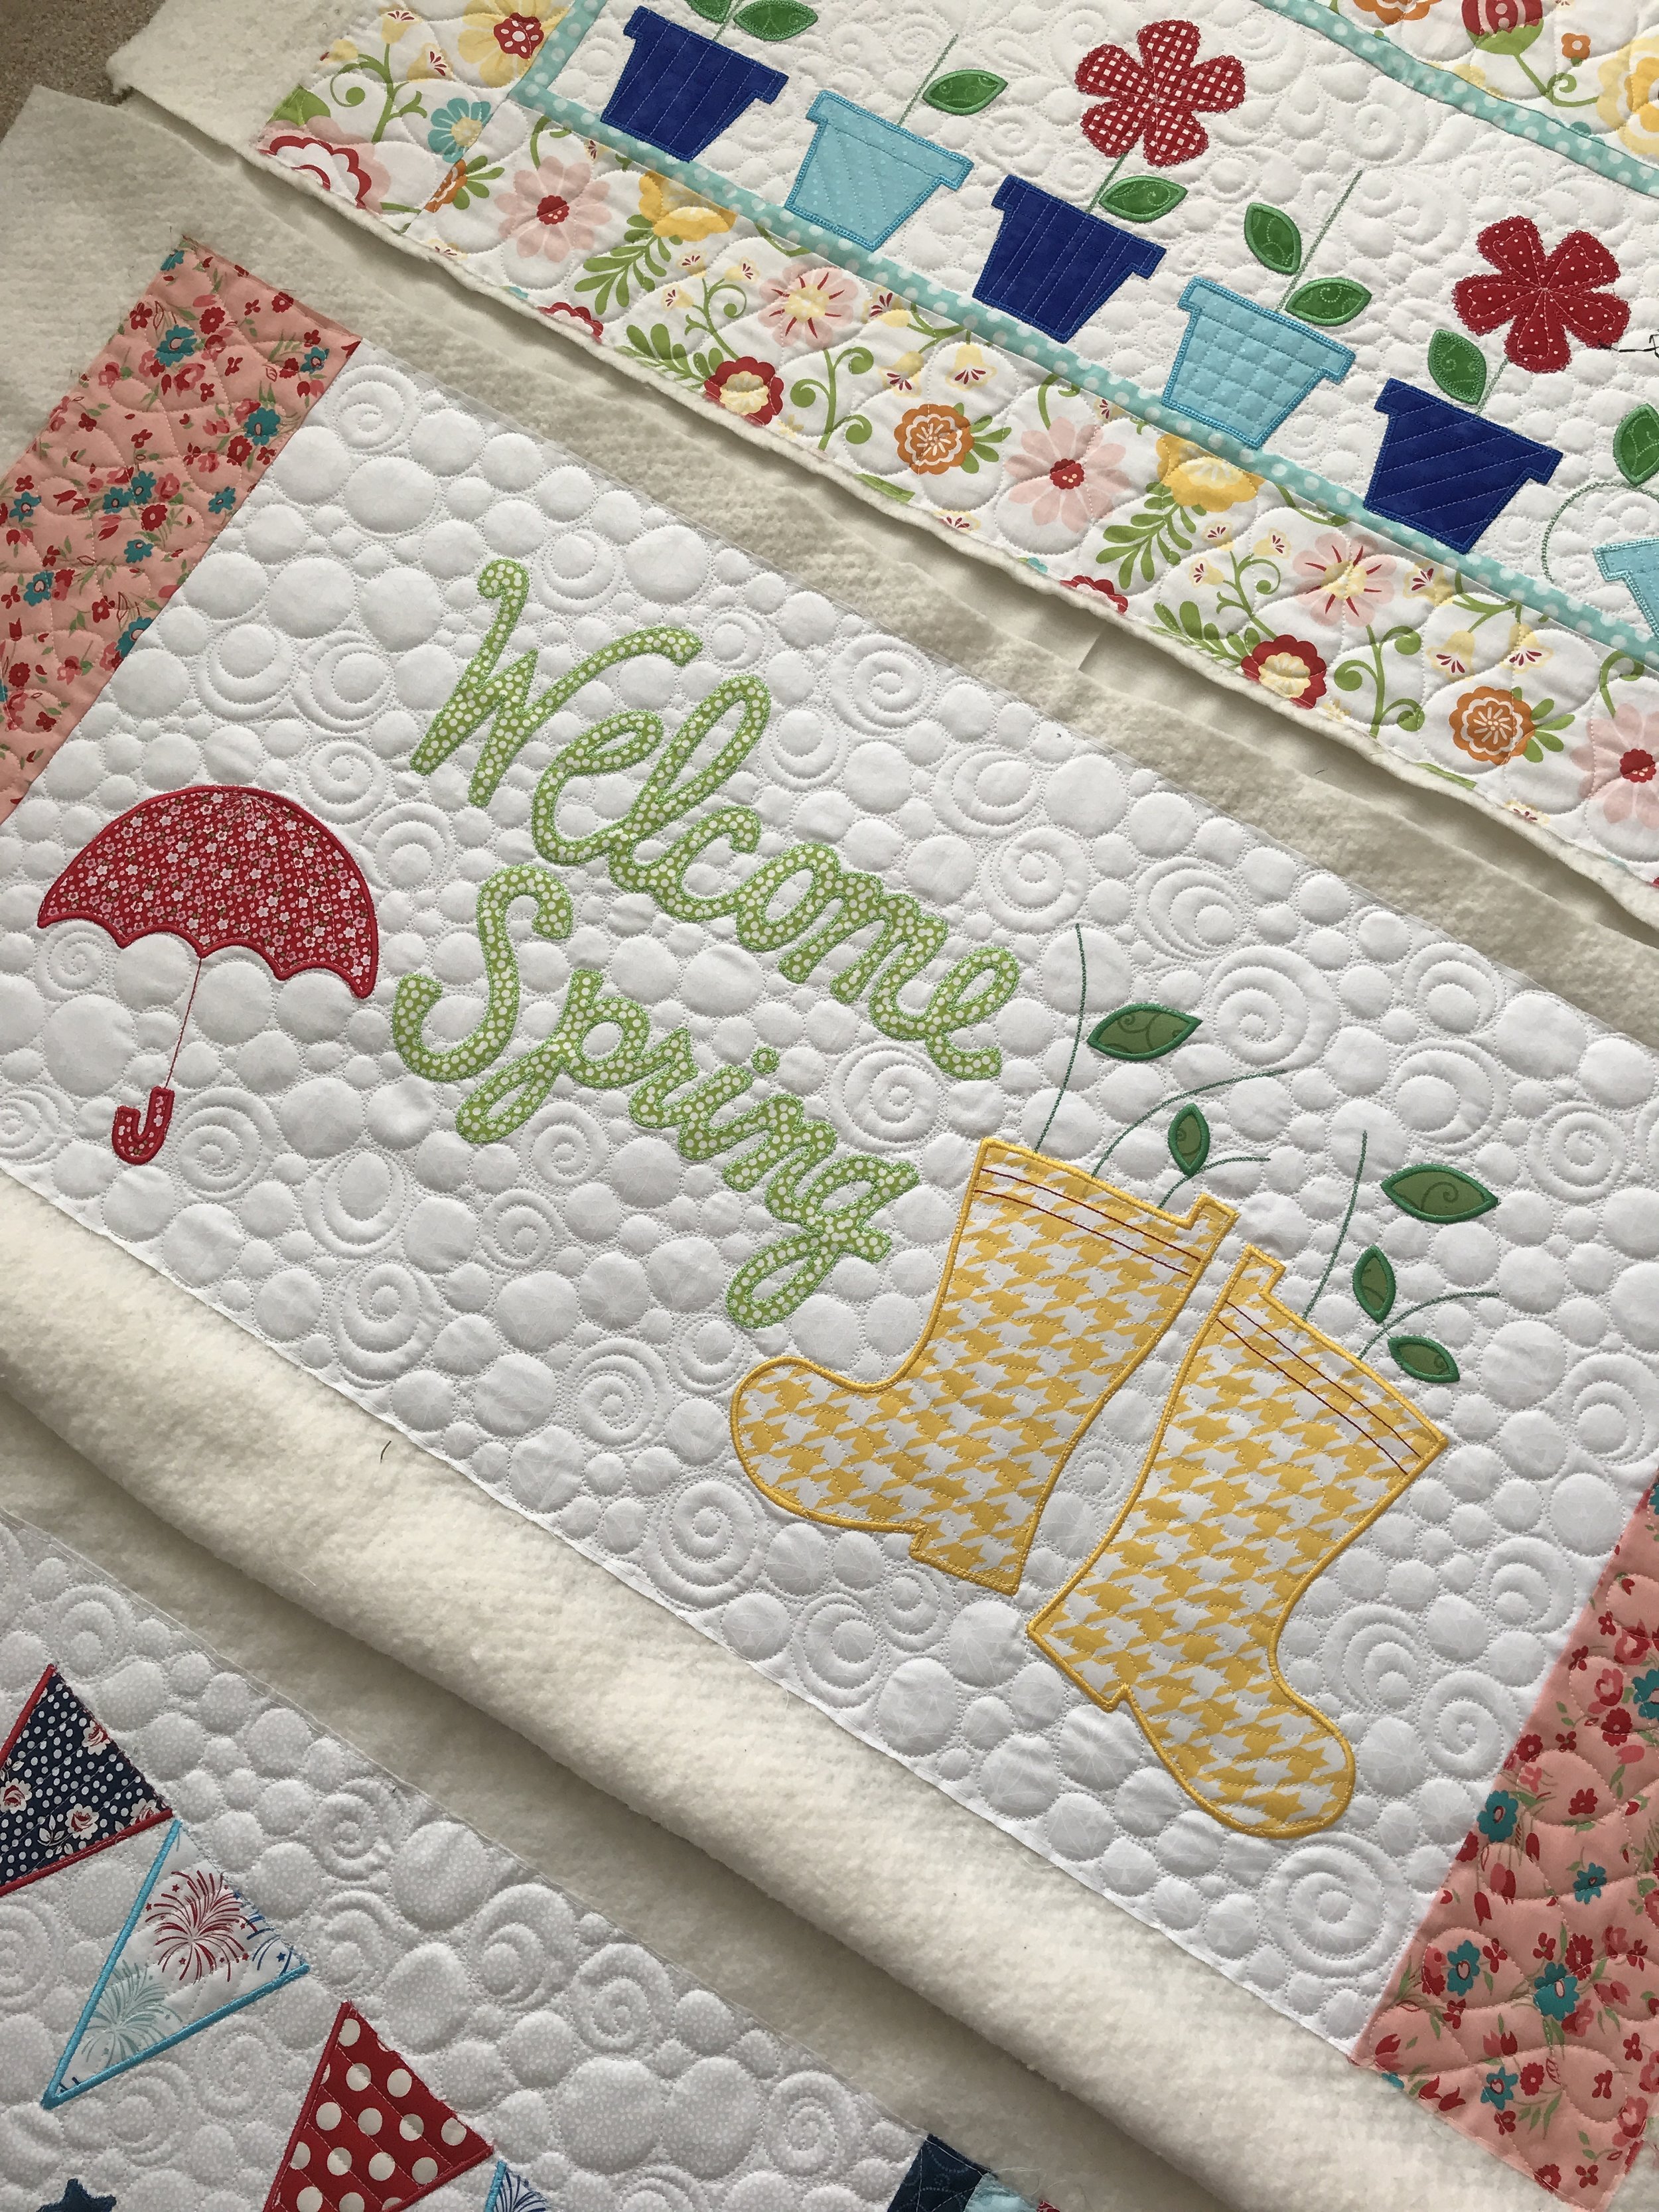
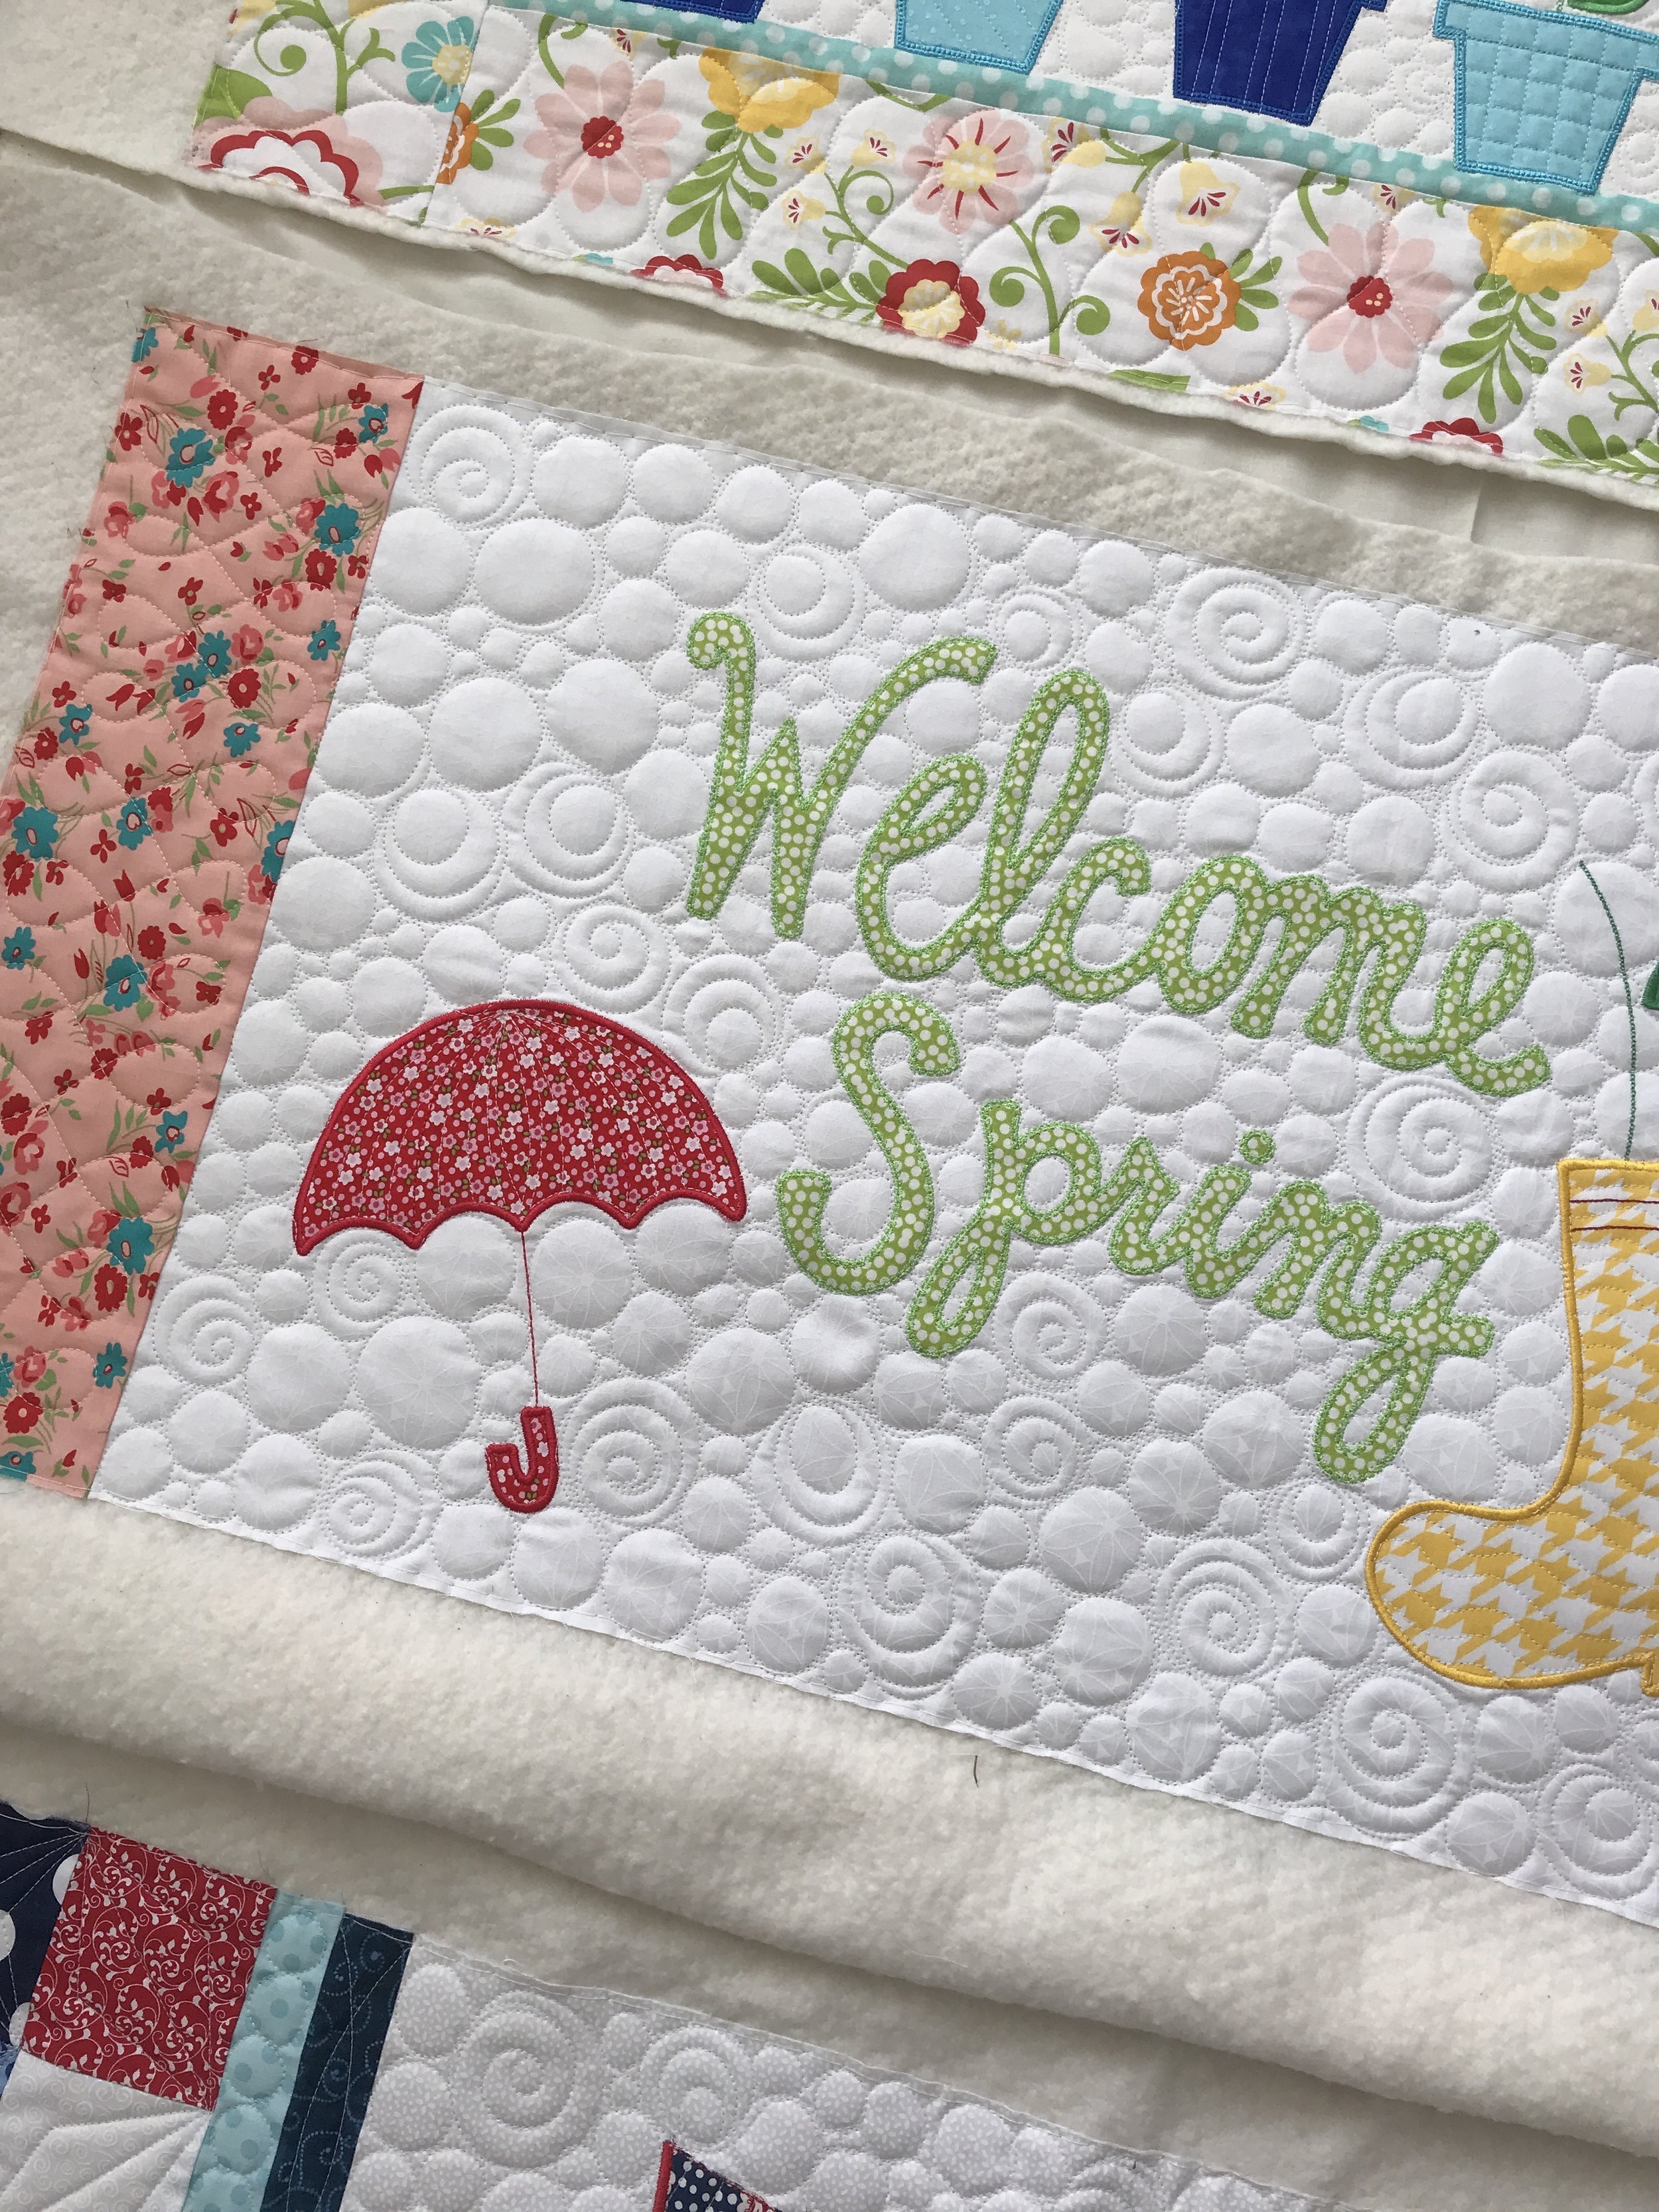
Next up, is the Welcome Spring pillow front. I love the rain boots! I did wavy lines to add texture to the boots. I decided on pebbles and swirls to mimick bubbles and ripples in puddles, for the background.

There will be flowers on the stems coming out of the boots. I love that cute little umbrella. I used a 5” circle ruler to quilt the curved lines inside.

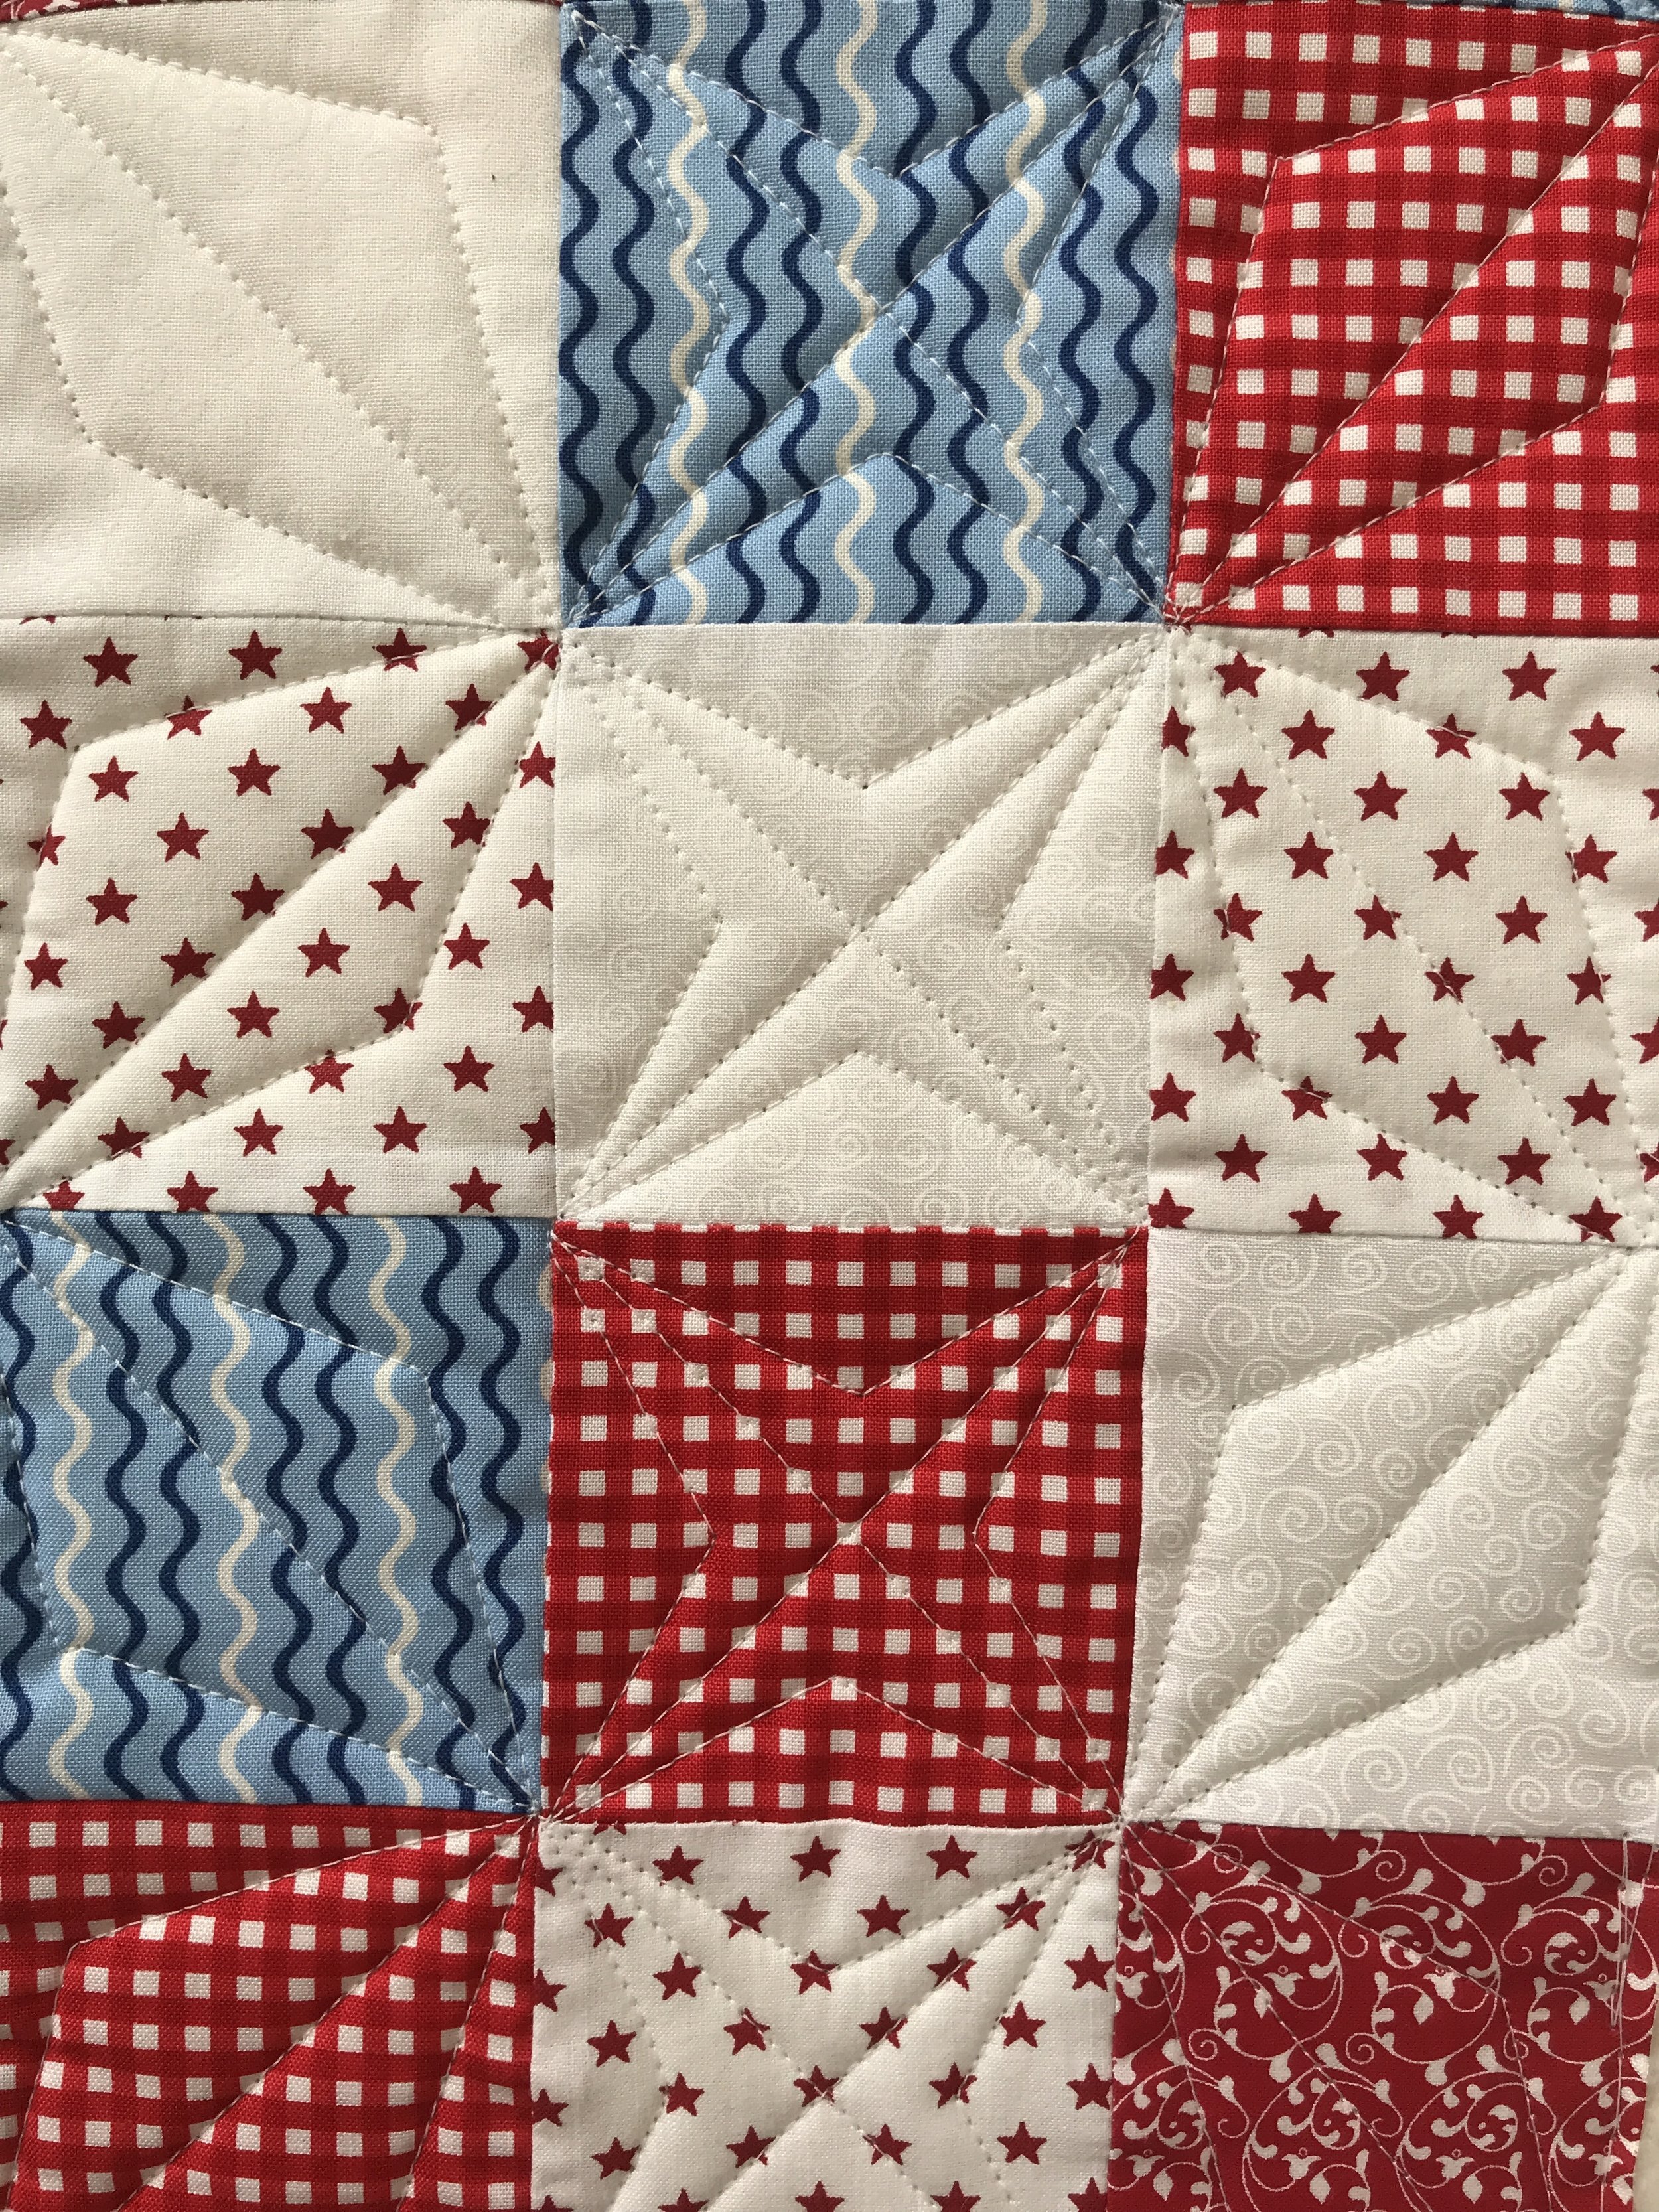
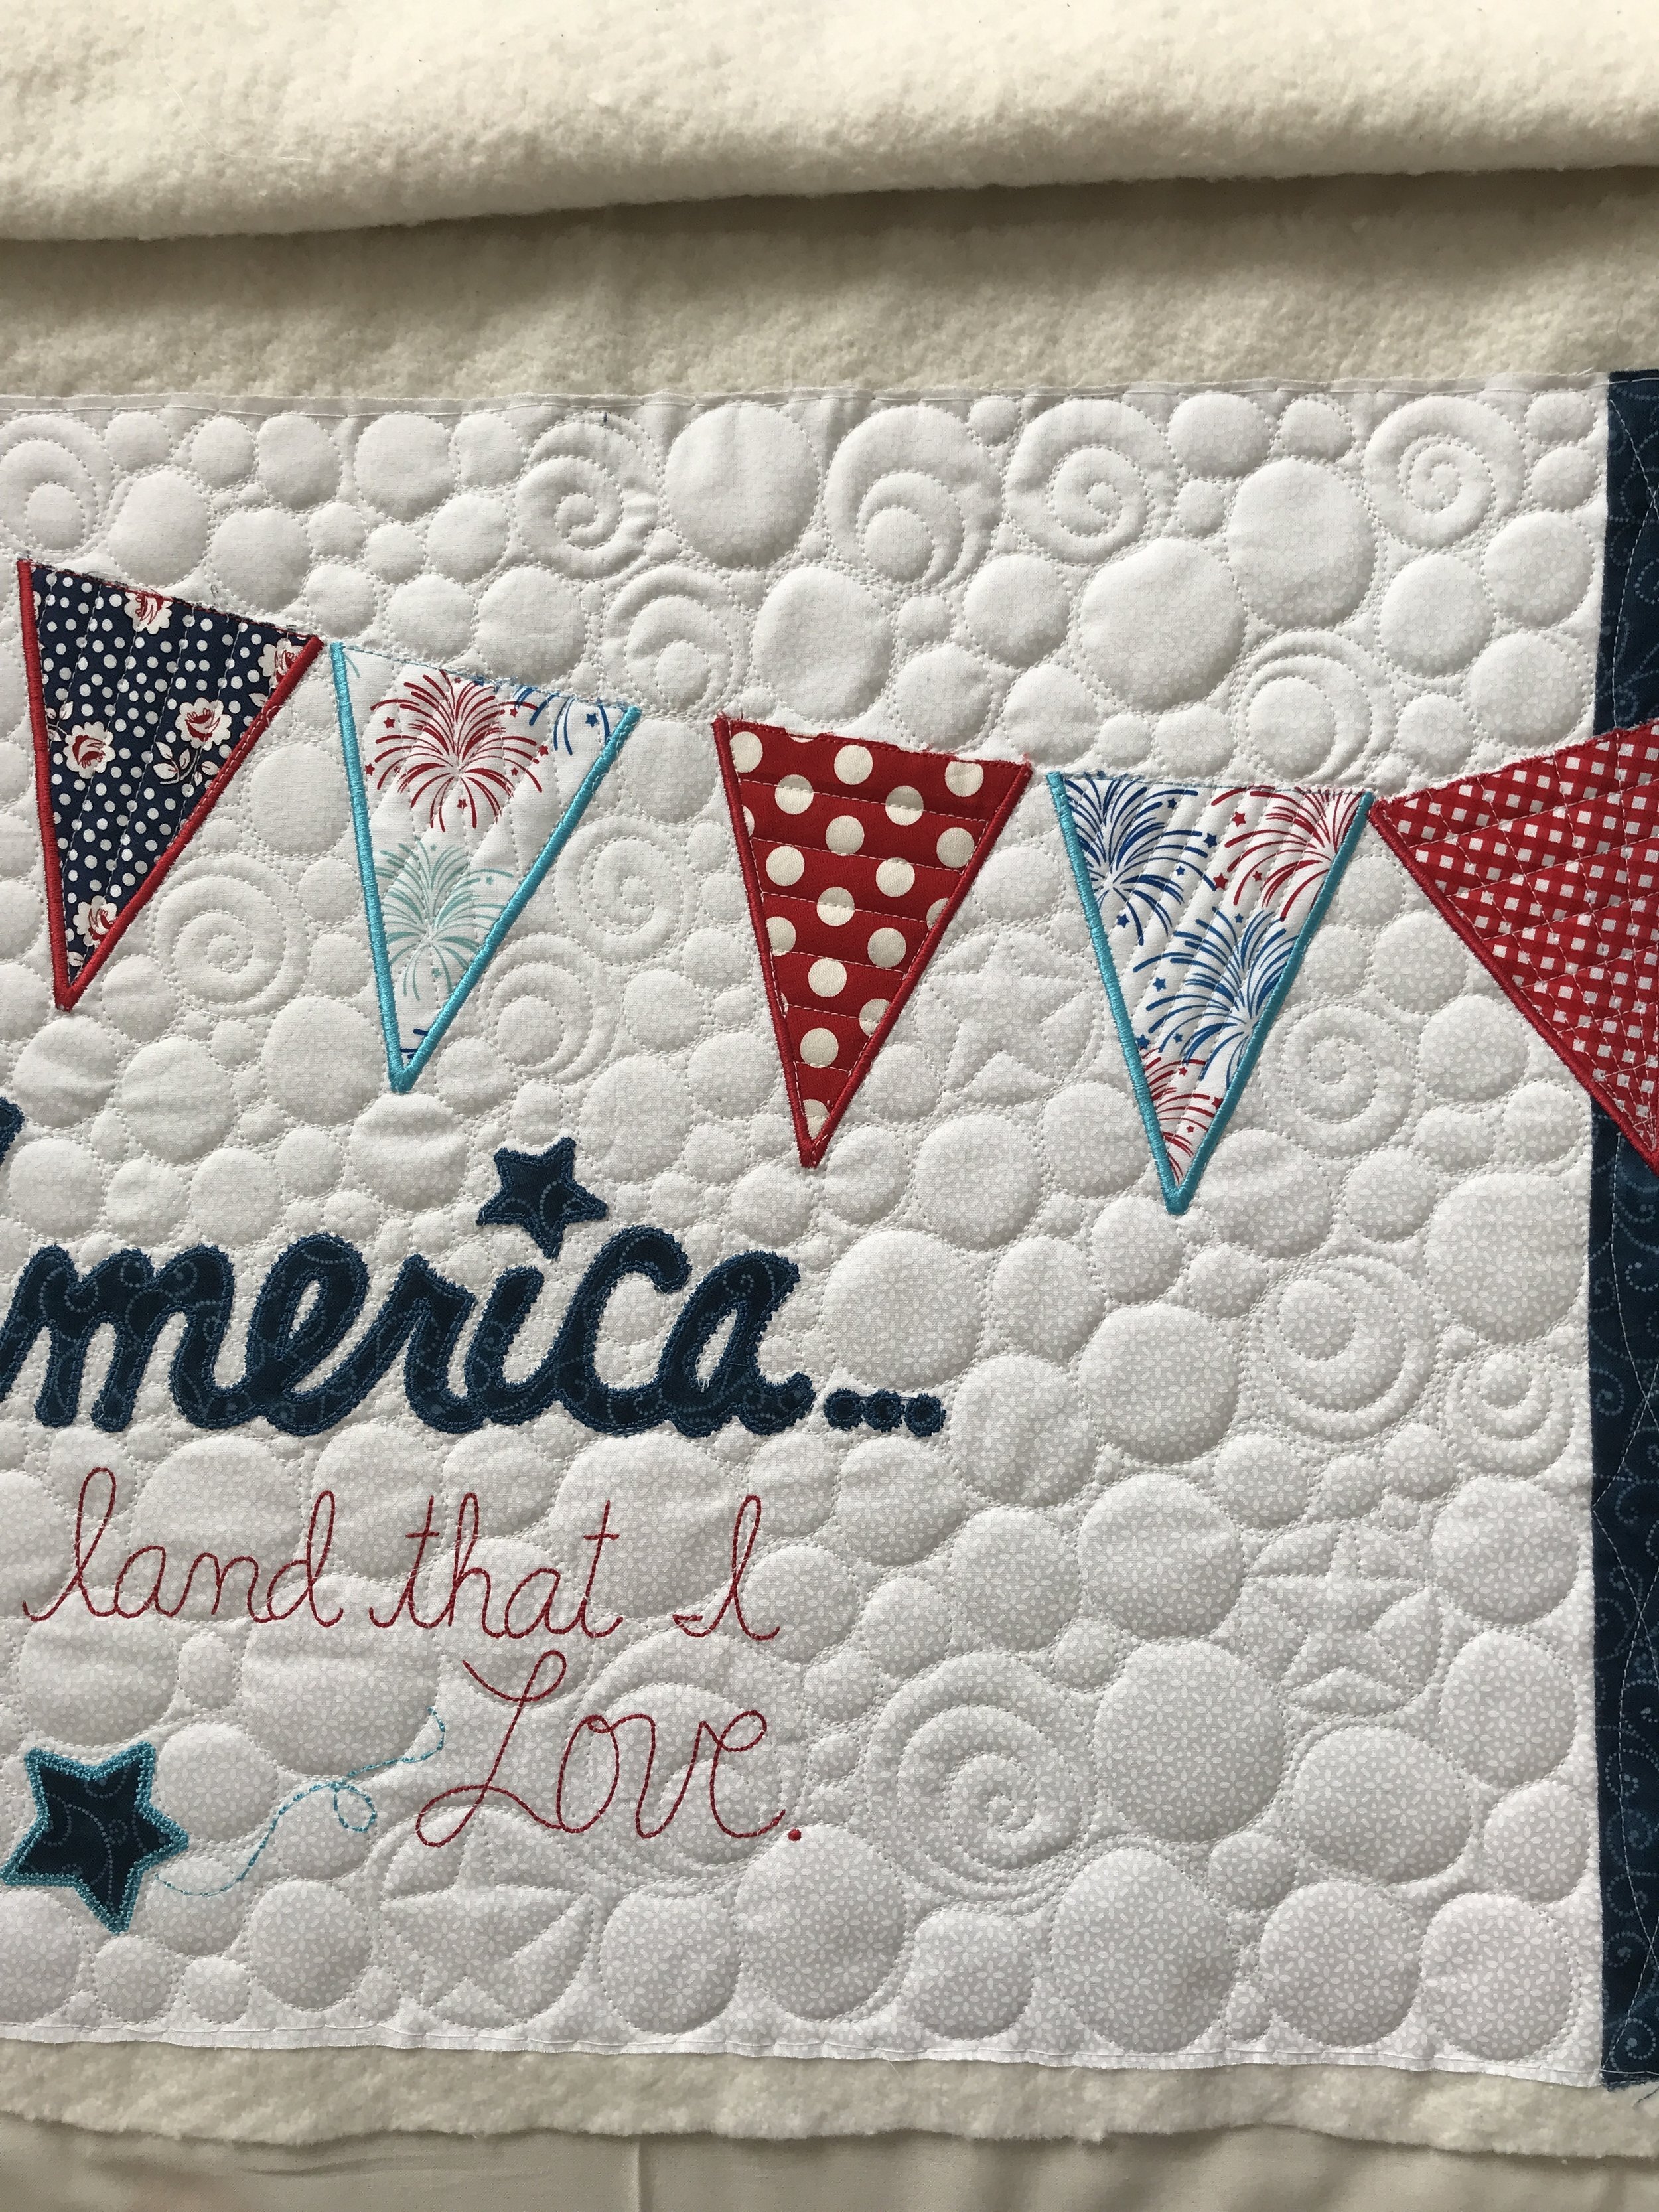
Land that I love is the last of the three quilted onto the same backing fabric. I added some stars inside some of the circles, with the addition of swirls, it’s some fun textures for the background.

Along the sides, in the patchwork squares, I quilted a four pointed star in the squares down the center and then added some alternating diamonds down each of the sides, I love the design it created. I never know quite what things will look like as I’m quilting them, until it’s done. That’s one of my favorite parts is seeing all of the designs together. I used Linda’s 8” edge ruler for this one too. I did freehand pebbles in the inner light blue border, then I used a circle ruler (I can’t remember the size) to quilt the curves inside the navy inner border.
Here is a close up of the different lines I quilted in the bunting flags.
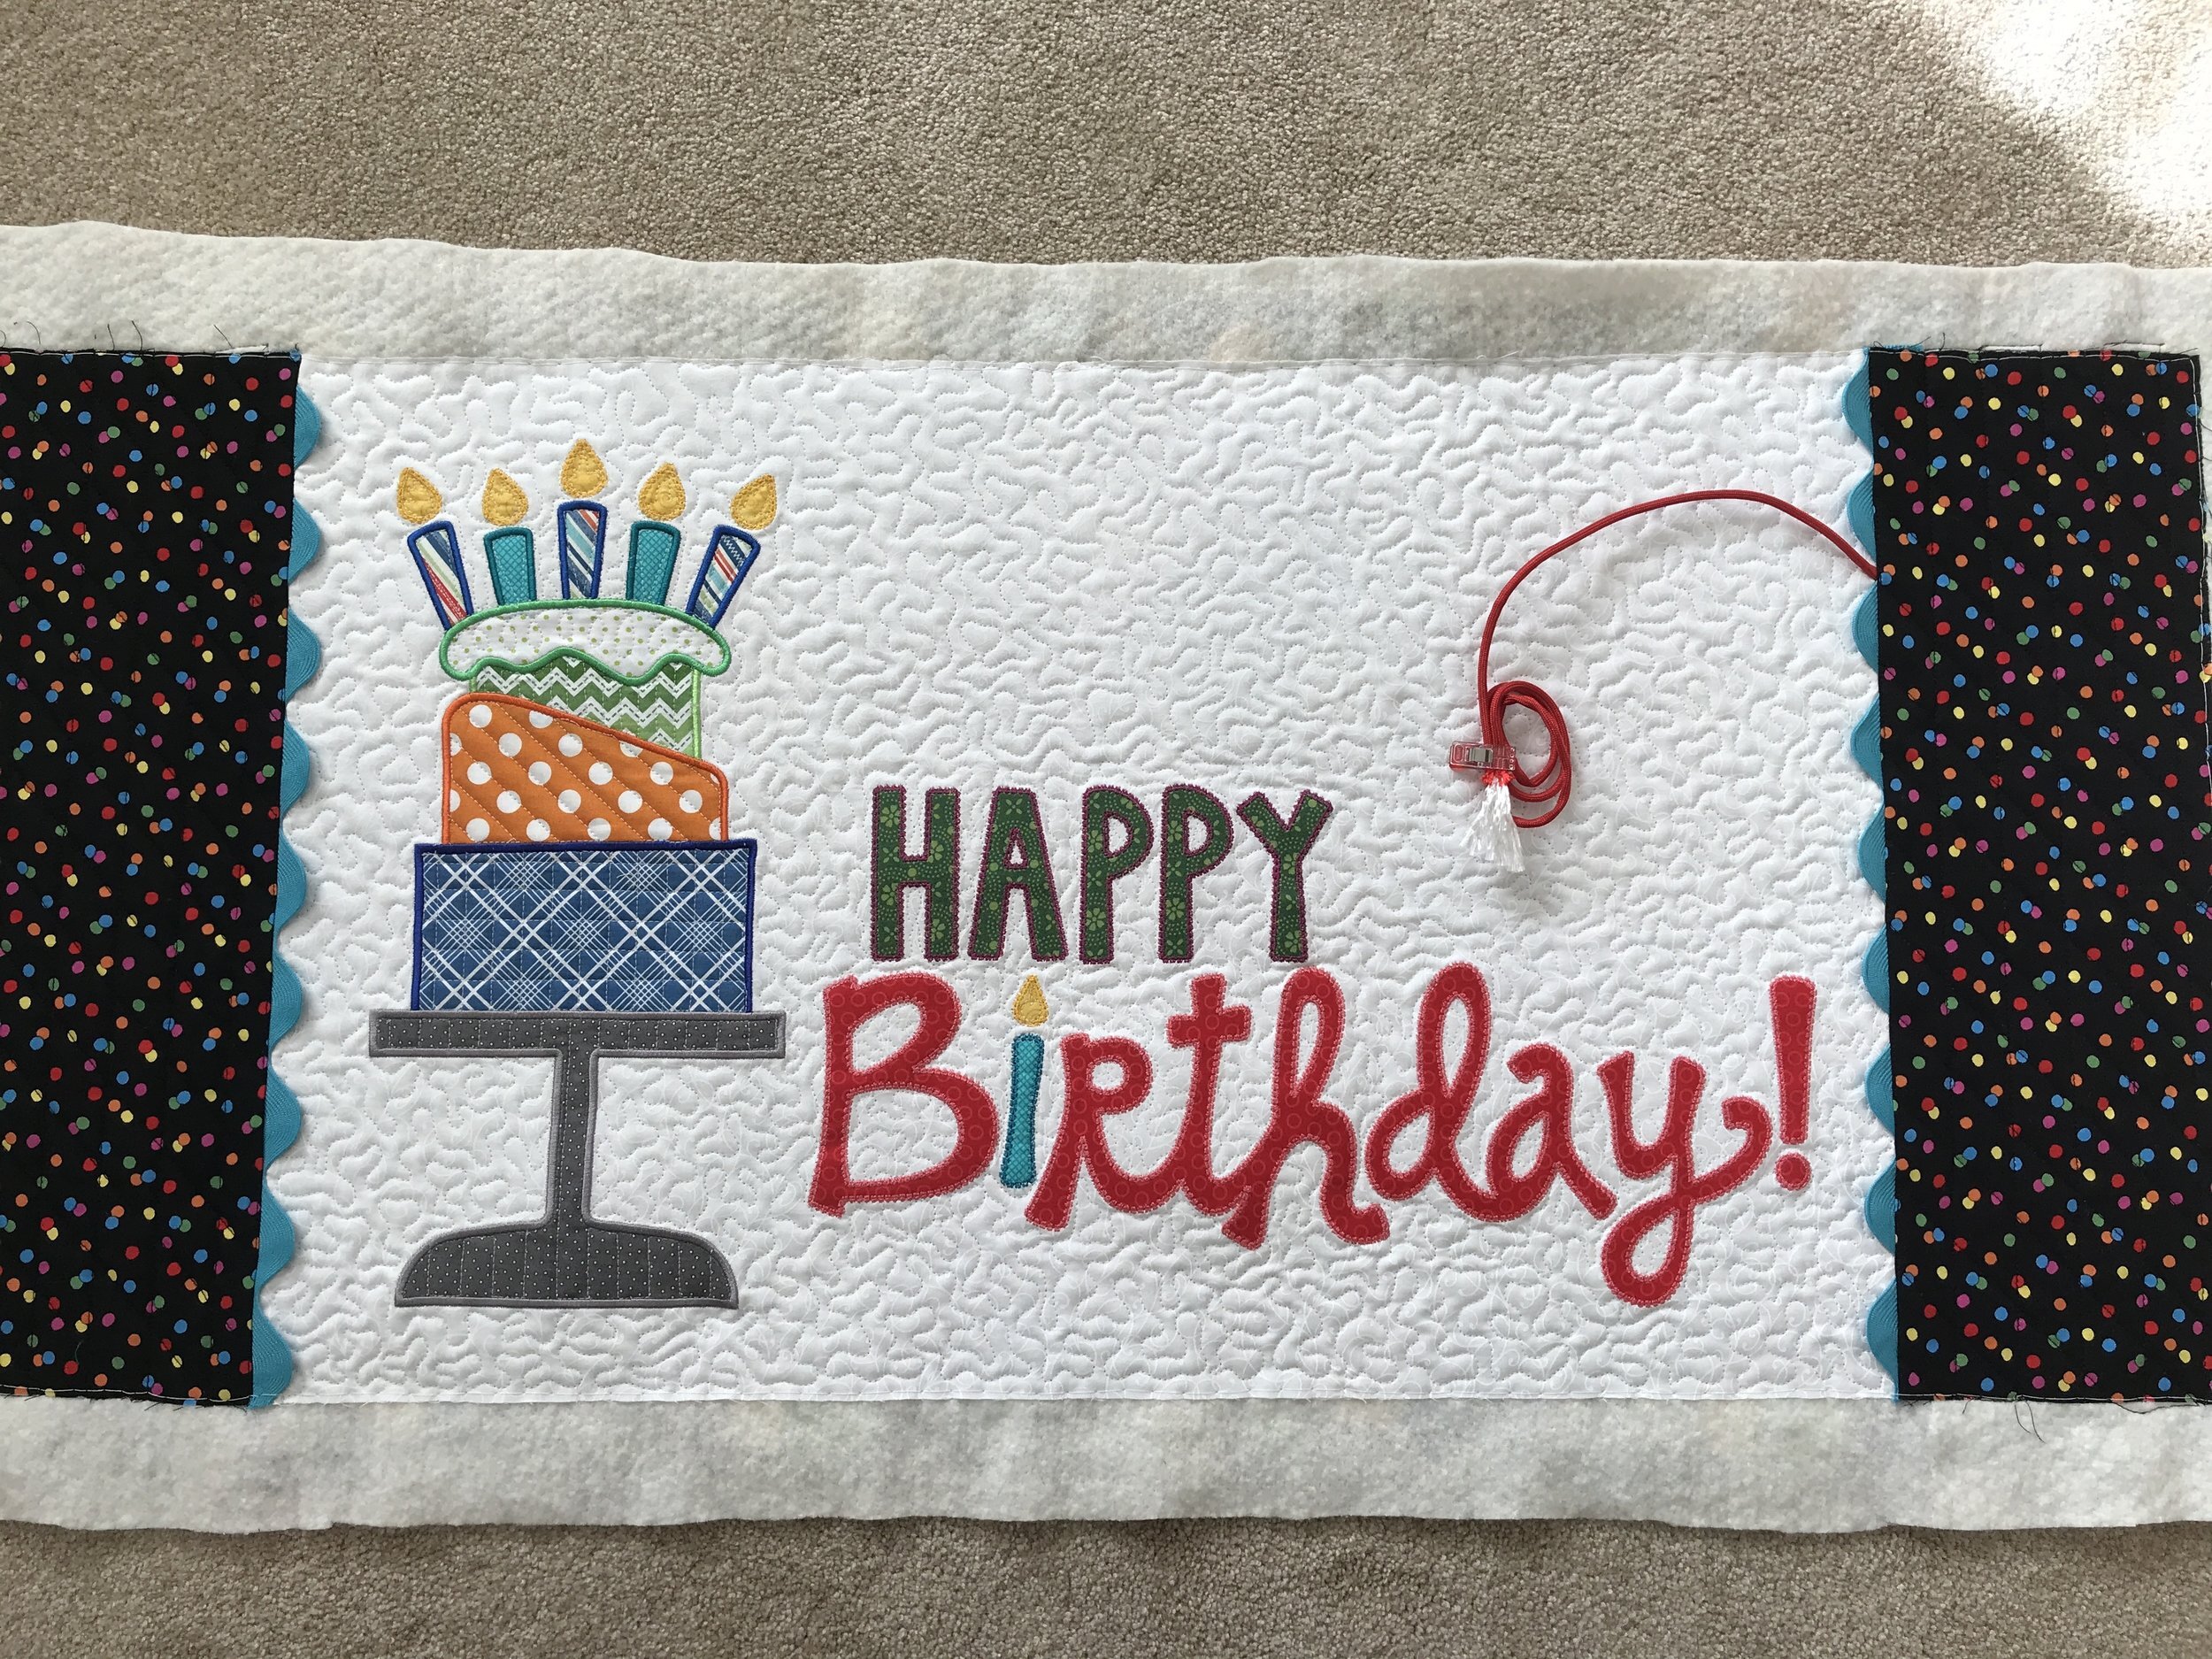
Next up is a birthday banner! This is also a Kimberbell pattern, Chris is making it into a banner instead of a pillow, so she brought a fabric like the borders down the sides, for the backing.
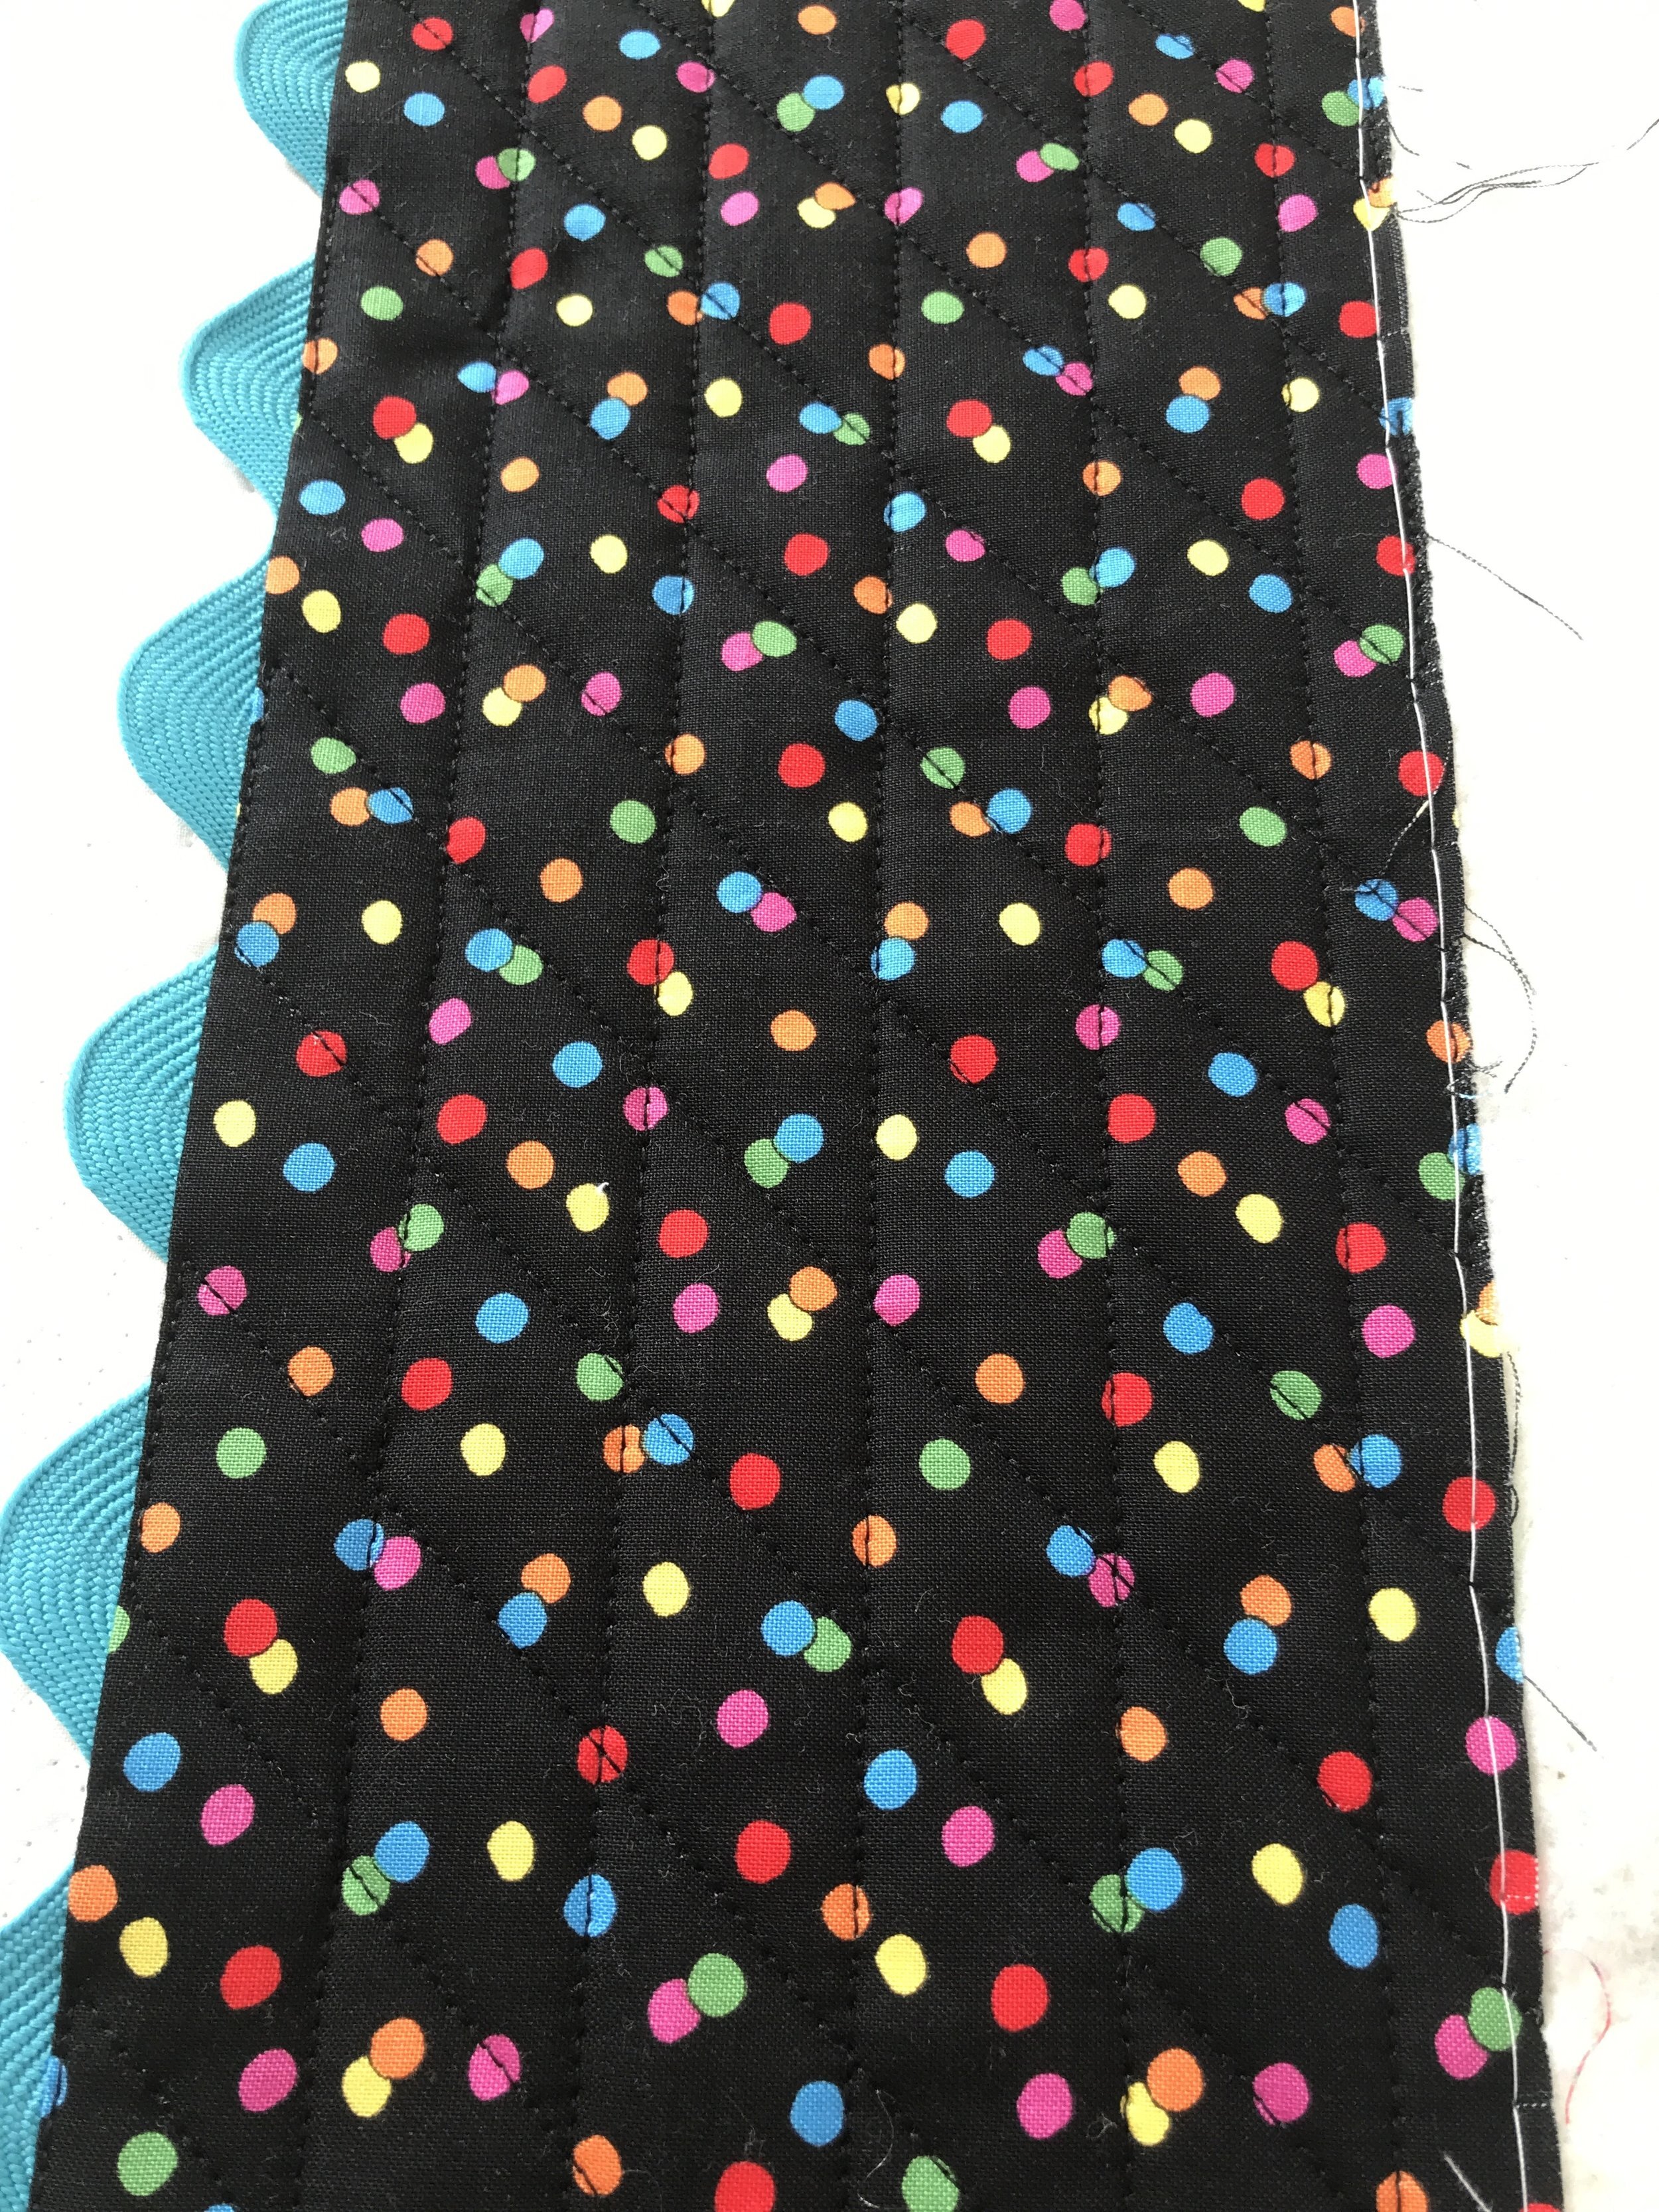
I used Linda from theQuiltedPineapple.com 12” edge ruler for these lines because the 8” isn’t long enough. I started with diagonal lines every inch, starting on the bottom left and working to the top right, then I can use the lines on the ruler for spacing as I’m quilting. If I quilted the opposite direction, I would be ahead of the lines I’m quilting, and wouldn’t have a line to use to line up to the lines on the ruler. So, if your new to quilting or ruler work, always quilt in a direction where you can use the lines you already quilted. Most of the time you won’t need to mark anything. After doing the inch diagonal lines, I do vertical inch lines. It creates the cross hatch angled diamond look.
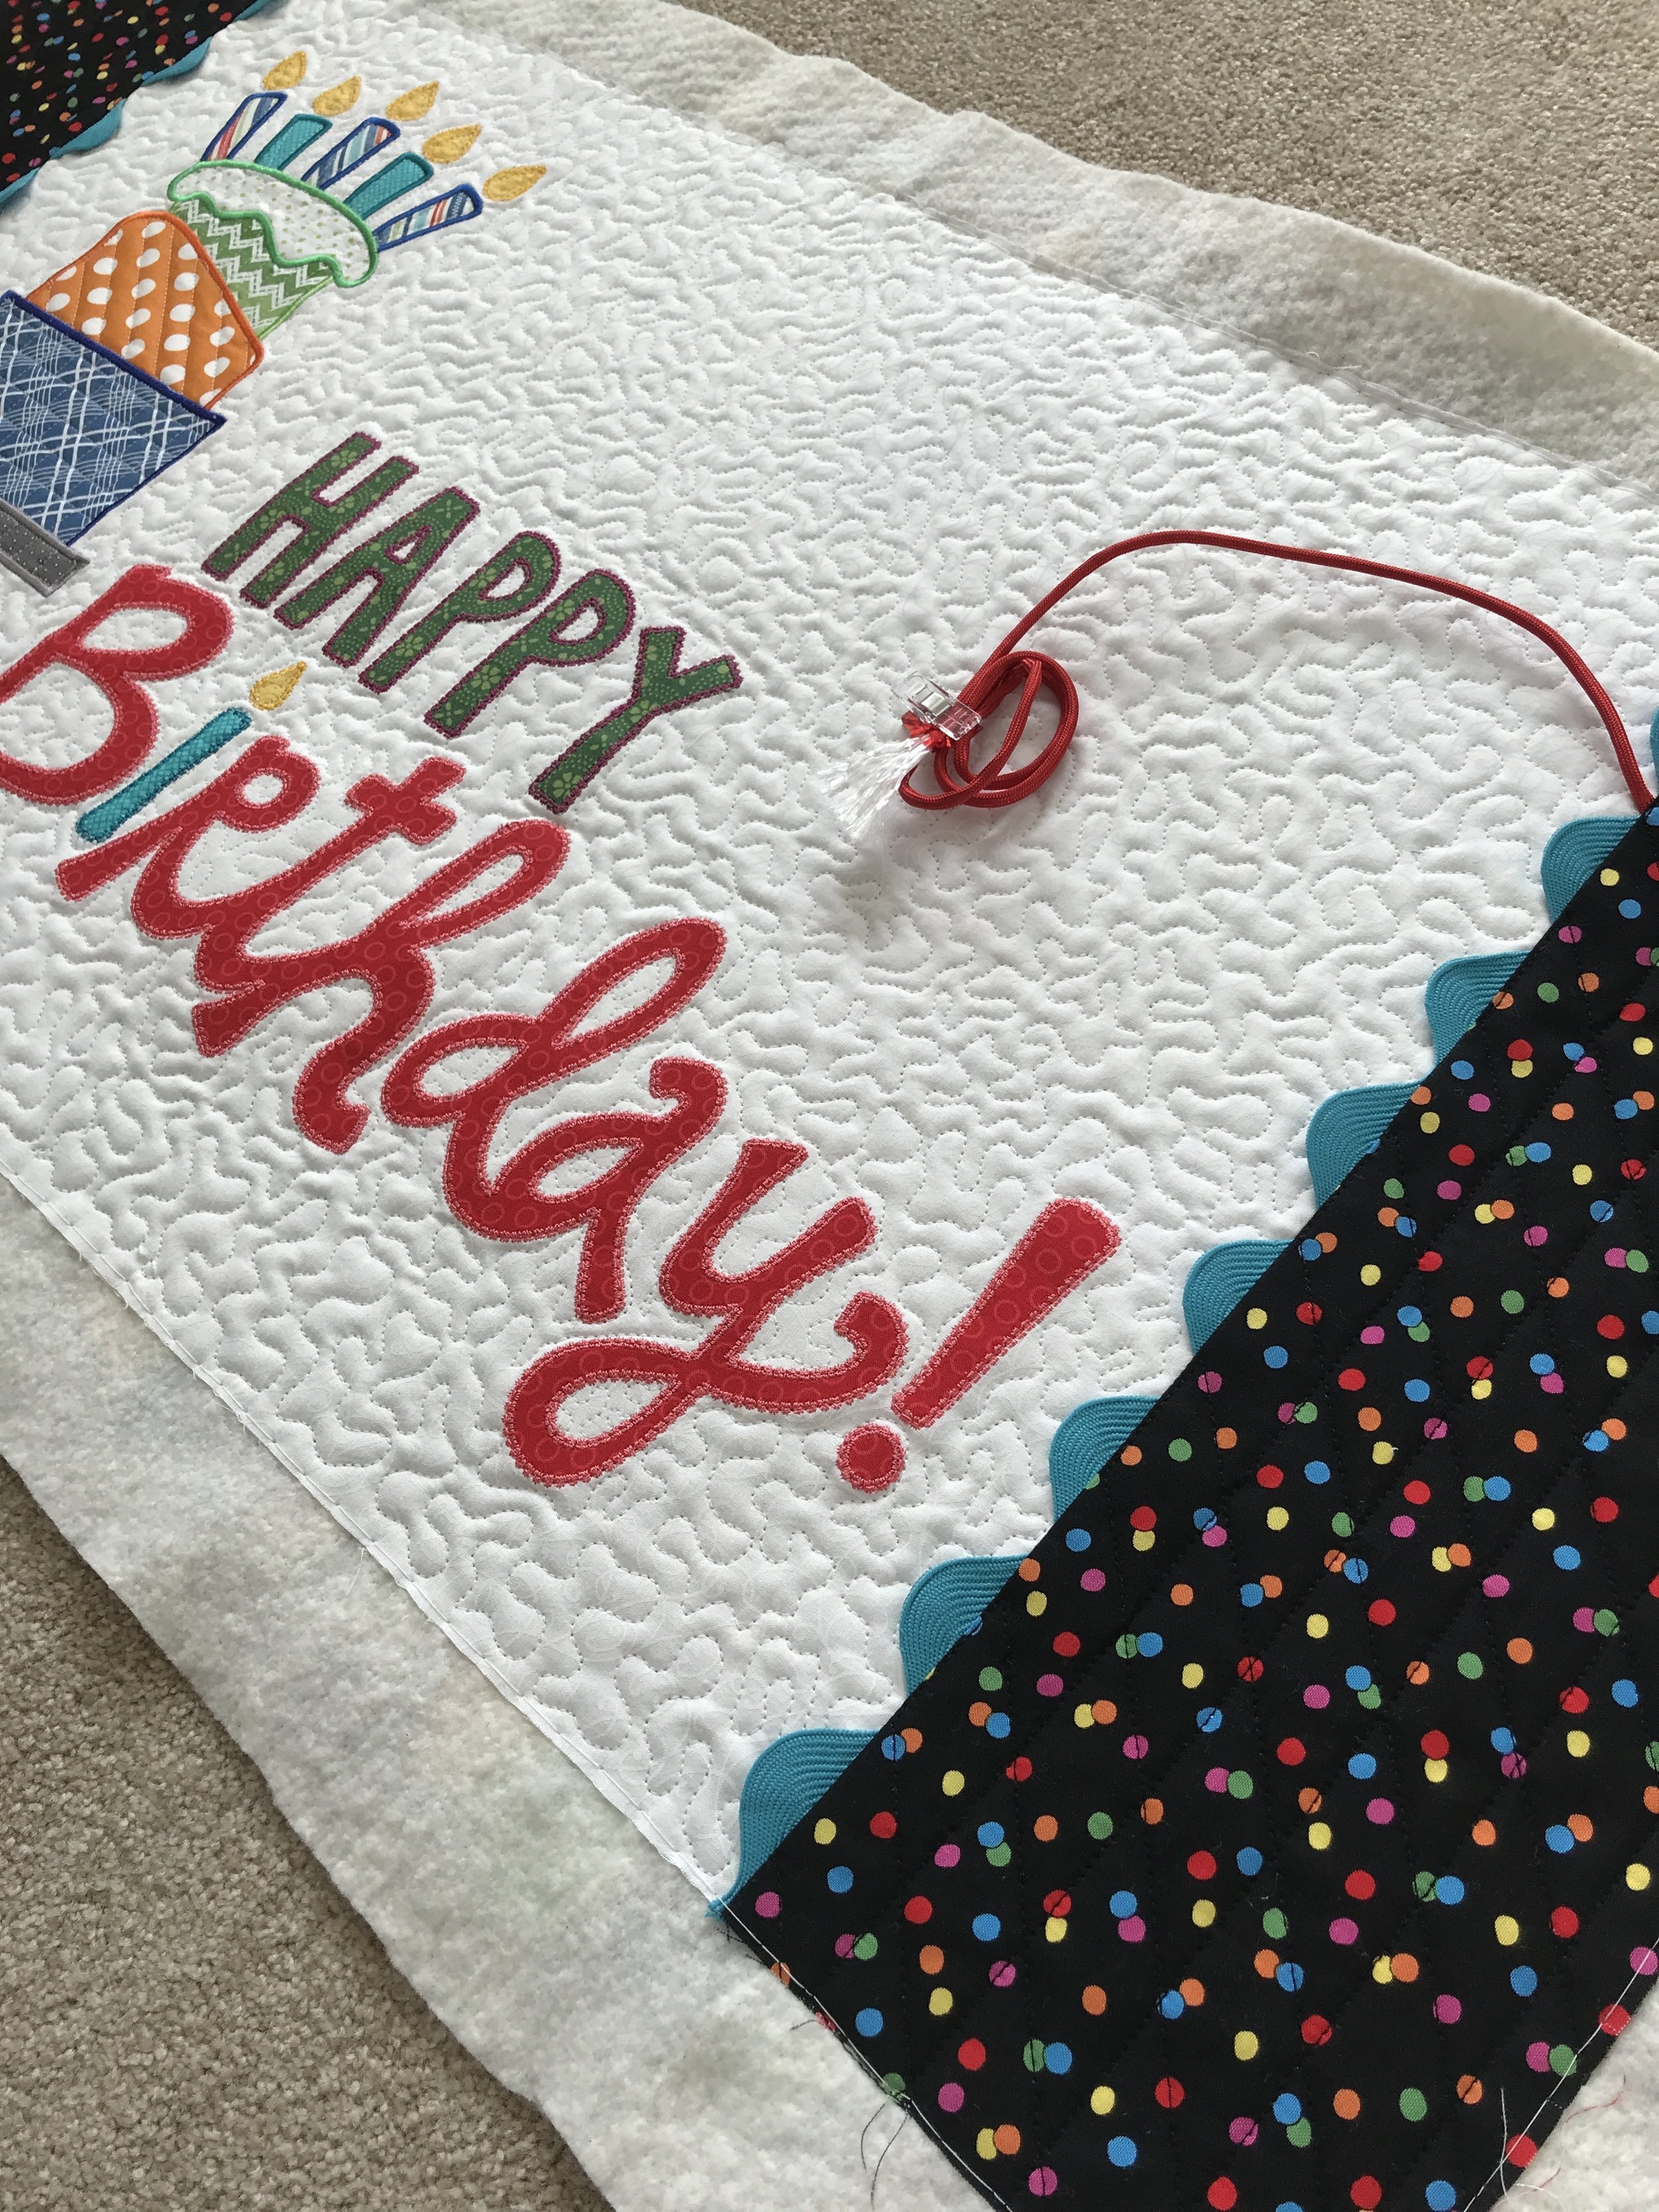
I stippled the background to make the banner universal for everyone’s birthday. The red rope is there to attach letters to for whomever’s birthday it is.

Here is a close up on the birthday cake. Lines lines lines are always a fun texture to add with the stipple or pebble background filler designs. I used Linda’s 8” ruler again for these lines.

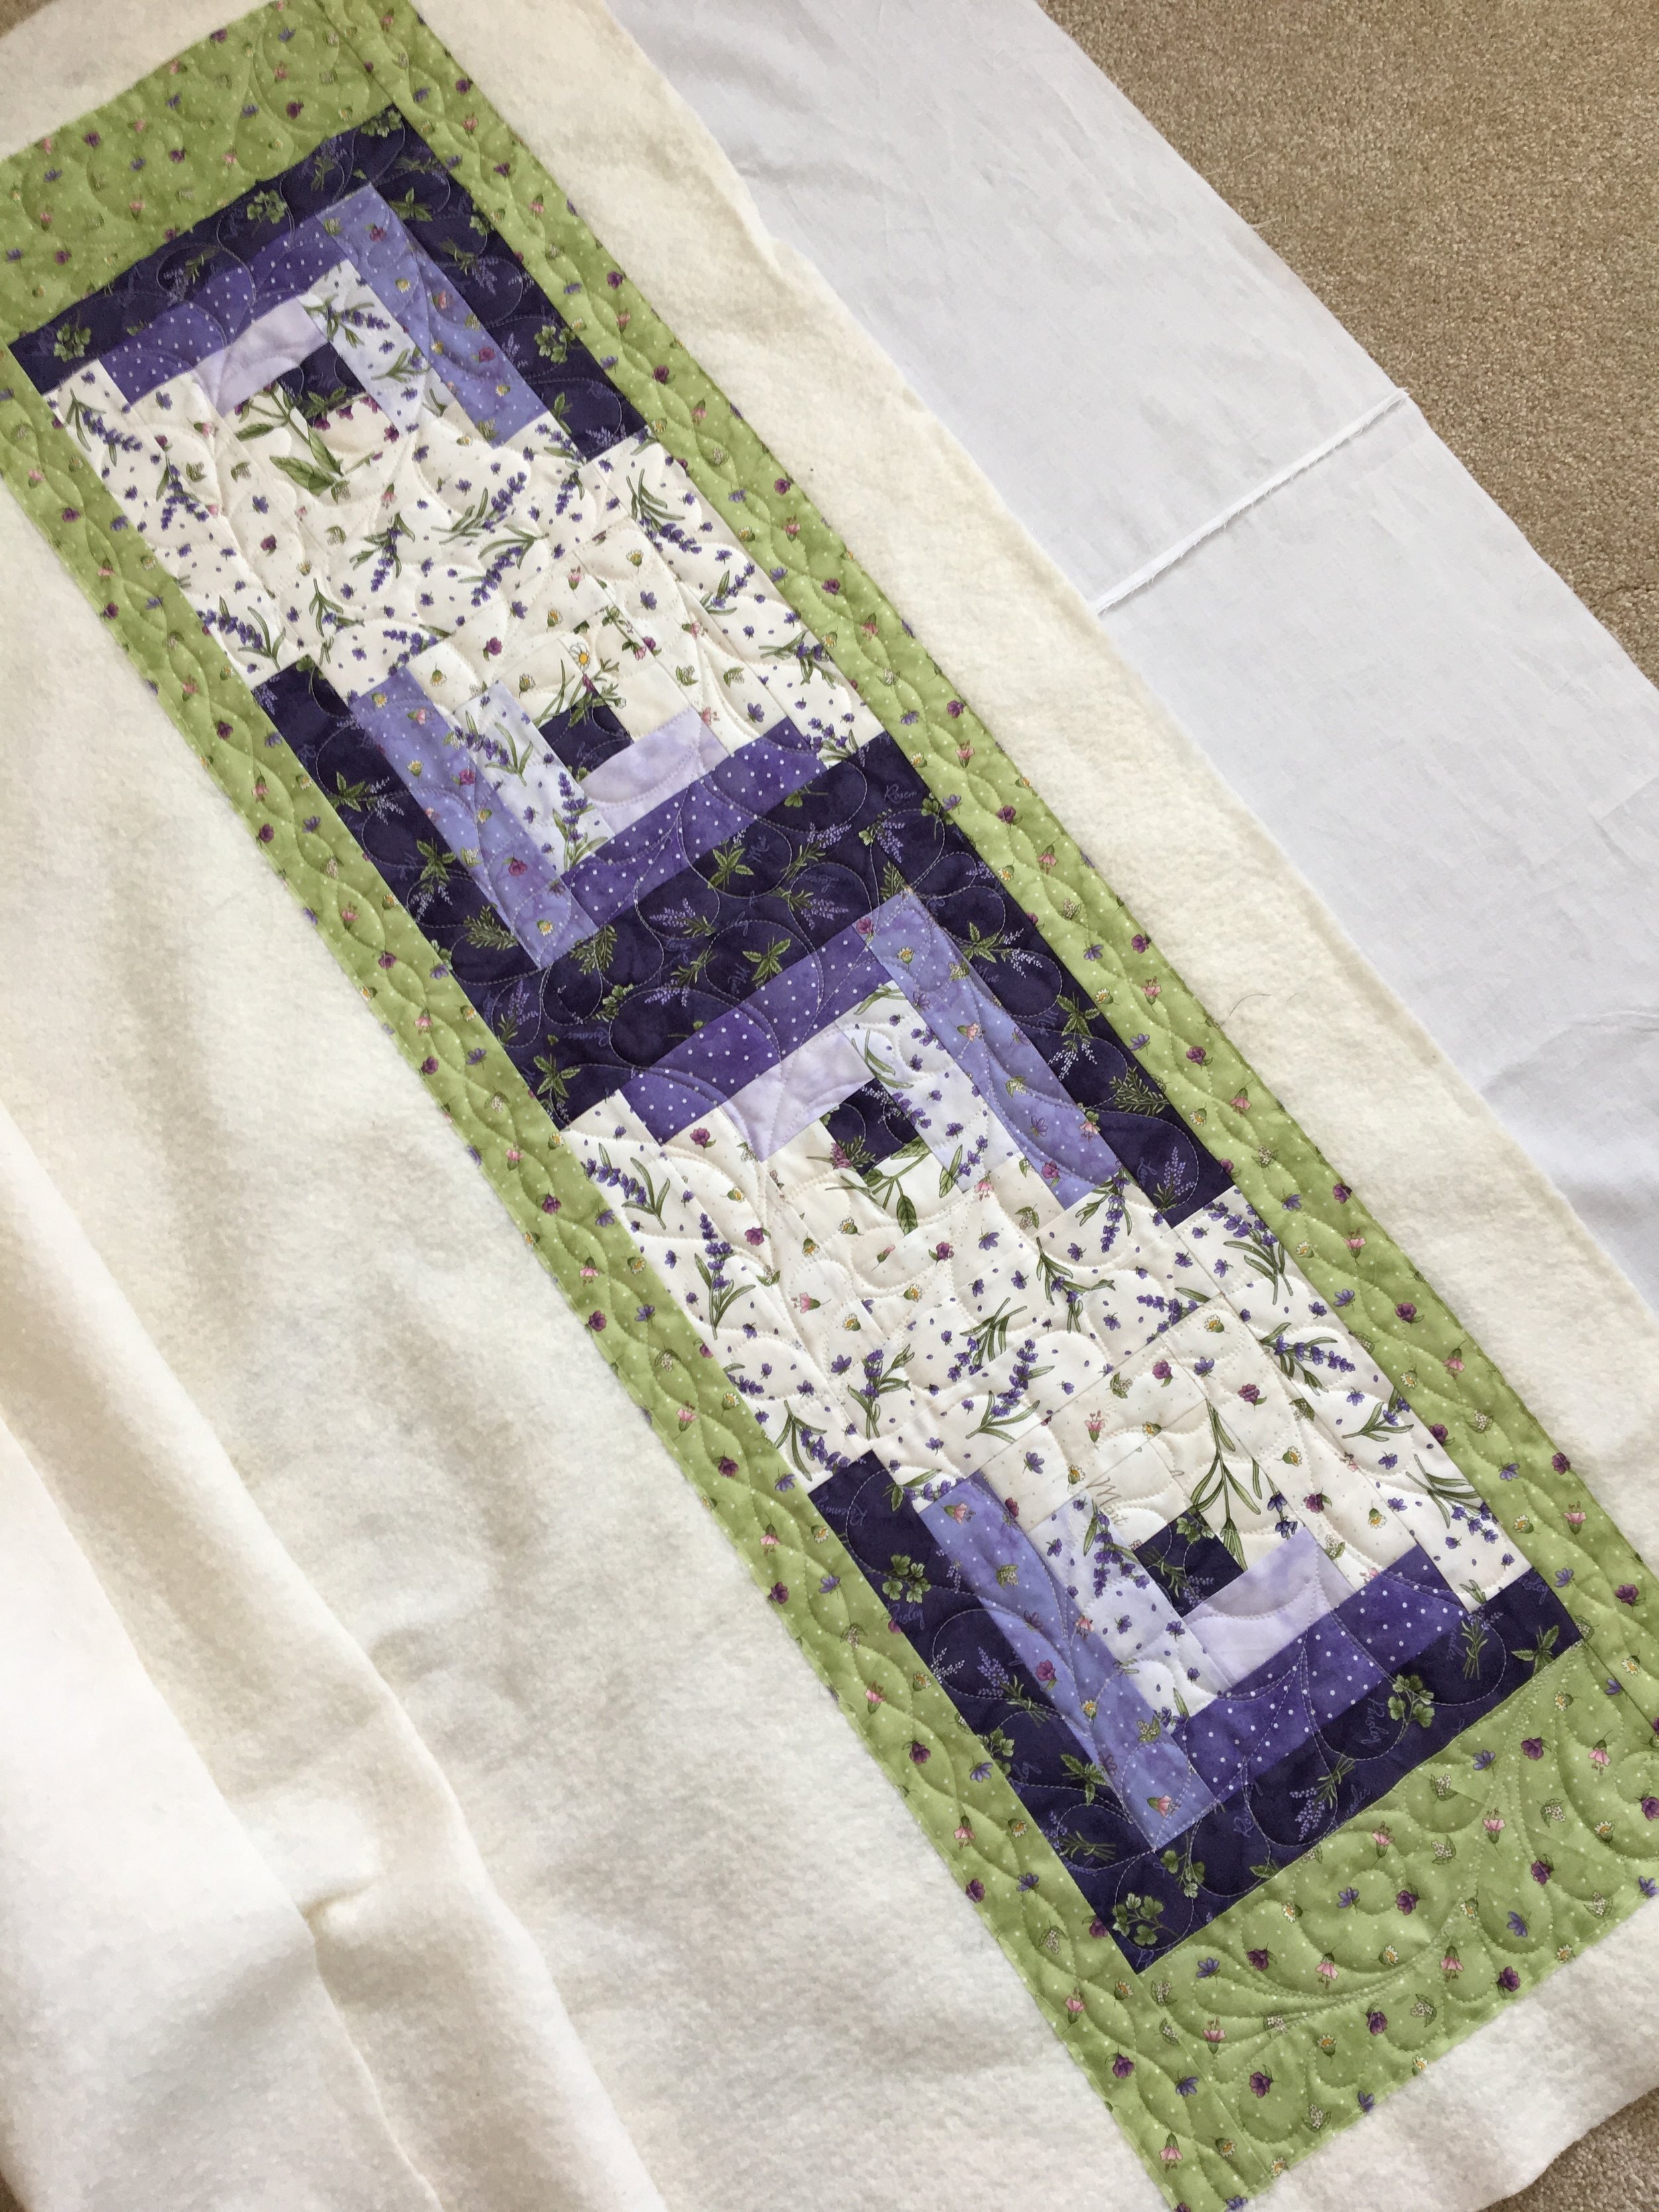
Last, but certainly not least is this sweet log cabin table runner. Kits are available on ShabbyFabrics.com ...however, be mindful if you want to have your runner machine quilted, they don’t provide enough backing for pinning to the machine canvas’.

Chris wanted it quilted like the ones that are pictured on shappyfabrics.com. Feathers in the log cabin blocks and wavy lines along the thinner outside border.
Thank you stopping by! I know that was a long post, and tons of pictures. Happy sewing and happy weekend!
-Leisha