

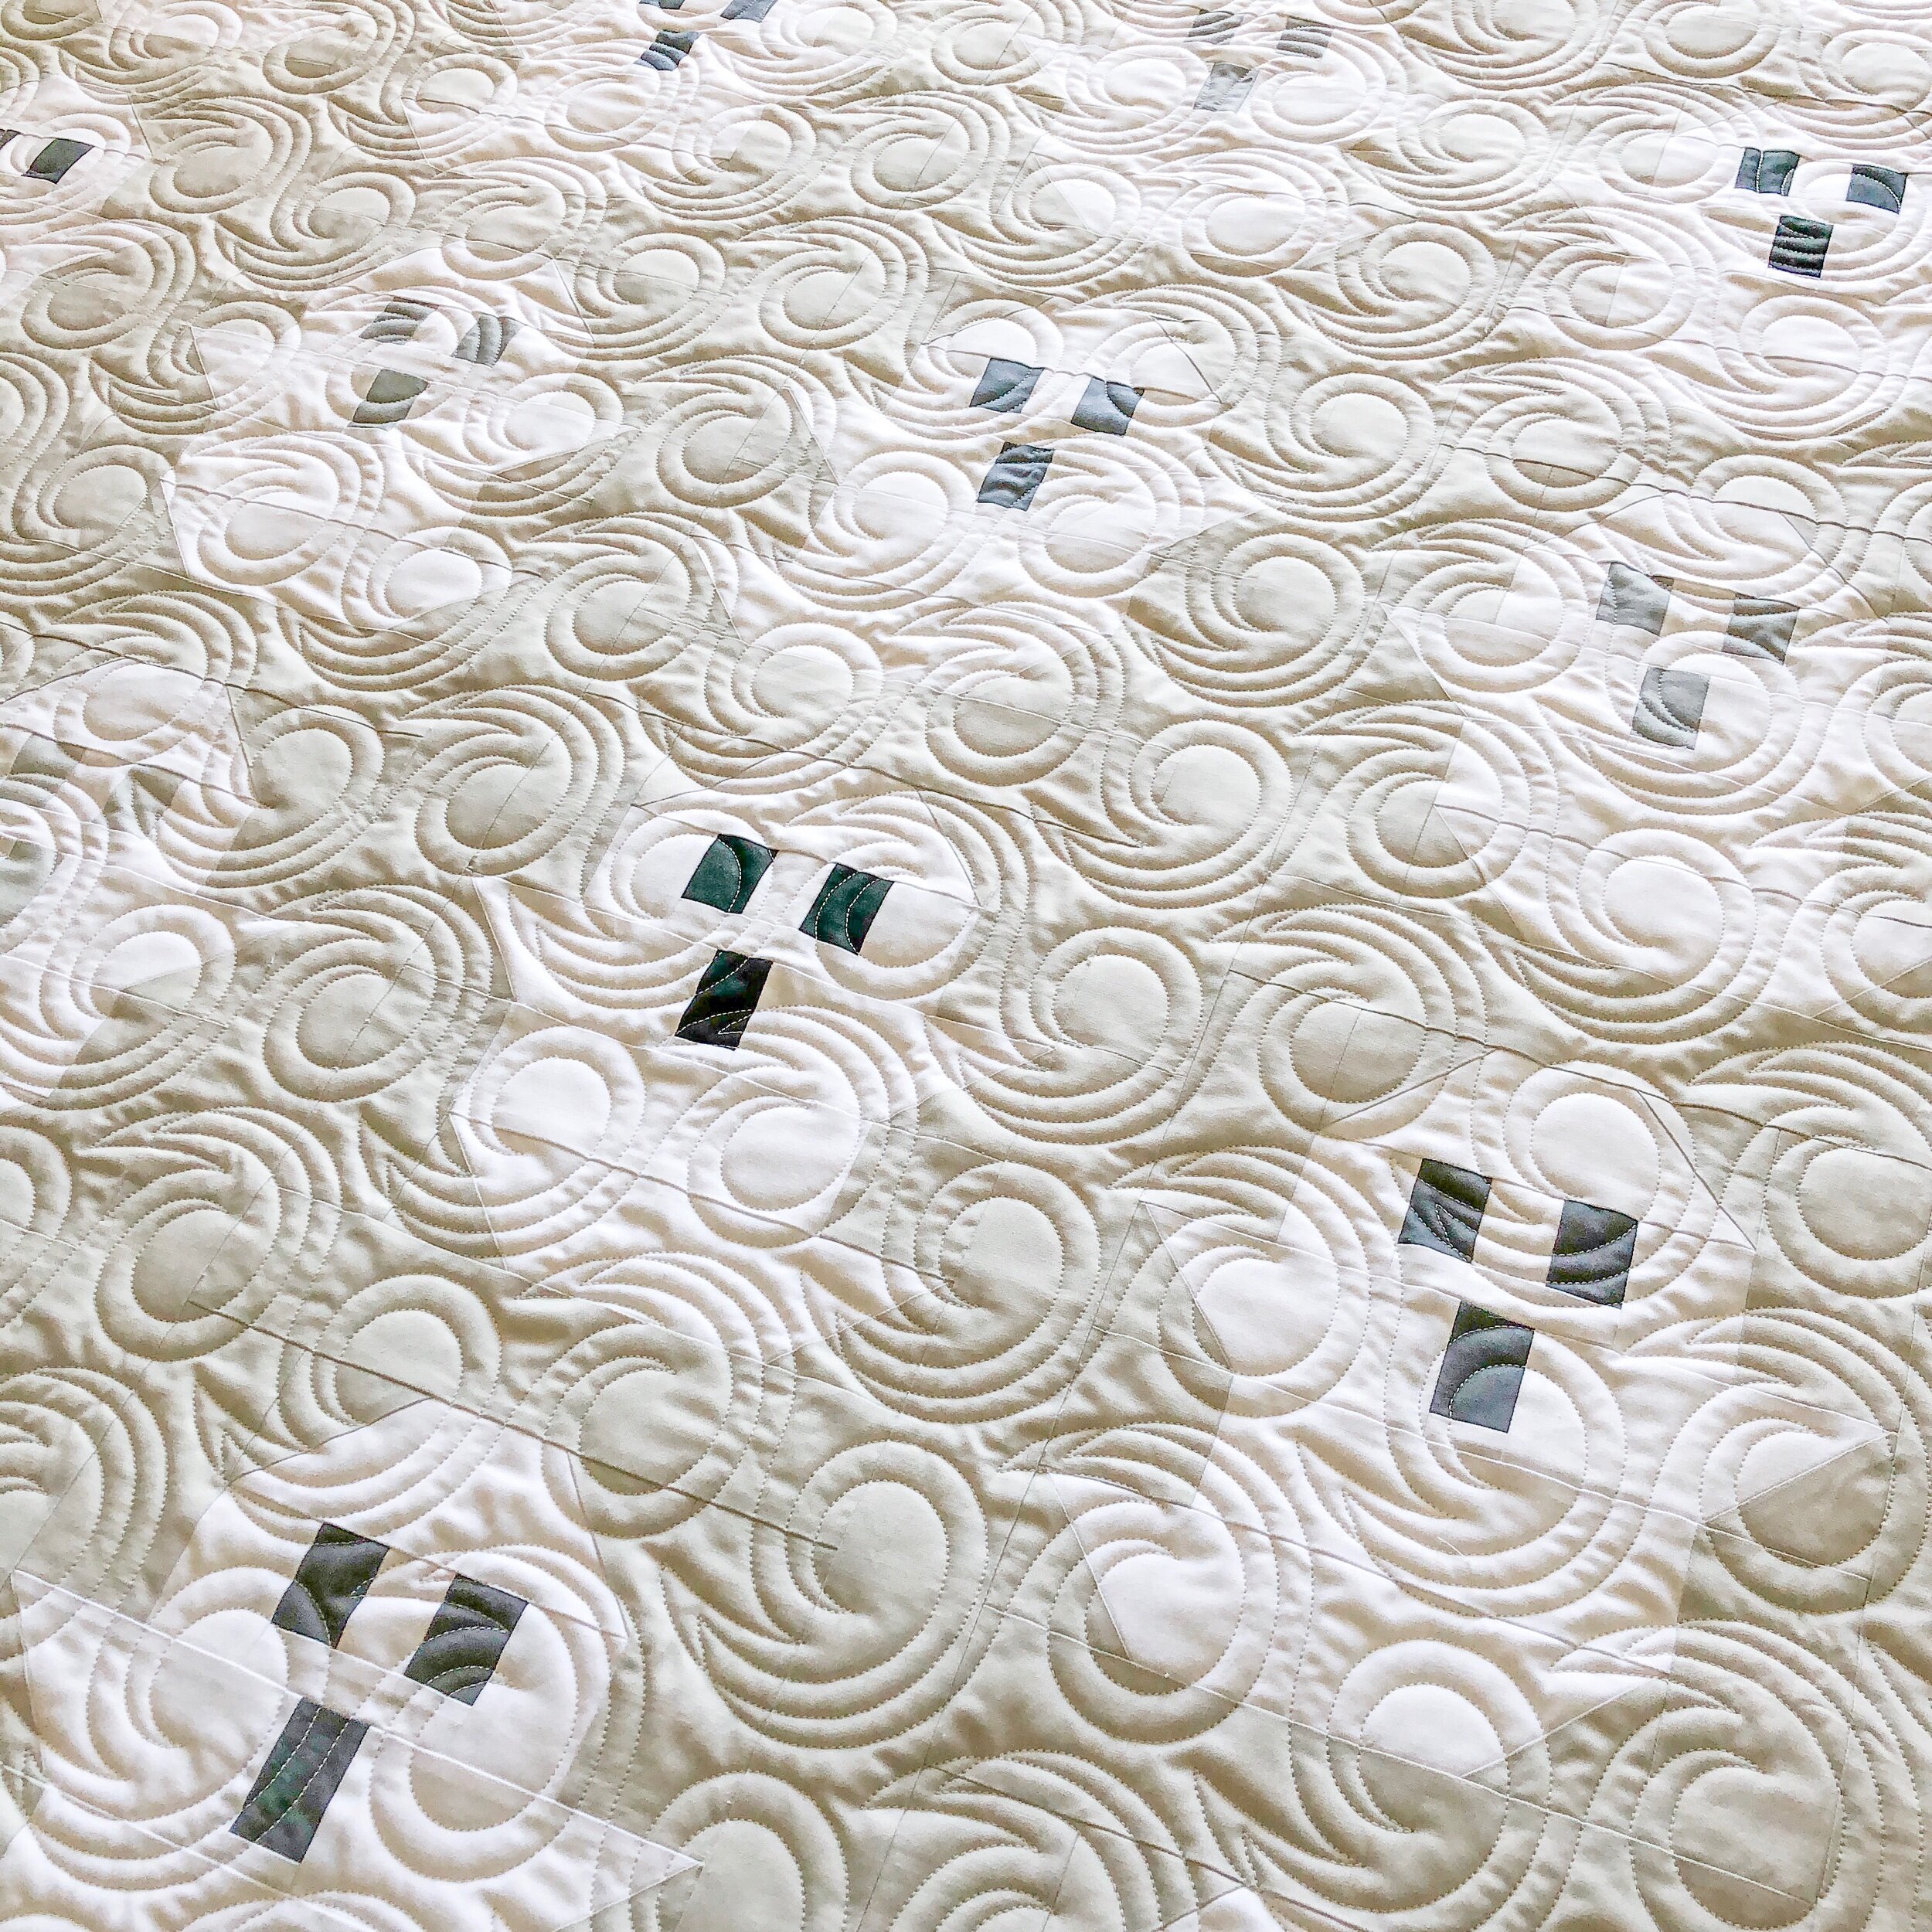
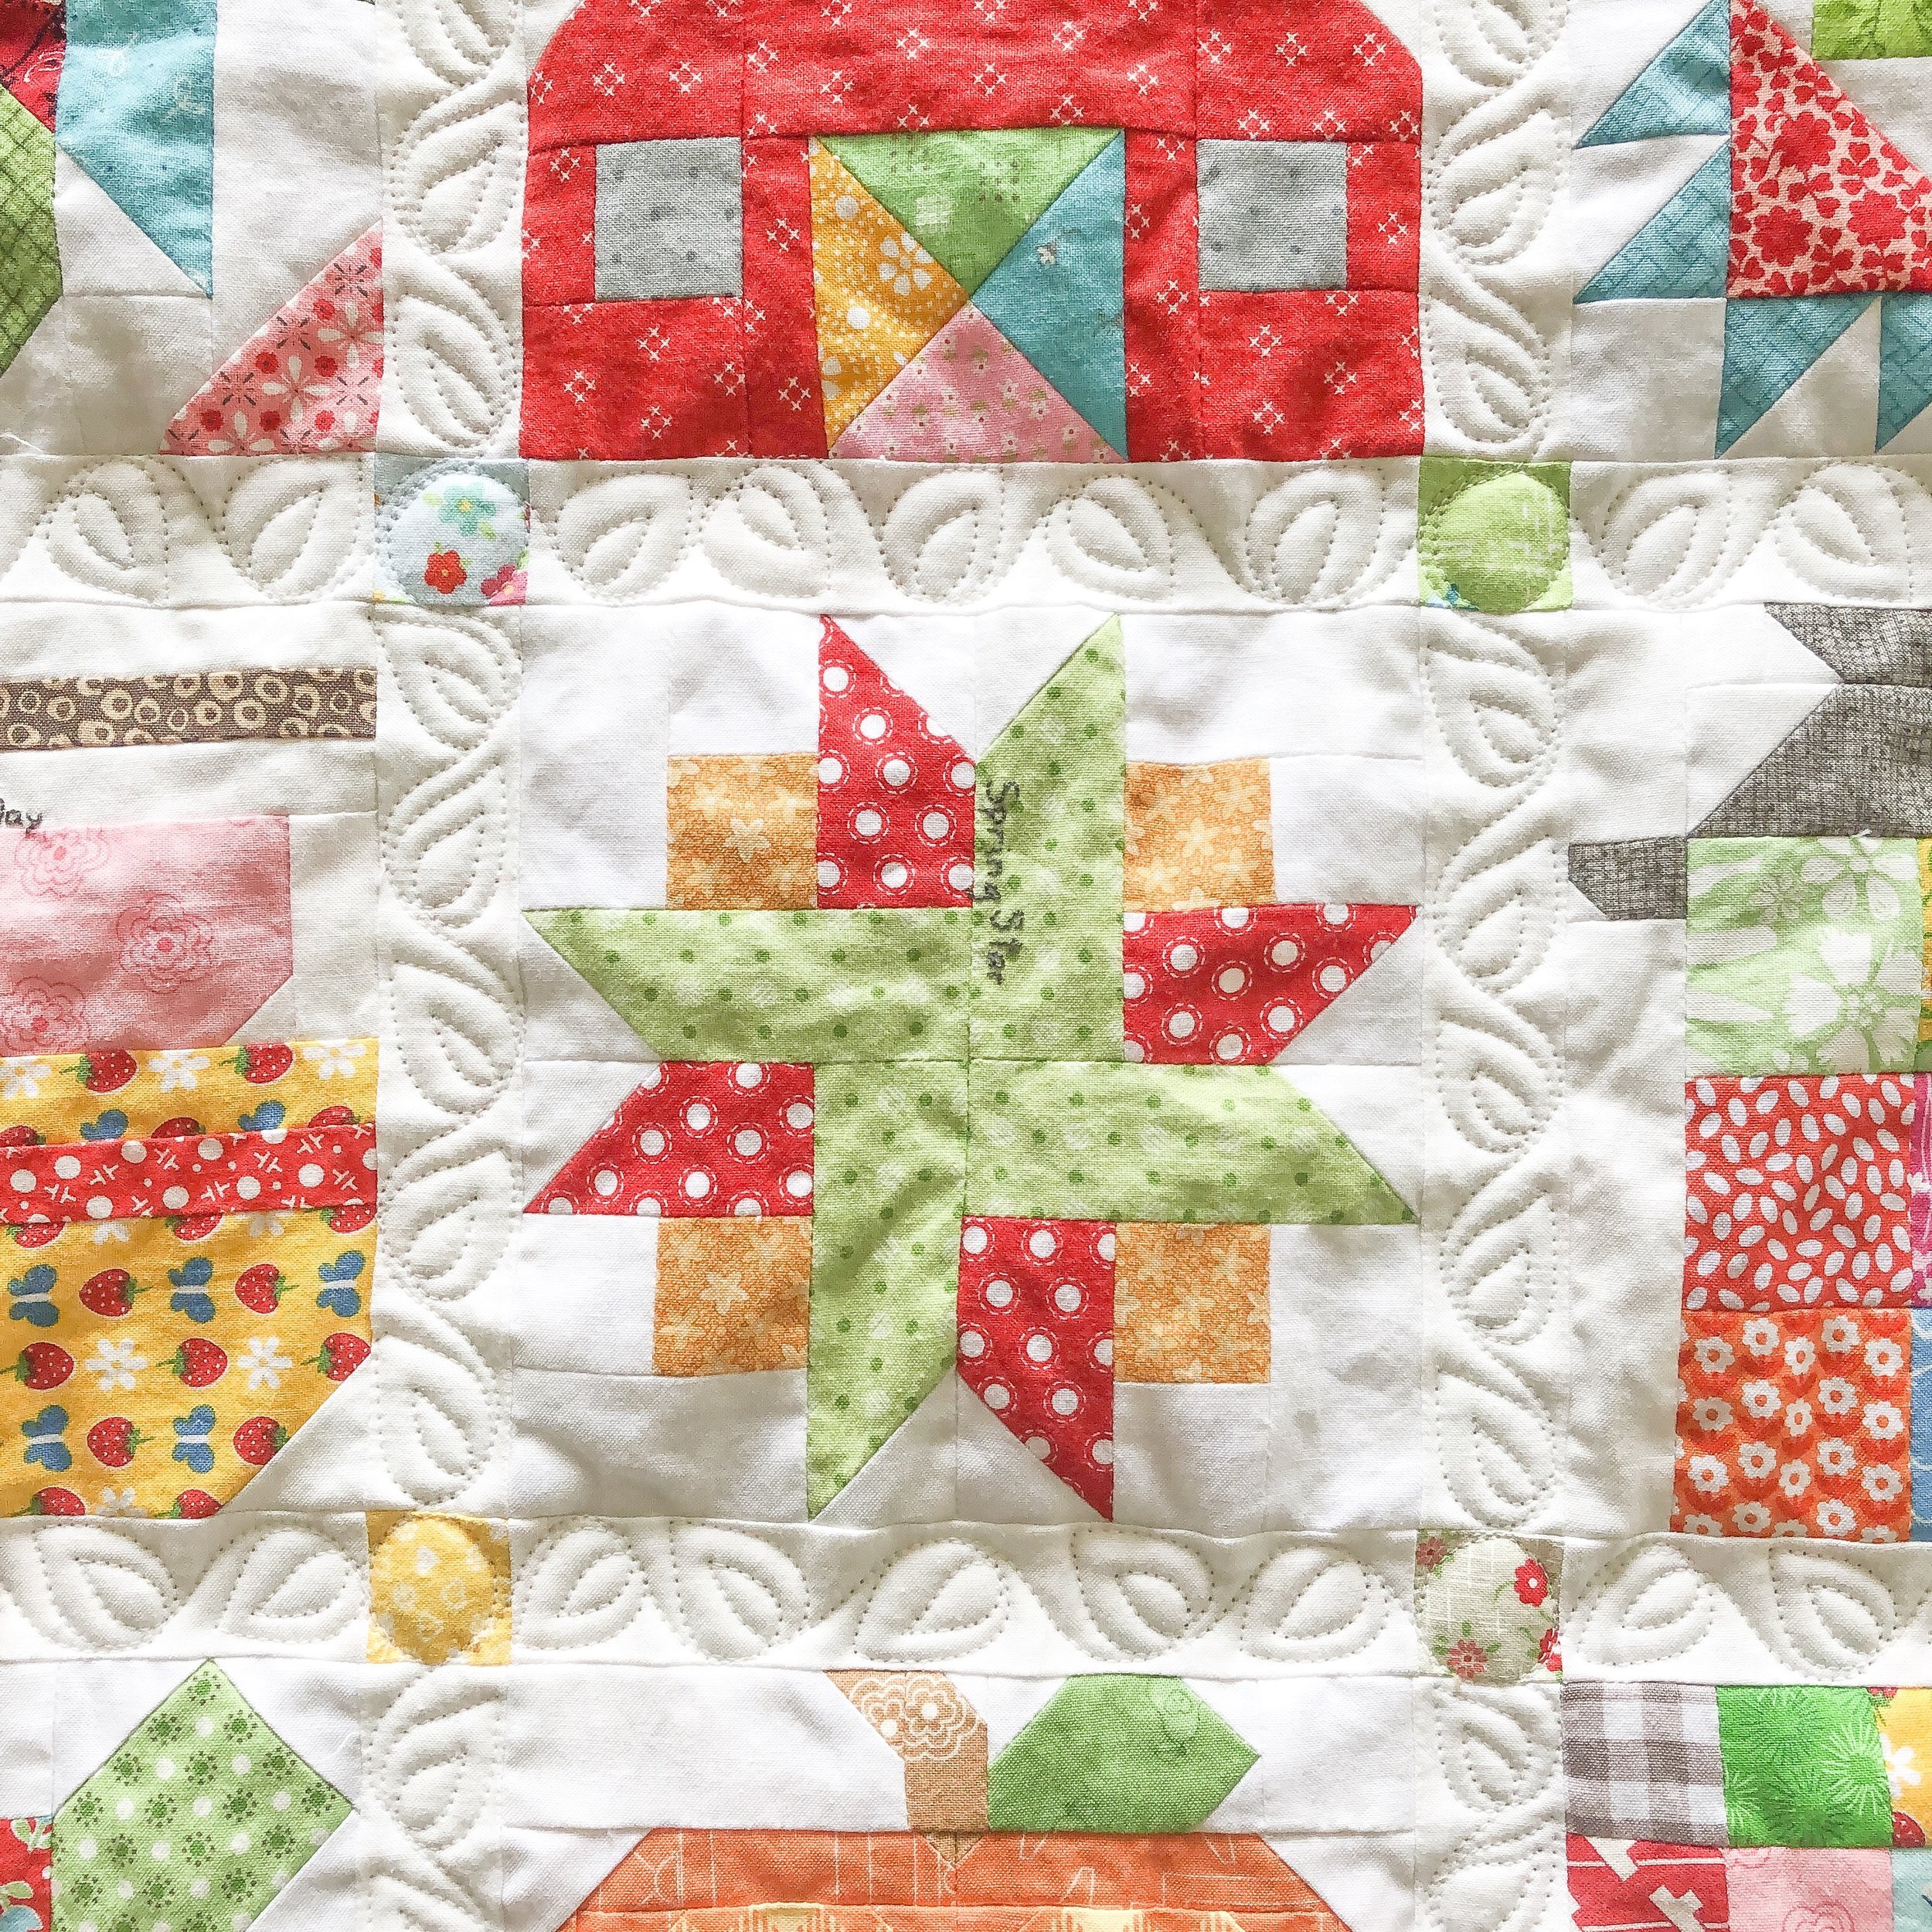
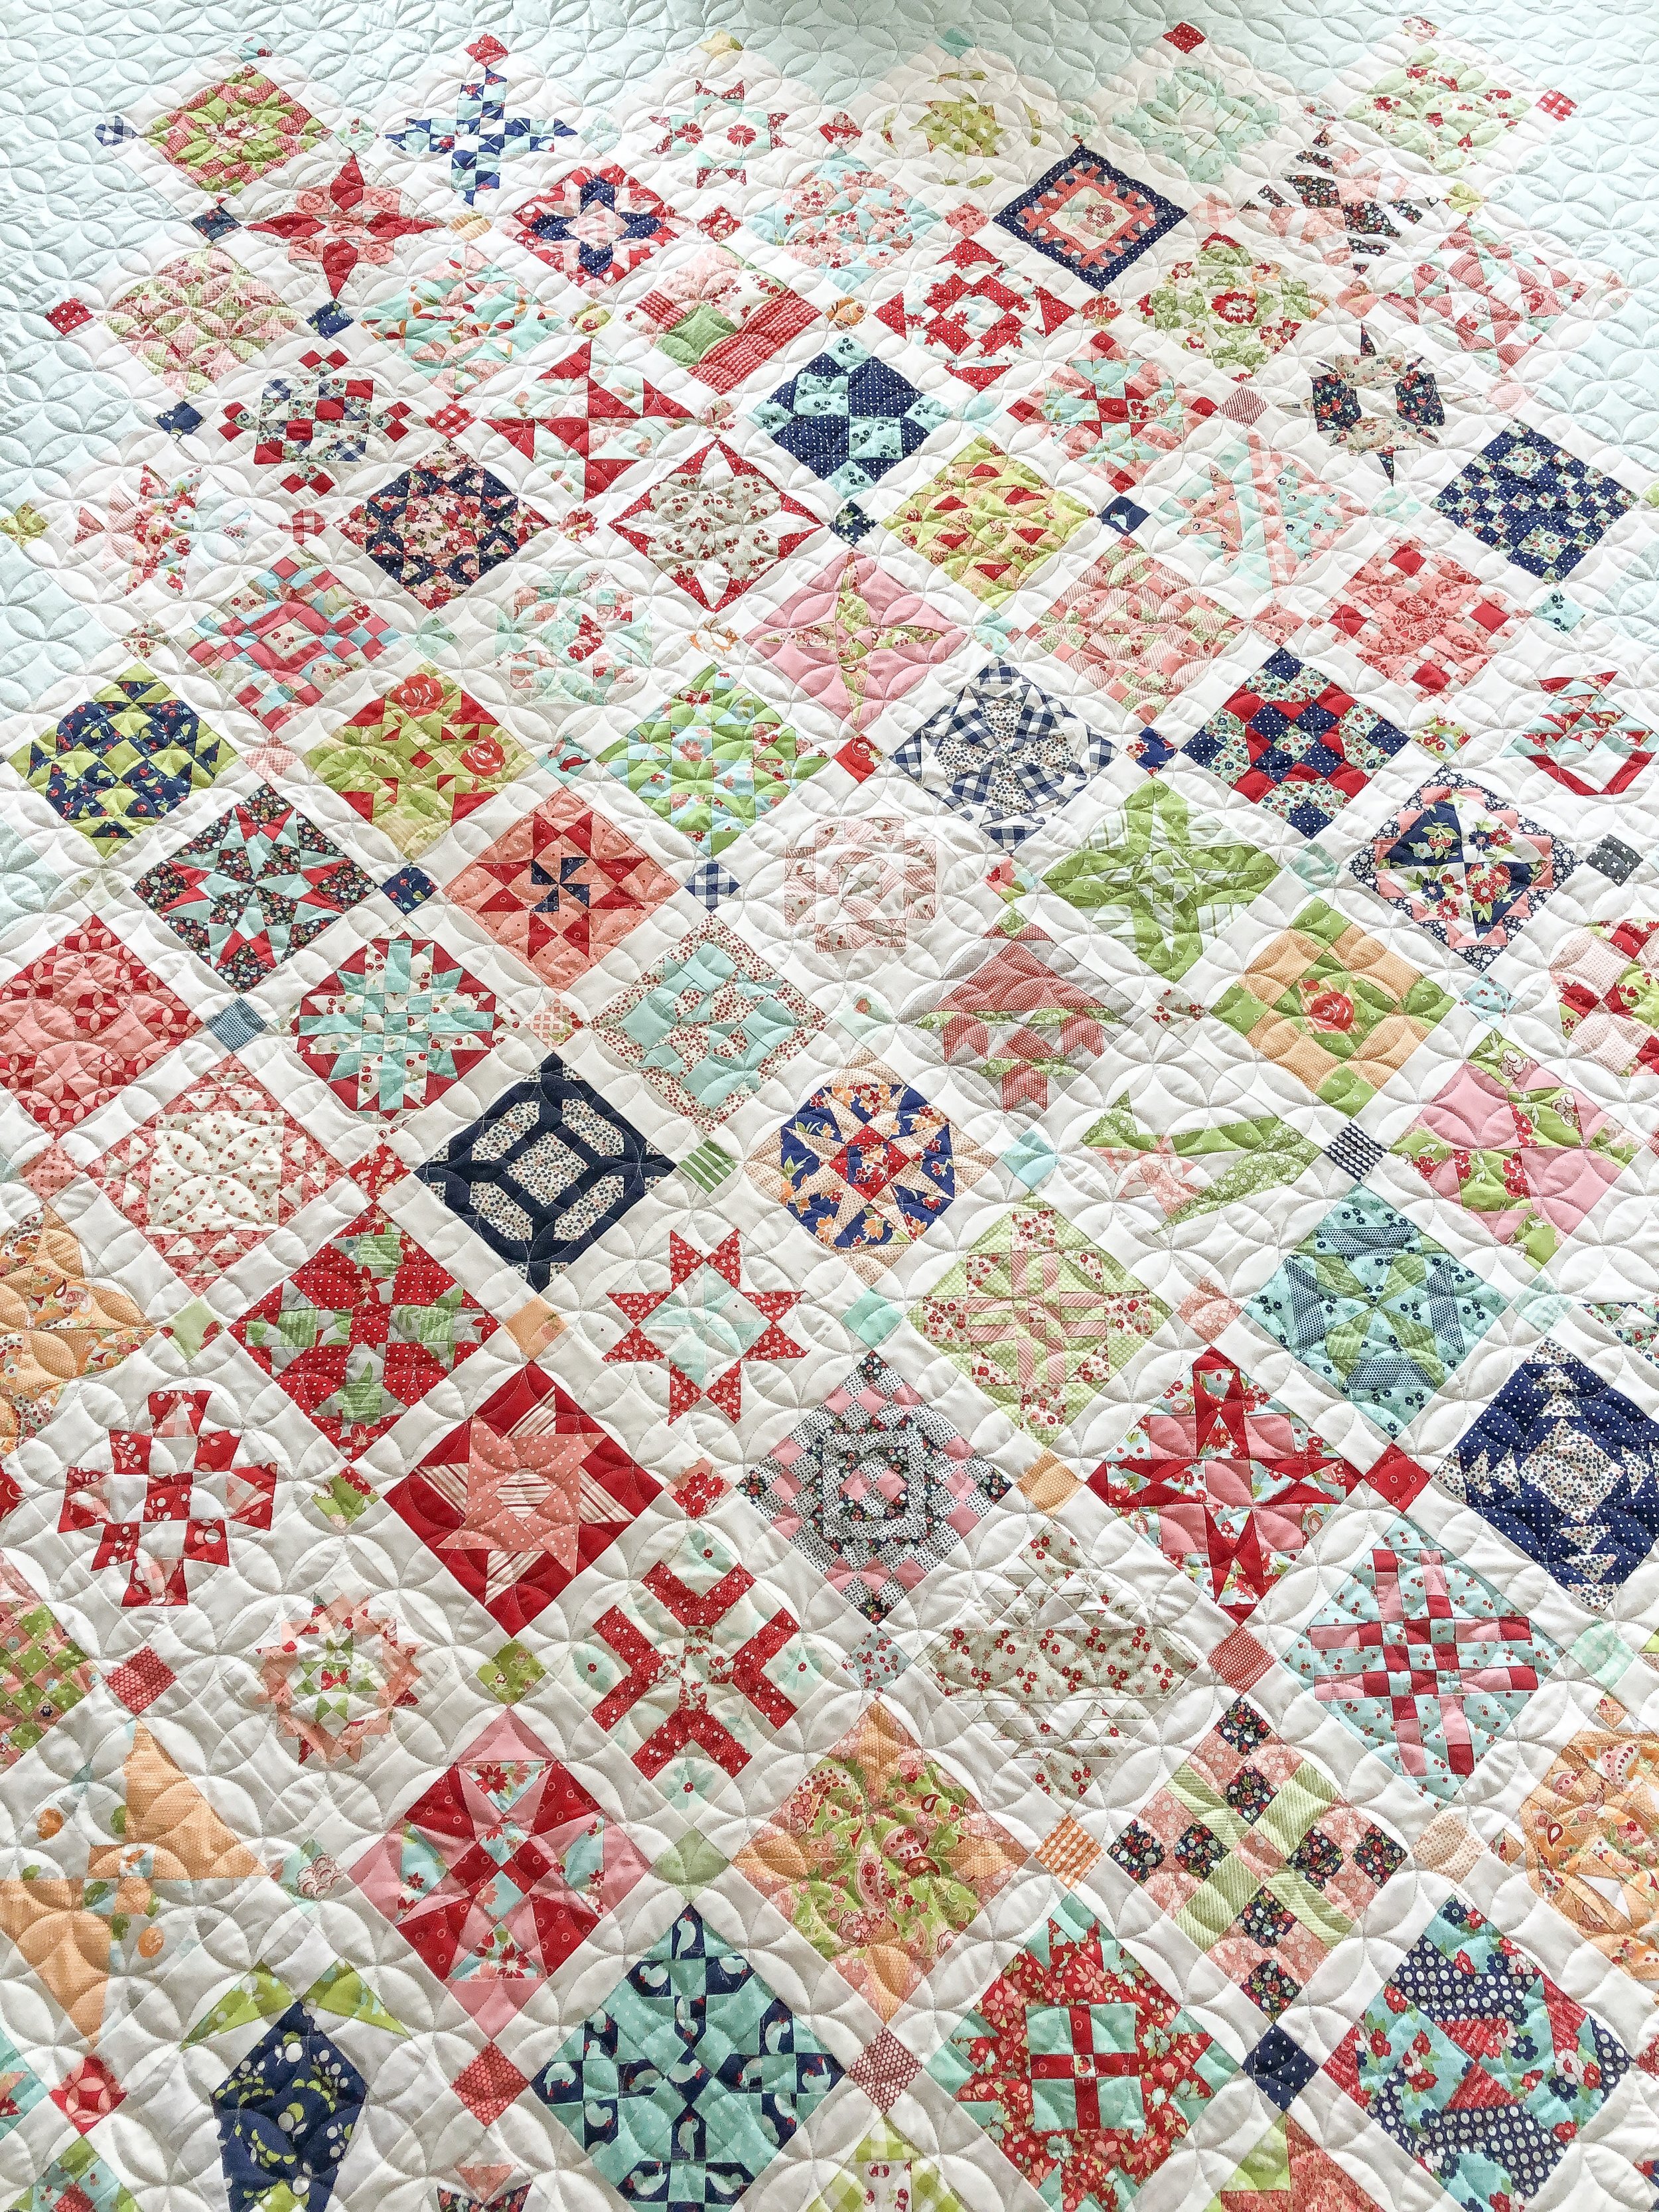
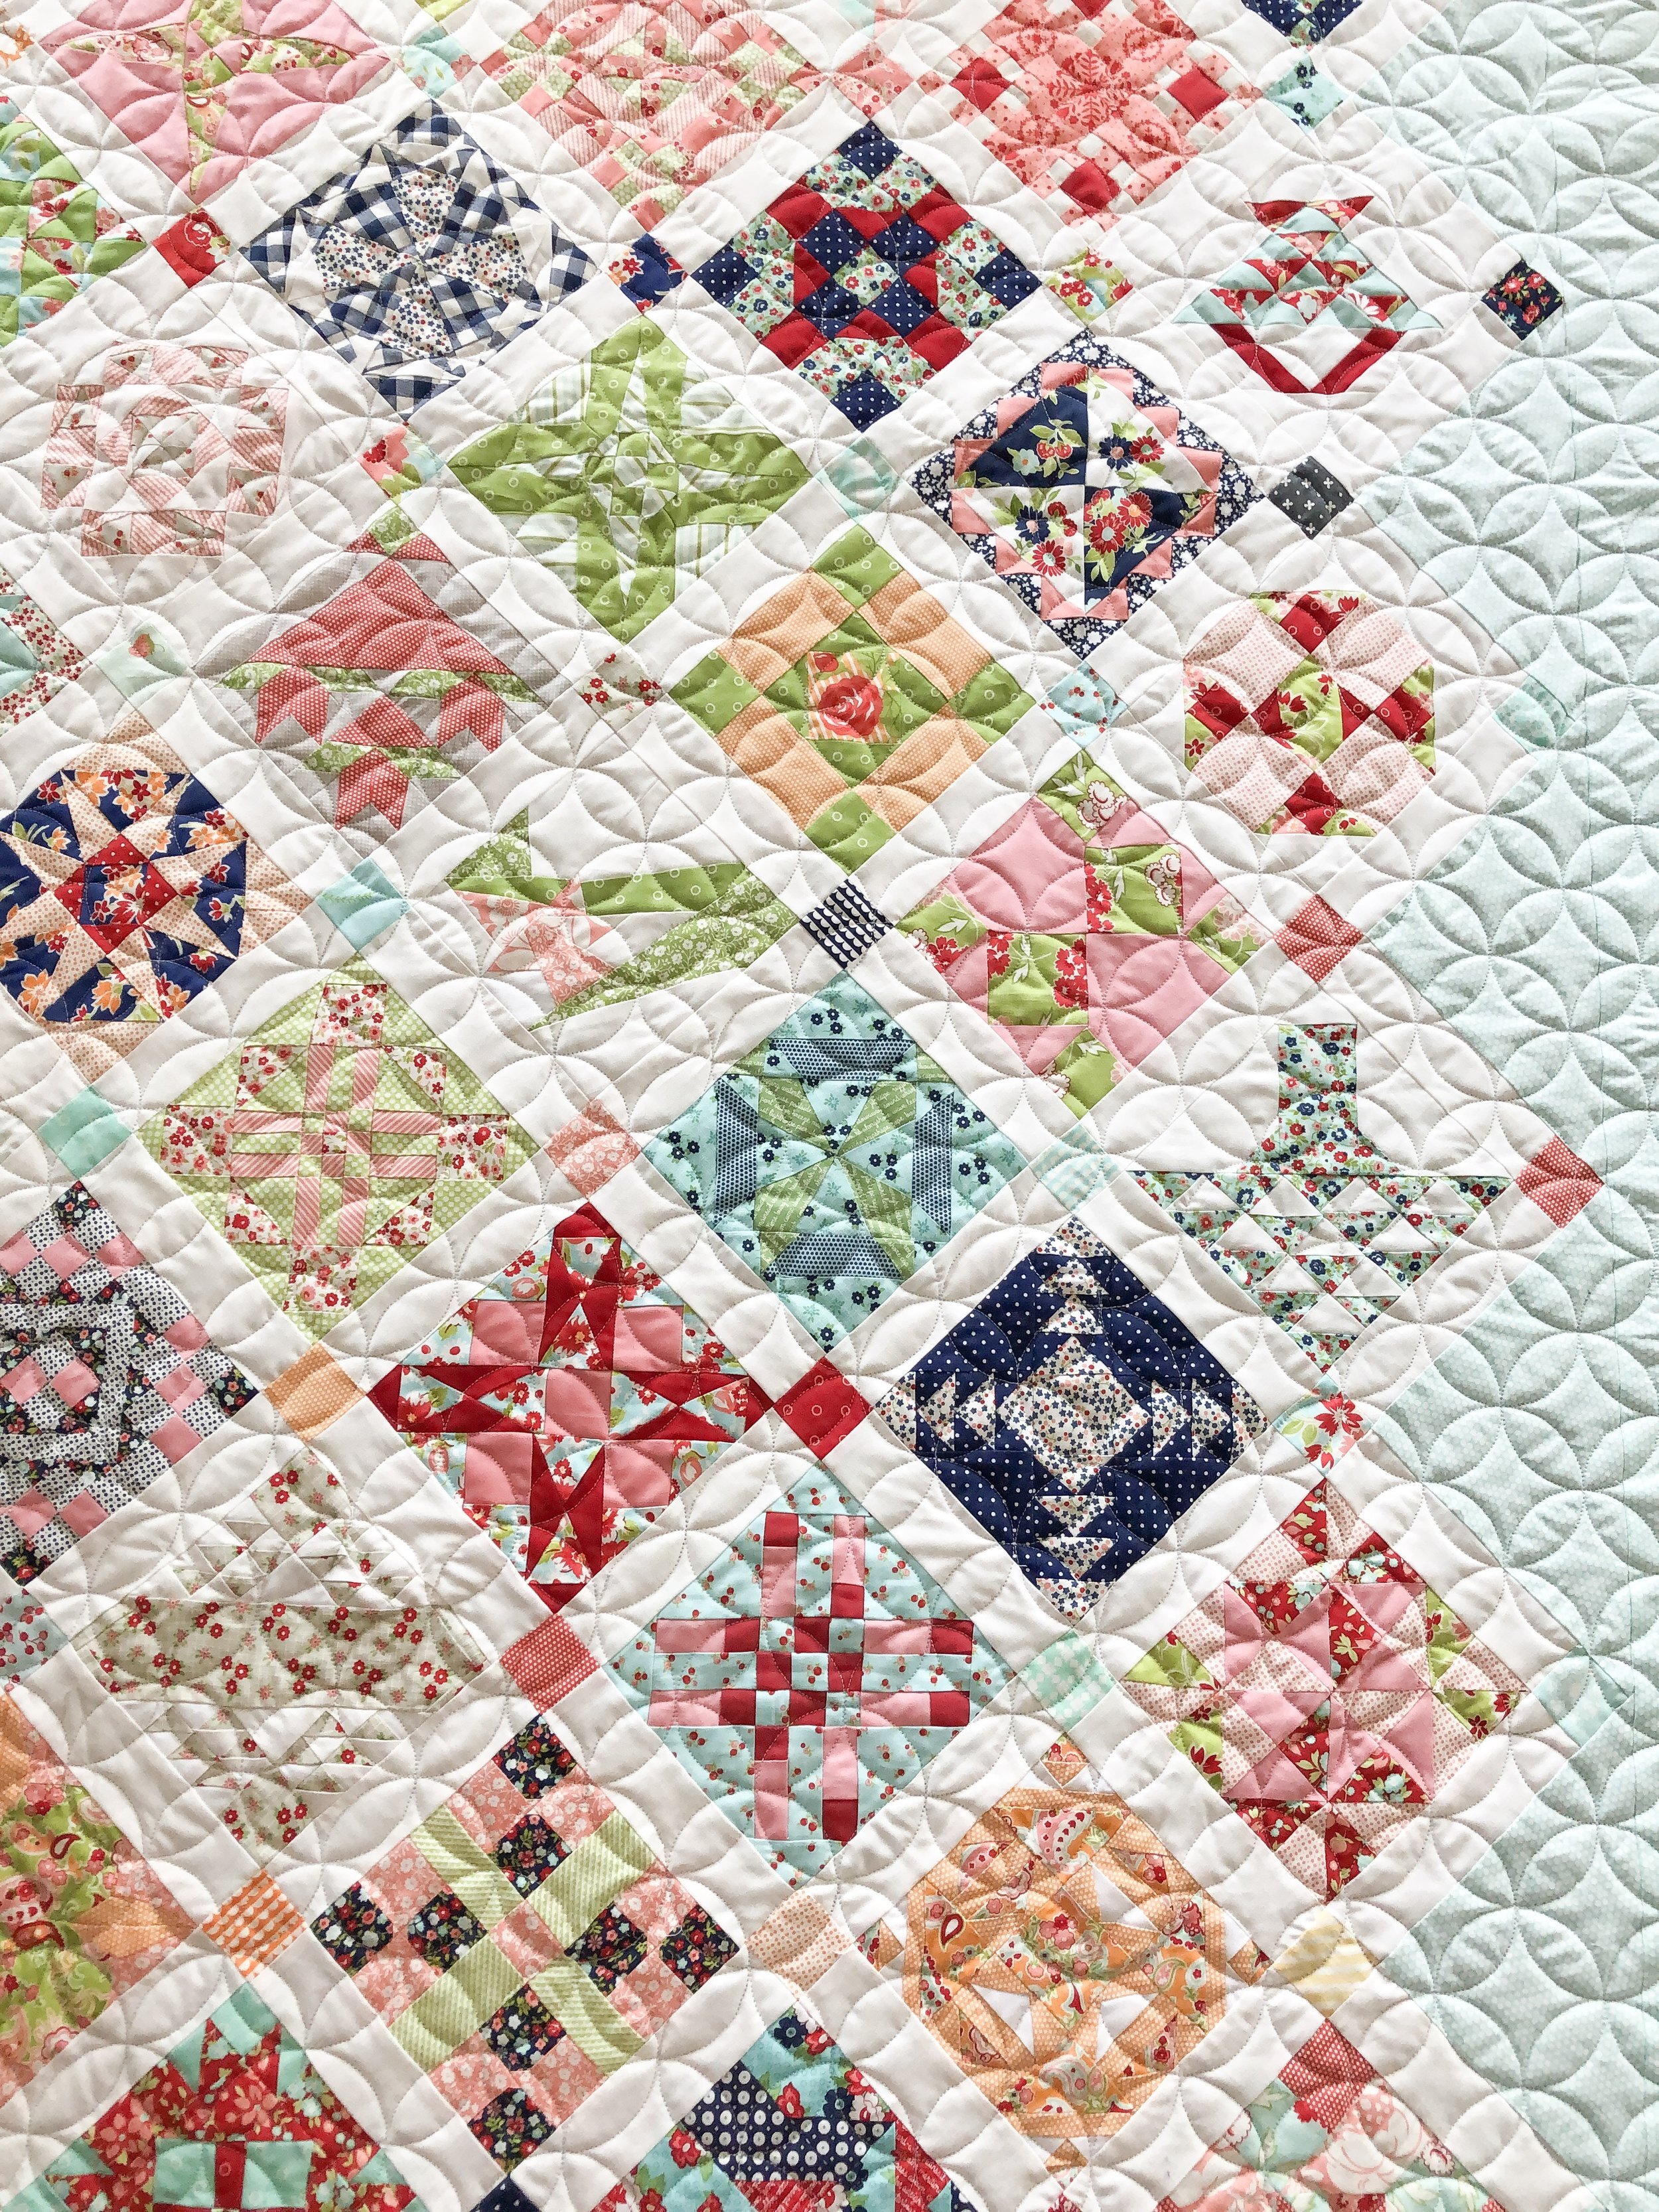
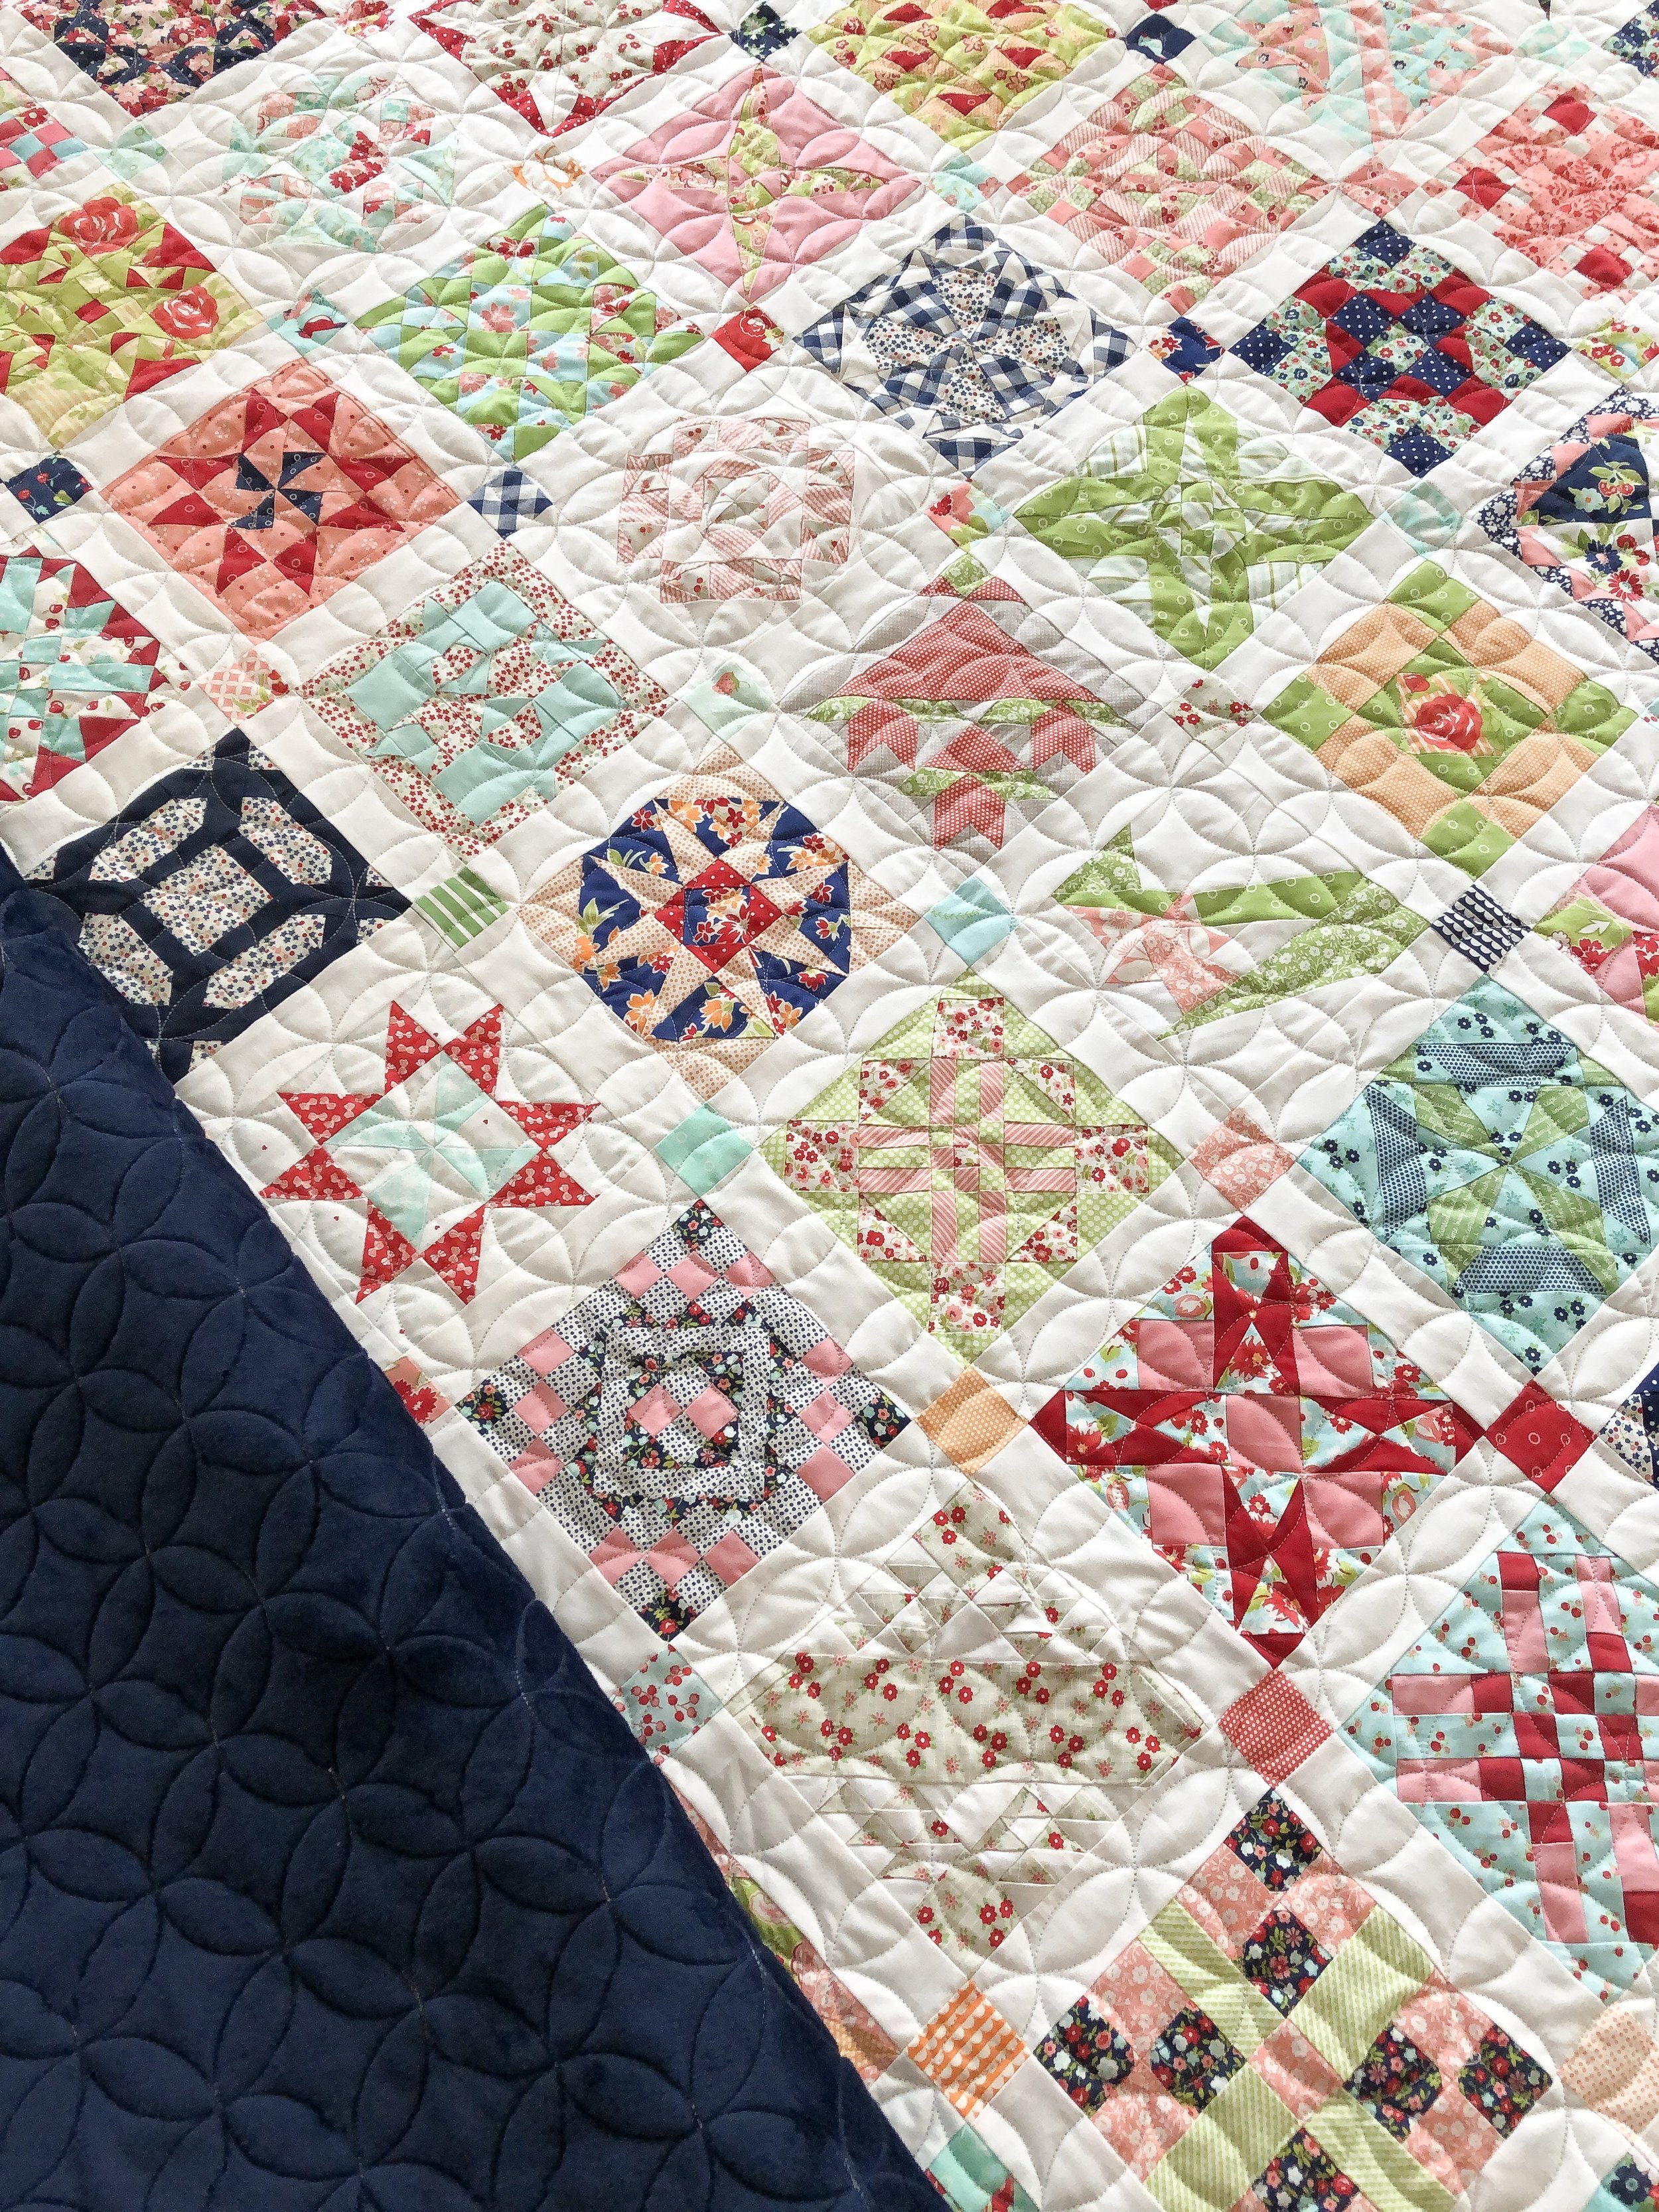
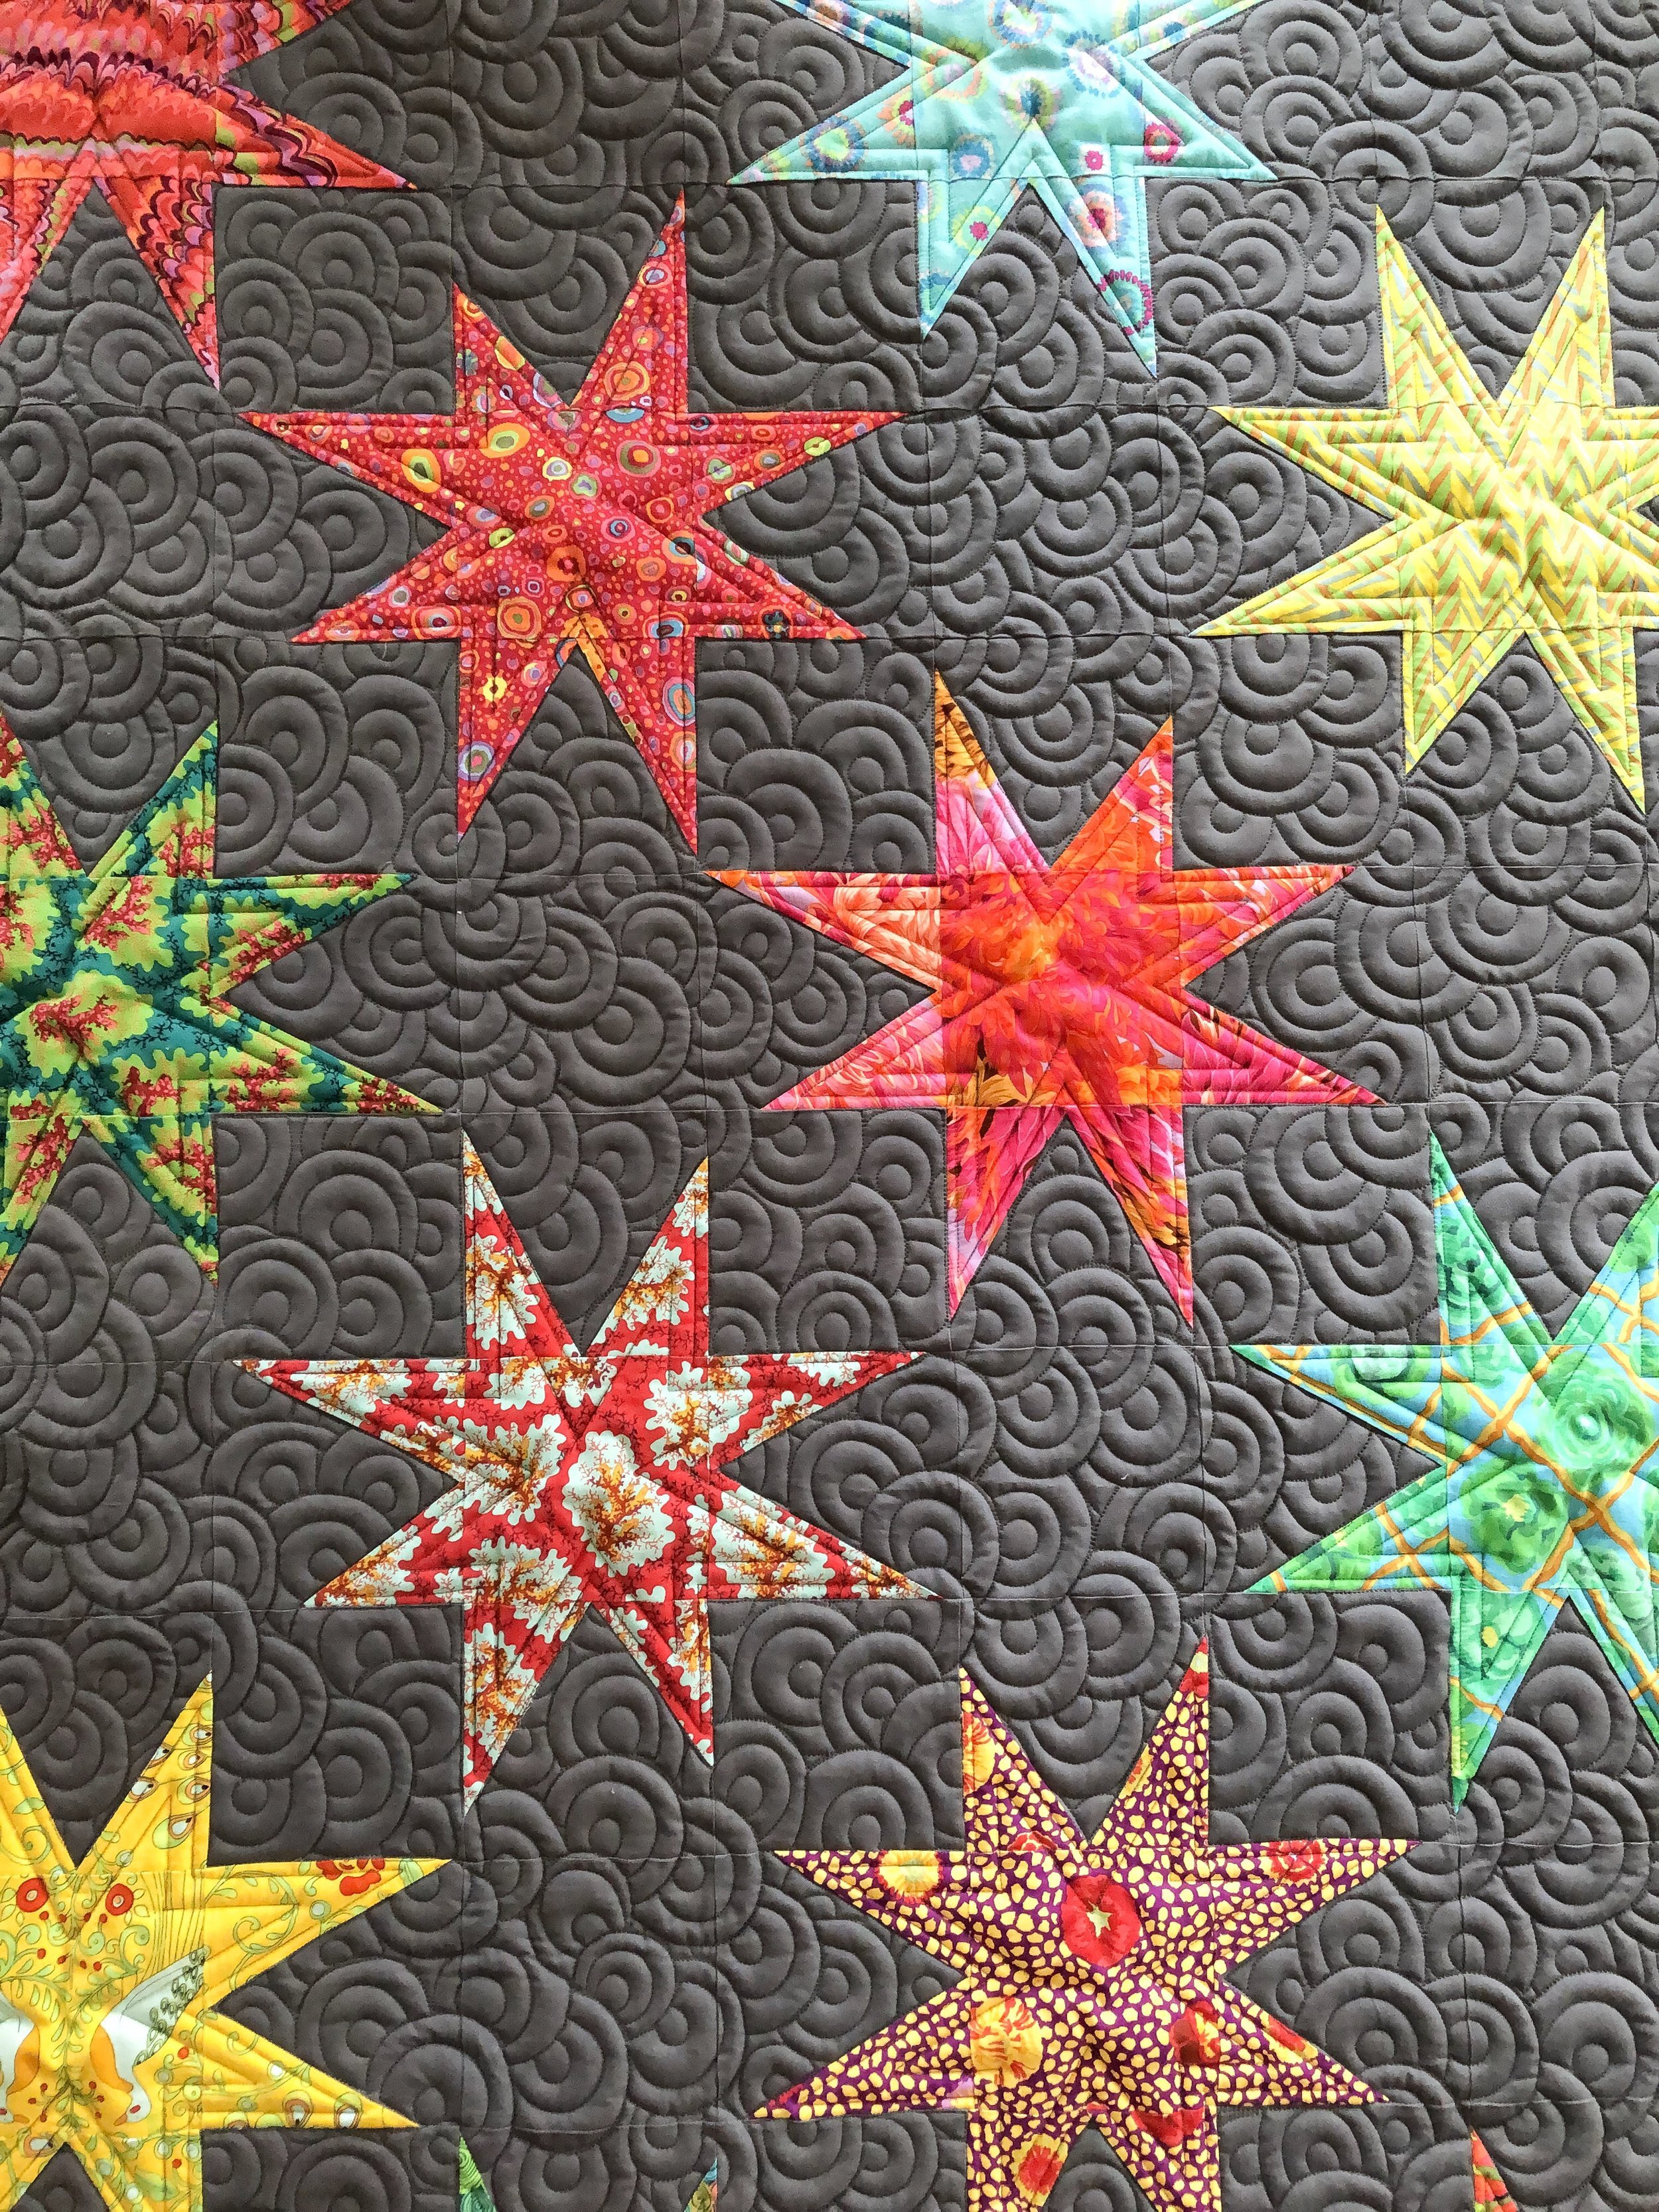
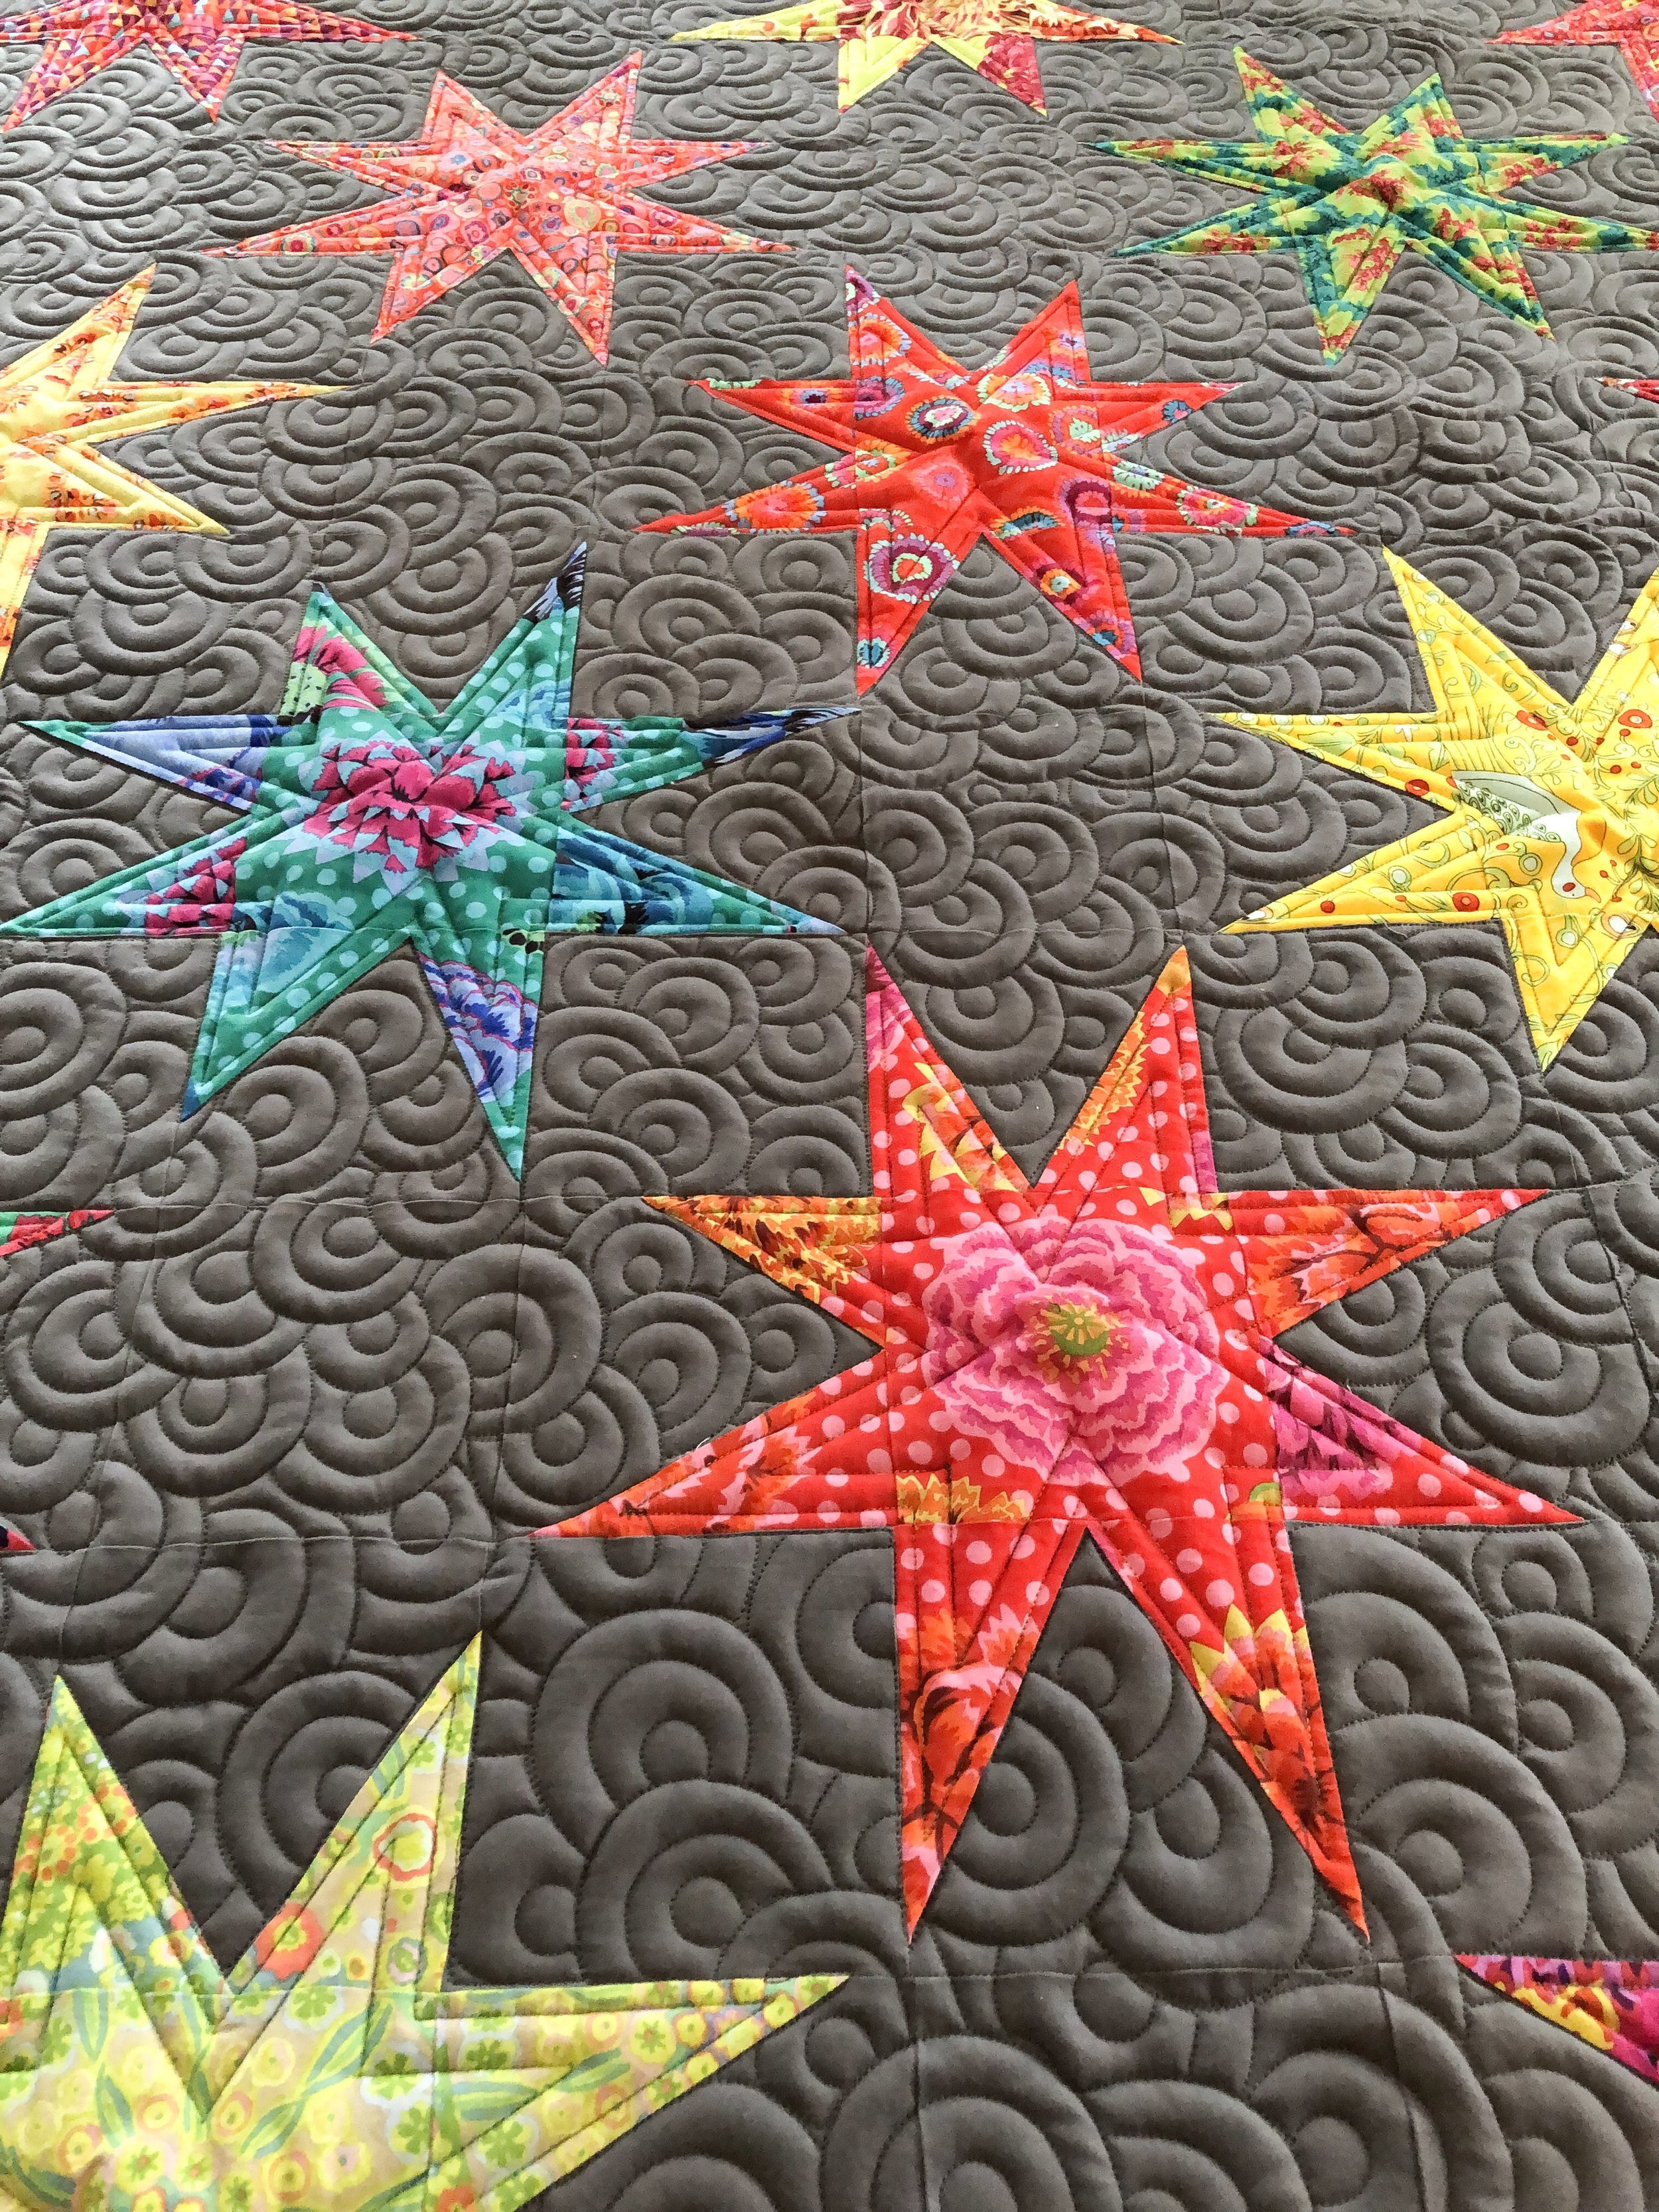
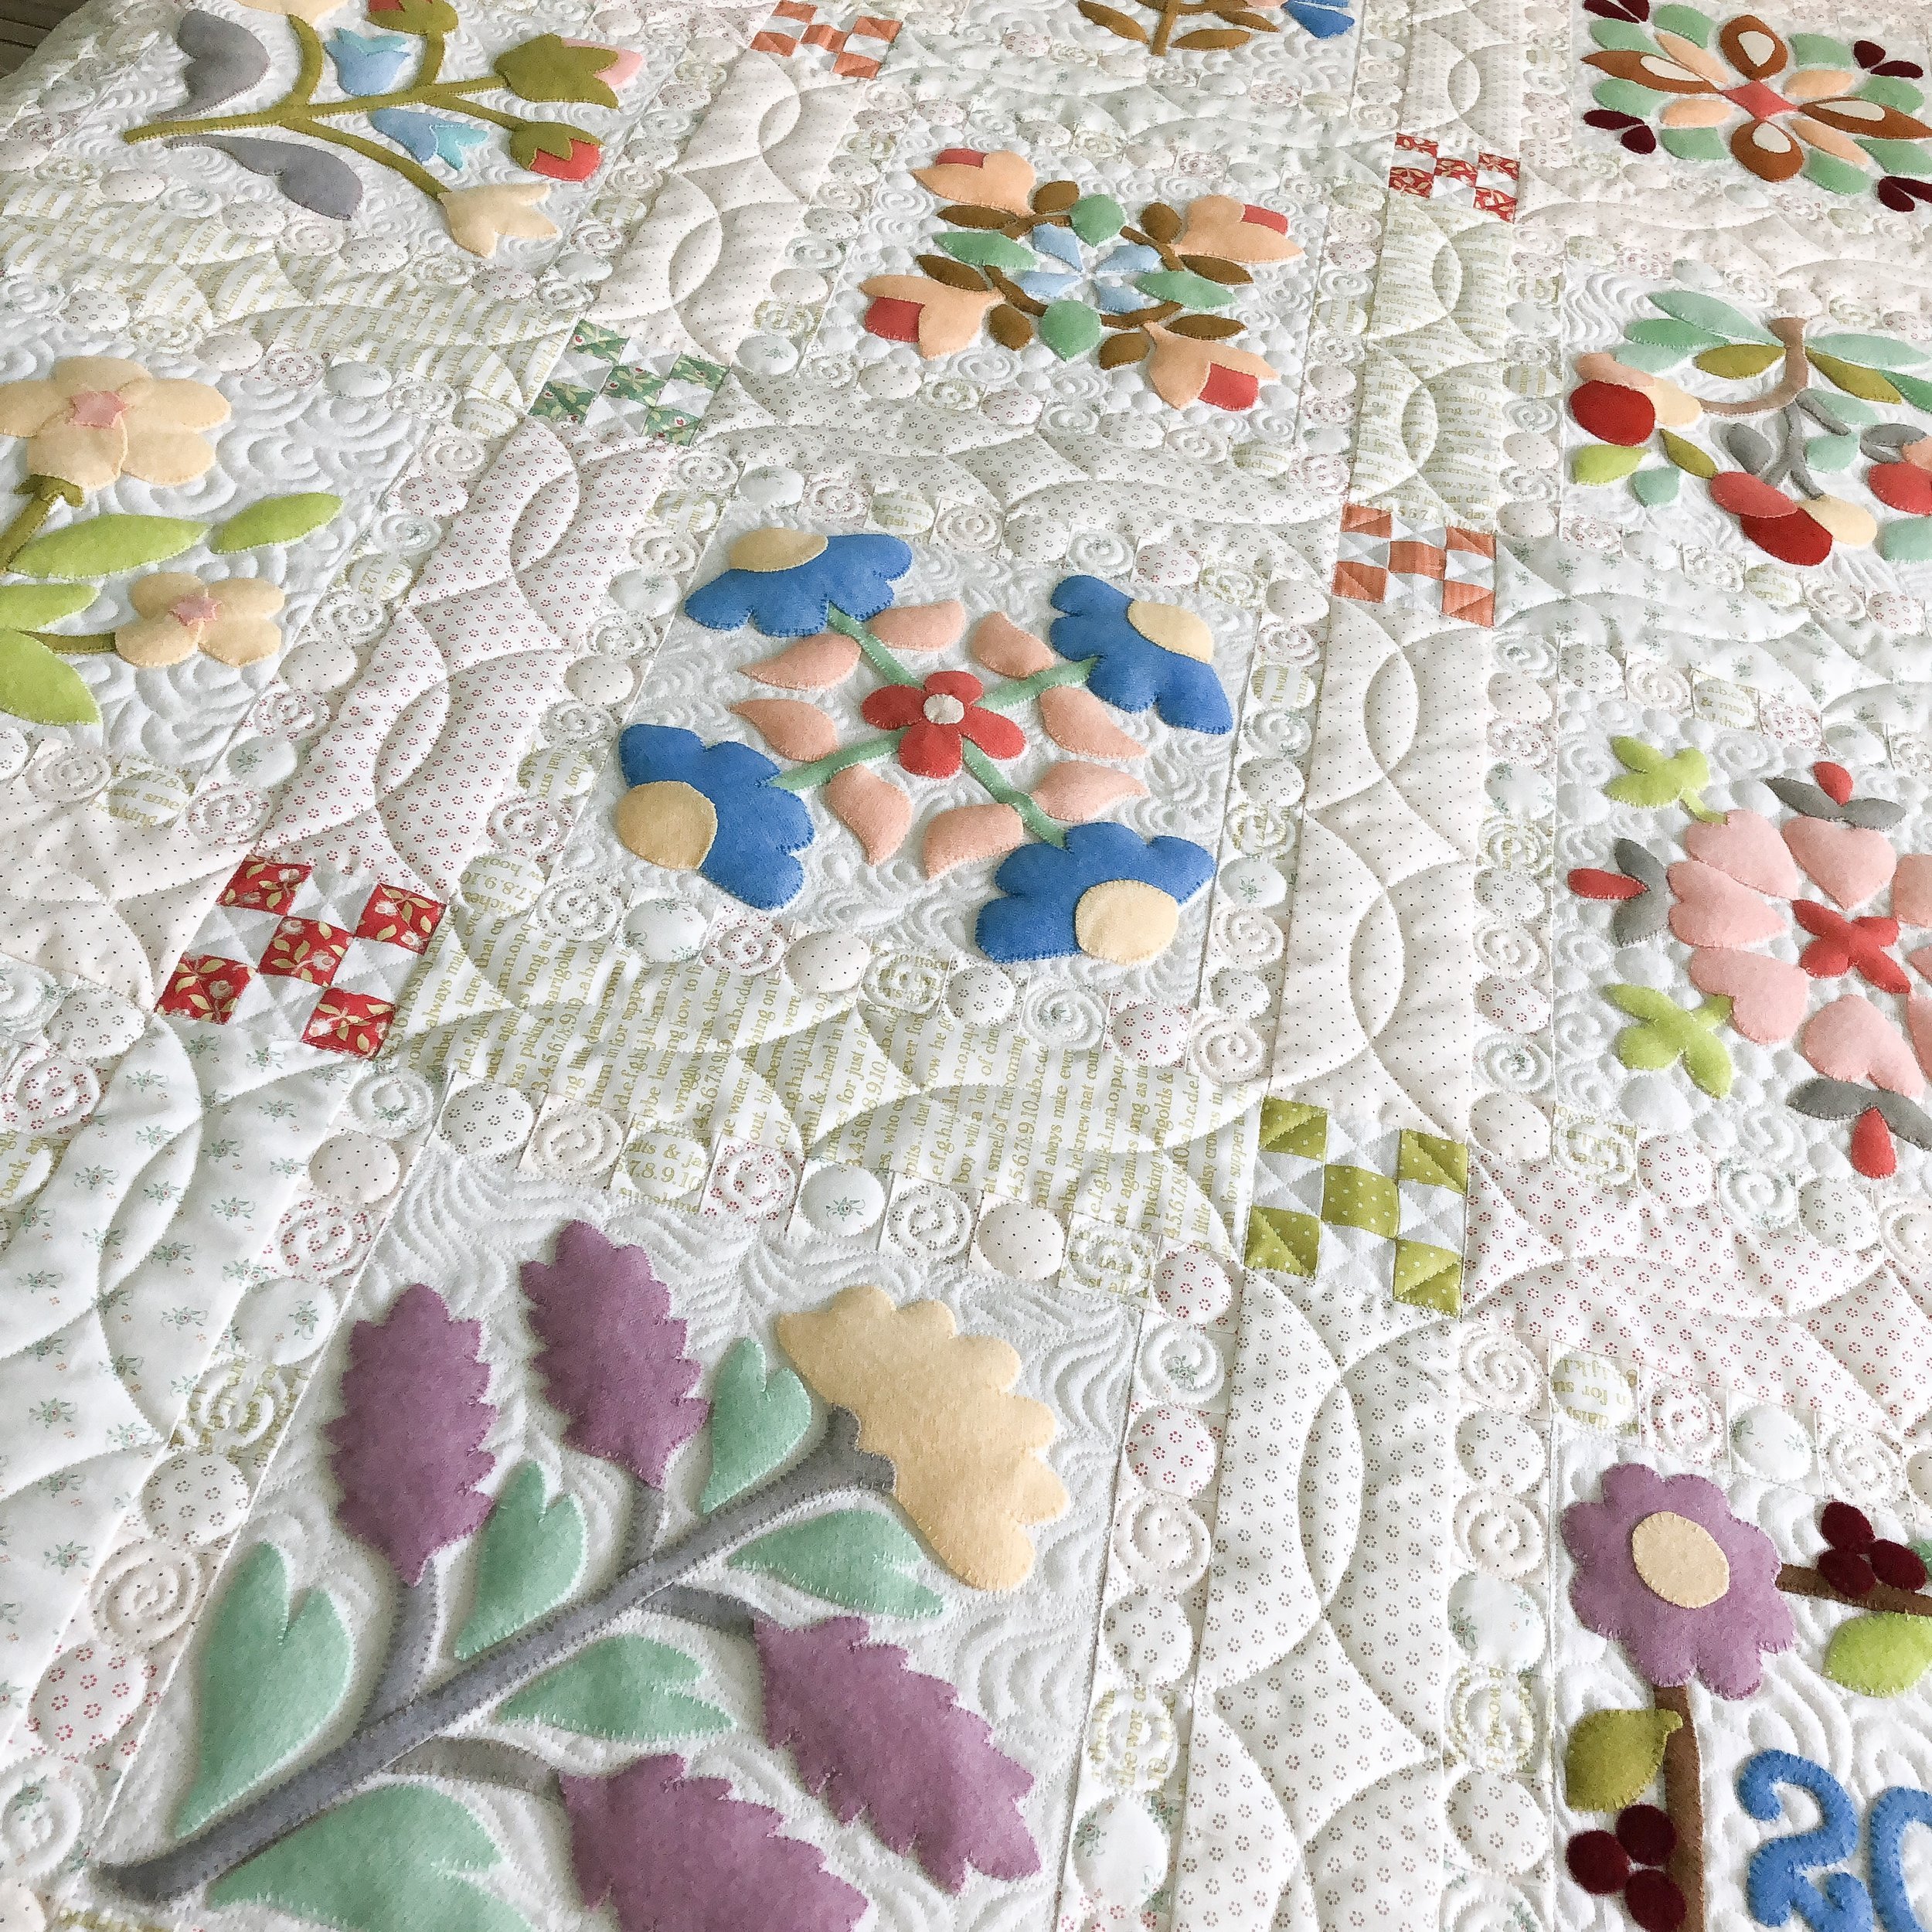
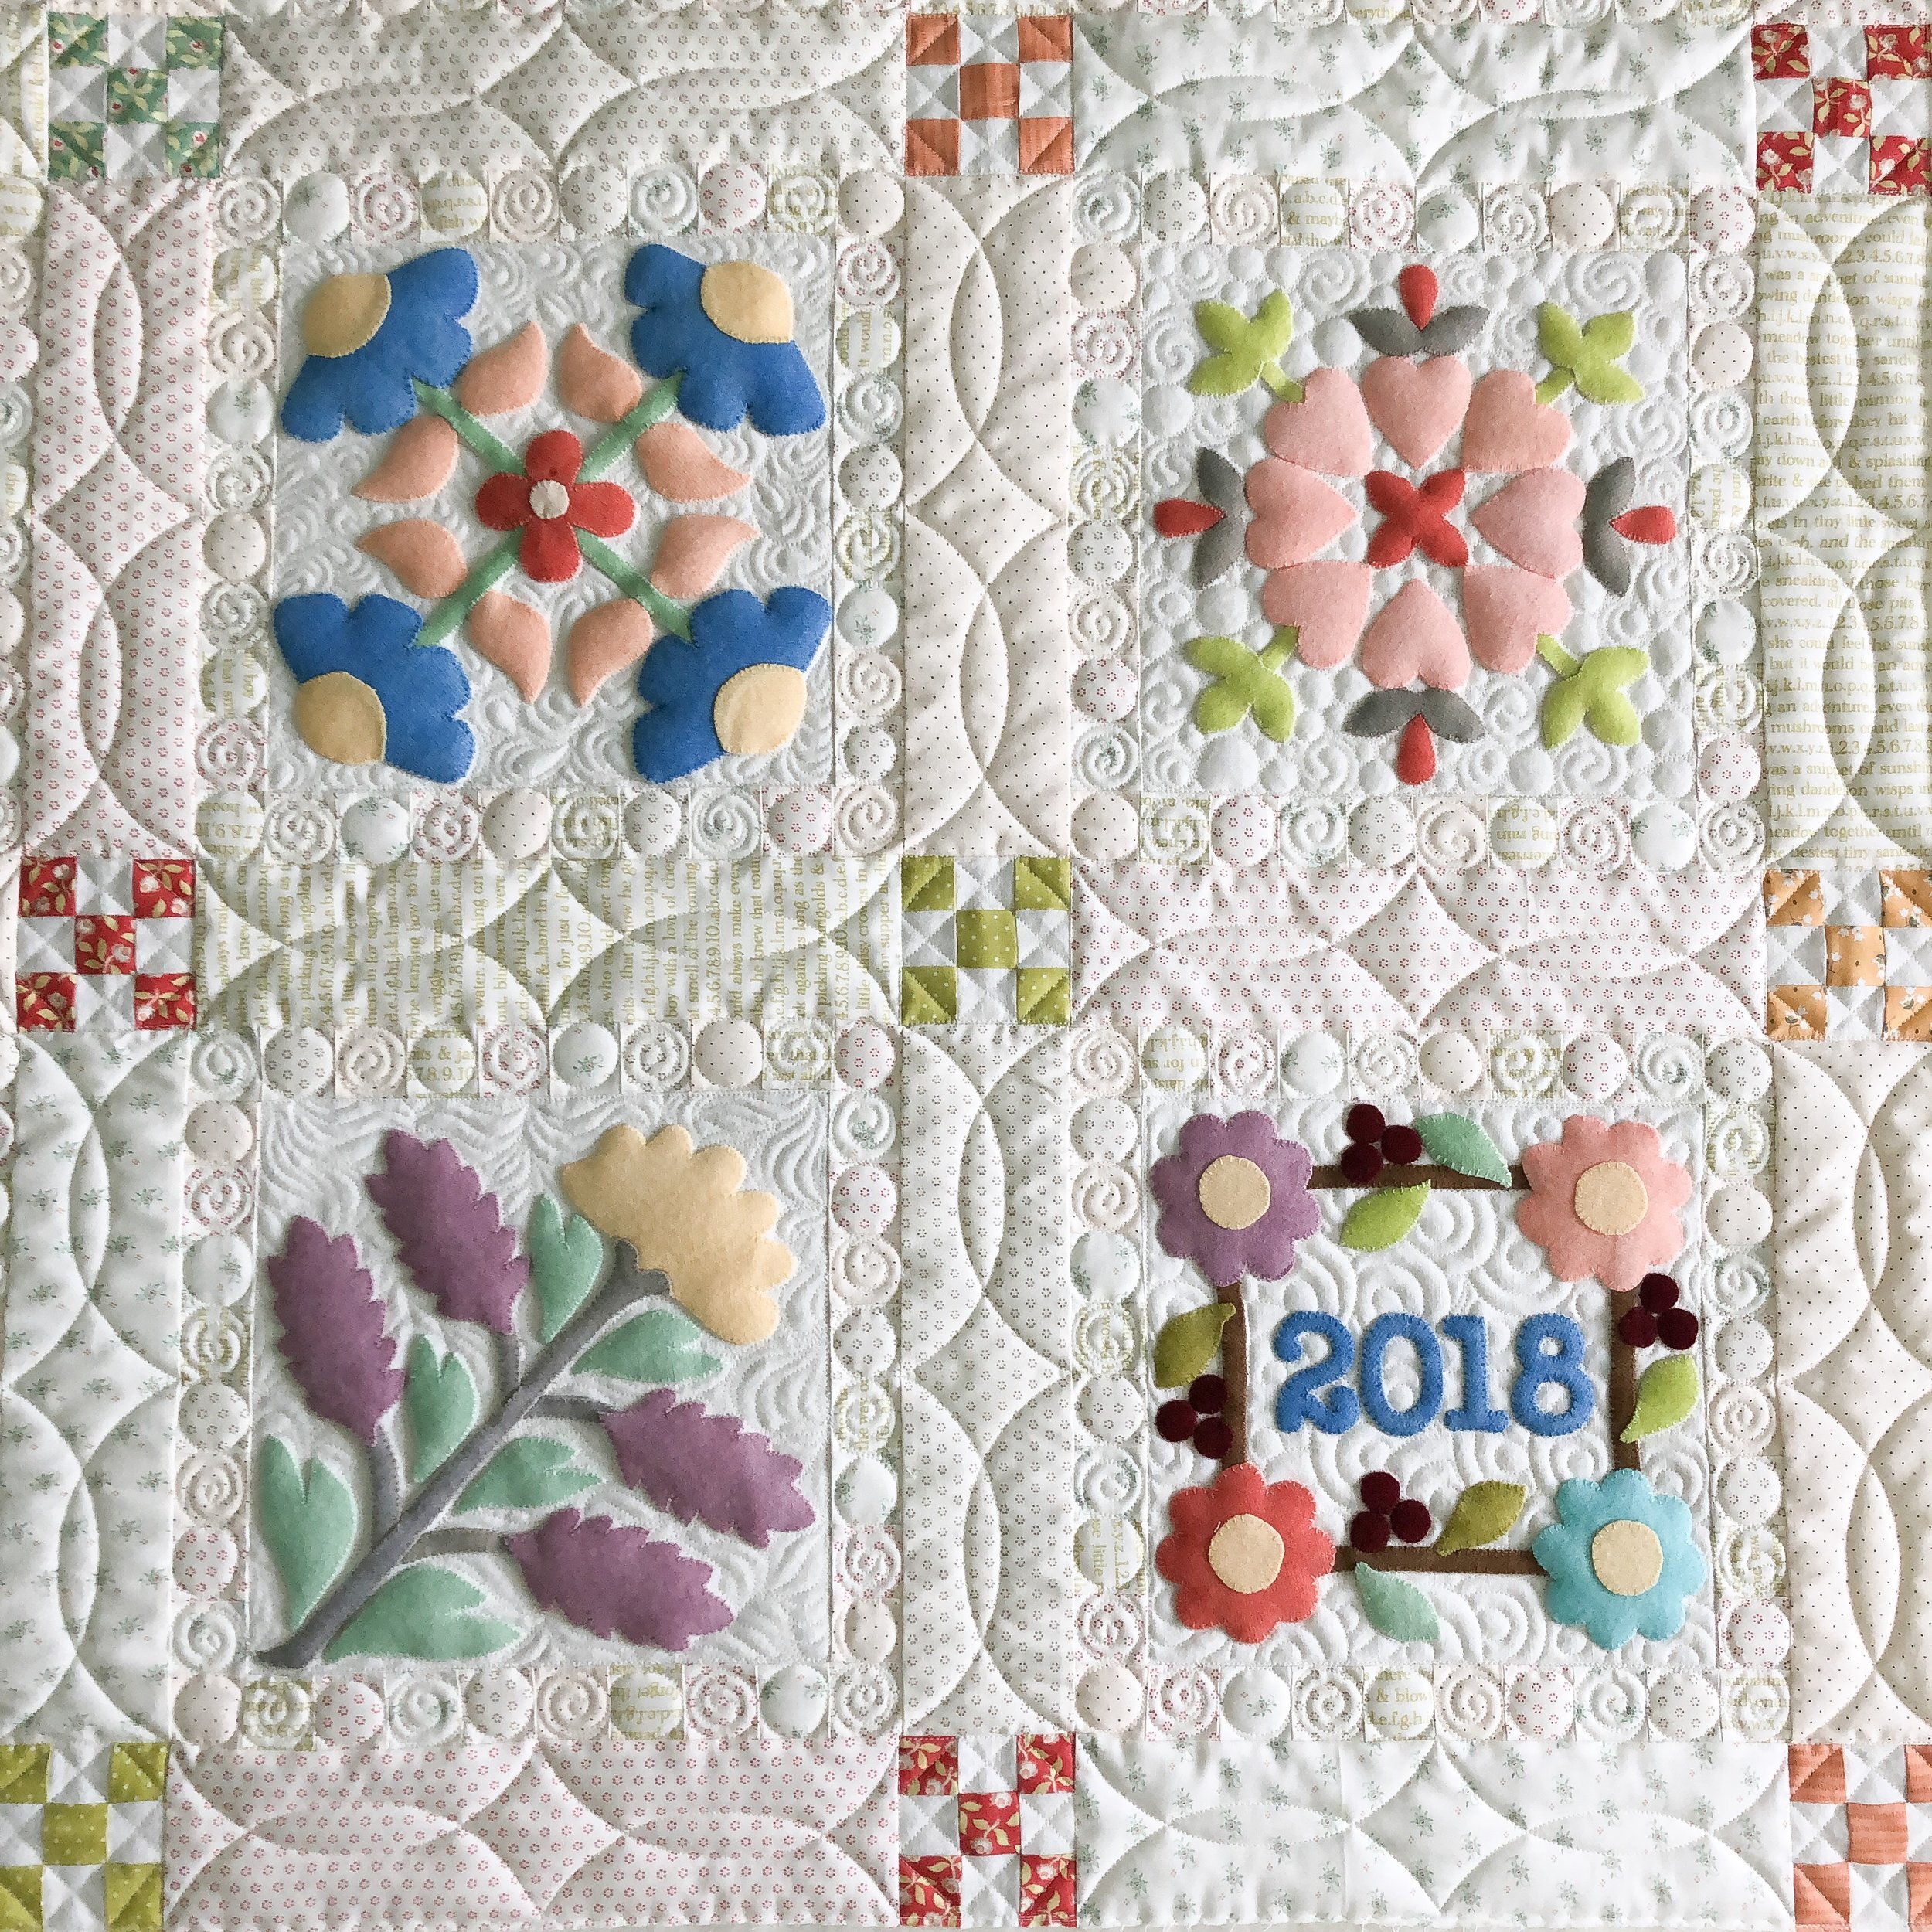
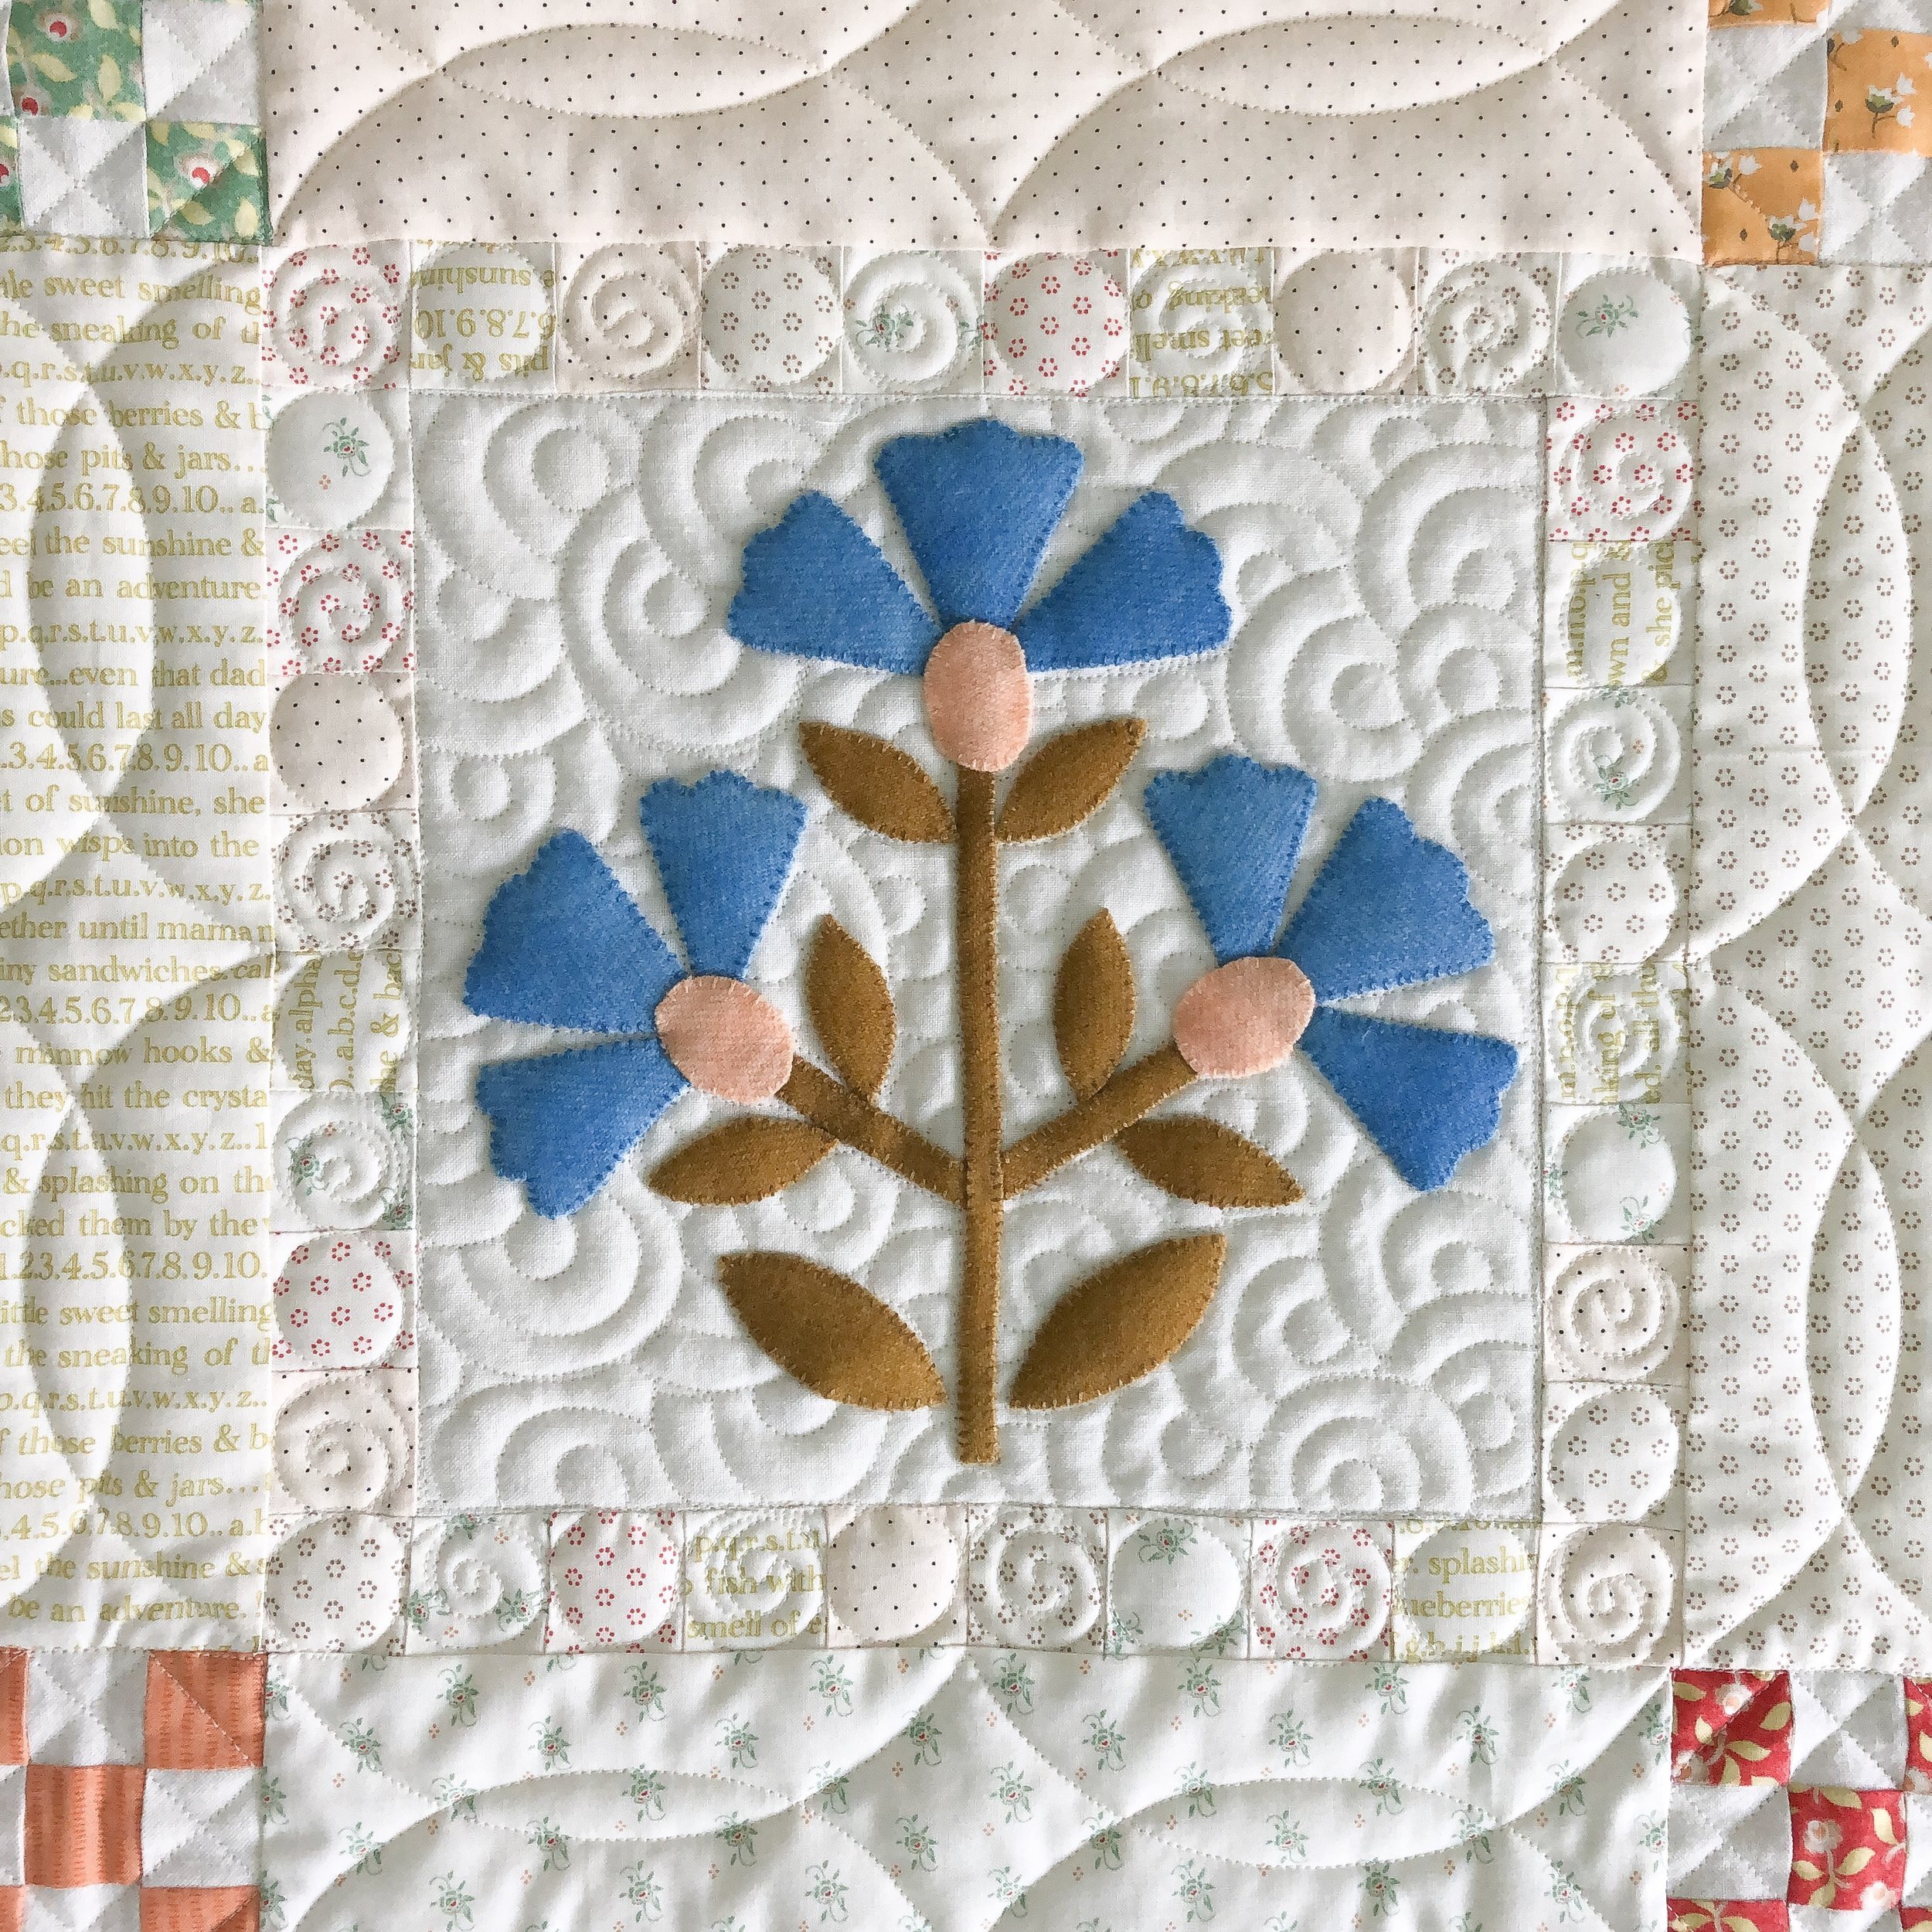
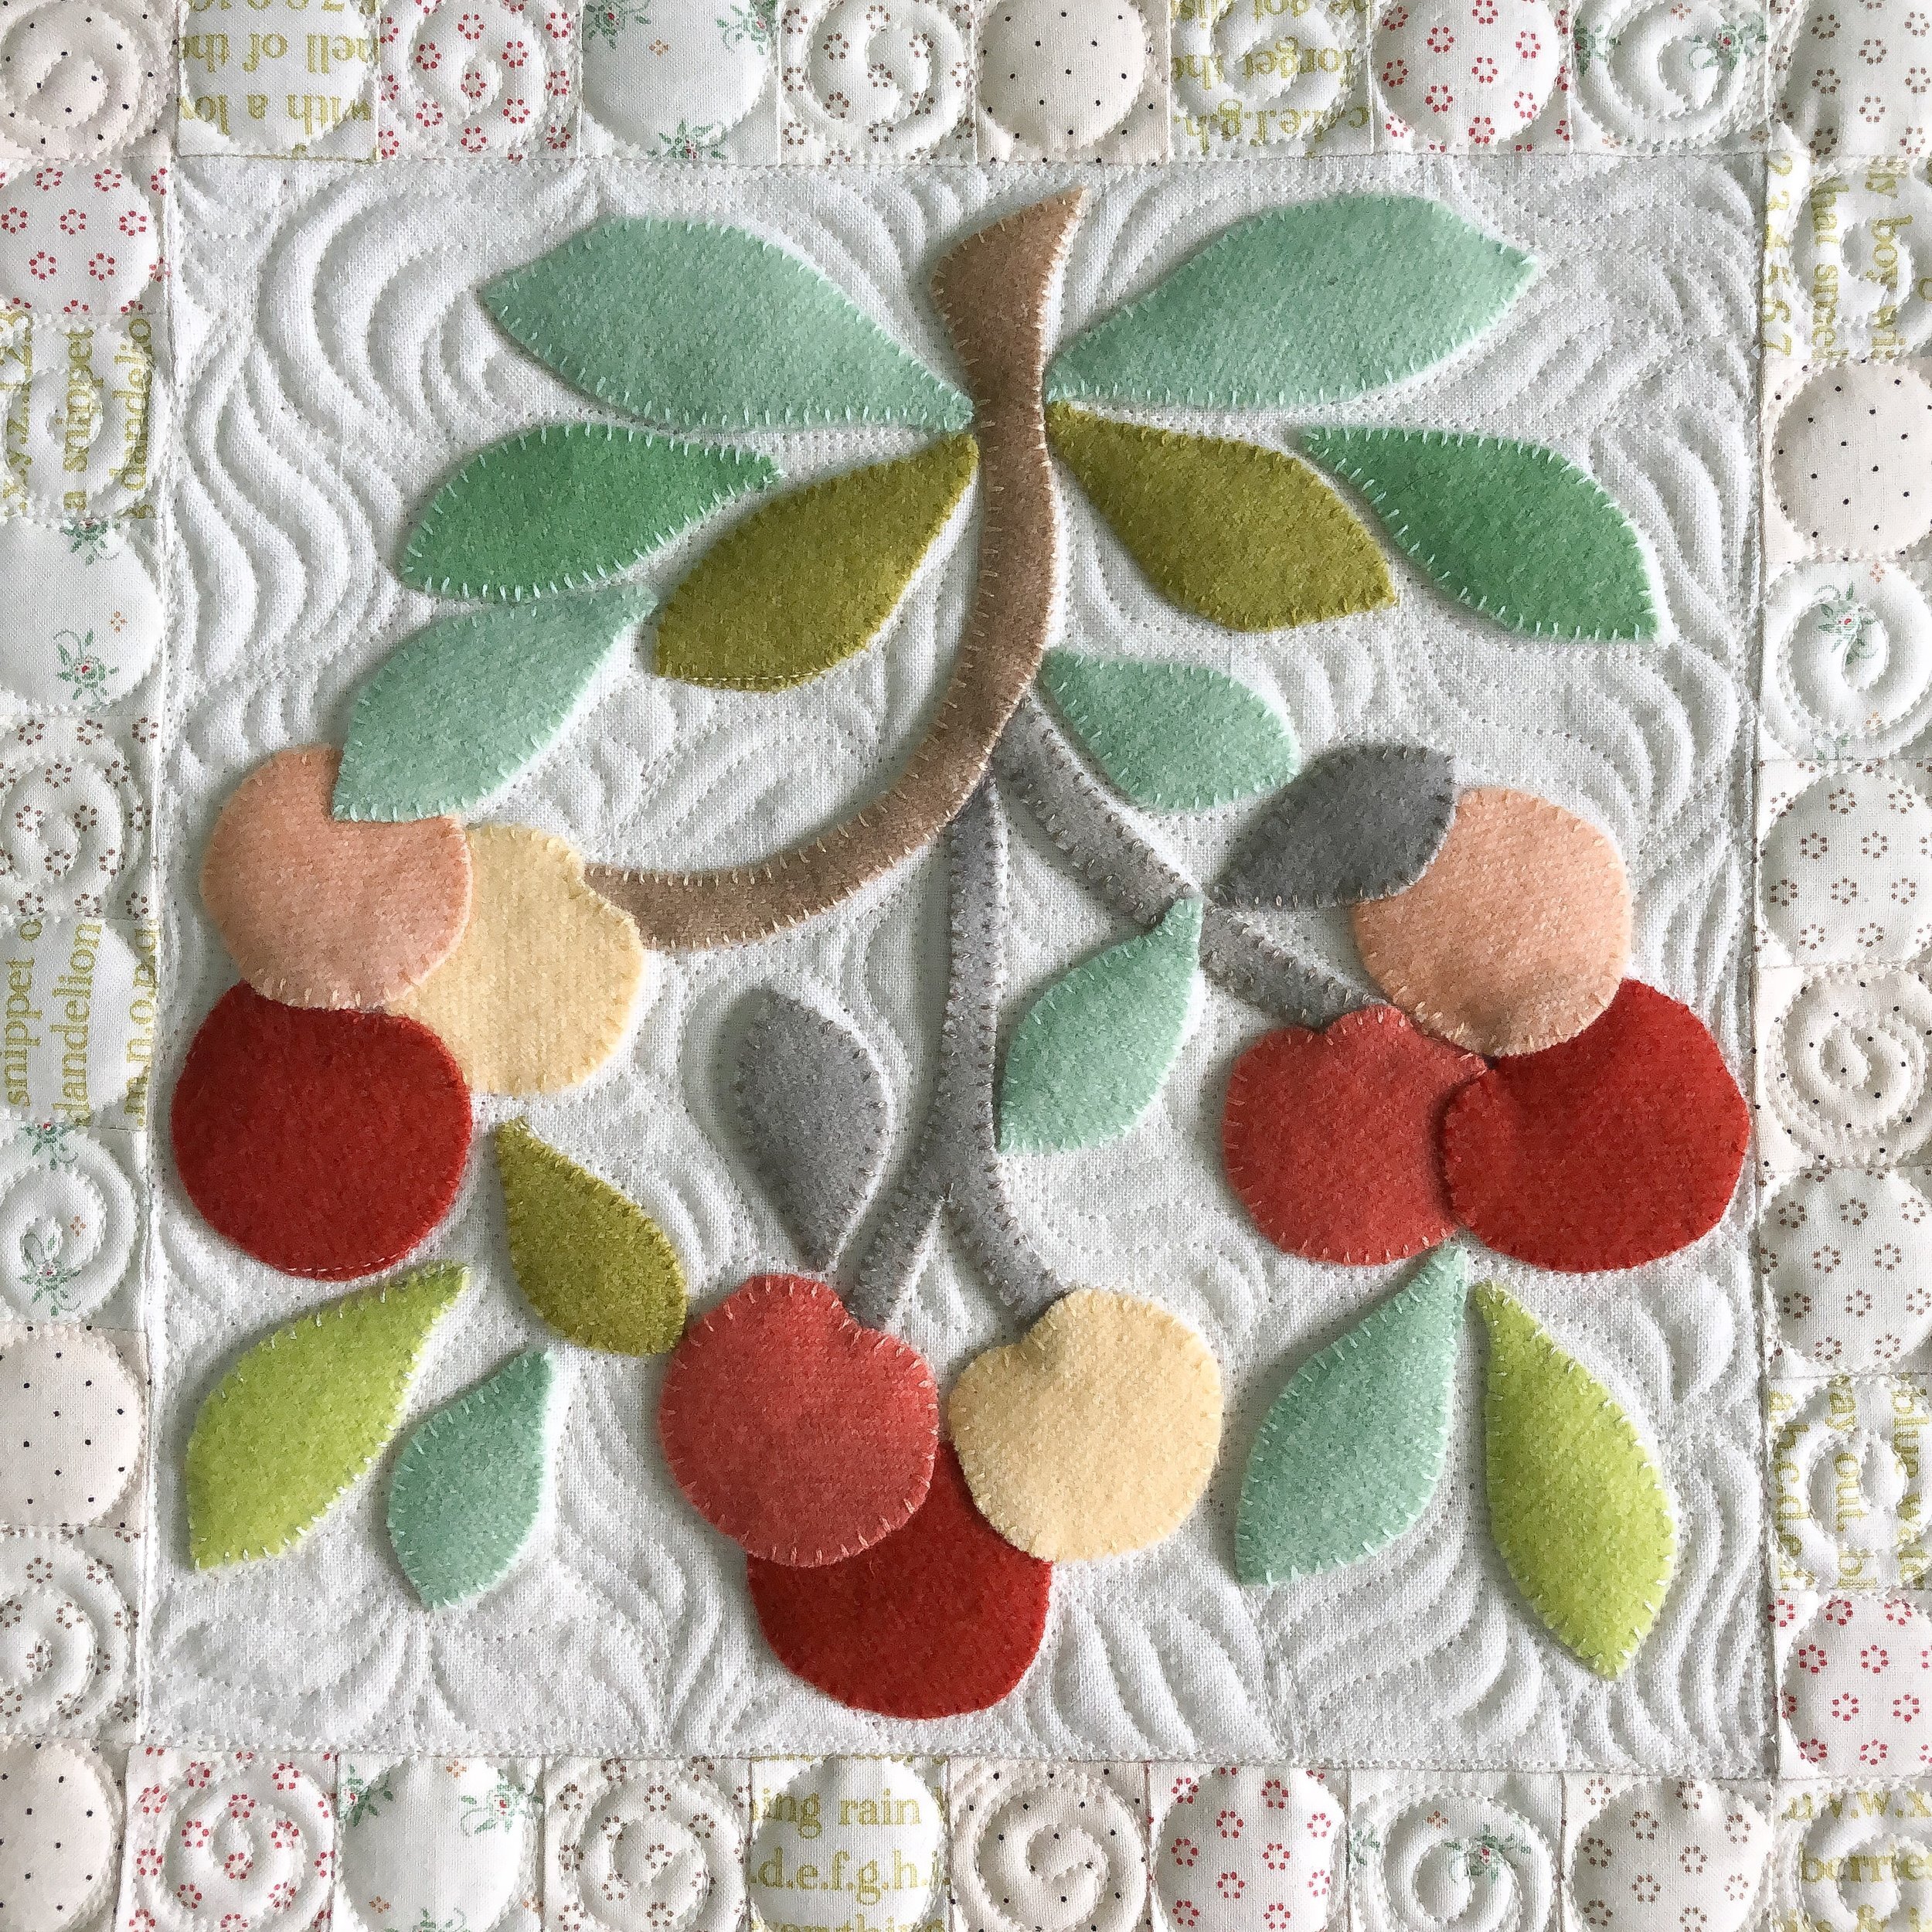
Client Quilts • 2020
What a crazy time. I hope each of you are healthy and well!! Maybe you’re taking this time to do a little more sewing. I hope to! I have been meaning to do this blog post for awhile, sorry for the delay! These are some of the client quilts that I’ve worked on in the past couple months.
A quick reminder, I am having a sale right now on my Circle2™ machine quilting circle rulers and all of the digital quilting designs in my shop. $20 off my Circle2™ rulers using code 20SPRING20, and 20% off of all digital quilting designs using code LEAPYEAR at checkout. I appreciate your support, like many other small business do, especially right now!! Thank you!!

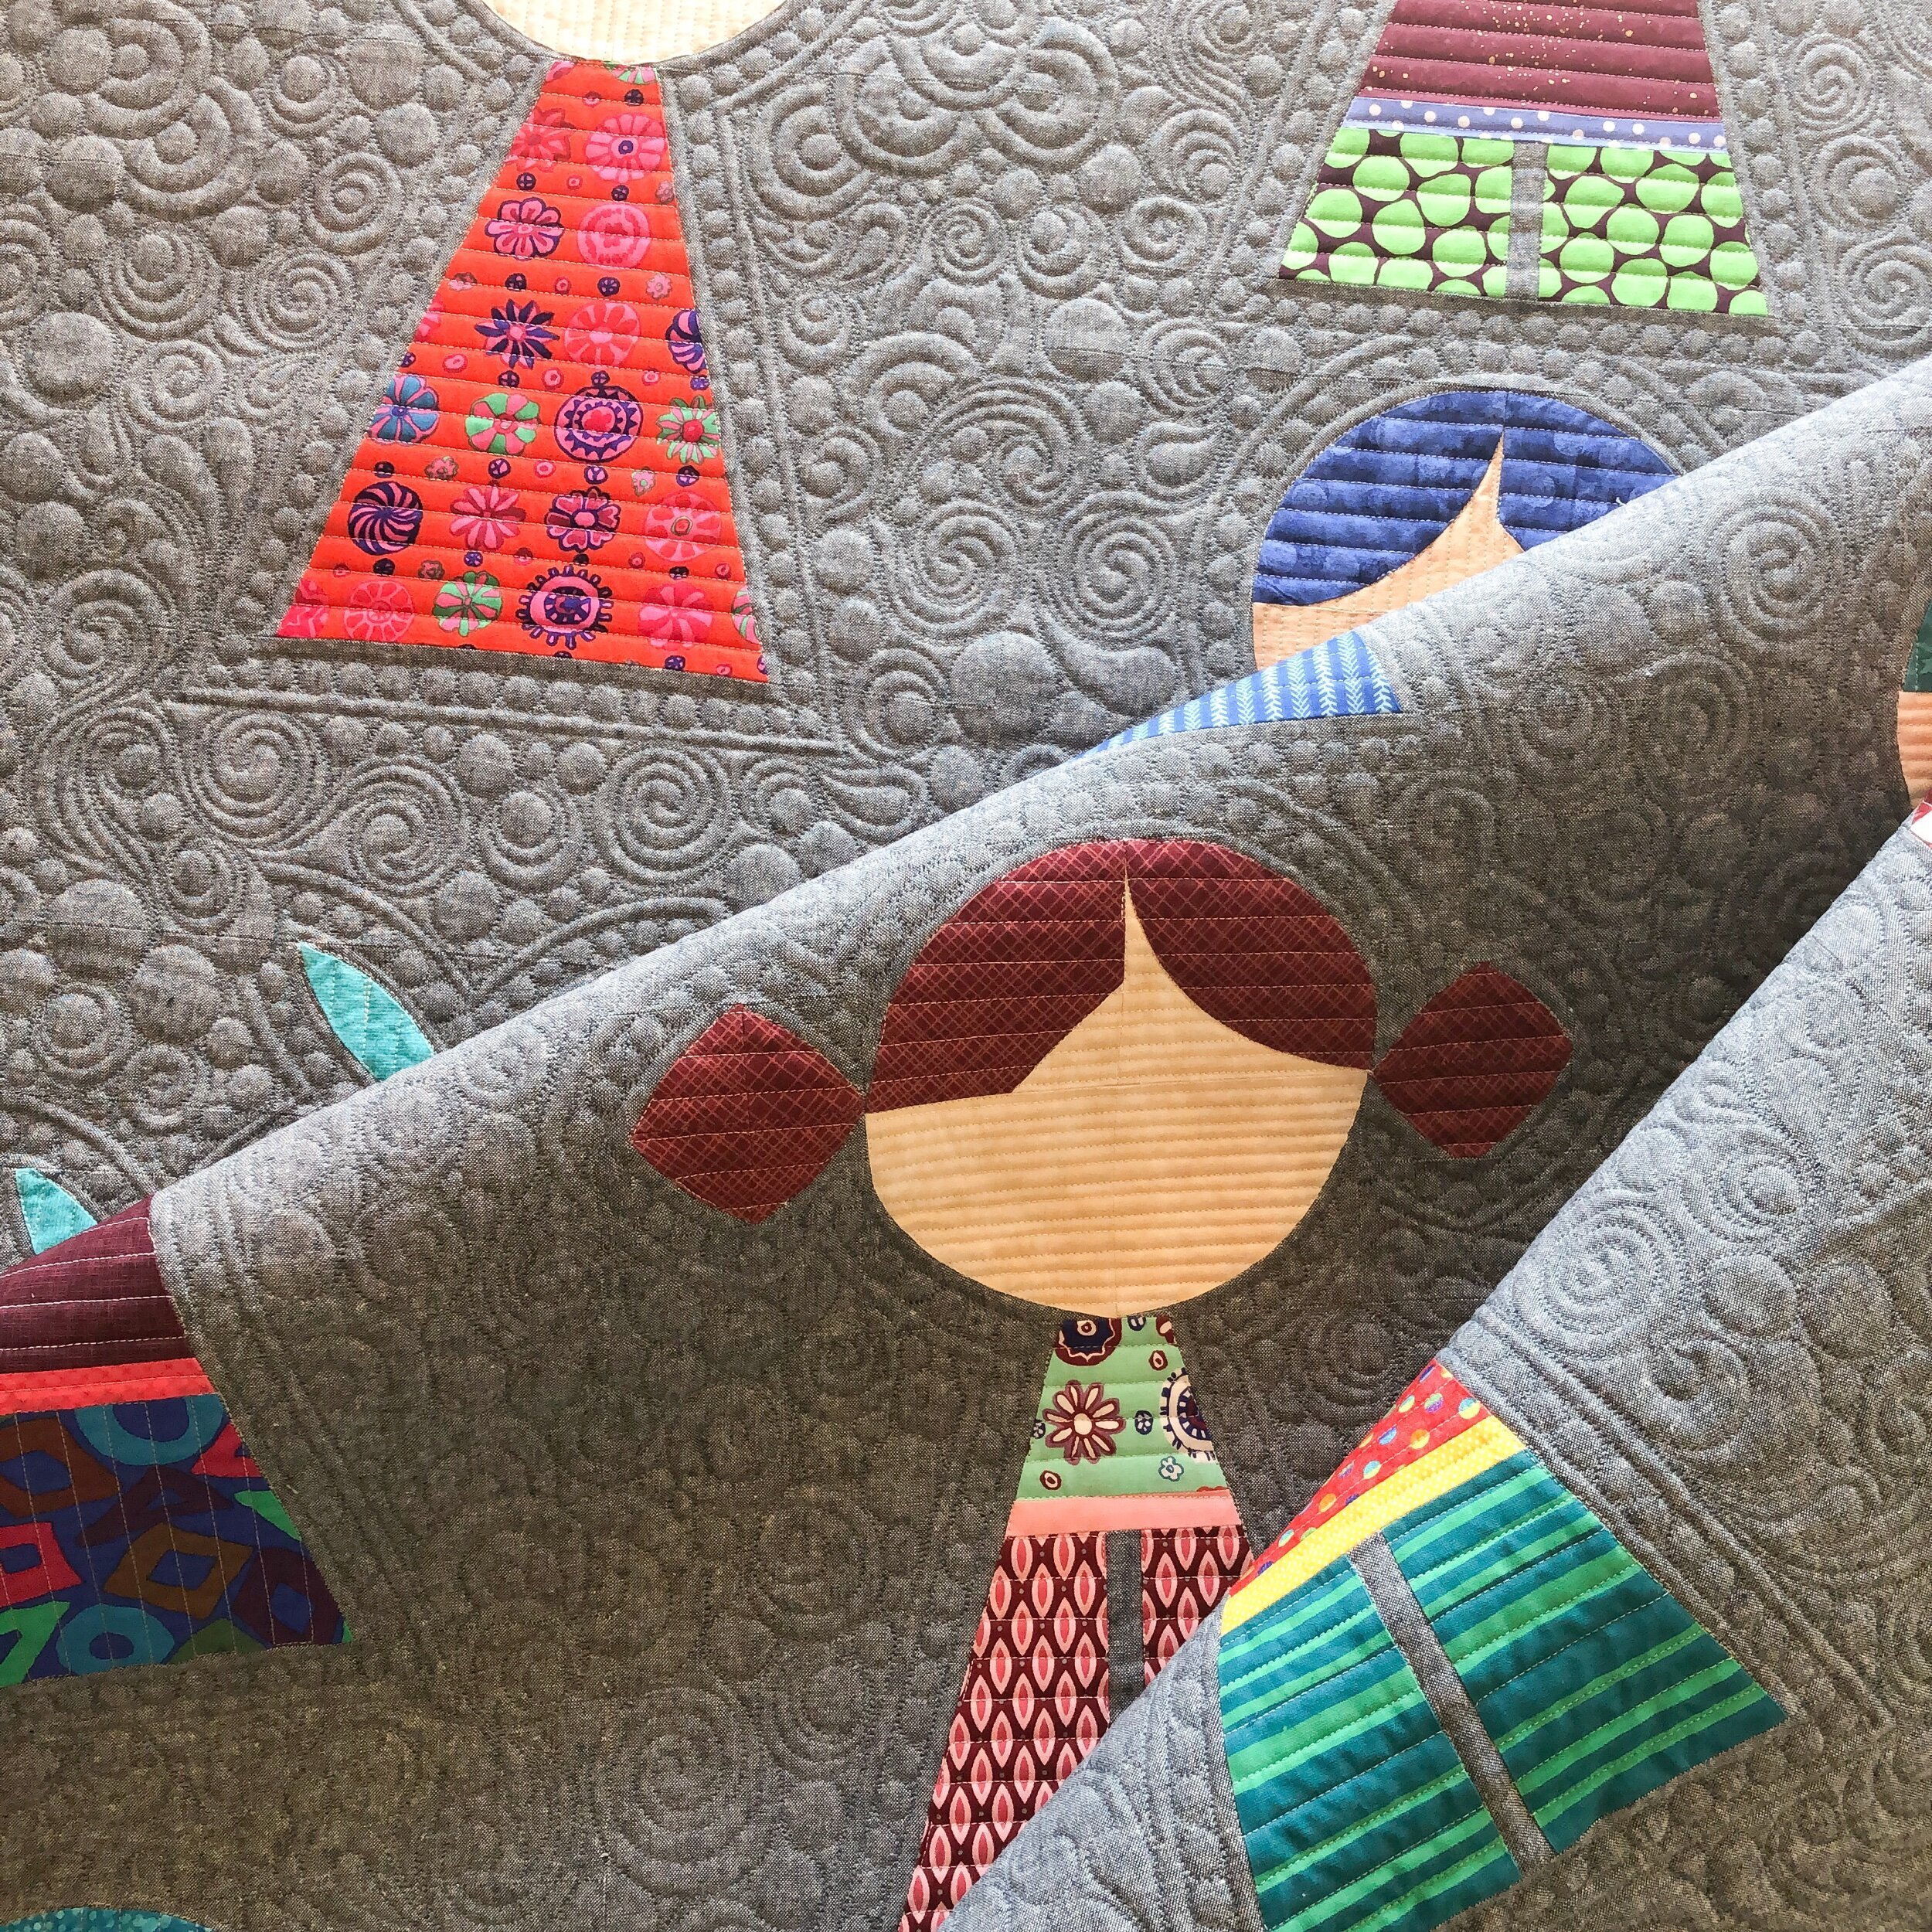
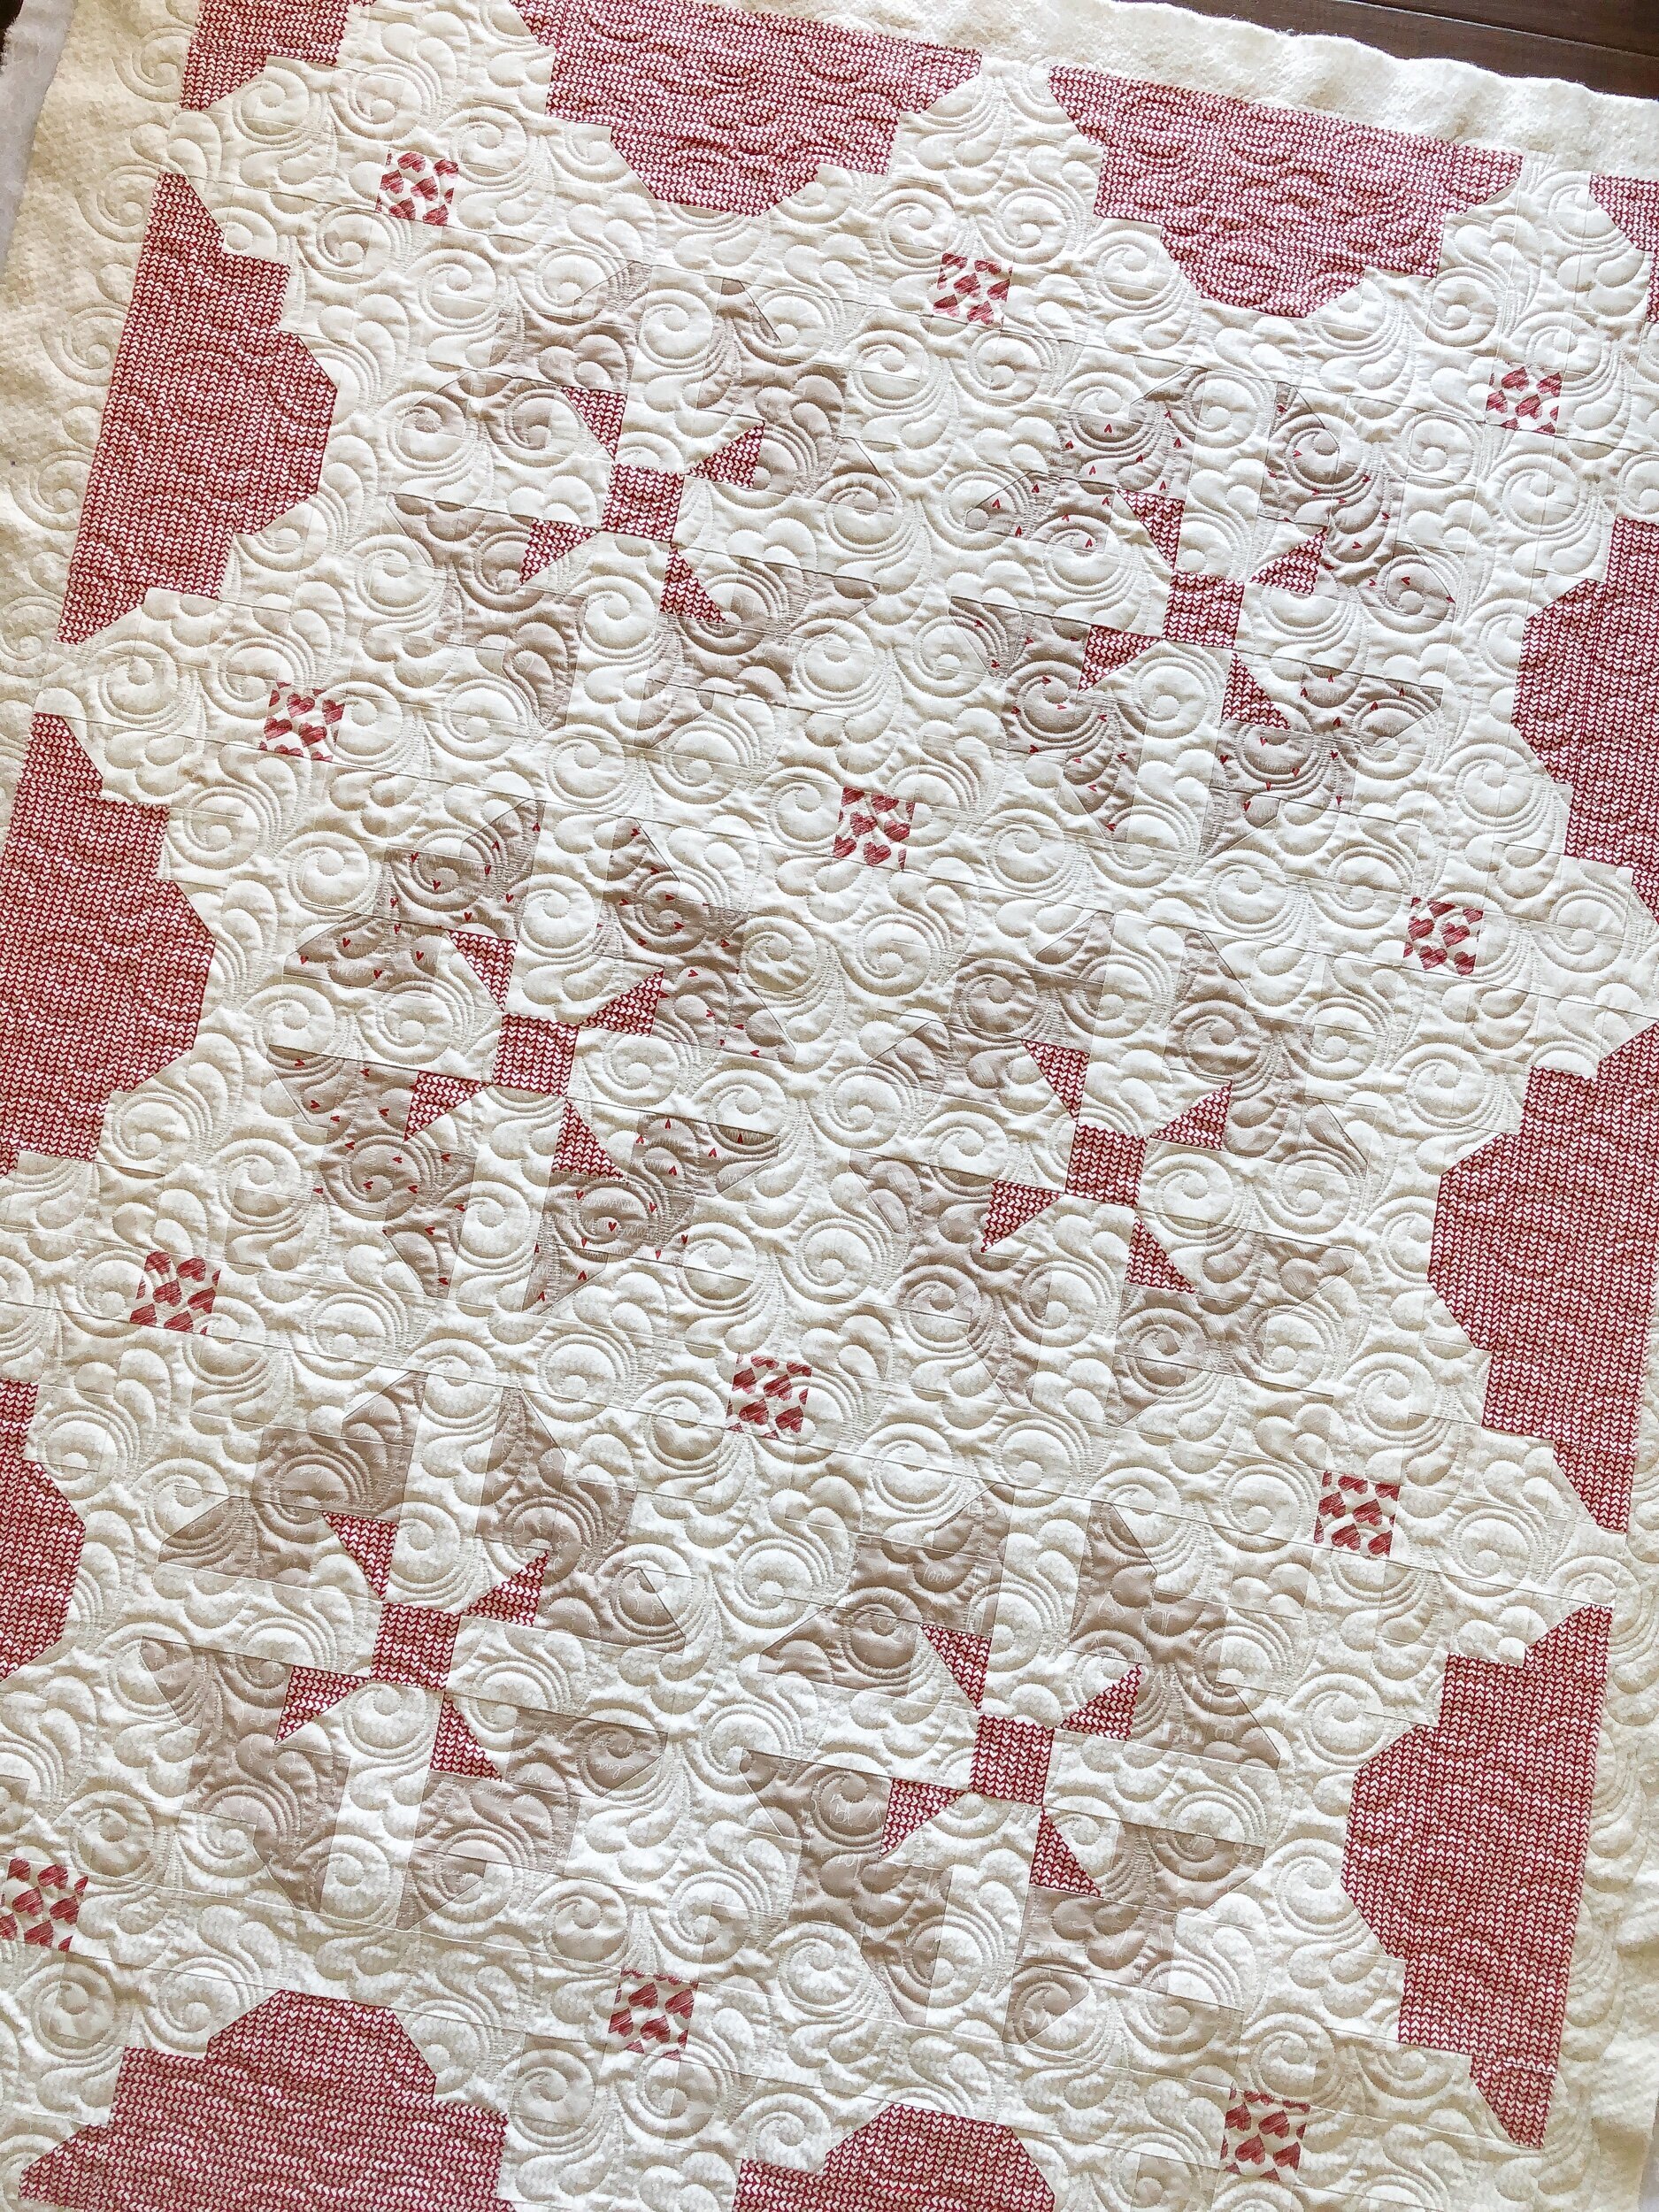
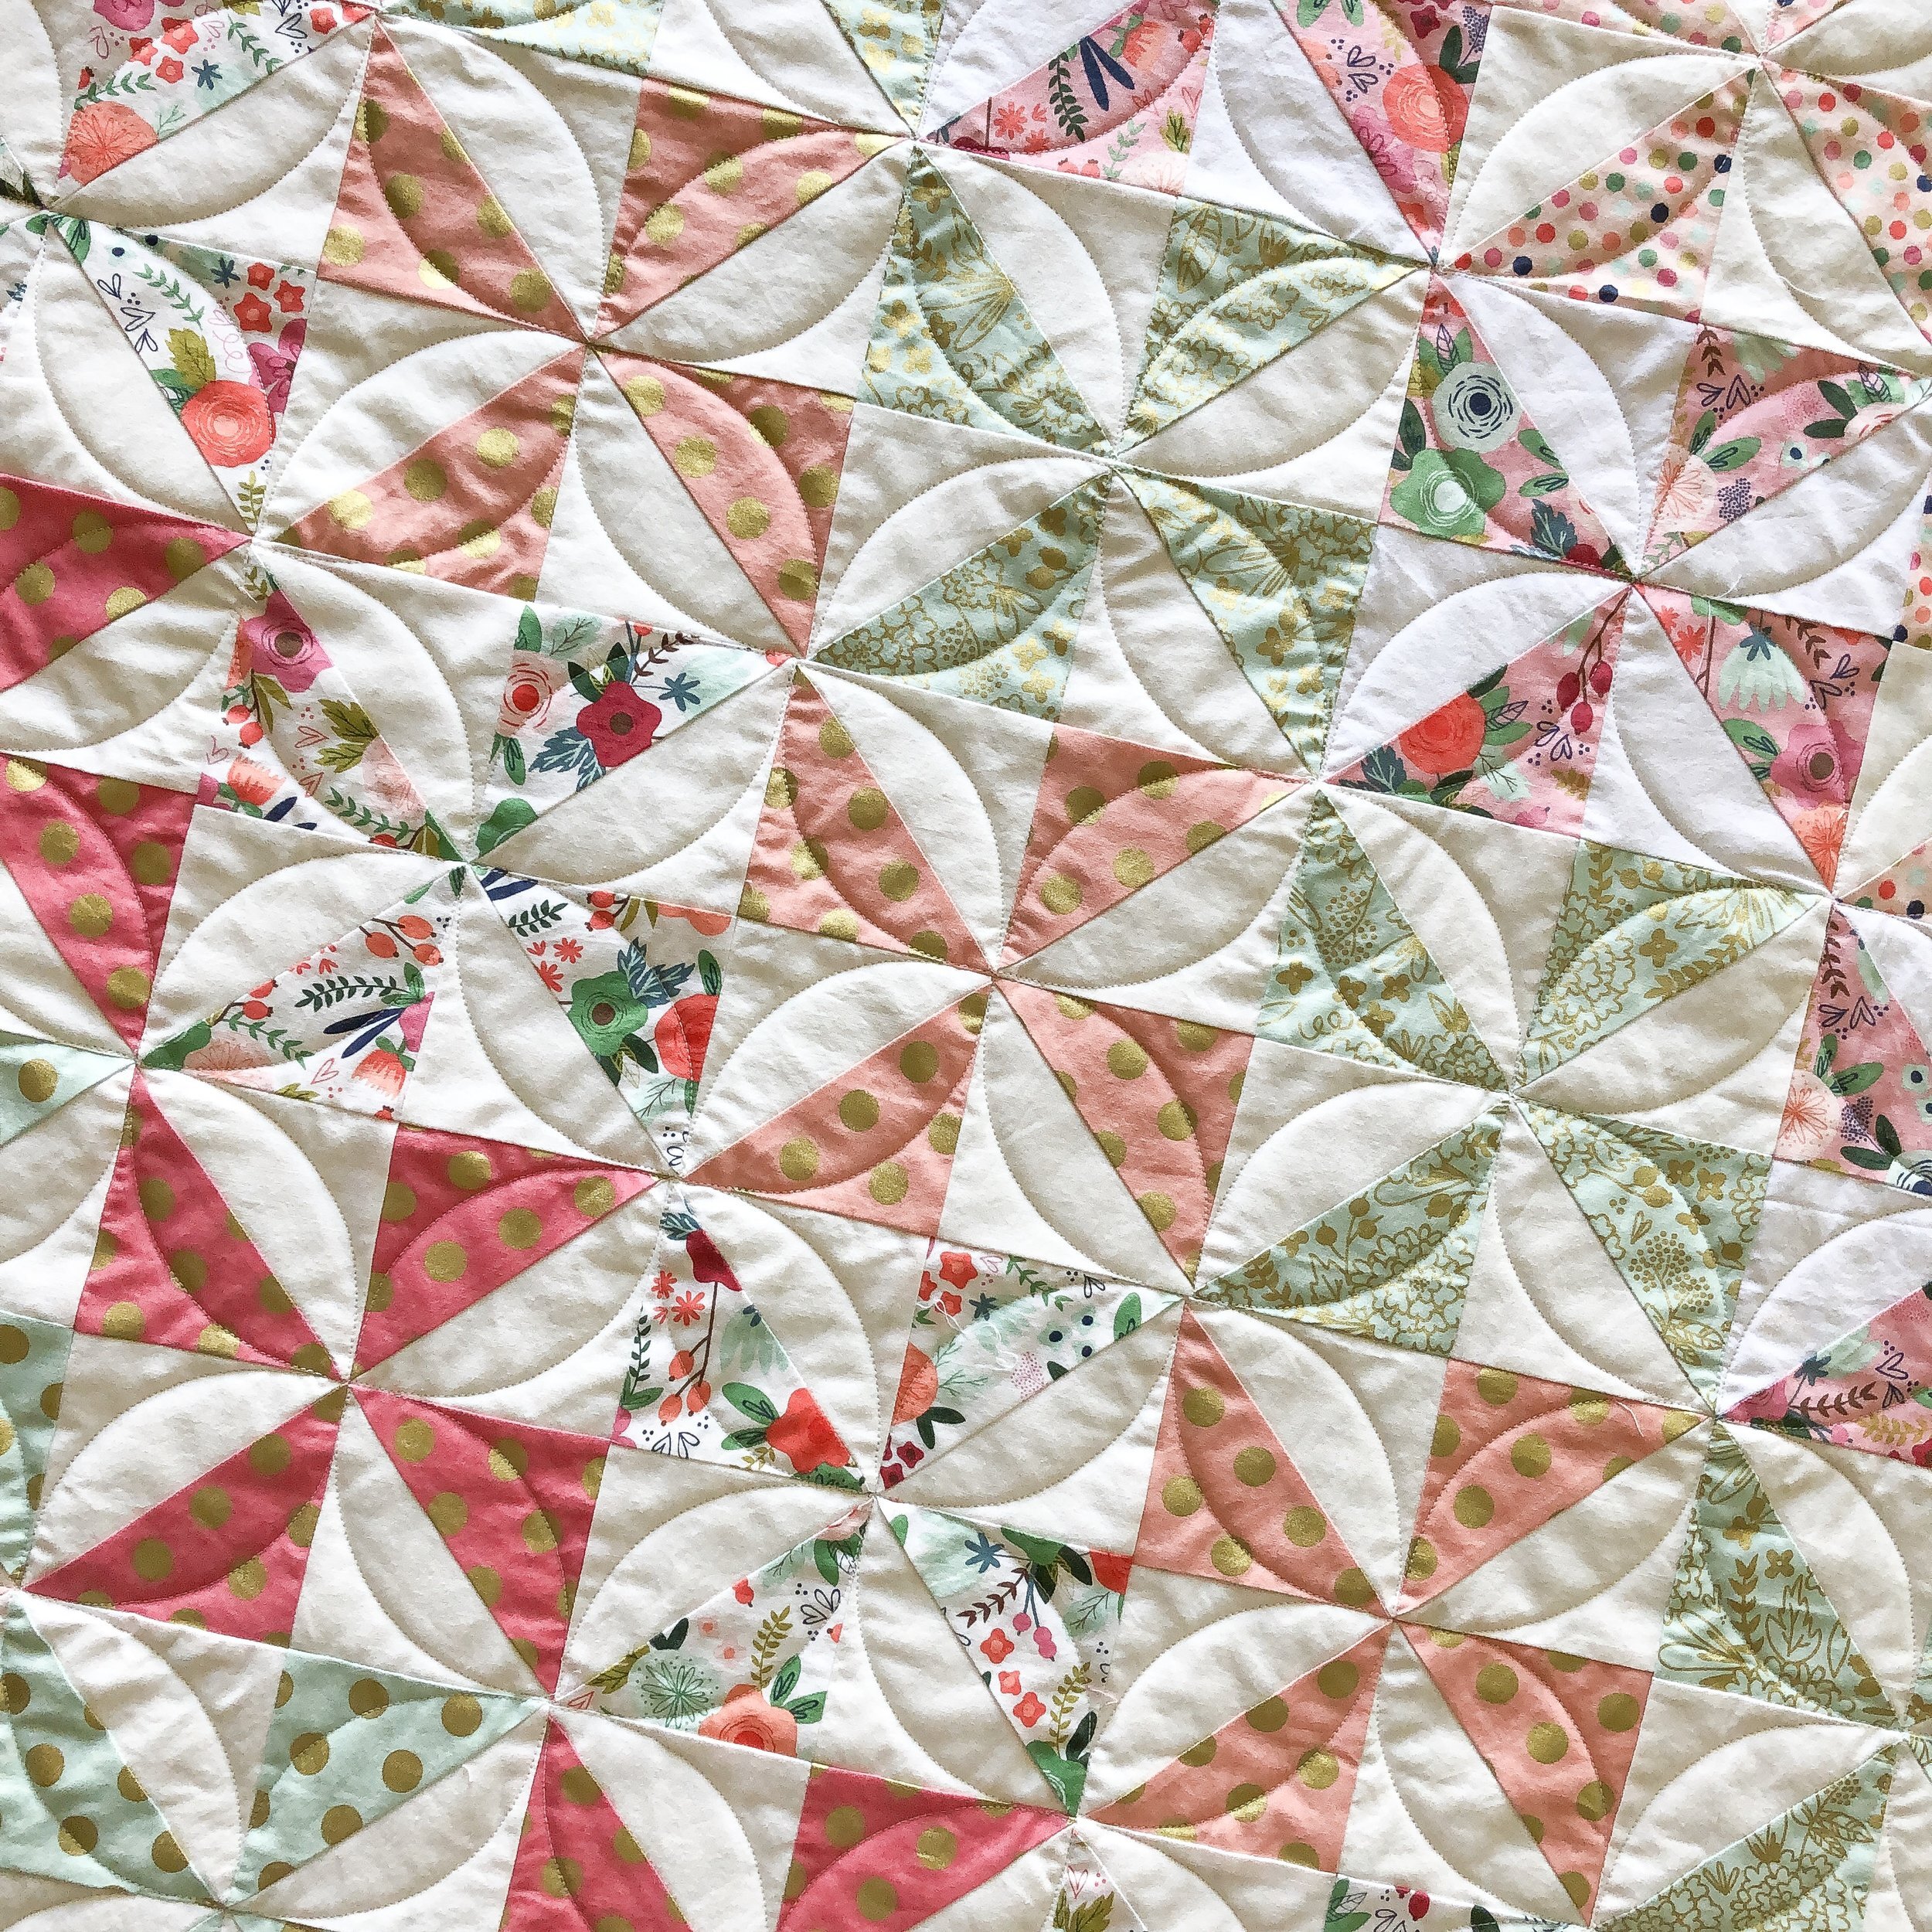
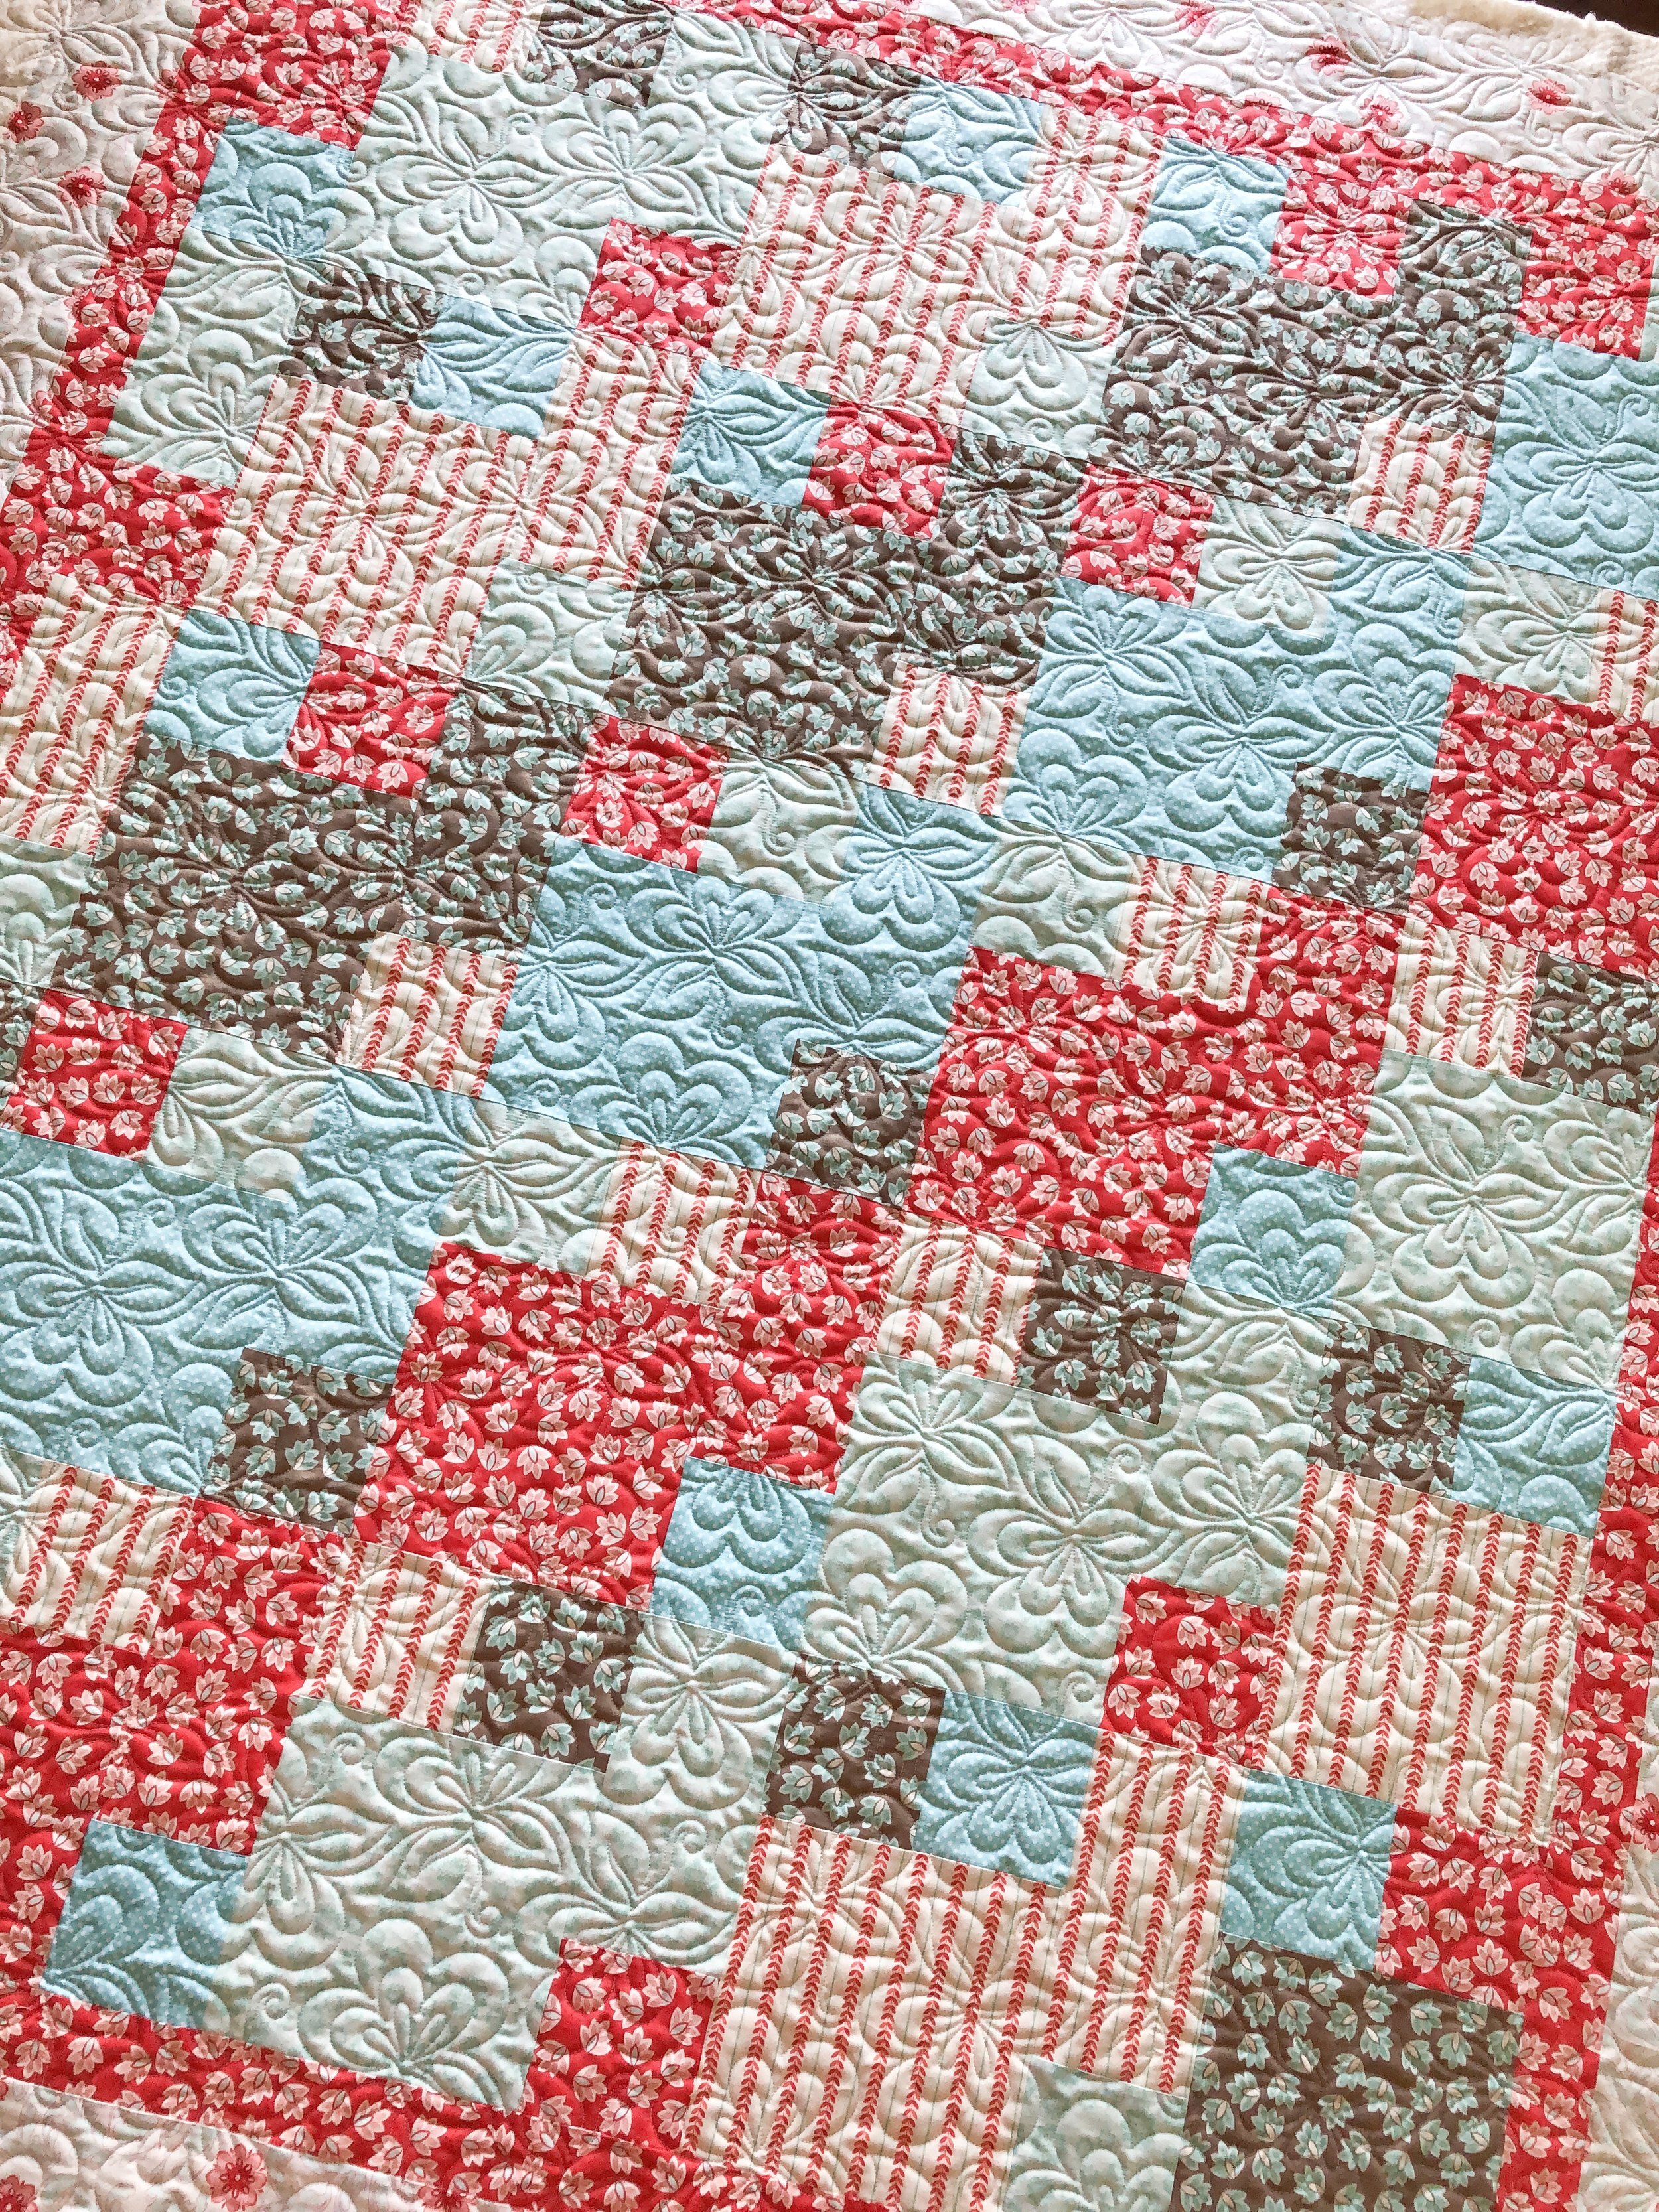
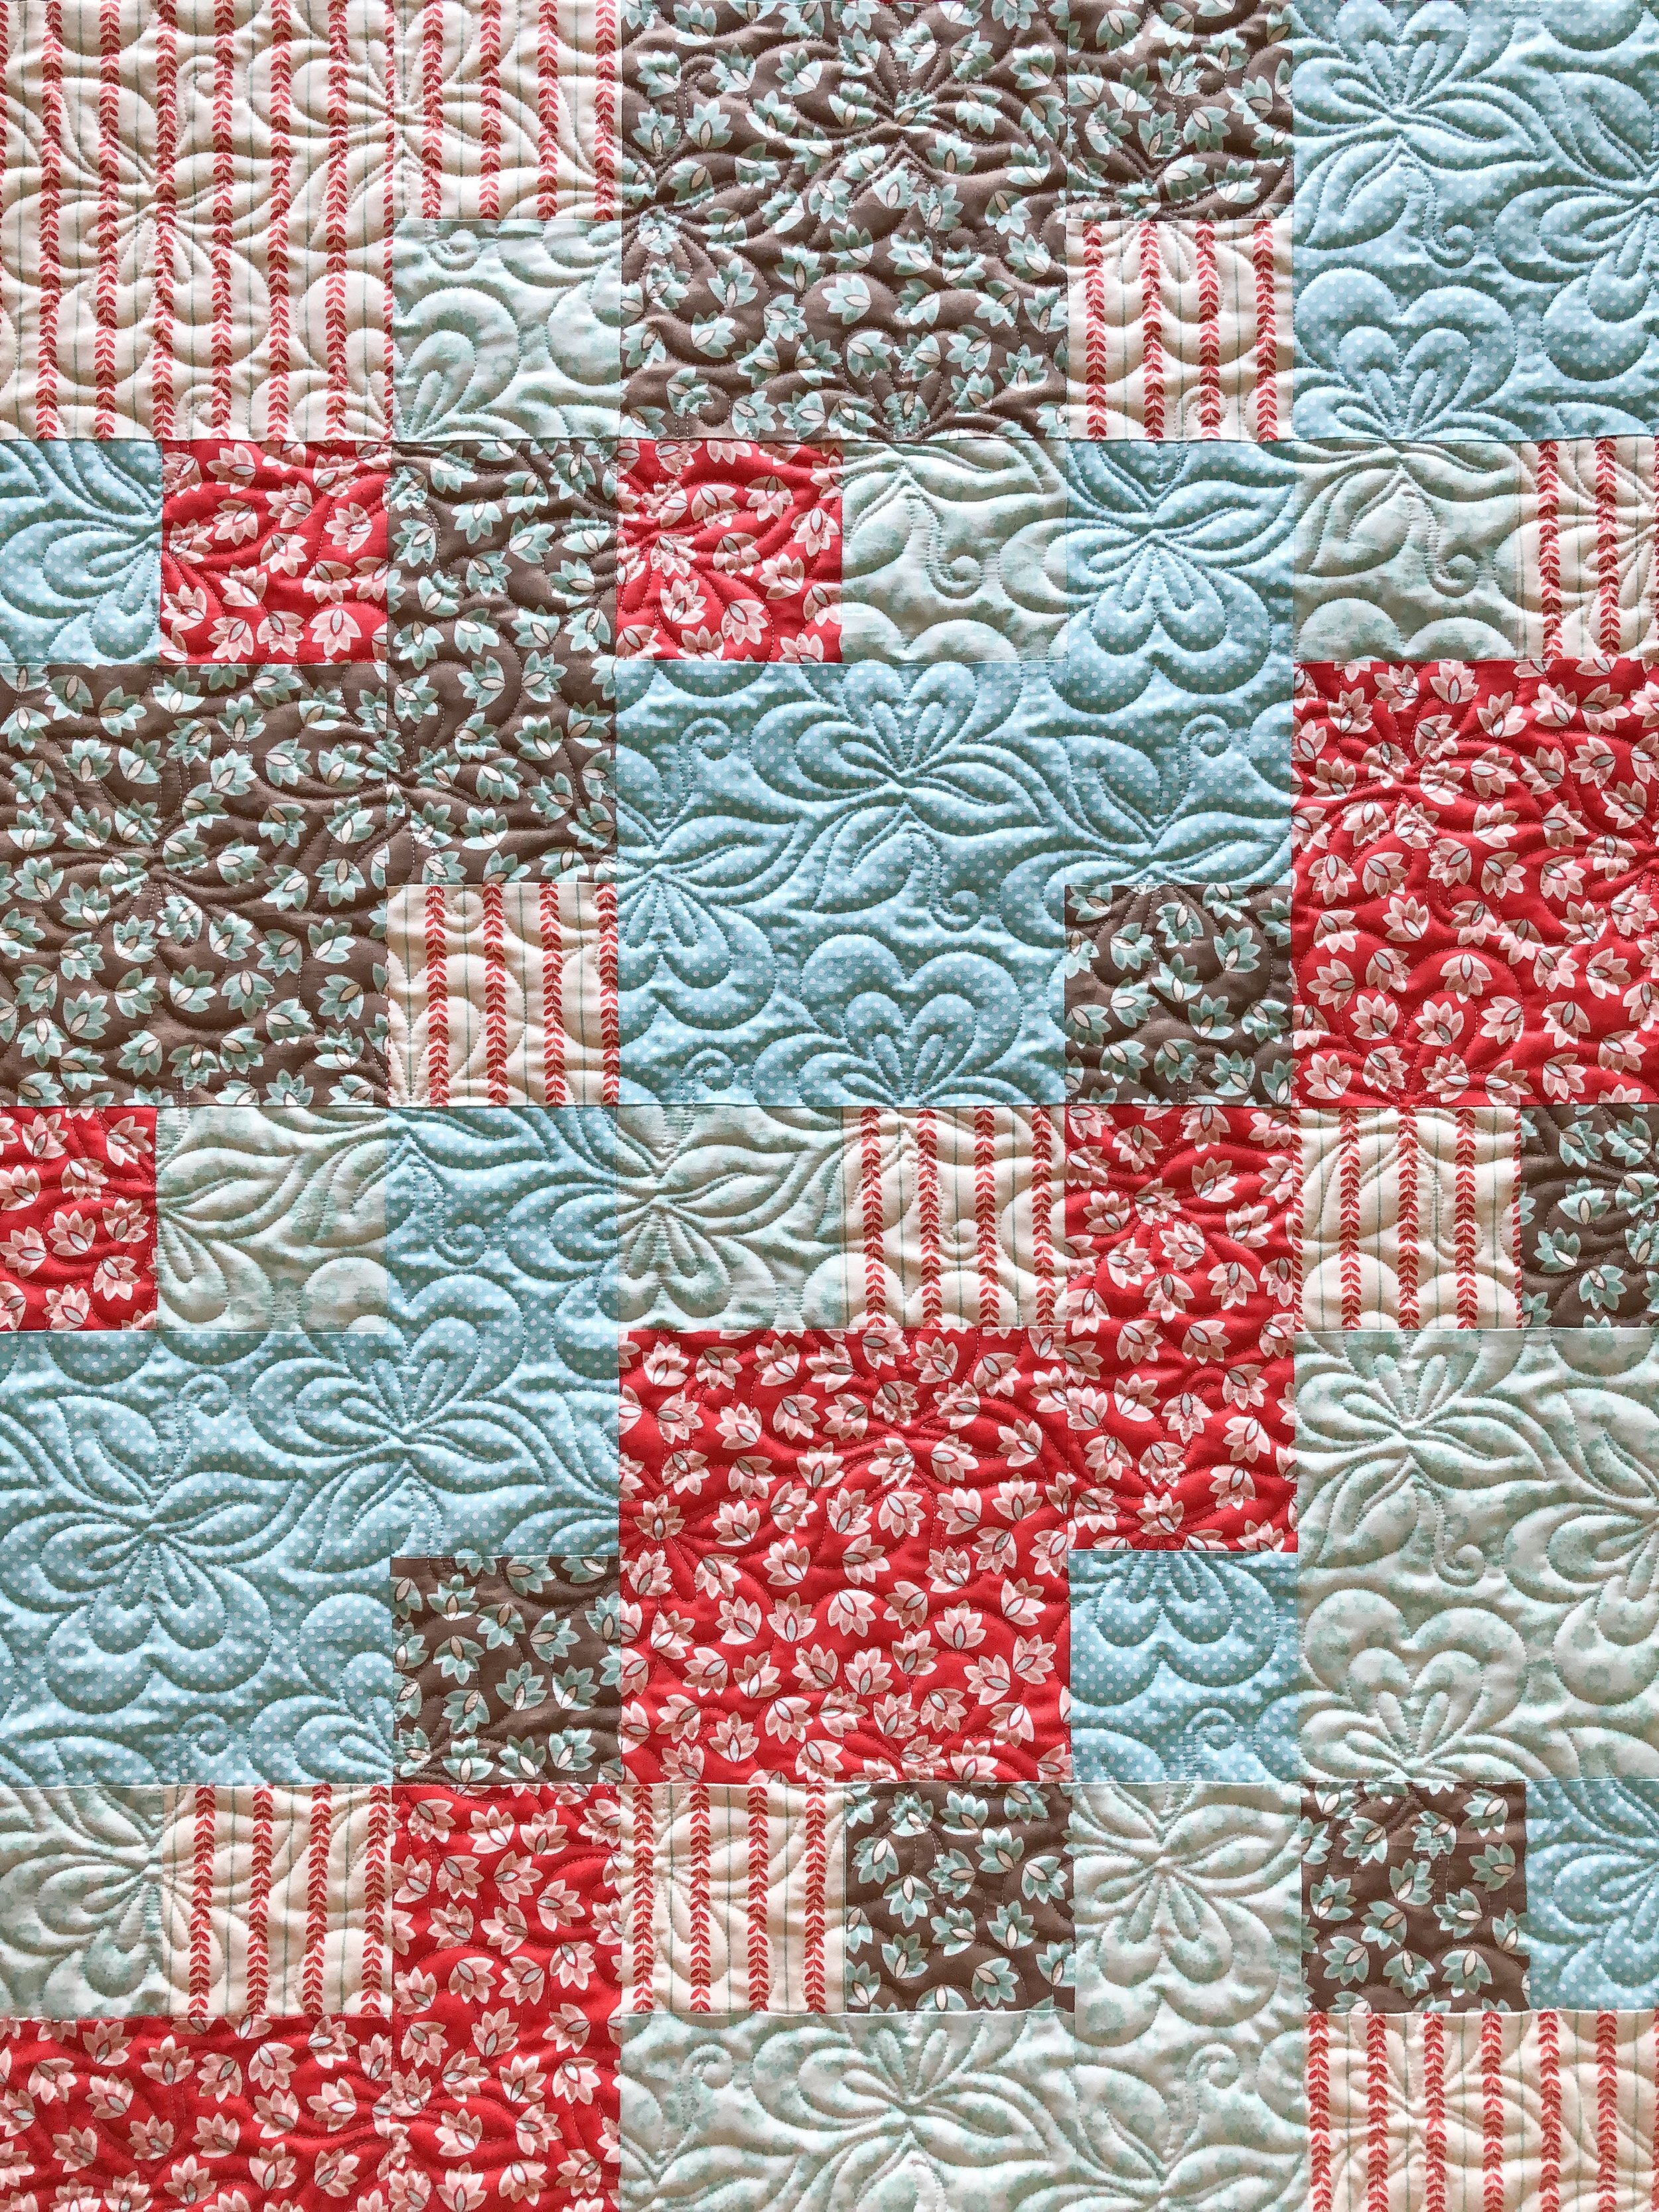
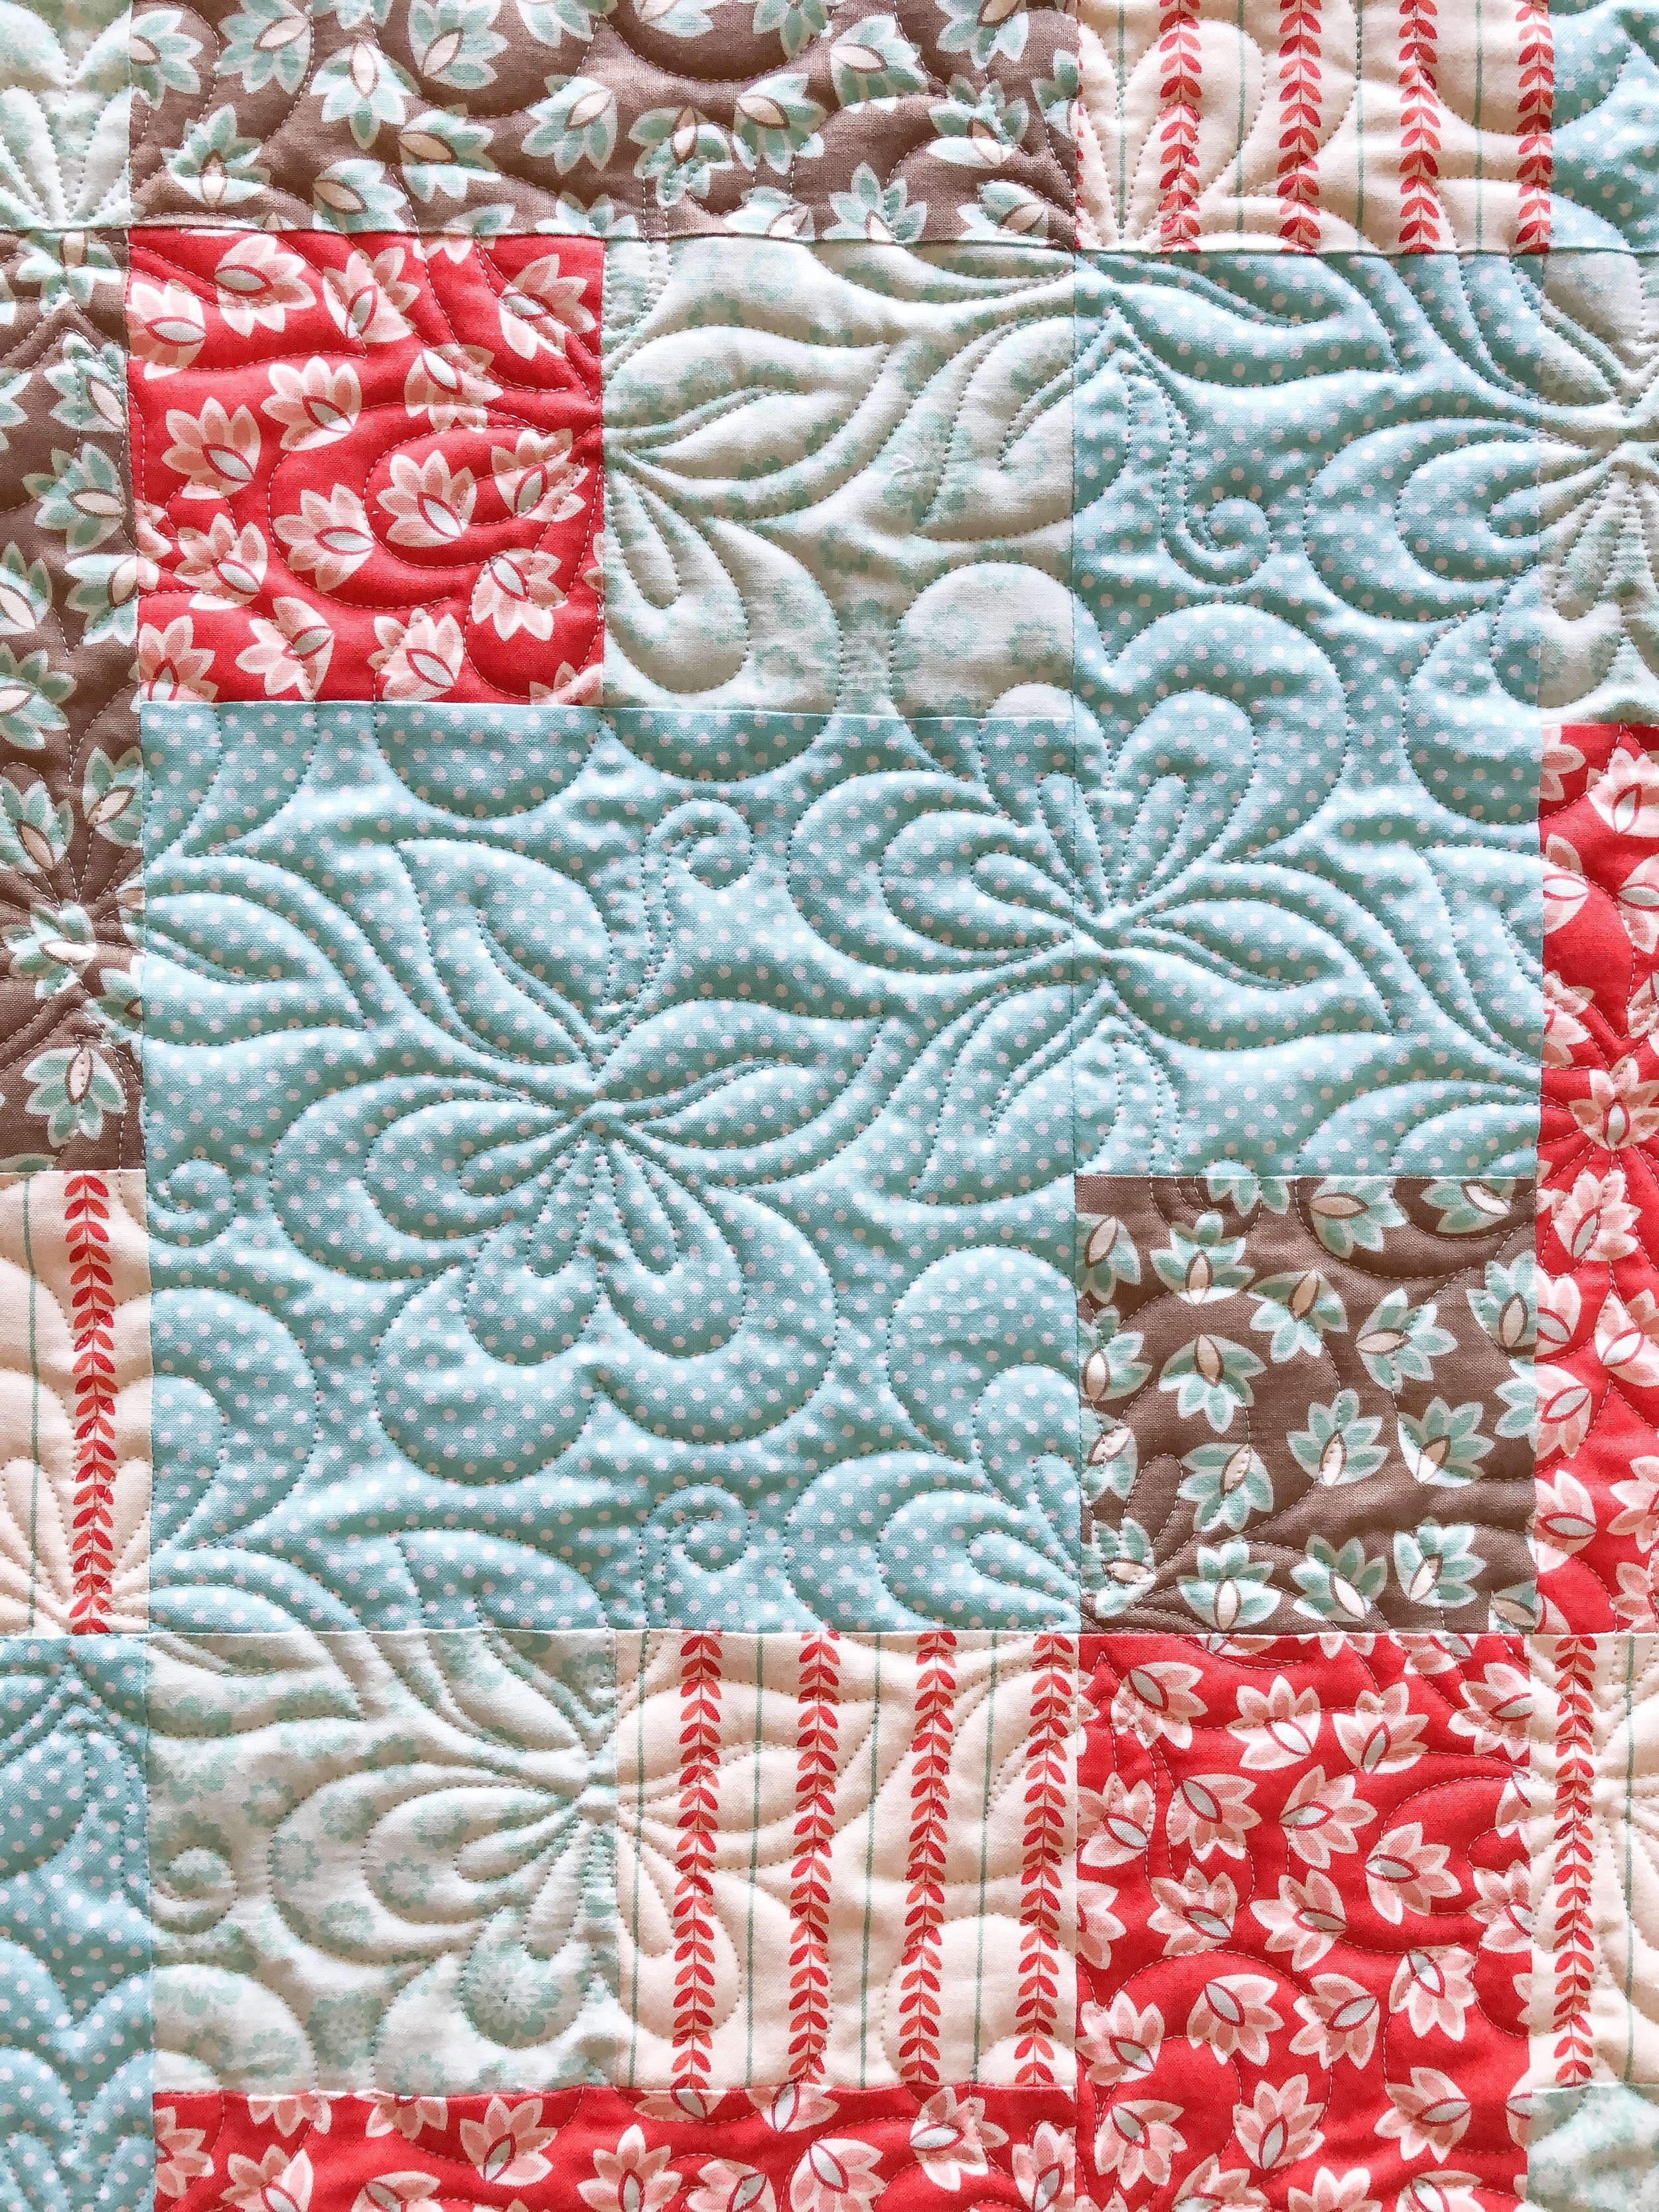
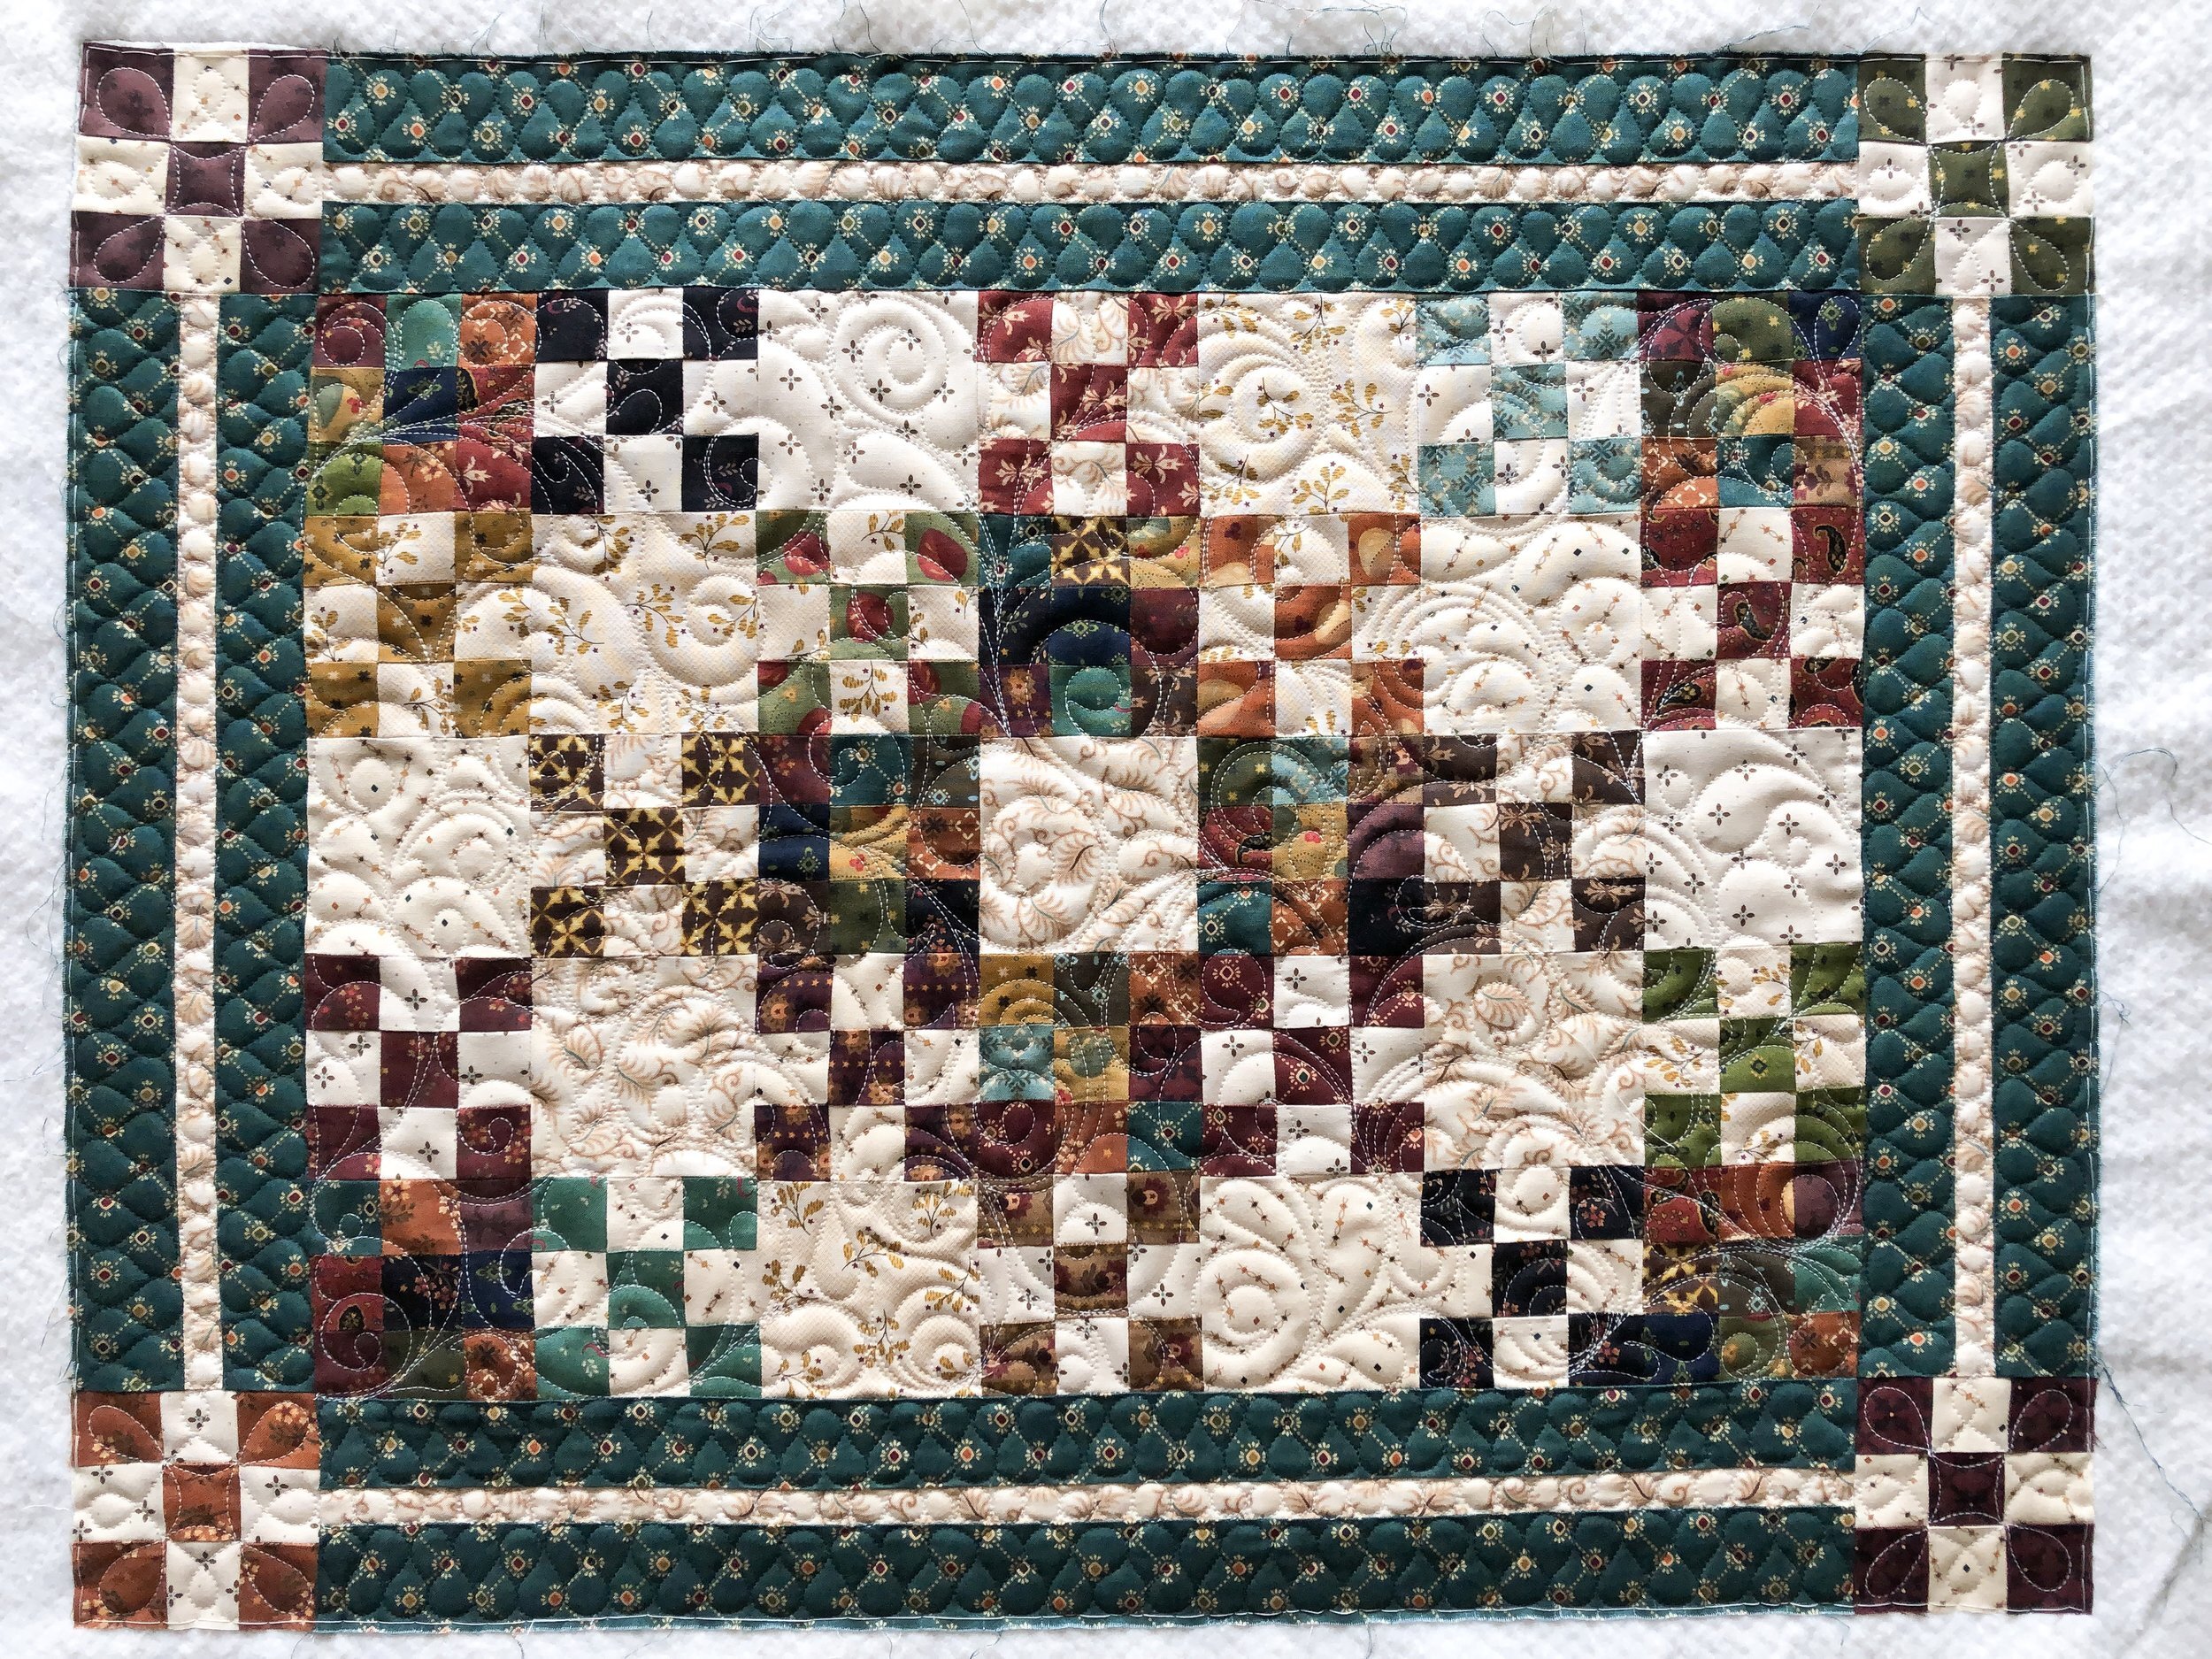
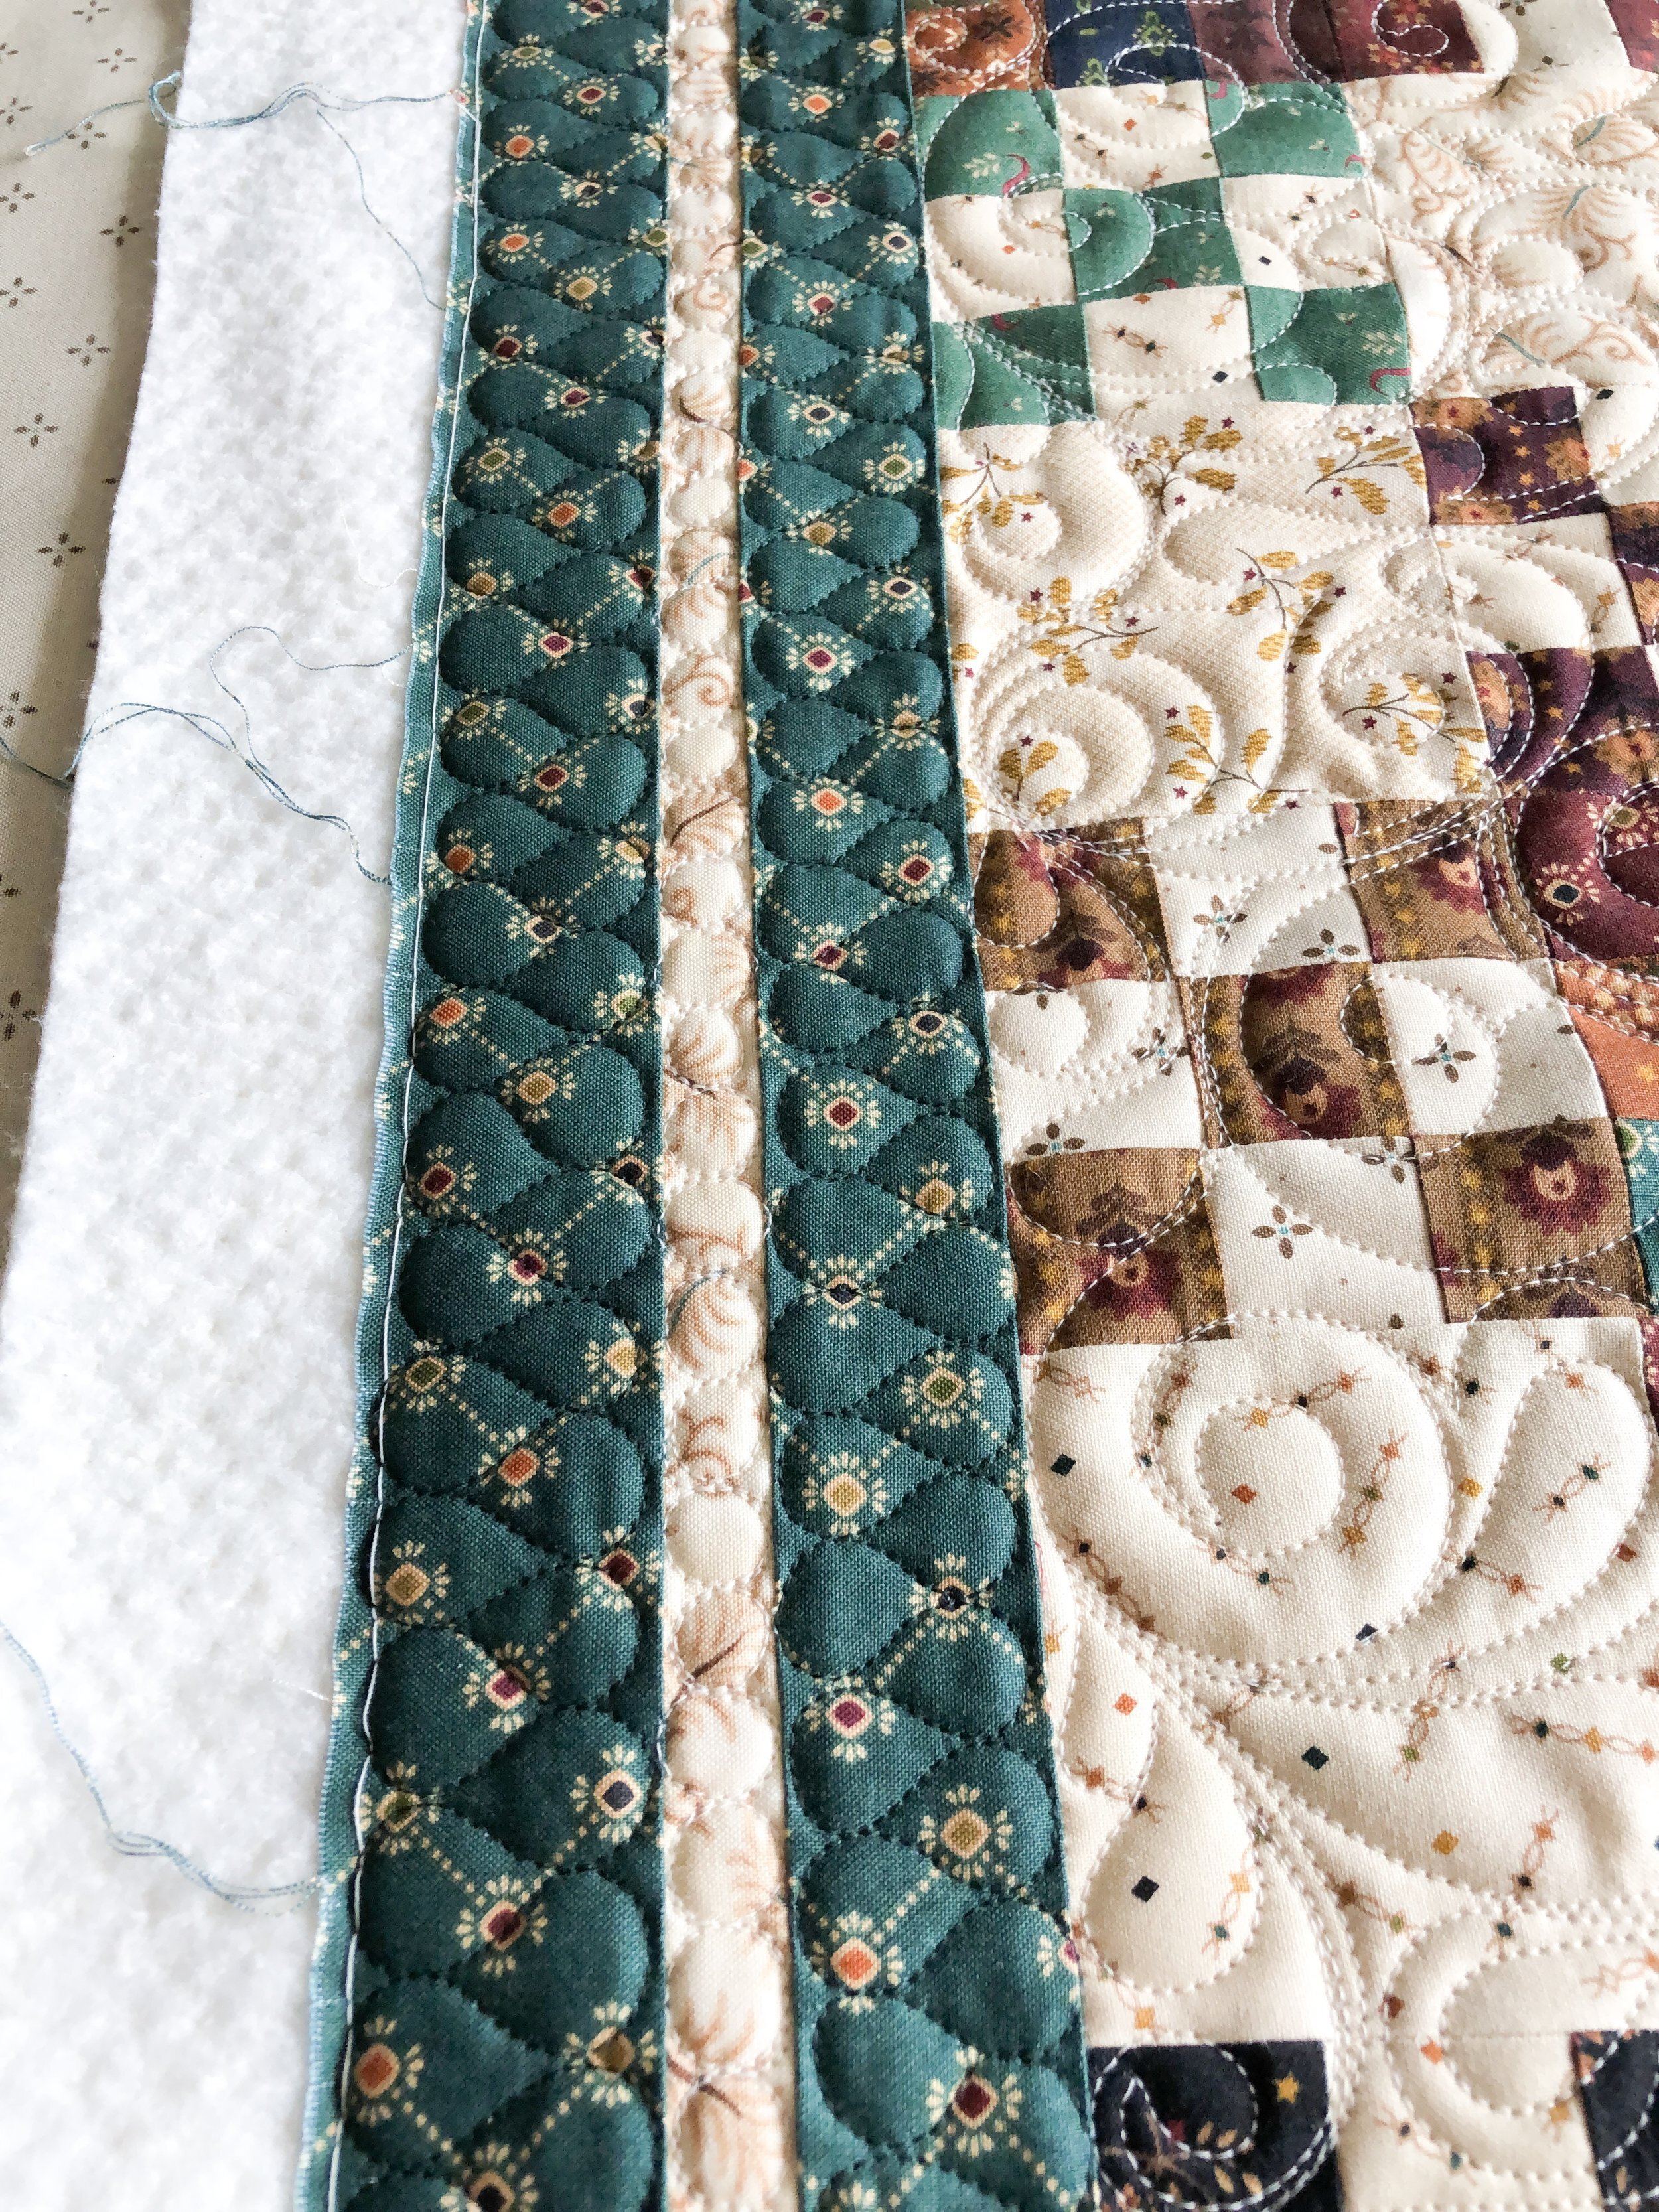
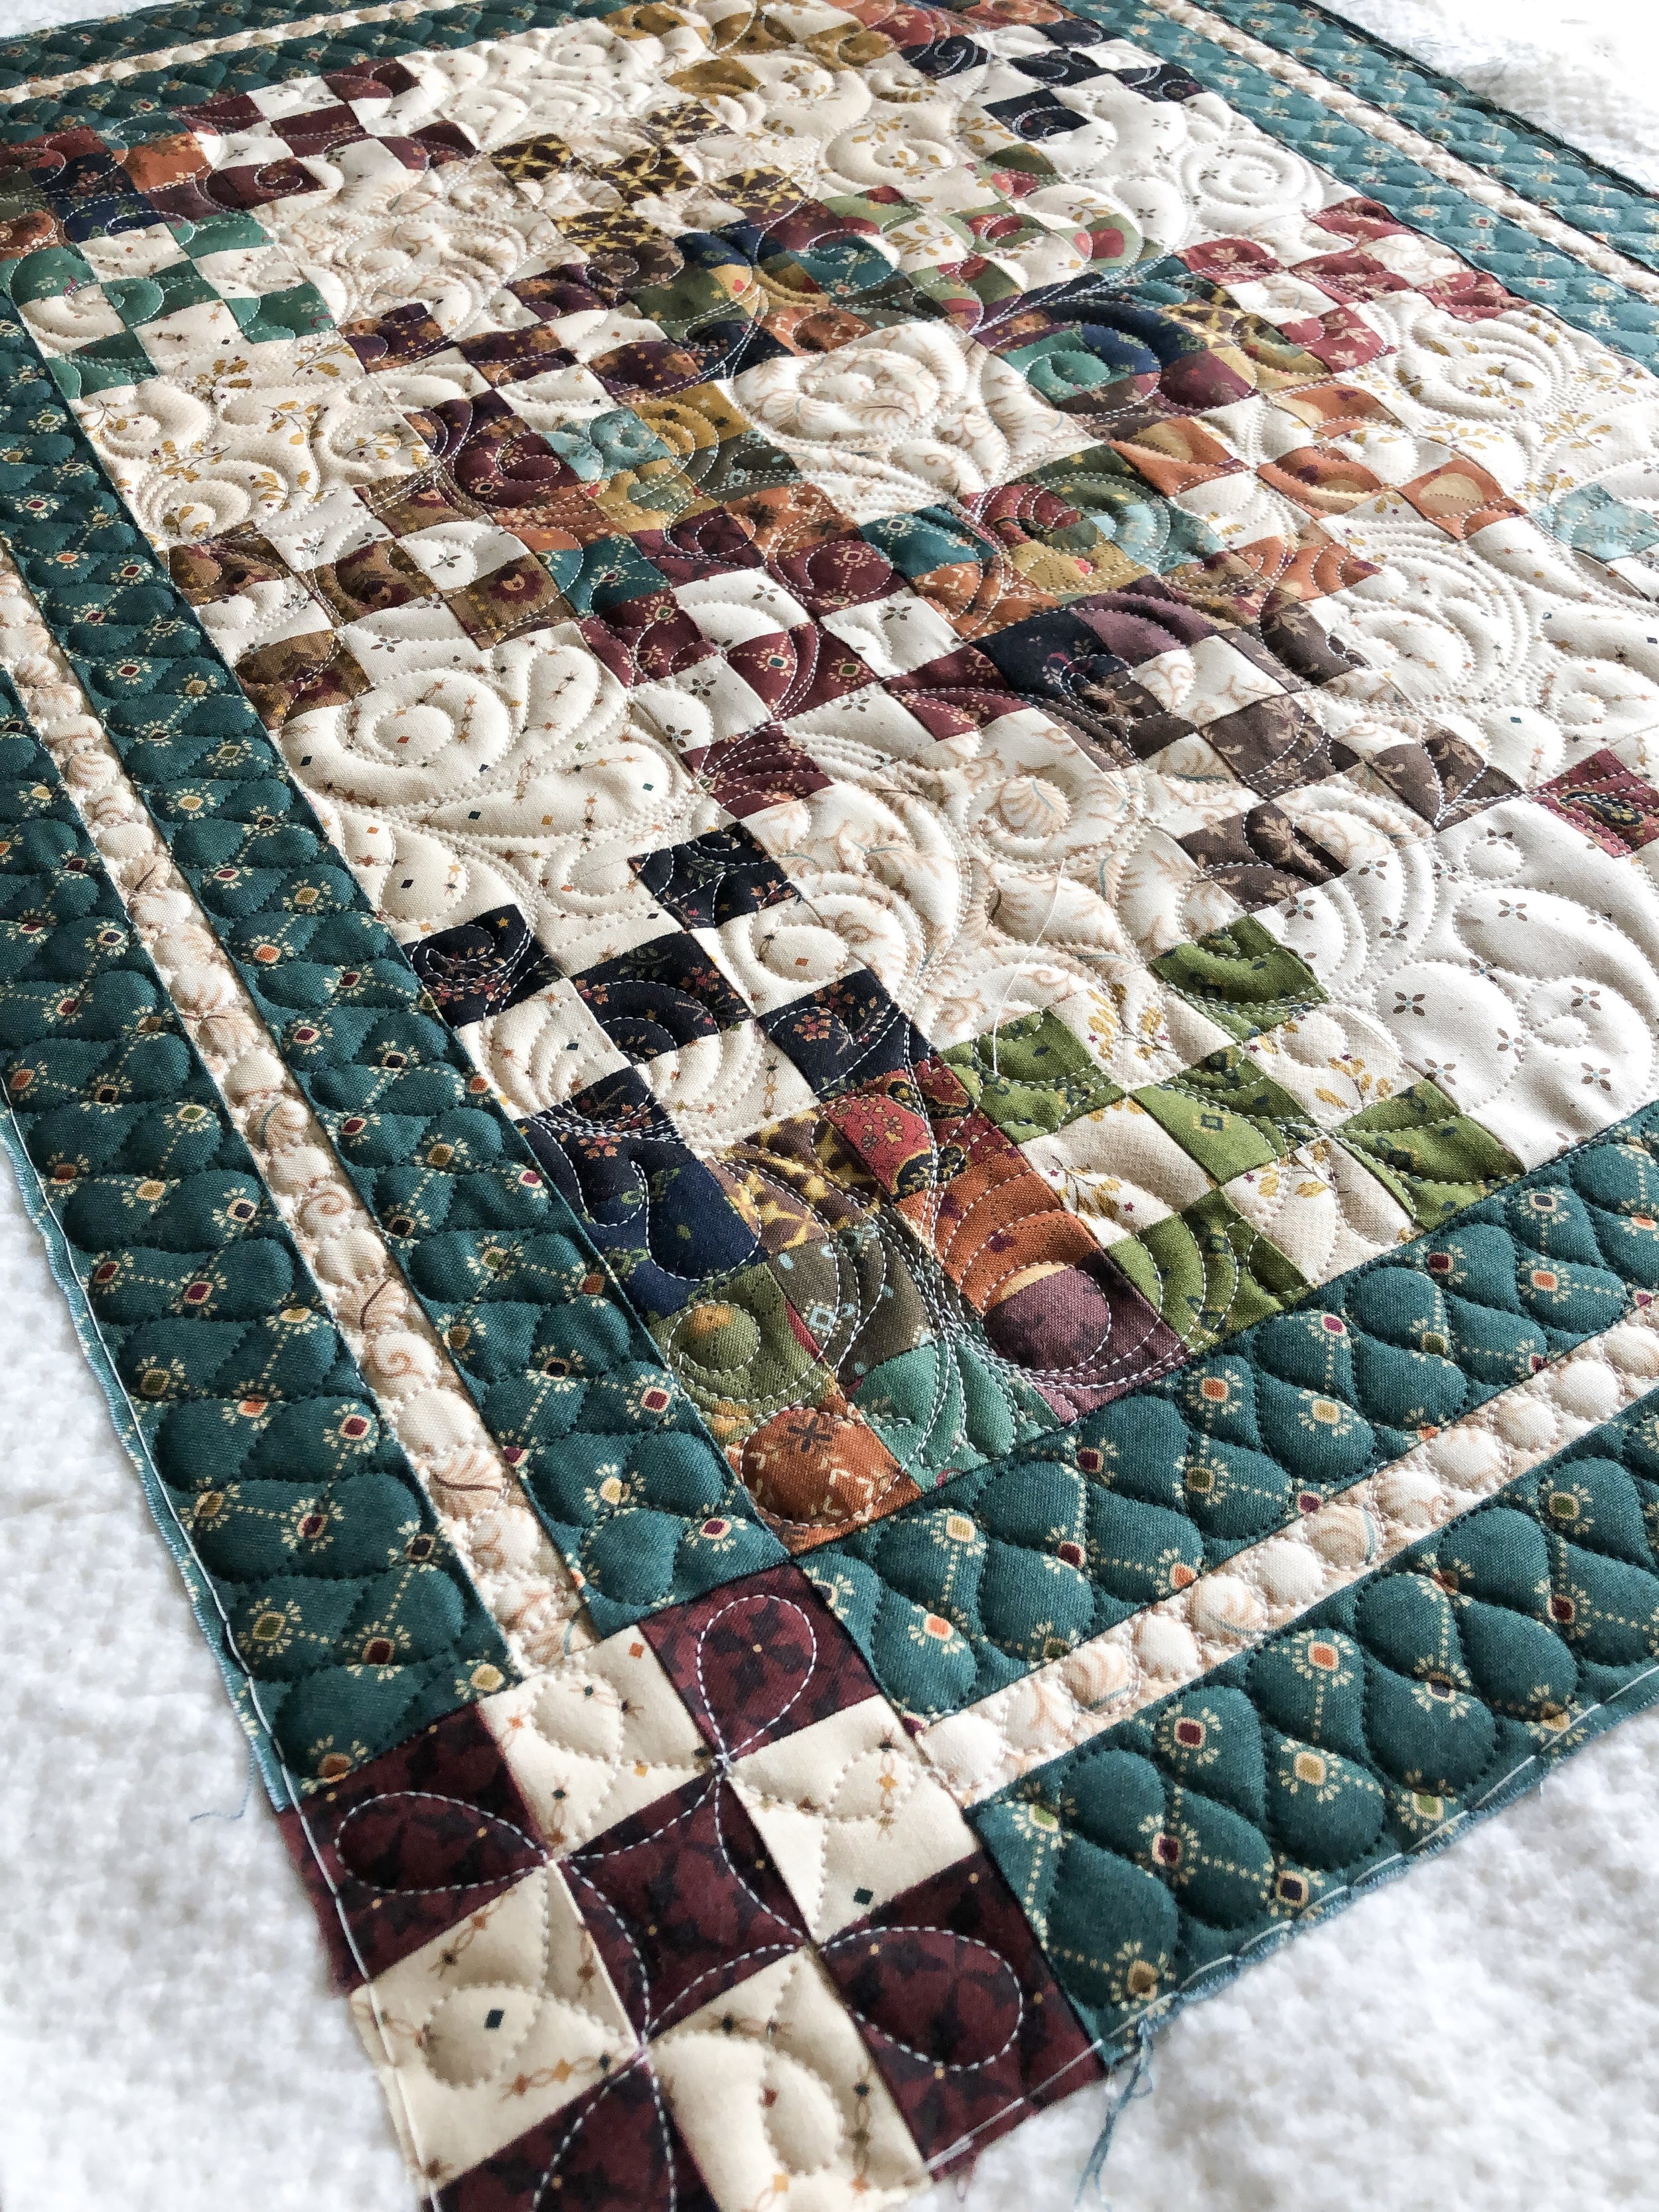
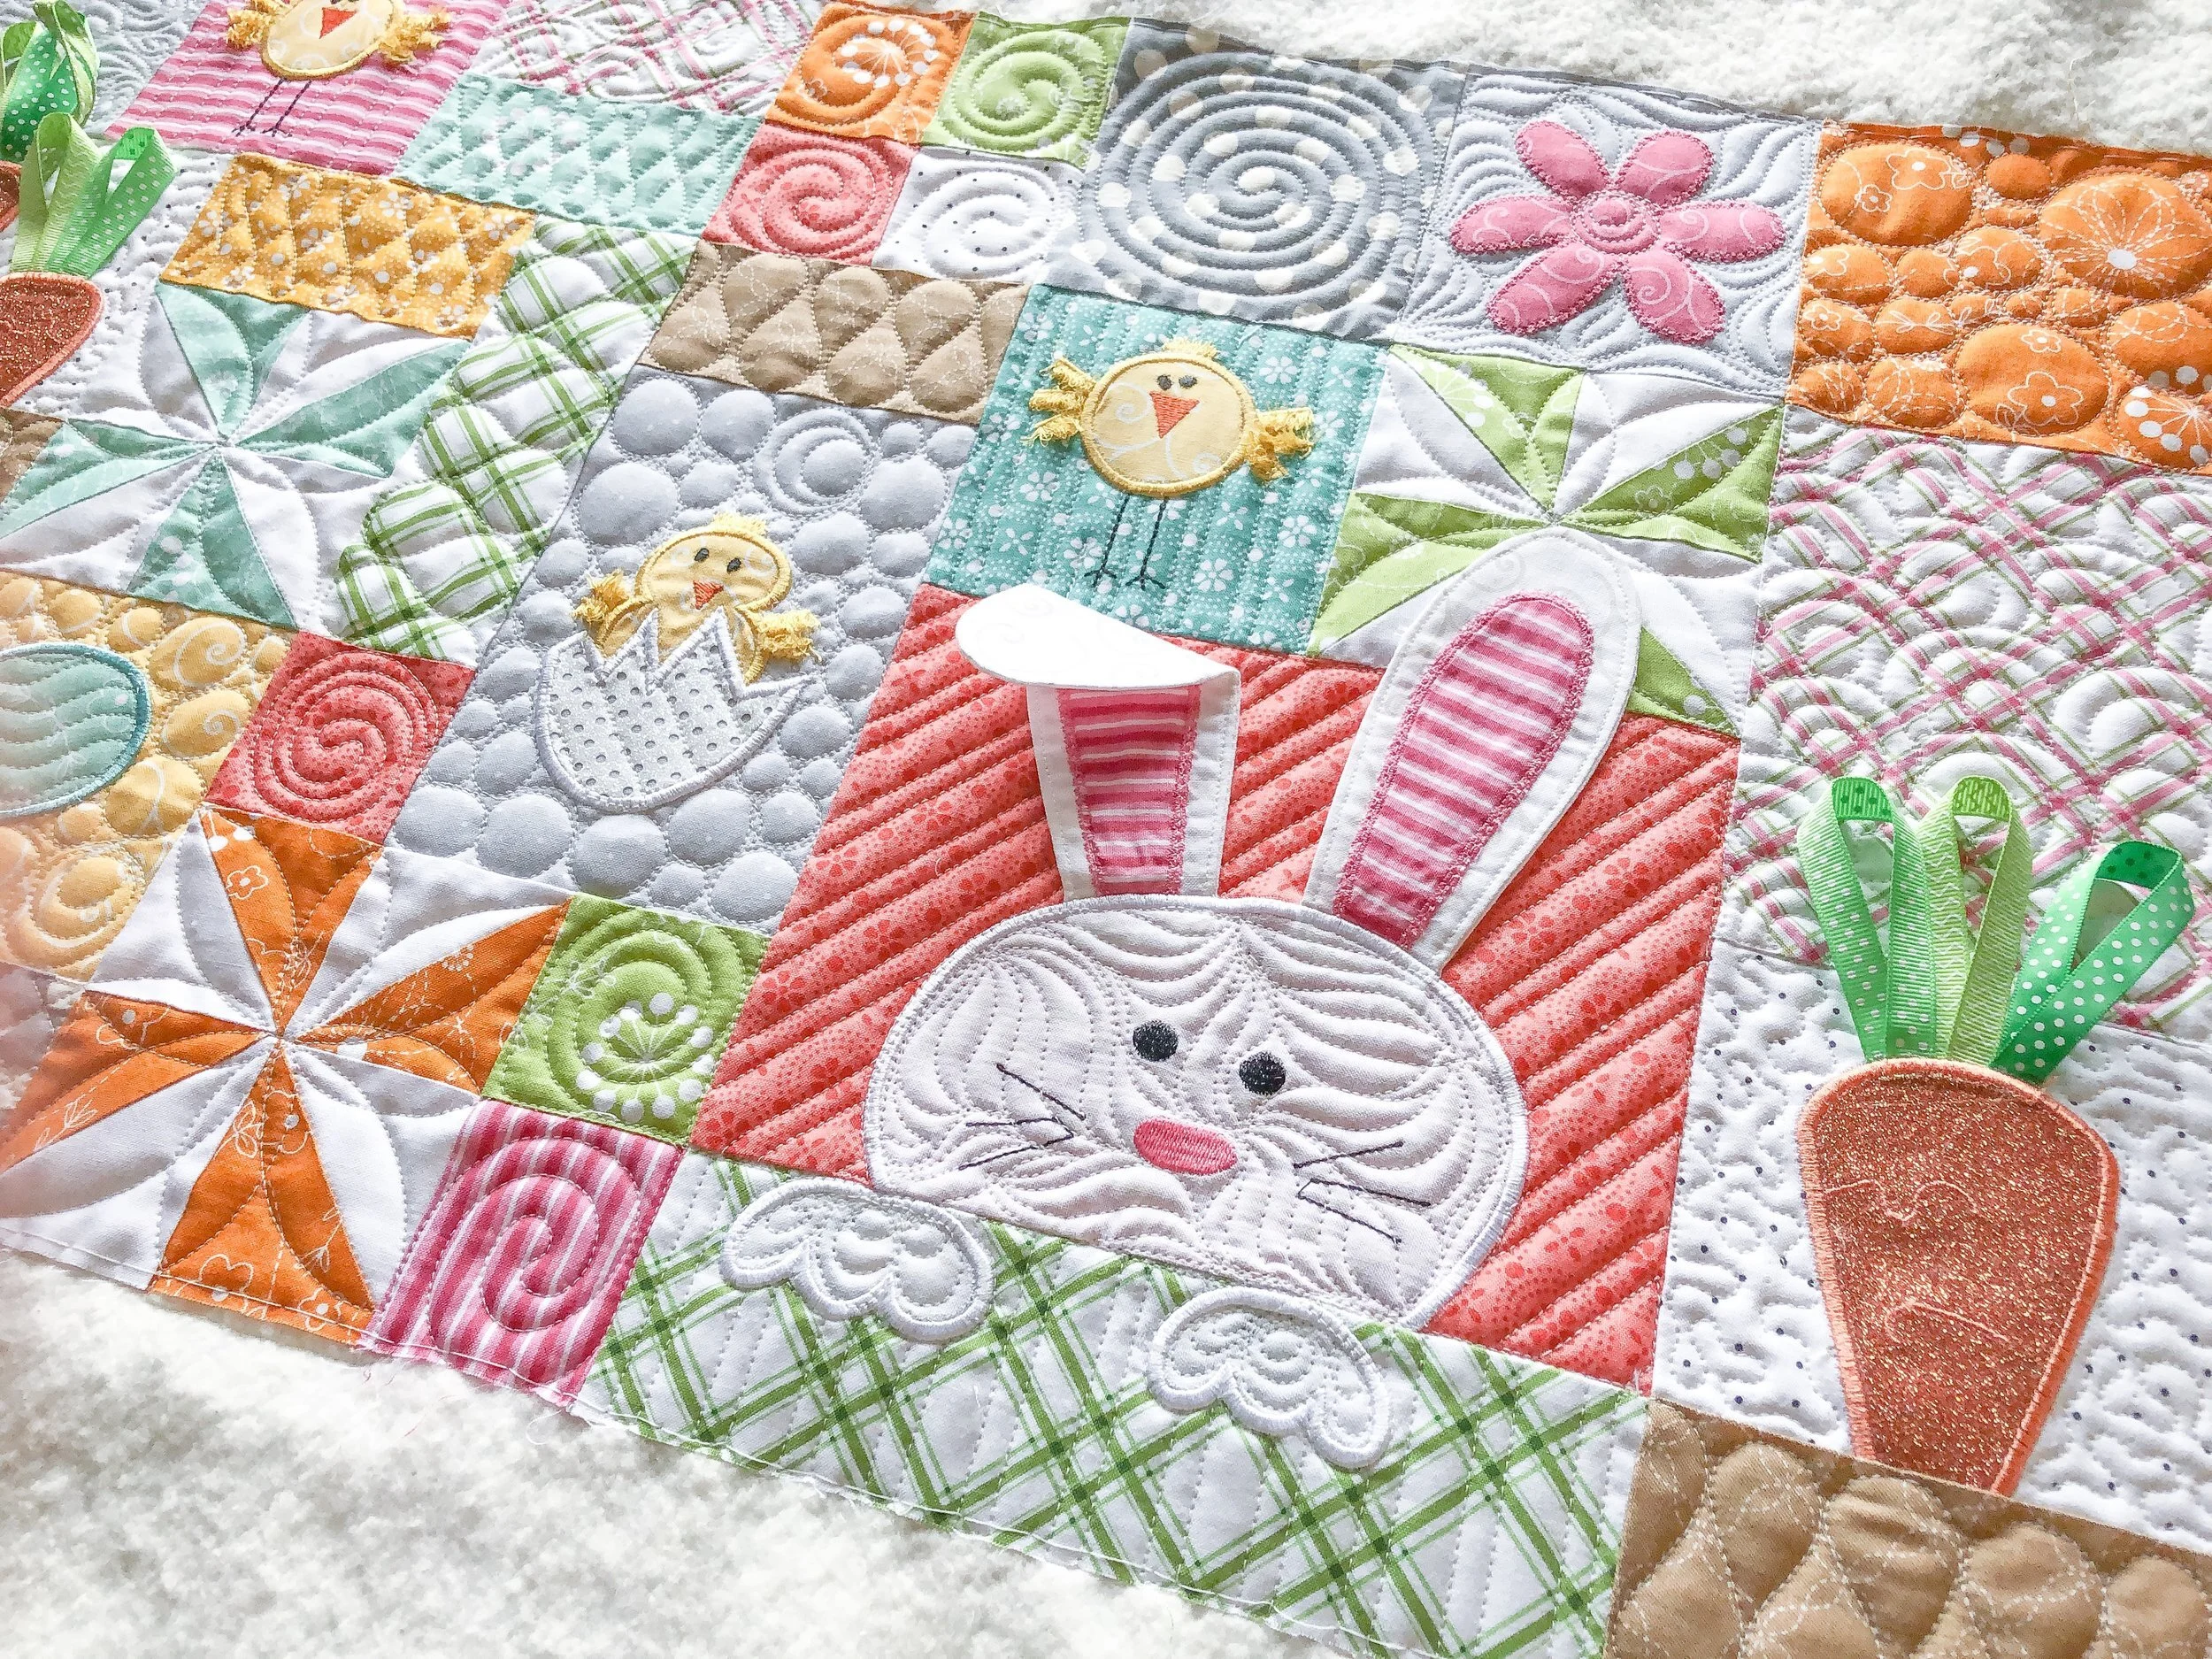
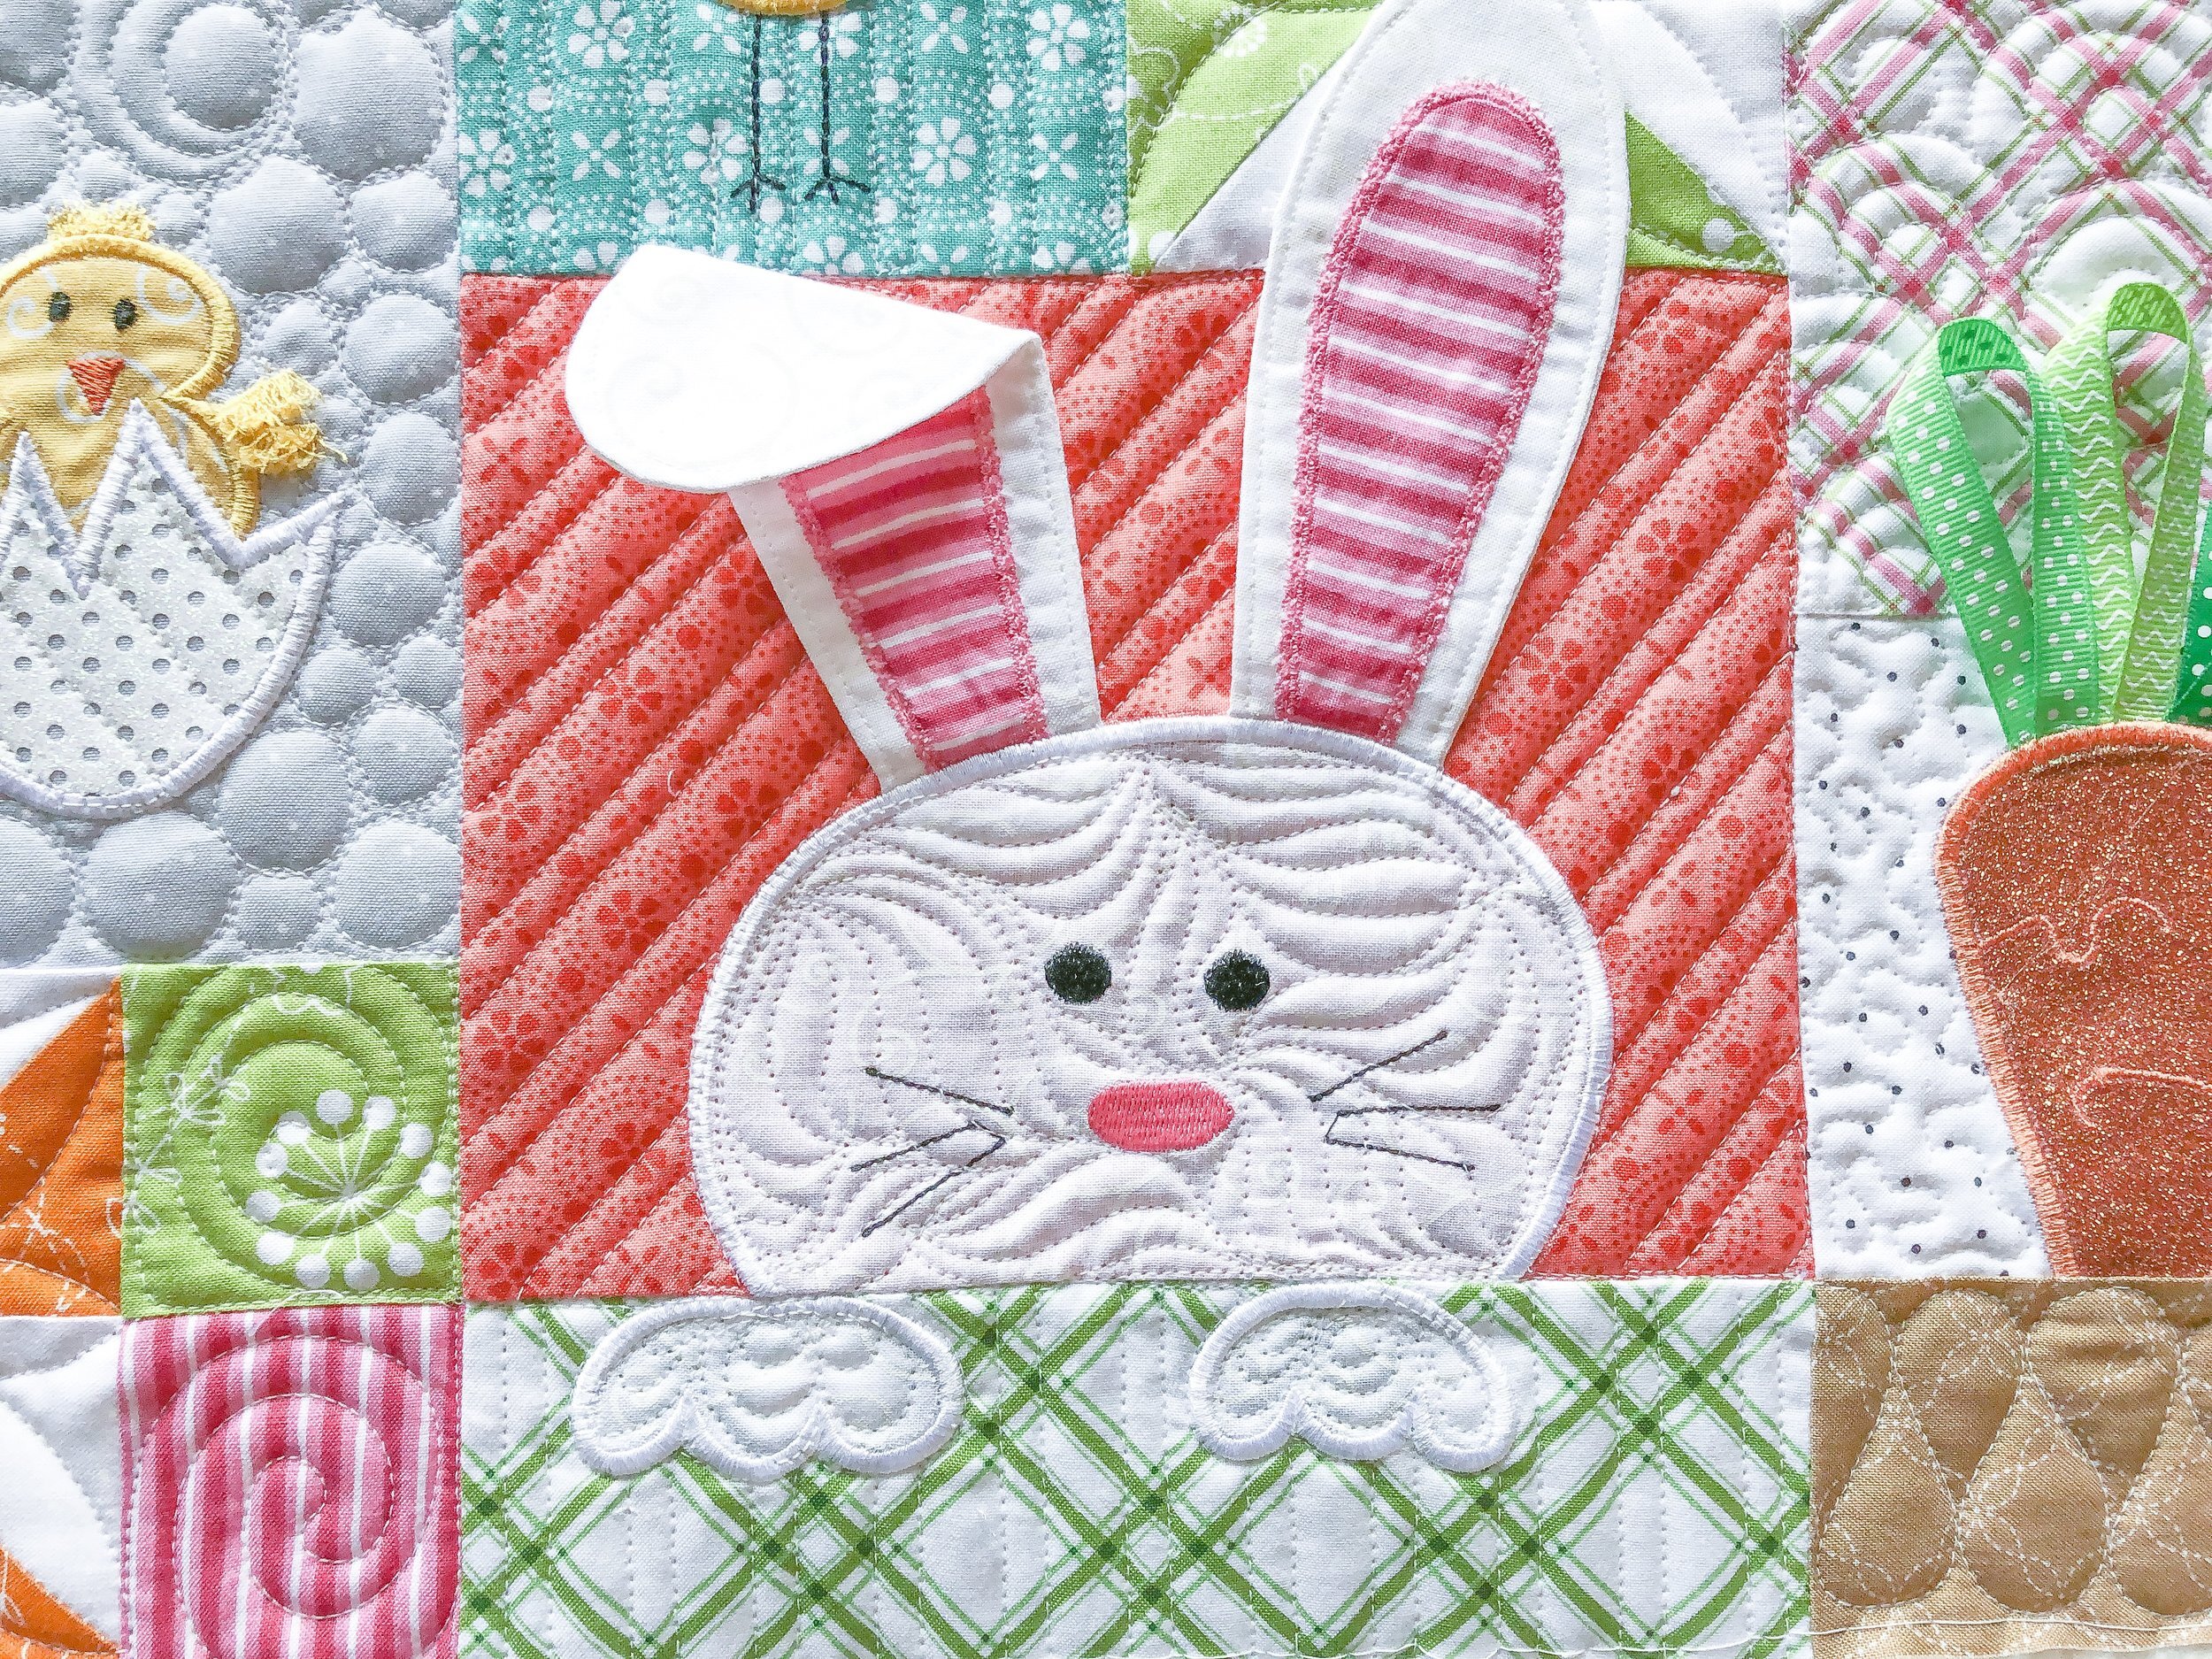
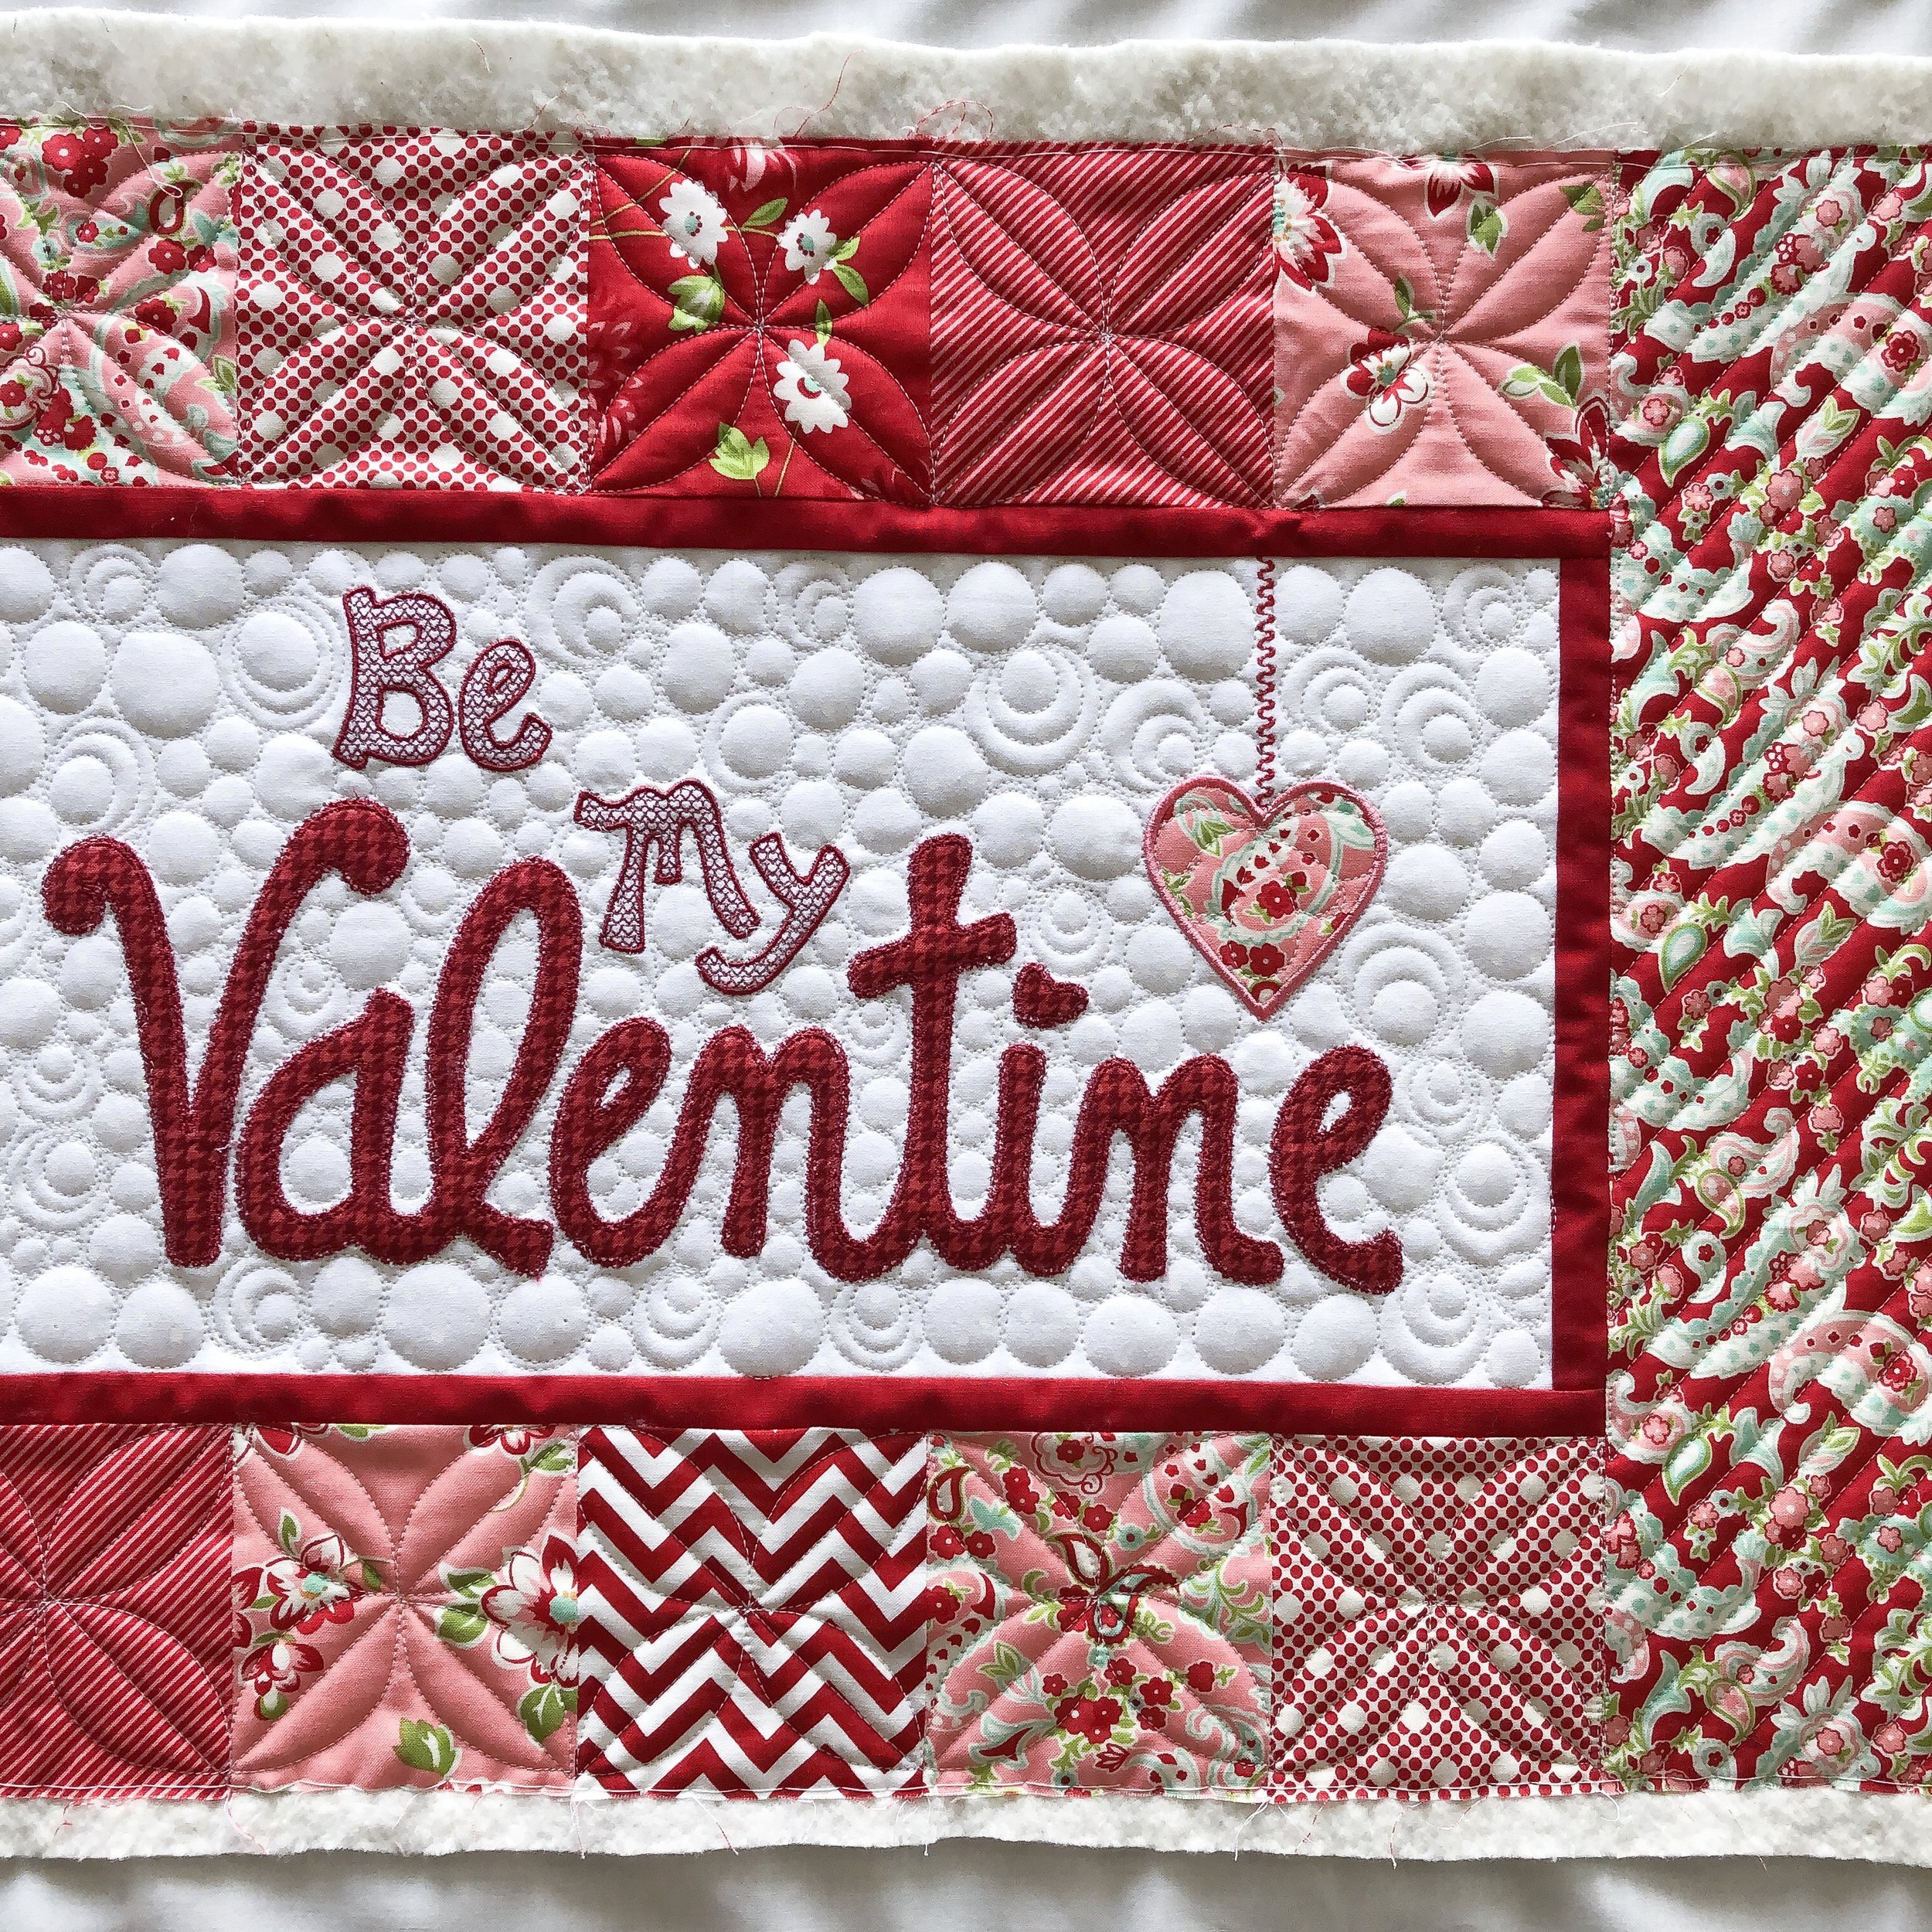
If you follow me over on Instagram…. @leishakaye then you may have seen me post about this first quilt made by Sherry! It’s called Happy Together by Sew Kind of Wonderful.

Sherry loved the lines quilted in the one Jenny from Sew Kind of Wonderful quilted, and I loved the quilting she did around each person…so I did that too, with some freehand background filler.

I used one of my Circle2™ rulers to quilt the curves that outline each person, and I should have written it down…I can’t remember which one. Remember they are $20 off right now, using code 20SPRING20 at checkout. I also used Linda from The Quilted Pineapple’s Edge rulers to quilt the straight lines.

I used an Omni grey thread for the background, and a cream A&E thread for the quilting in the people.

I used my favorite 8020 cotton poly blend batting from Winline. This was such a fun quilt to quilt!!
Next up, this fun wall handing that Laurie made…. she actually won the blocks from her guild, and then sewed them together. The pattern is by Vanessa from Lella Boutique, and is called By the Chimney mini.
How fun!!! I used a cream A&E Perma Core thread and winline’s 8020 cotton poly blend batting.

She wanted something Christmasy, so I decided on Patricia Ritter and my Merriment©️ design, which is available at Urban Elementz. It’s such a fun universal Christmas design.
It’s never too early to get your Christmas quilts quilted!!

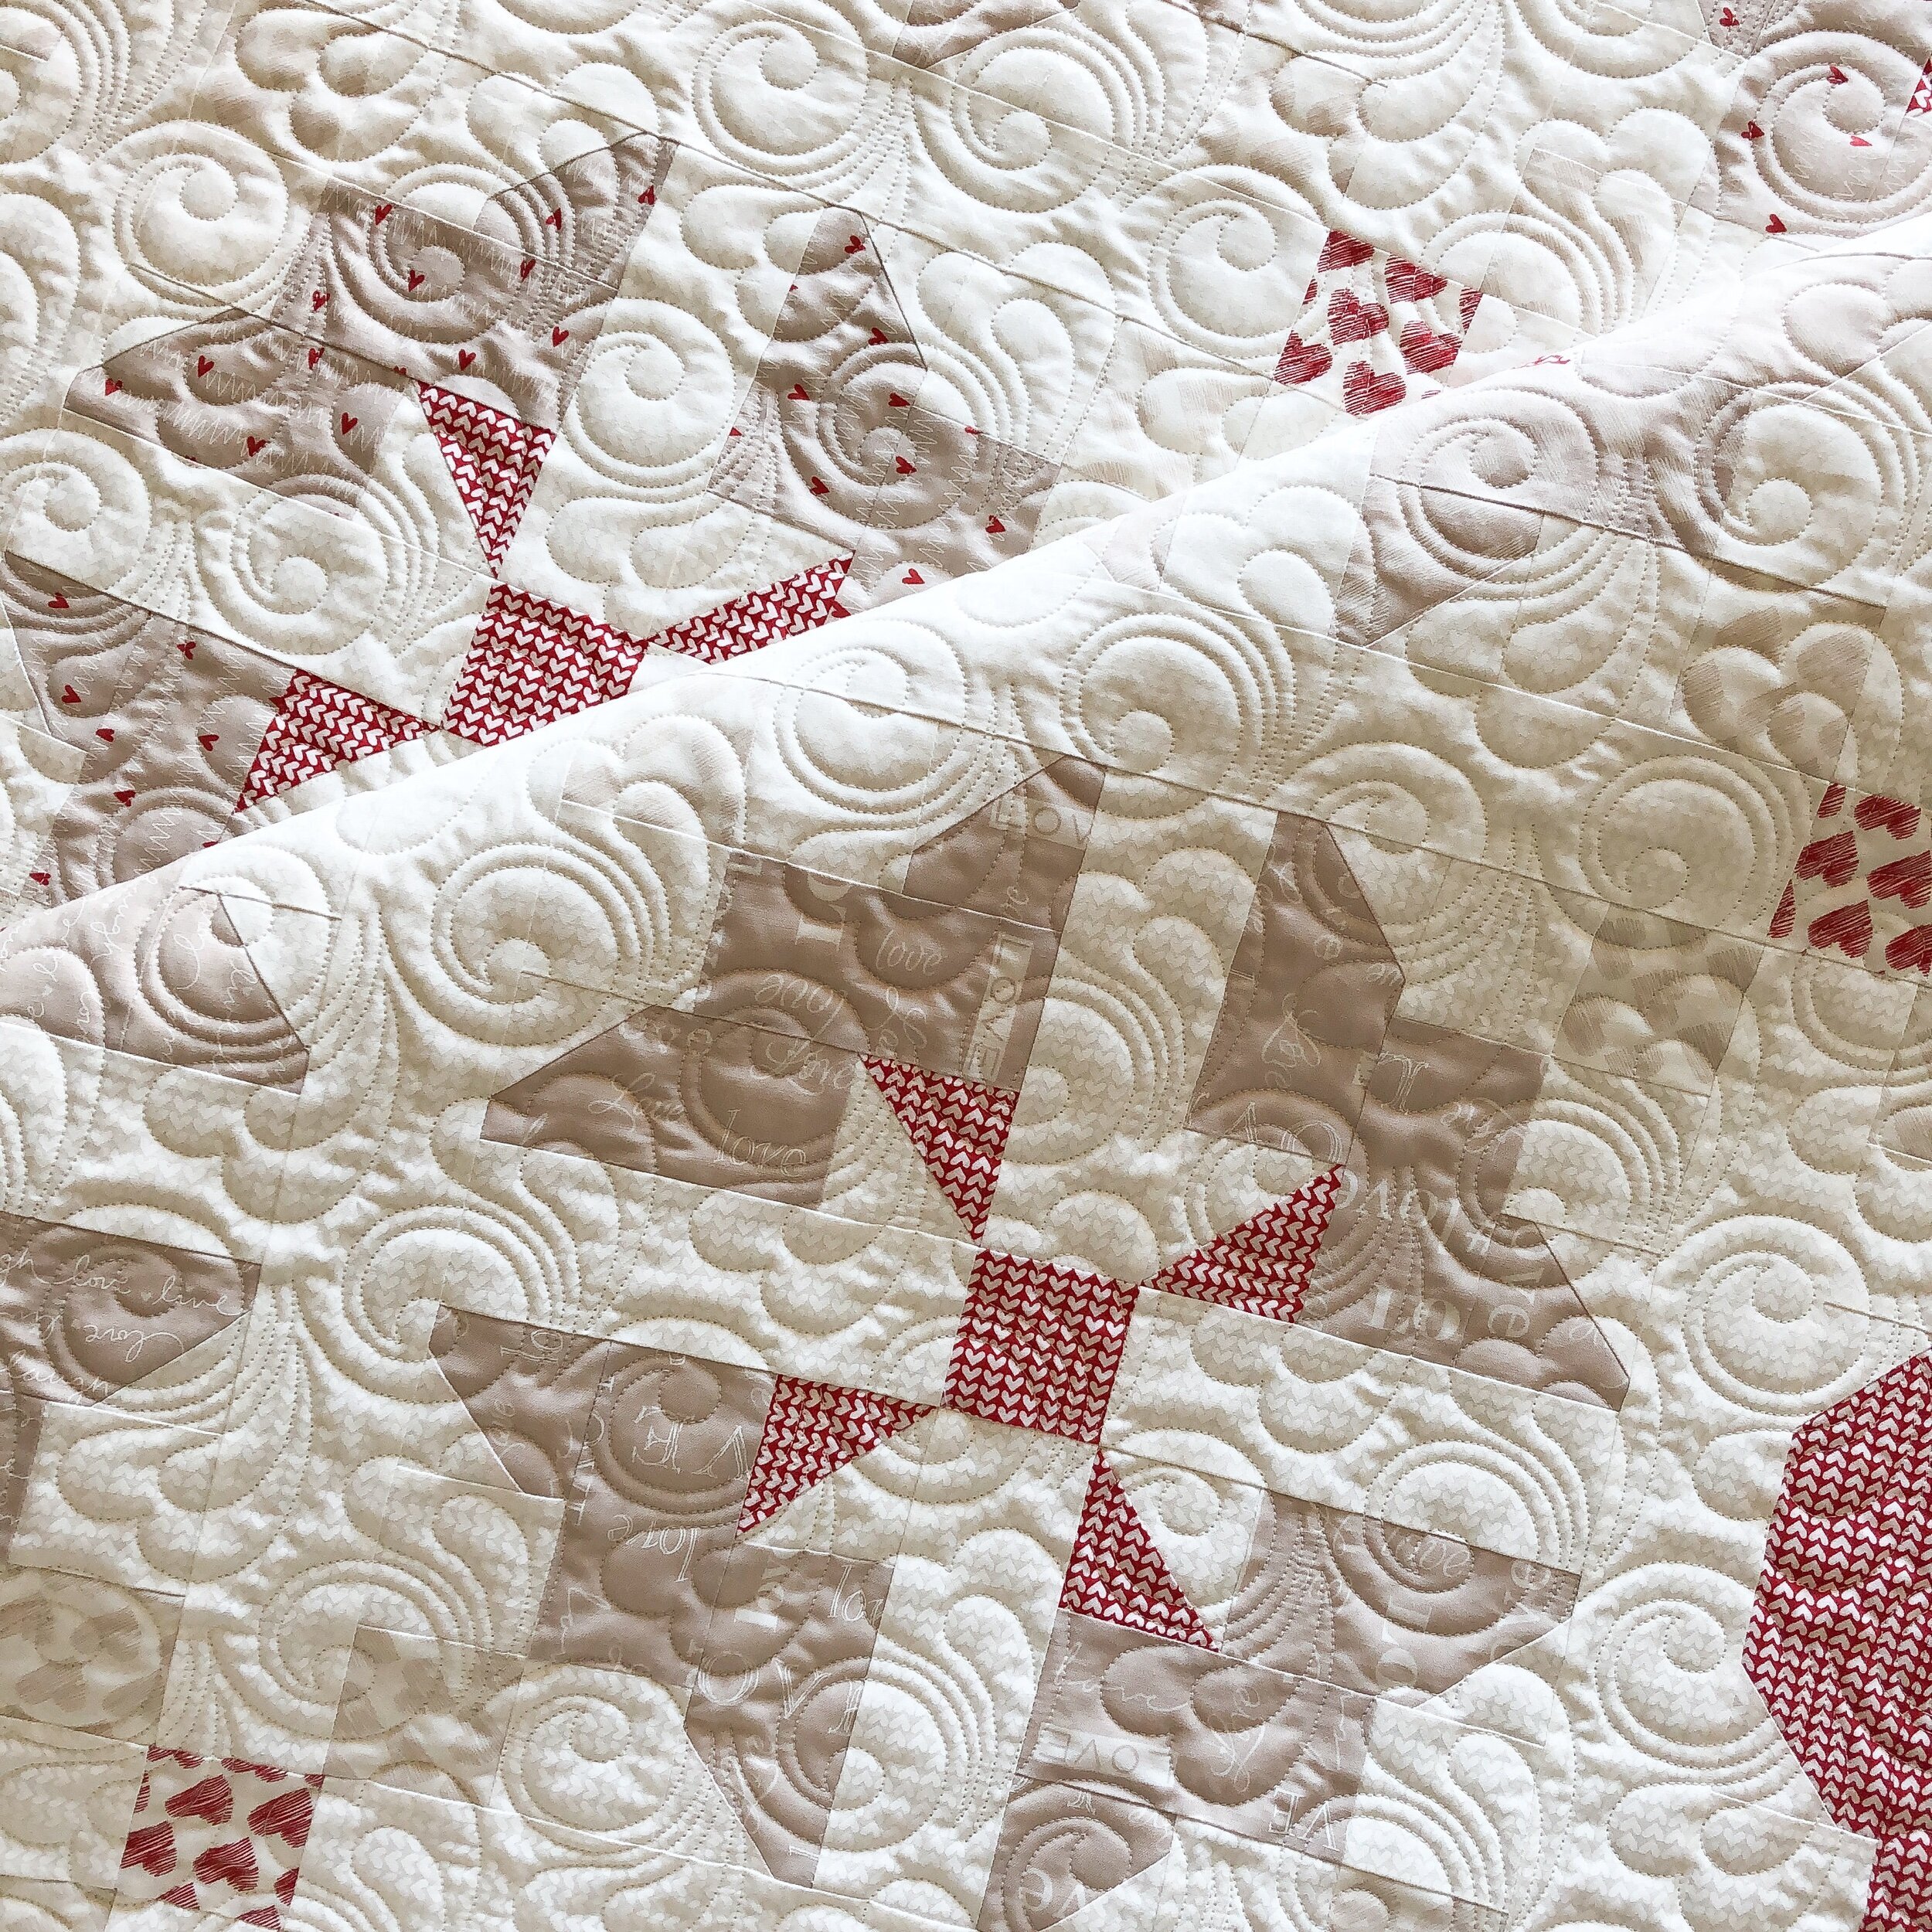
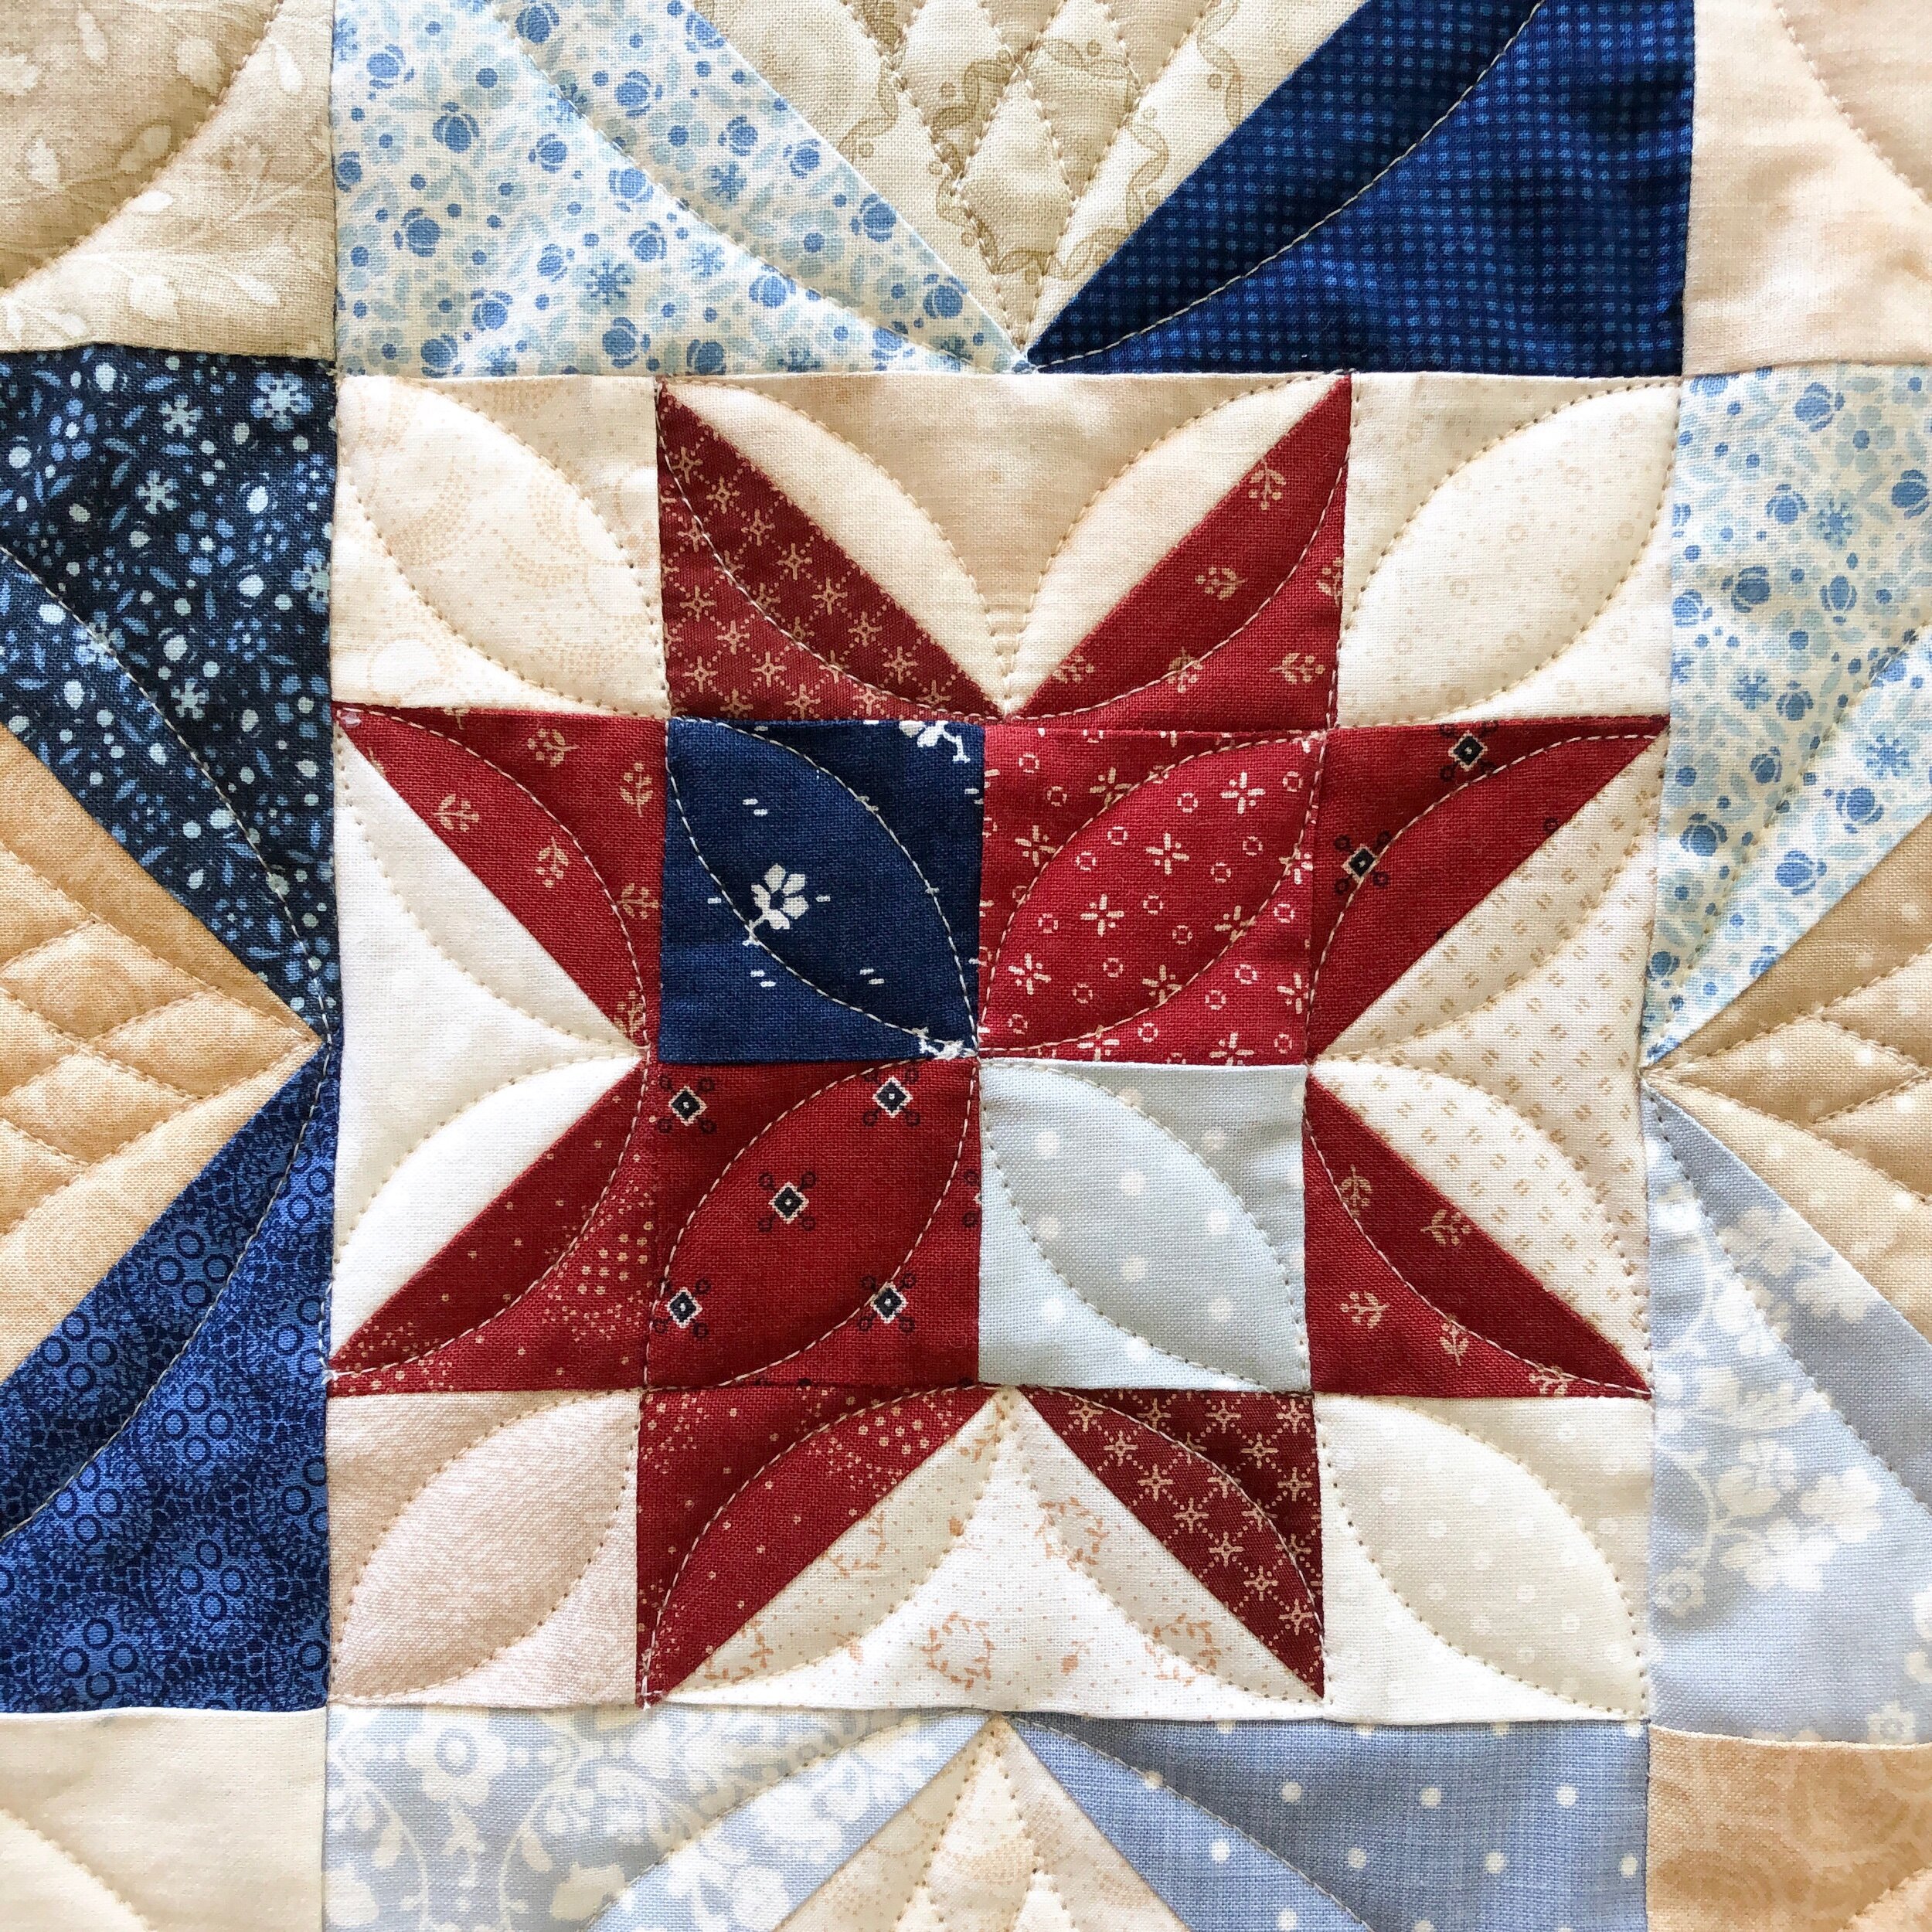
Next up, this beautiful quilt that Liz’s sisters help her make.

This quilt pattern is by Sandy Gervais called Rubies and Diamonds.
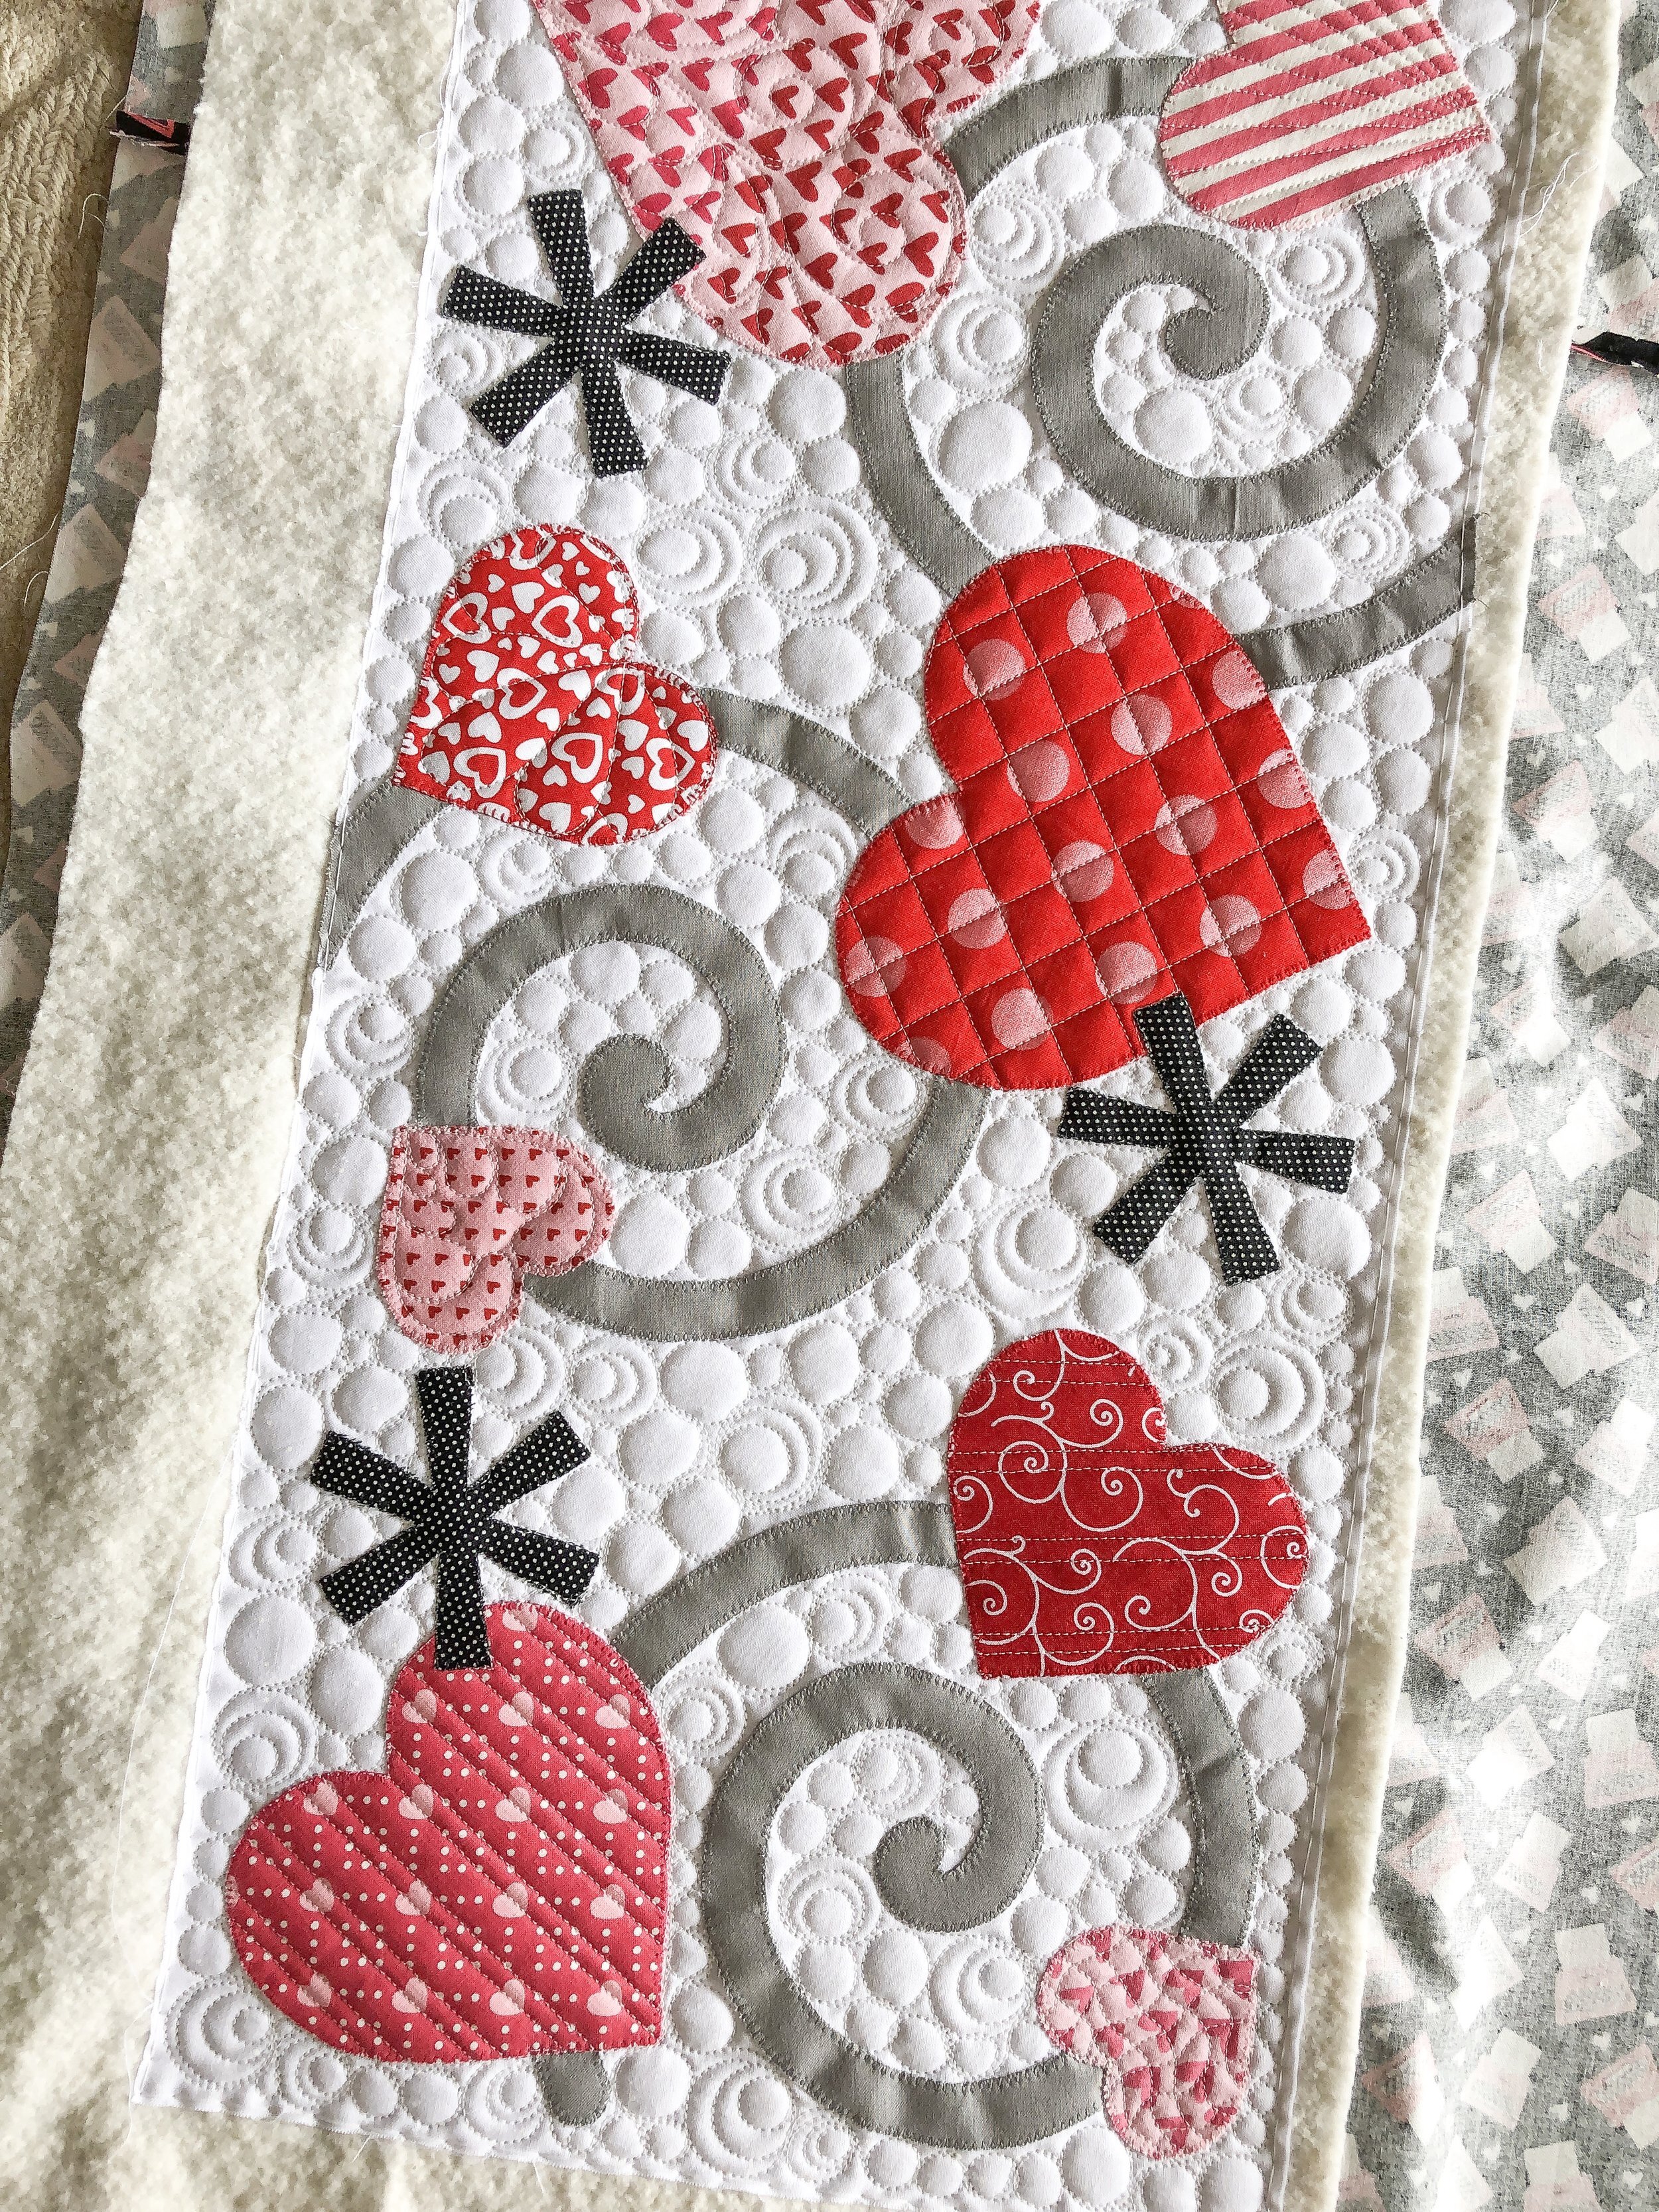
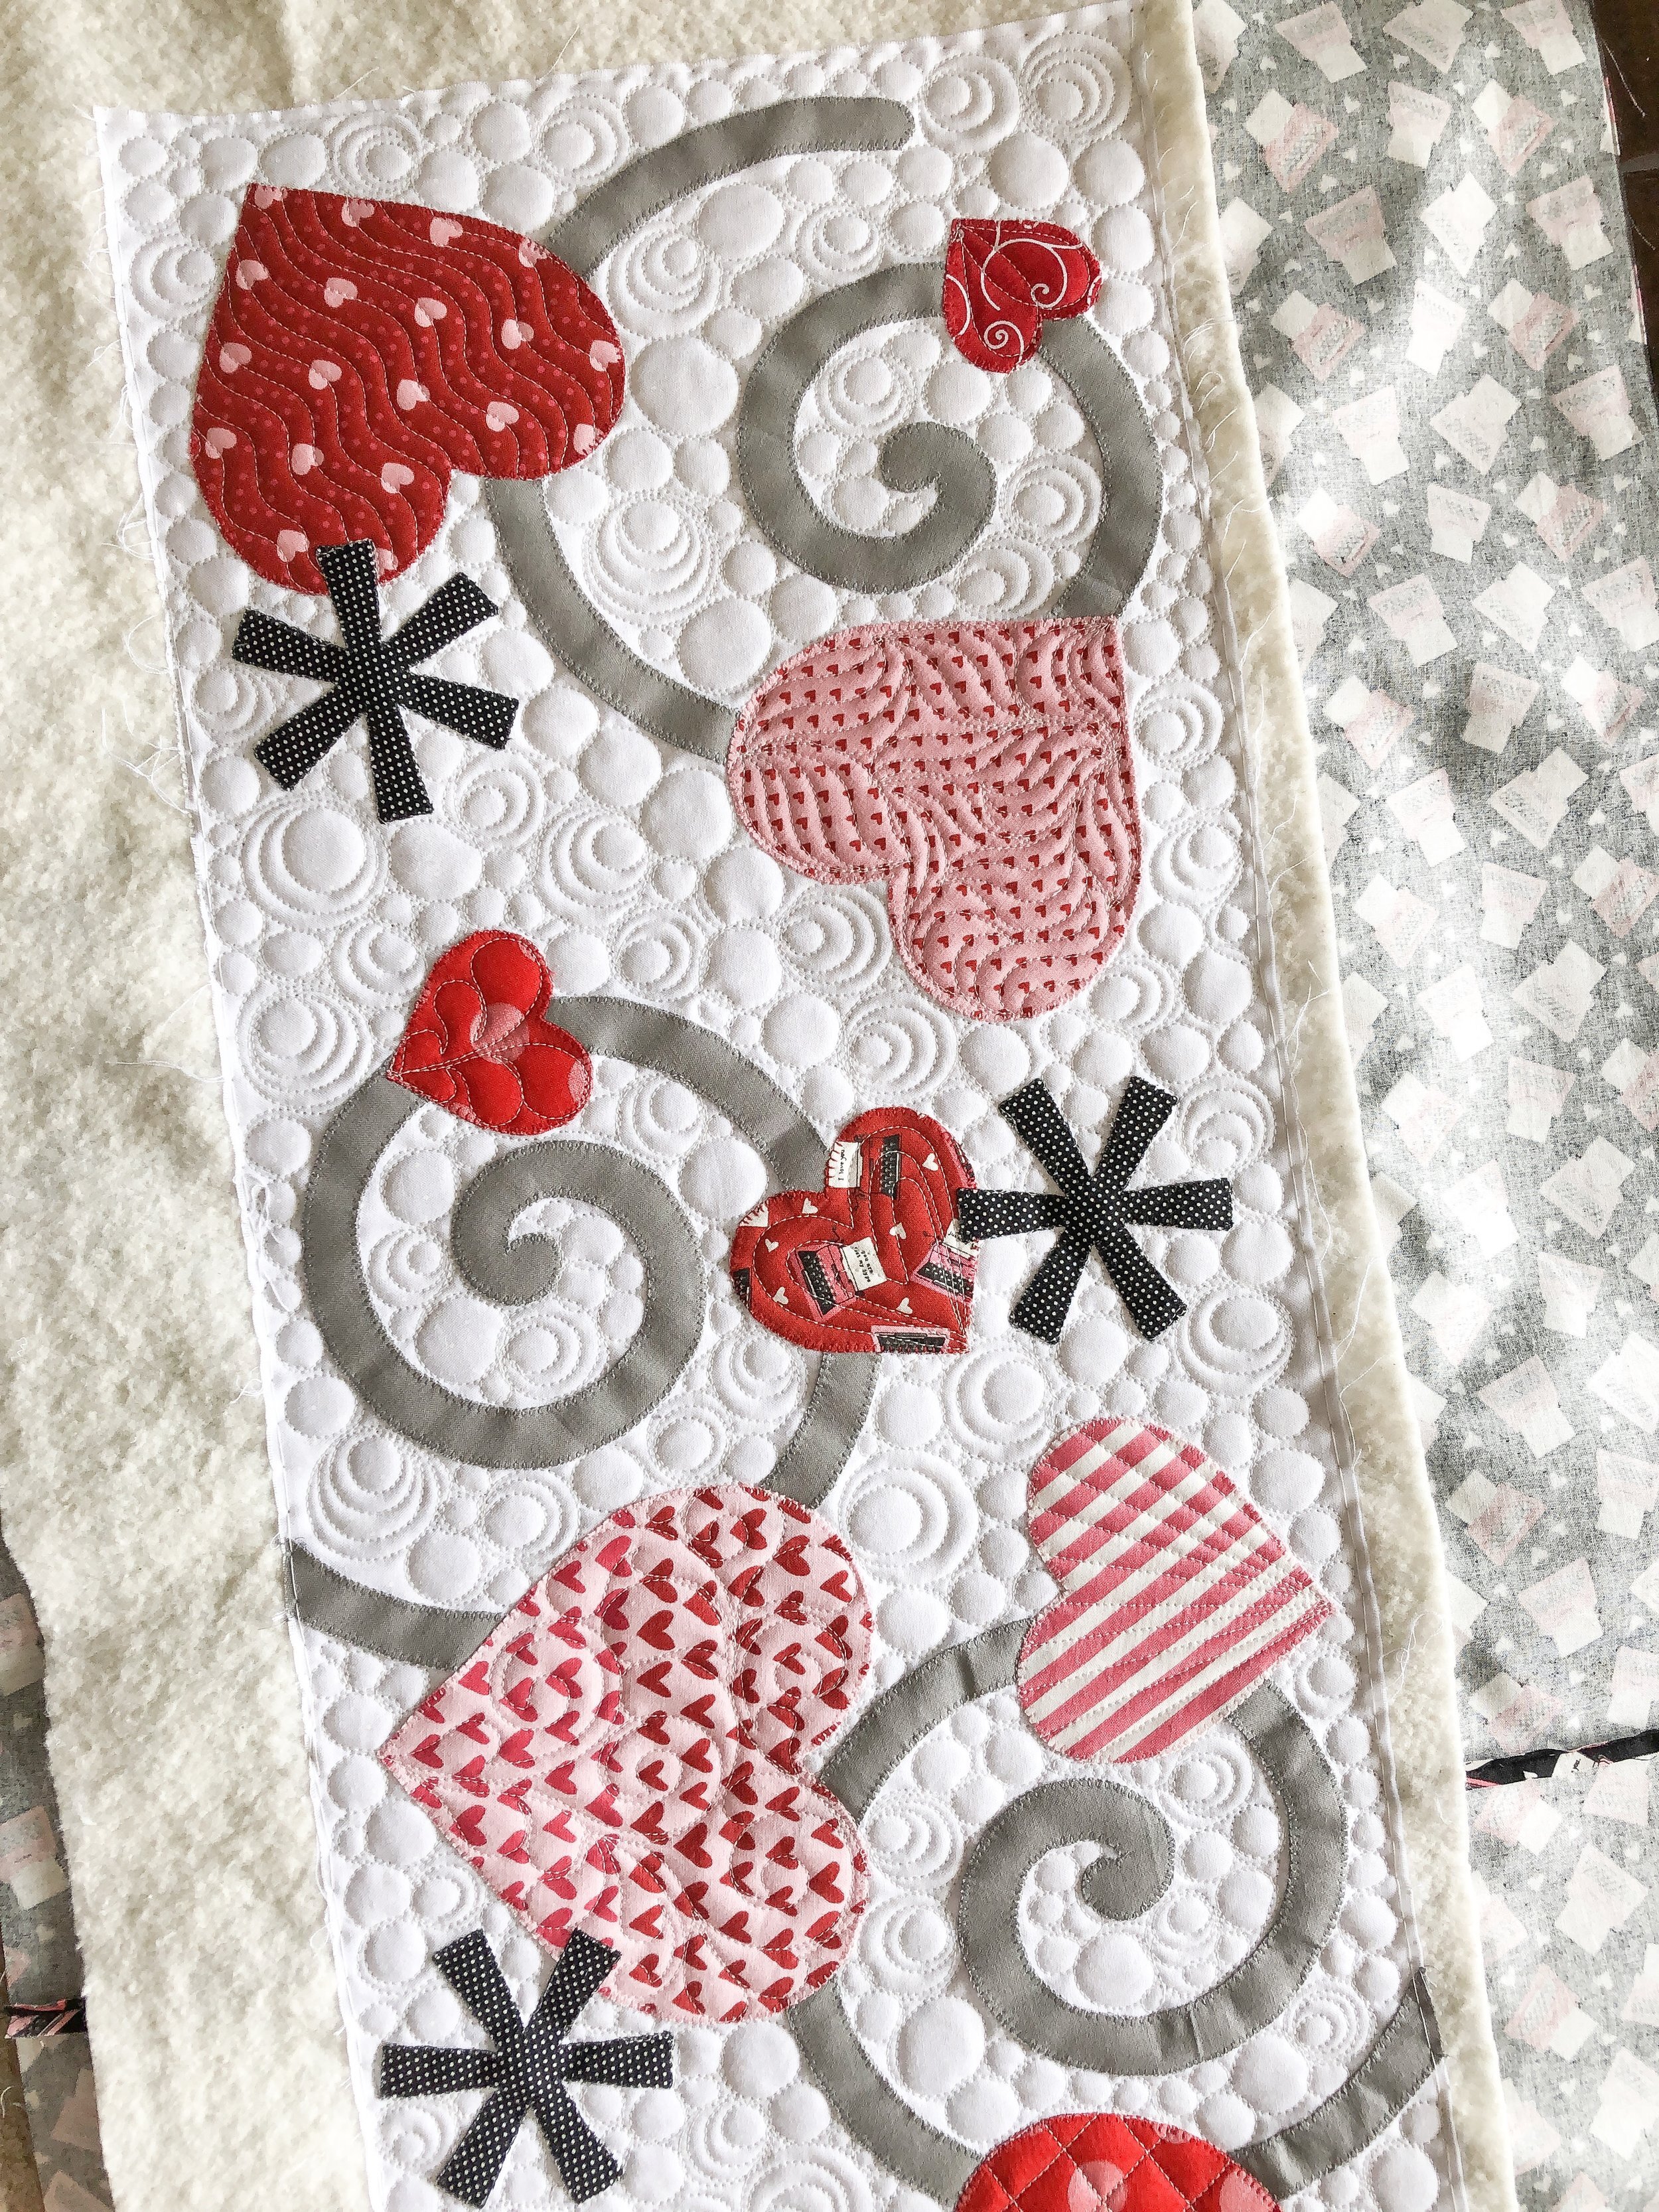
If you look super close, there are heart fabrics in this quilt…which I don’t know the name of, so she wanted a heart quilting design. I showed her Patricia Ritter and my Cupid©️ design, and she loved it. I think it looks so beautiful!!
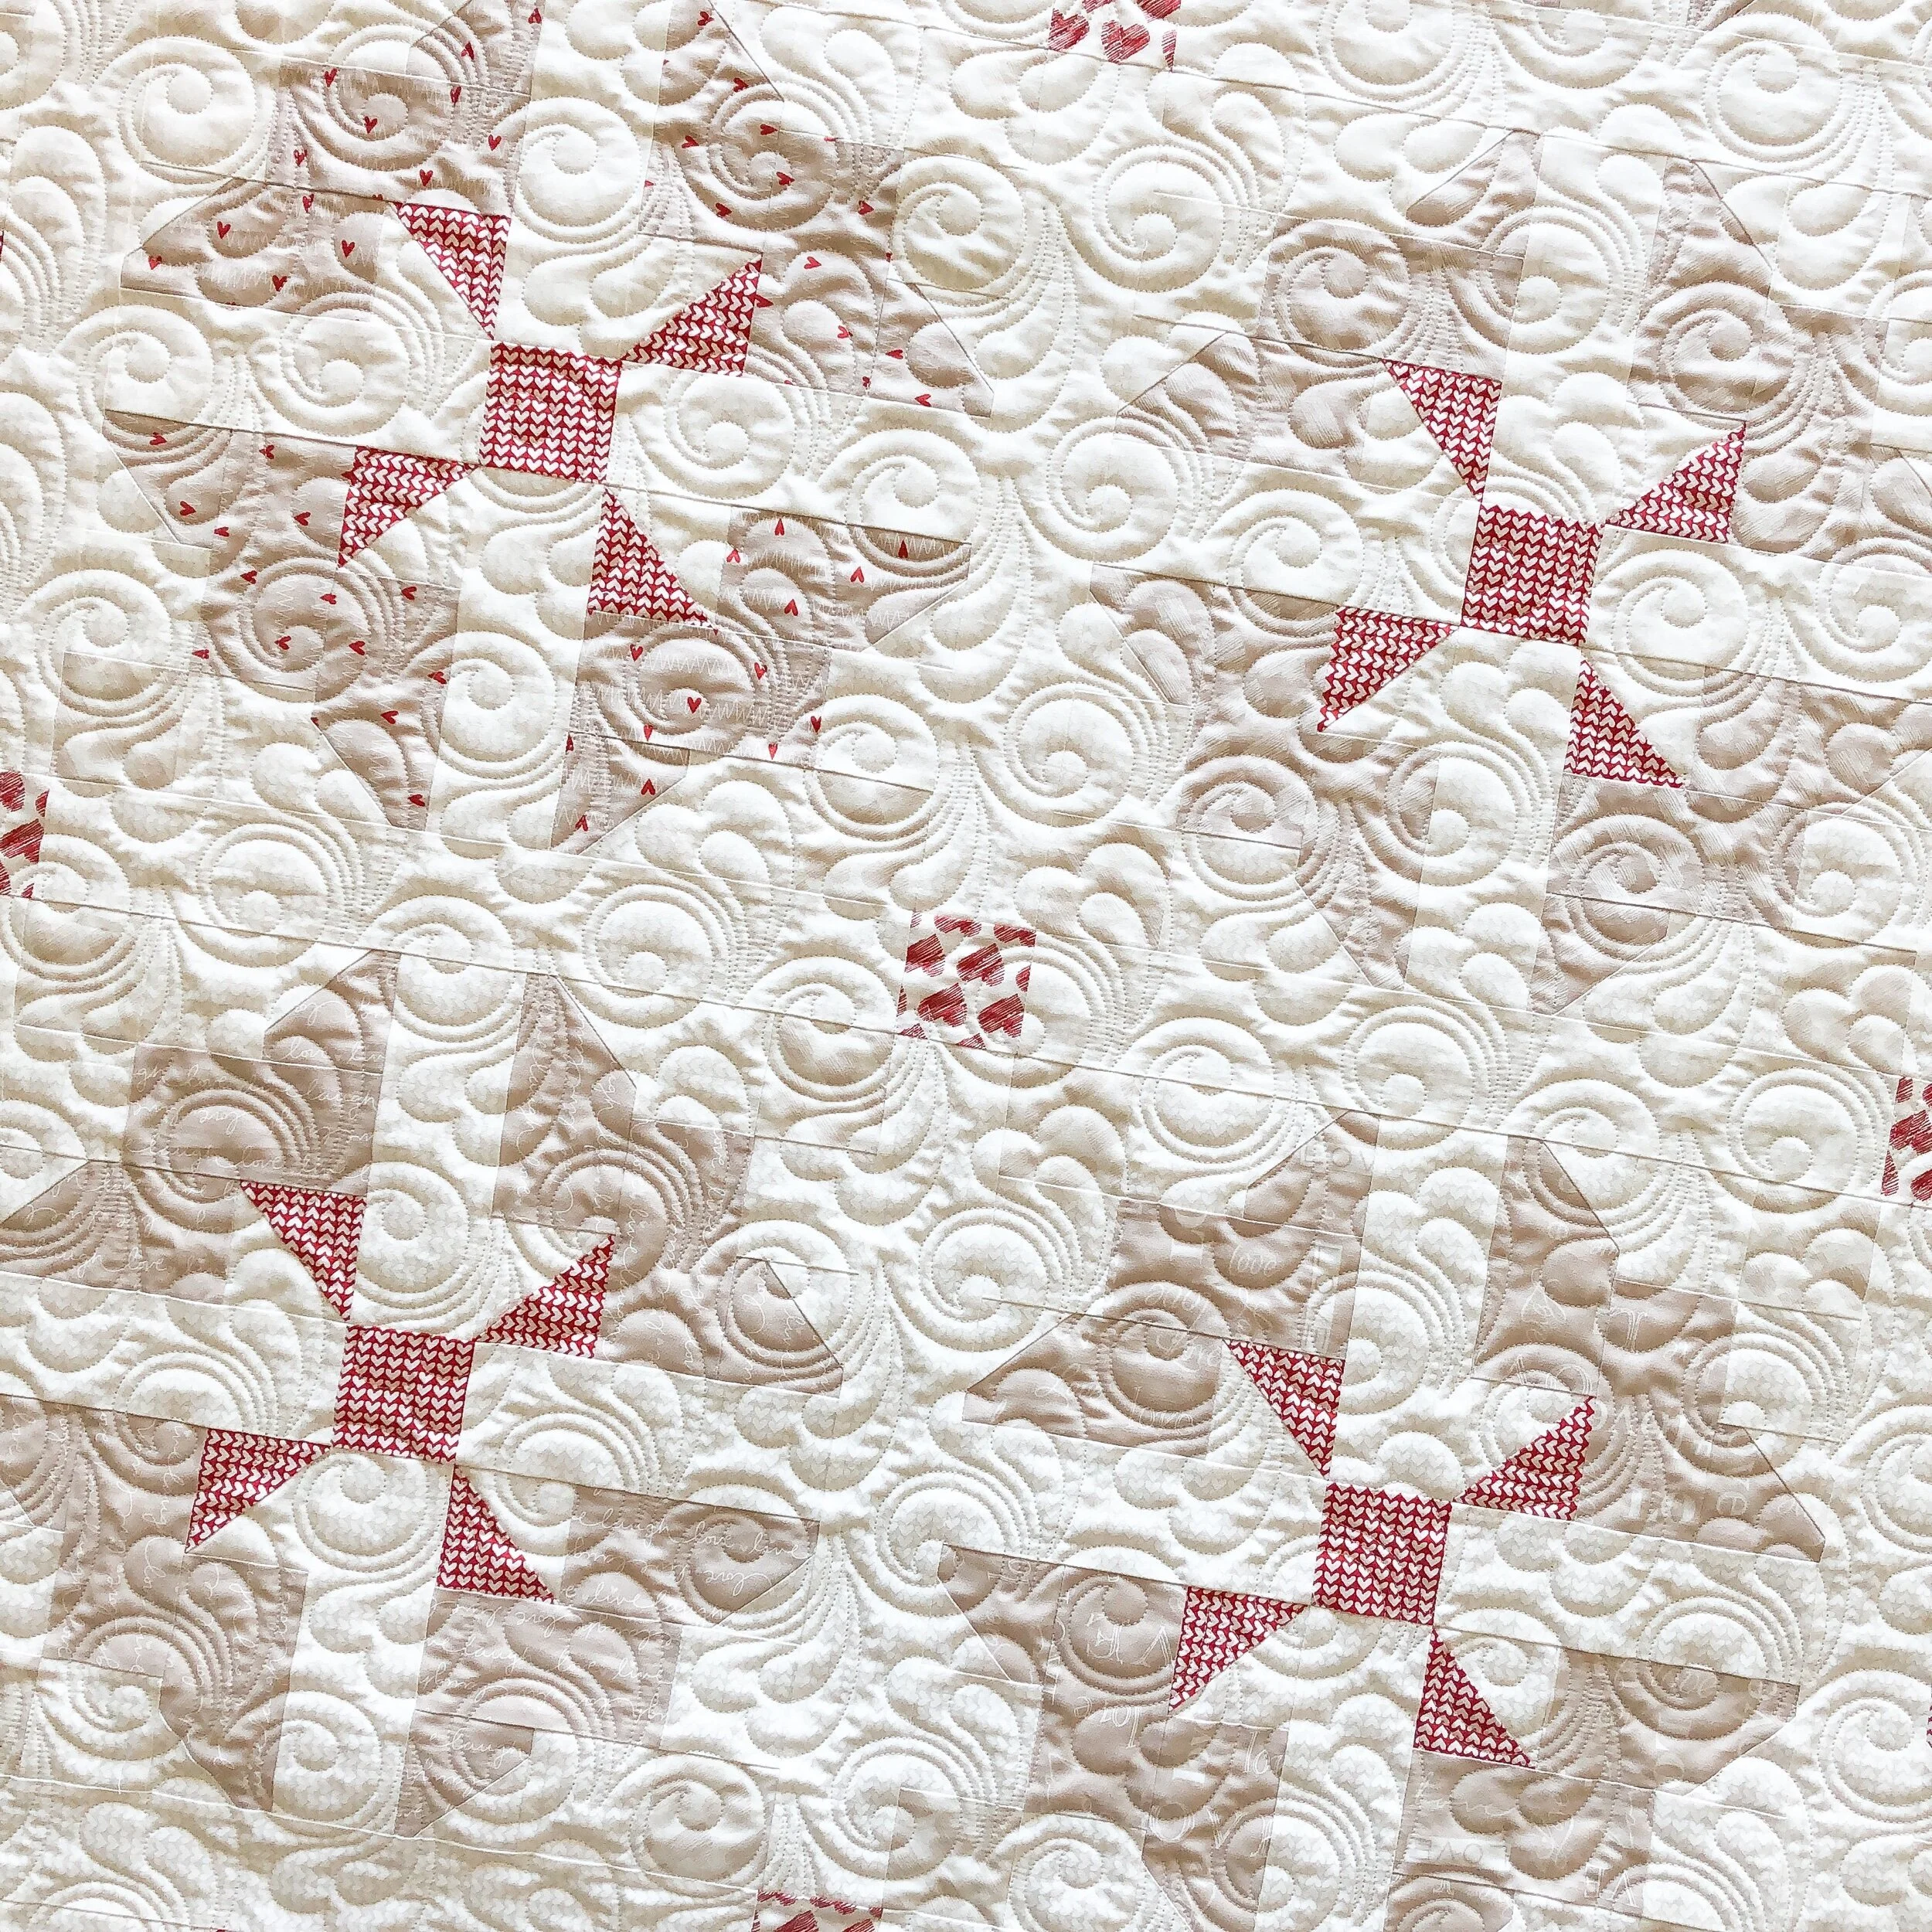
I used 8020 cotton poly blend batting and cream A&E Perma Core thread.

That swirly heart texture is my favorite!!!
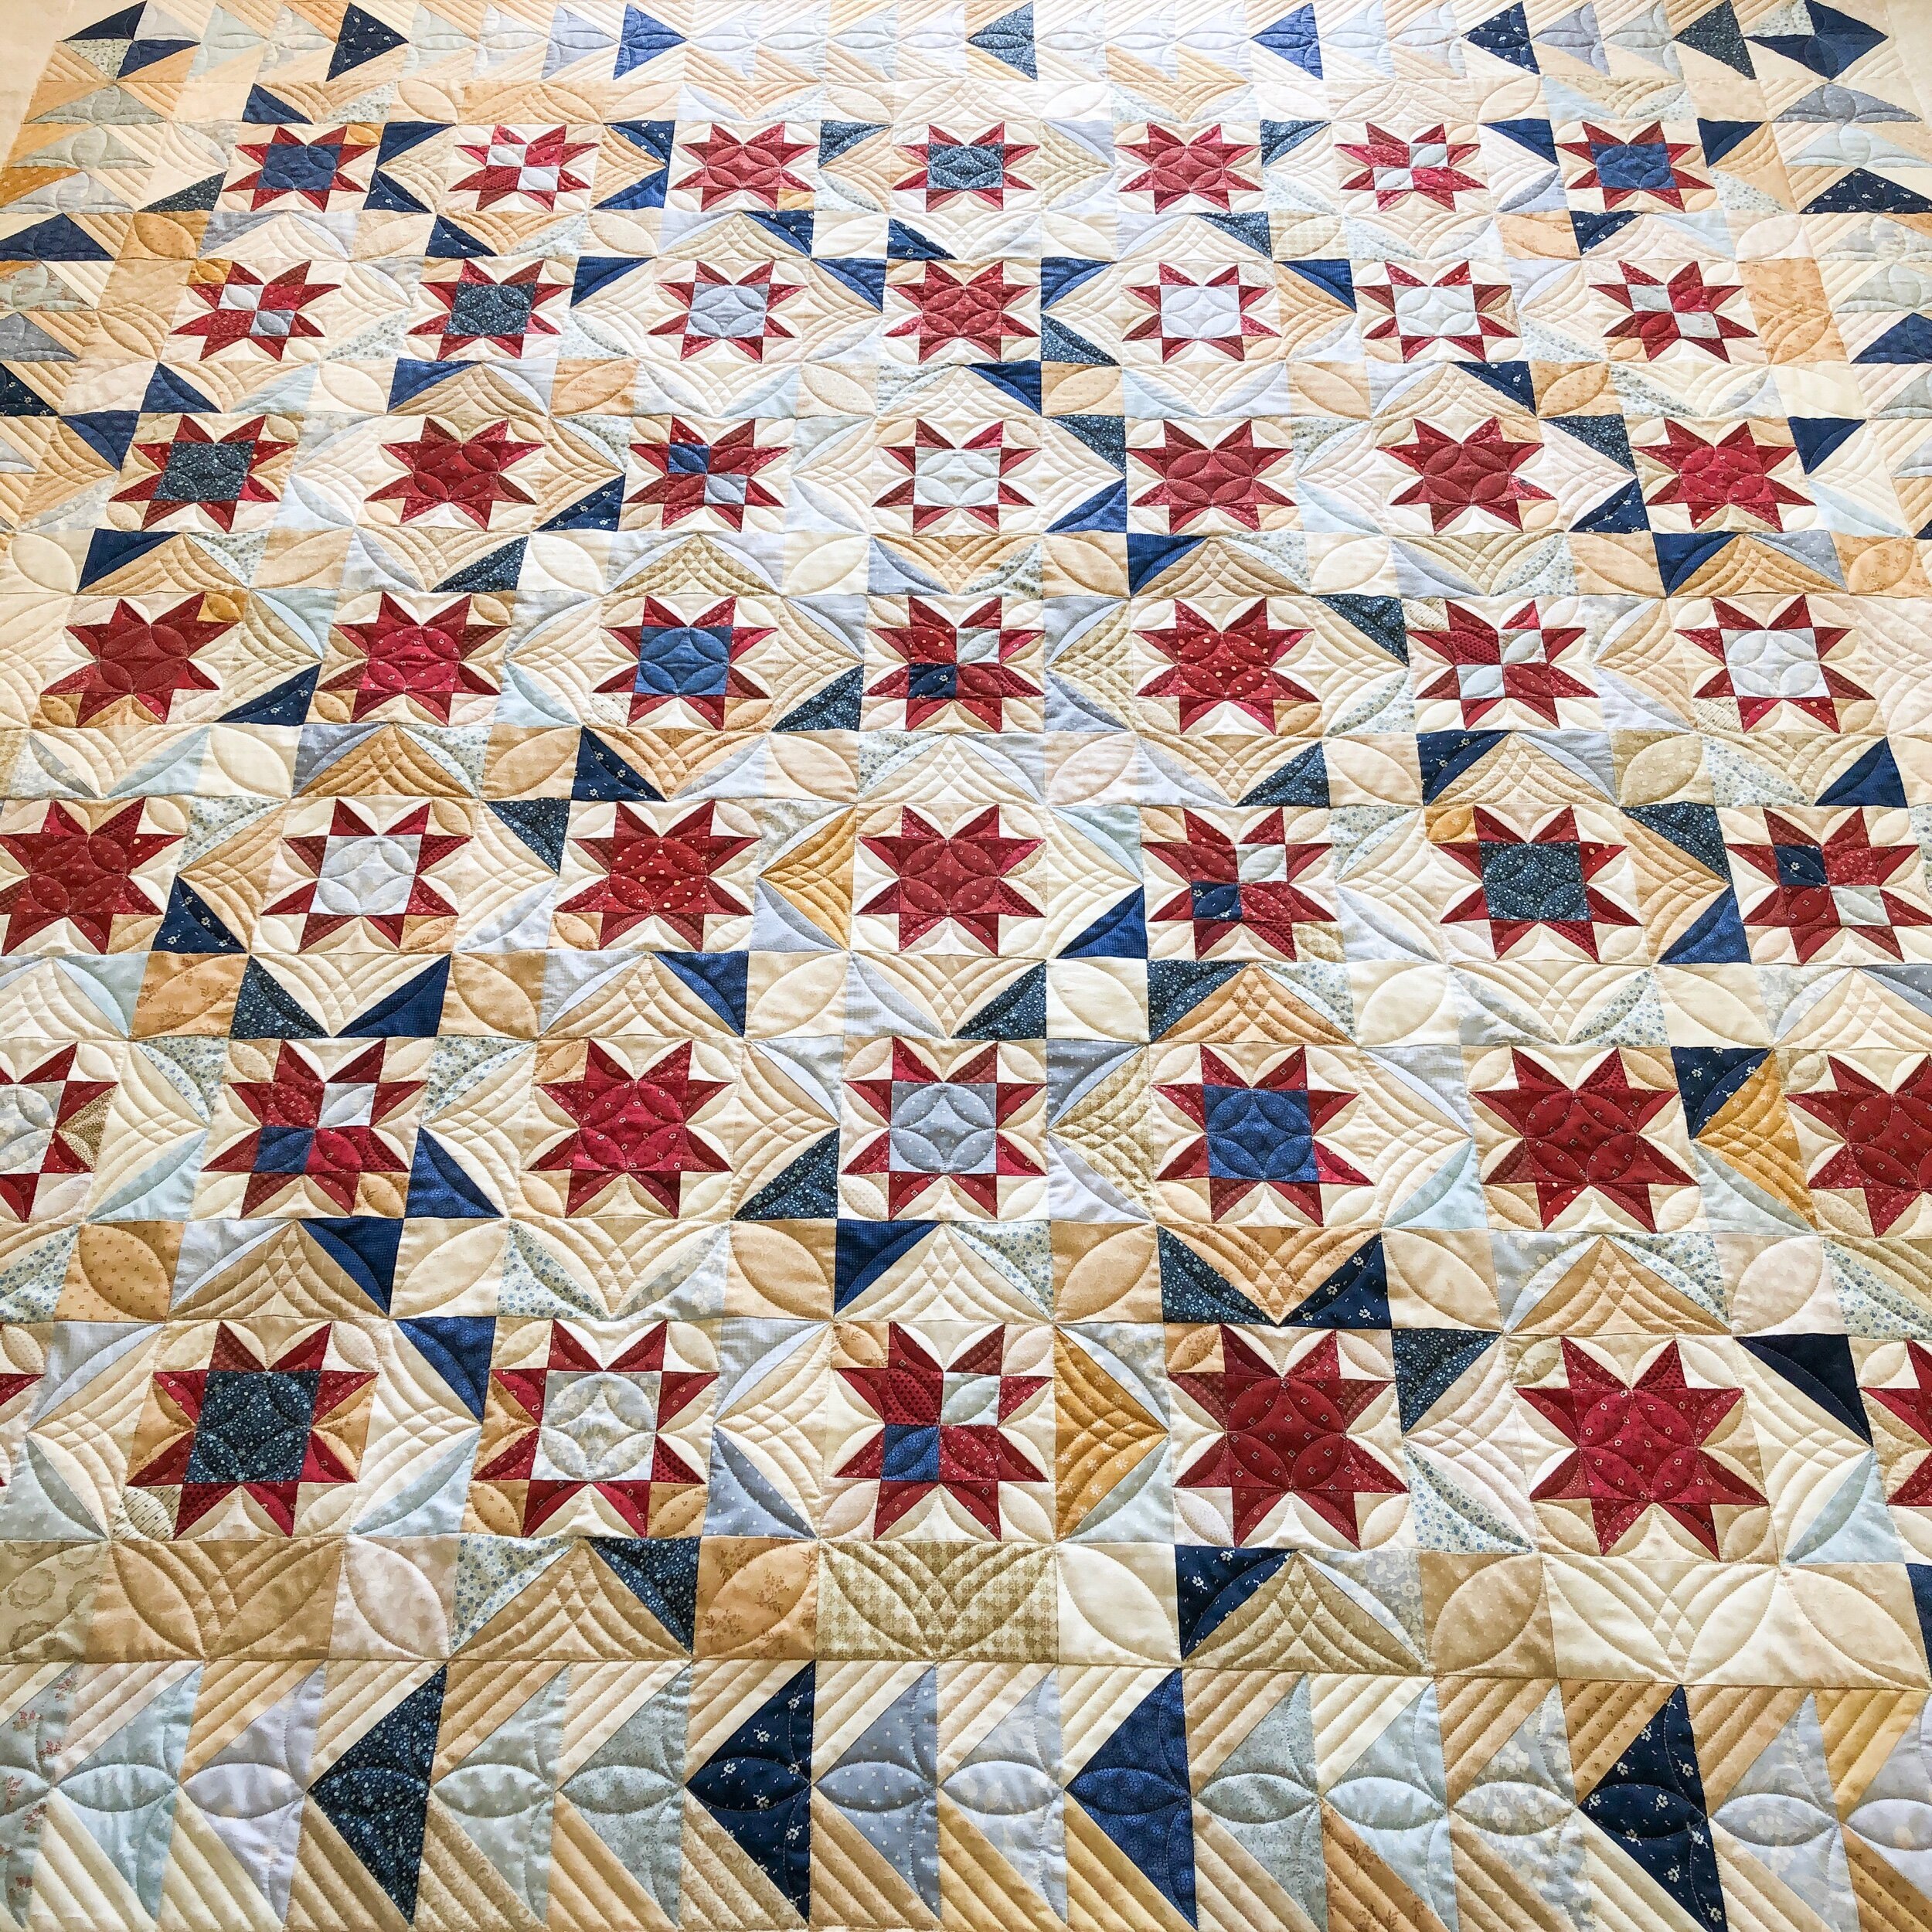
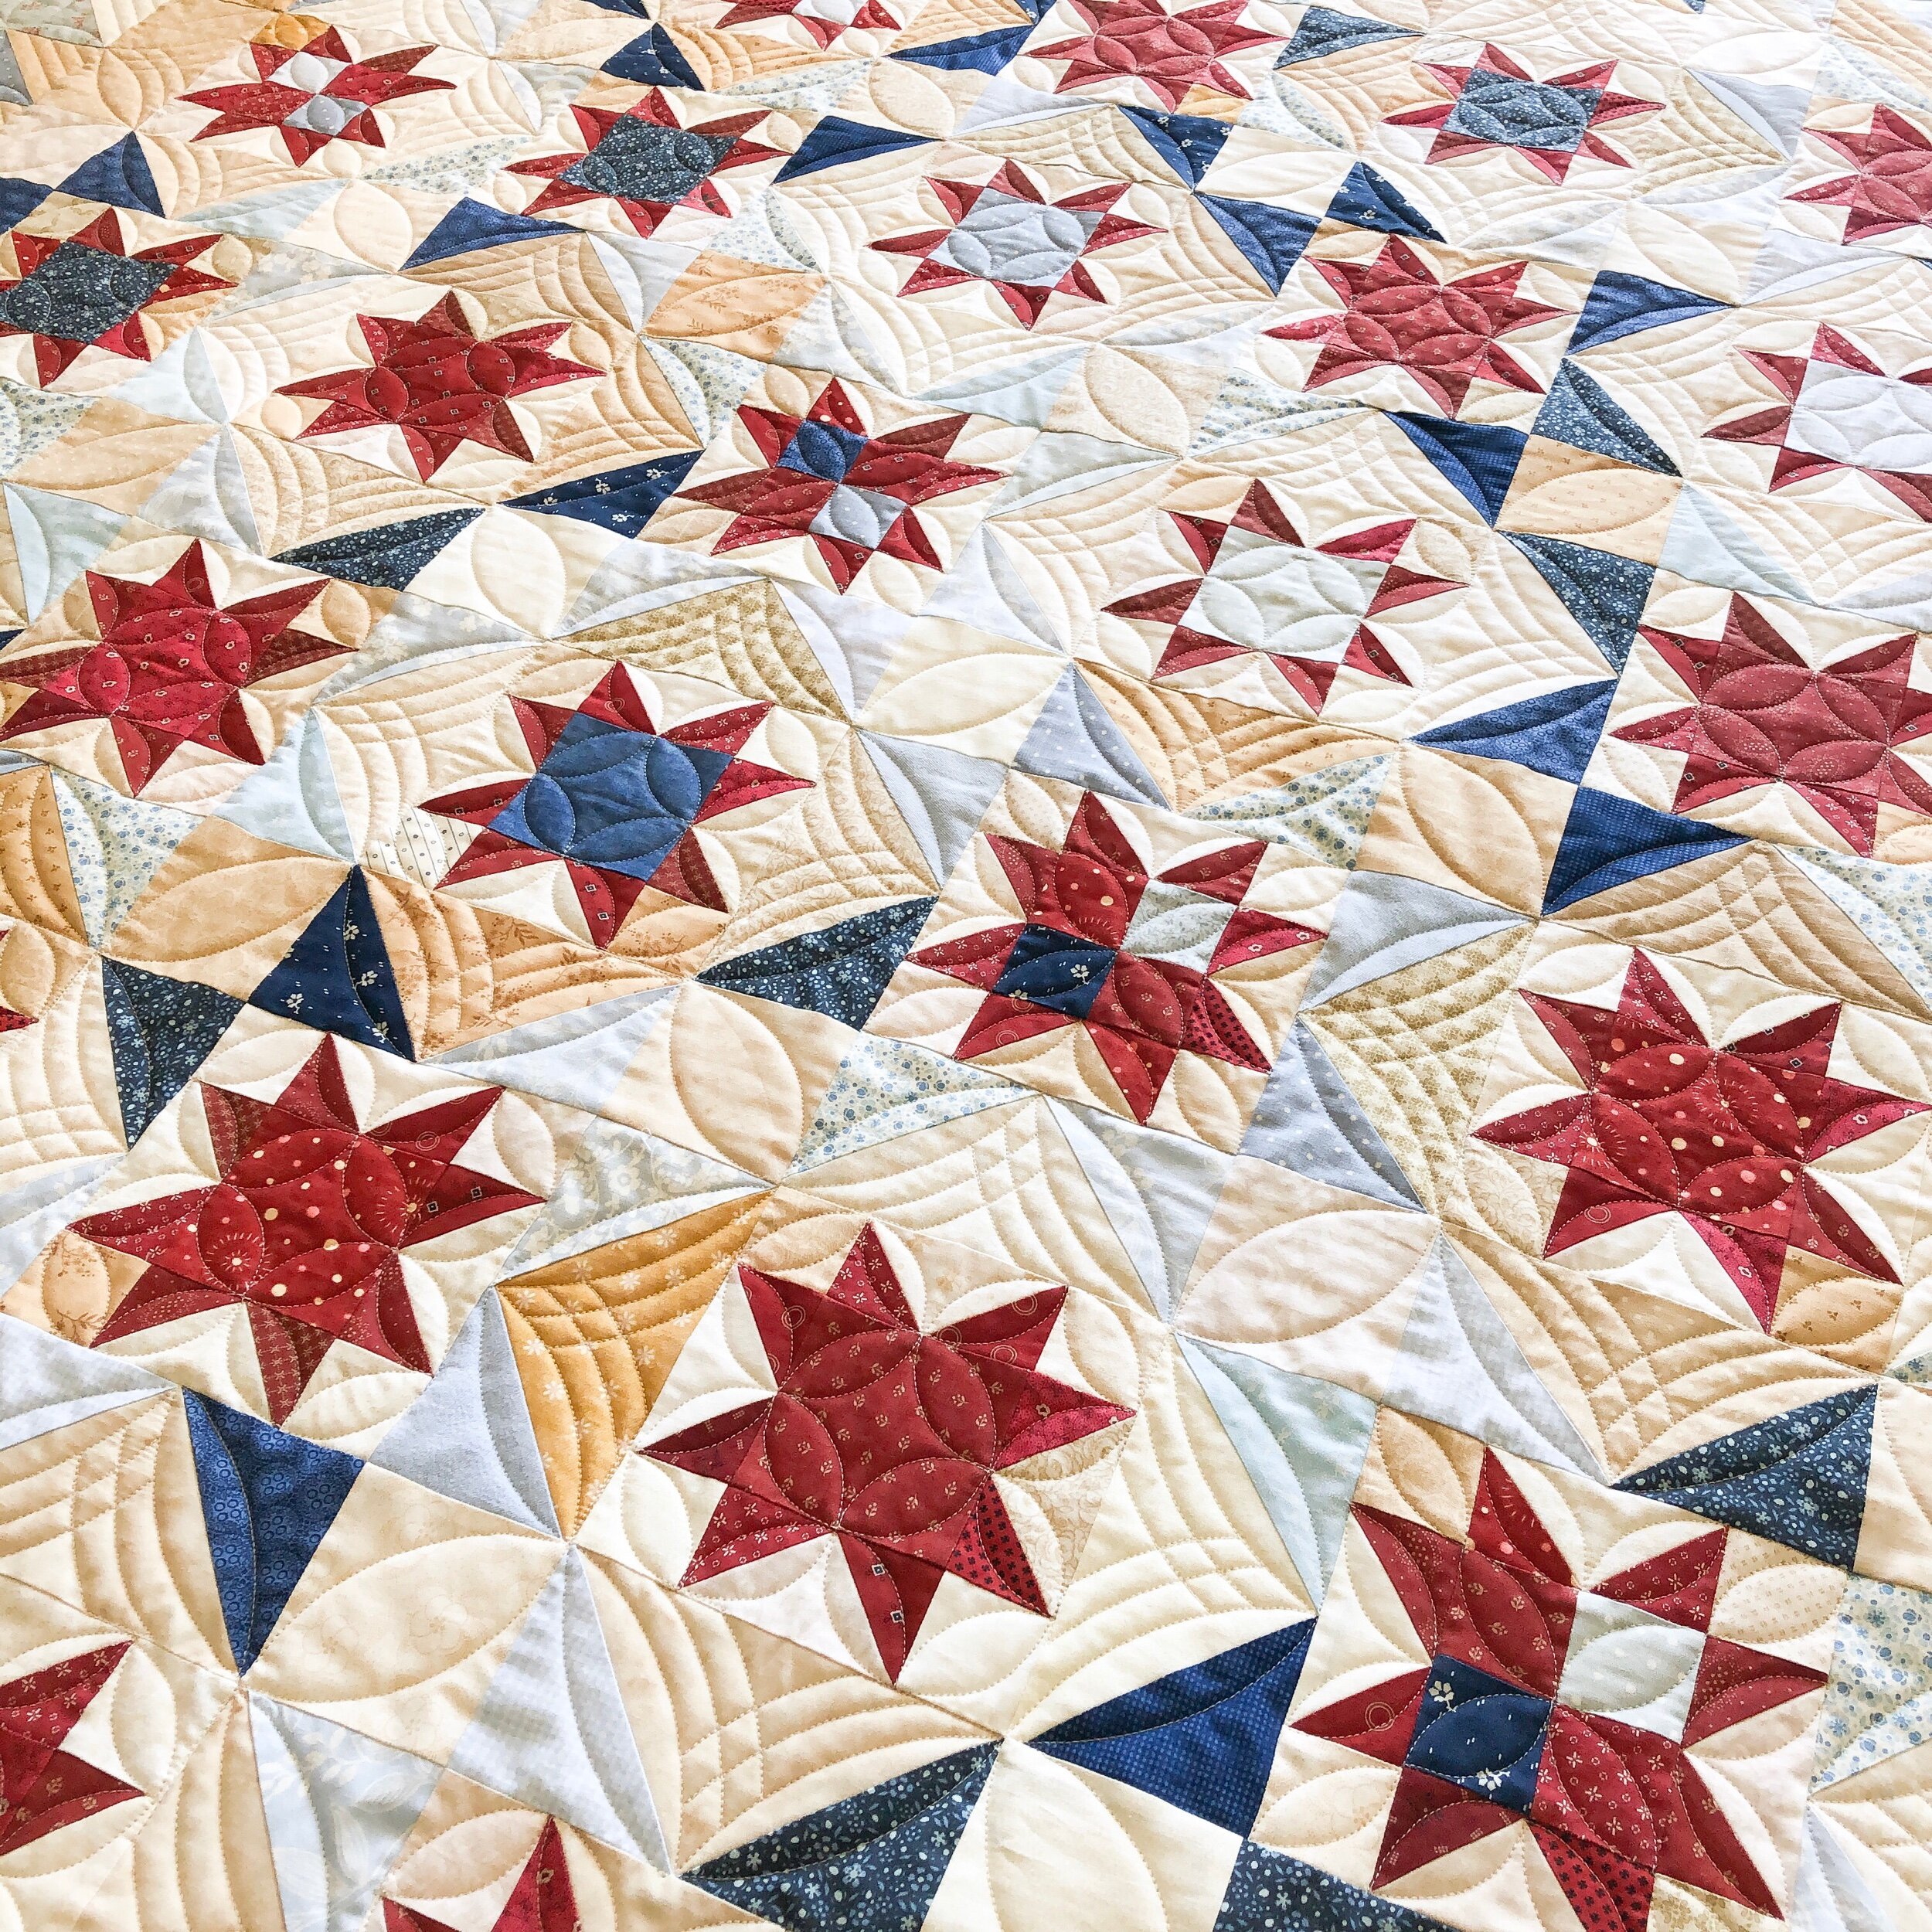
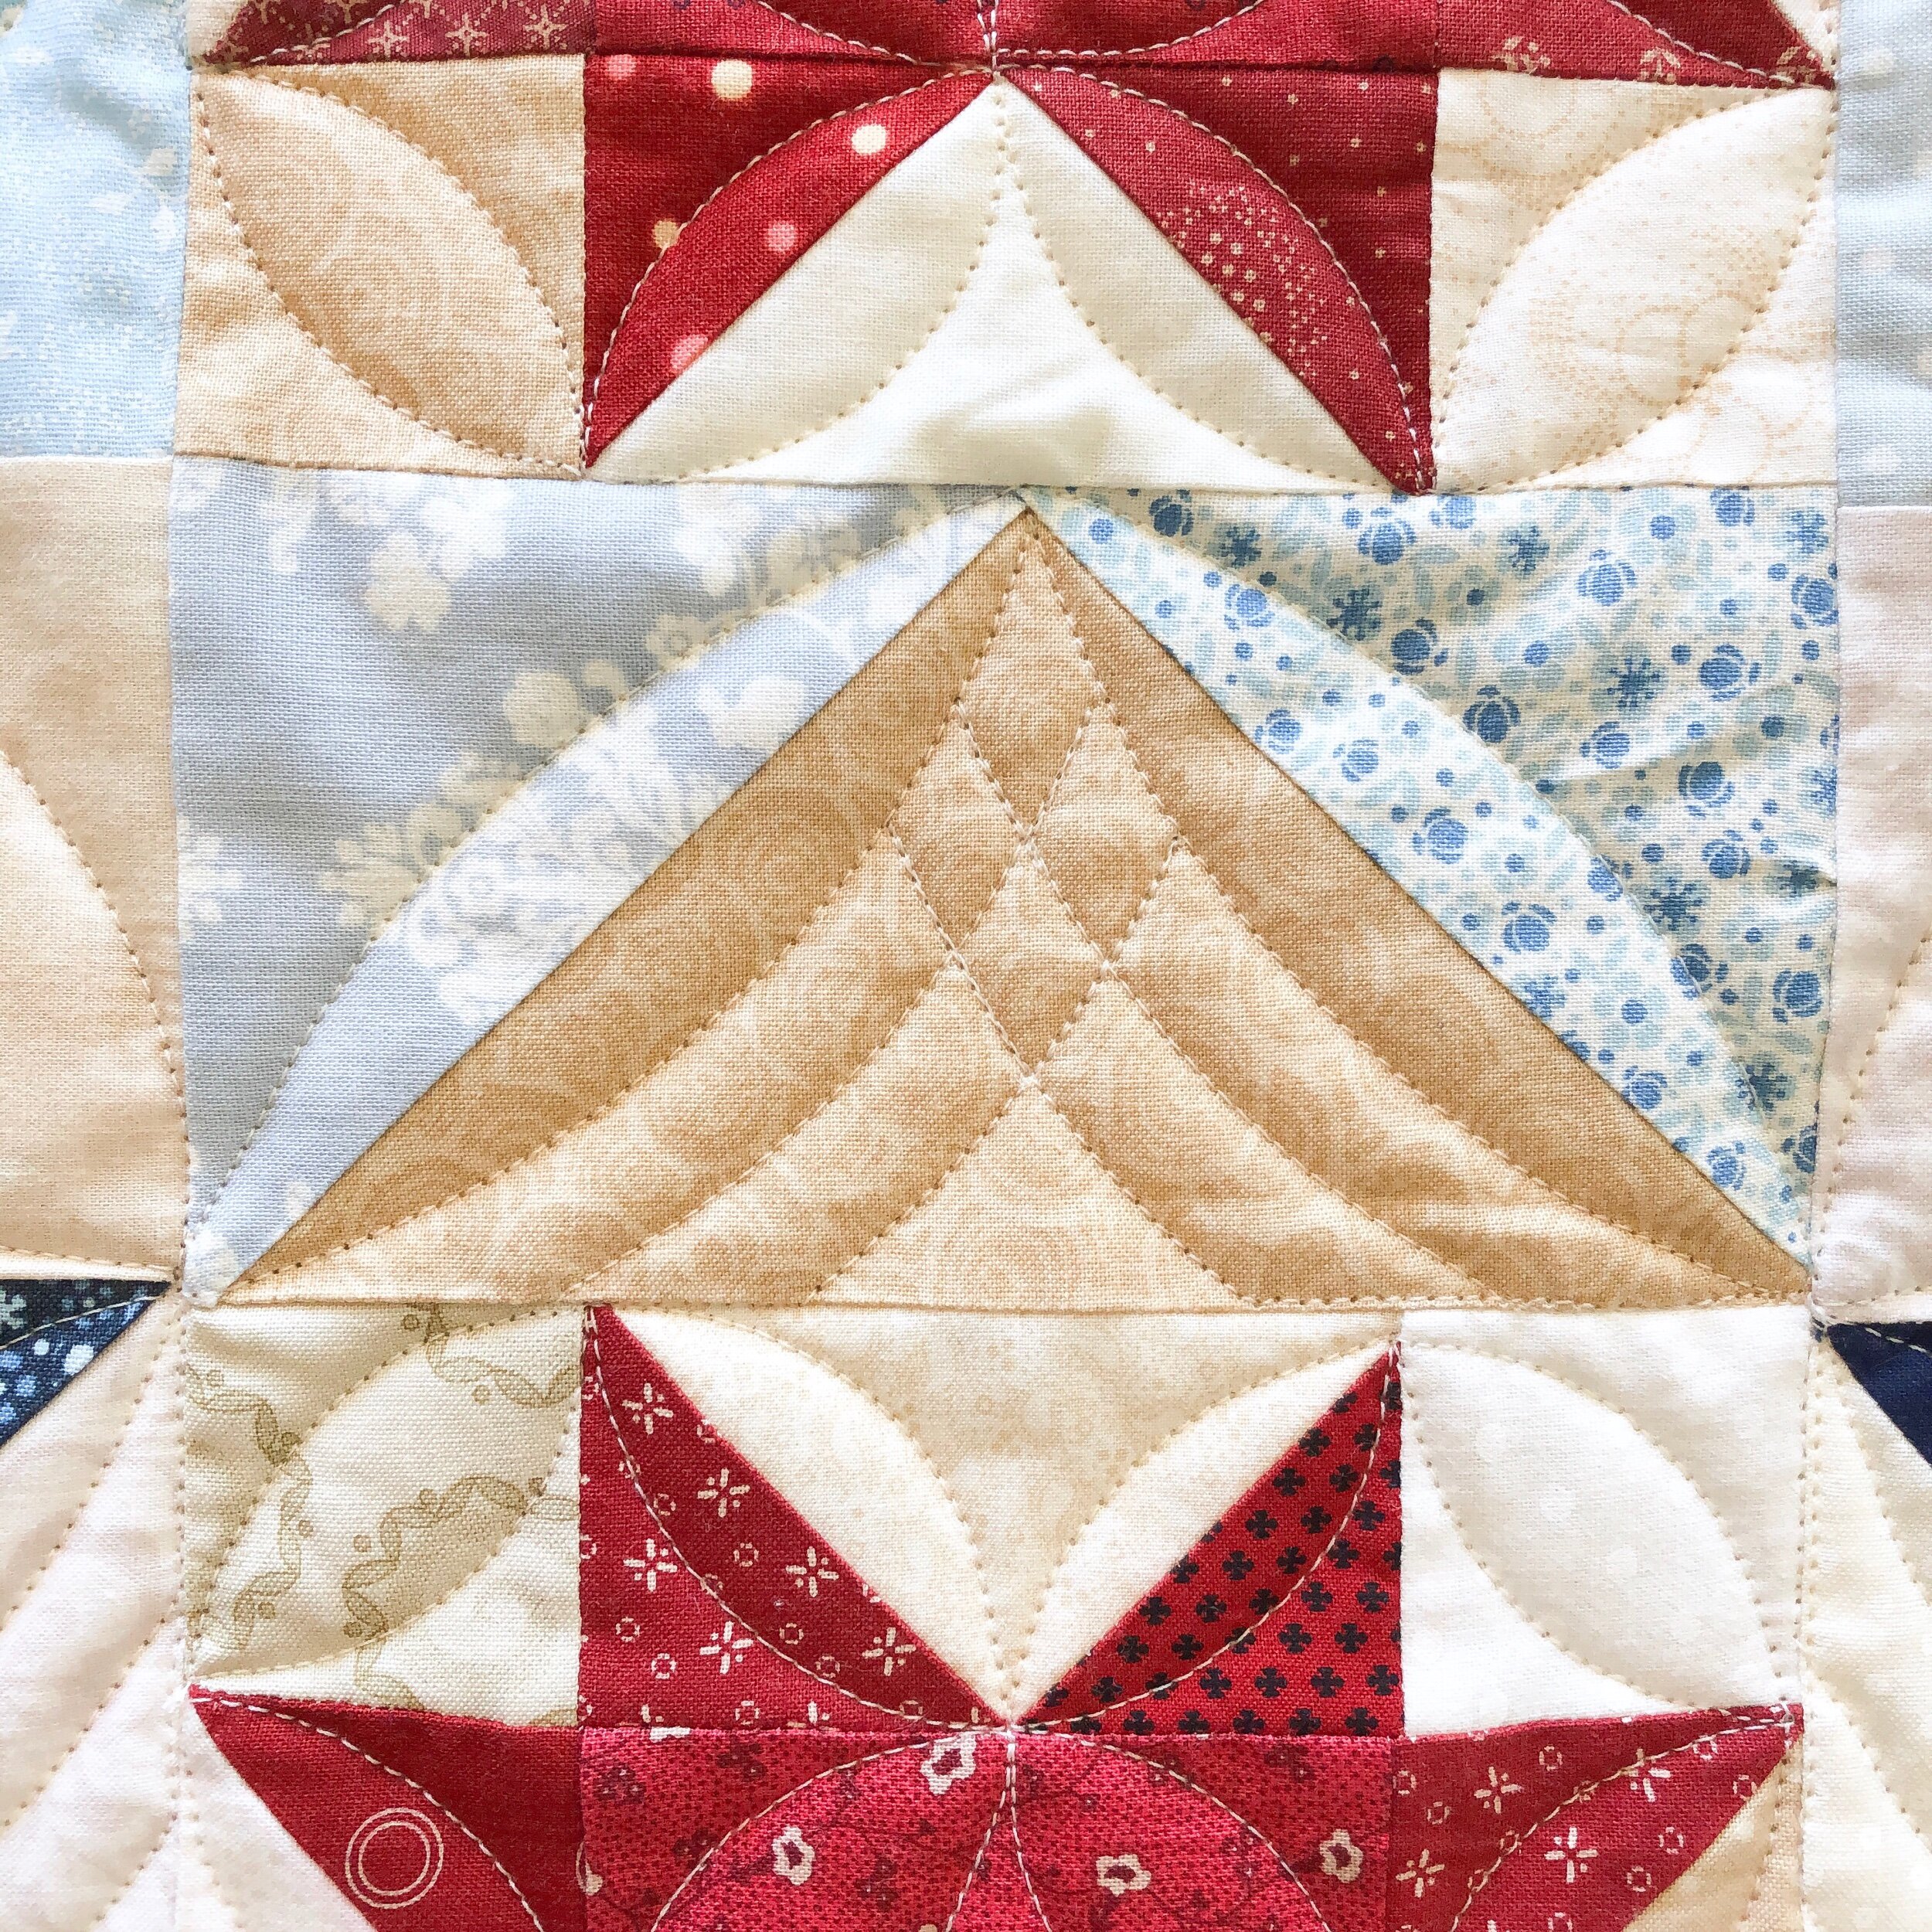
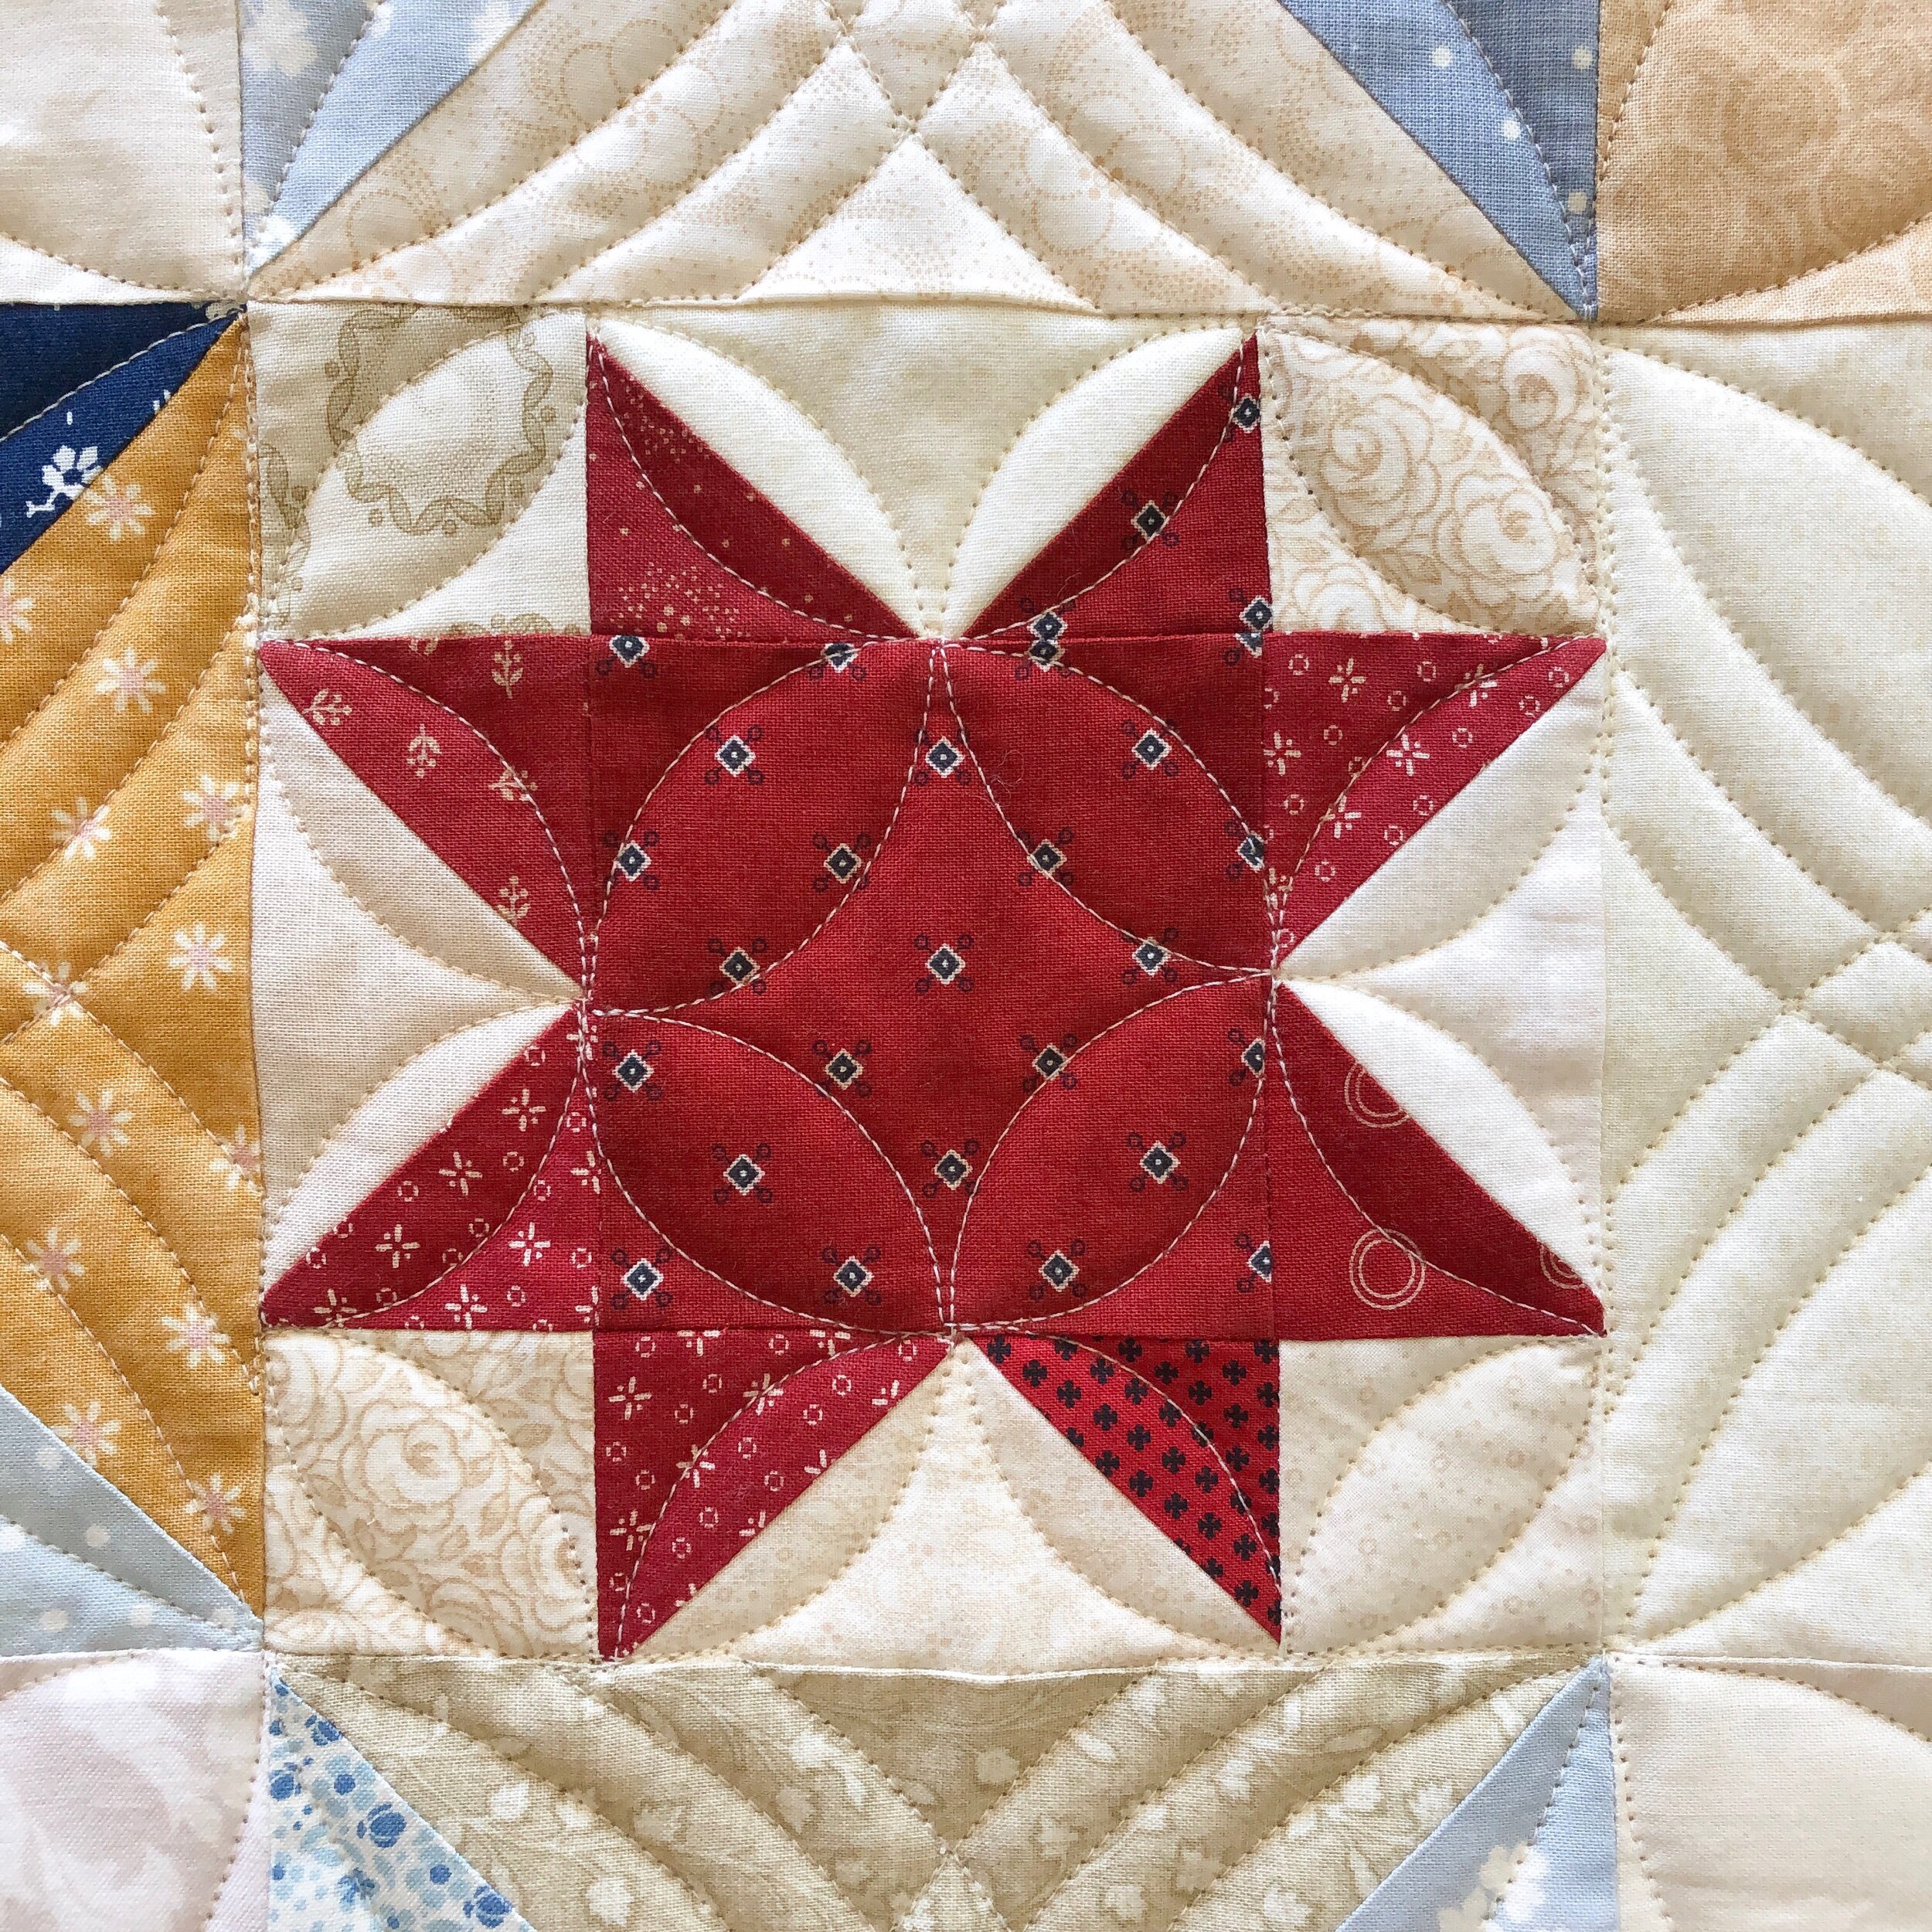
Next up…this incredible quilt made by Denise.
The pattern is called Heritage Square by Whirligig Designs.

Seriously incredible quilt!!!

Denise wanted my Squared©️ quilting design on this one. Which is great with all the blocks being on point.

I used a king size 8020 cotton poly blend batting and cream A&E Perma Core thread.
This next one, is one I’ve wanted to make for awhile…someday! Also made by Denise.

This is called Vintage Lace by Lo & Behold Stitchery. This is also king size, and I couldn’t quite get the whole quilt in one picture, so head to the link above on Lo & Behold Stitchery’s website, to see the full quilt.
I used cream A&E Perma Core thread and winline’s king size 8020 cotton poly blend batting.

To go with the Vintage Lace theme of the quilt, we decided on Taka by Keryn Emmerson which is available at Urban Elementz.

This quilt is backed with a fluffy Minky, which adds a puffiness to the quilting texture.
Also made by Denise, this fun tree wall hanging is called The Giving Tree and is in the book by Sew Kind of Wonderful called Mini Wonderful Curves.

She wanted wood grain quilting, which I did freehand. Then I used my 4” Circle2™ ruler to quilt the star.
This texture is so fun!!

I used Linda’s Edge ruler to quilt the echoed v’s on the trunk.

I used cream A&E Perma Core thread and Winline’s 8020 cotton poly blend batting.

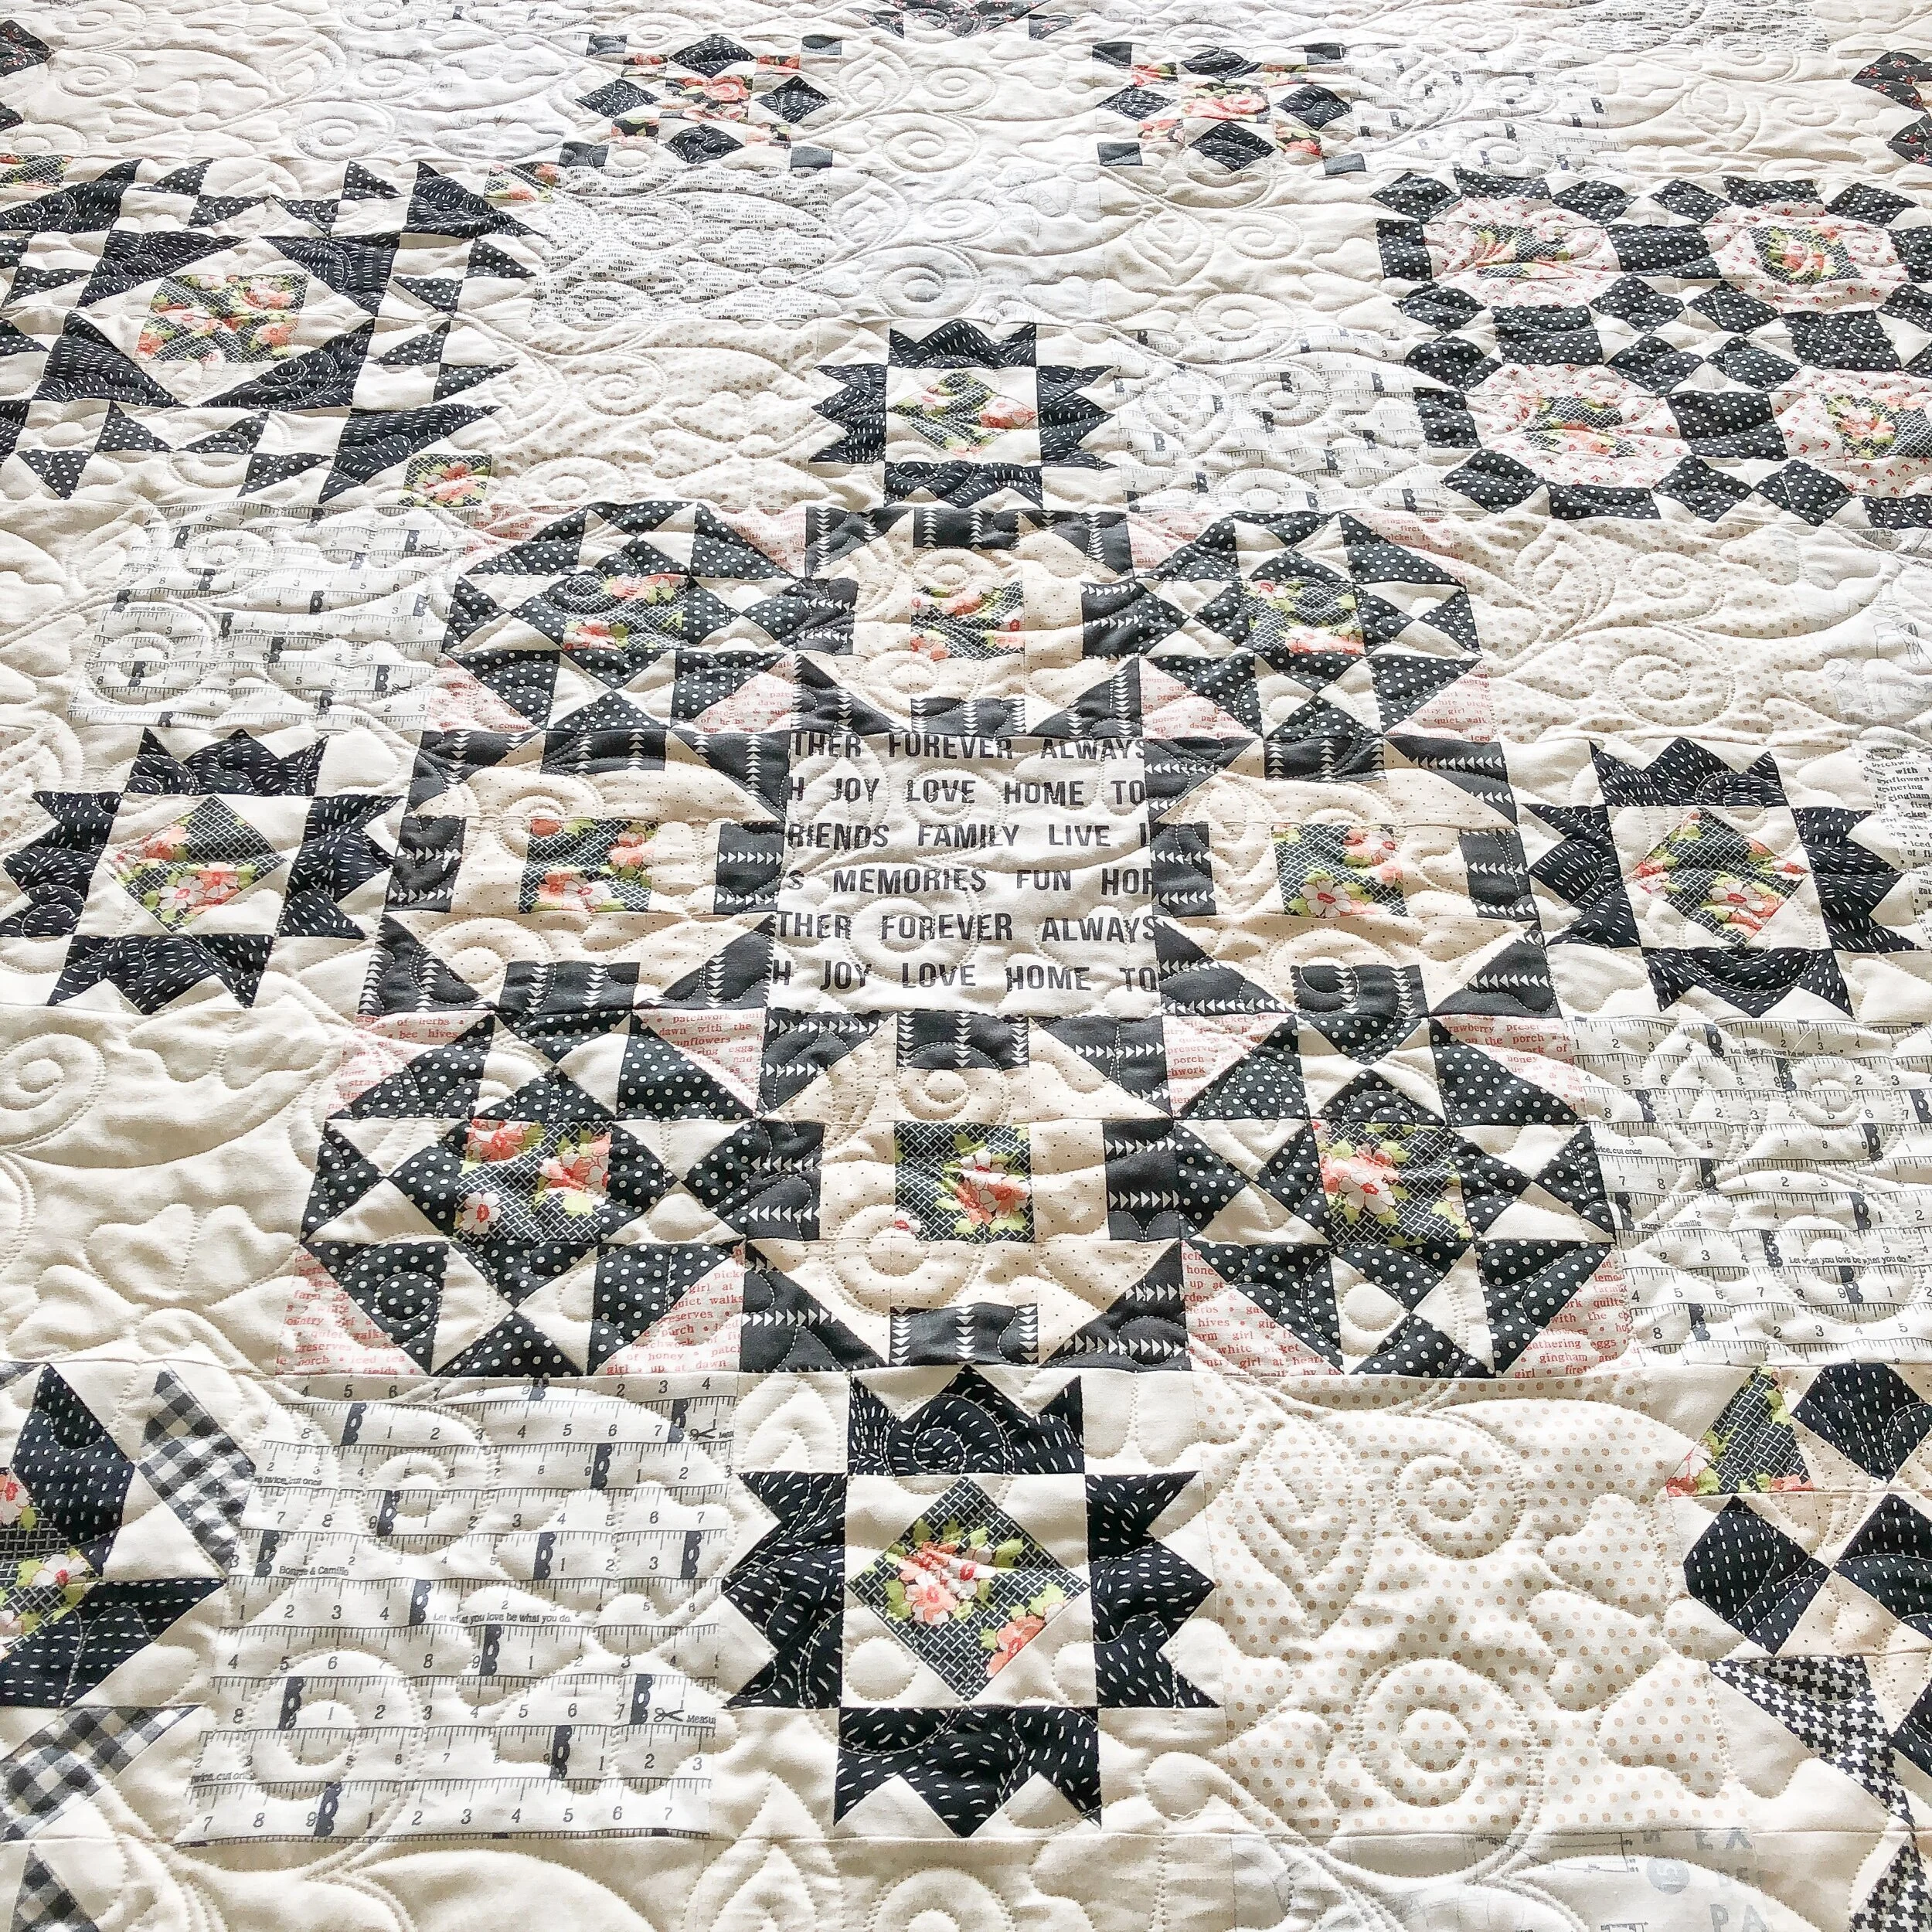
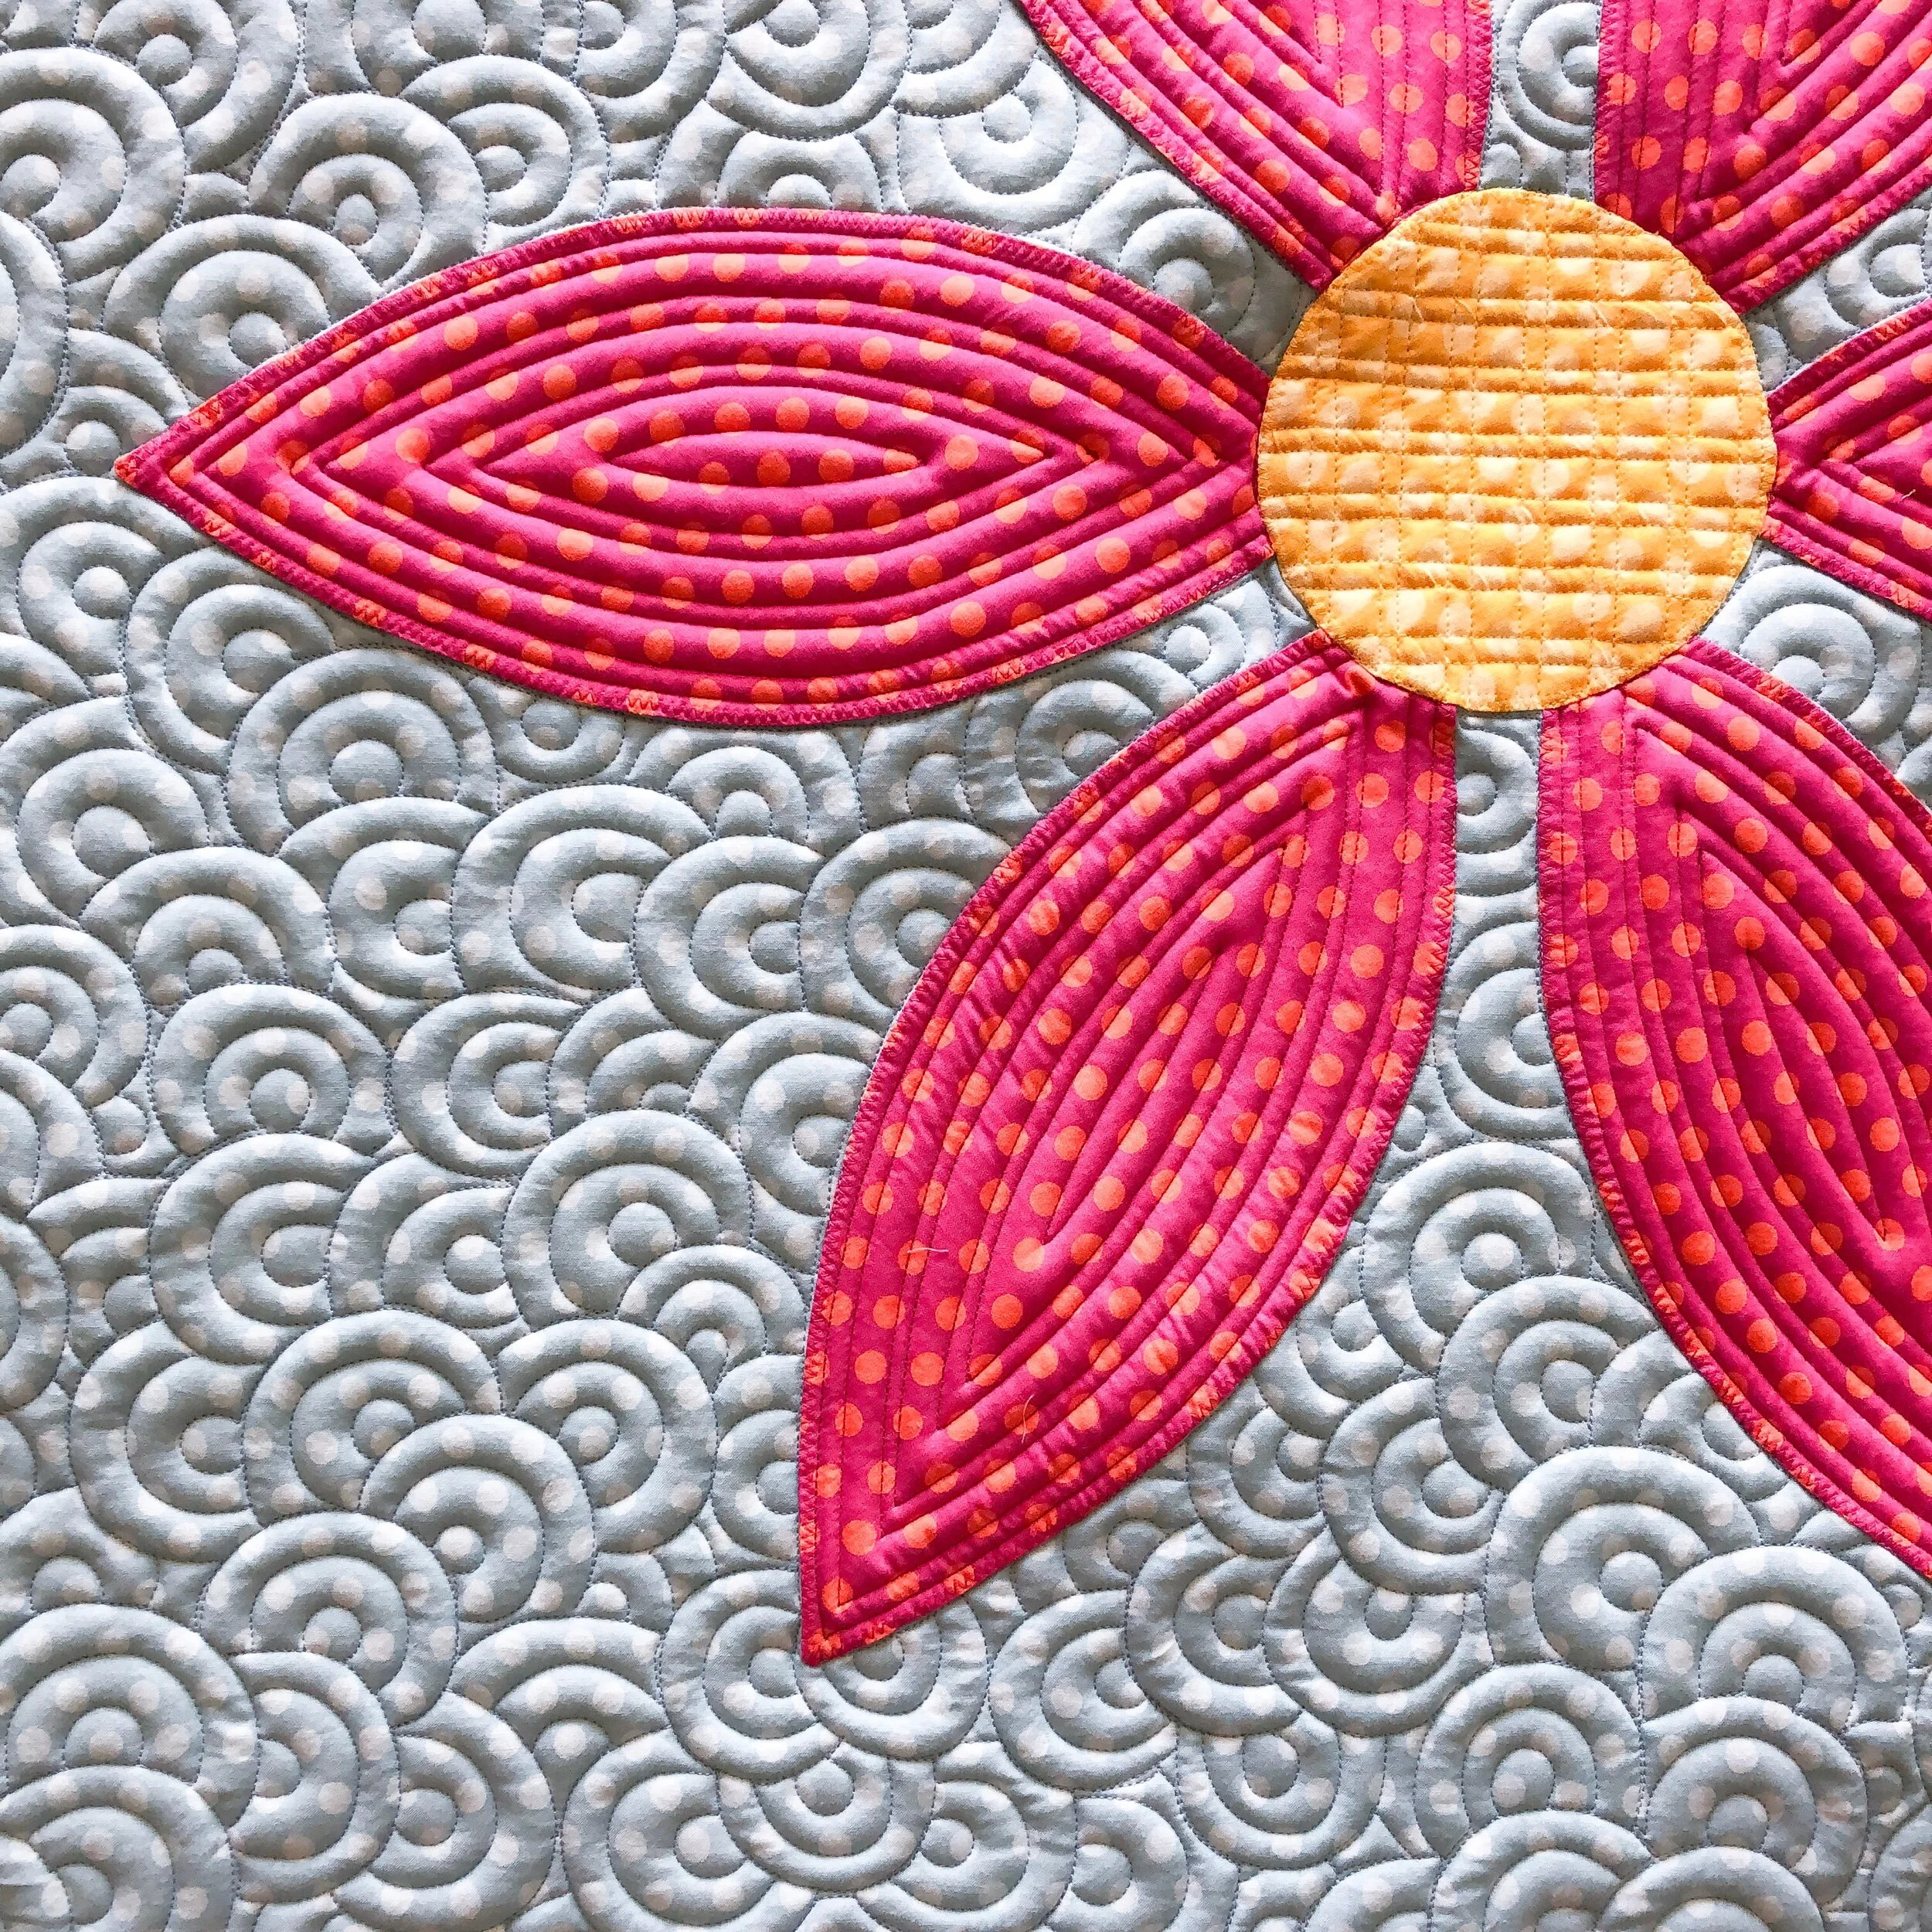
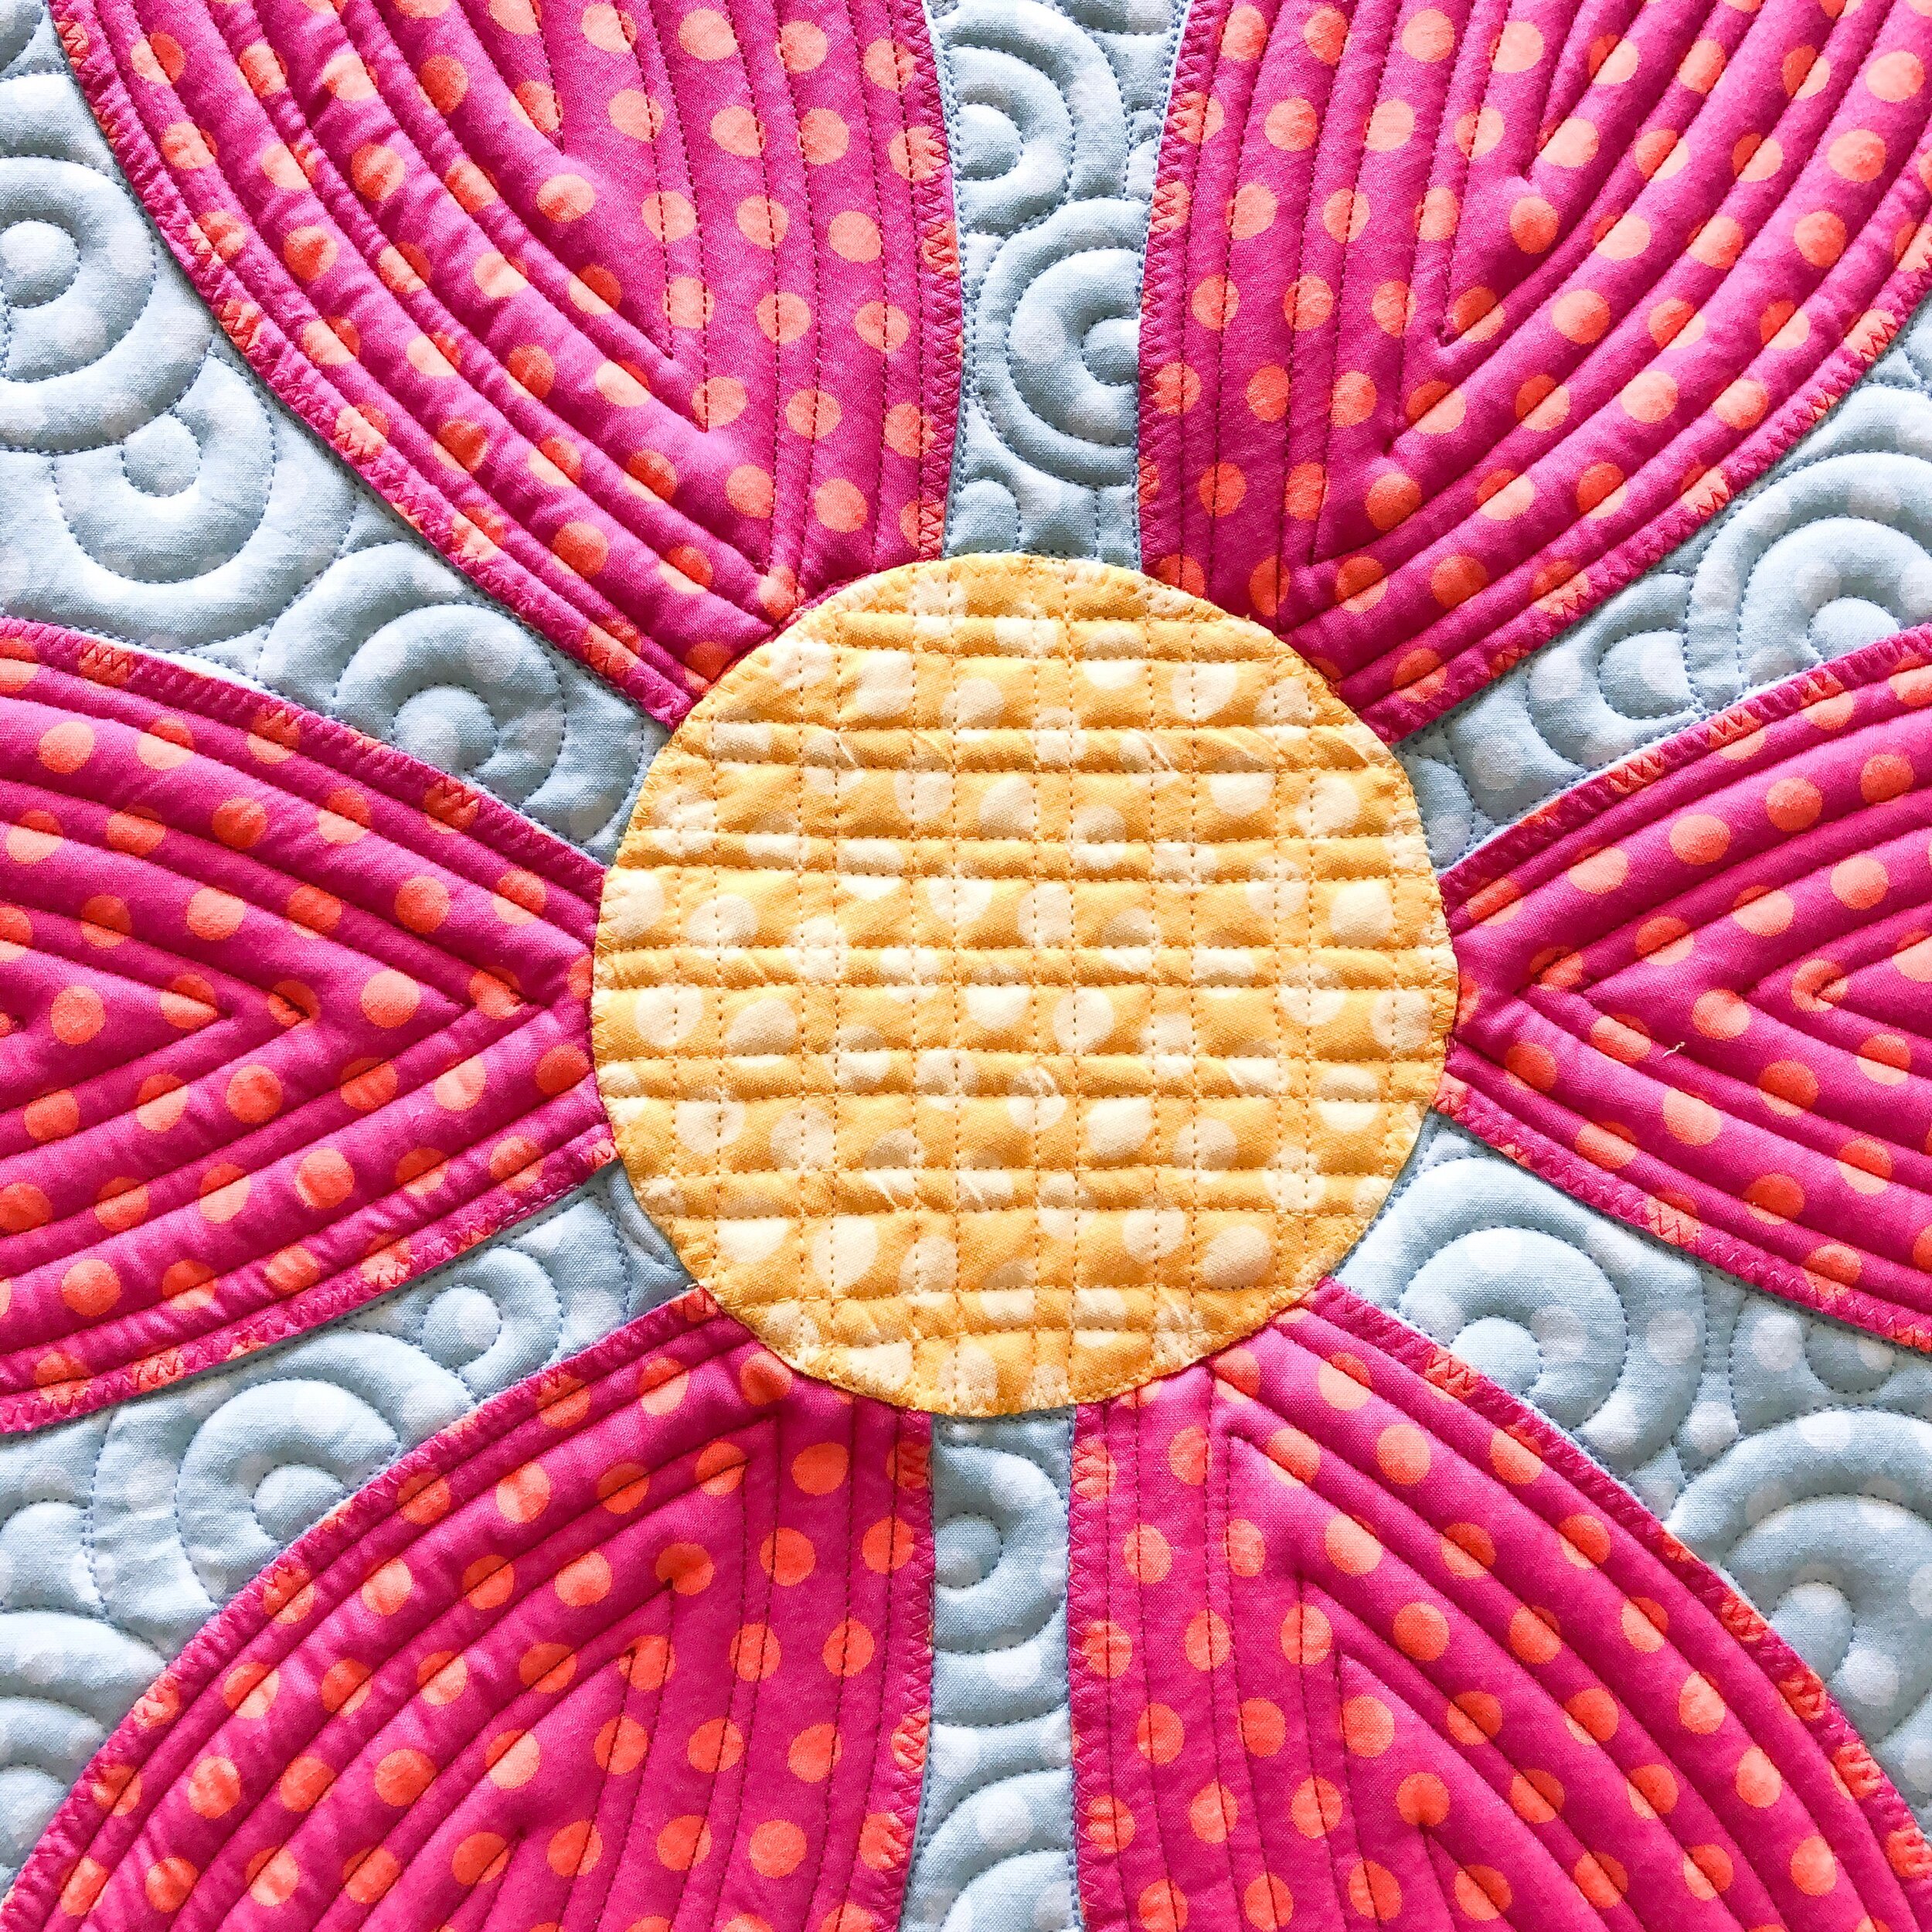
Next up, this beautiful Charcoal and Cream block of the month quilt, made by Barbara. Pattern by Fig Tree and Co. This was a block of the month that ran last year. So, you’ll have to read the details in the link above for more information on if it’s still available.

Sorry these pictures aren’t the best…even with editing the pictures, it’s just hard to get good pictures in the gloomy winter days we’ve had in January and February.
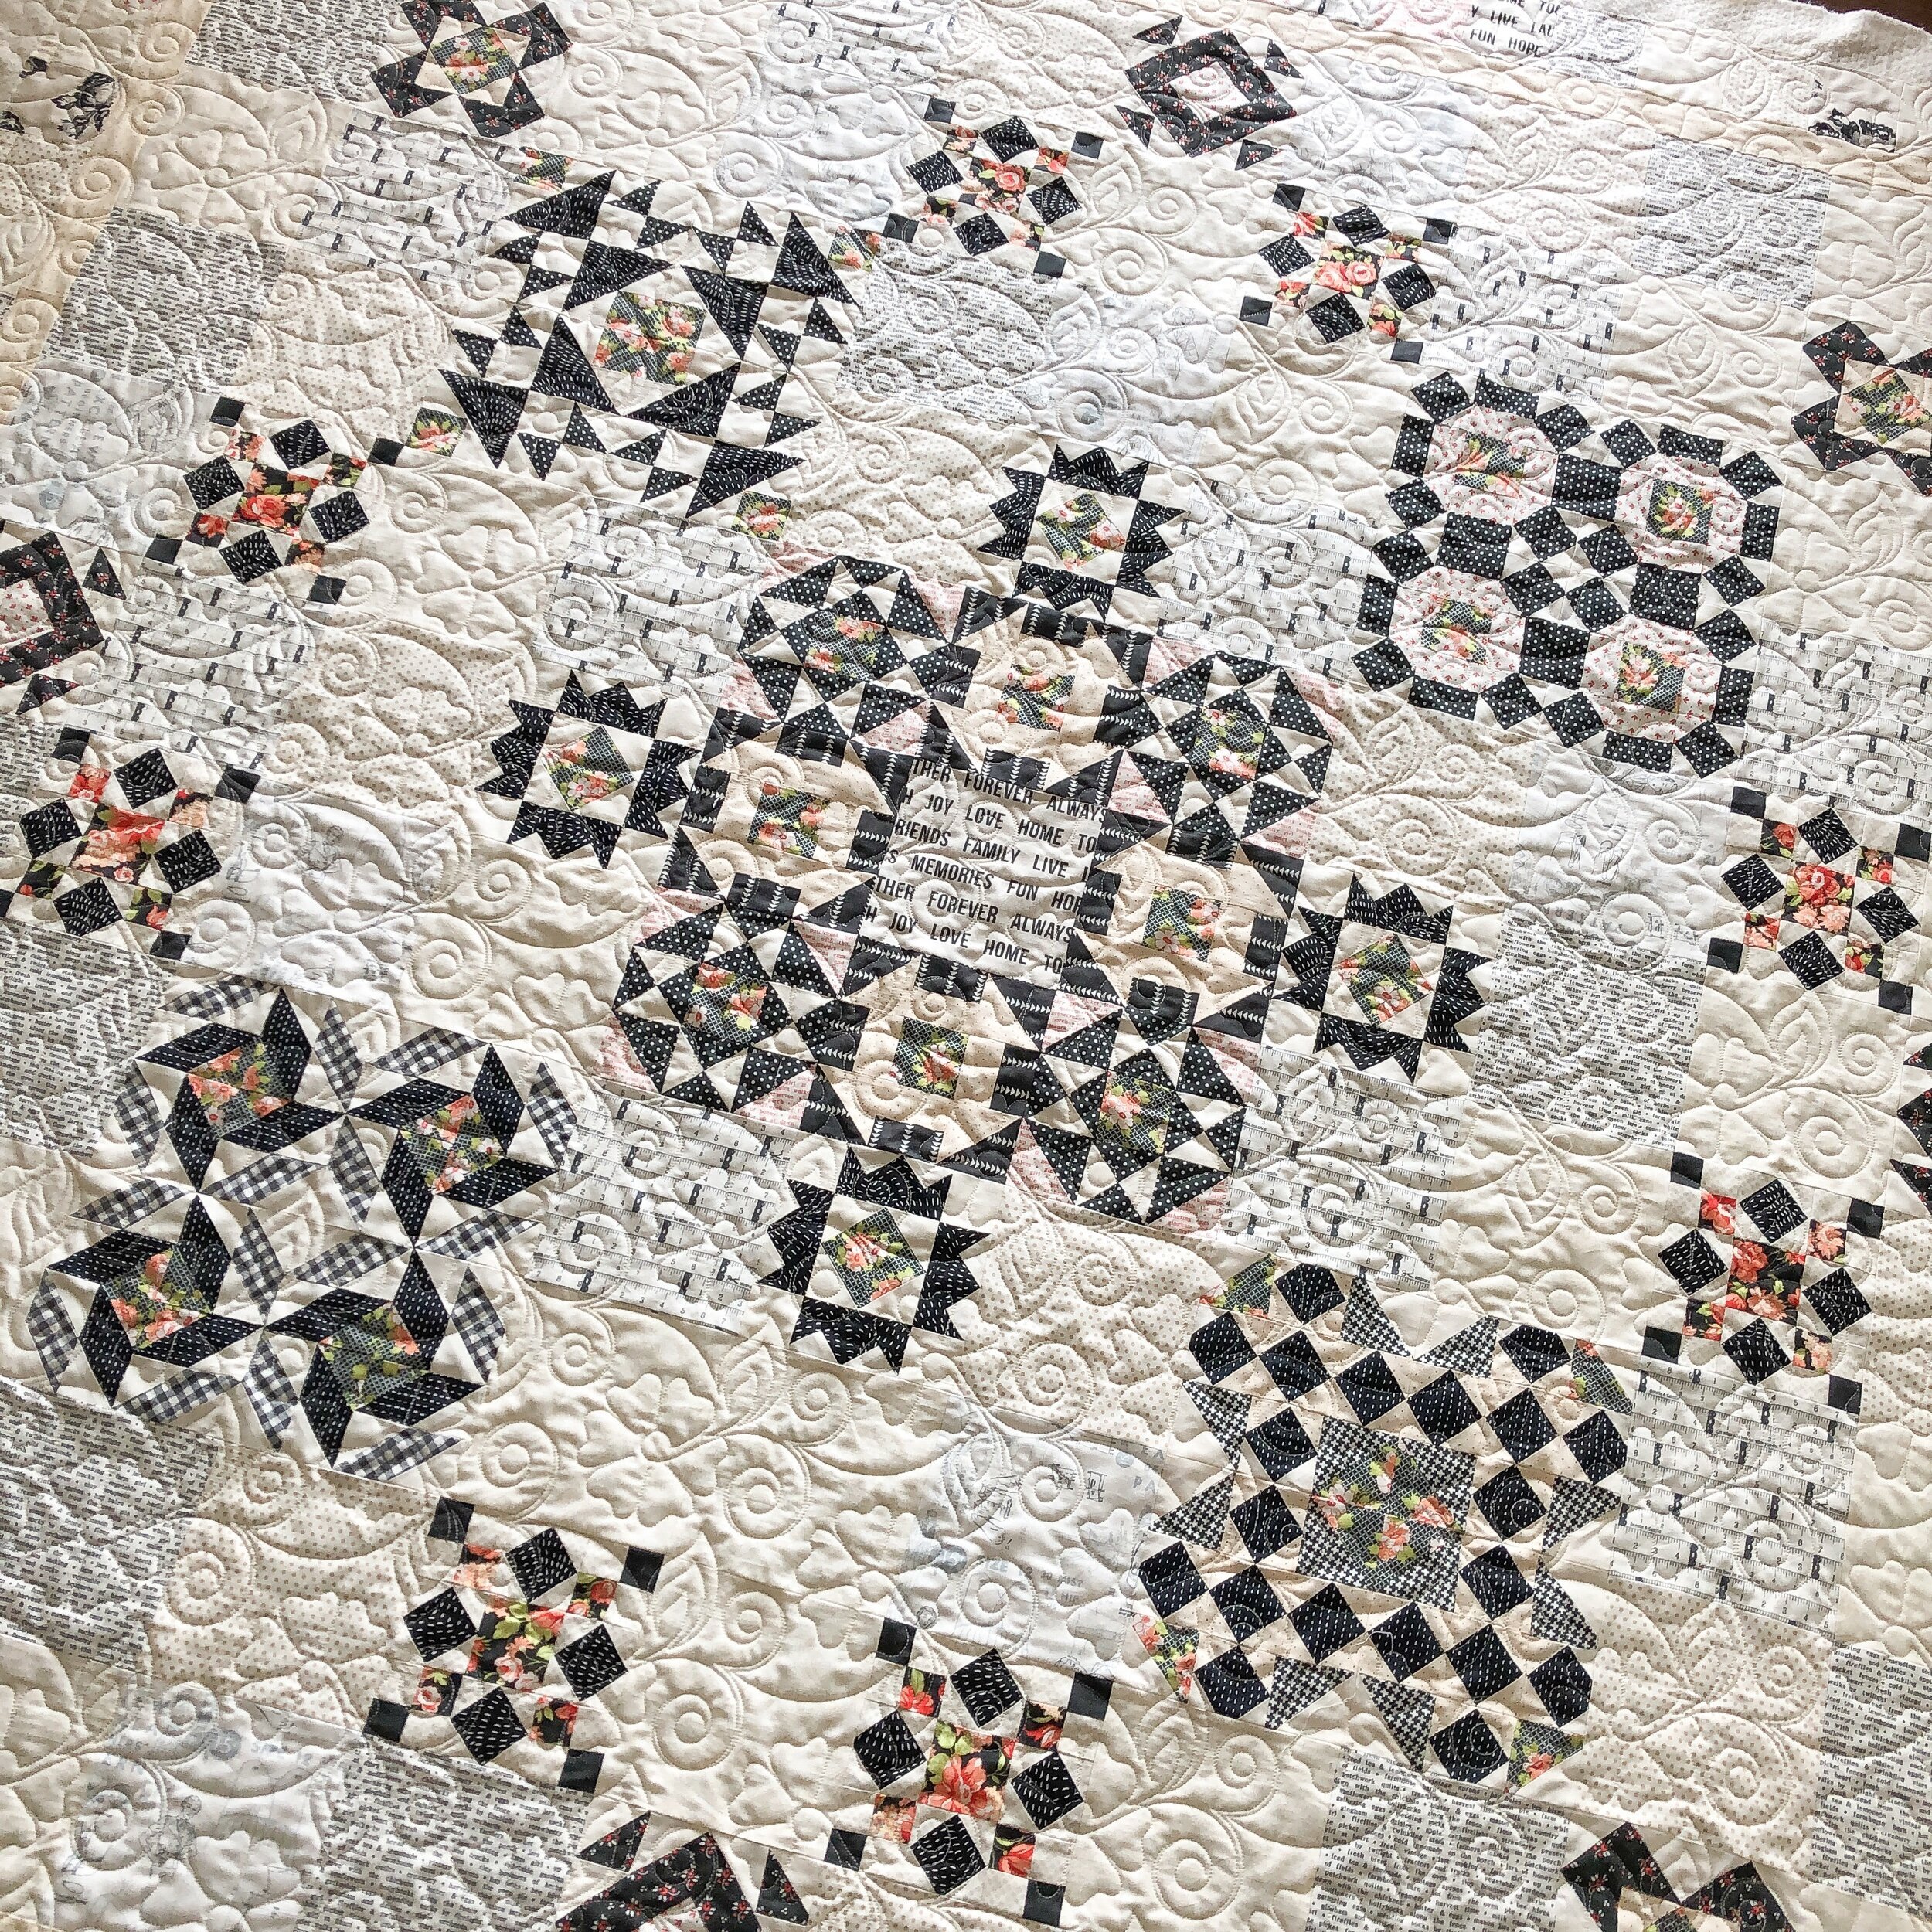
I decided to quilt Patricia Ritter and my Sweet Indigo©️ design, which is available at Urban Elementz. Which I think was a perfect choice for the vintage look to this quilt.

I used cream A&E Perma Core thread and Winline’s 8020 batting.

My favorite swirly flower design that we’ve created.
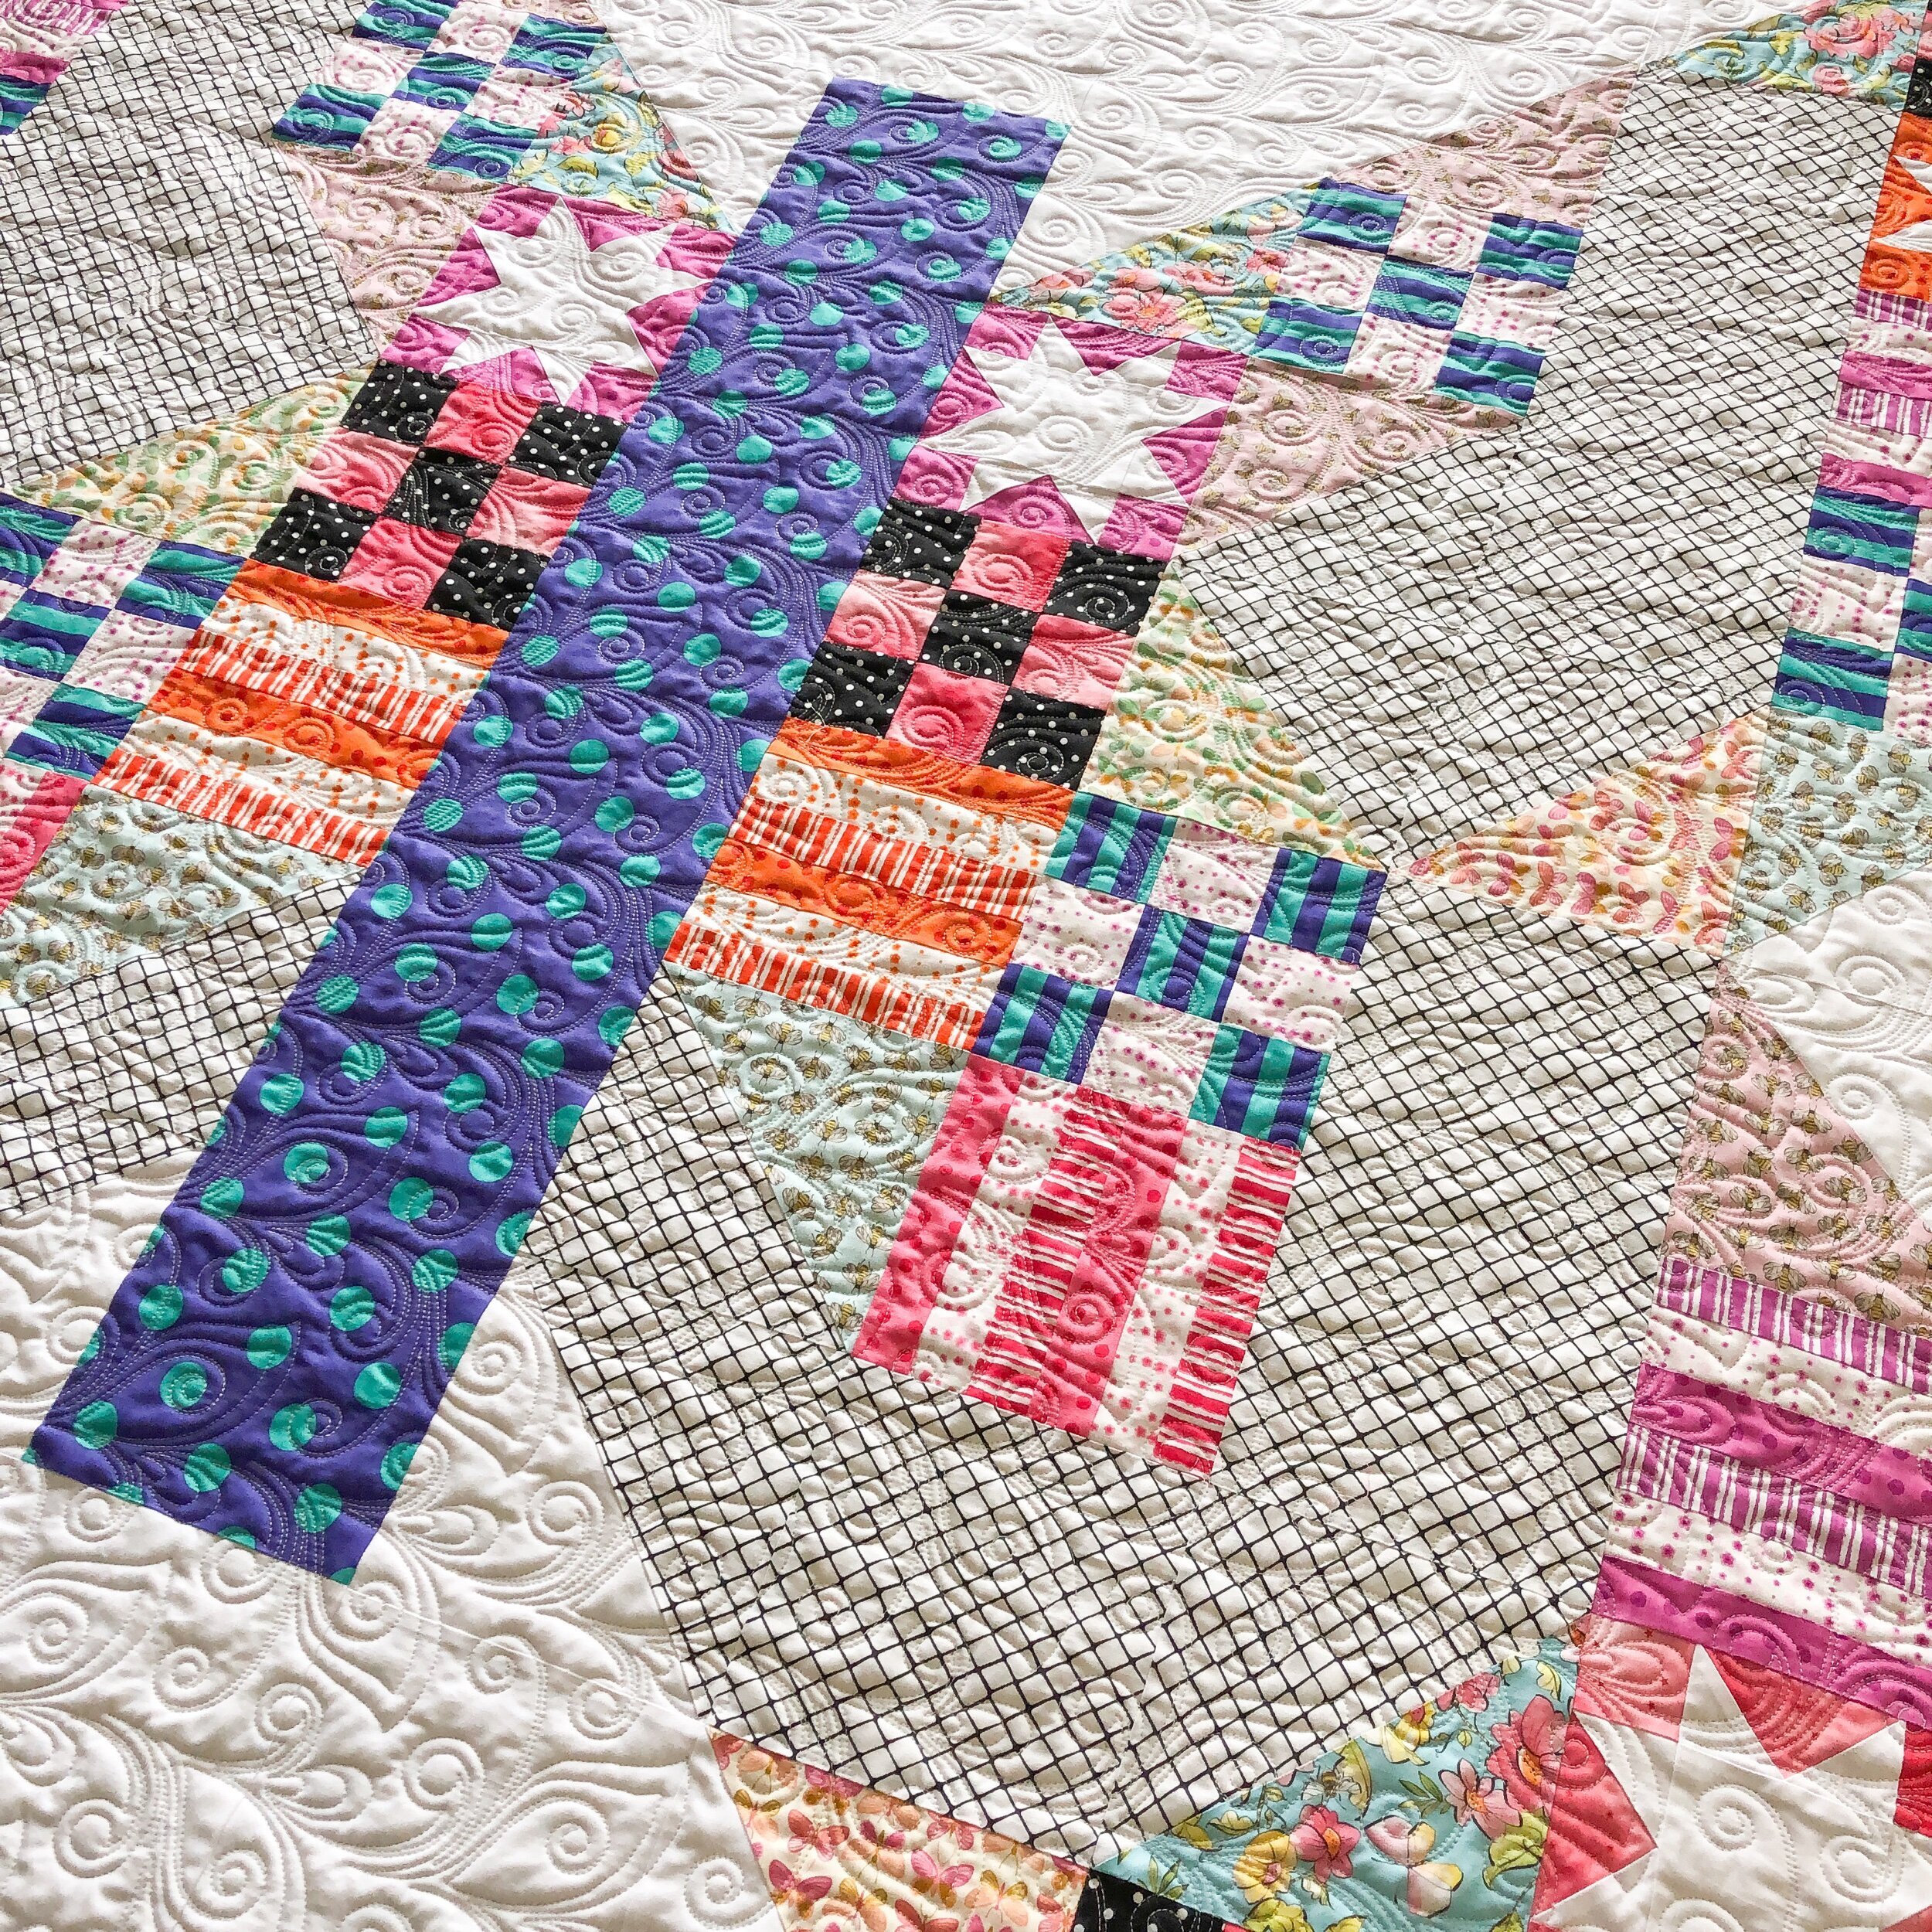
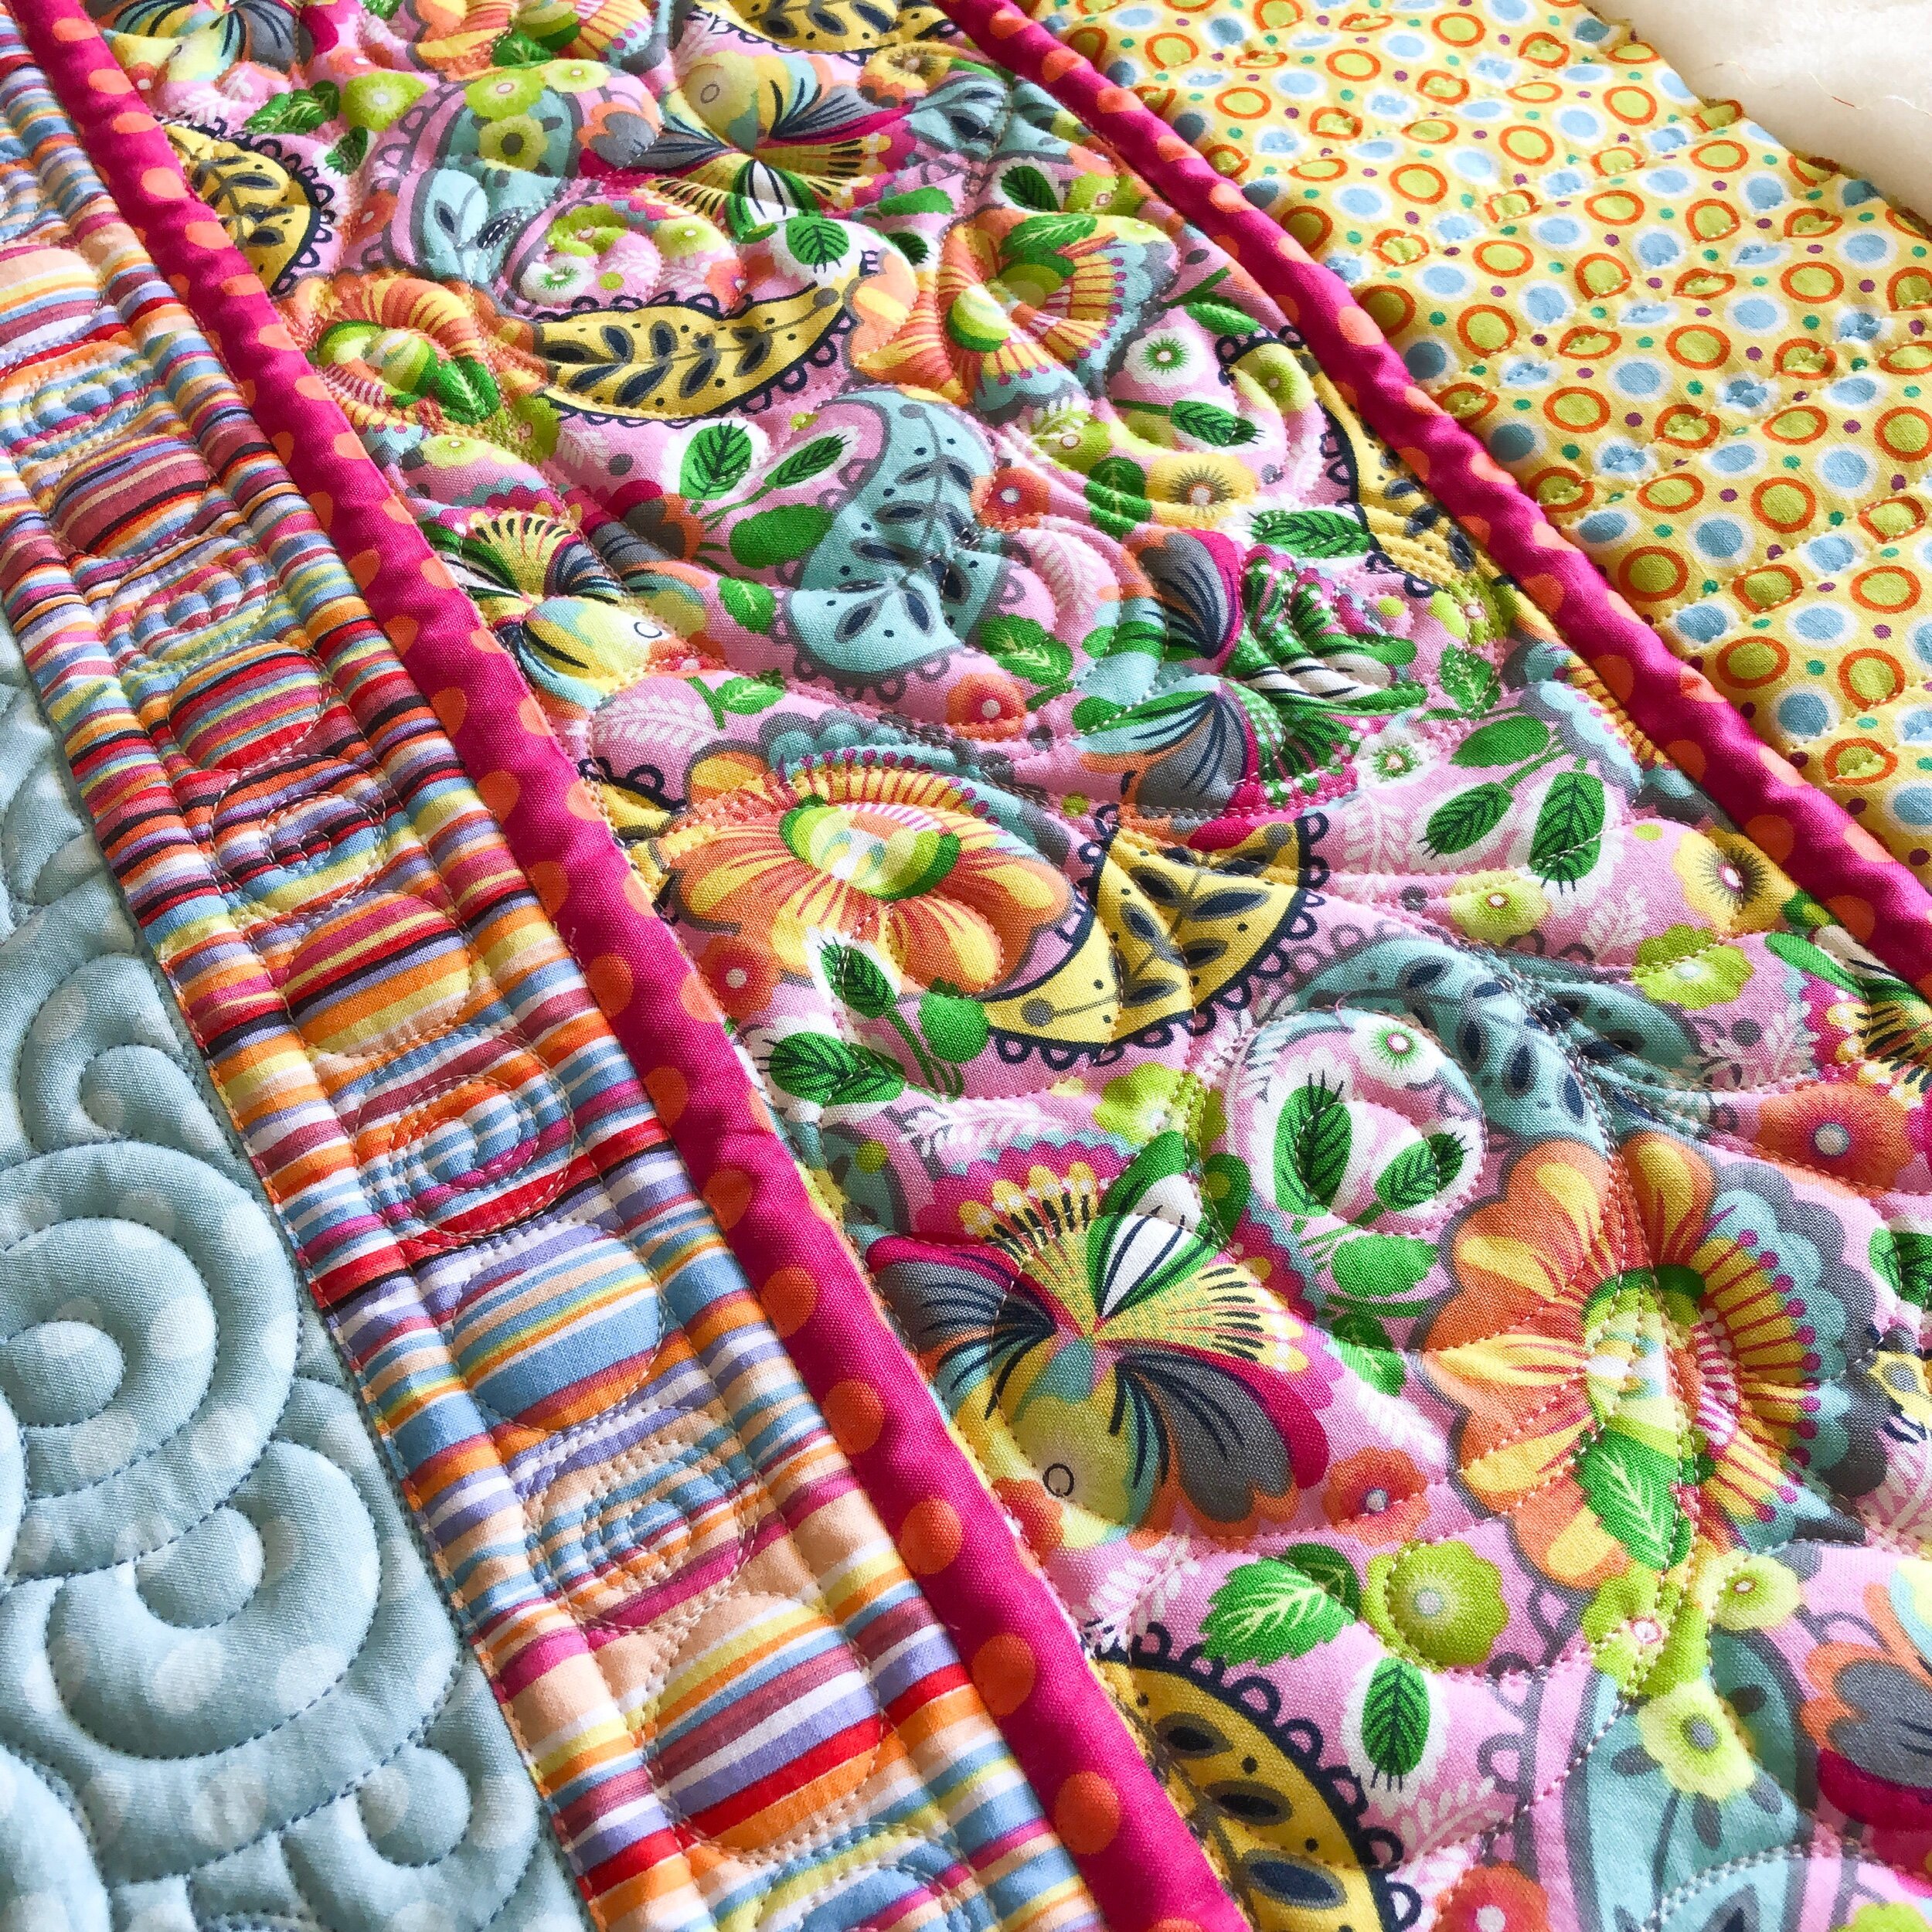
Next, this super fun Lella Boutique quilt called Butterfly Patch, made by Chris.

The fabrics on this quilt are fun and bright, sorry the pictures just don’t do it justice.

Chris chose Patricia Ritter and my Capri©️ design for the quilting. It is such a fun design for this quilt. It is available at Urban Elementz.

I used a cream A&E Perma Core thread, and Winline’s 8020 cotton poly blend batting.

A close up on that quilty texture and some of the fun fabrics that Chris used.
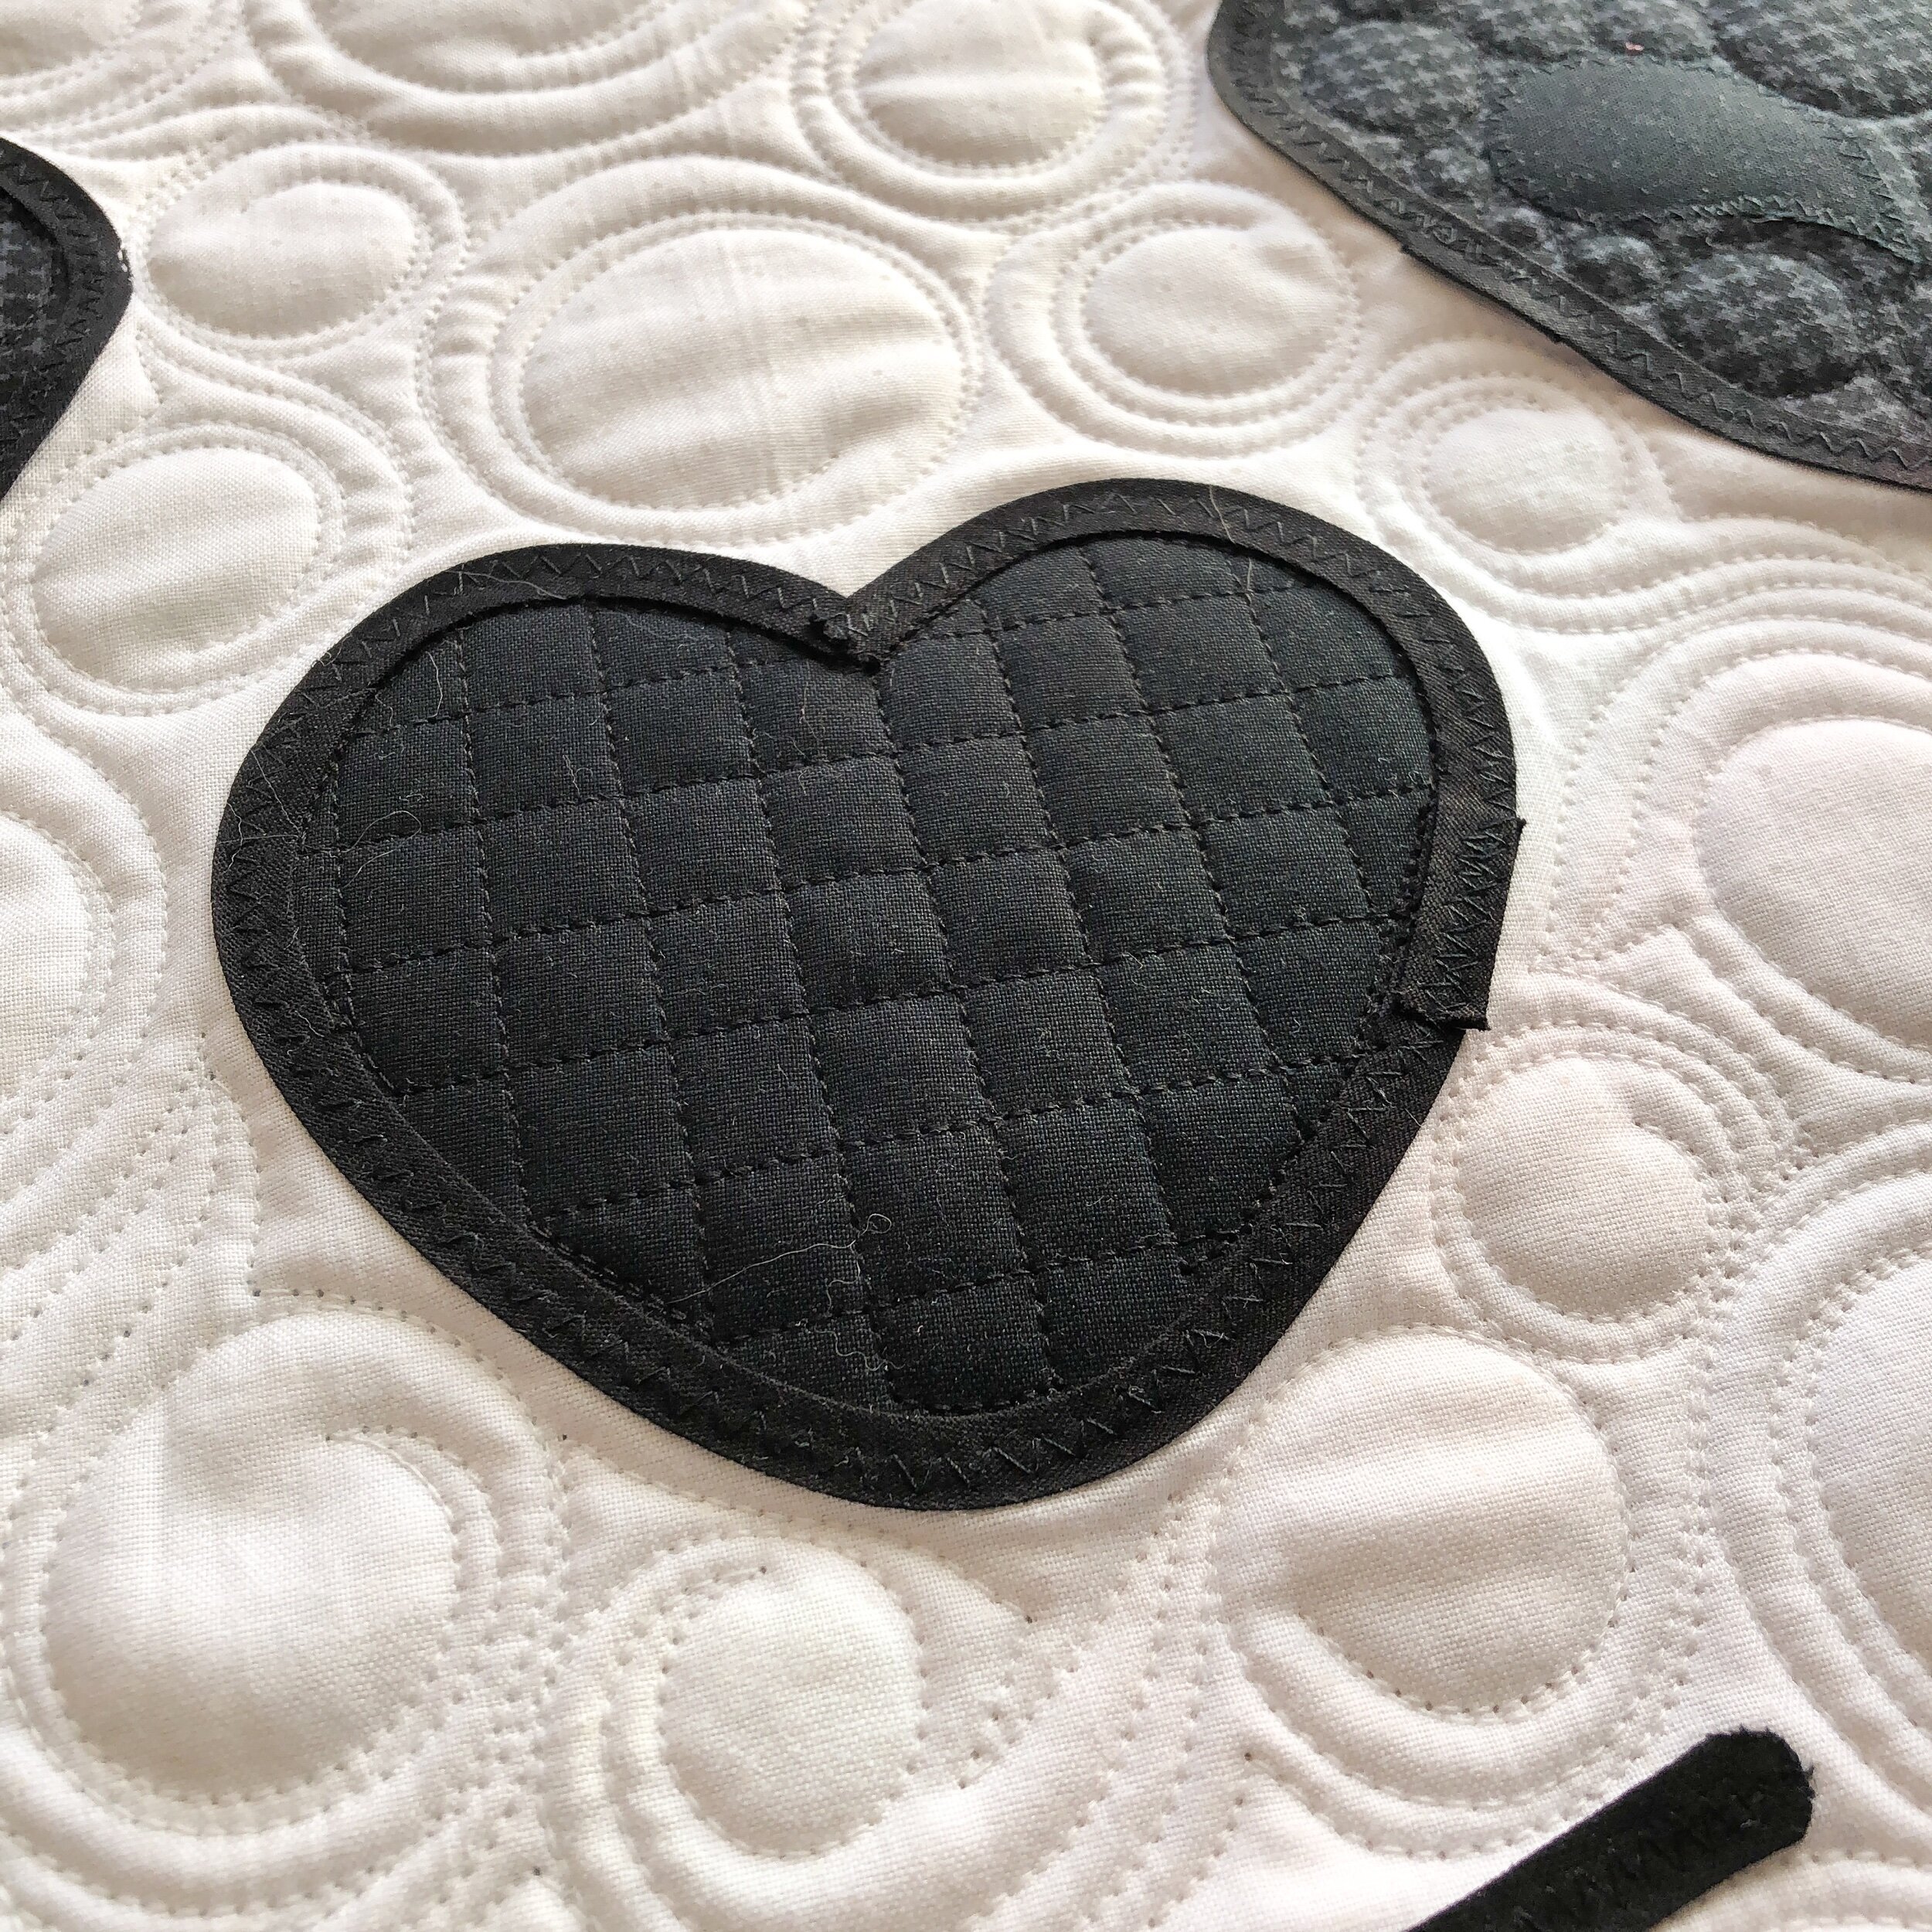
Next, this adorable panda quilt that Chris made for her granddaughter.

It’s called Cursive Panda Quilt by Vintagedoor. Chris added flowers, changed a few things on the pandas face…and it turned out so sweet.

I used one of Linda’s Edge rulers to quilt the lines, and then everything else was done freehand.

I used black thread on the back and white on everything else. I also used Winline’s 8020 cotton poly blend batting.
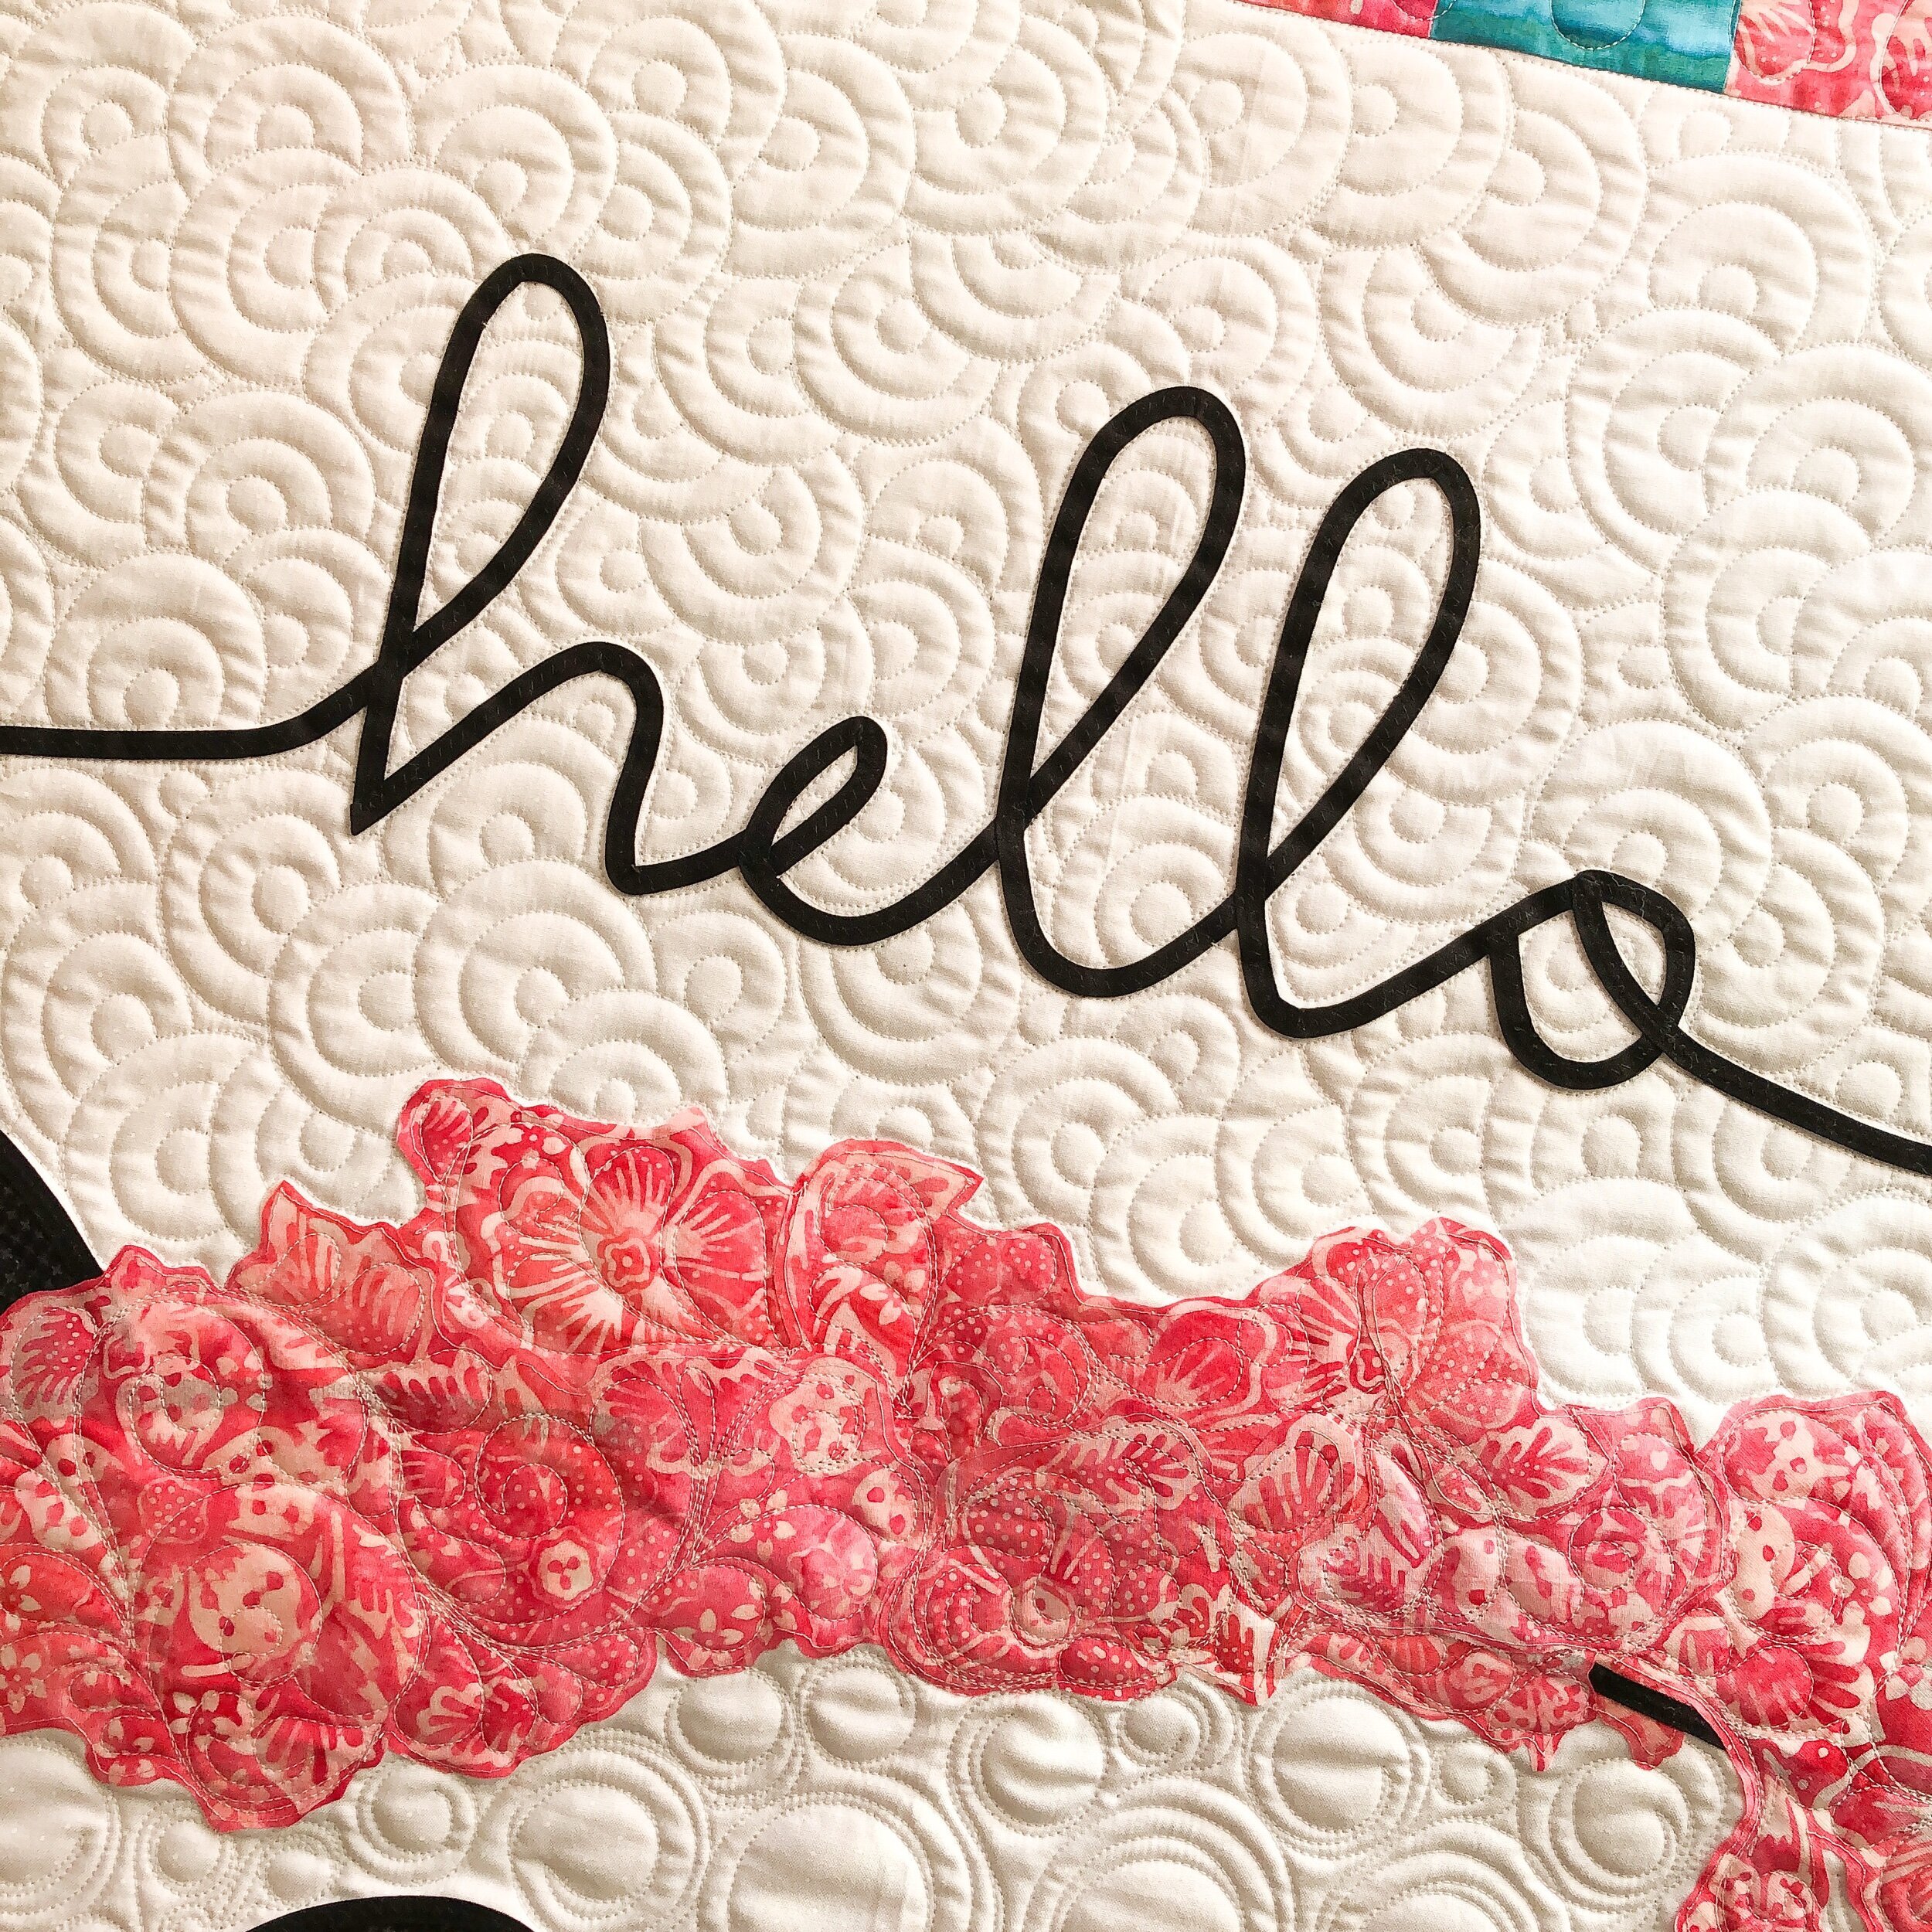
Love what simple lines or squares can add to the quilting texture on a quilt. Adding a variety of quilting designs, that harmonize together, creates fun textures and makes different parts of the quilt stand out more.

I love that “hello”! To see some of these designs and others quilted on video, head on over to my YouTube channel and check out those videos.
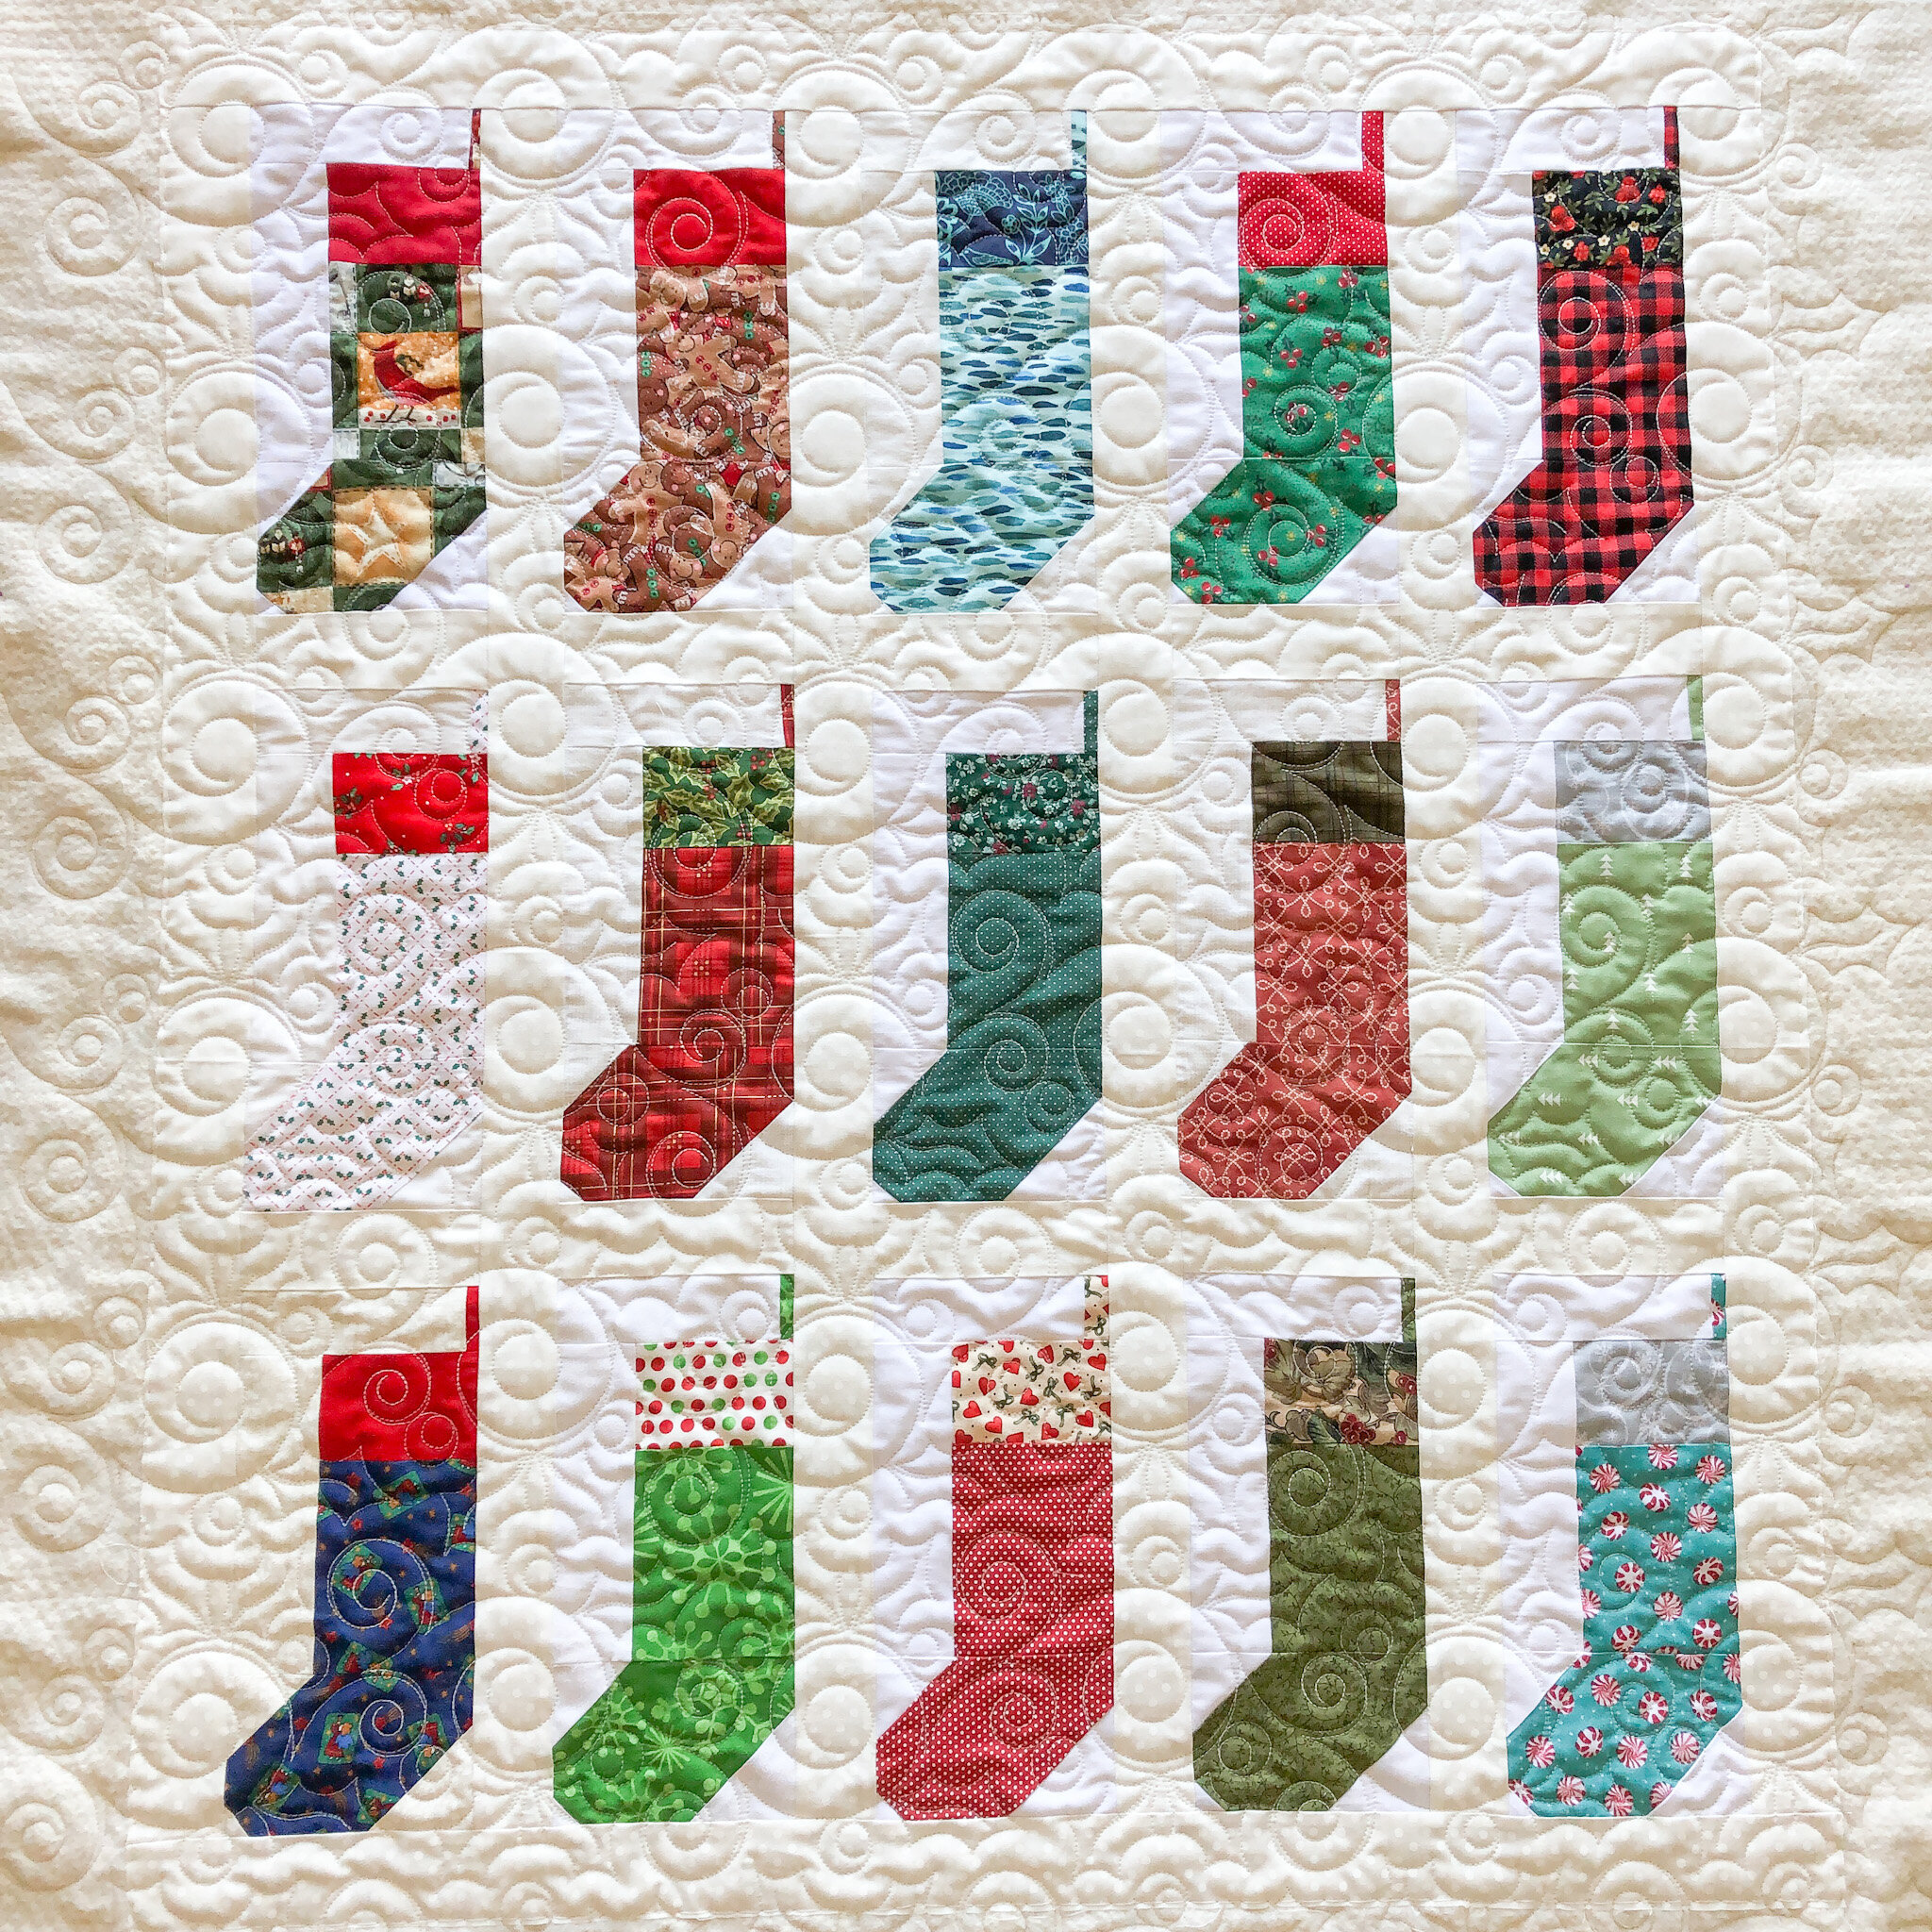
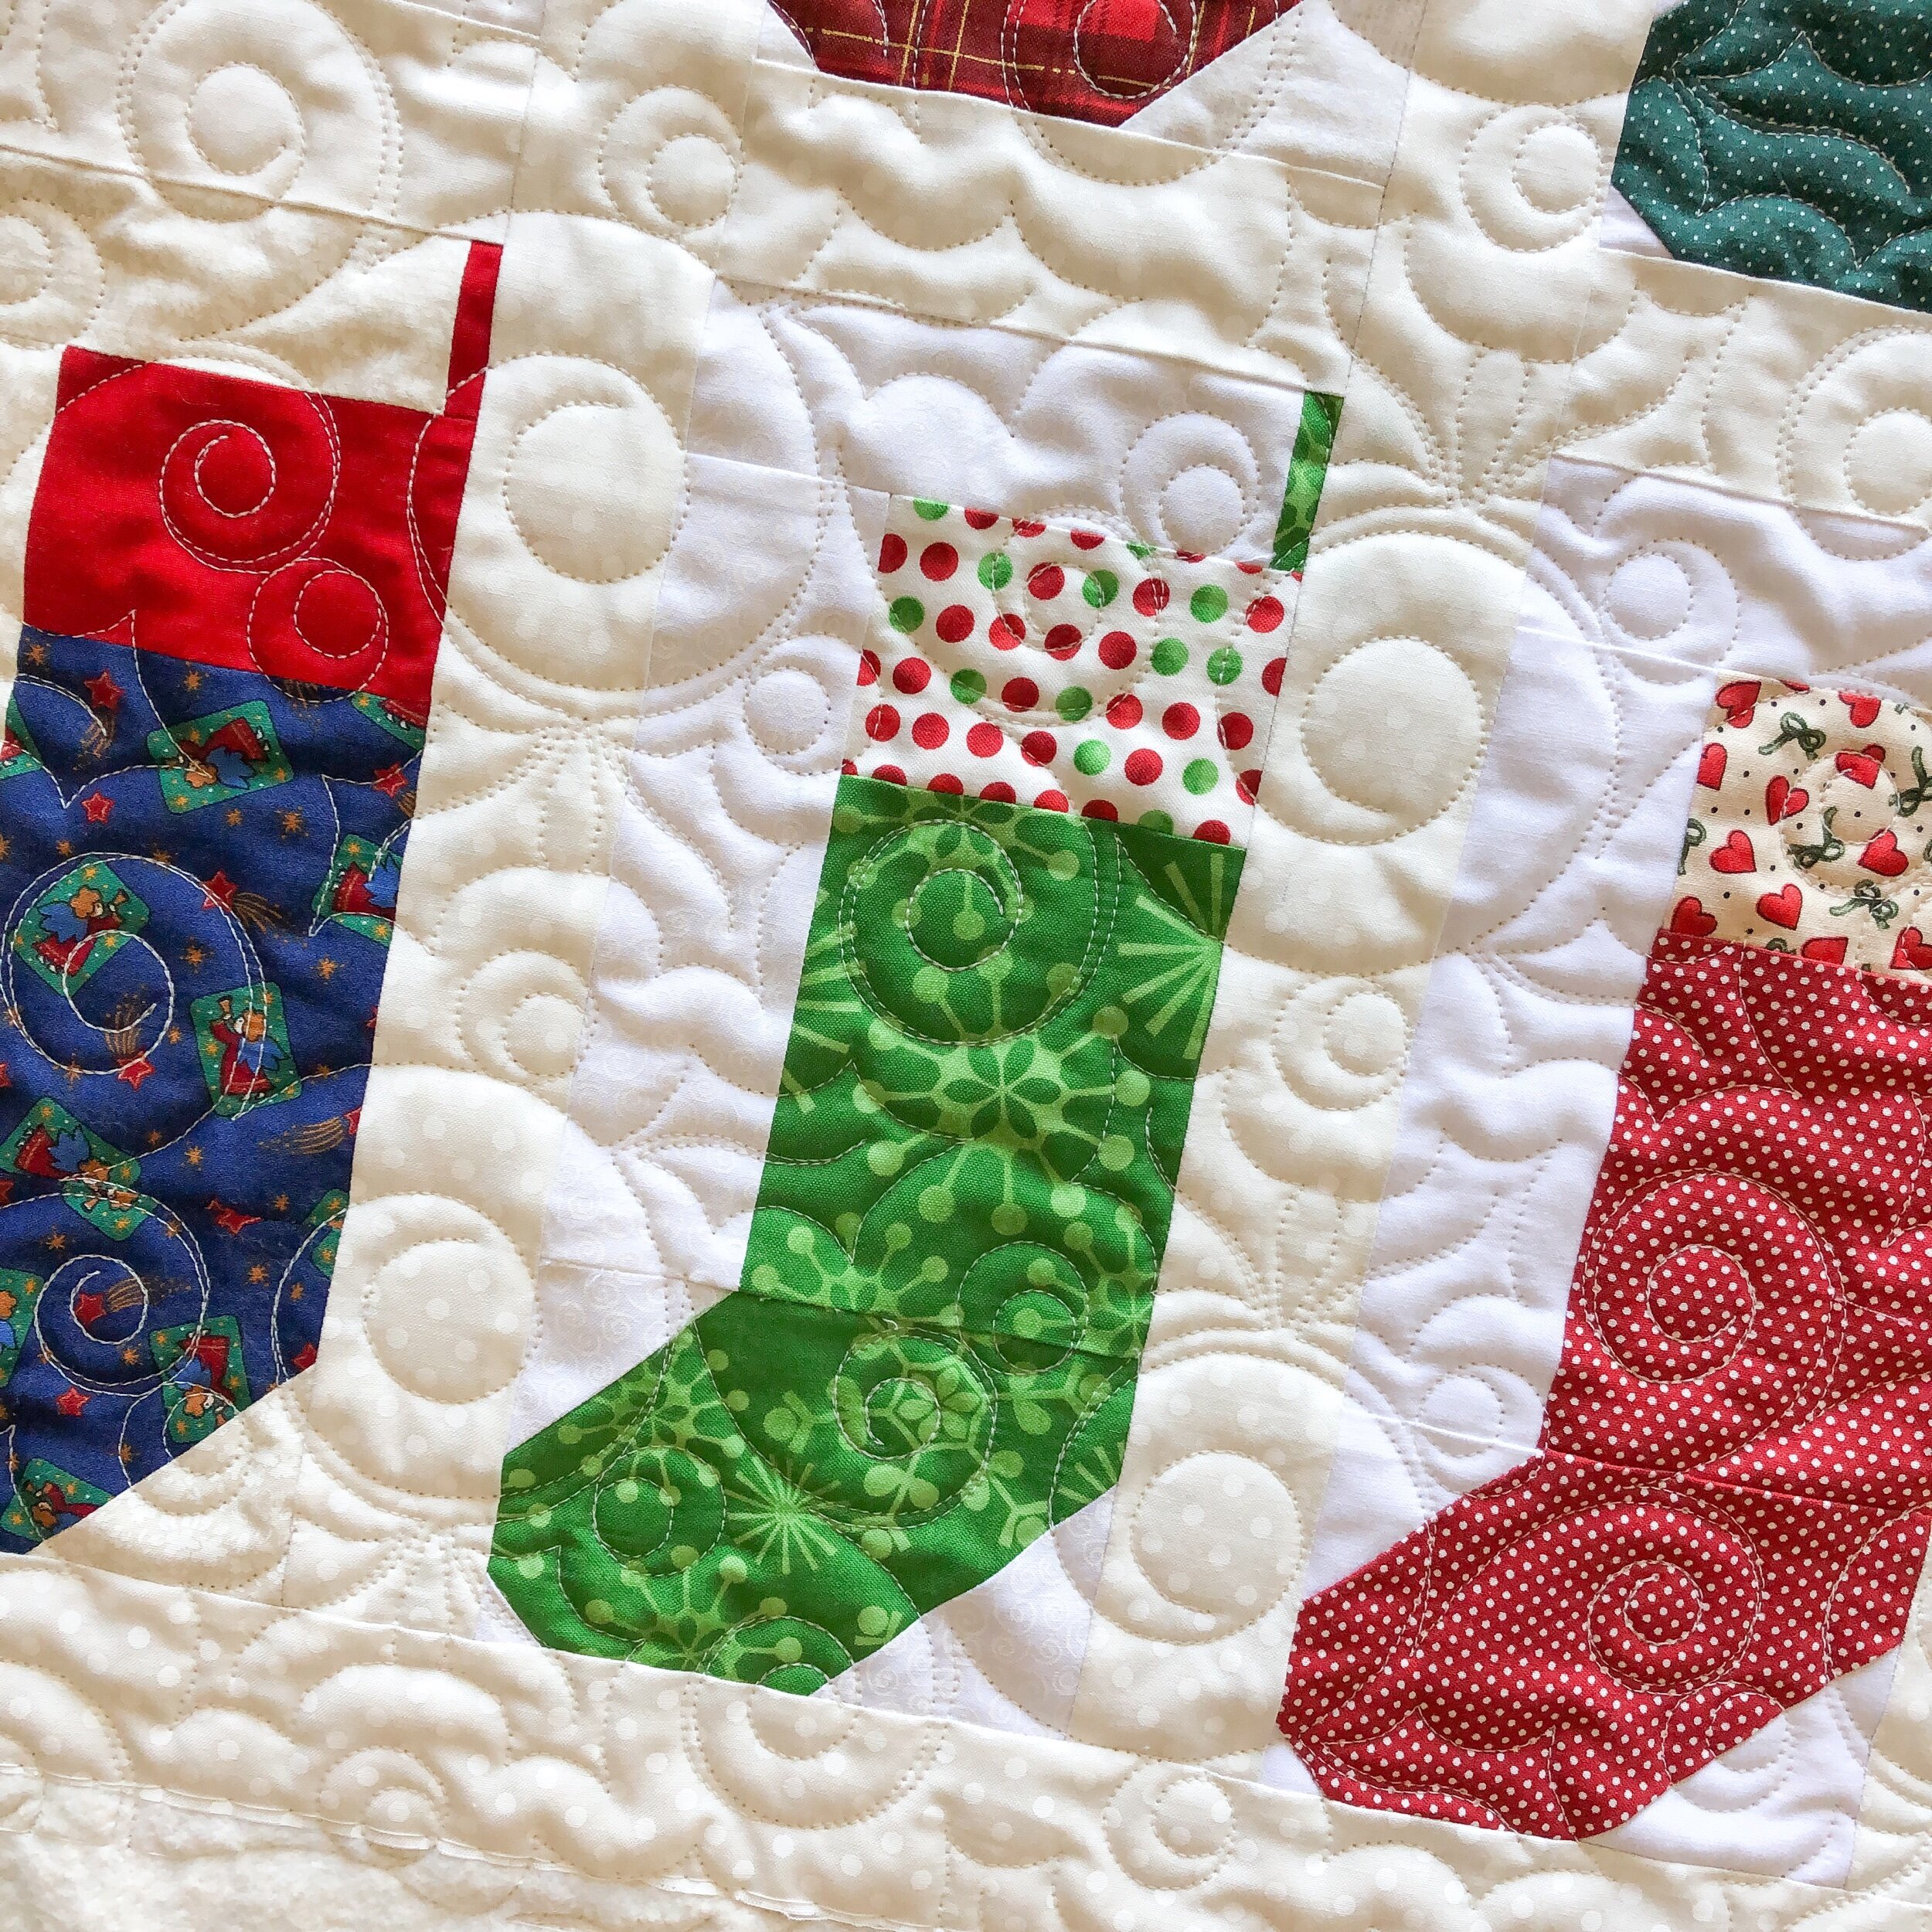
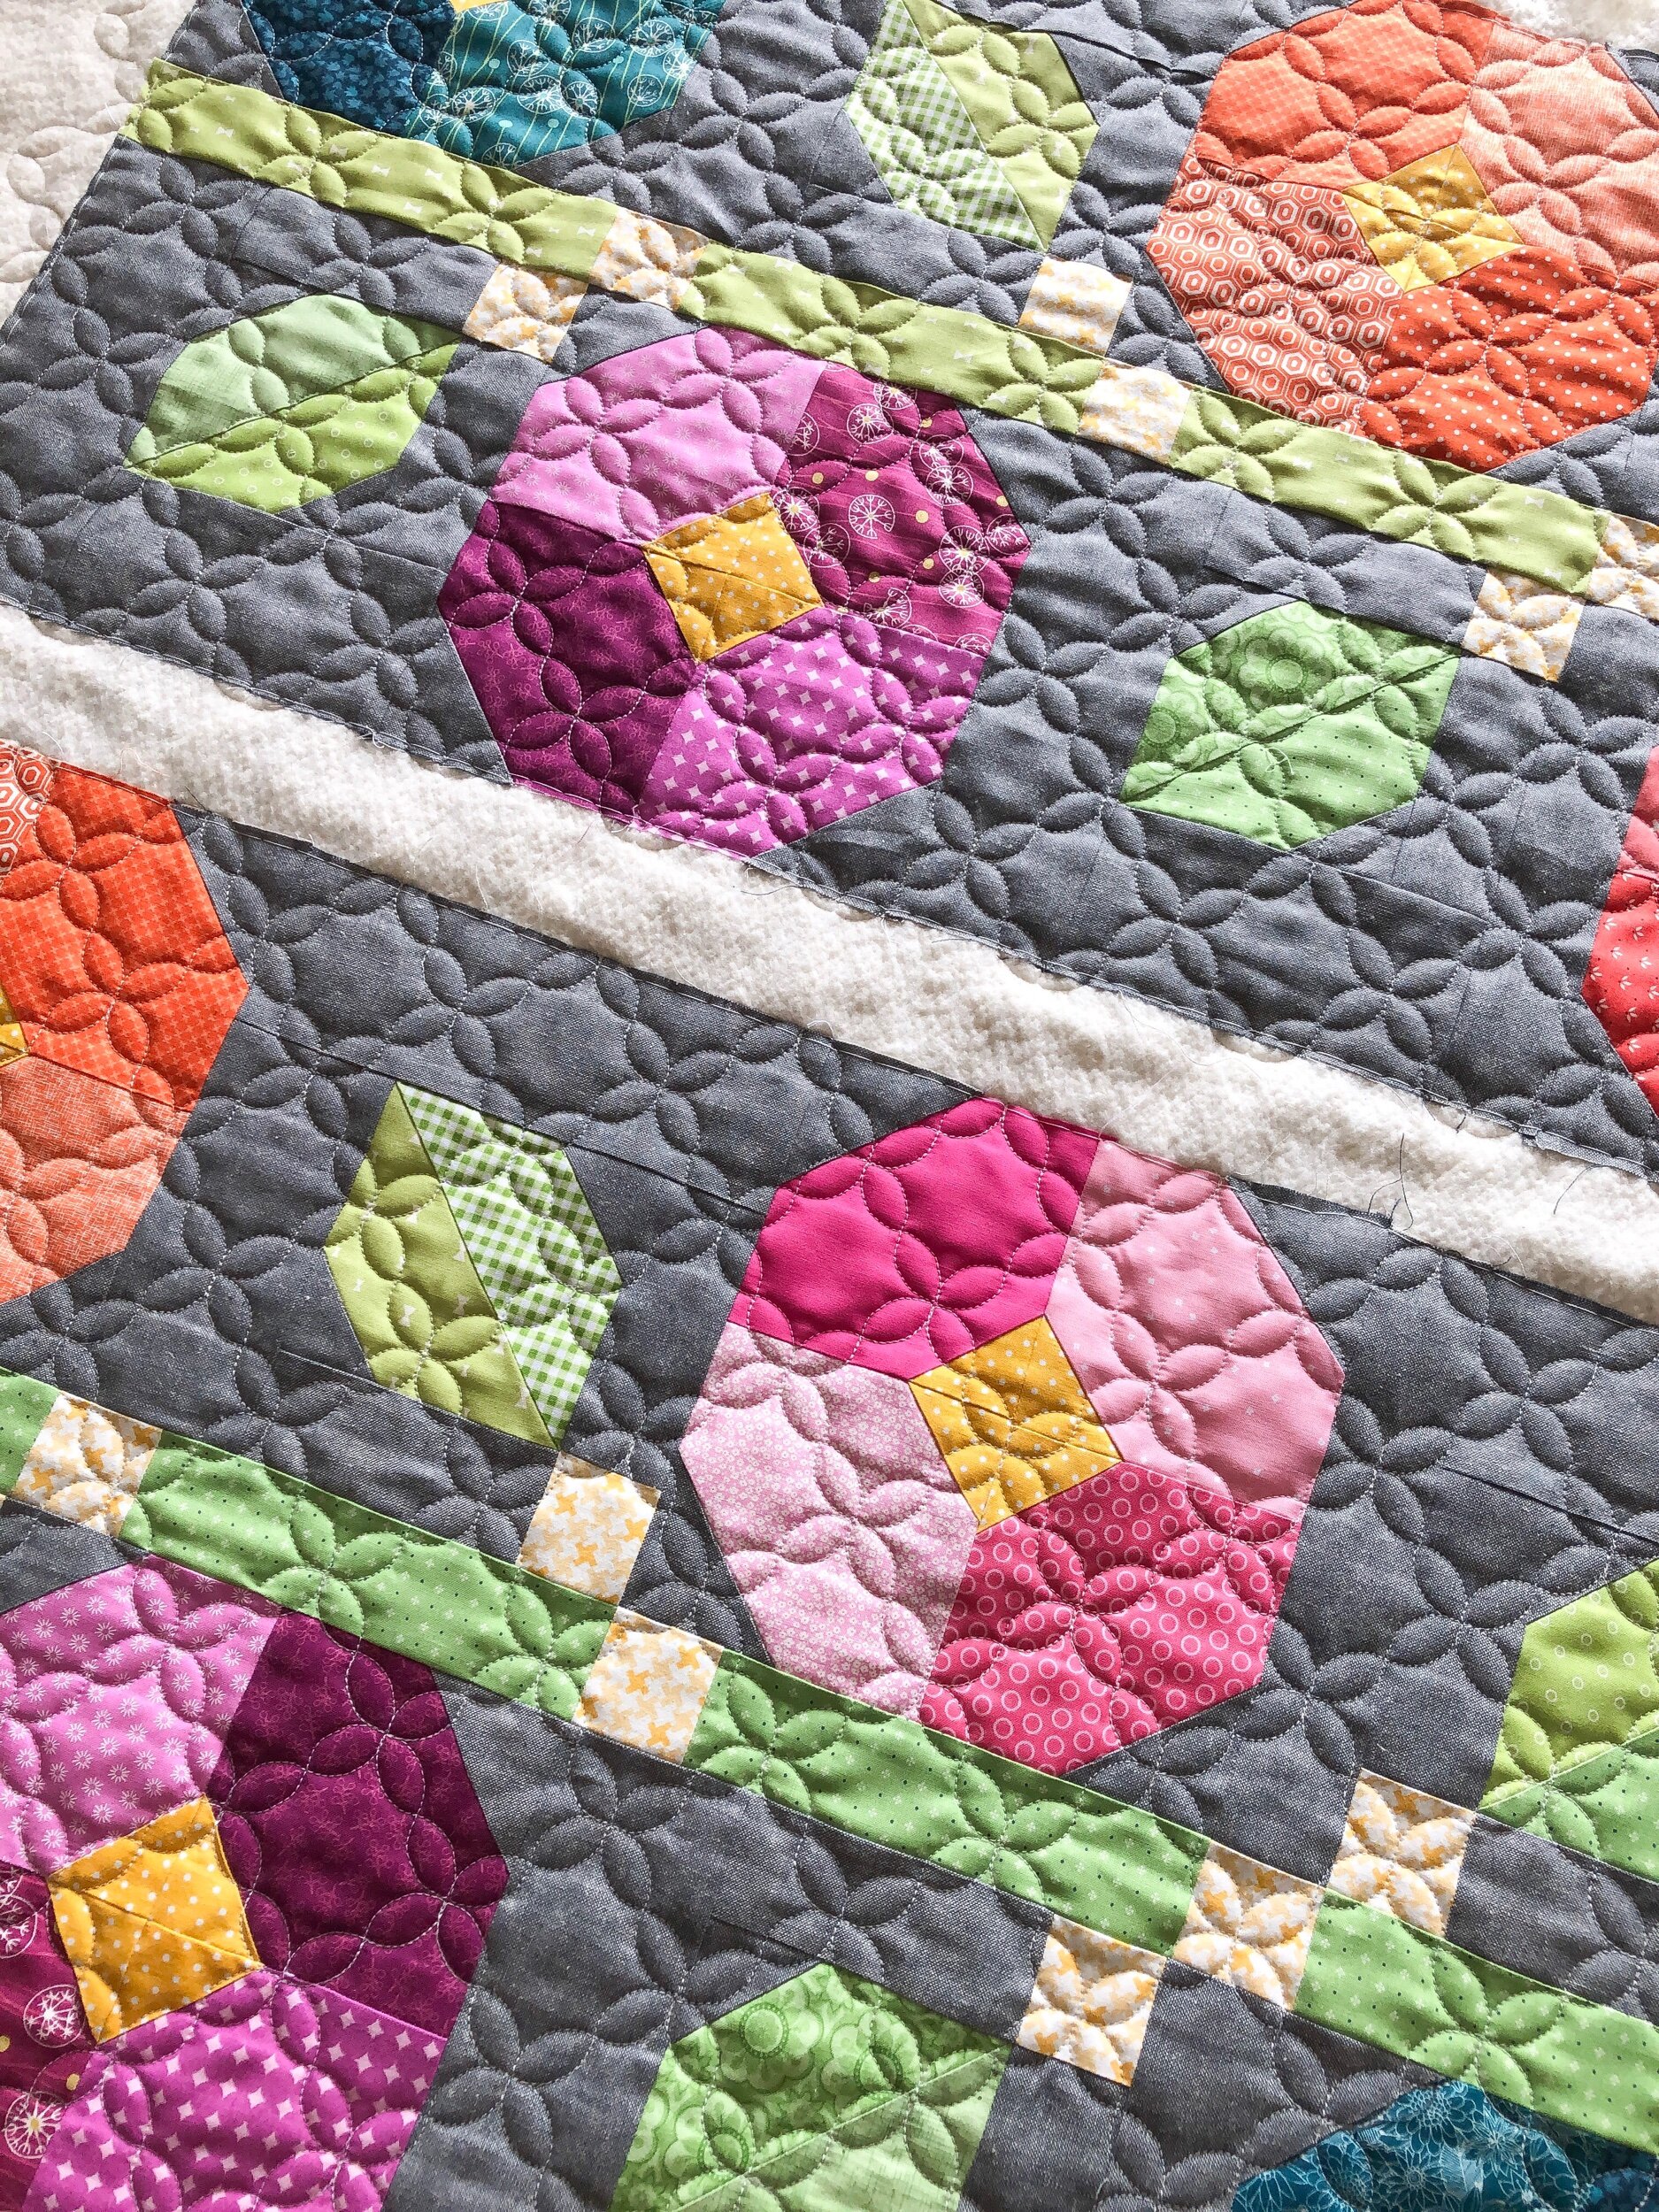
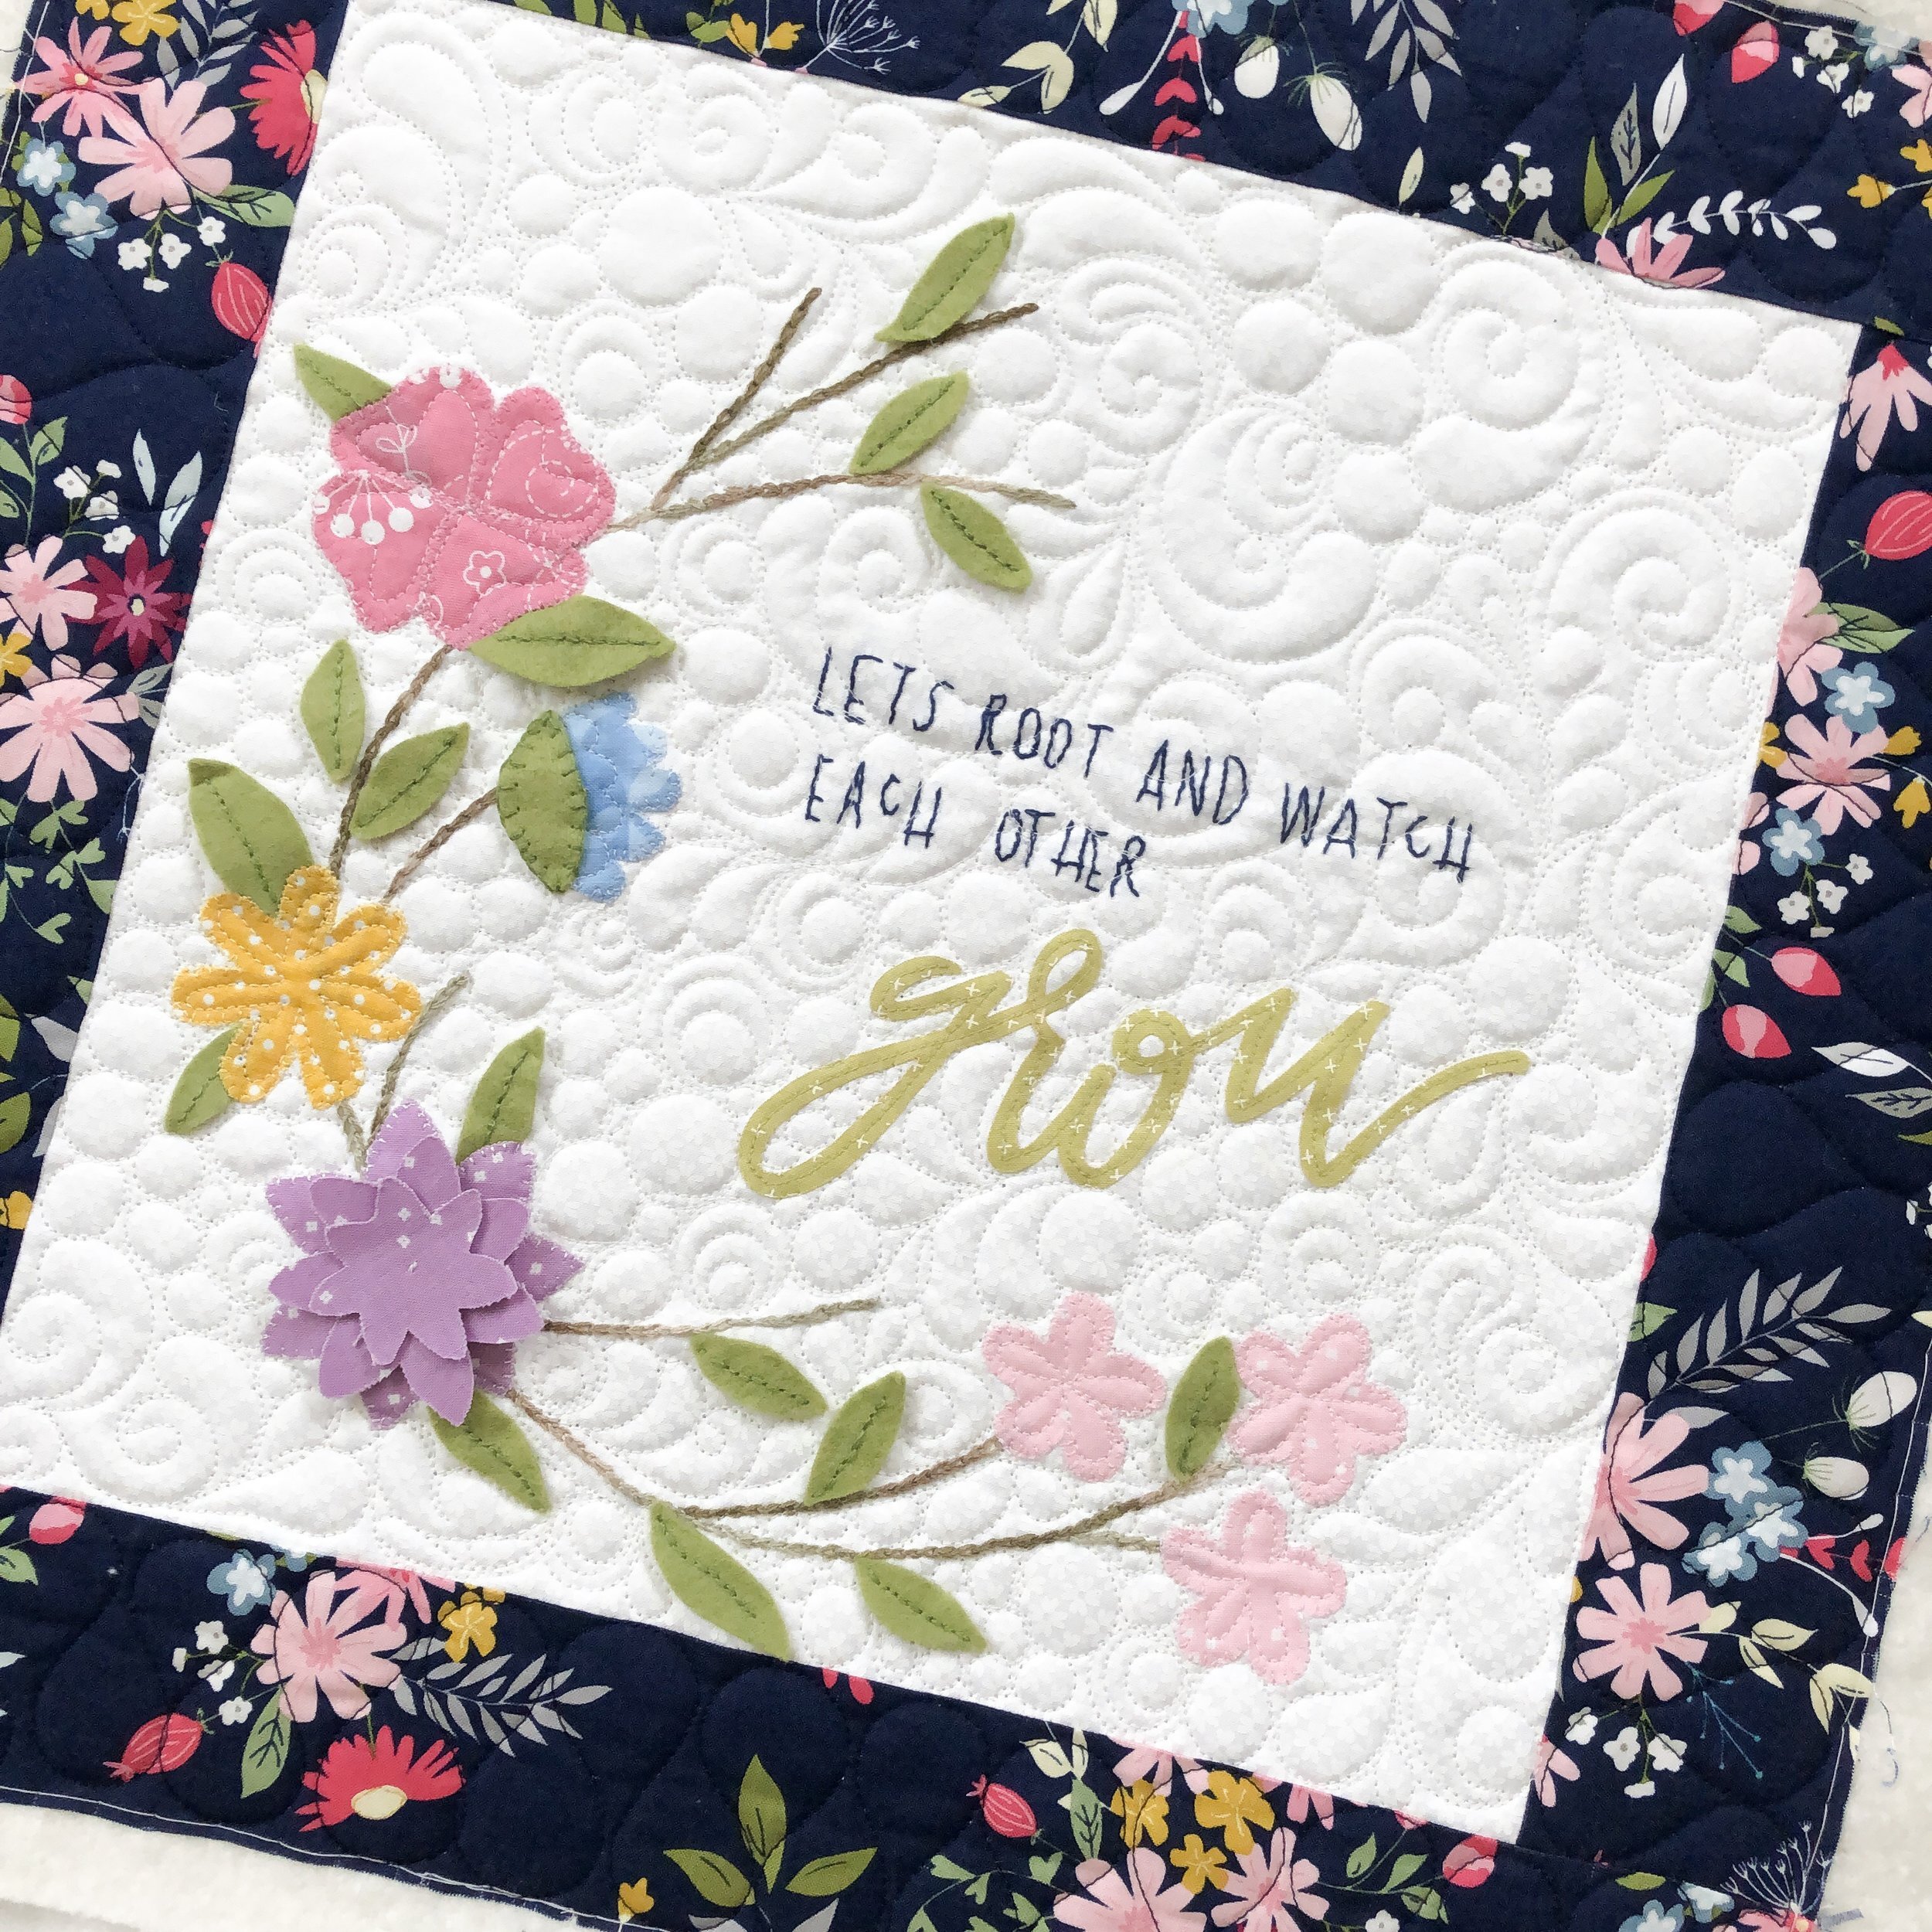
Last one for today…this sweet quilt was made by Sherry for a dear momma who is dying from cancer, to give to her daughter. Sherry’s sister made some more quilts for this momma’s other children. She wanted to leave her kids with a reminder of how much she loves them. When I have the opportunity to quilt a quilt for someone like this, it makes my job mean sooo much more. It adds a greater purpose to fabrics, threads, batting, and quilting designs.

The pattern is called Merry-Go-Round designed by Regina Girard and is in The Big Book of Strip Quilts by Karen M. Burns.
This quilt is jelly roll friendly…I have a jelly roll that would be perfect for it!!

I love these fun happy fabrics and colors.
With the hexagon fabrics, I decided to use Hexies by Patricia Ritter to quilt it. It’s available at Urban Elementz. I just love this quilting texture!
I used a white 30 tex A&E Perma Core thread and Winline’s 8020 cotton poly blend batting. I hope this little girl feels extra love from her momma each time she is wrapped up in this quilt.

Patricia Ritter and I have a new design called Scottish Plaid - Hexies and it’s available at Urban Elementz. It is not part of the 20% off sale that I’m currently having in my shop.

Another reminder about my Circle2™ machine quilting circle ruler set that is $20 off right now using code 20SPRING20 at checkout. Quilting designs are 20% off using code LEAPYEAR at checkout. Thanks again for supporting my small business. Appreciate you all so much!!

Thanks for being here!! Take care and I hope you each stay healthy.
- Leisha

Quilting Galore!
Between working and life, I haven’t blogged the amazing quilts and fun runners that I’ve had the privilege of quilting…for awhile. I hope you enjoy the variety of custom and edge to edge quilting, that I’m going to share with you.
First up, this amazing quilt made by my friend and neighbor Karen. She’s made several quilts, and has never had one custom quilted. It was so fun to quilt this for her, especially knowing she was going to keep it and enjoy the quilting. This pattern is by Carrie Nelson. It is from Miss Rosie’s Farmhouse Favorites book and is called Stella Blue.


I just love softening the hard lines in a quilt pattern, with curves in the quilting. That was my plan with this quilt. I love the end result.
I used Winline’s 8020 cotton poly batting, and Dyed Natural 30 tex A&E Perma Core thread.

A close up on the two main blocks.

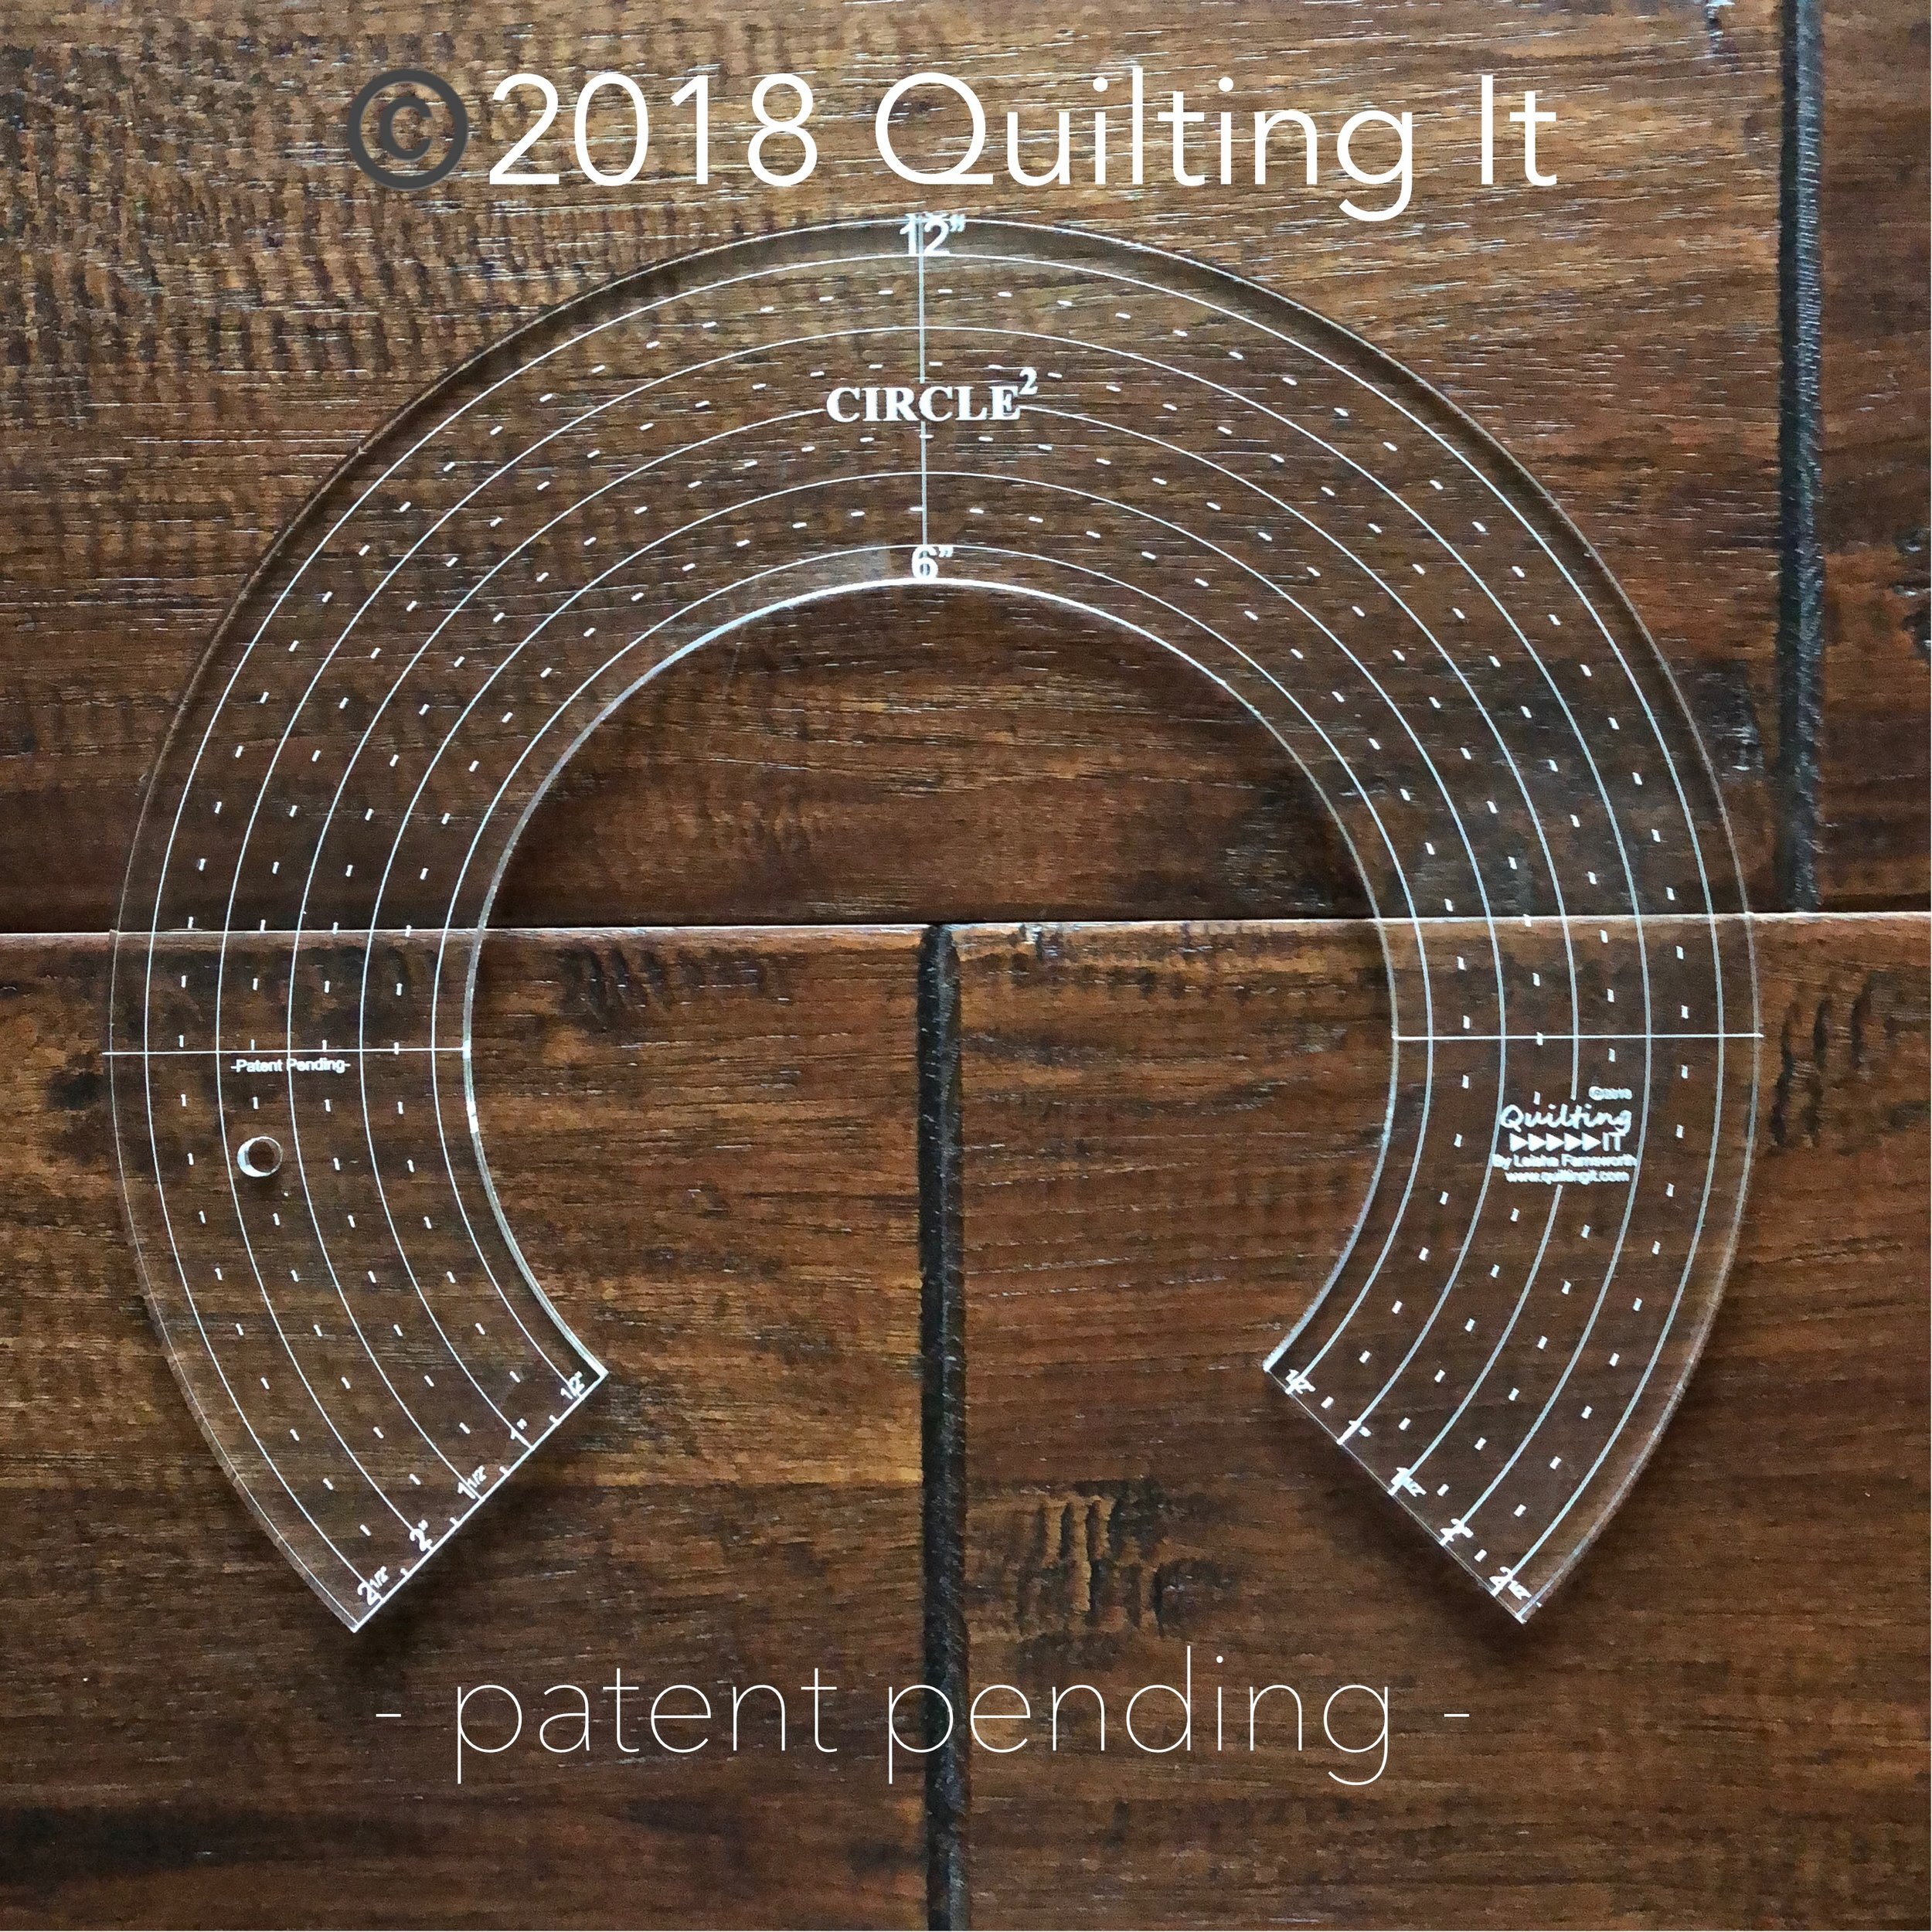
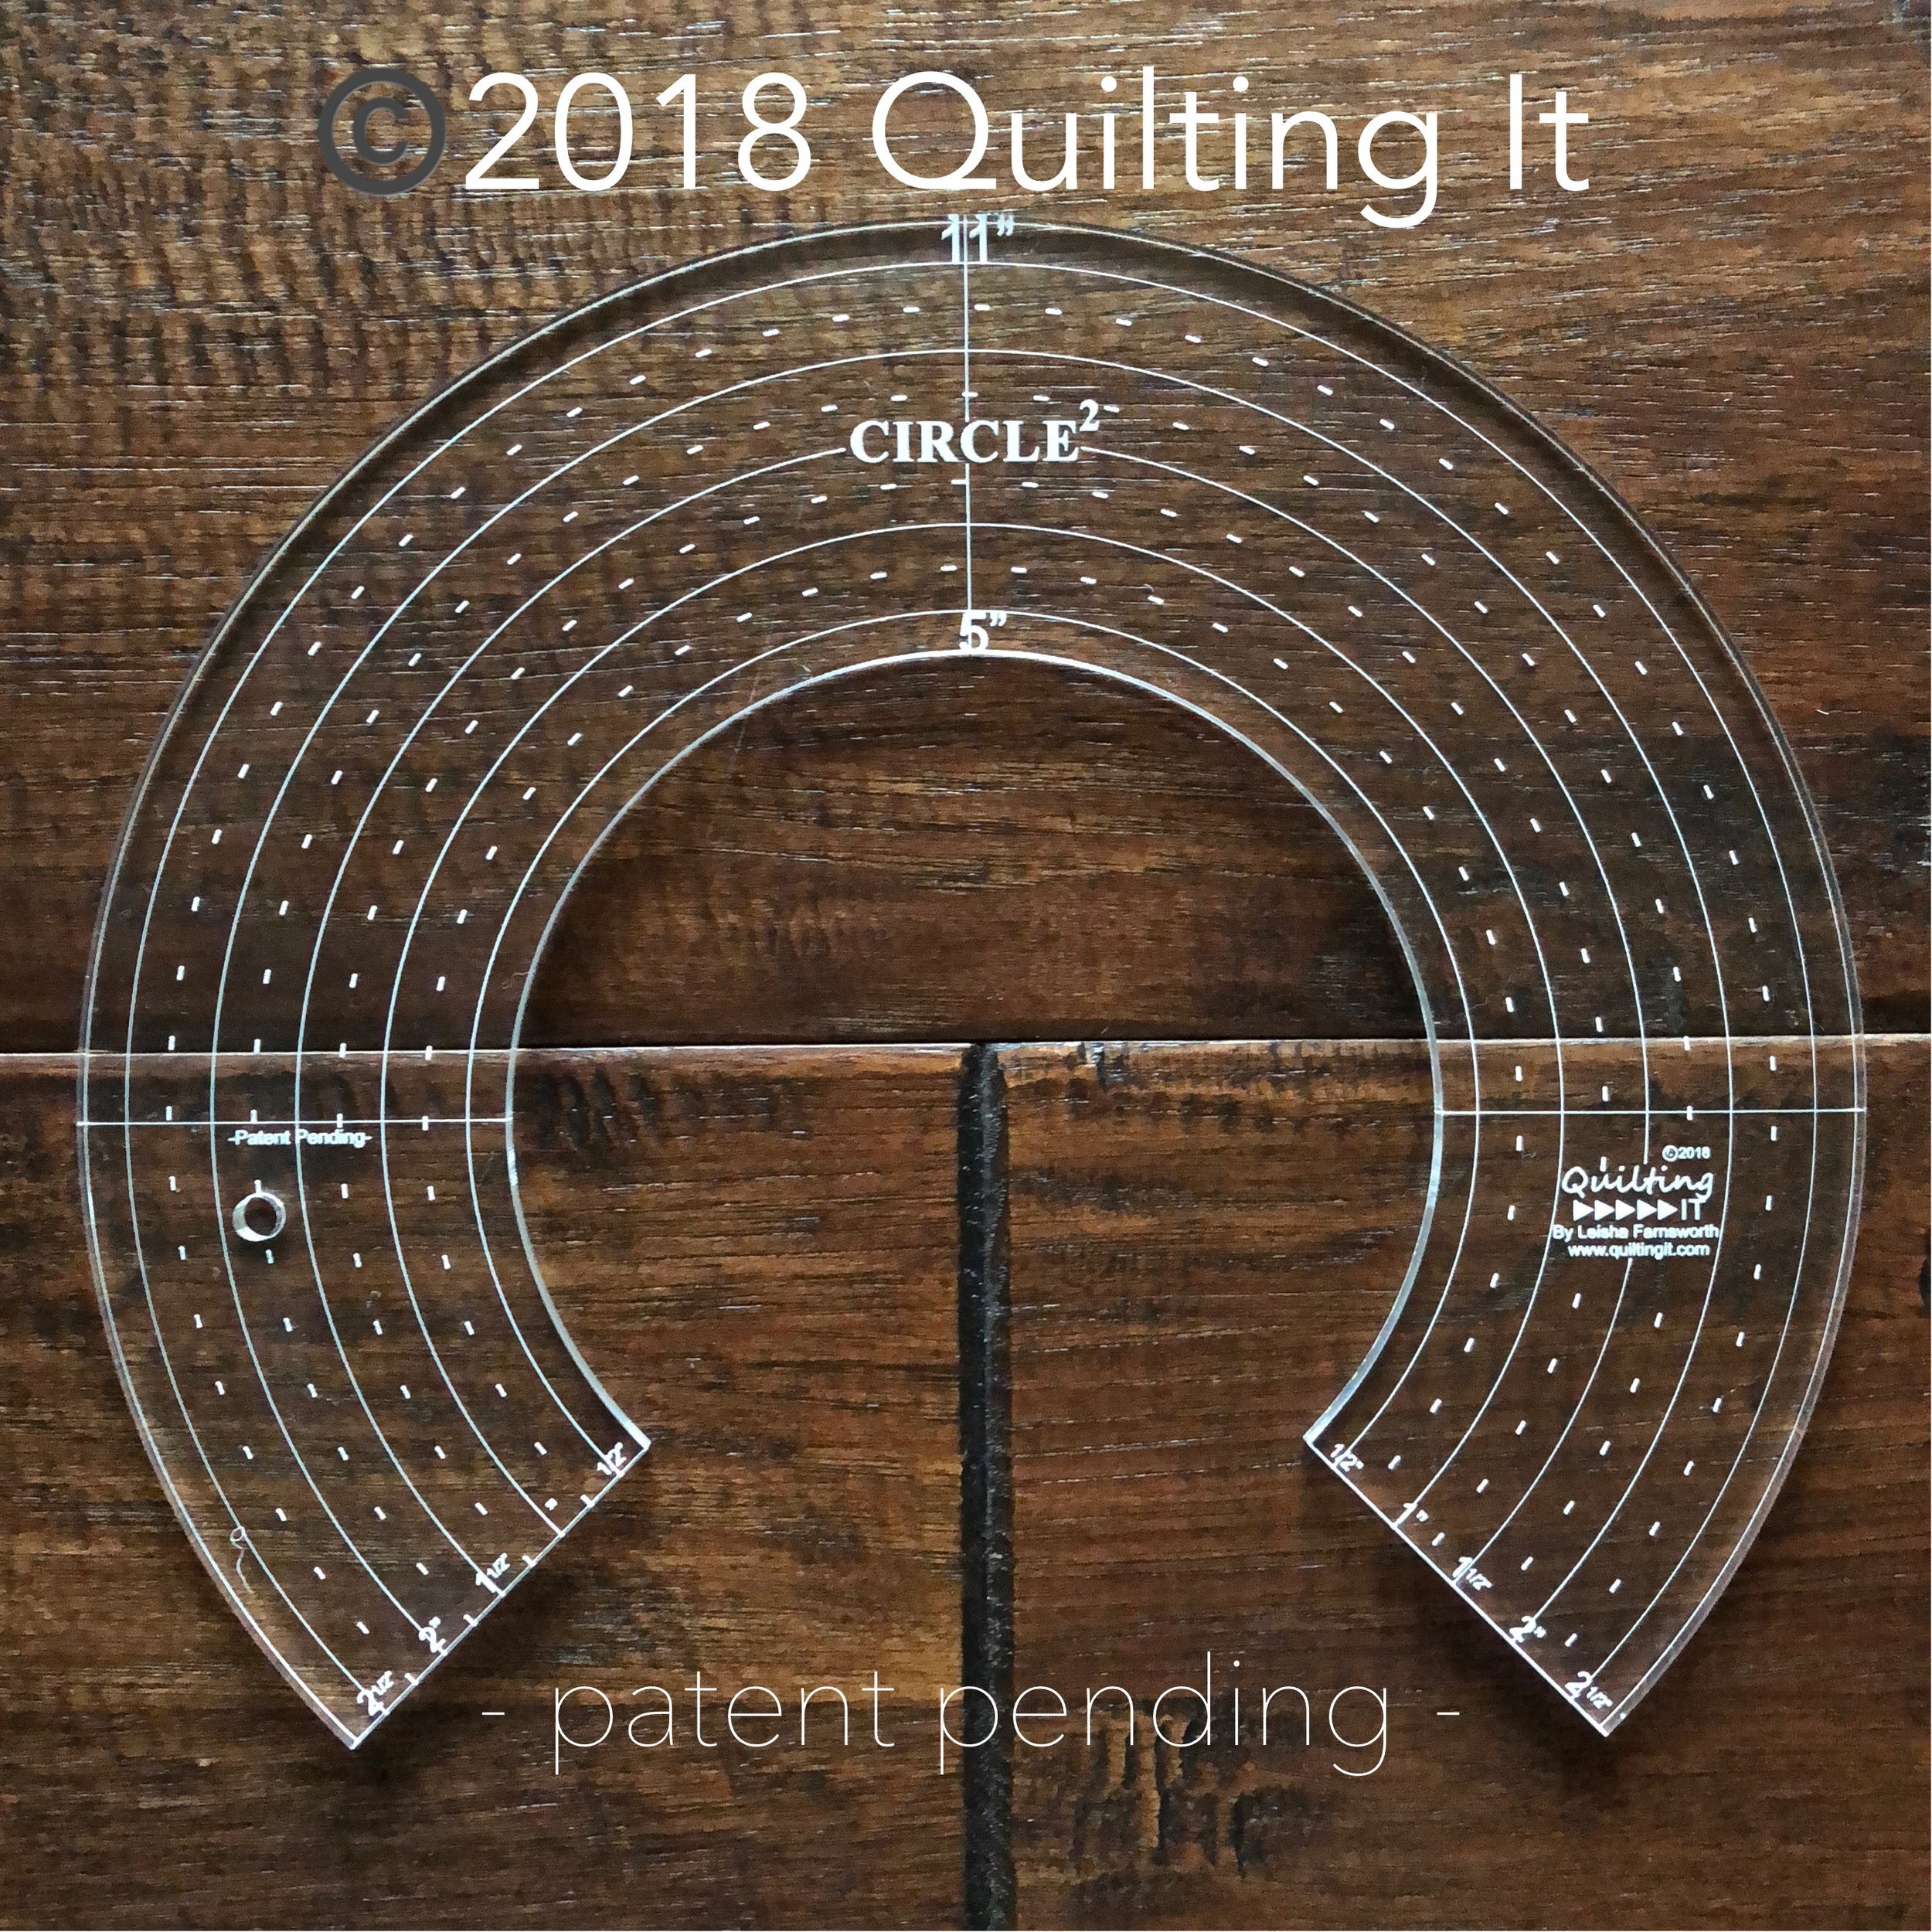
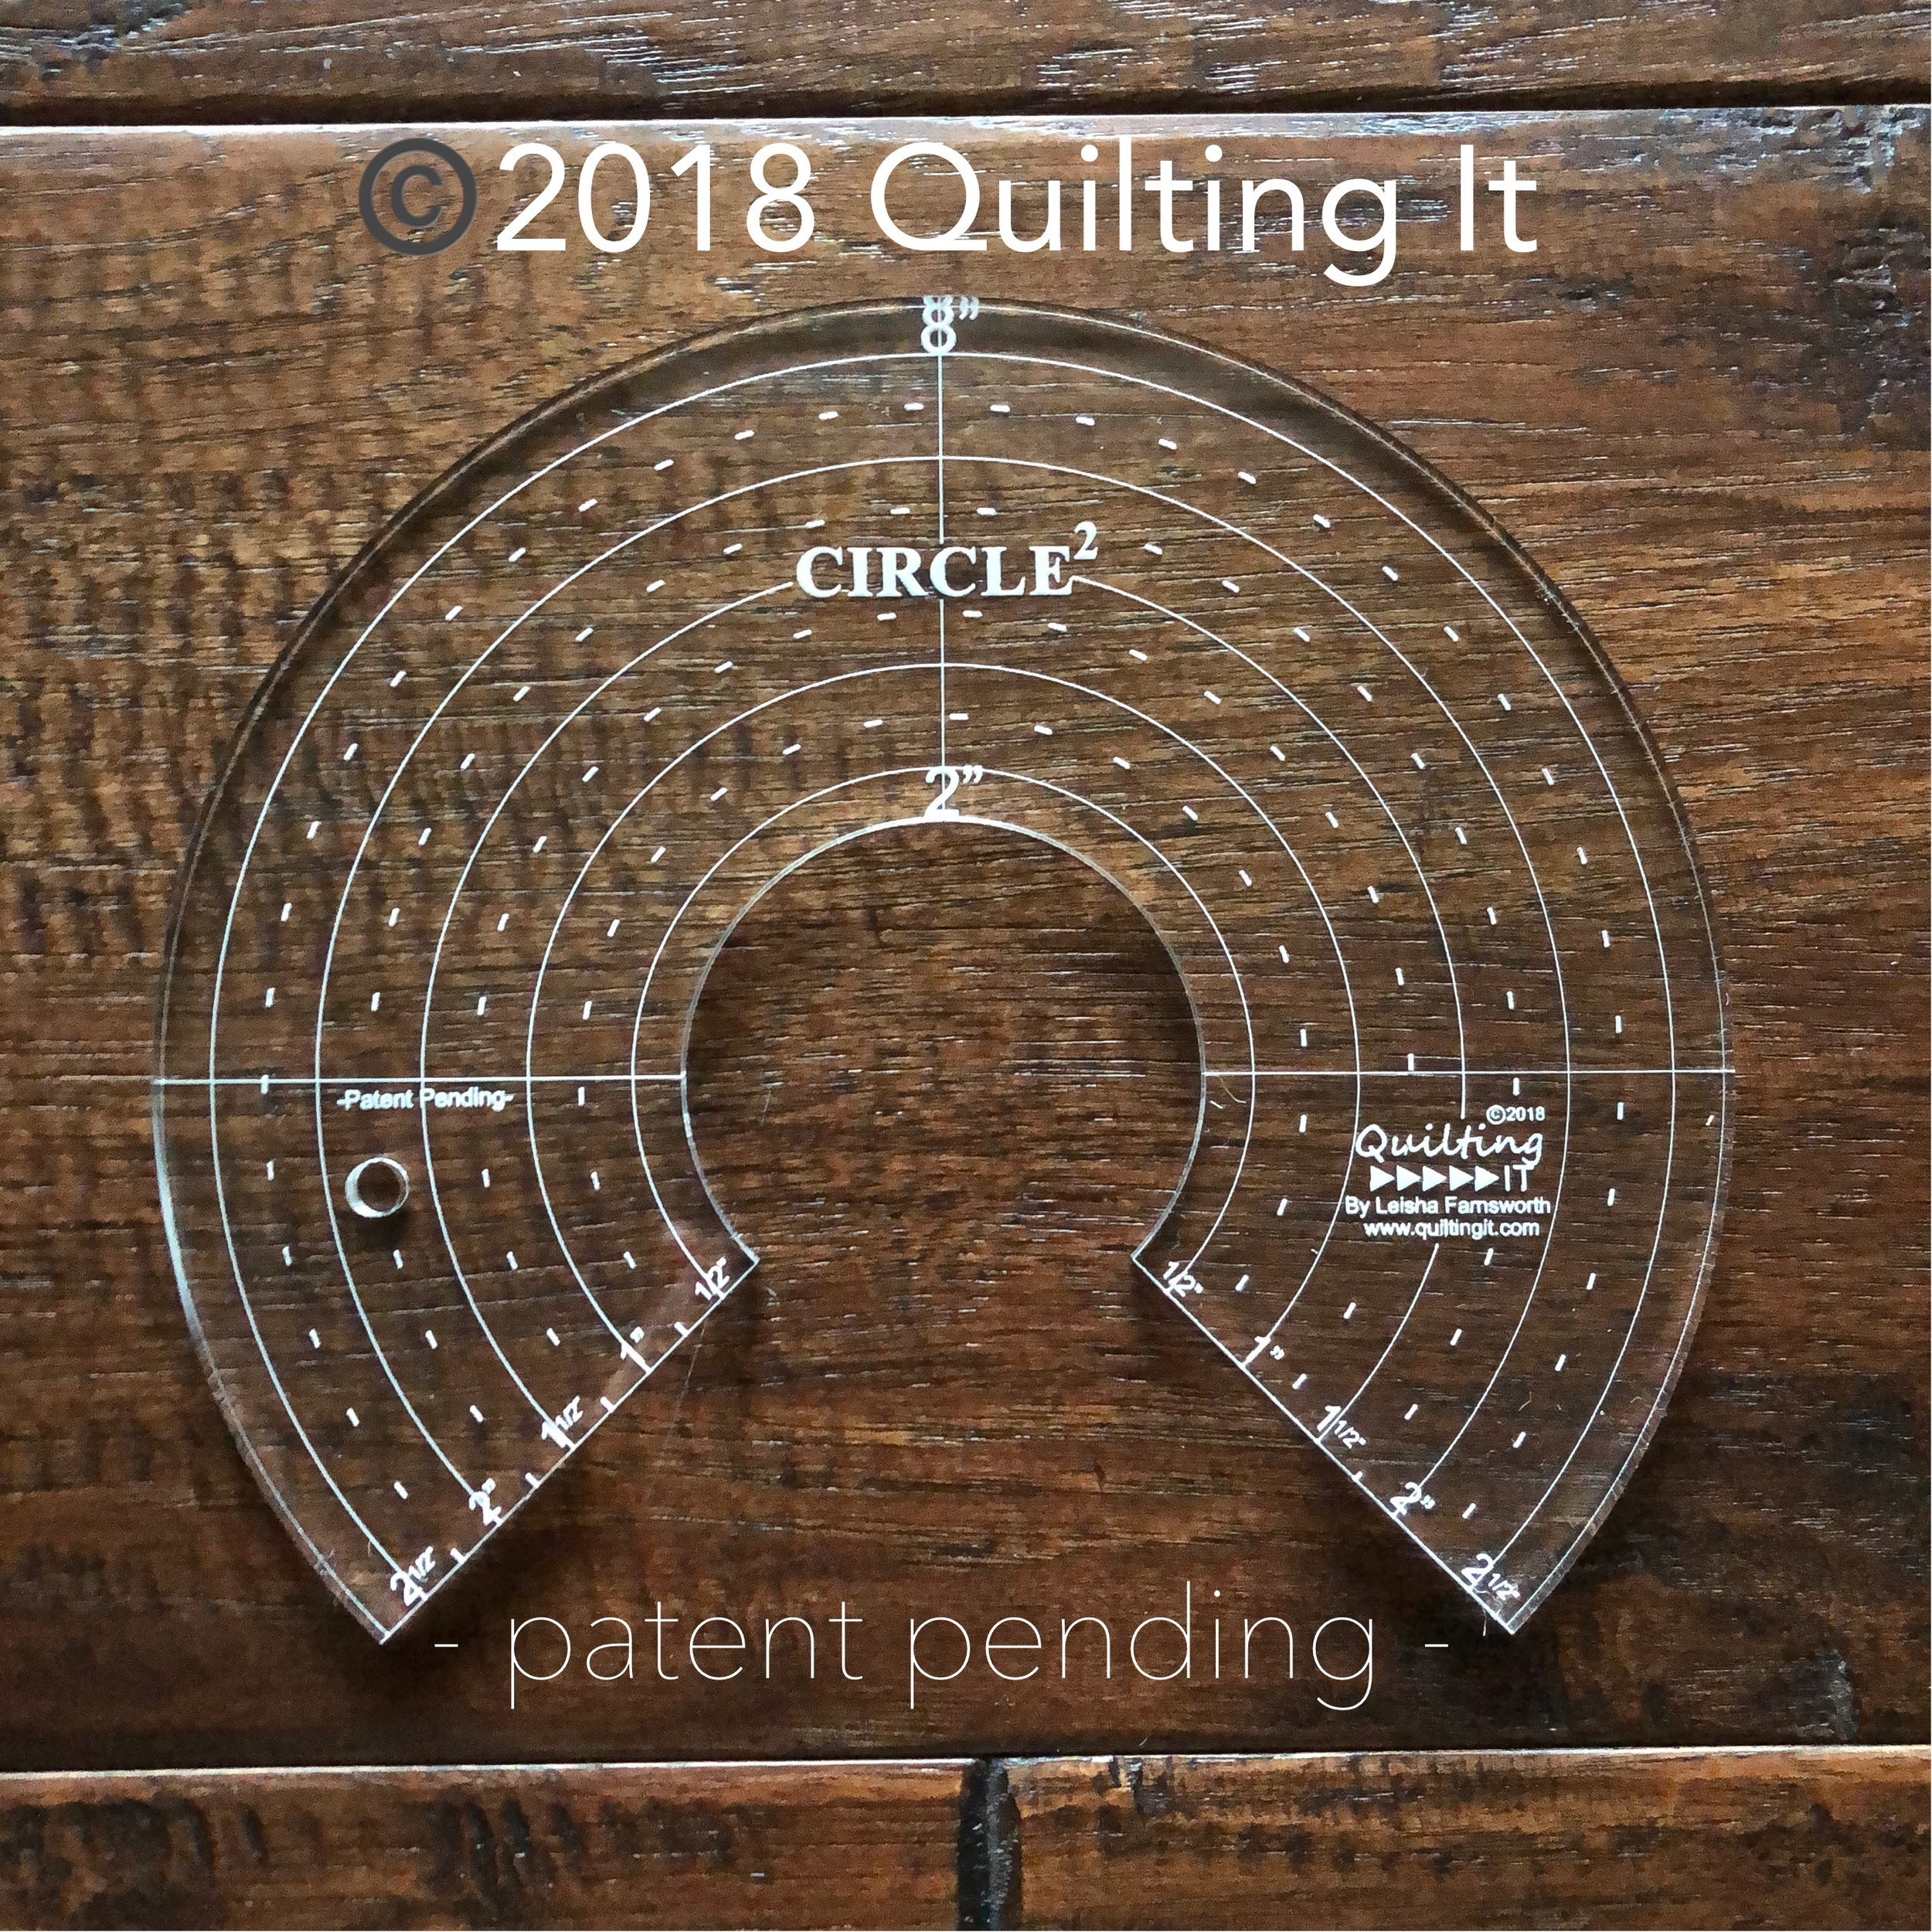
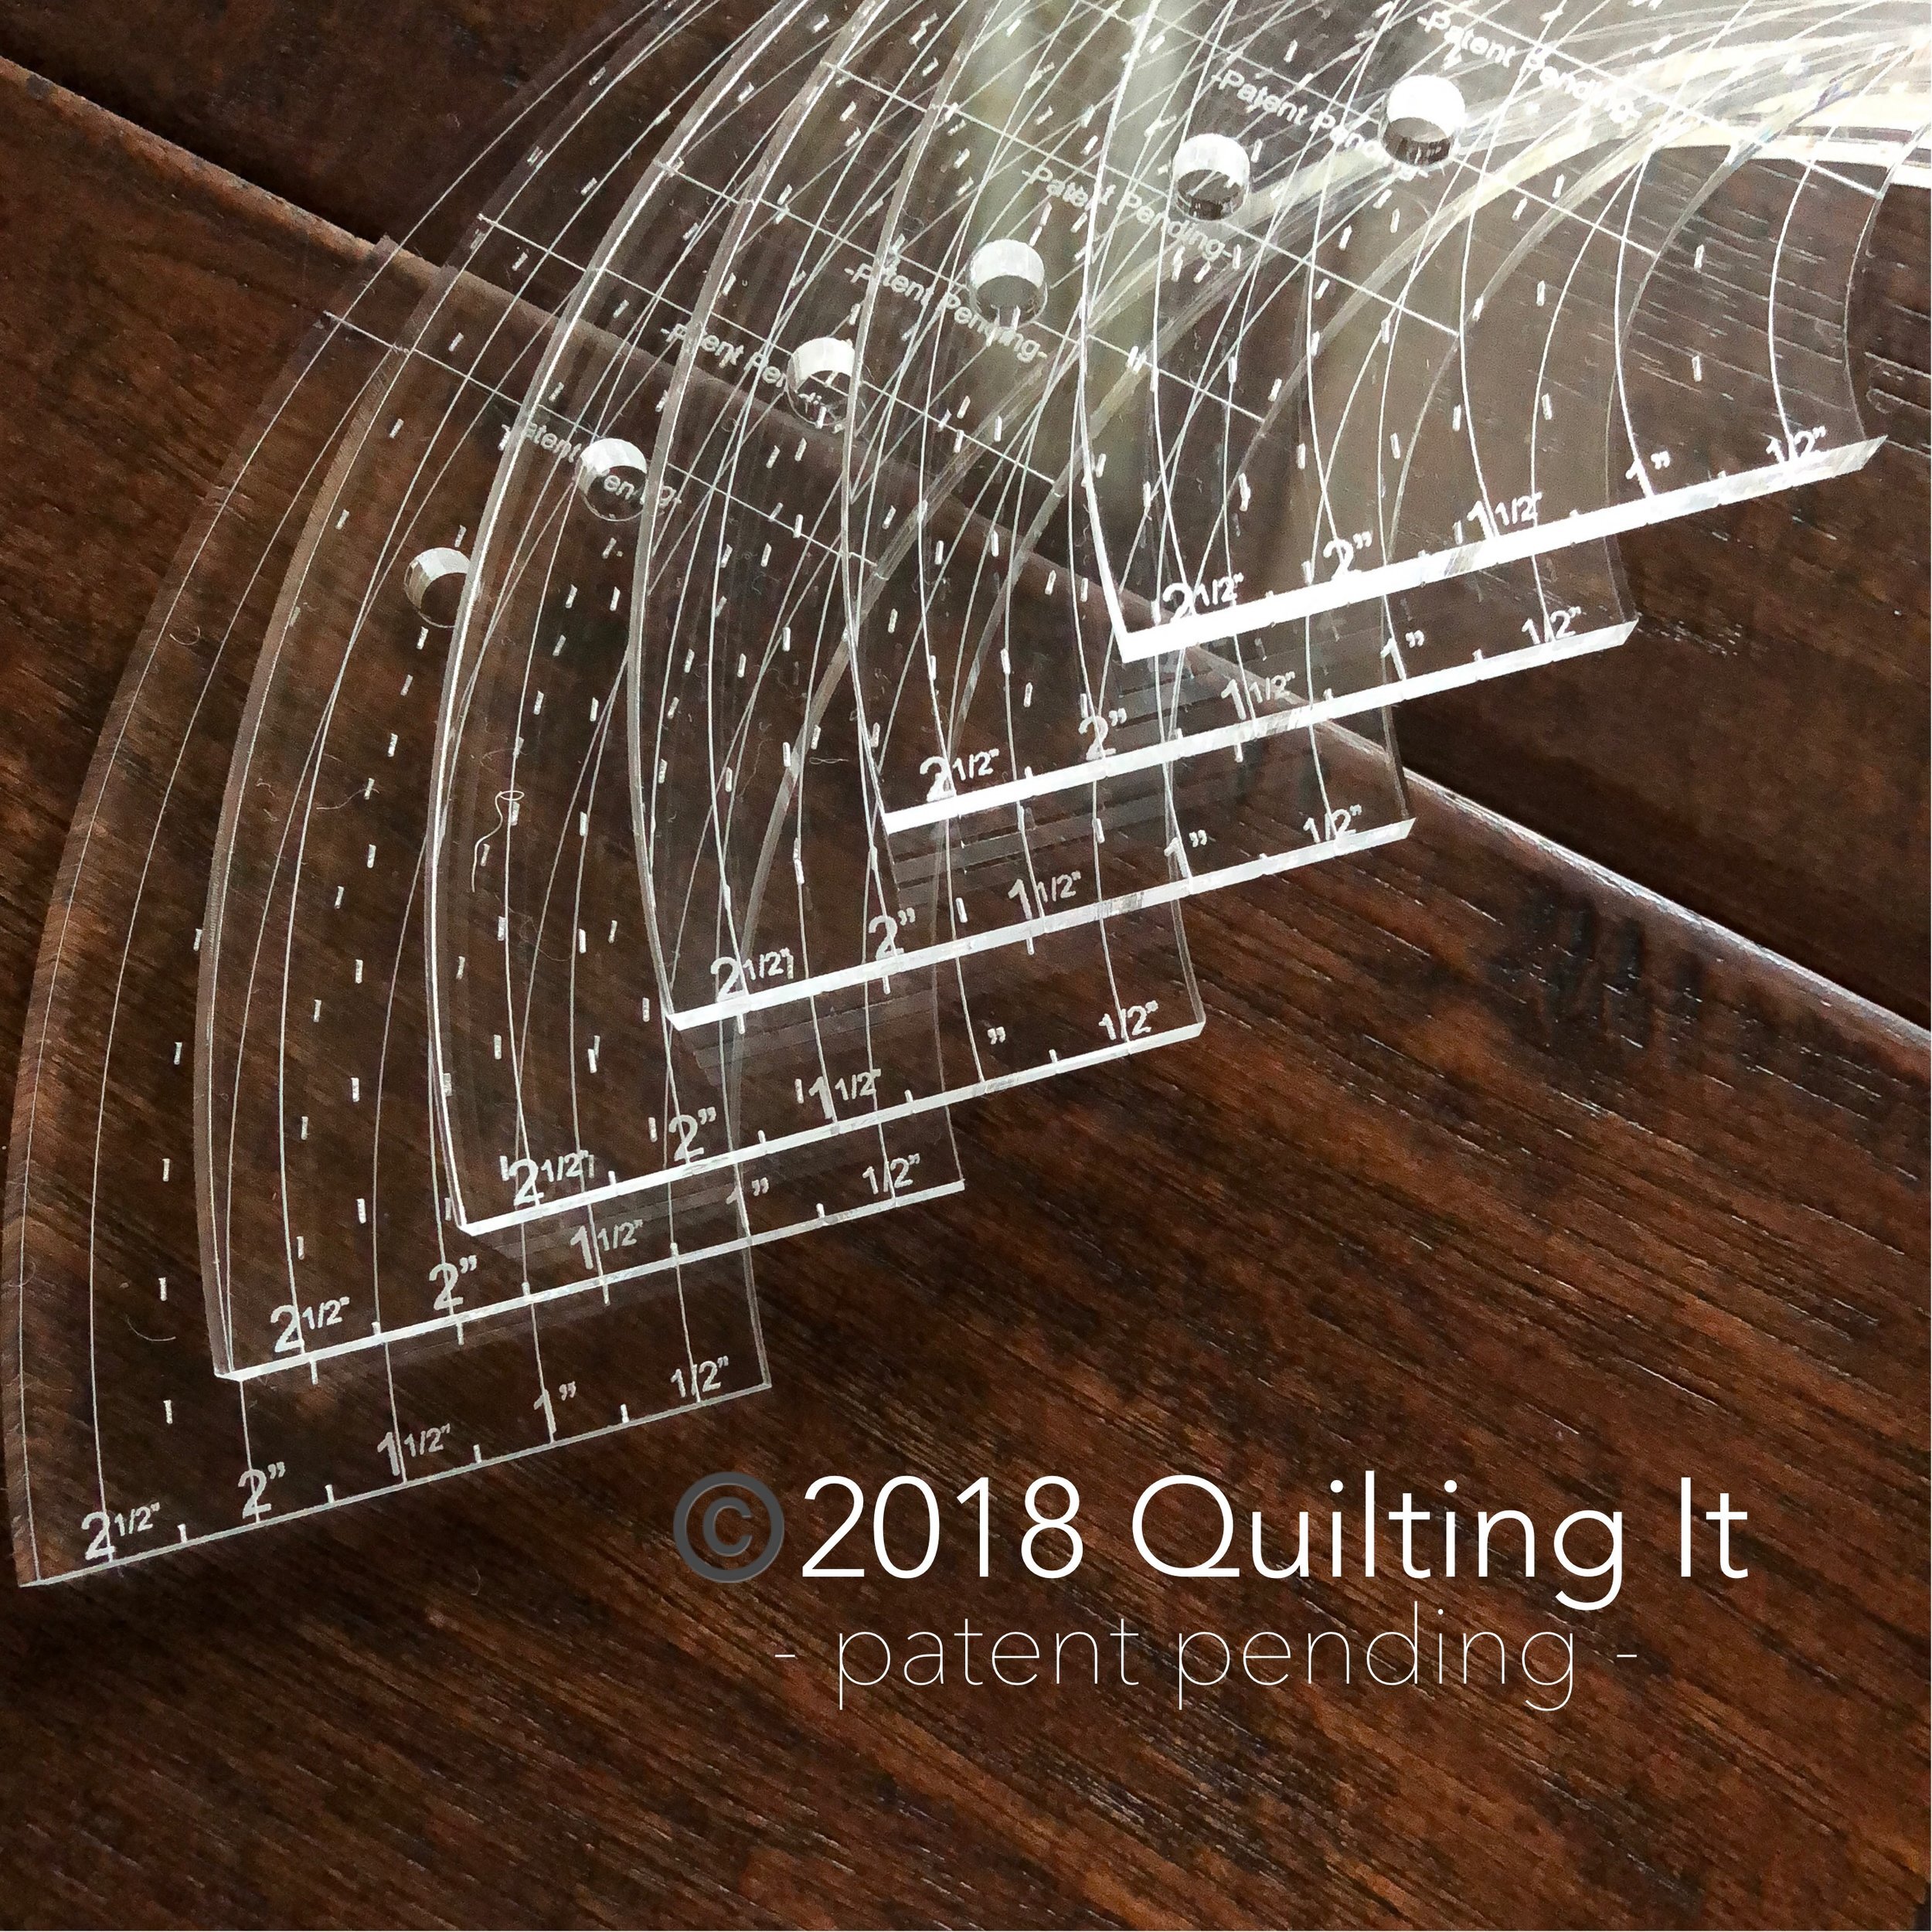
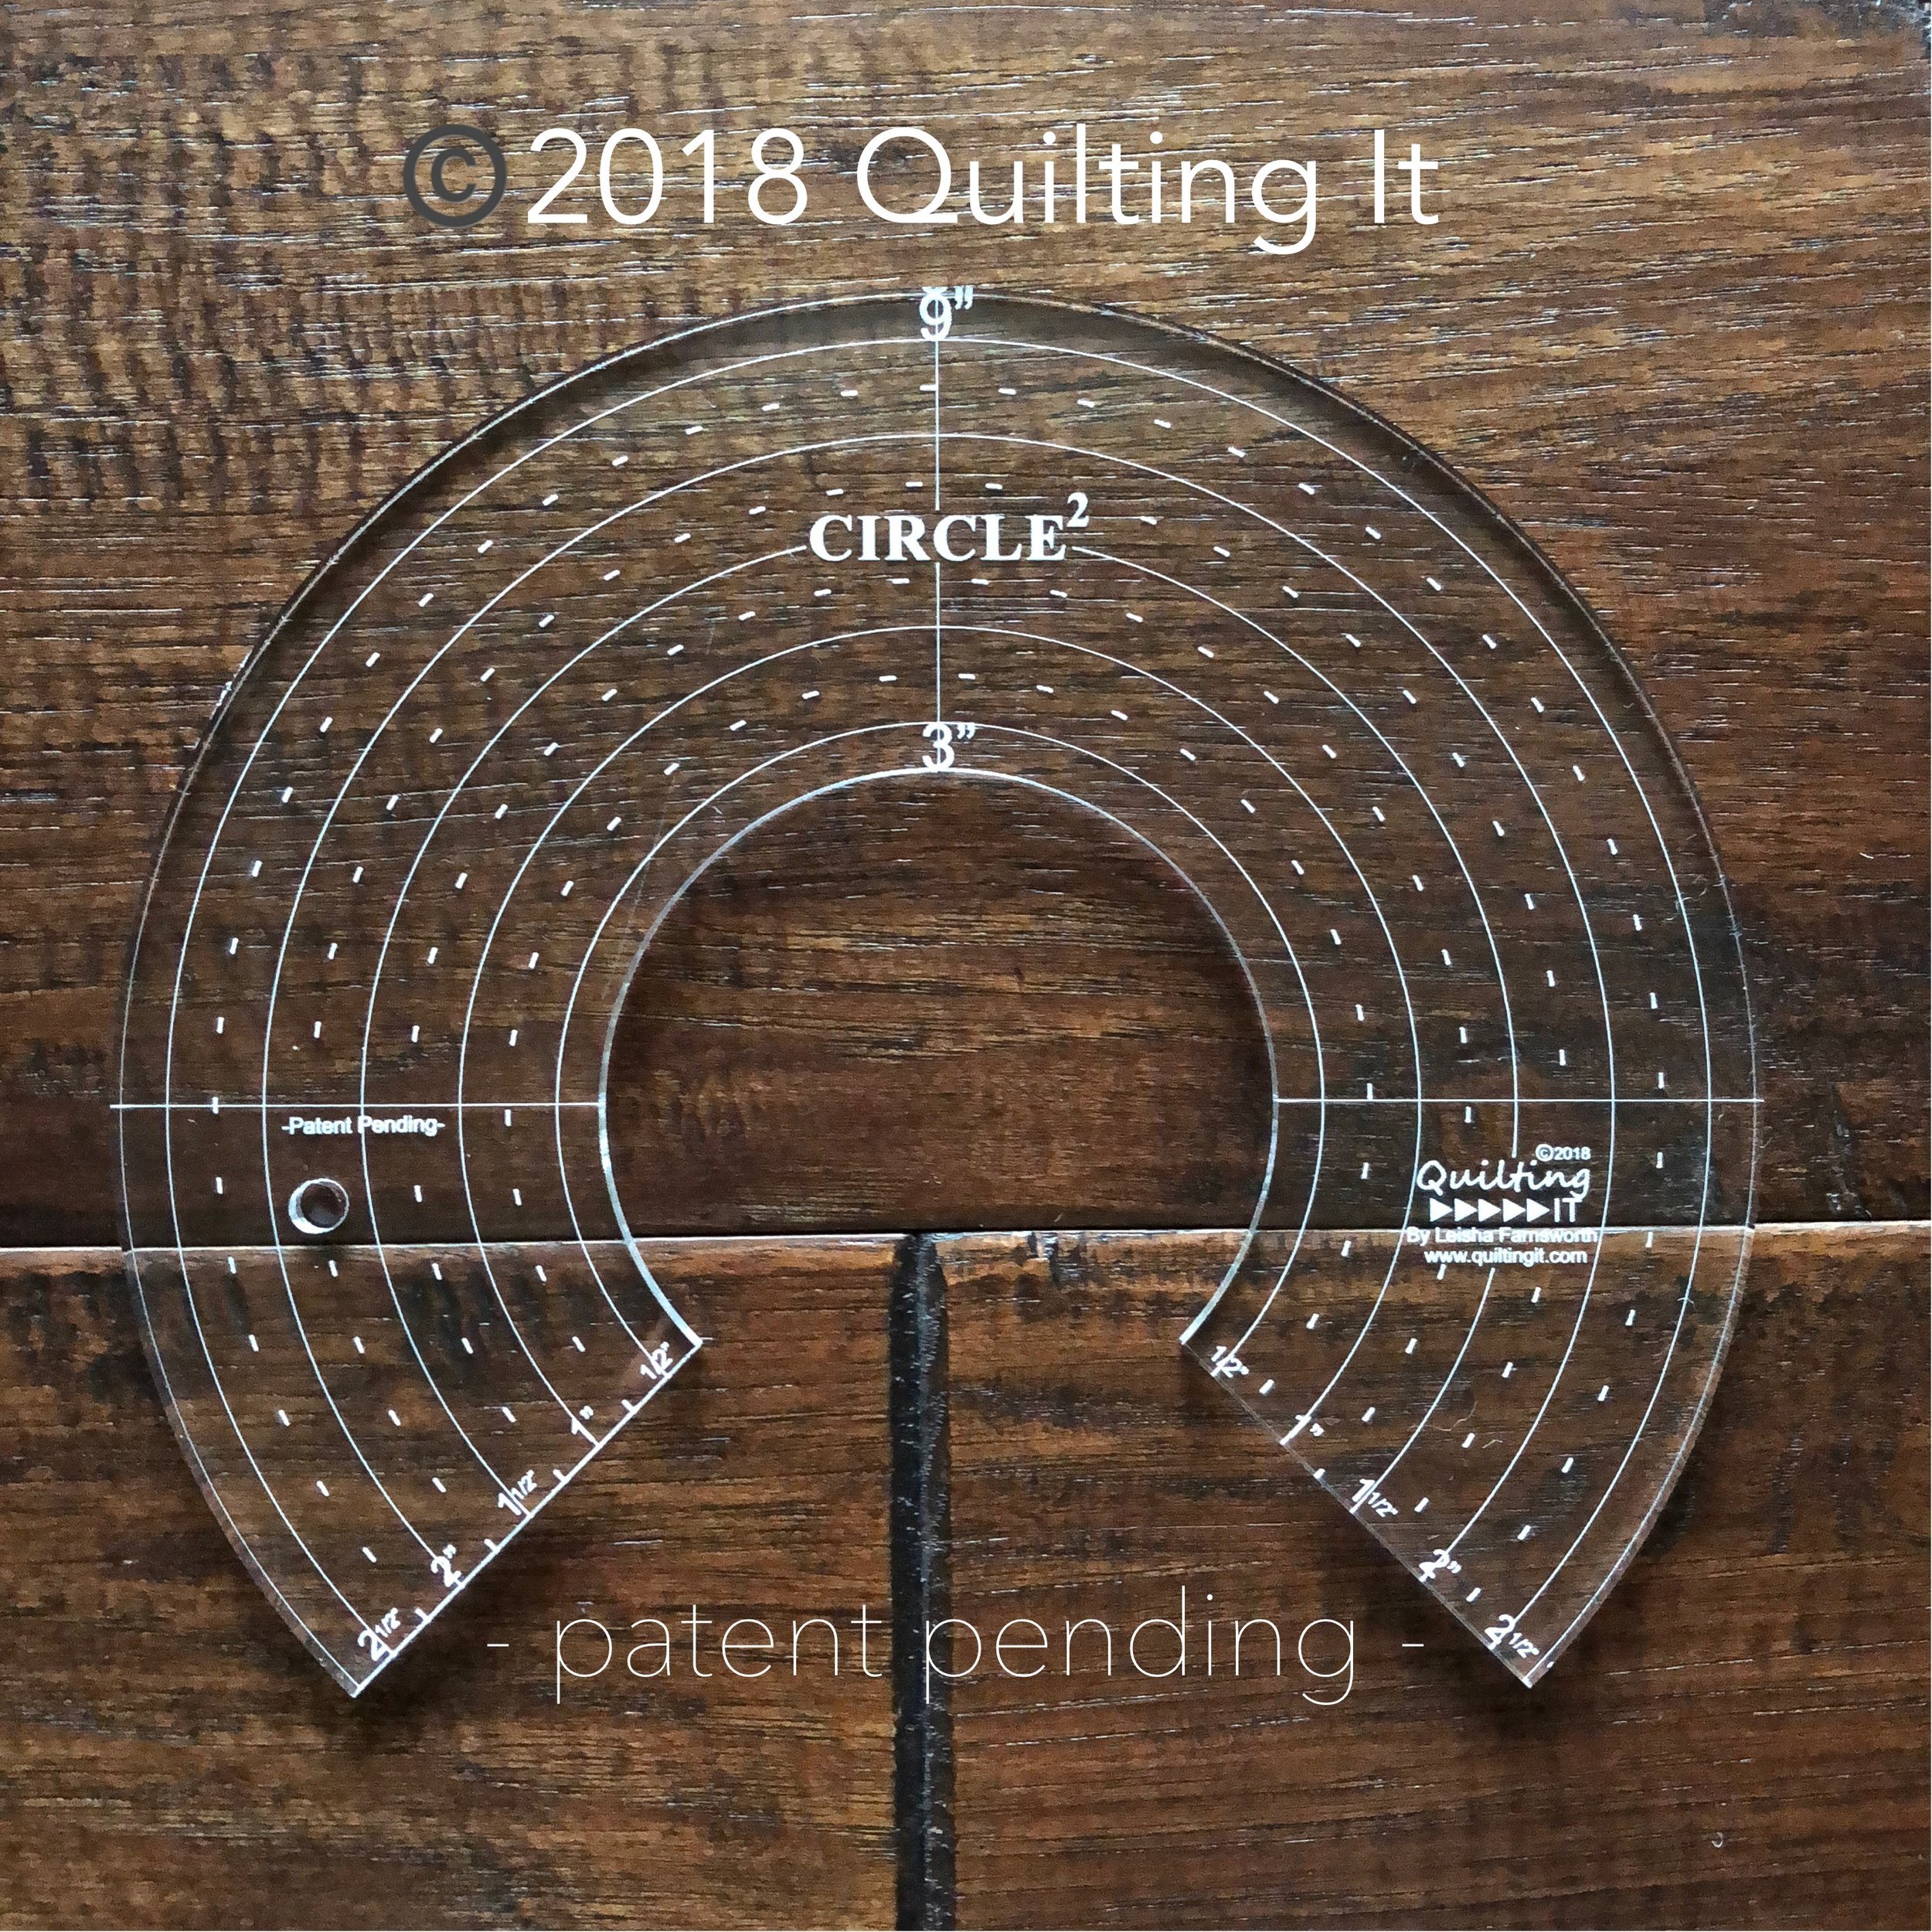
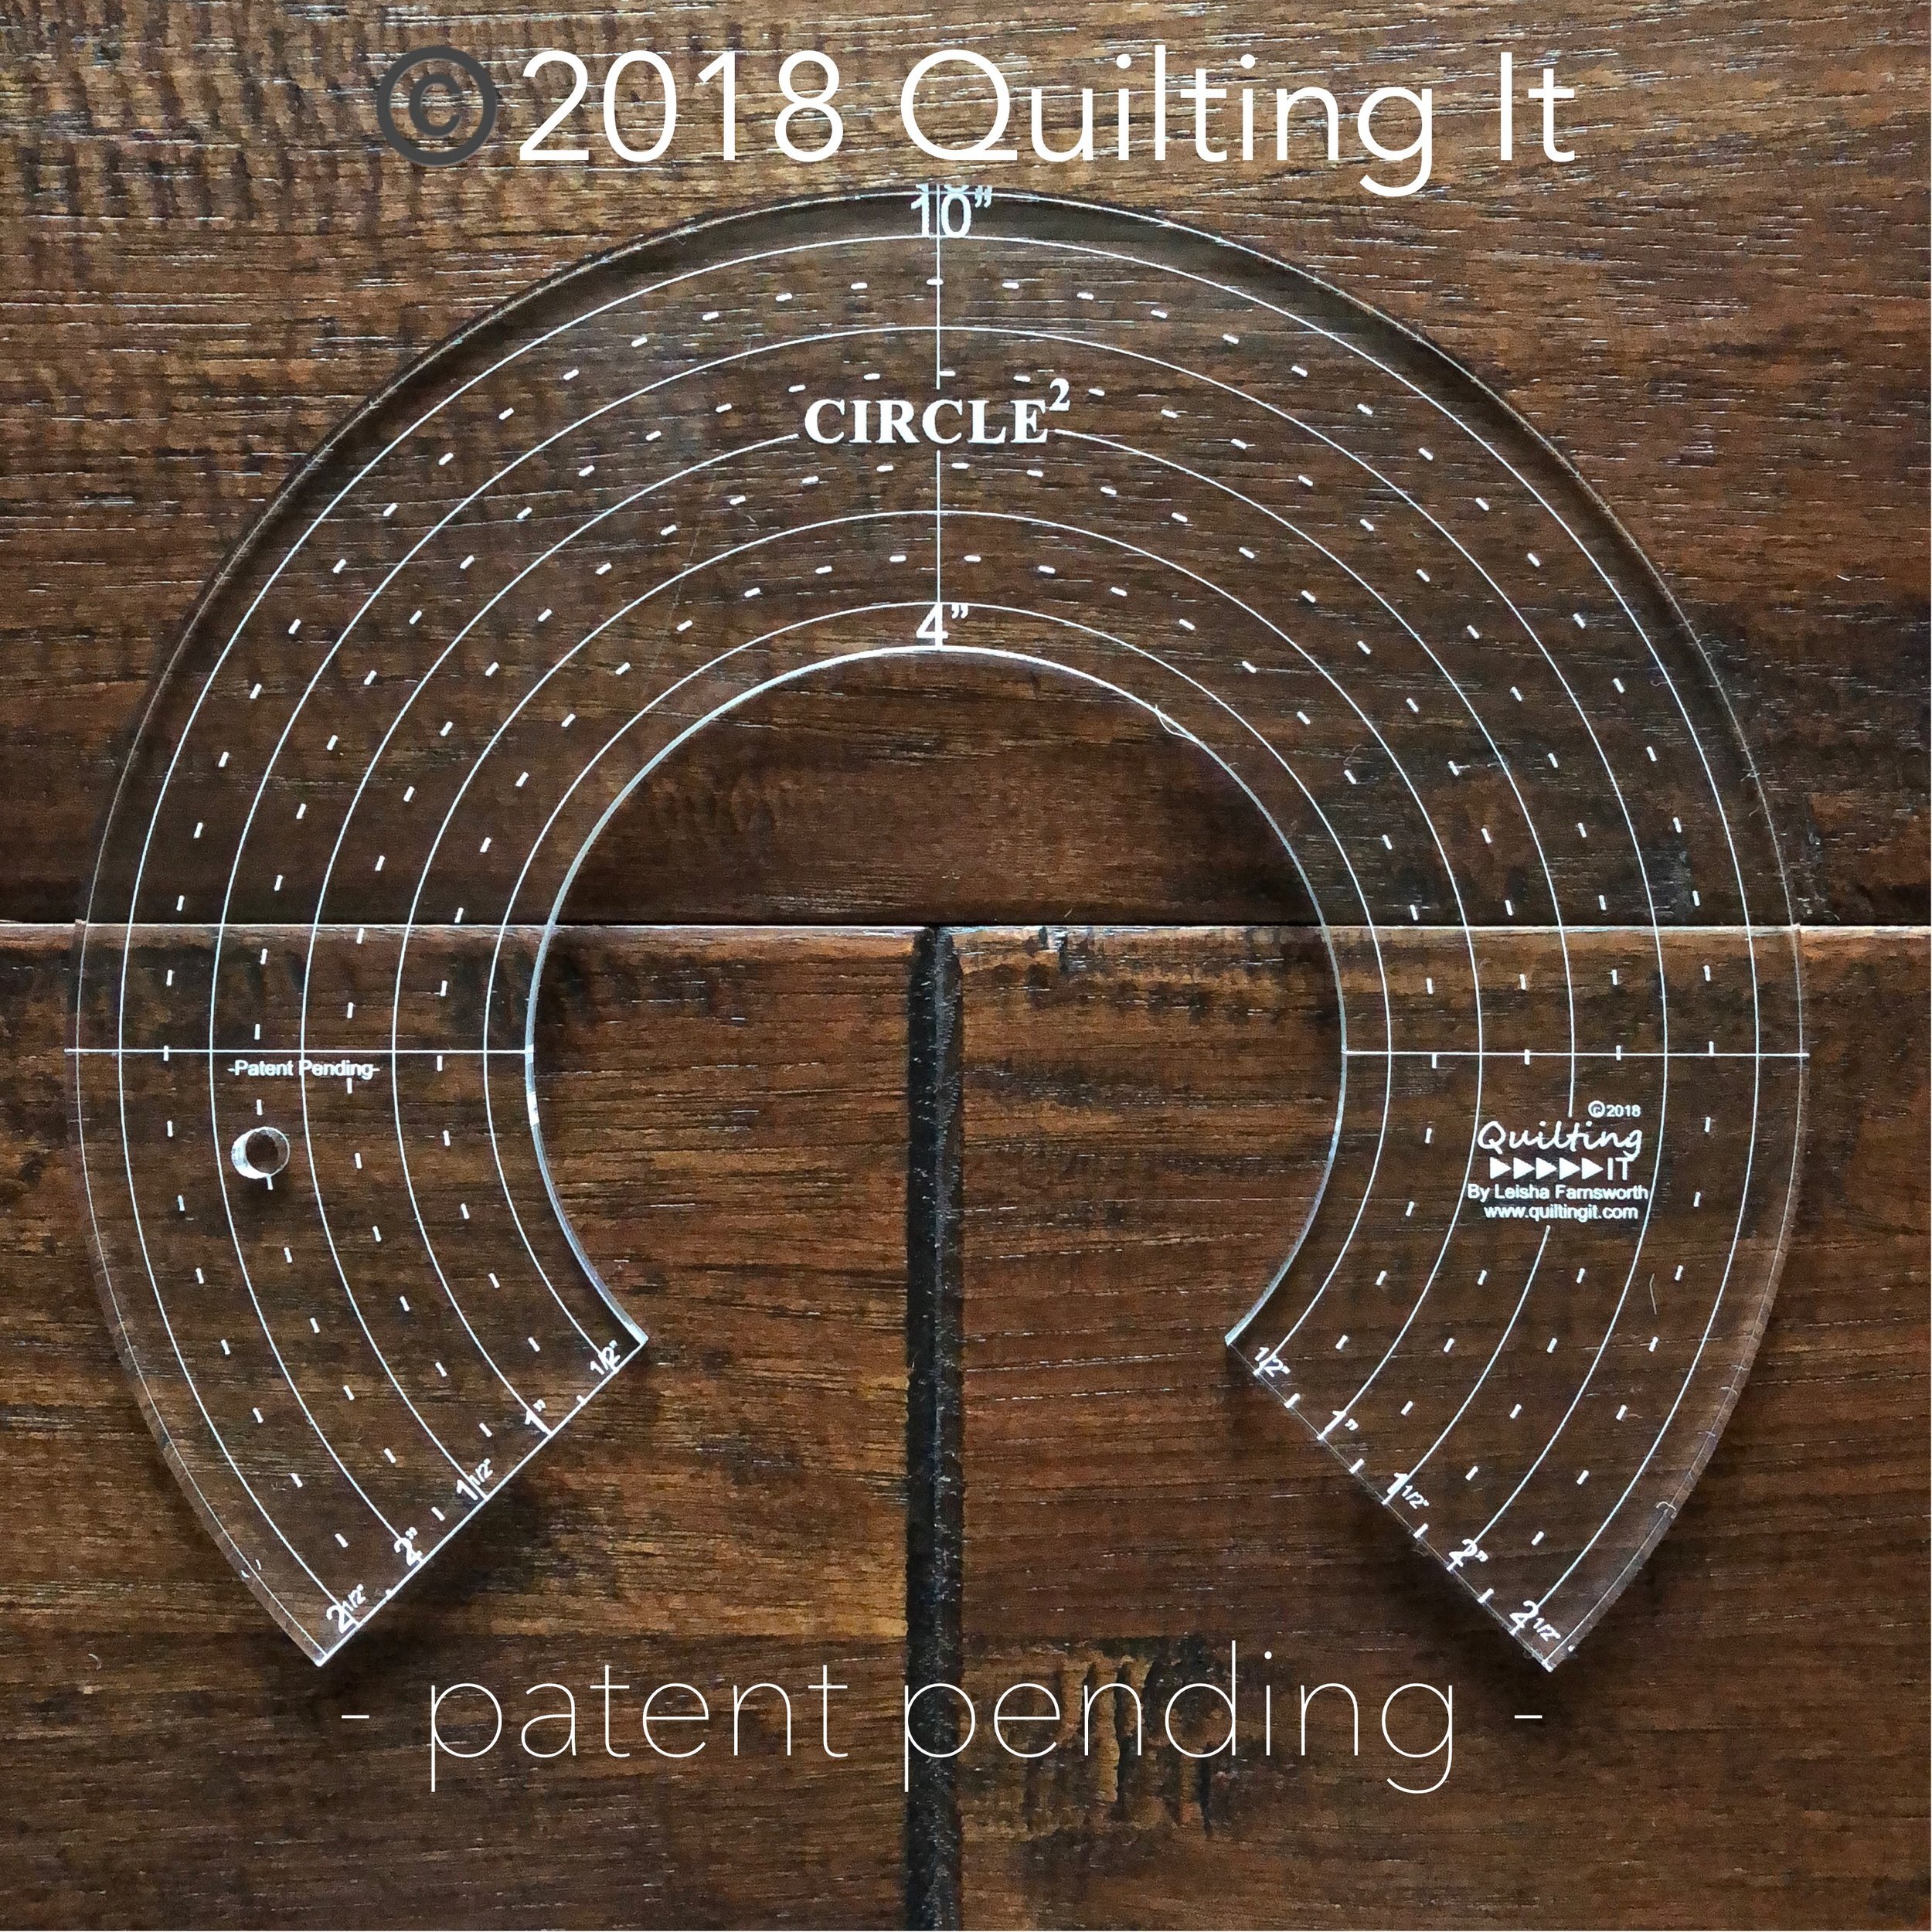
I used four of my Circle2™ (Circle Squared) rulers to quilt these lovely curves. I used the 3”, 4”, 6”, and 9”. It’s so great to have such a versatile set, ranging in size from 2”-13” circles. These rulers are made from 1/4” thick, high quality acrylic. They are available in clear or green in my shop. For more details go here: Circle2™ . My machine quilting circle rulers can be used on a domestic machine with the correct quilting foot and on a longarm machine with a ruler foot. To check them out in action, go to my YouTube channel here: https://www.youtube.com/user/QuiltingIt


The above picture shows the 3” and the 9” circles. Each ruler has two sizes of circles. The reason being, you get 12 different sizes of circles and you only need 6 rulers. Saves space in your quilting studio and saves you money…because you’re not buying 6 more rulers. (Green set is pictured below)


The quilting in each block is so cohesive and pairs nicely together, while enhancing the quilt blocks. I used the 6” circle ruler to quilt the large orange peel on the corners of the star block.
That beautiful arc diamond design is so fun to quilt, and is my favorite part of quilting on this quilt. I use the 9” circle ruler on that design.
For all the orange peel designs inside the star blocks I used the 3” circle. As pictured above and below.

I used the 4” circle ruler to quilt these petals in these flying geese. I also used an Edge ruler from Linda at The Quilted Pineapple, to quilt all the lines.
All those different sizes of curves just fit so nicely together.


A few pictures of the back. Love it!!

Next, some cute table runners…made by Barbara!
How sweet are these popsicles?!?!?!! The pattern is by Ribbon Candy Quilt Company and is one of their Sizzlin’ Summer Skinnies. Click on their name above, and it will take you right to their website.
I used a white 30 tex A&E Perma Core thread, and Winline’s 8020 batting. I mixed the quilting up, by adding a lot of different shapes and textures. Ribbon candy borders, overlapping circles in the background, and a variety of different designs in the popsicle stripes.

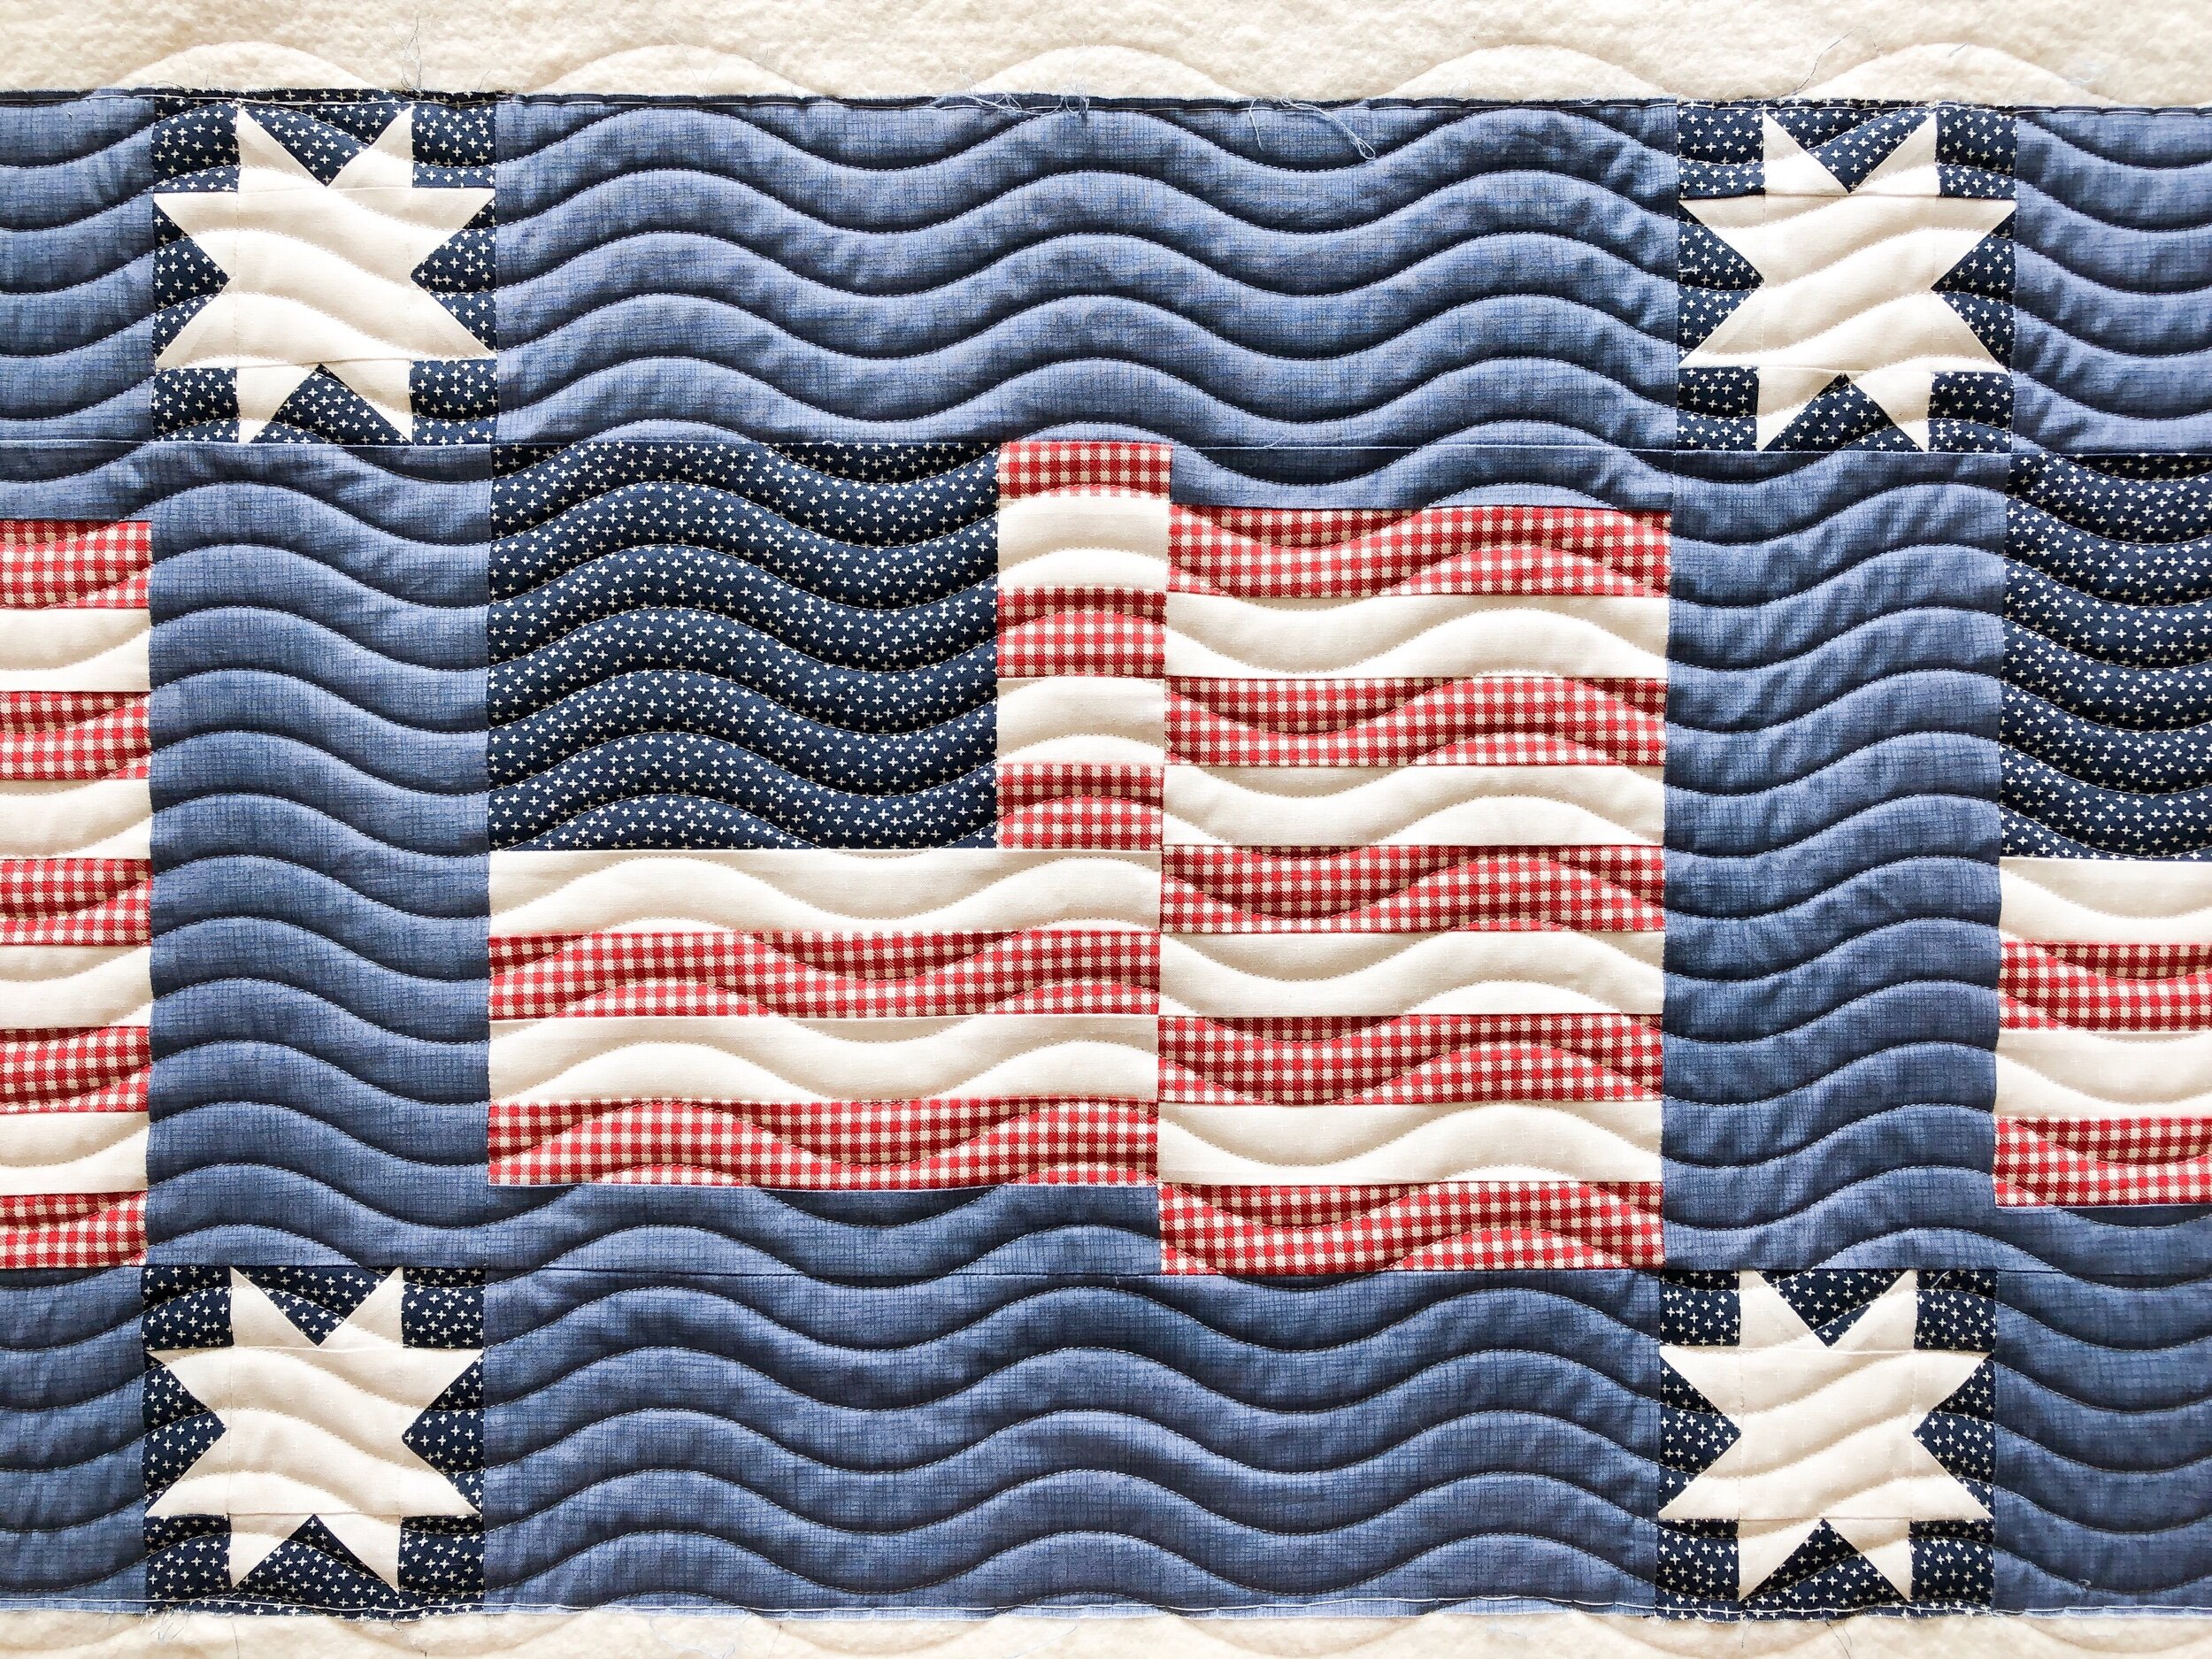
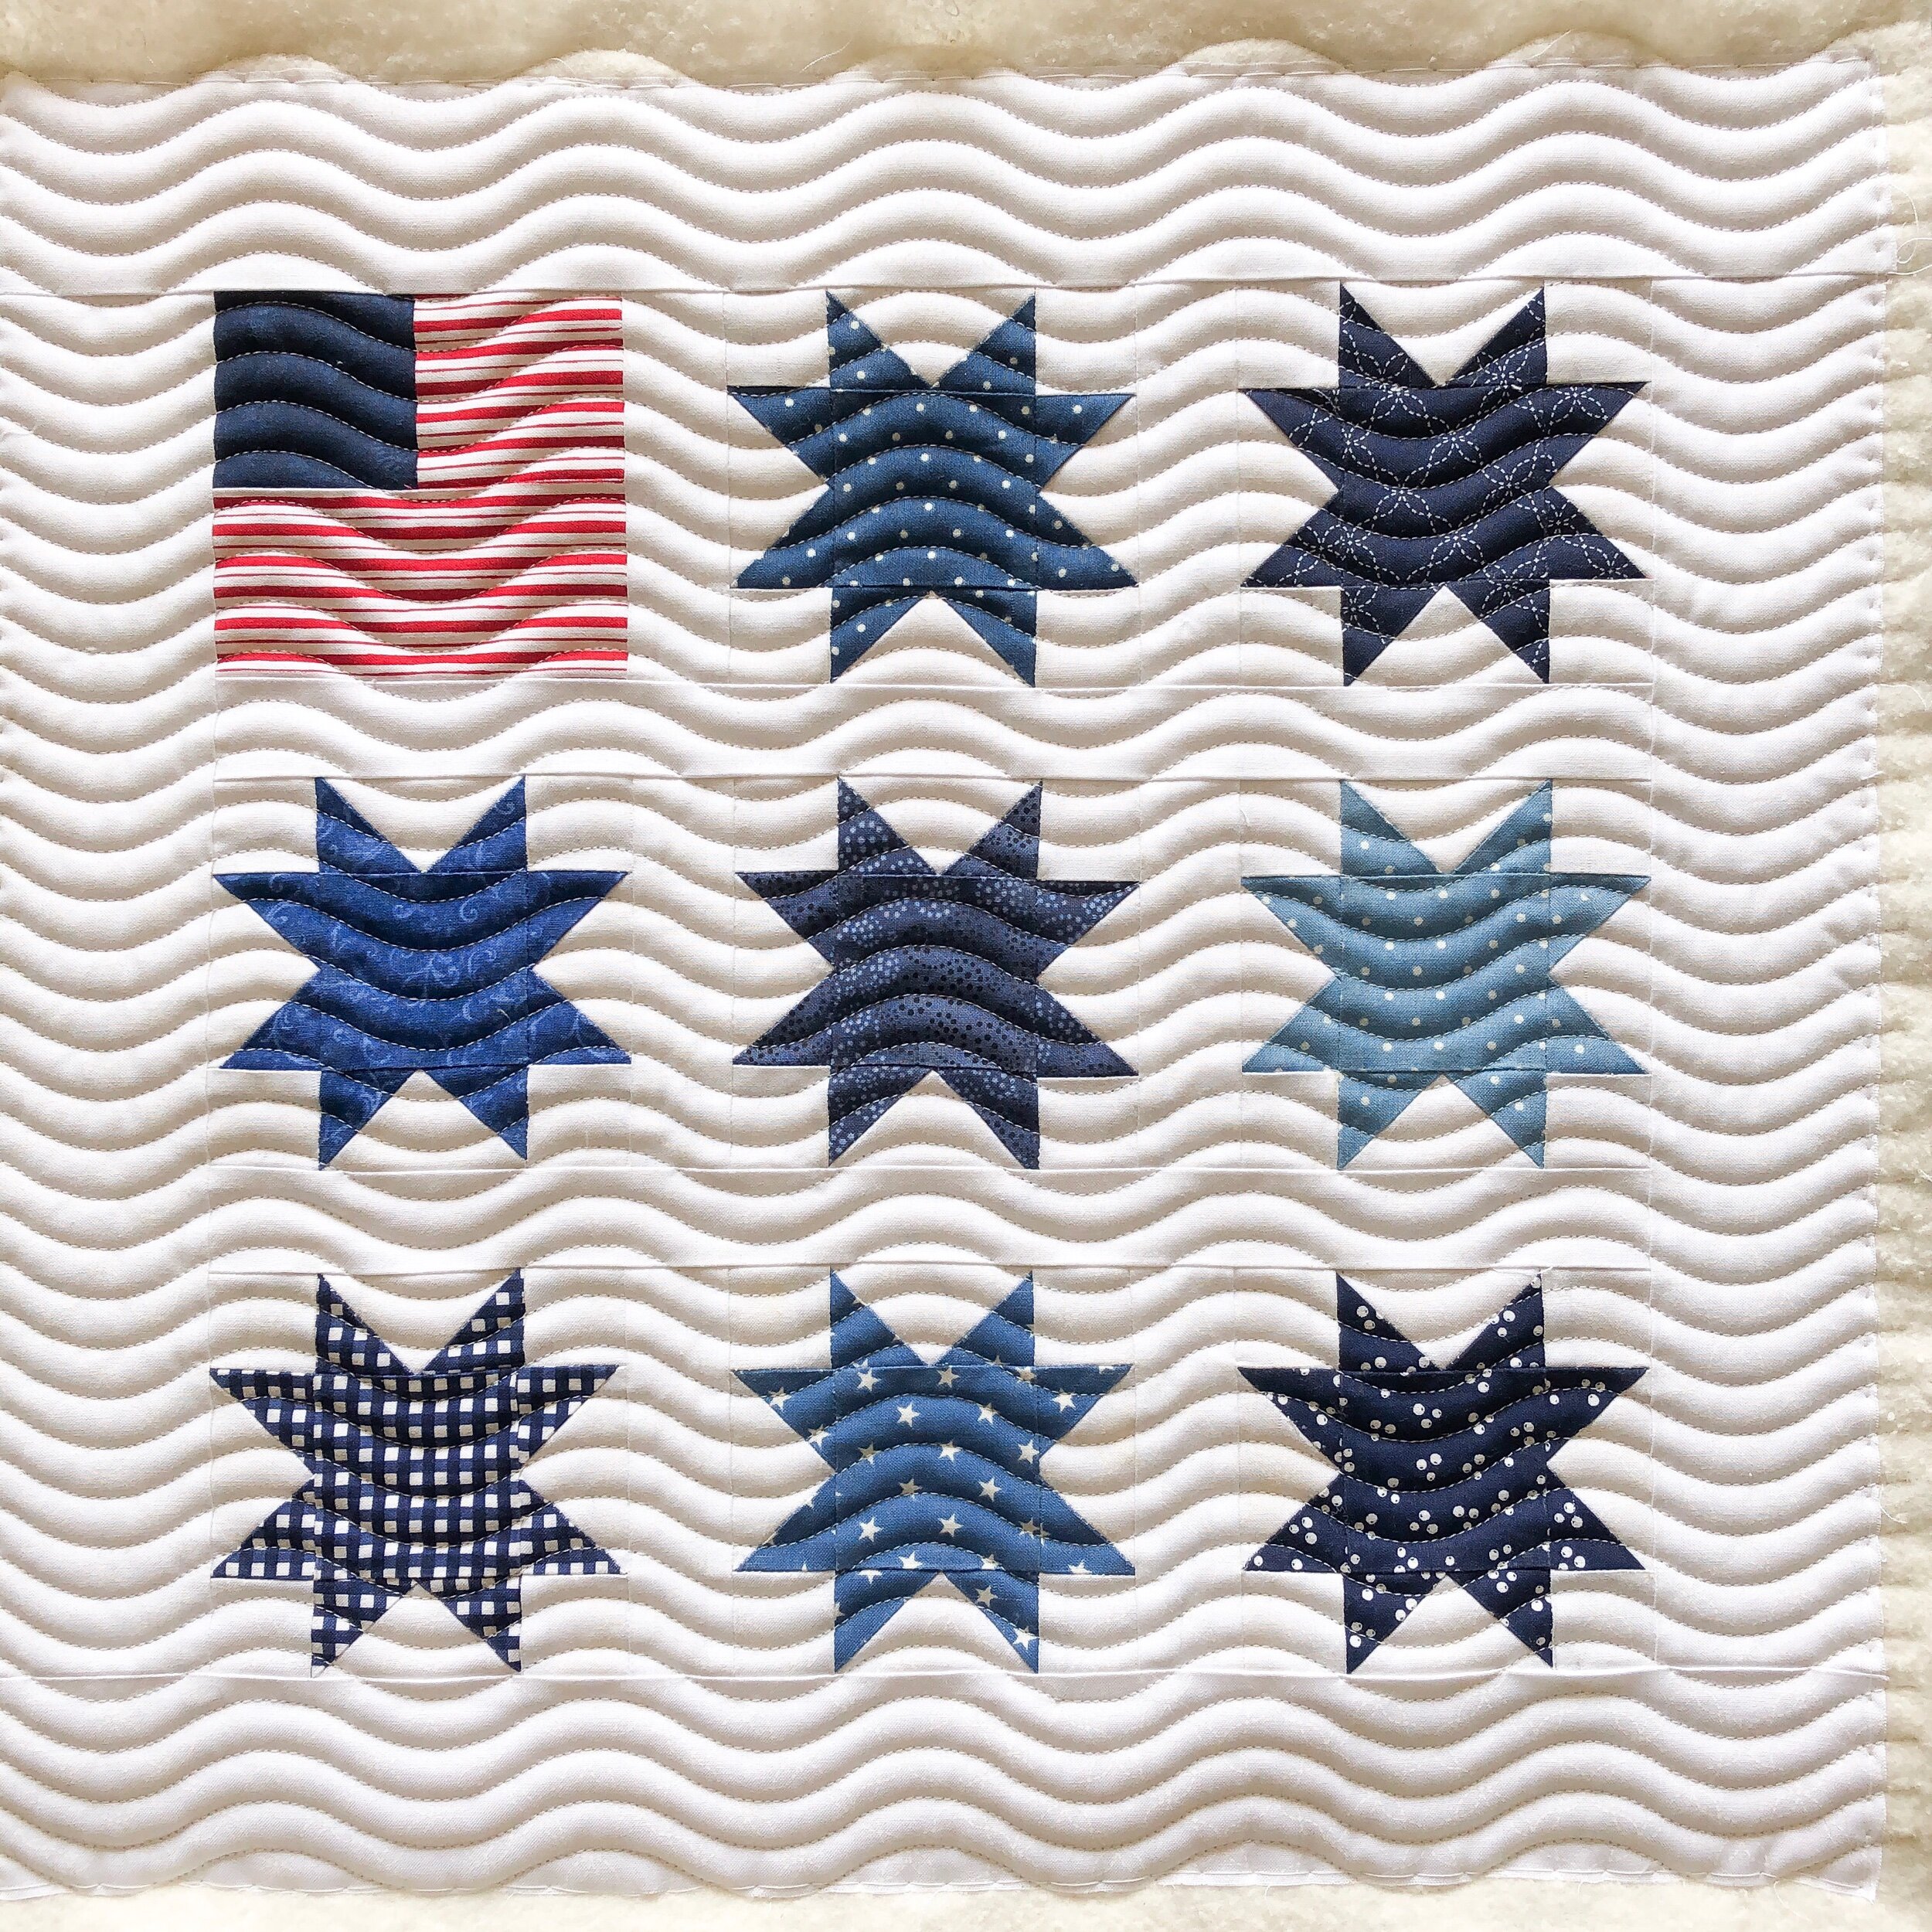
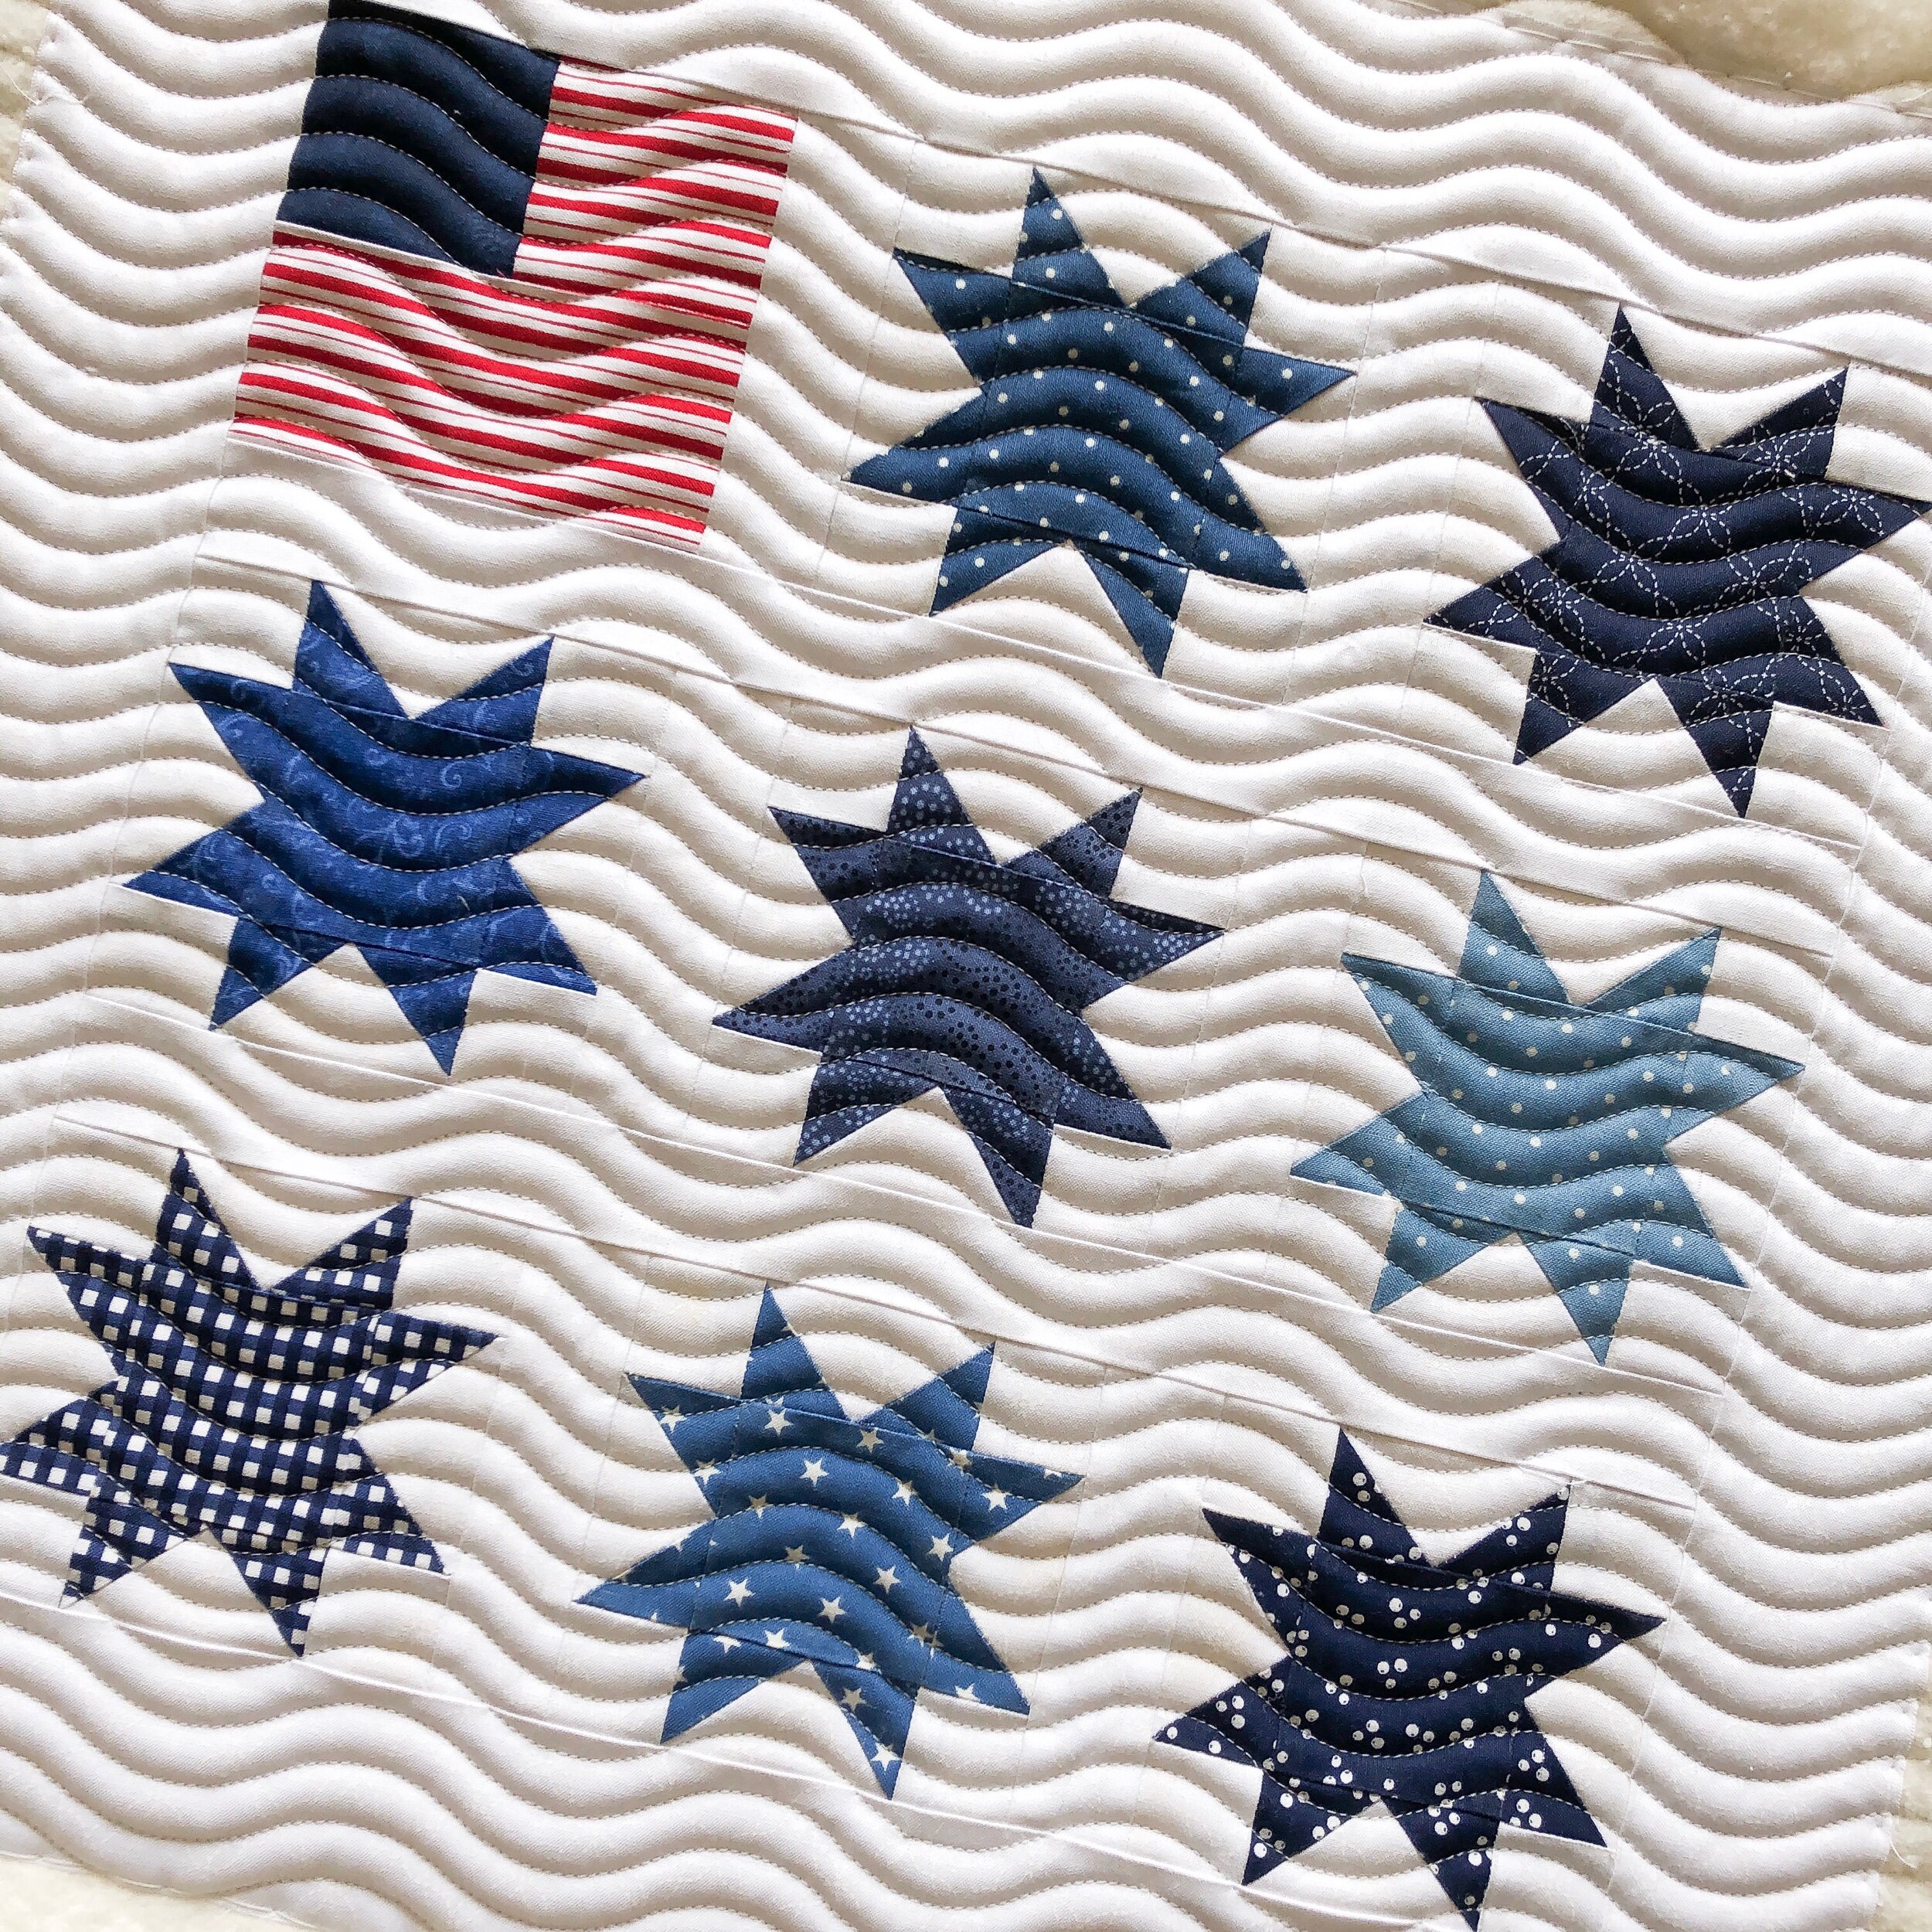
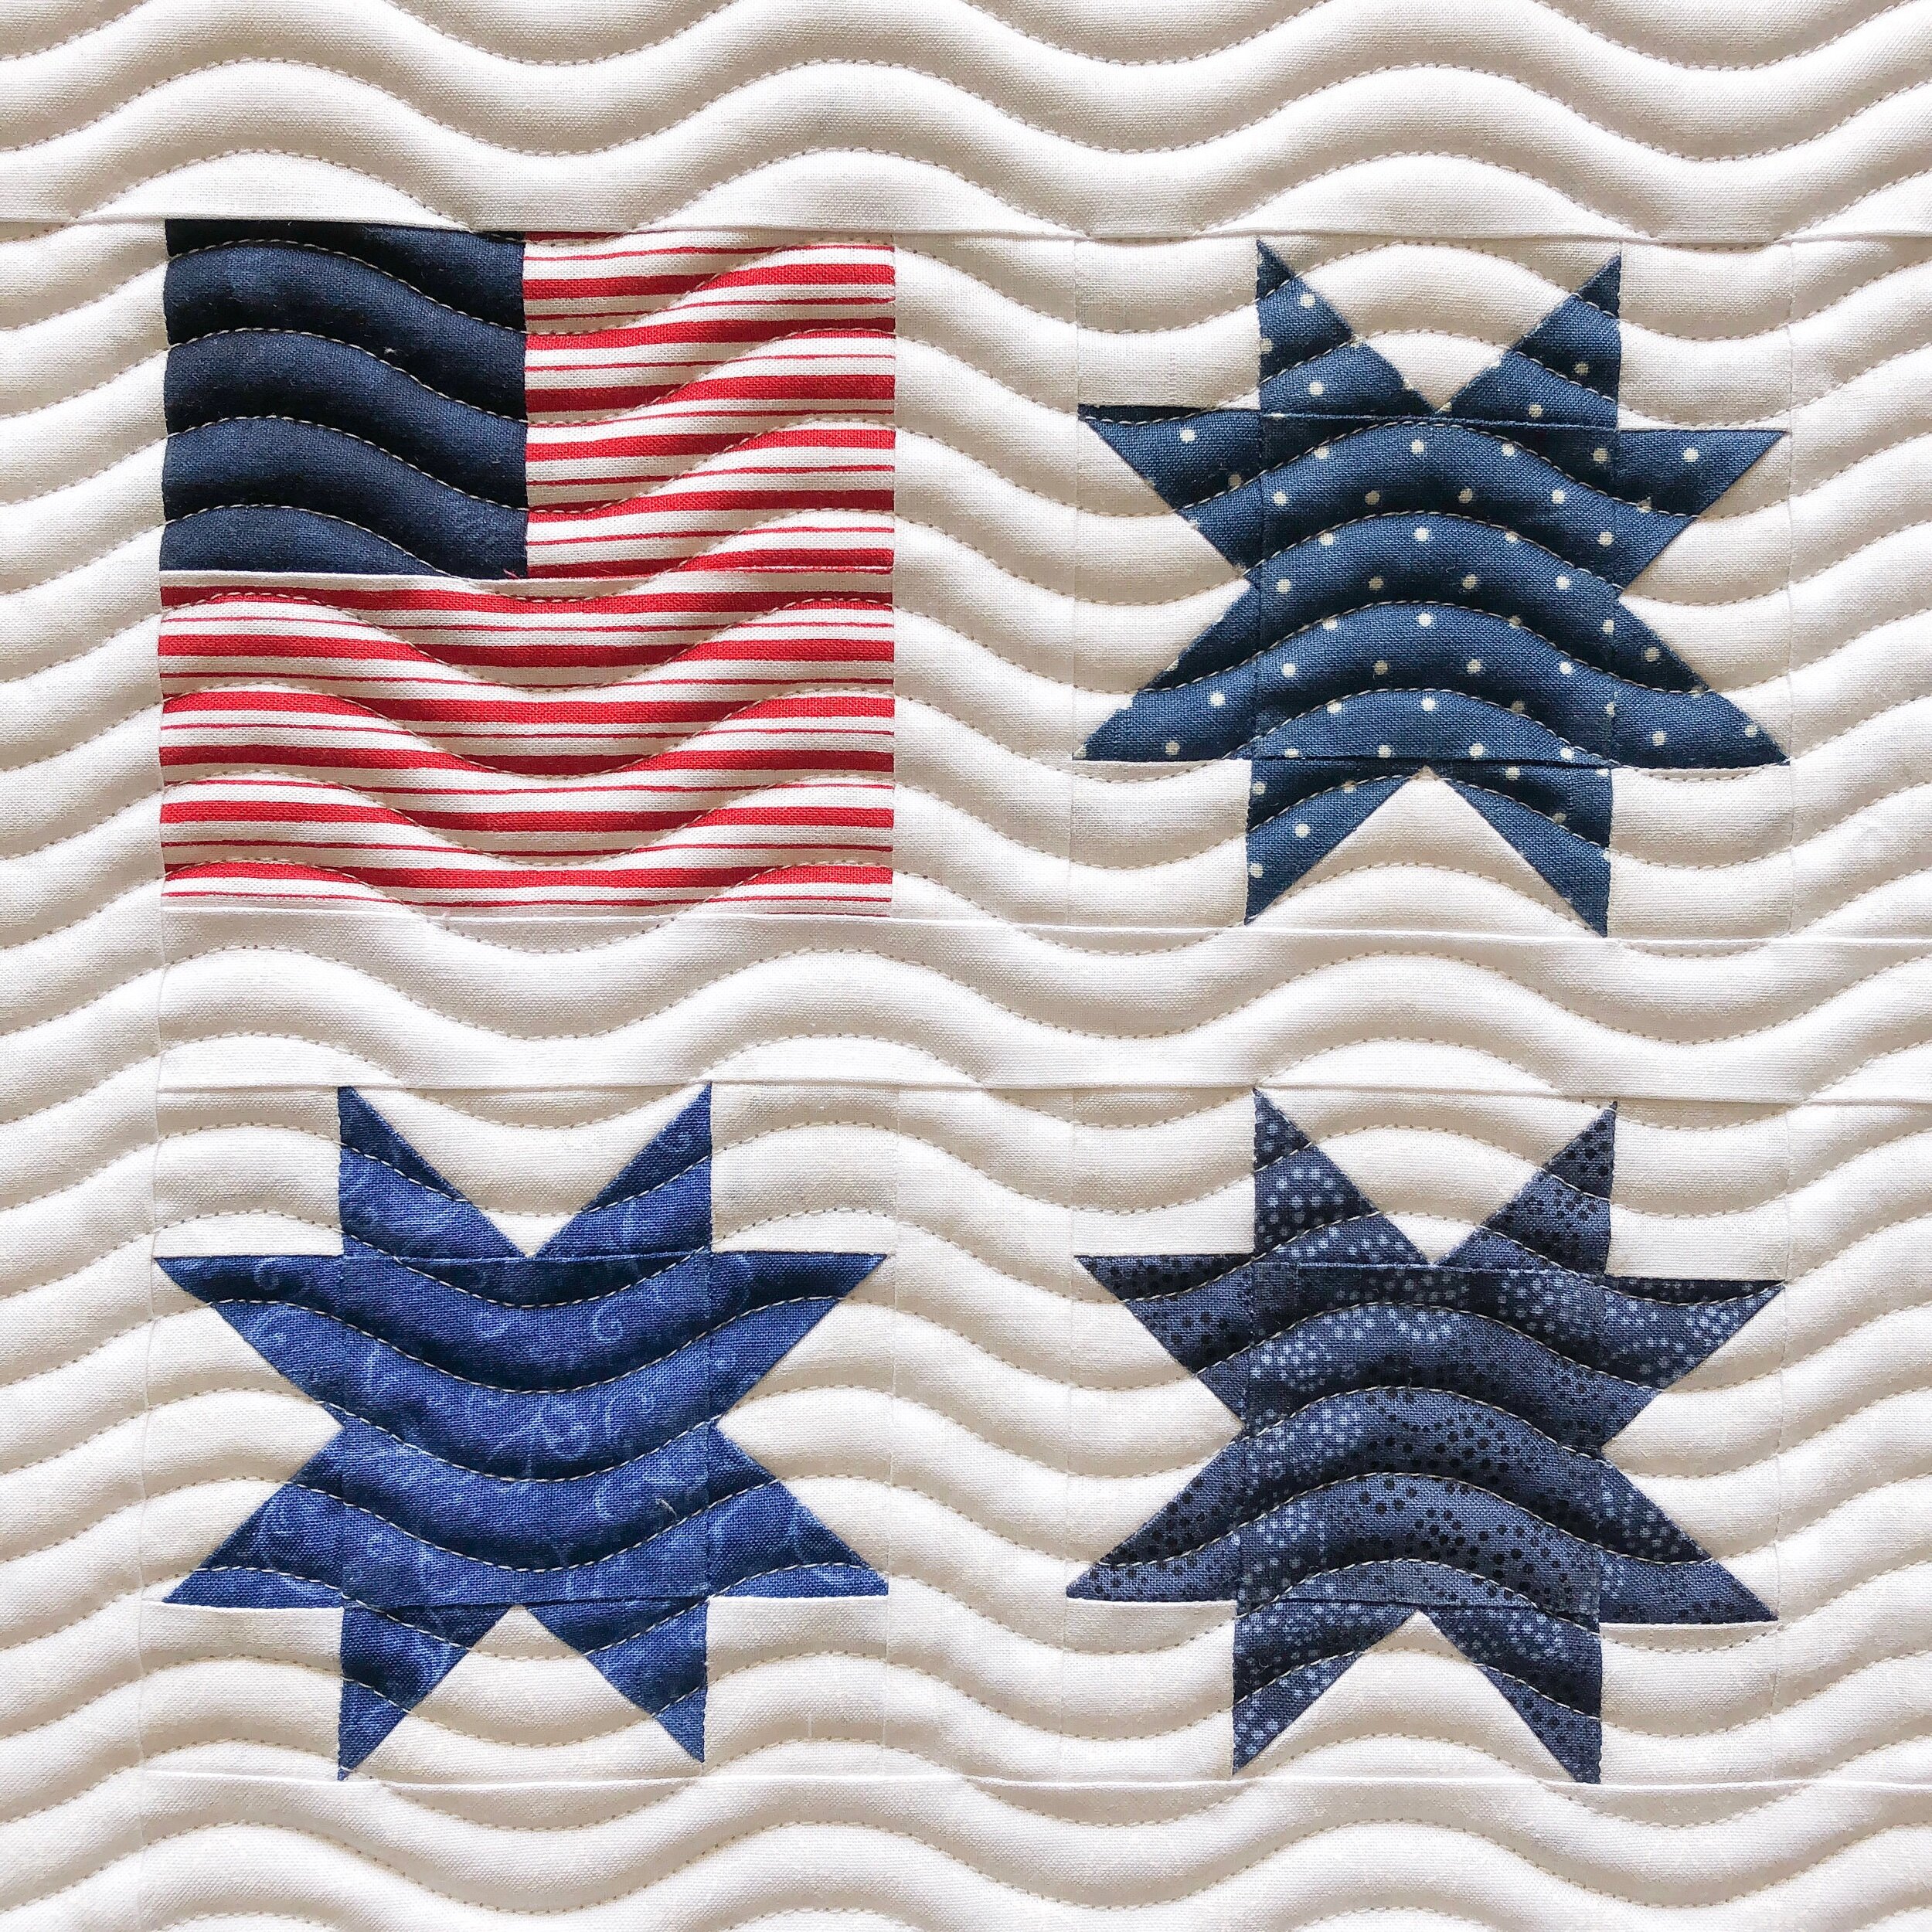
Next up, Barbara made this flag runner, using the FREE Wave Your Flag table runner pattern by Fat Quarter Shop.
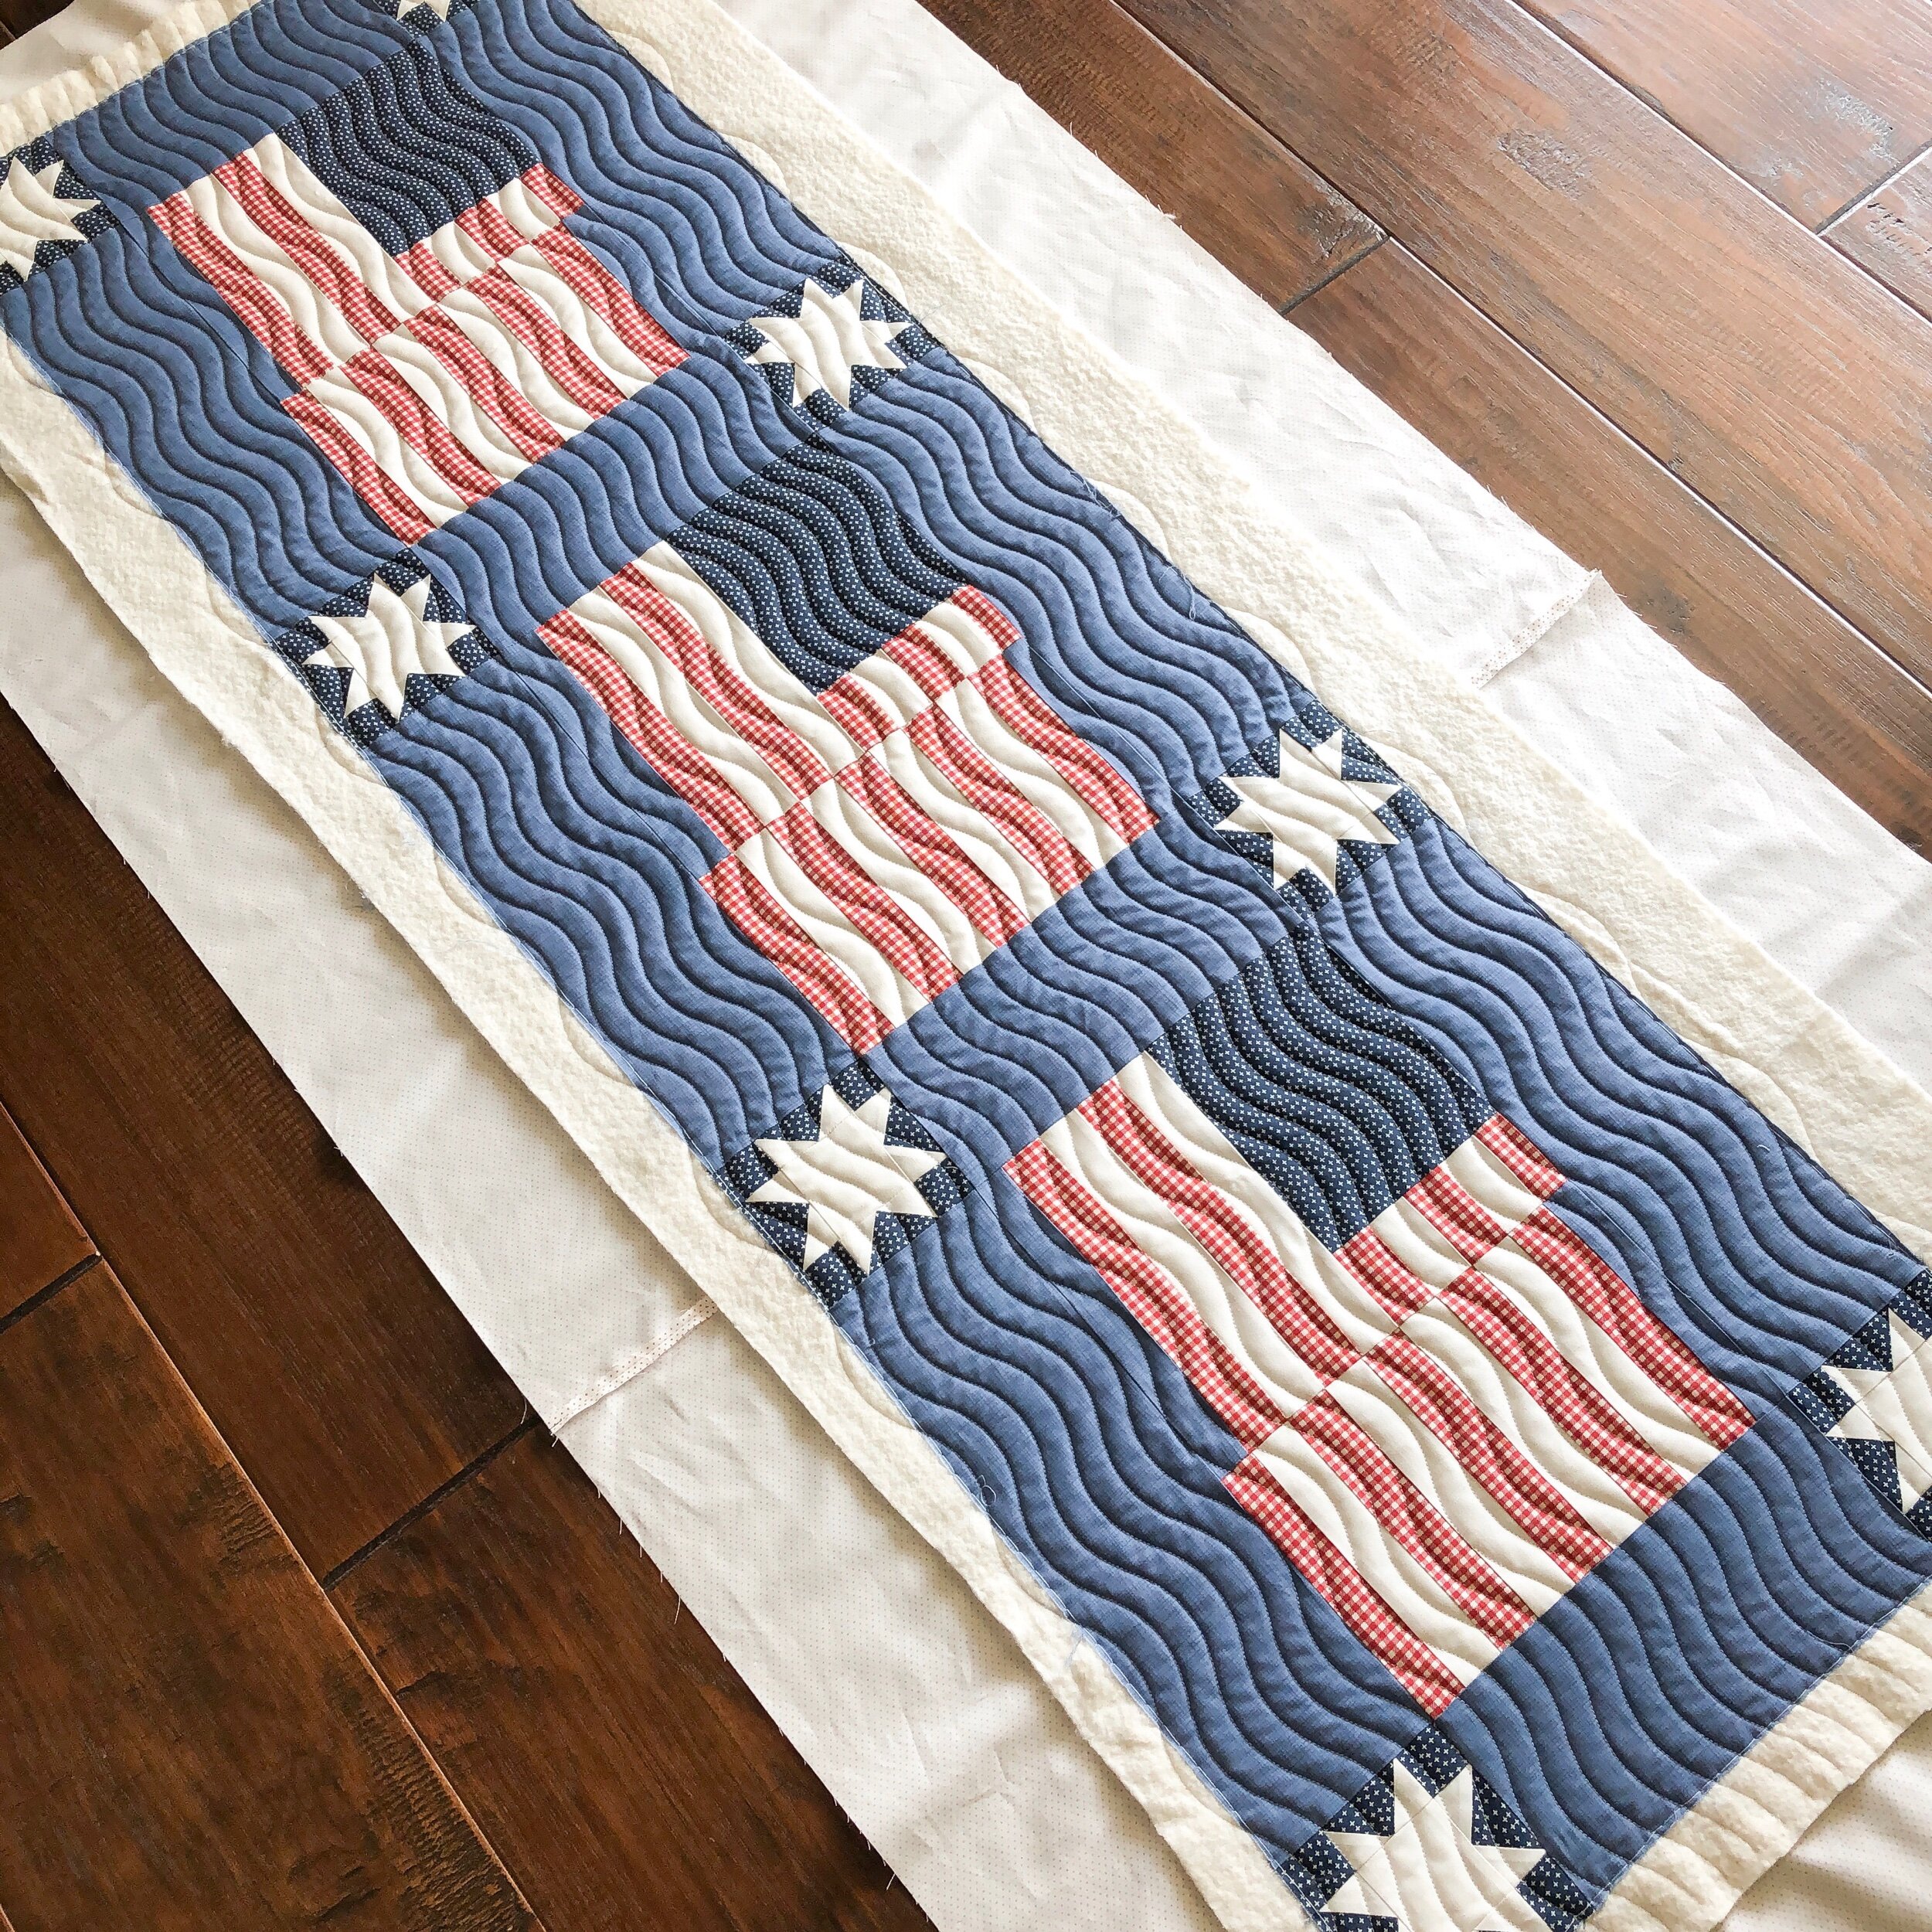
I used Good Vibrations from Patricia Ritter at Urban Elementz to quilt it. I spaced the wavy lines 3/4ths of an inch apart. I love the texture from these simple wavy lines. I used Antique Cream 30 tex A&E Perma Core thread and more of my favorite 8020 cotton poly Winline batting.
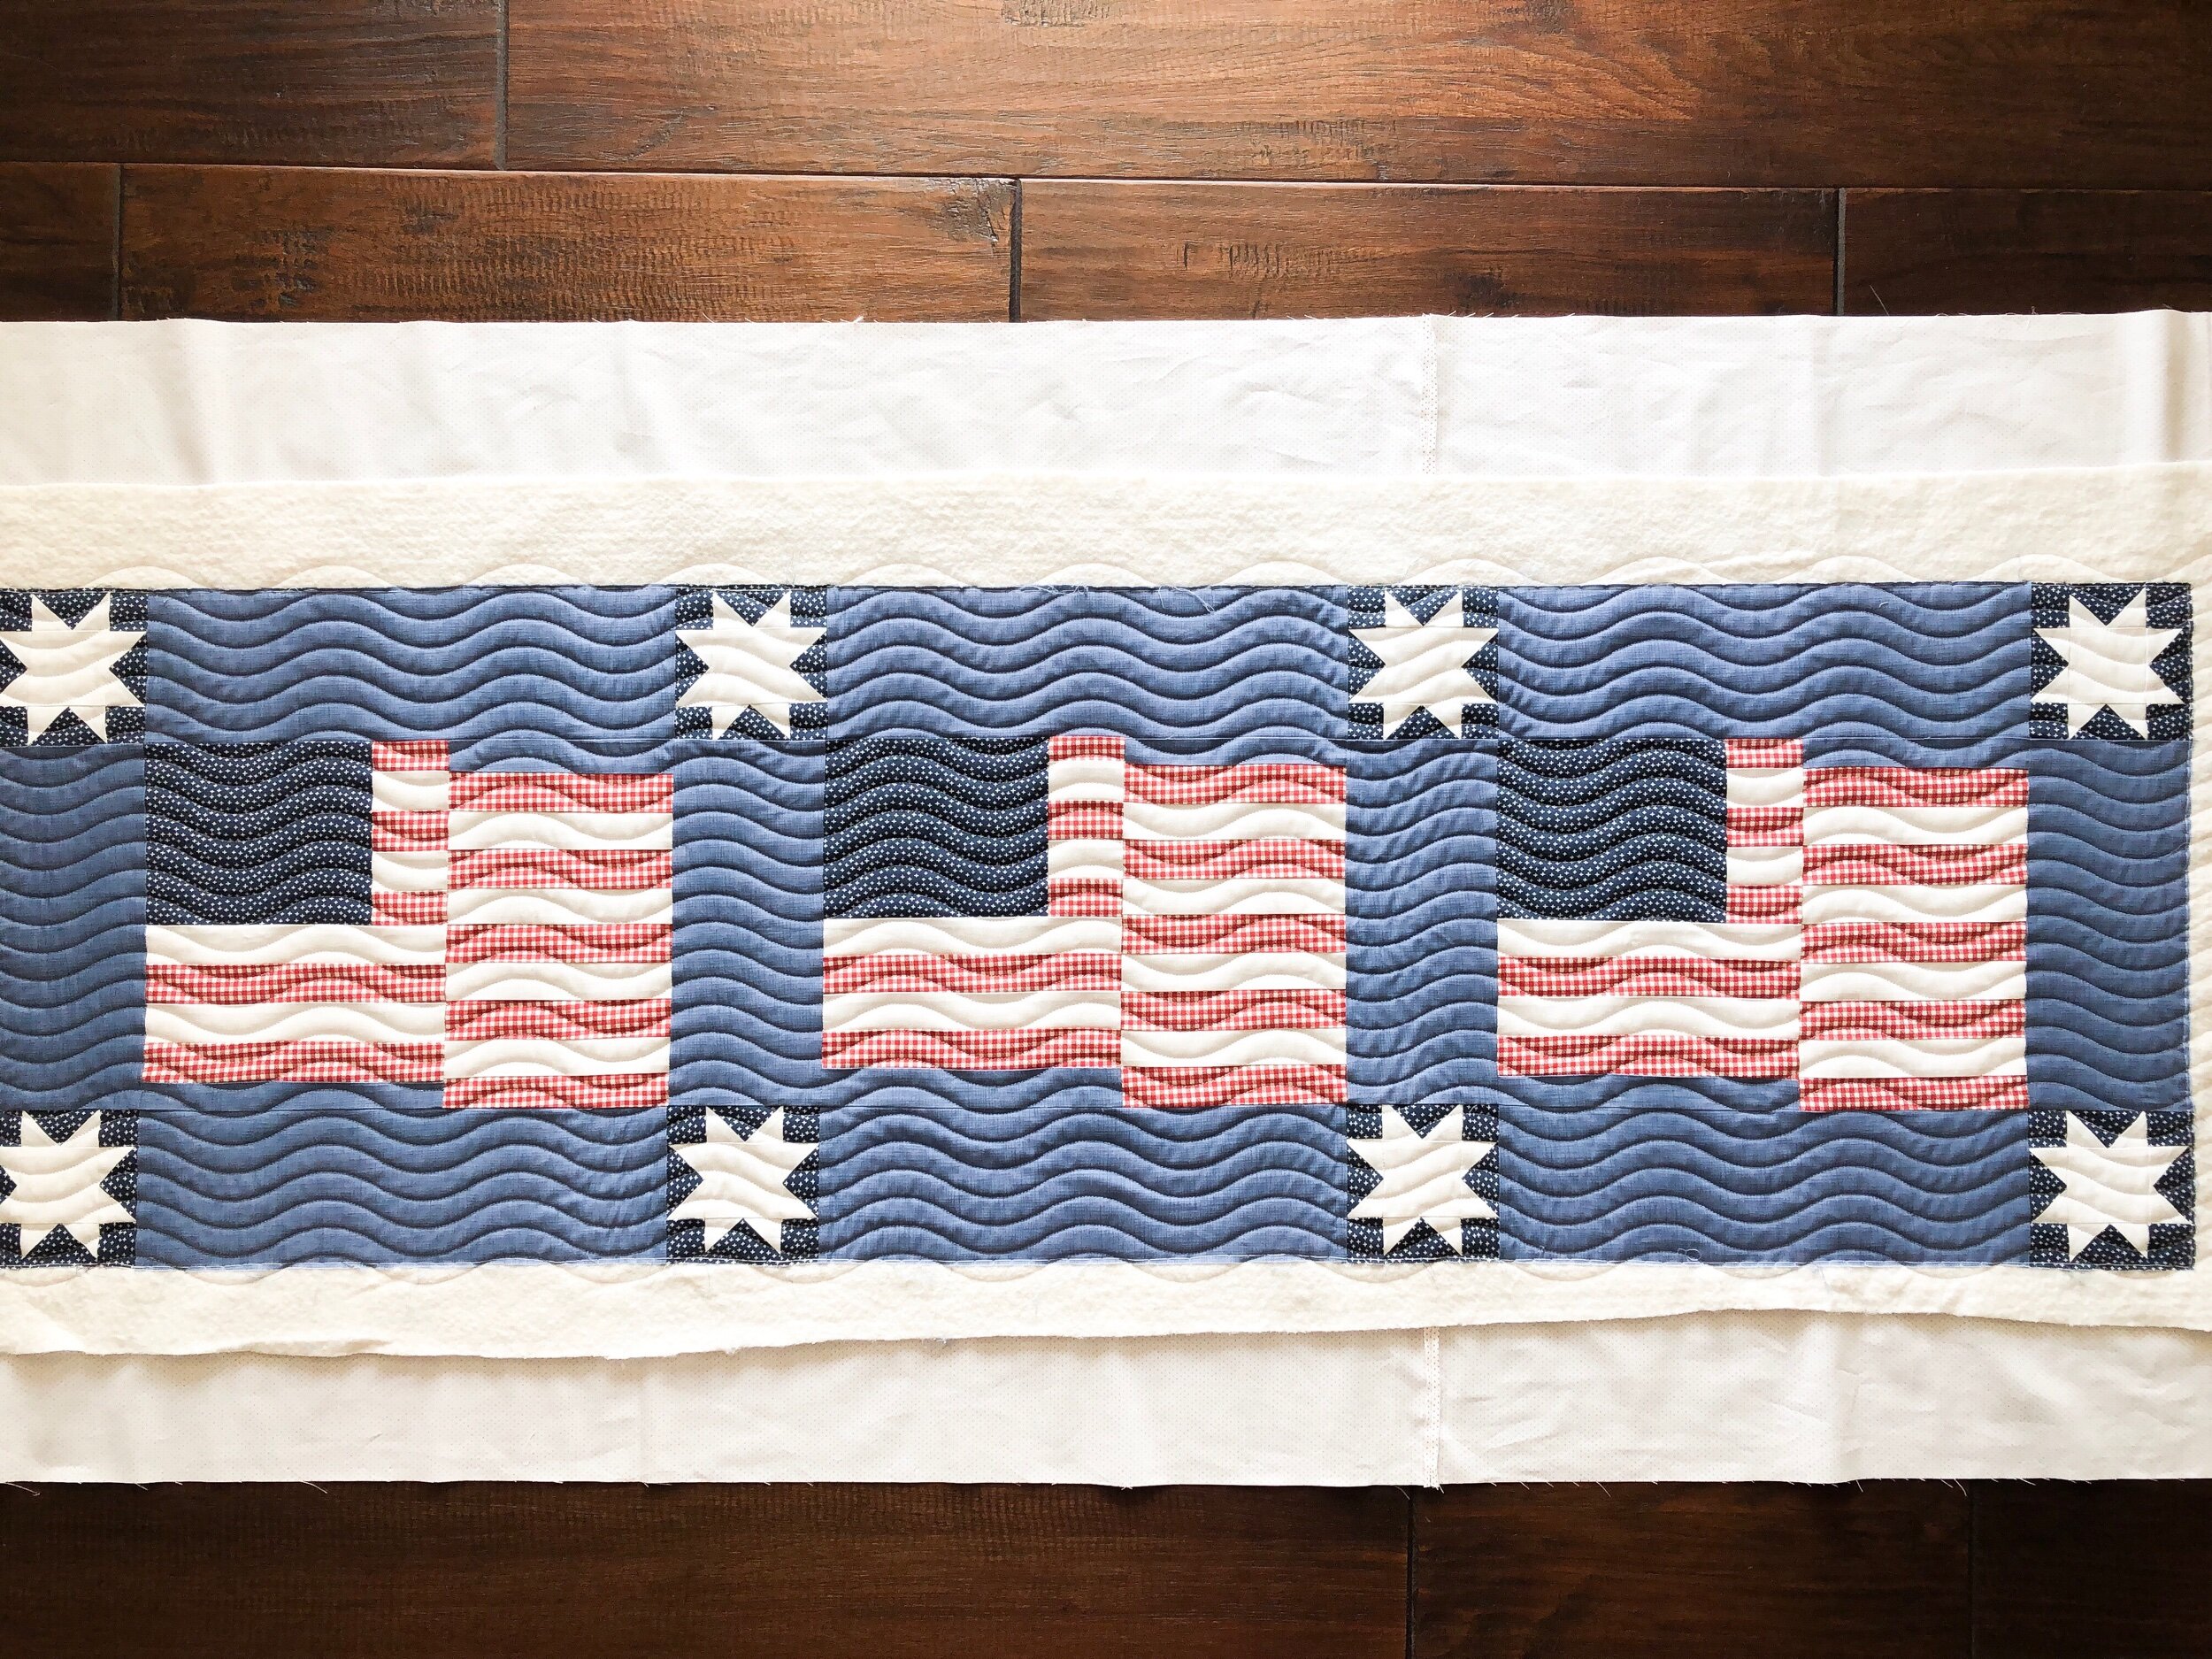
I love the dimension that comes from offsetting the flag stripes. I love all things 4th of July. I was born after the fireworks, on the morning of the 5th.
Okay, this watermelon runner…also made by Barbara, is just so fun!! The pattern is by Primrose Cottage Quilts and is called Summertime.
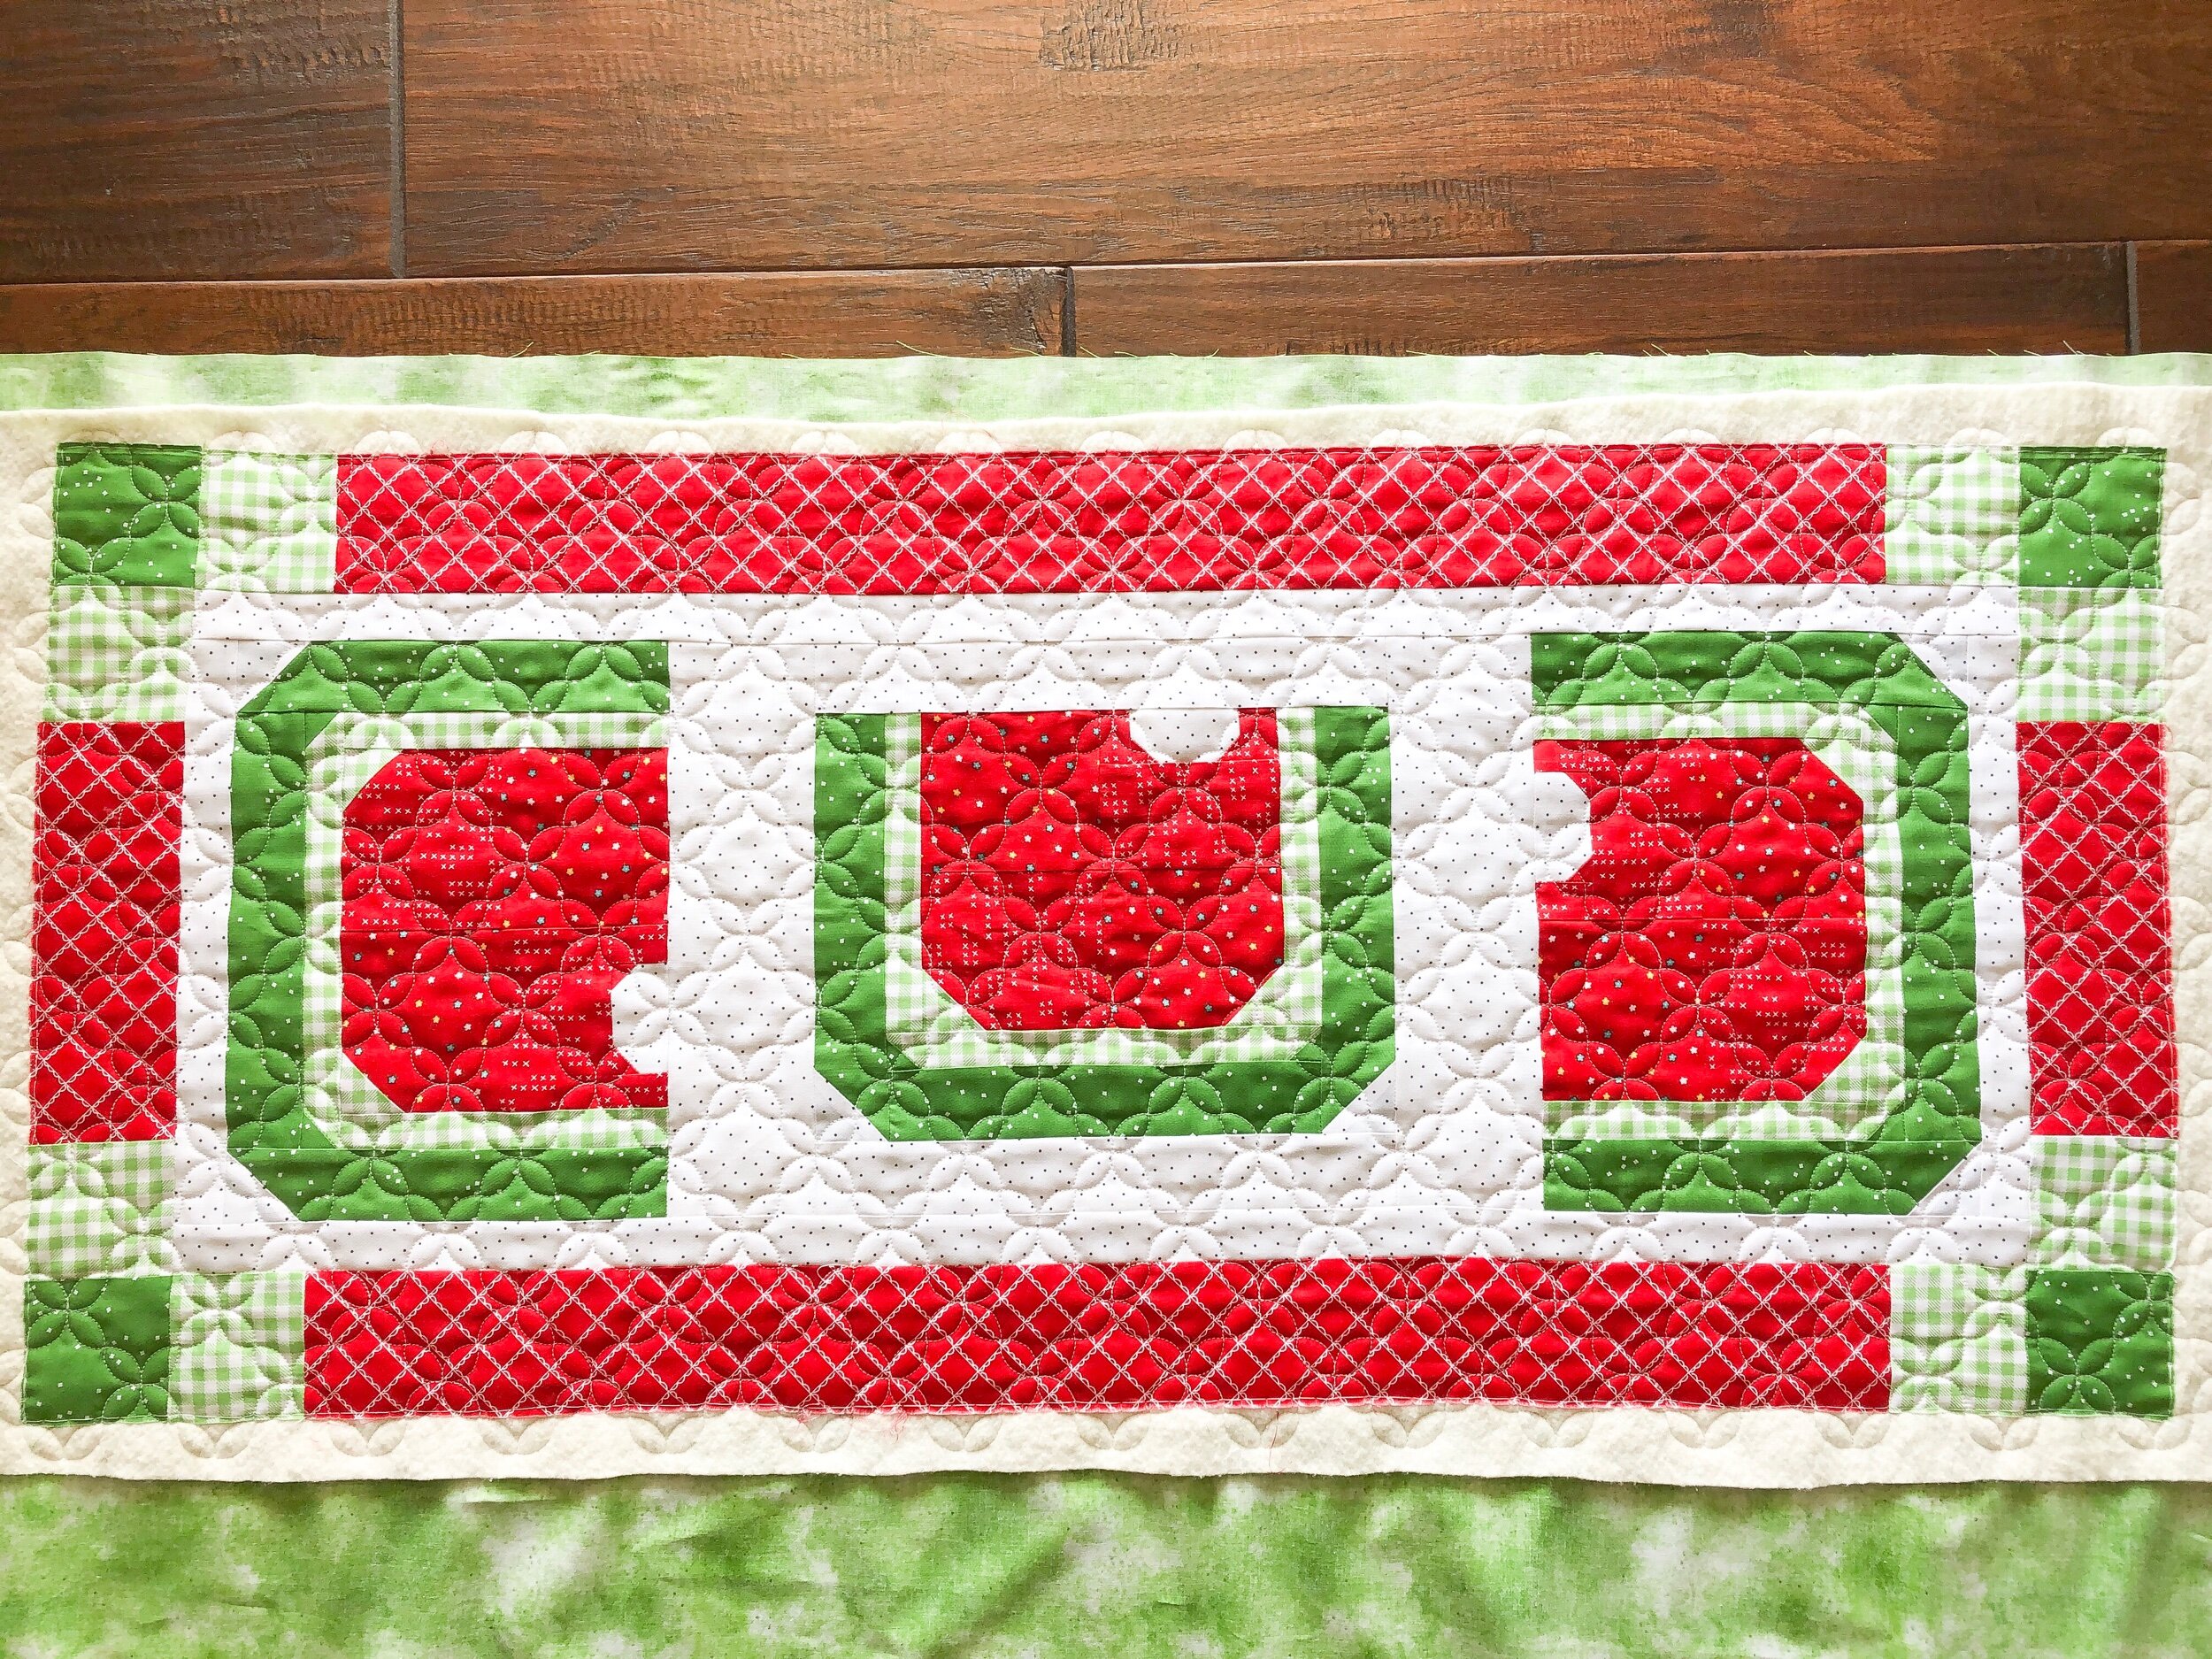
I may be a little biased, but that Sweet Orange Peel quilting design, is a perfect fit for this!! It reminds me of the shape of watermelon seeds. Sweet Orange Peel©️ is available in my shop at www.quiltingit.com/shop and is one of my best sellers!

I used a white 30 tex A&E Perma Core thread and Winline’s 8020 cotton poly blend batting.

Now, a few fun projects made by Sherry.
This cute pillow front is from My Girlfriends Quilt Shoppe, here in Logan Utah. It’s part of their pillow of the month club. You’ll have to contact them for a pattern.
I used Good Vibrations from Patricia Ritter at Urban Elementz again to quilt this. I spaced the wavy lines 1/2 of an inch apart. Because it’s a pillow, it works being that tightly quilted. Sherry brought a cotton poly scrap of batting, and I used a white 30 tex A&E Perma Core thread to quilt it.
Next up, these lovely runners made by Sherry. Designed By Heather Peterson from Anka's Treasures. This runner is in the Trendy Table 2 book.
Once again I used my Sweet Orange Peel©️ design to quilt it.
I used a Antique Cream 30 tex A&E Perma Core thread and Winline’s 8020 batting.

Sherry made two, so I quilted them onto the same quilting back. I quilt on a Gammill 22” machine. So I set the boundary when doing Edge to Edge quilting, as if it were all one quilt. Saves on time. I quilted the first one, rolled it to the next one and easy peasy, done!!

Loranne is a master at making her own patterns from things that inspire her. This lovely quilt was made for her friends new granddaughter.

Loranne requested a double batt, which adds some beautiful texture to the quilt/quilting. I did a bottom layer of the 8020 cotton poly blend batting that I love from Winline, and a top layer of Hobbs Wool. Love the combination of the two. I’ve done the same thing with some of my own quilts.

Pictures really don’t do this quilt justice.
I used the -20- curve ruler for the petals, and some of the Edge rulers for all the straight lines, both are from Linda at The Quilted Pineapple.

Because this quilt has lot of borders, I wanted to make each of them stand out with different yet cohesive quilting designs. I especially love how these corners turned out. I also share a few more pictures to show the border details. The pinstripe border below is done with a 1/4” line and then a inch section.


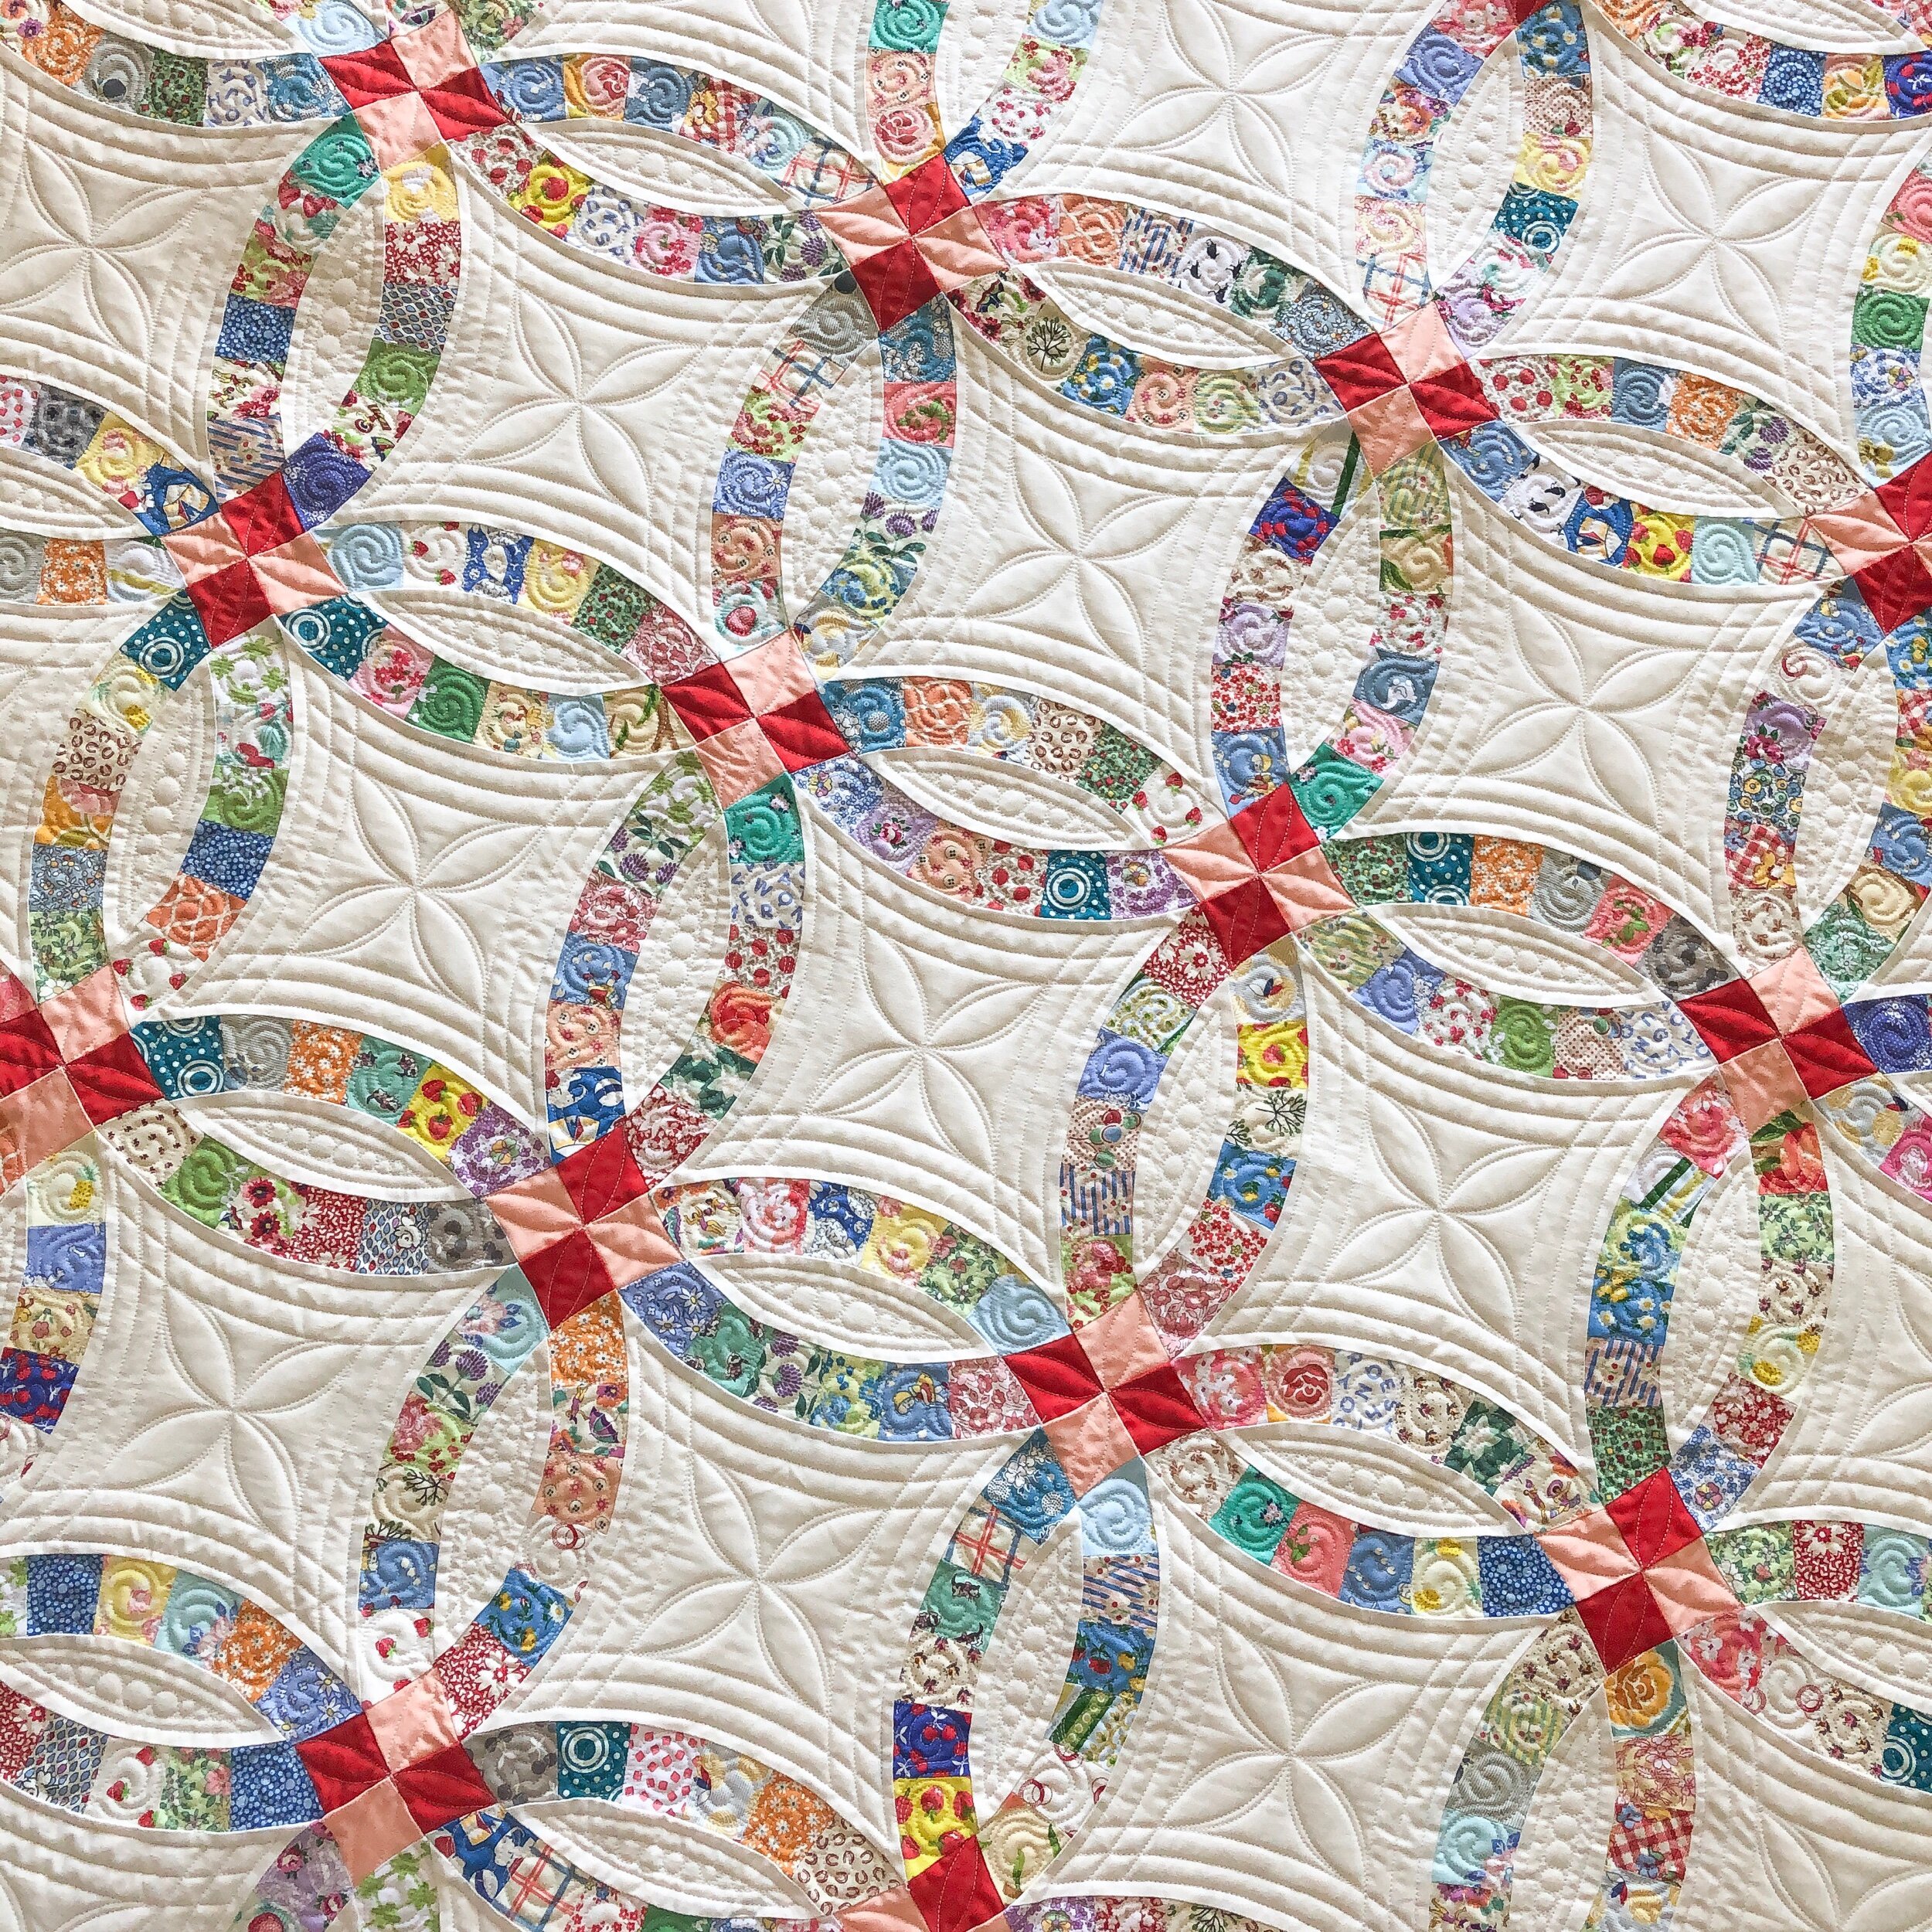
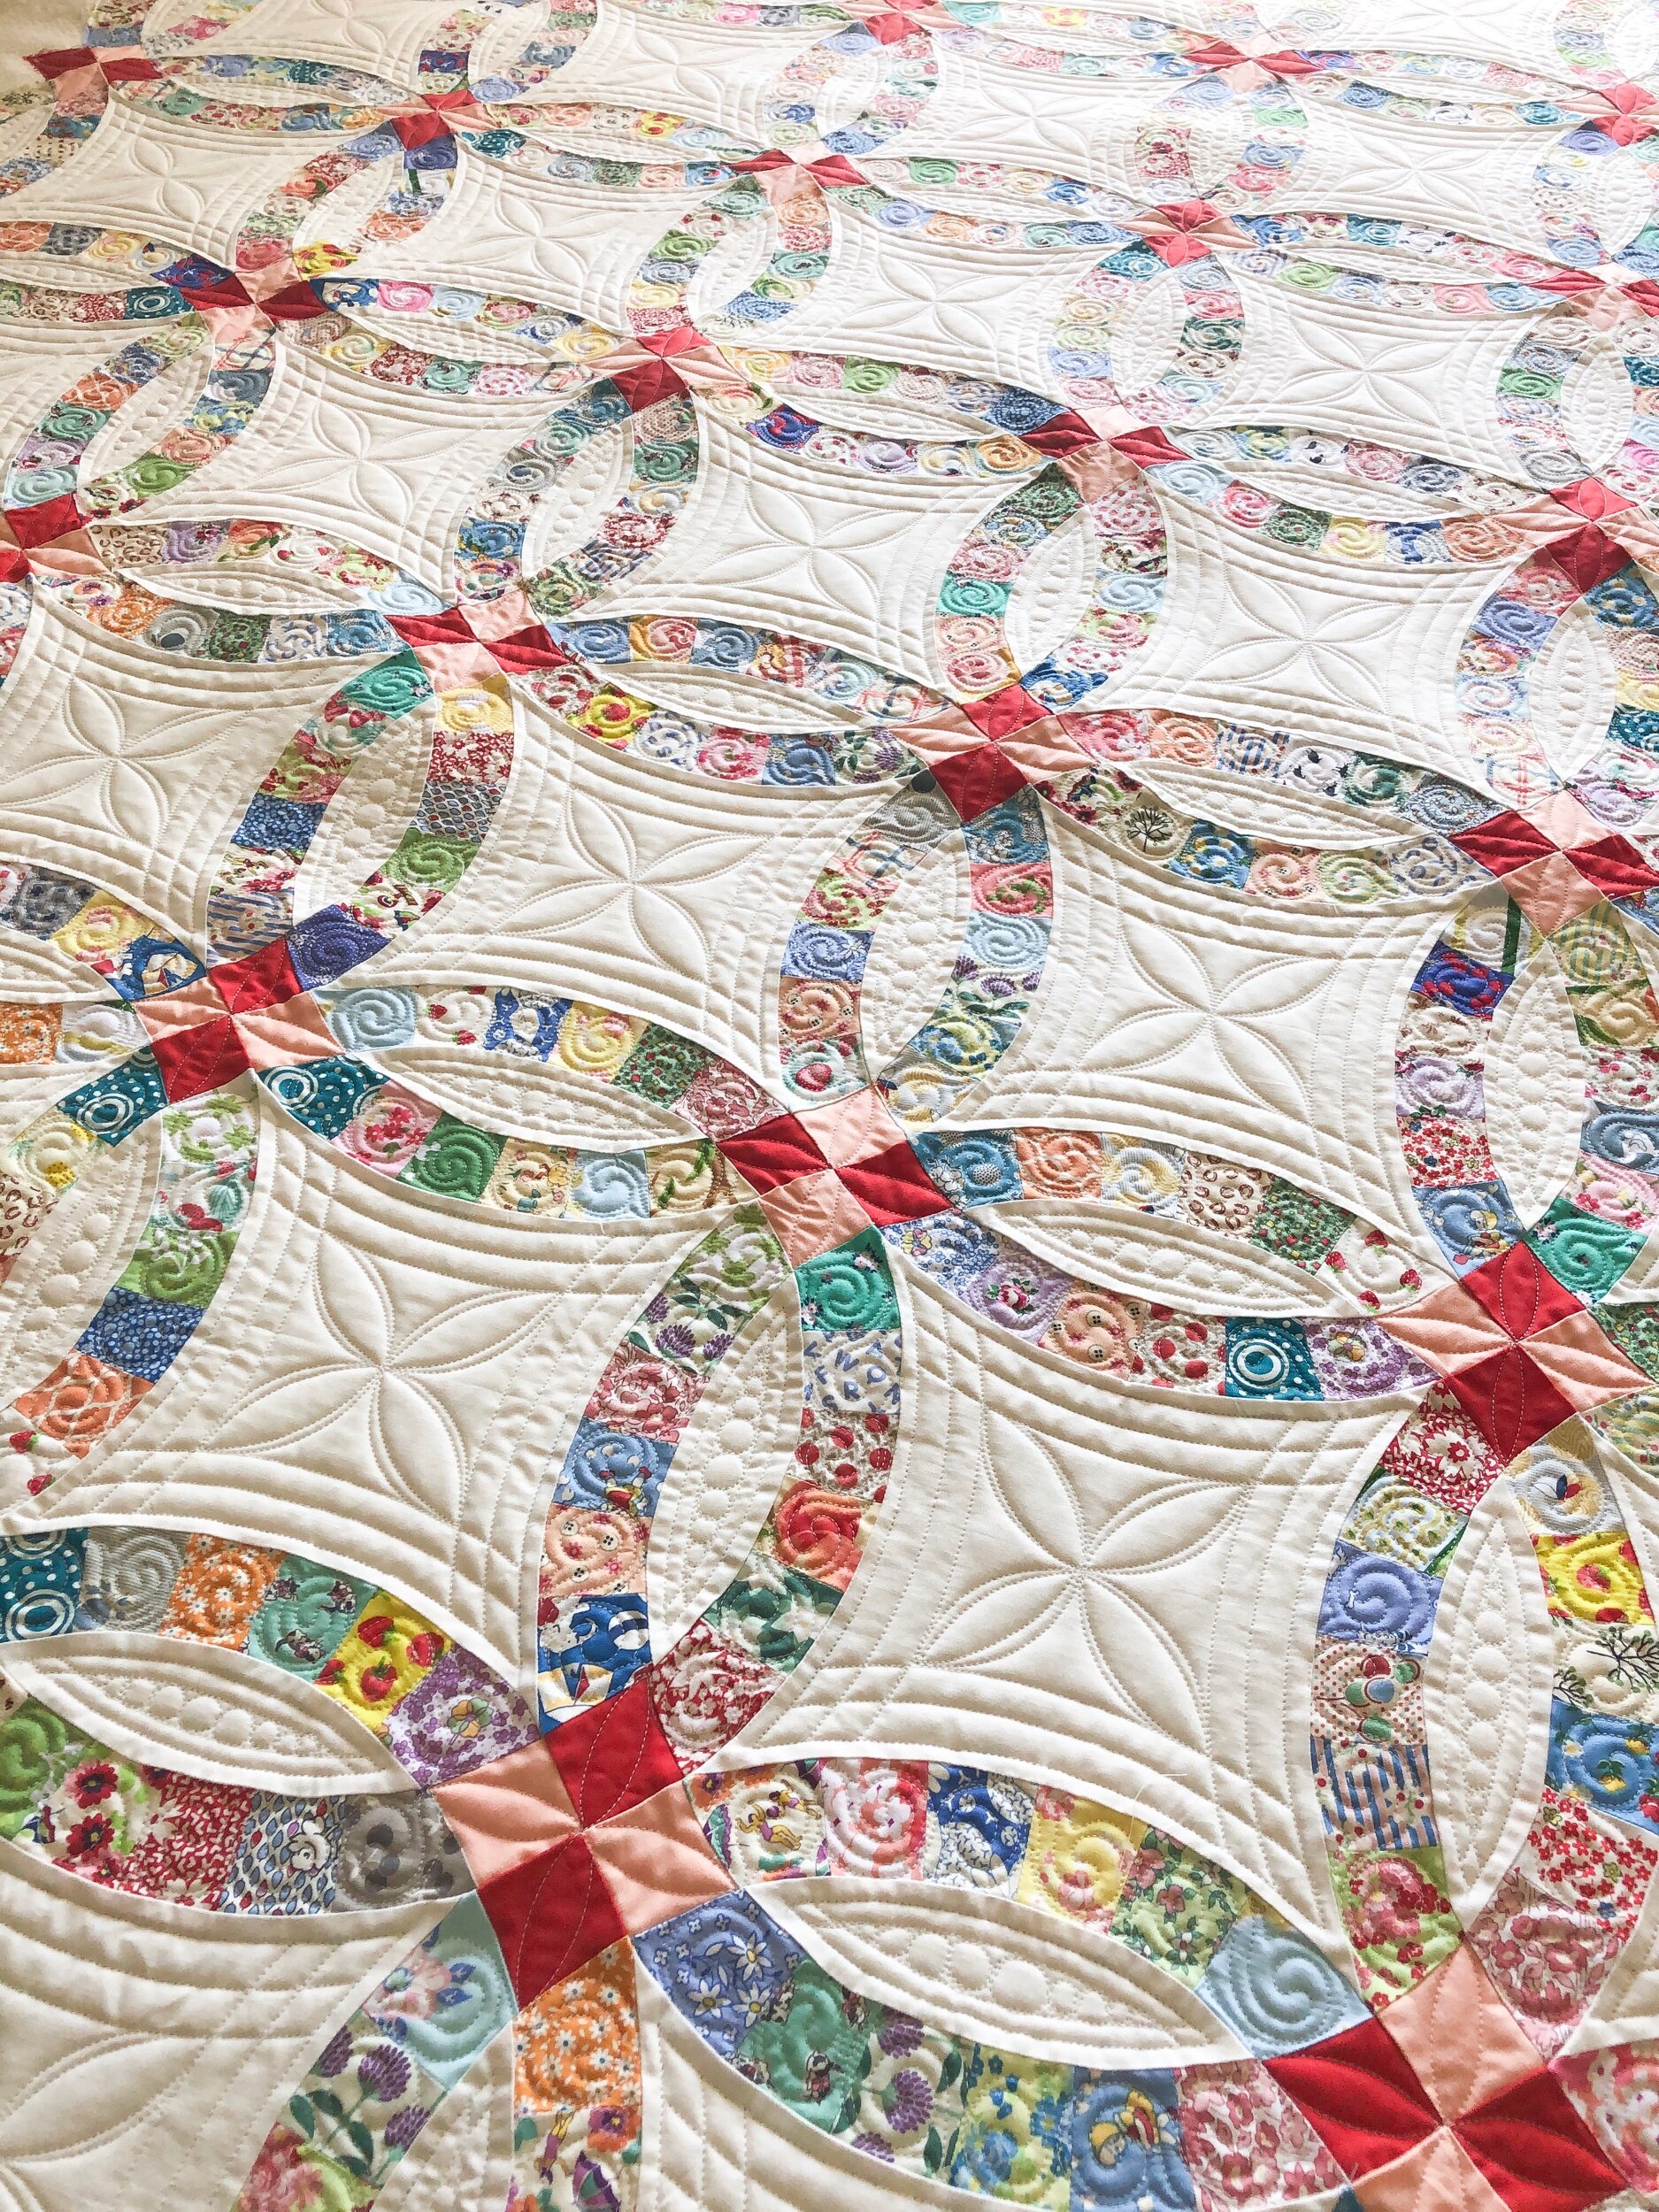
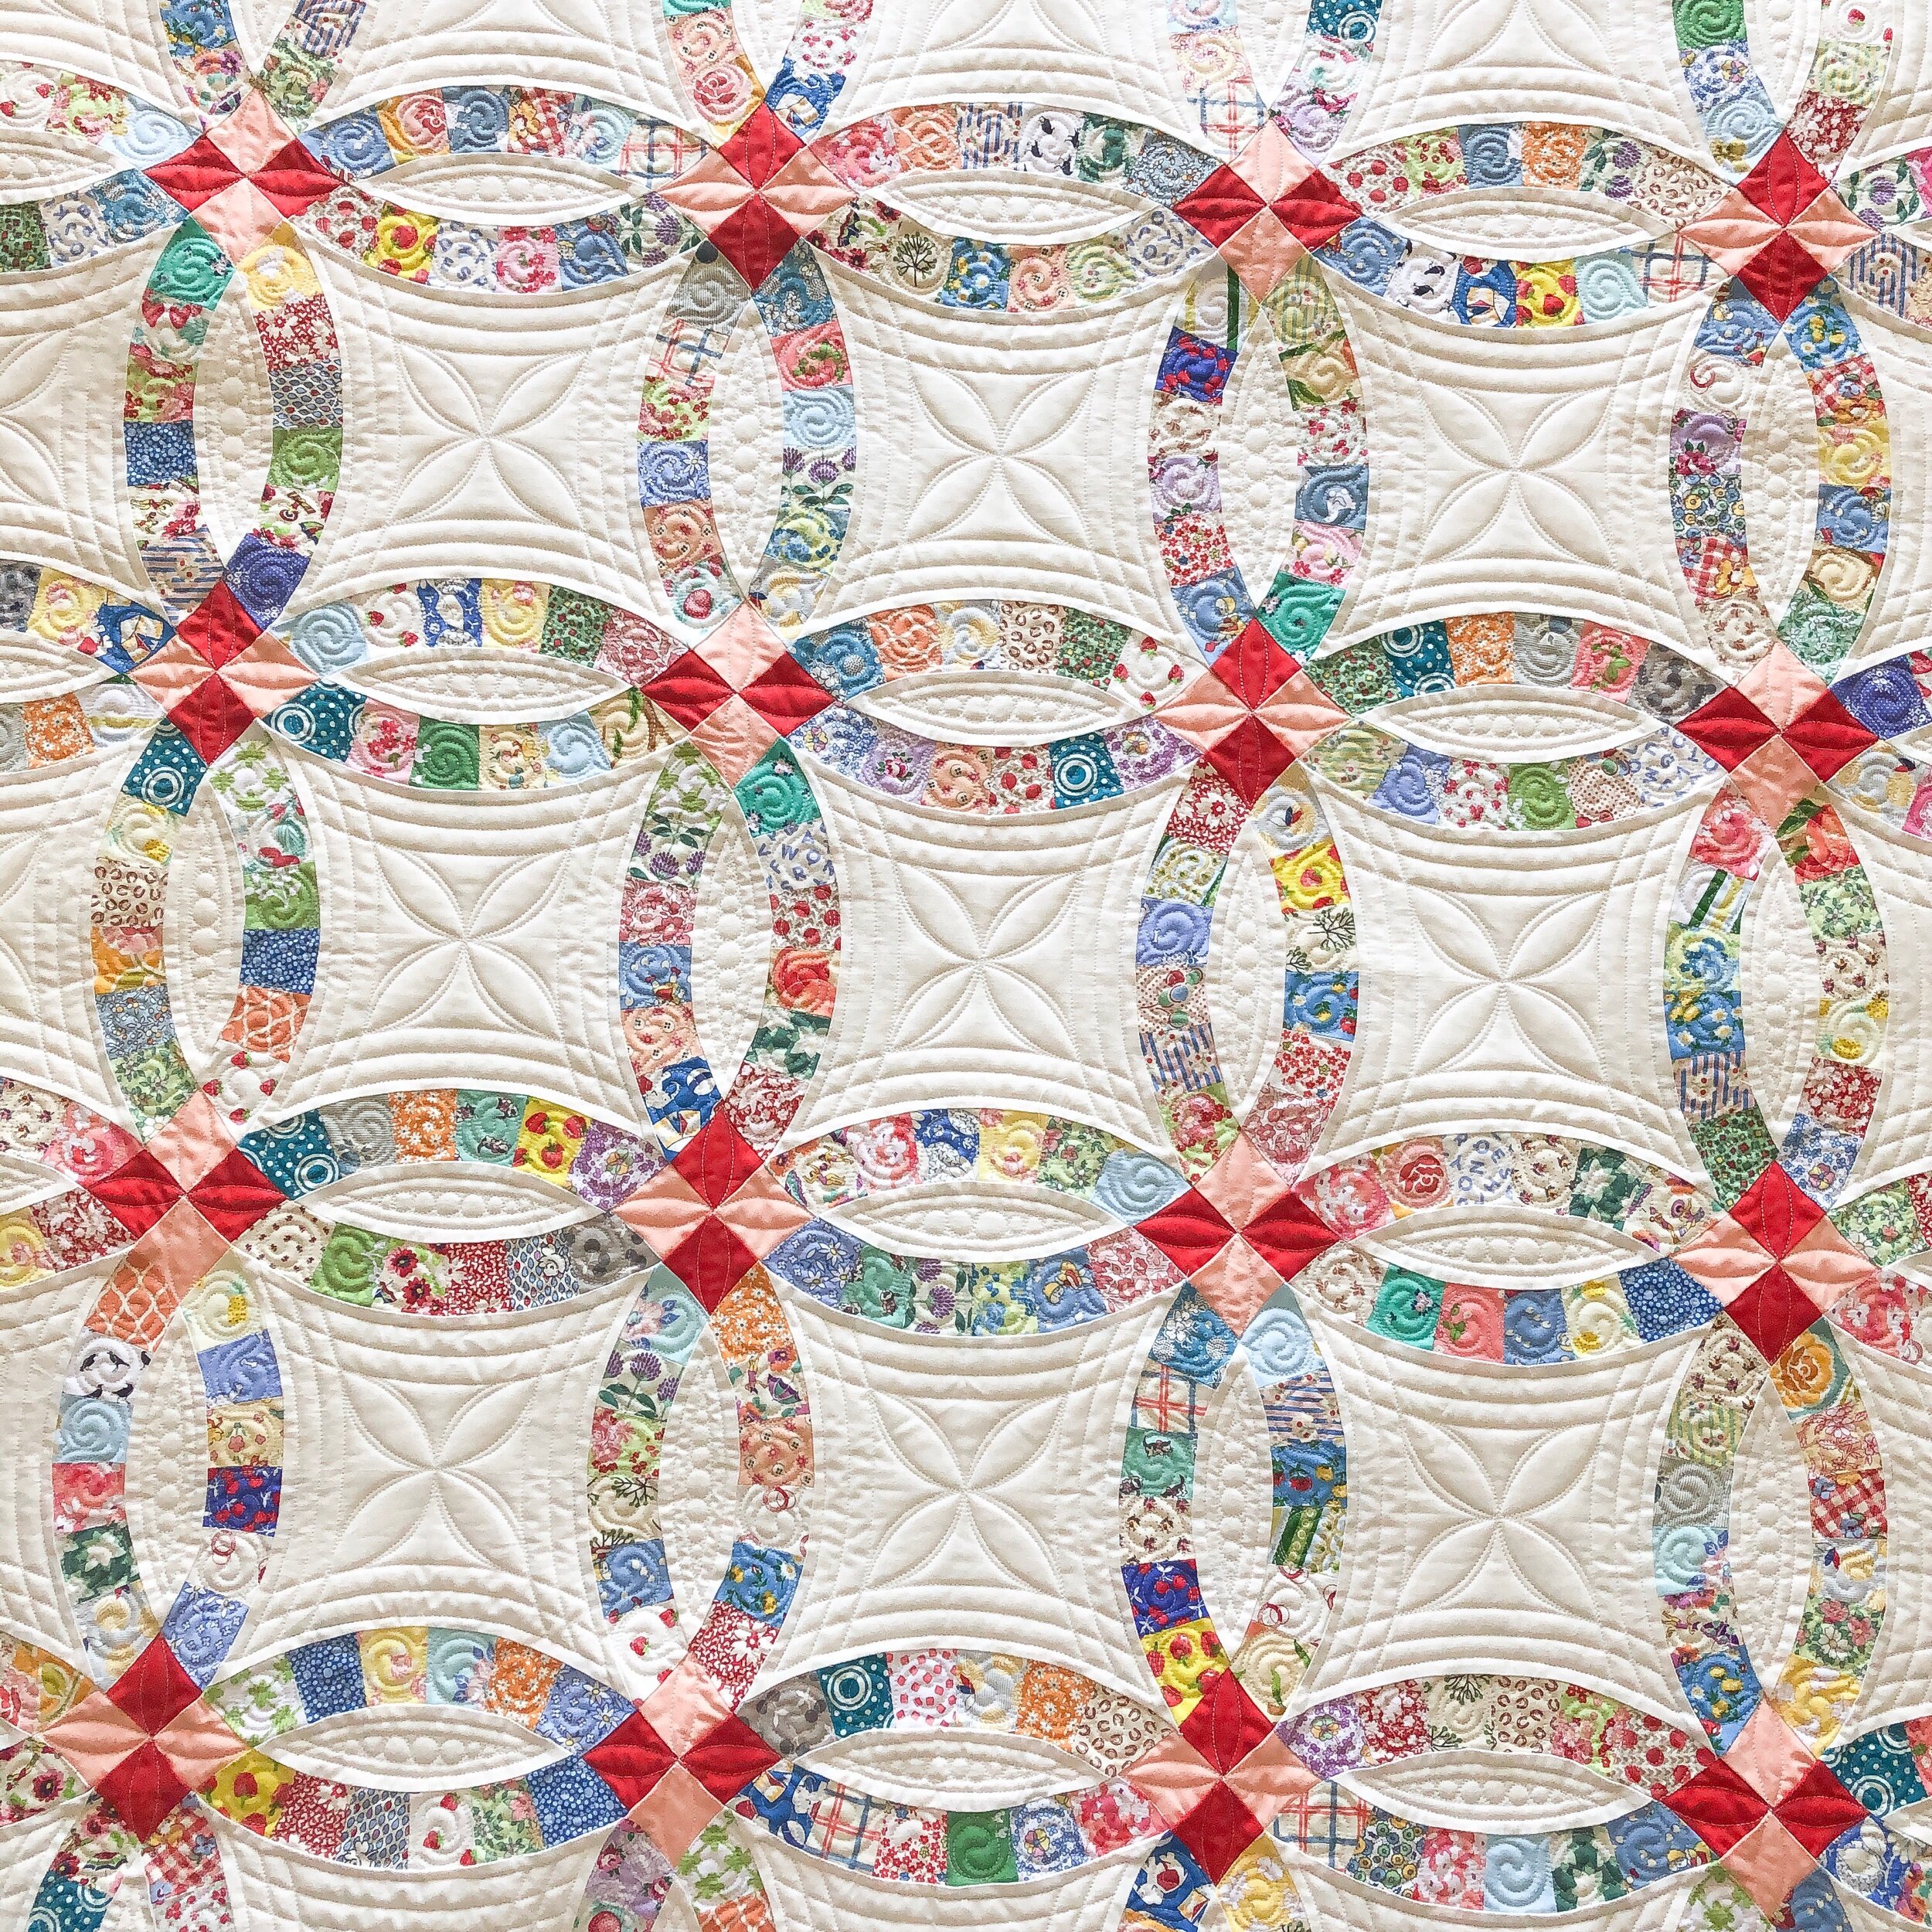
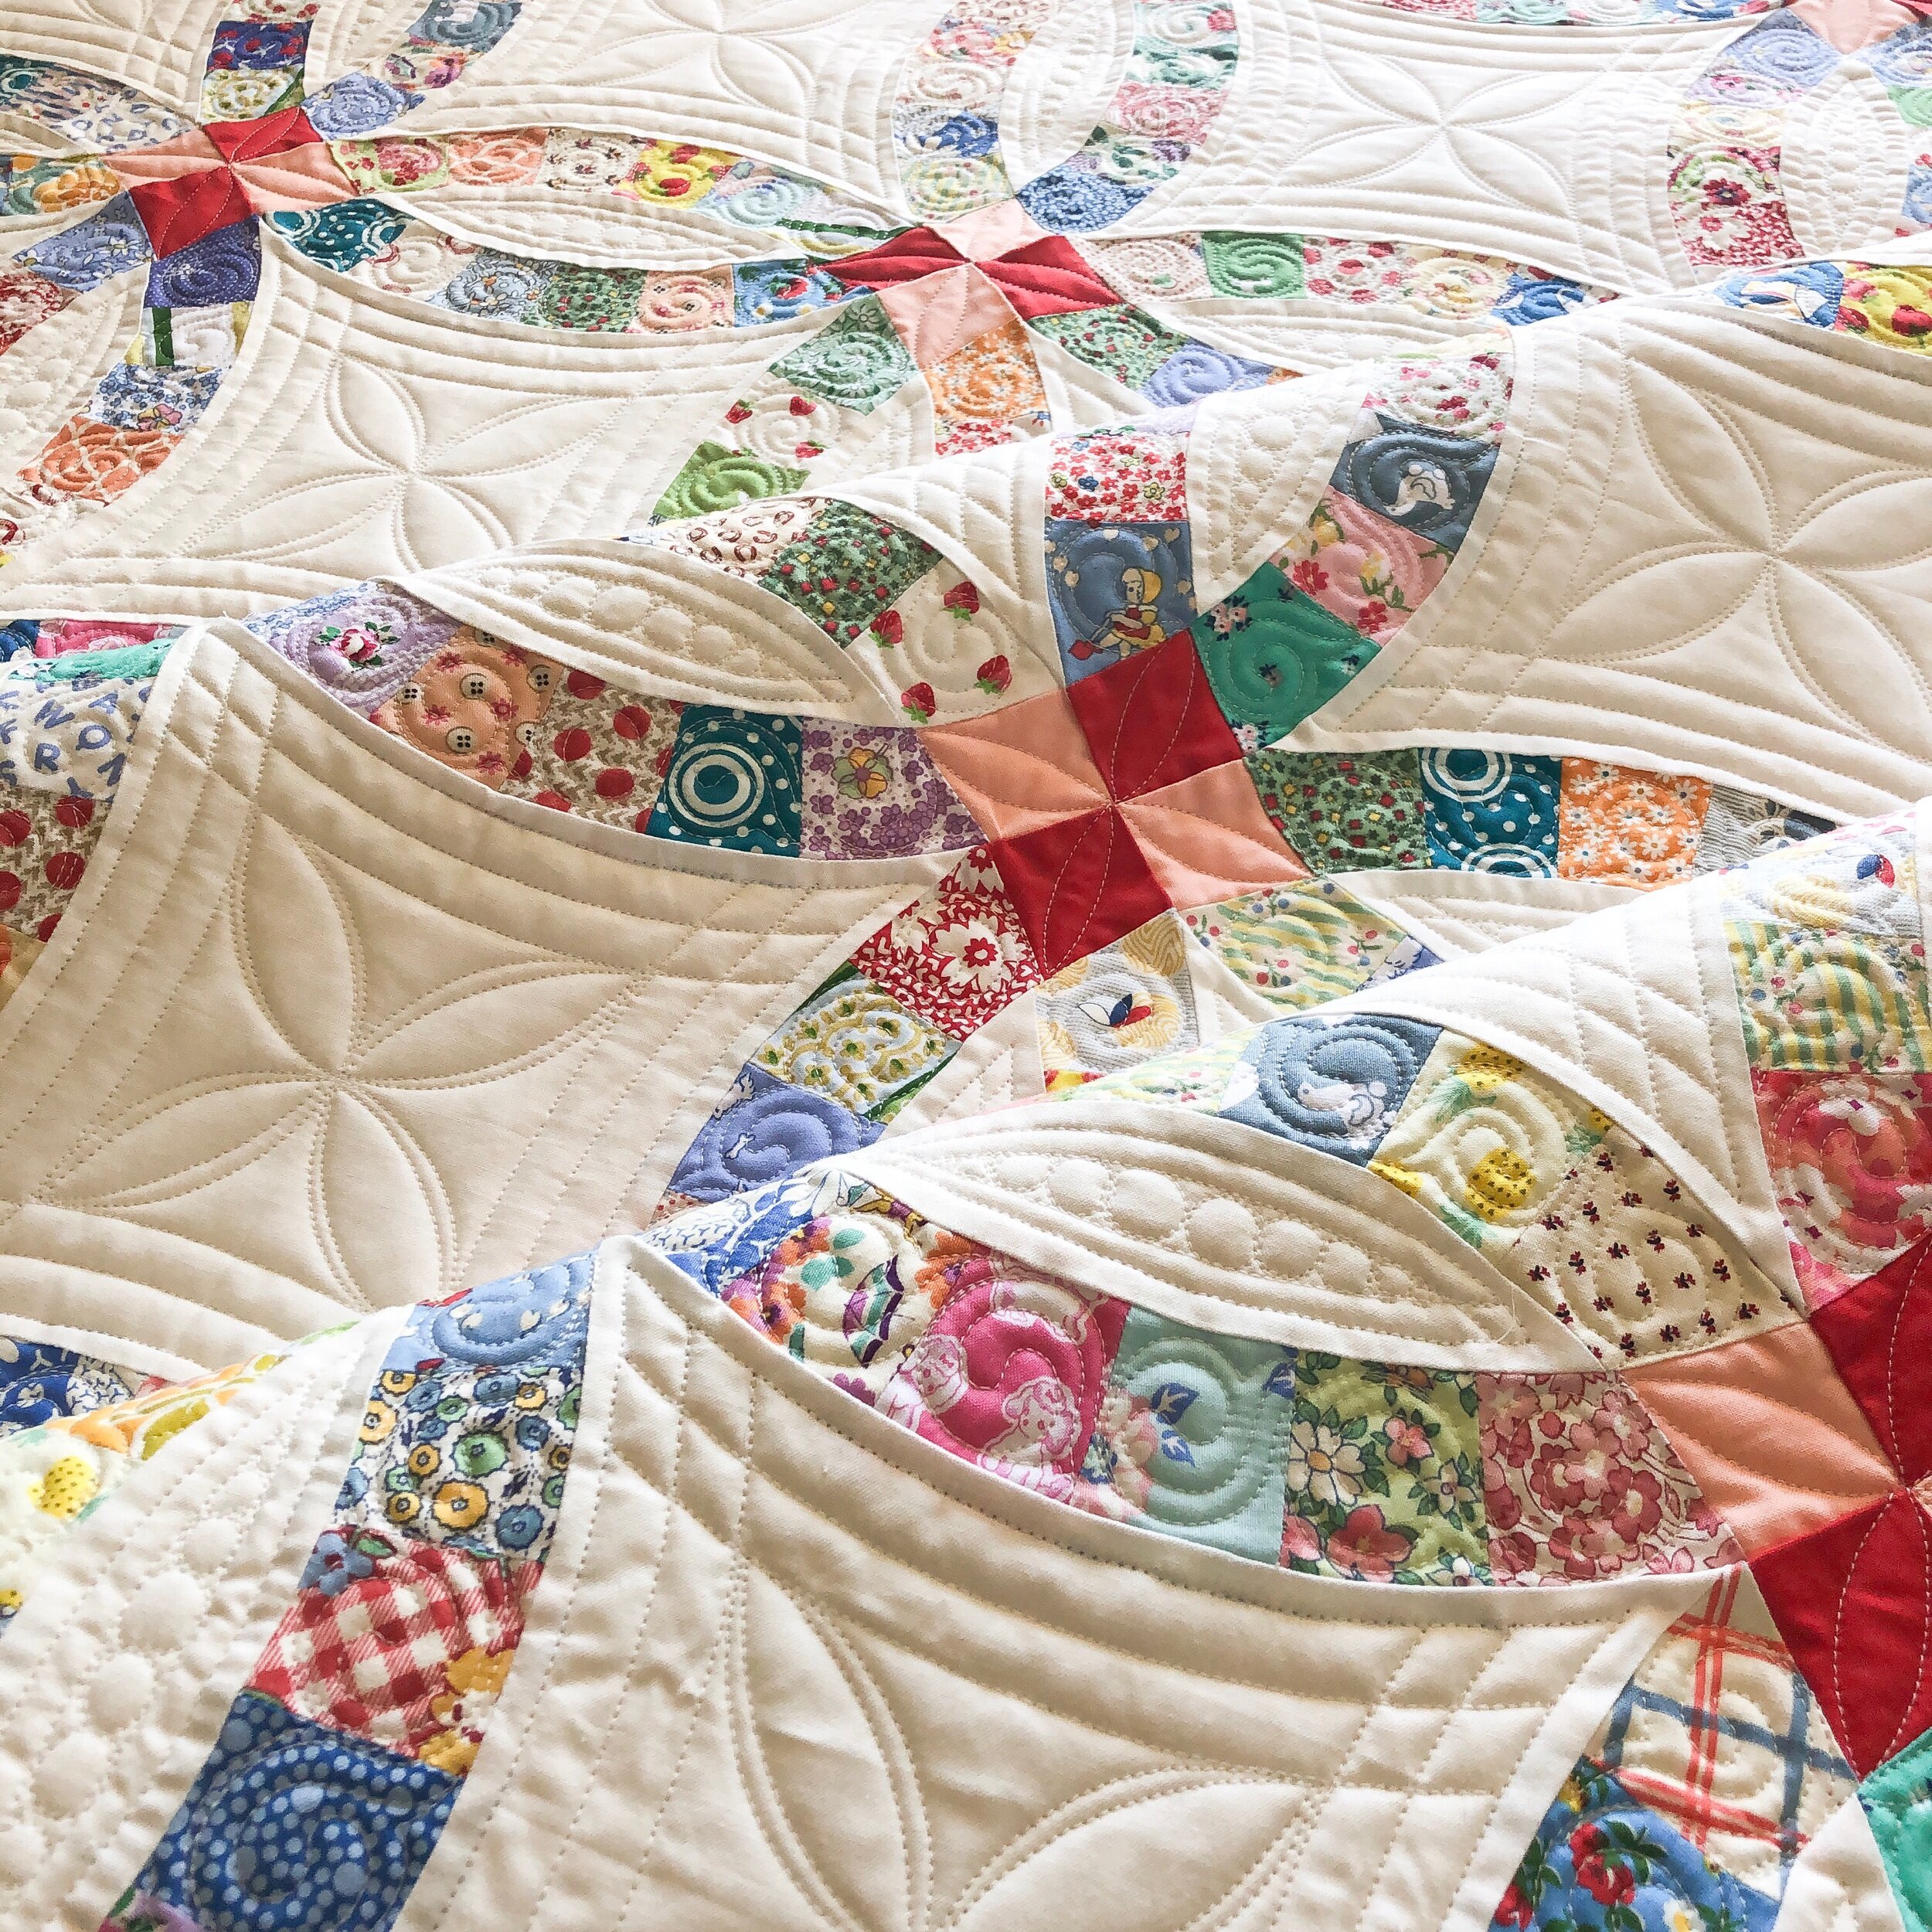
Airen’s amazing Double Wedding Ring quilt is up next!! It was such a gem to quilt, knowing it is going to be a family heirloom. Airen used Double Wedding Ring Templates by Sharlene Jorgenson which are available here.
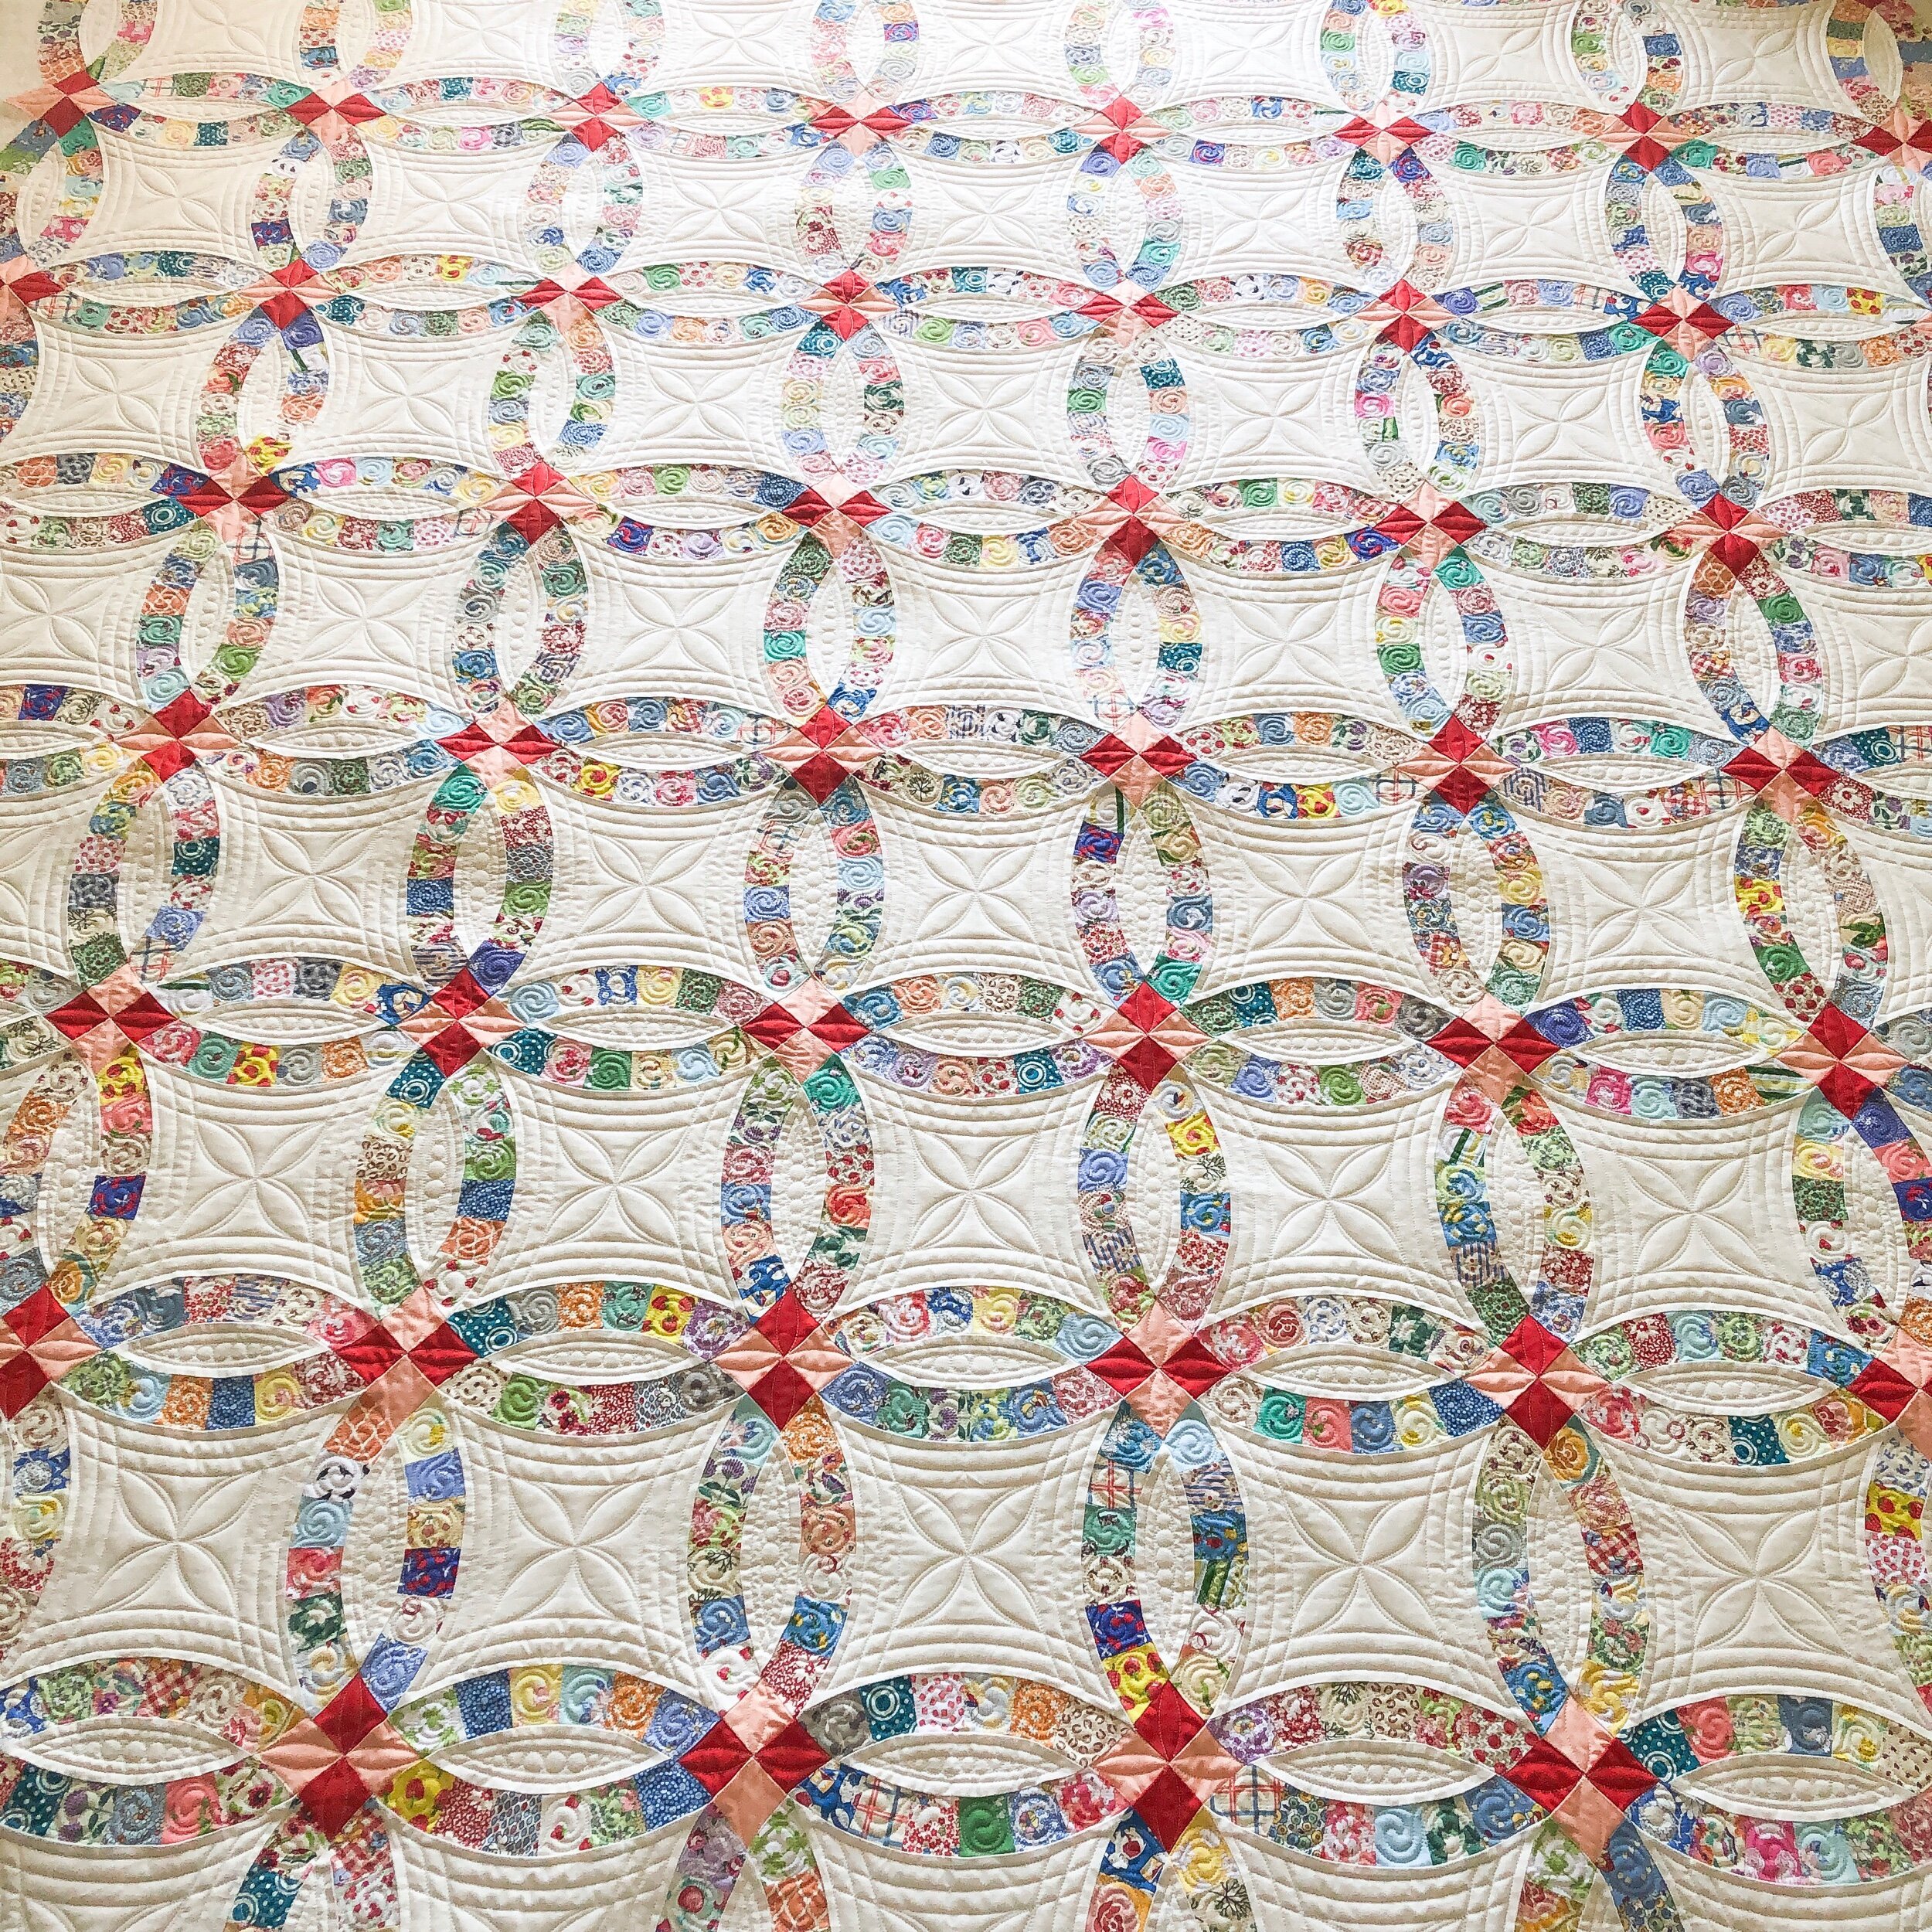
I used white 30 tex A&E Perma Core thread and winline’s 8020 cotton poly blend batting.
I wanted to keep the quilting classic, yet show off all the amazing piecing that Airen did.
I used 3 of my Circle2 machine quilting circle rulers (the 4”, 5”, 13”) and Linda’s -15- curve ruler from The Quilted Pineapple.

The quilting inside where the rings overlap, is dainty. A double curved line at a 1/4” spacing, with tiny pebbles, enhances the curves of the rings and the negative space. I quilted swirls with a hook, inside the rings. Checkout the backging pictured below to see the hooks better.


I used this 4” Circle2™ ruler for one of the sets of petals inside the double arcs of the wedding rings.

I used this 5” Circle2™ ruler for the other set of petals in the double arc.

I used the 13” Circle2™ ruler to quilt the 1/4” lines inside where the rings overlap.
I also used the -15- curve ruler from Linda, to quilt the 1/2” arched curves inside the center of the rings. (As pictured below) I hope that makes sense. The reason I share which ruler I used where, is so you can see the benefits of having a great selection of circle rulers and curve rulers. I lay out my circle rulers to see which curve fits in the best spot. No two quilts are the same. It’s such a great asset to have a great set of rulers.

Front/back!! Love it! You can also see the hook on the swirls in the bottom picture. I love the look of the diamonds in each corner.

I wish each of you could see this beautiful quilt!!
Lovely sunlight highlighting all that quilting texture.
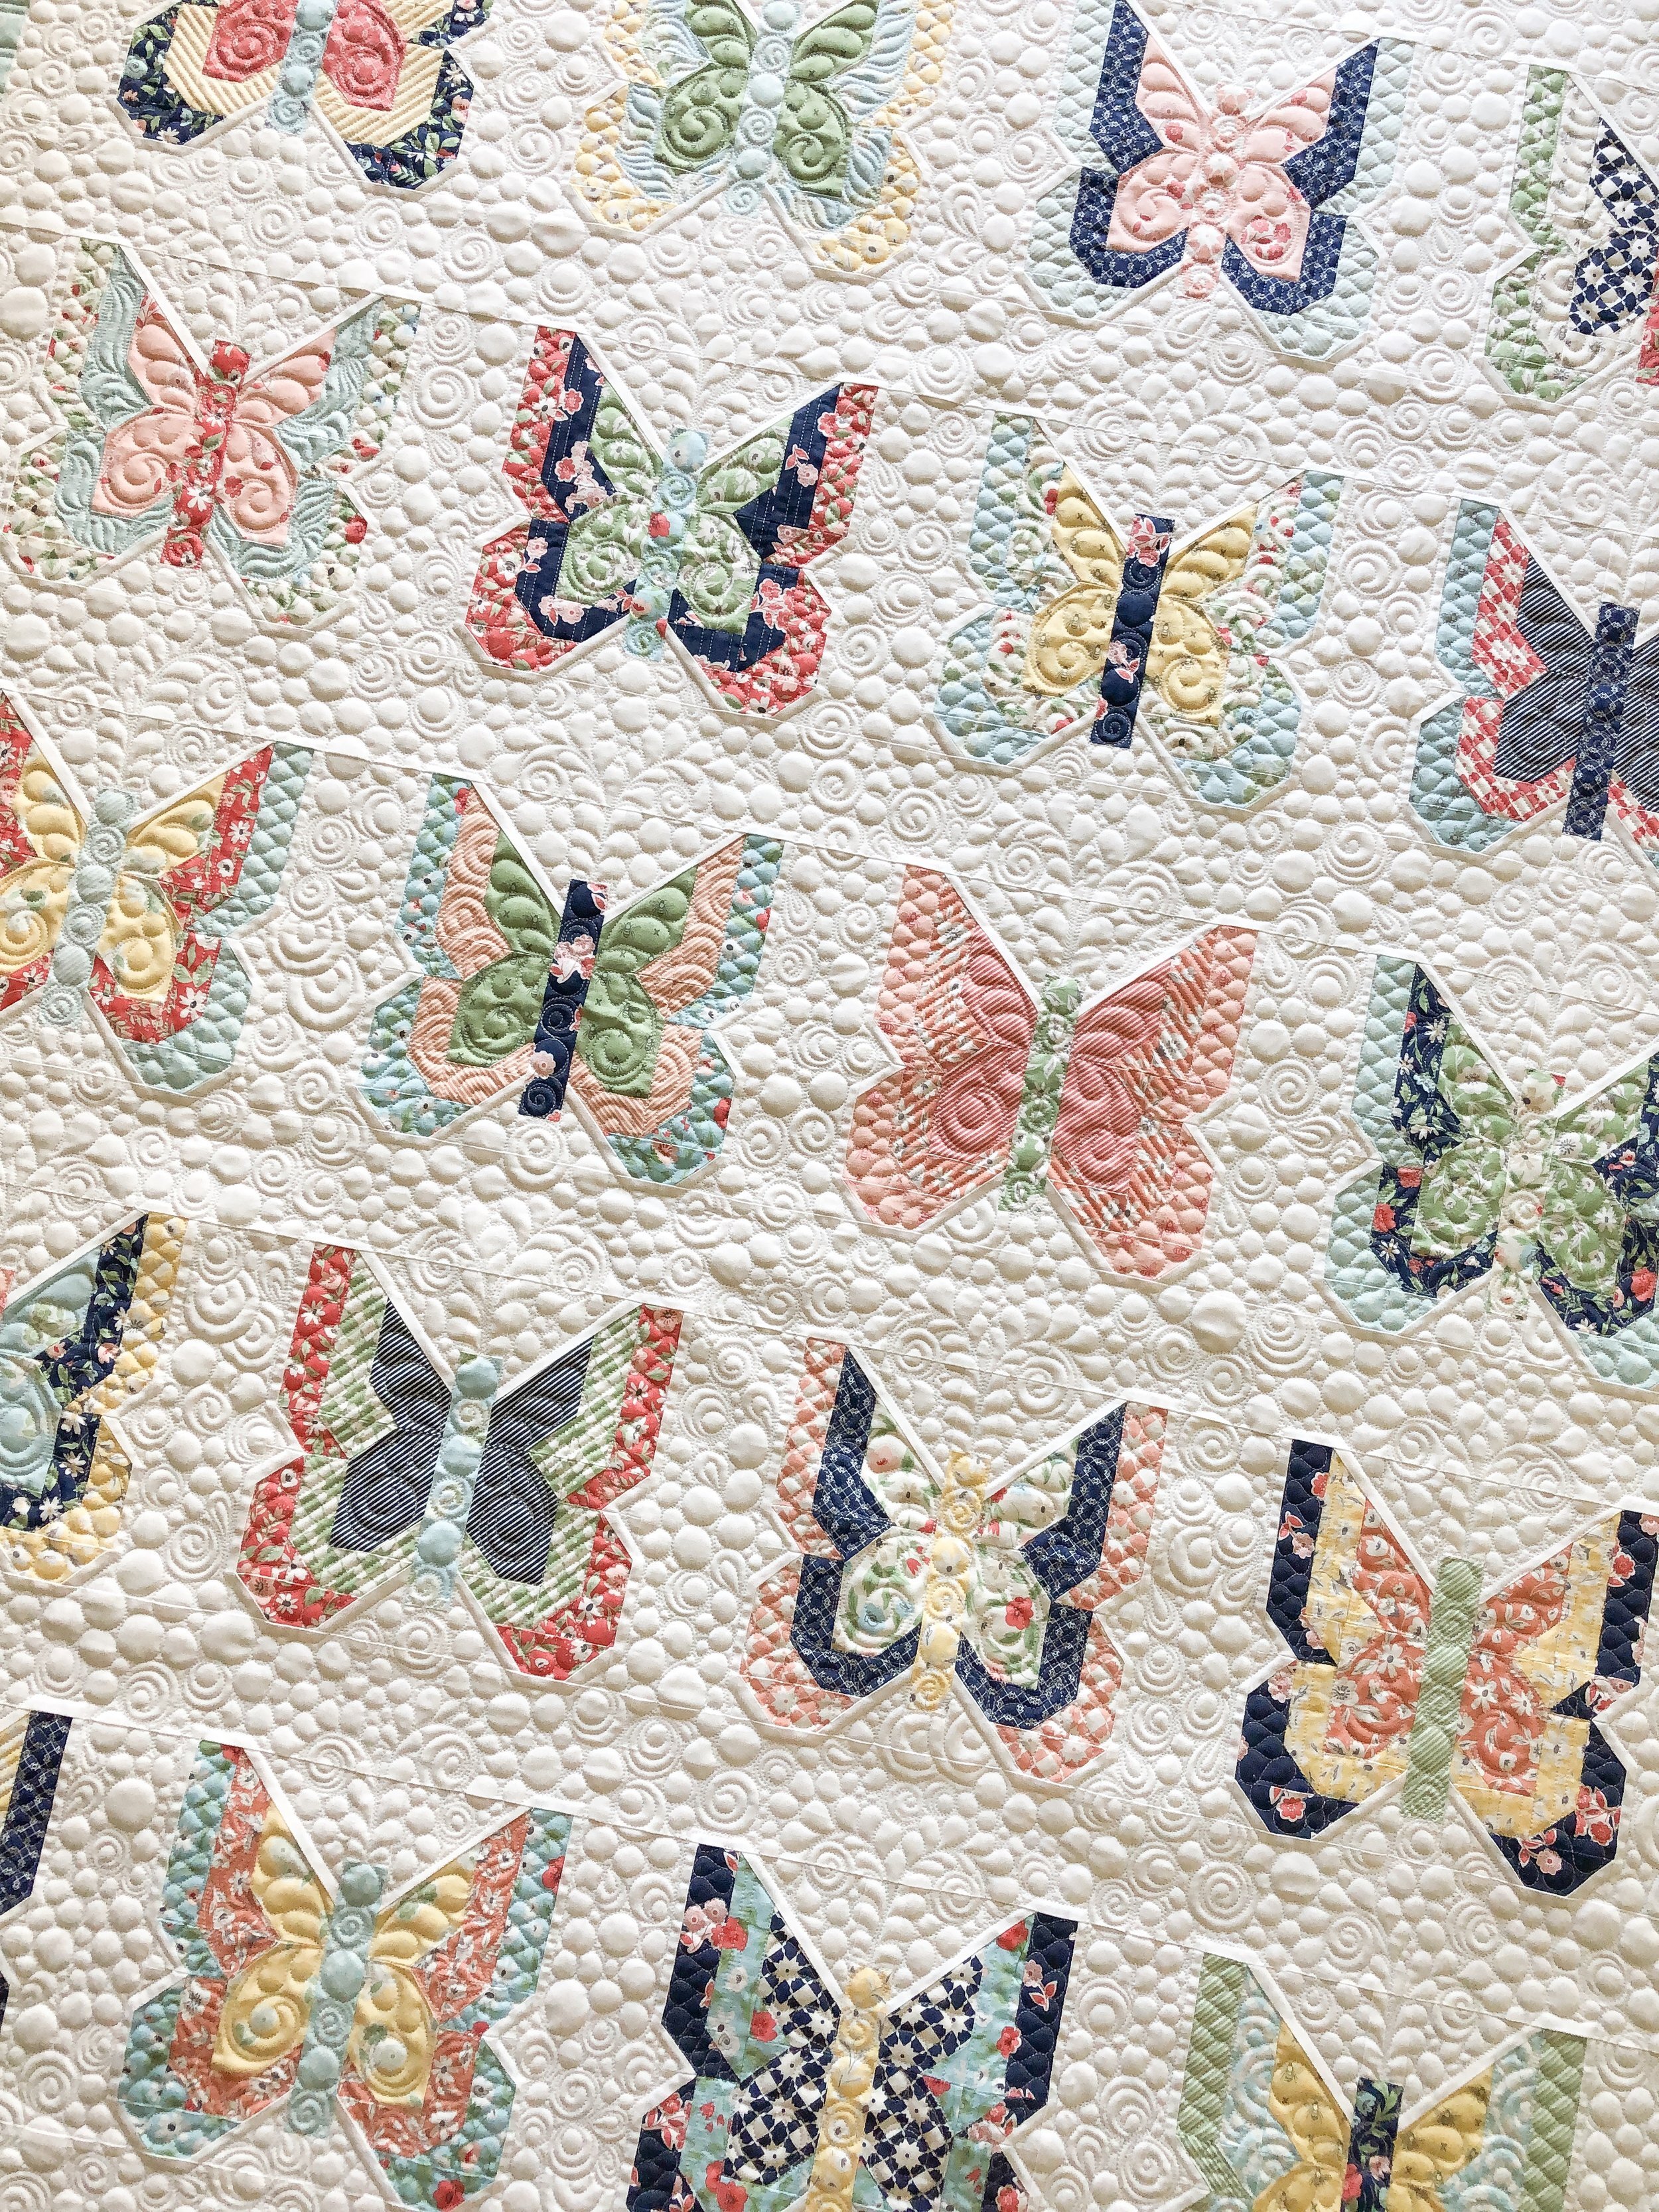
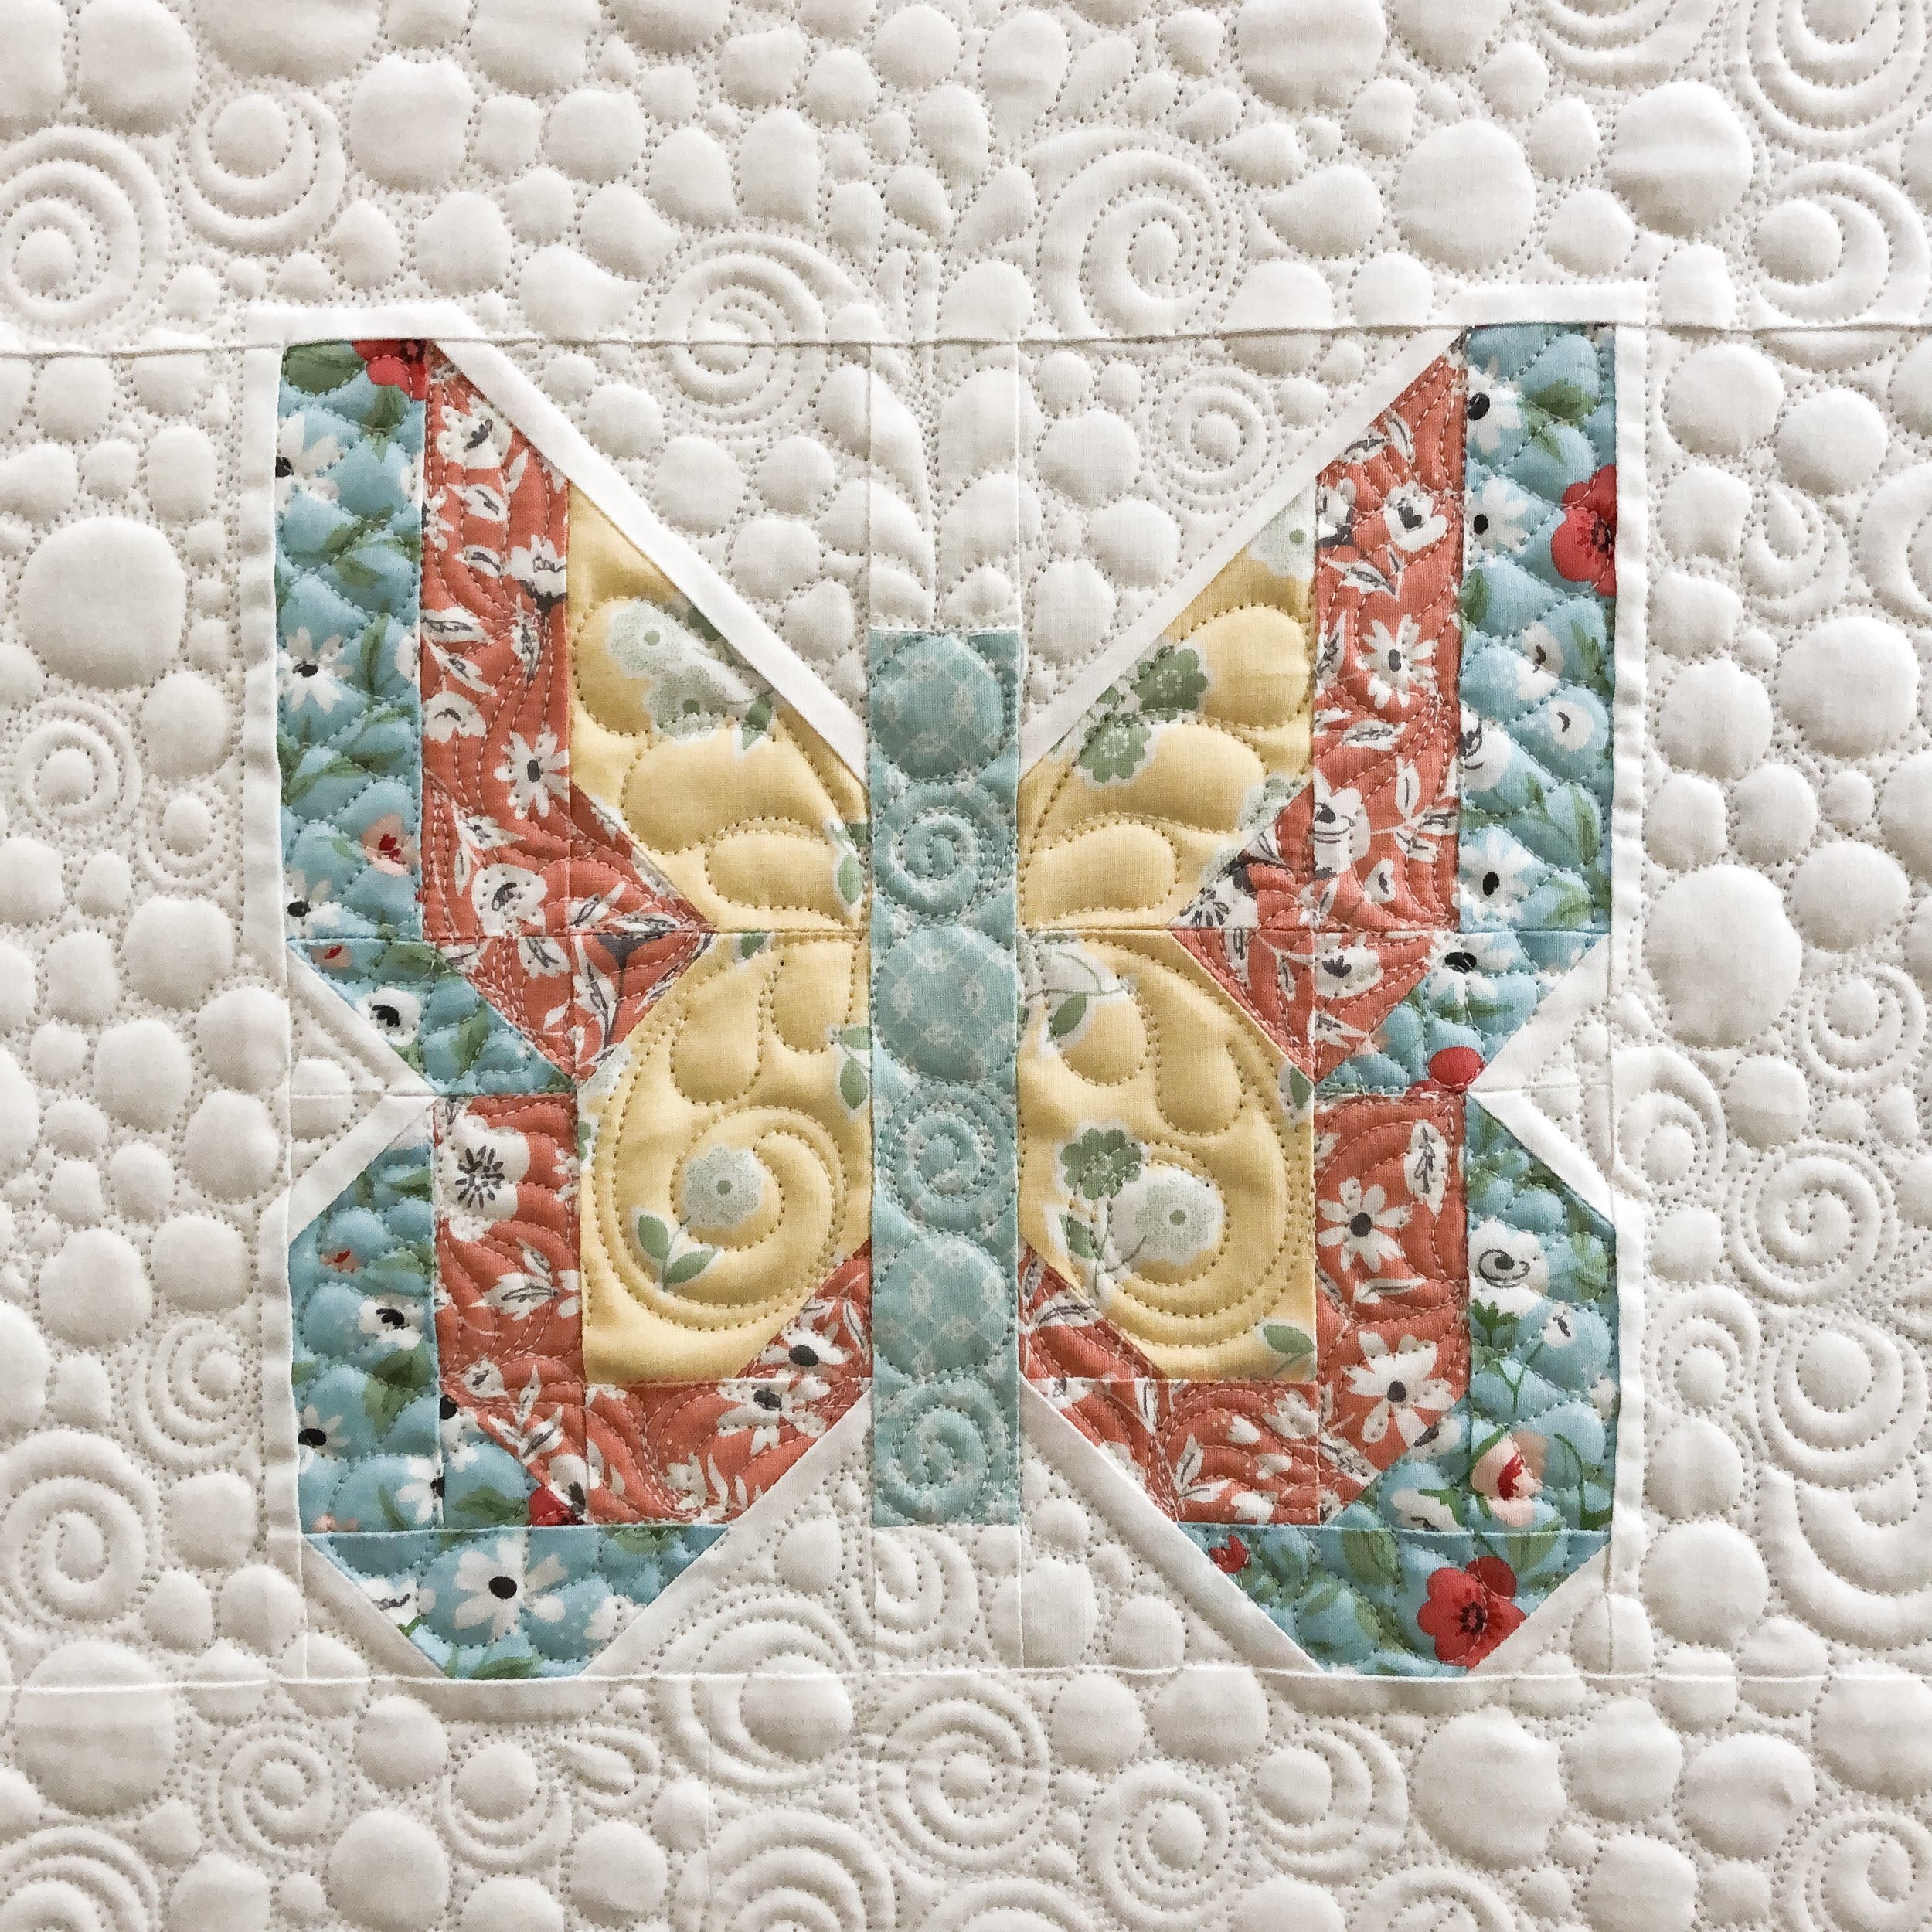
These sweet butterflies were made by Lori for her granddaughter. The pattern is by Nadra Ridgeway from Ellis & Higgs and is called Butterfly Dance.

This is such a sweet sweet quilt!!

Lori chose Flower Child by Apricot Moon Designs, and it’s available at Urban Elementz. This is such a fun design to quilt. It looks like the flowers are dancing along with the butterflies.
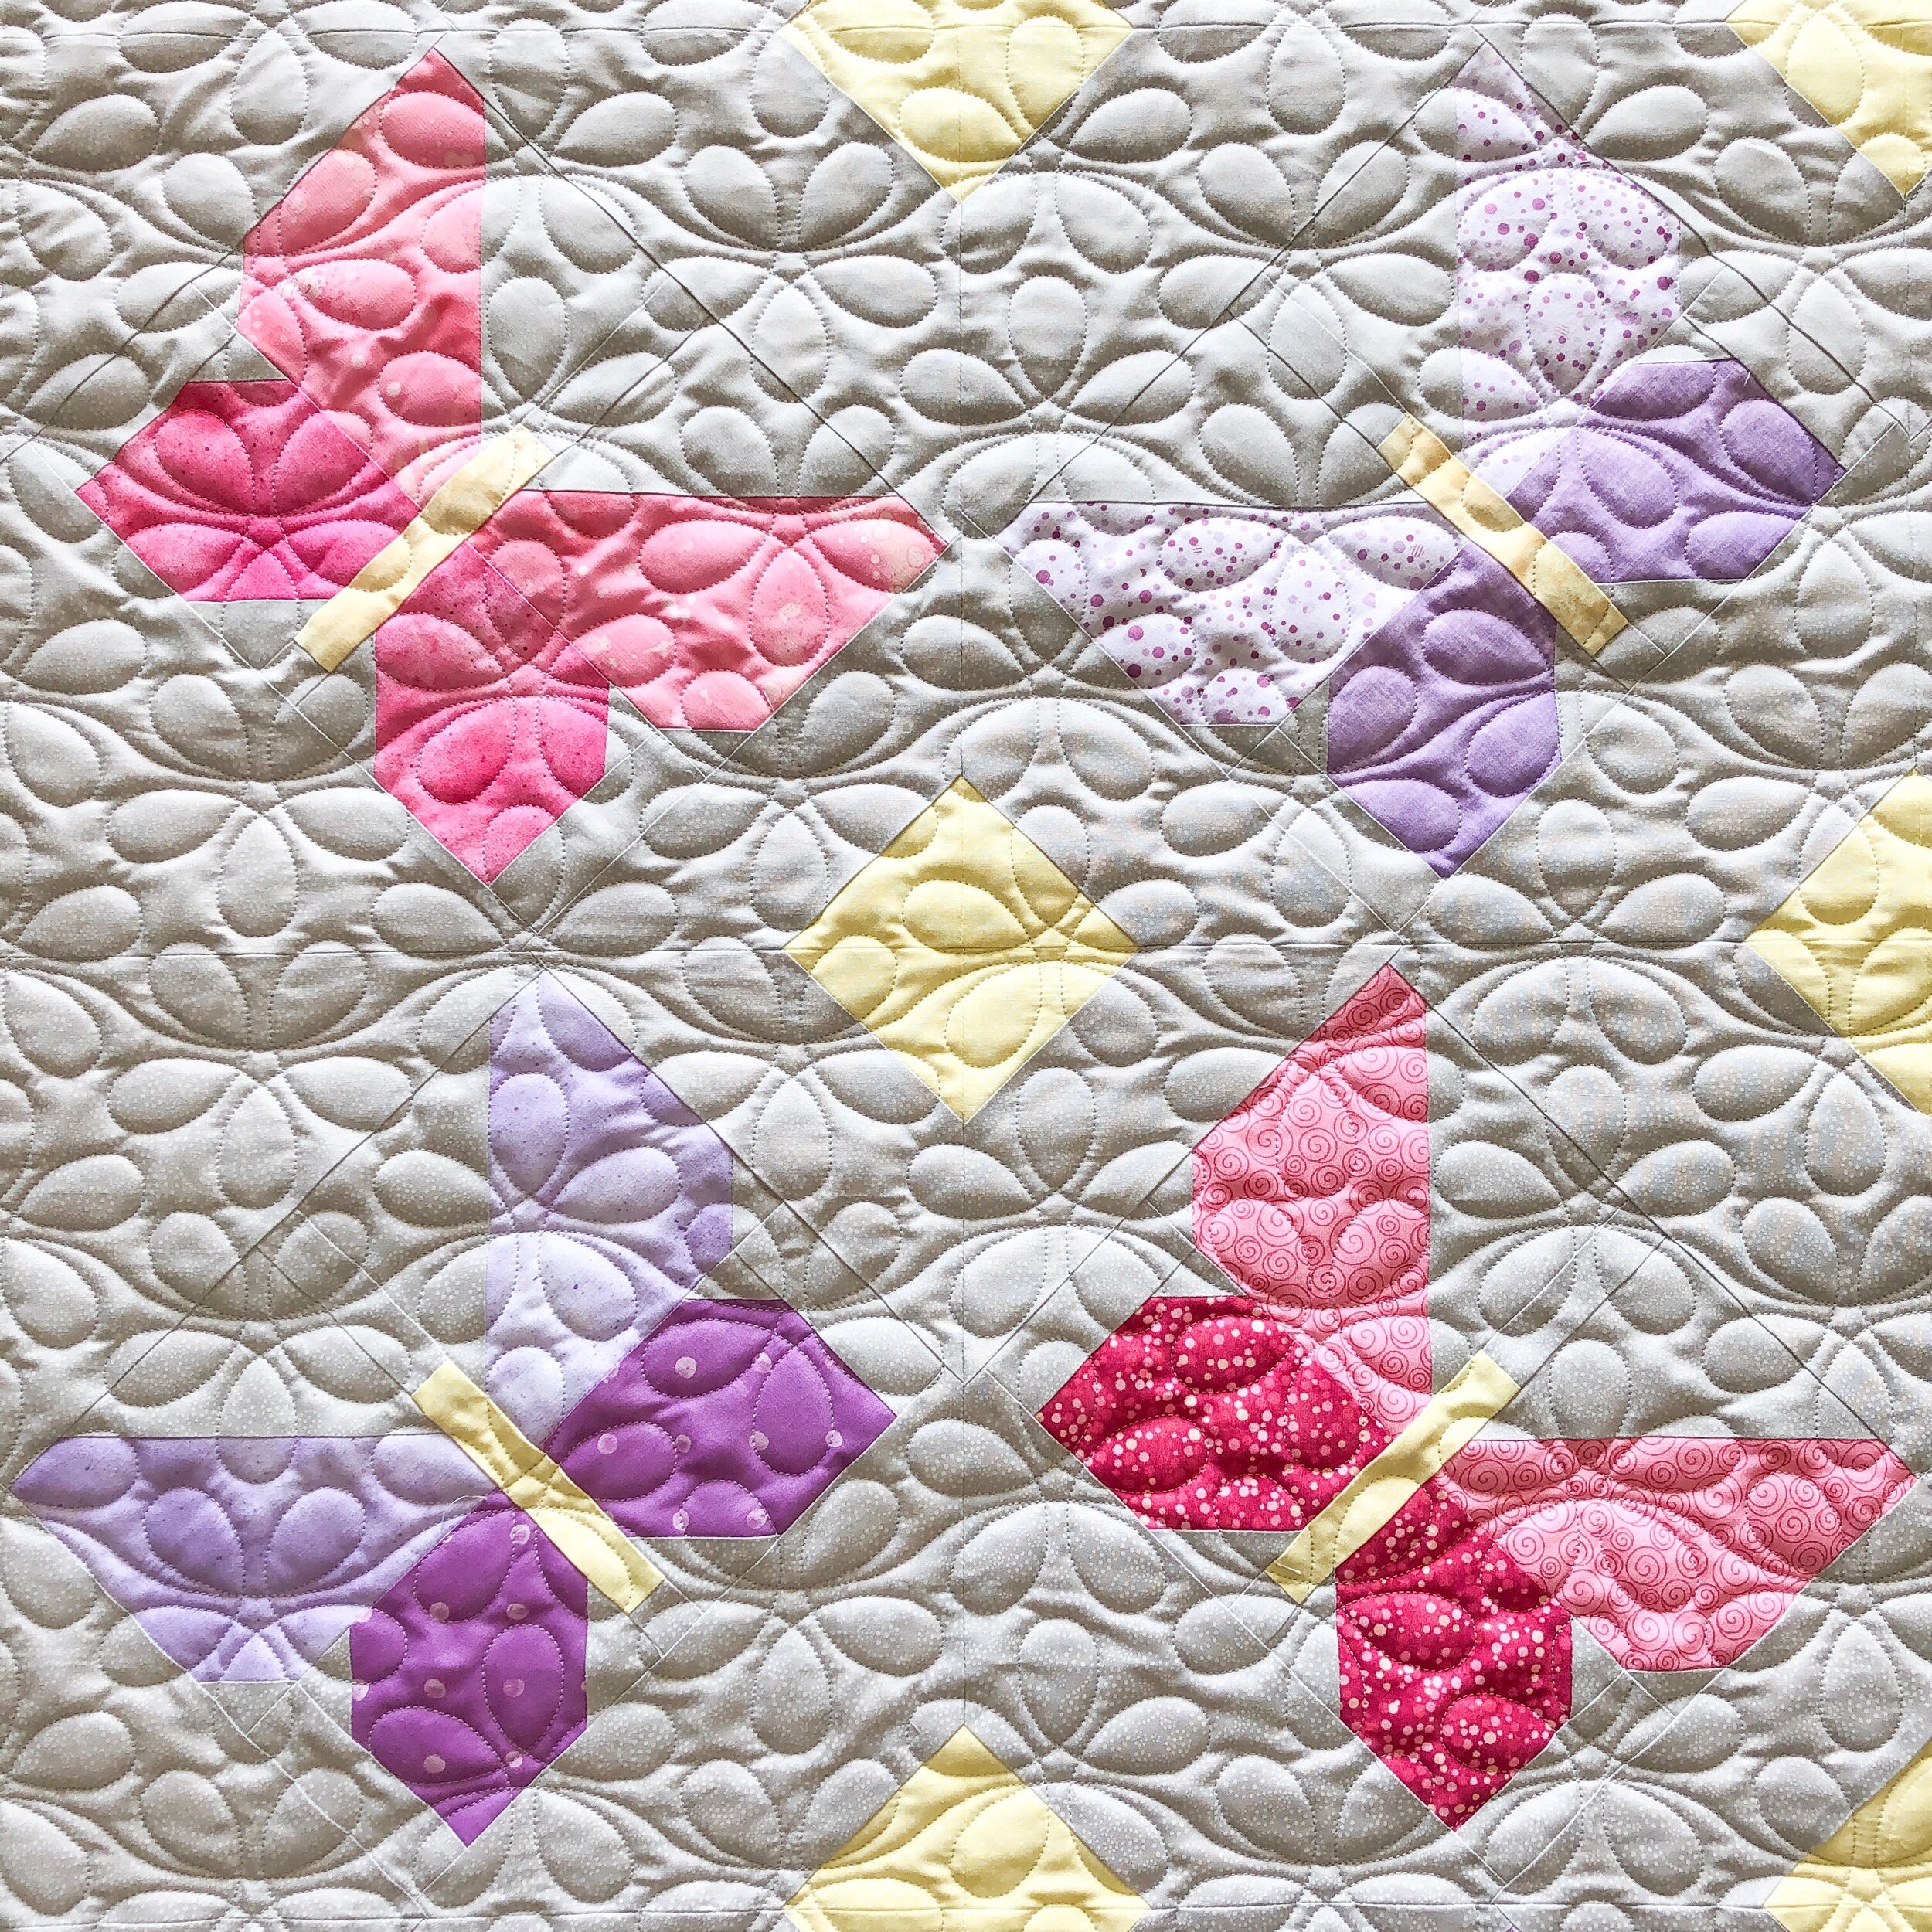
I used a 30 tex Silver Omni thread from Superior Threads, and 8020 cotton poly blend batting from Winline.

I hope you have fun snuggling your new granddaughter soon, Lori!!! She’s lucky to receive such a beautiful quilt.

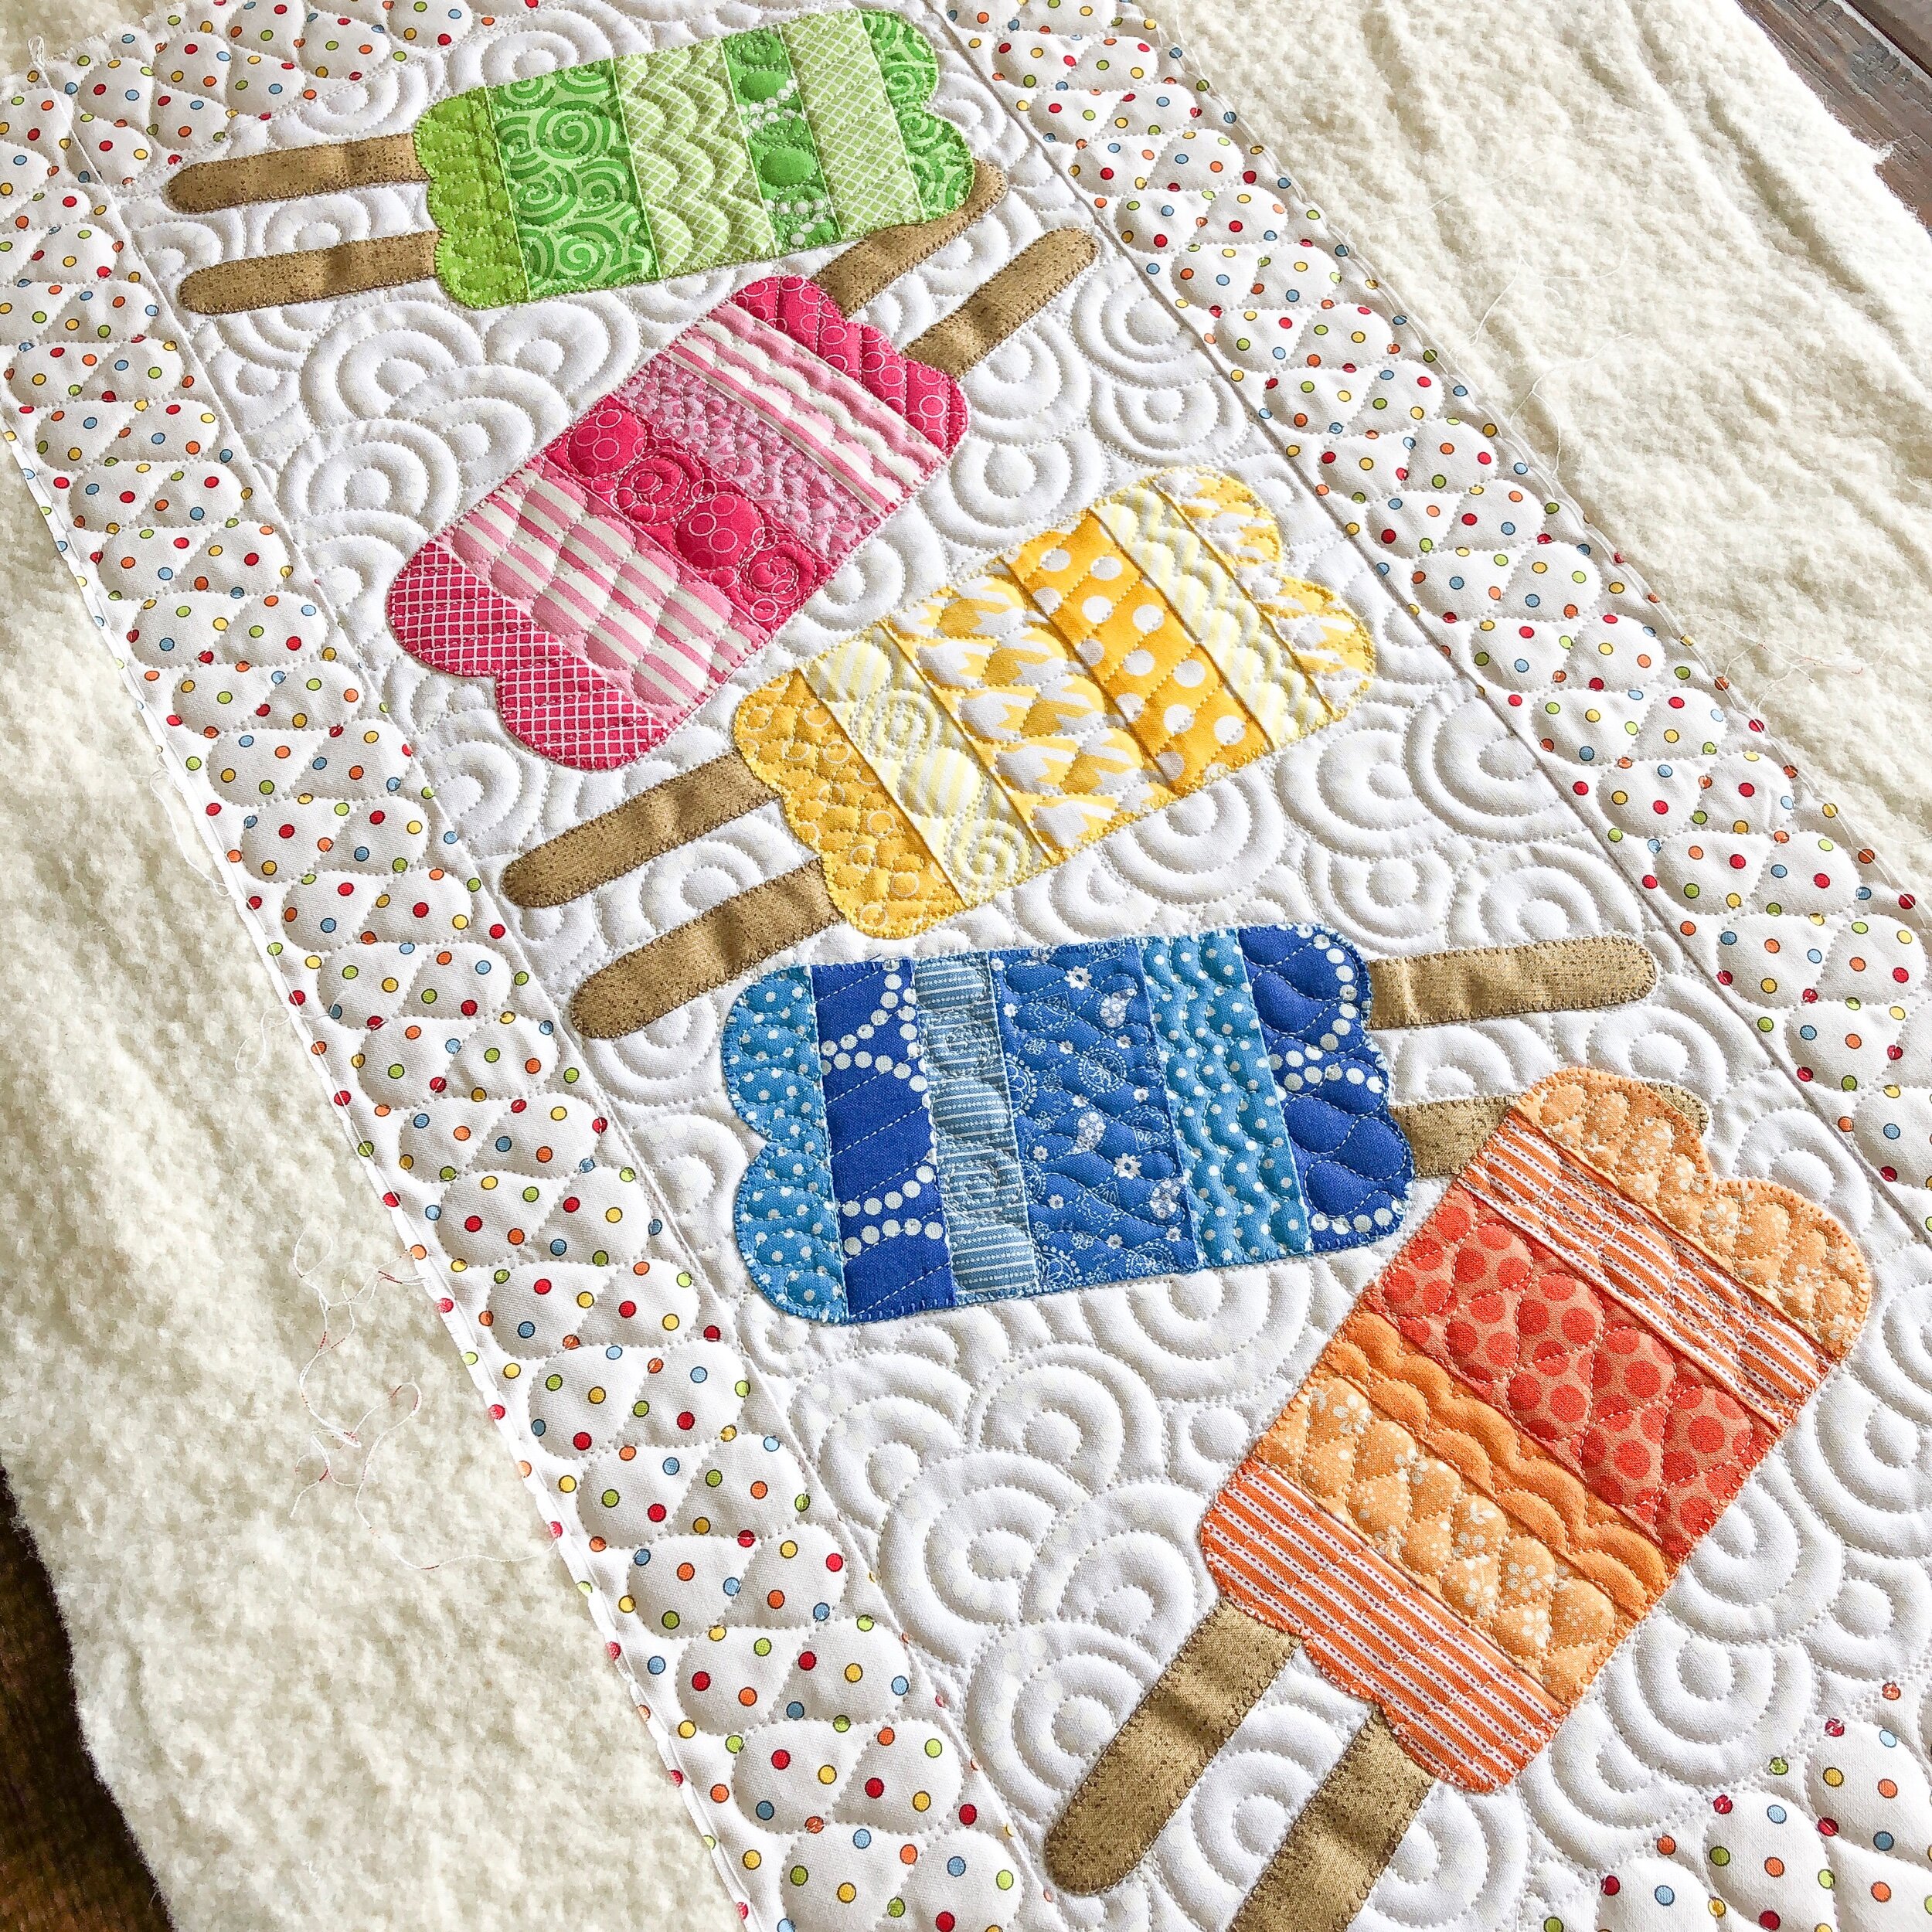
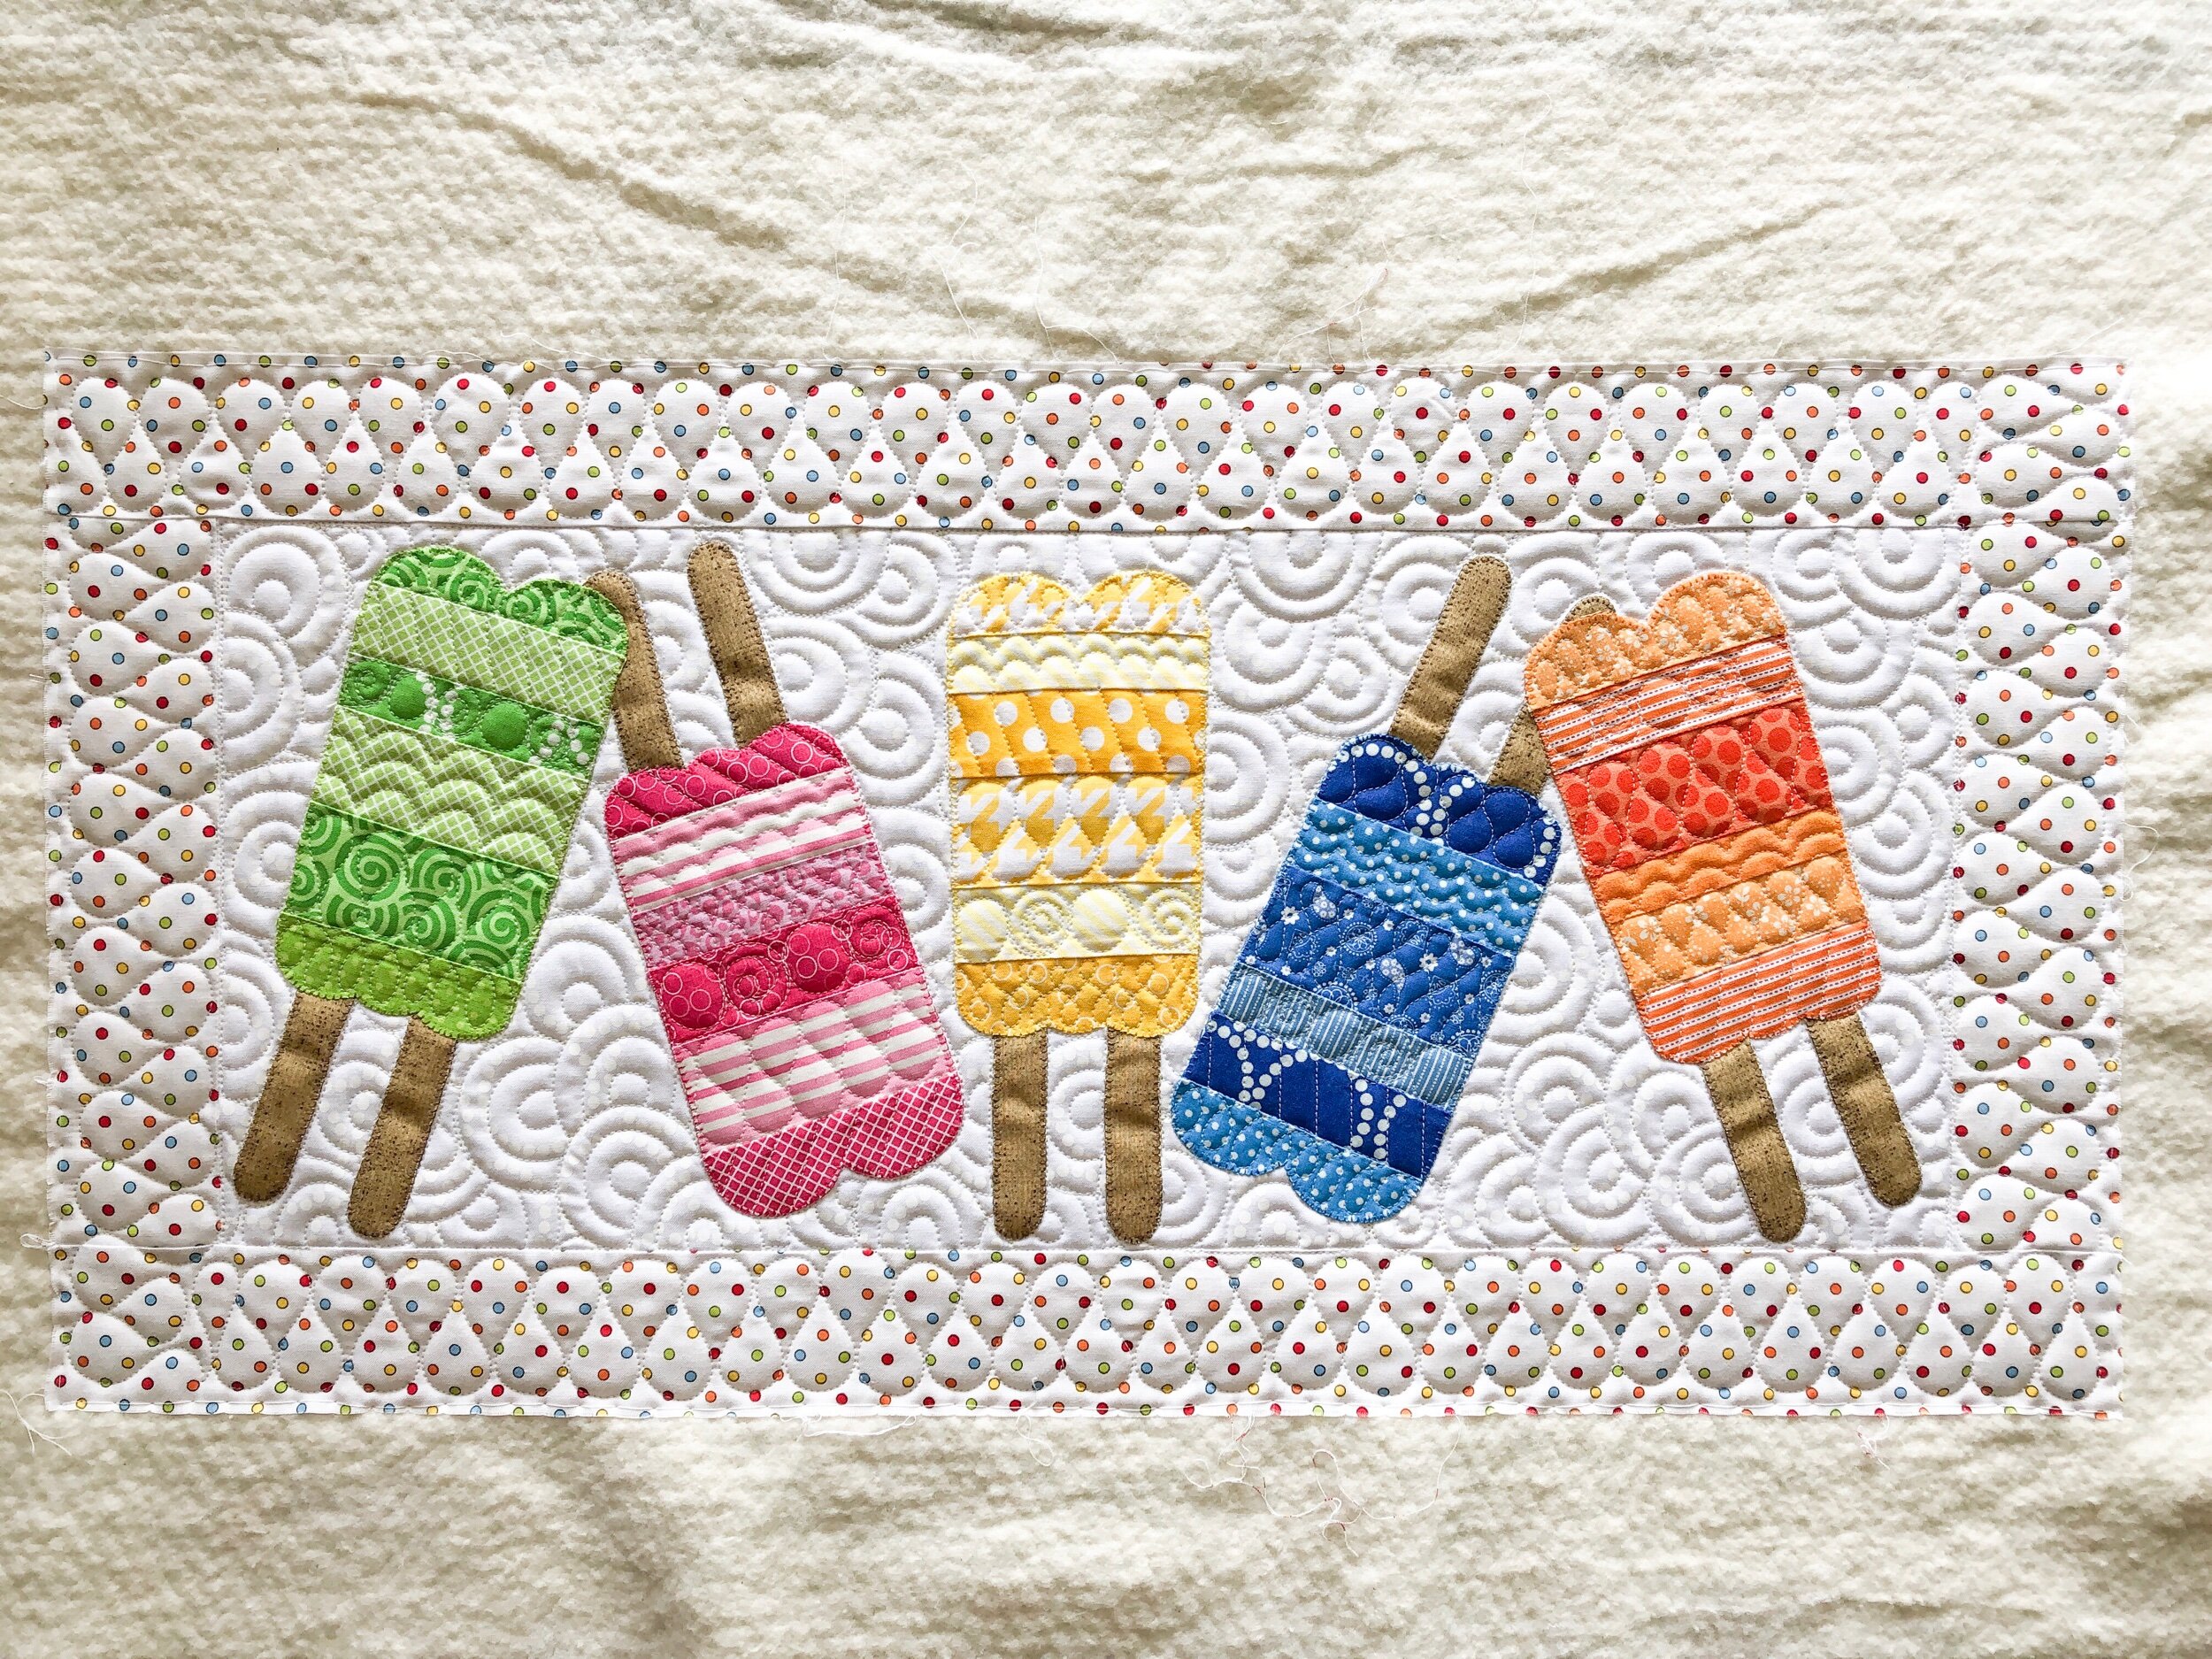
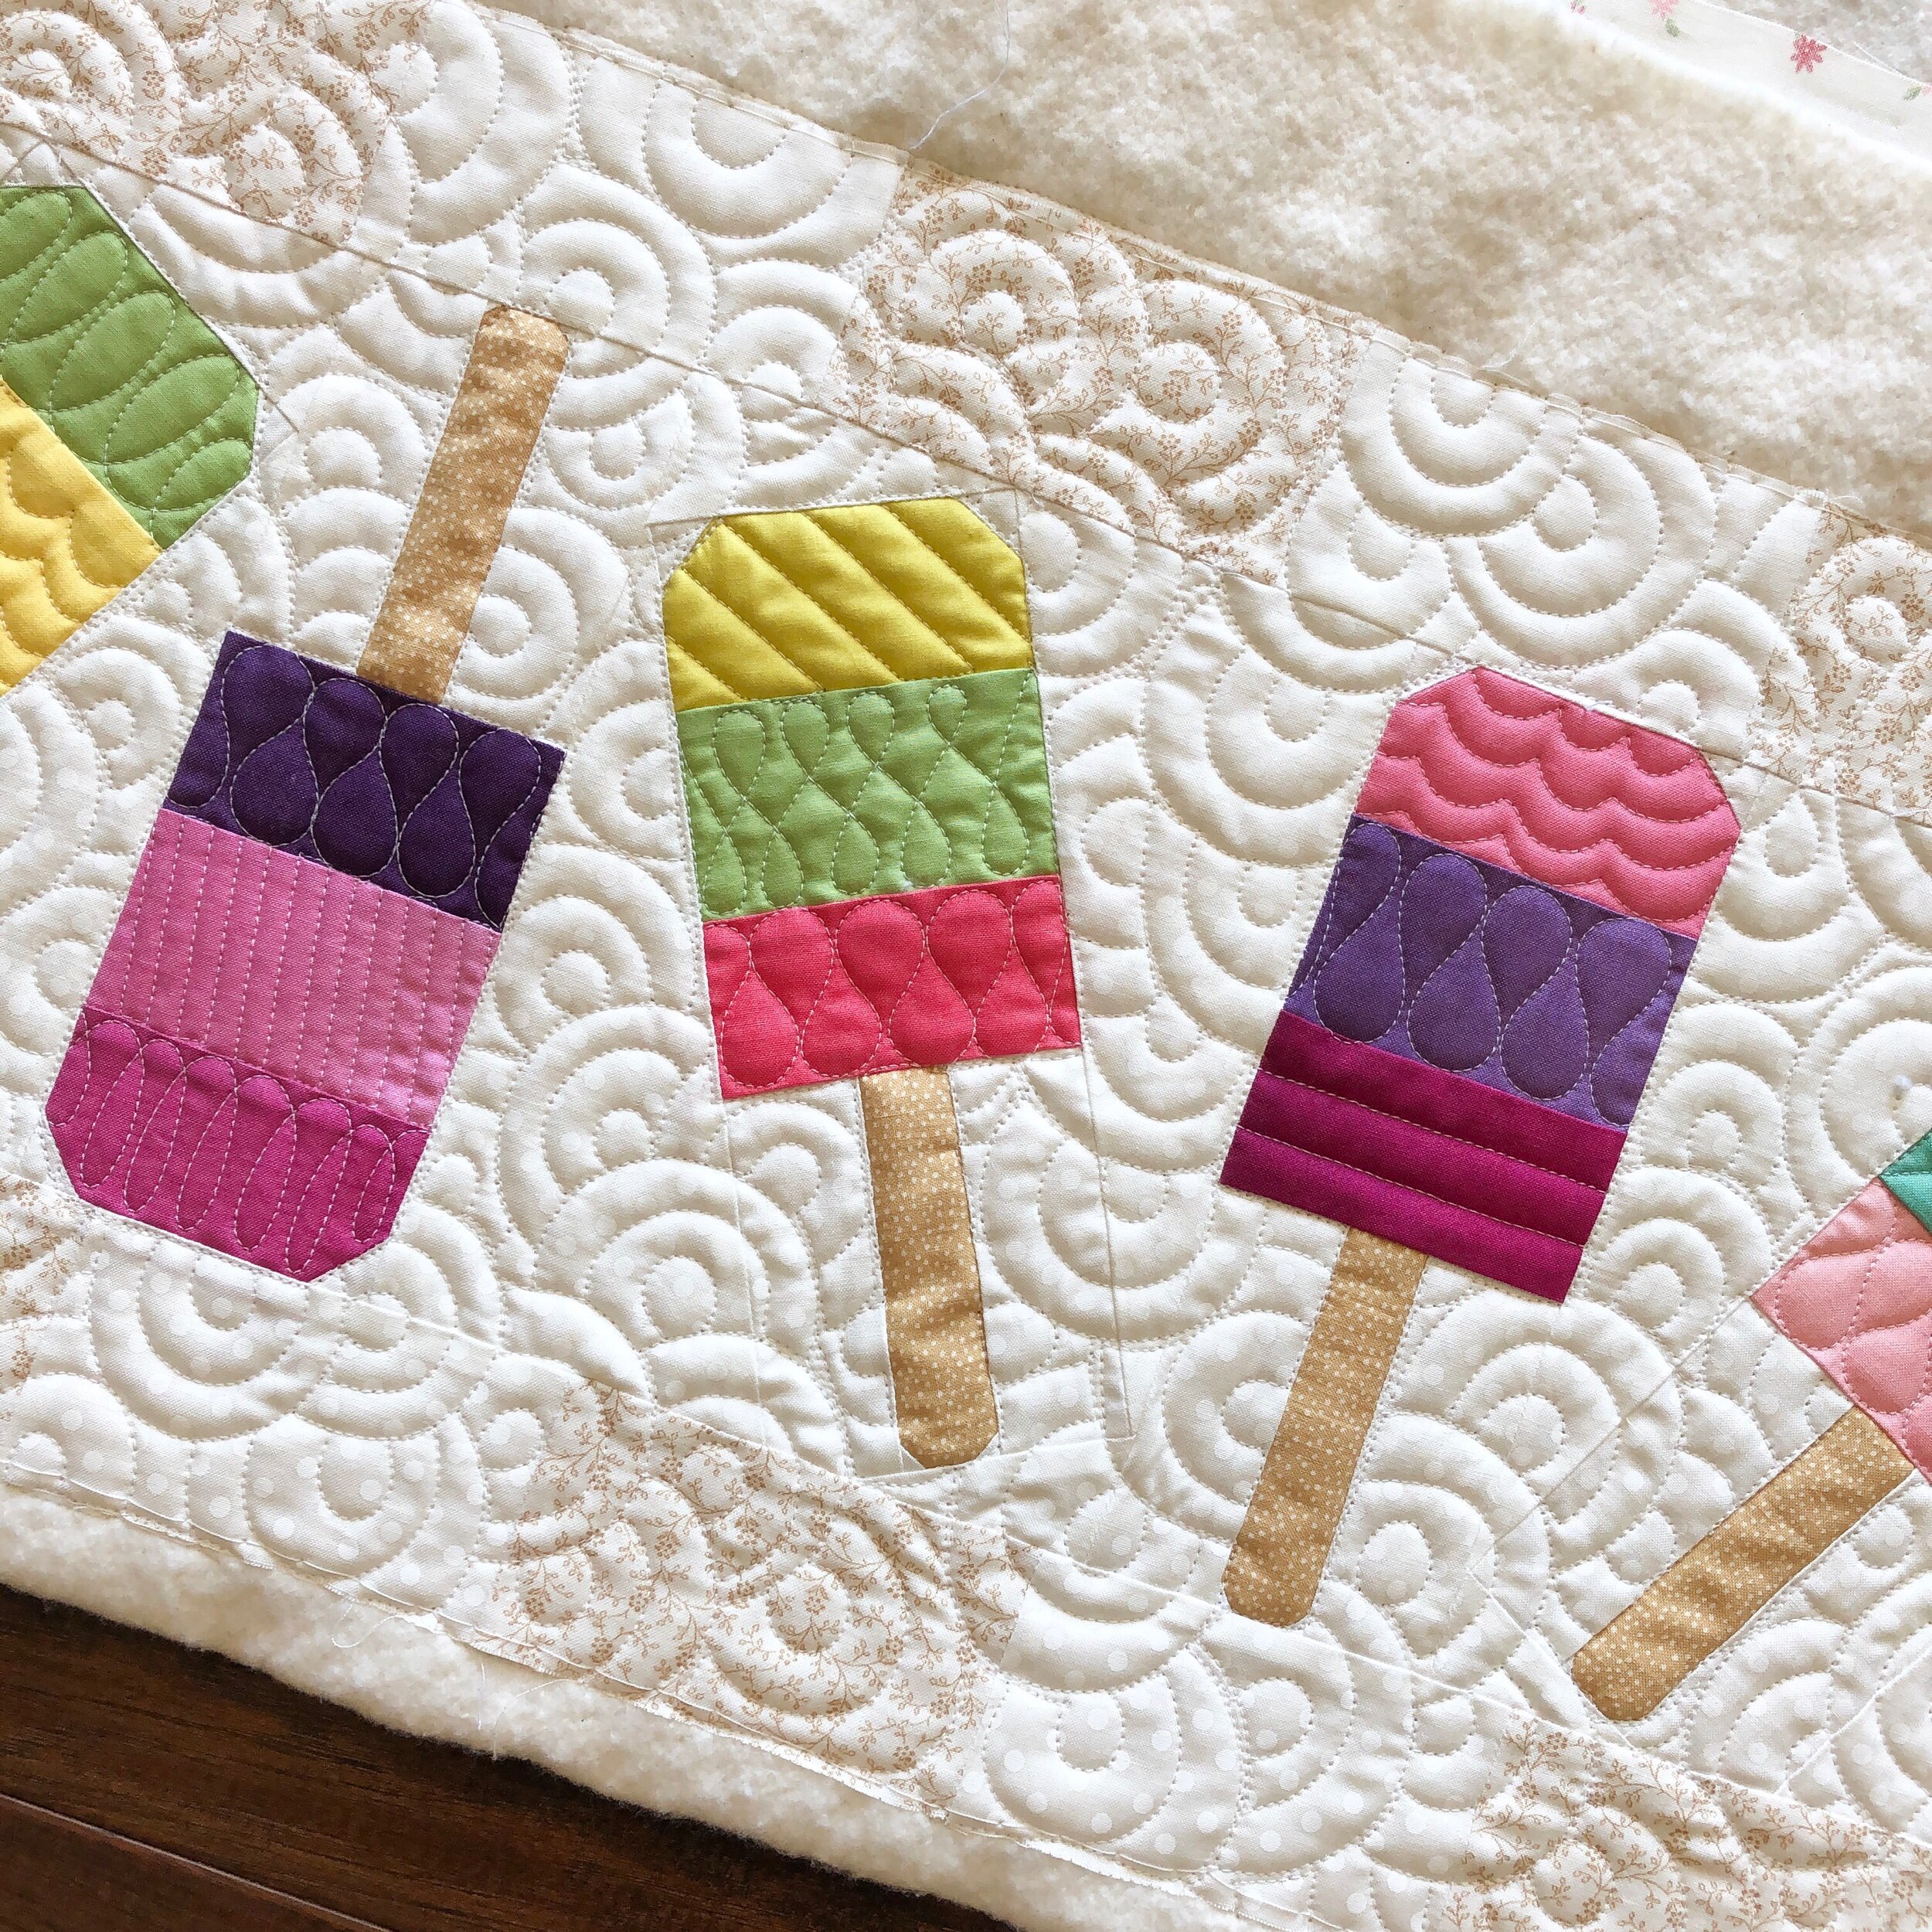
I love this bright fun runner, made by Laurie. The pattern is Mini Popsicles Table Runner and is available at Annie’s Catalog.

Made with the Crayola Fat Quarter Box from Riley Blake Designs.

I custom quilted this with overlapping swirls in the background, and a variety of fun textures in the popsicles.

Such a fun summery runner. I used Antique Cream 30 tex A&E Perma Core thread and Laurie brought a cotton poly batting scrap.
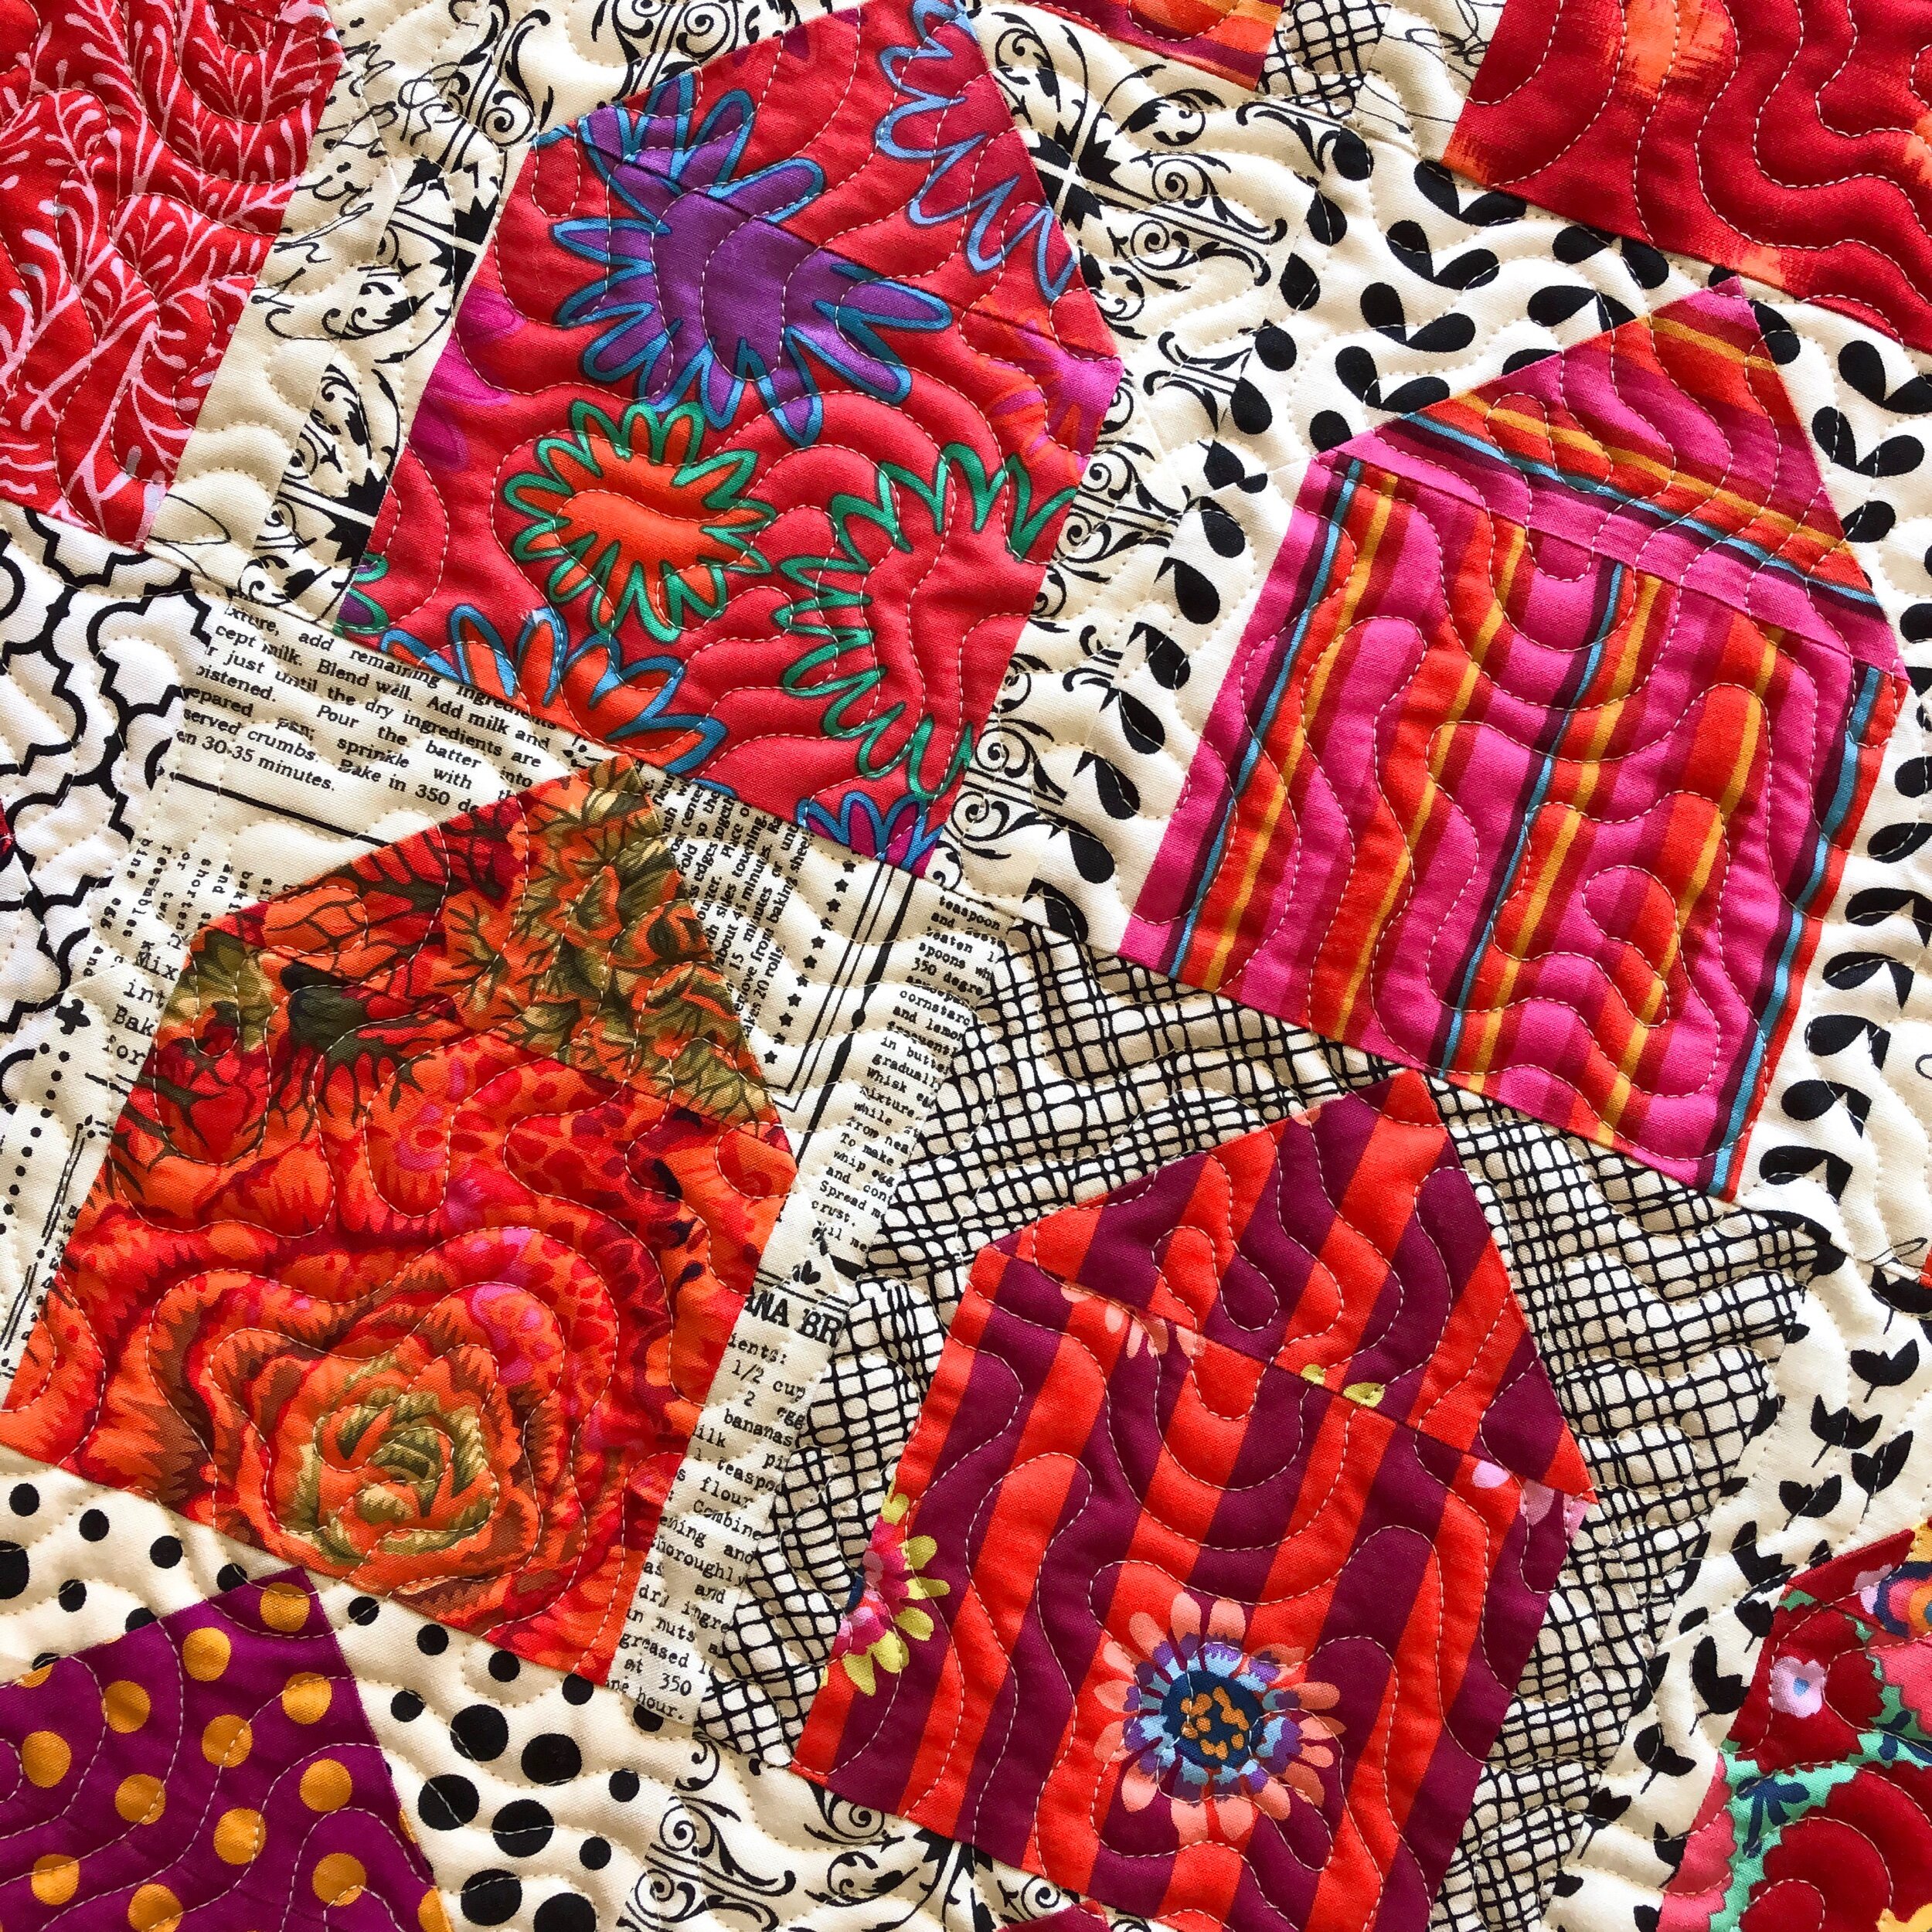
This house quilt is just so fun, it was made by Kara Jo. The bold reds, pinks, and oranges…next to the black and white low volume prints…make this quilt pop!! I’m guessing these red/pink/orange fabrics are by Kaffe.
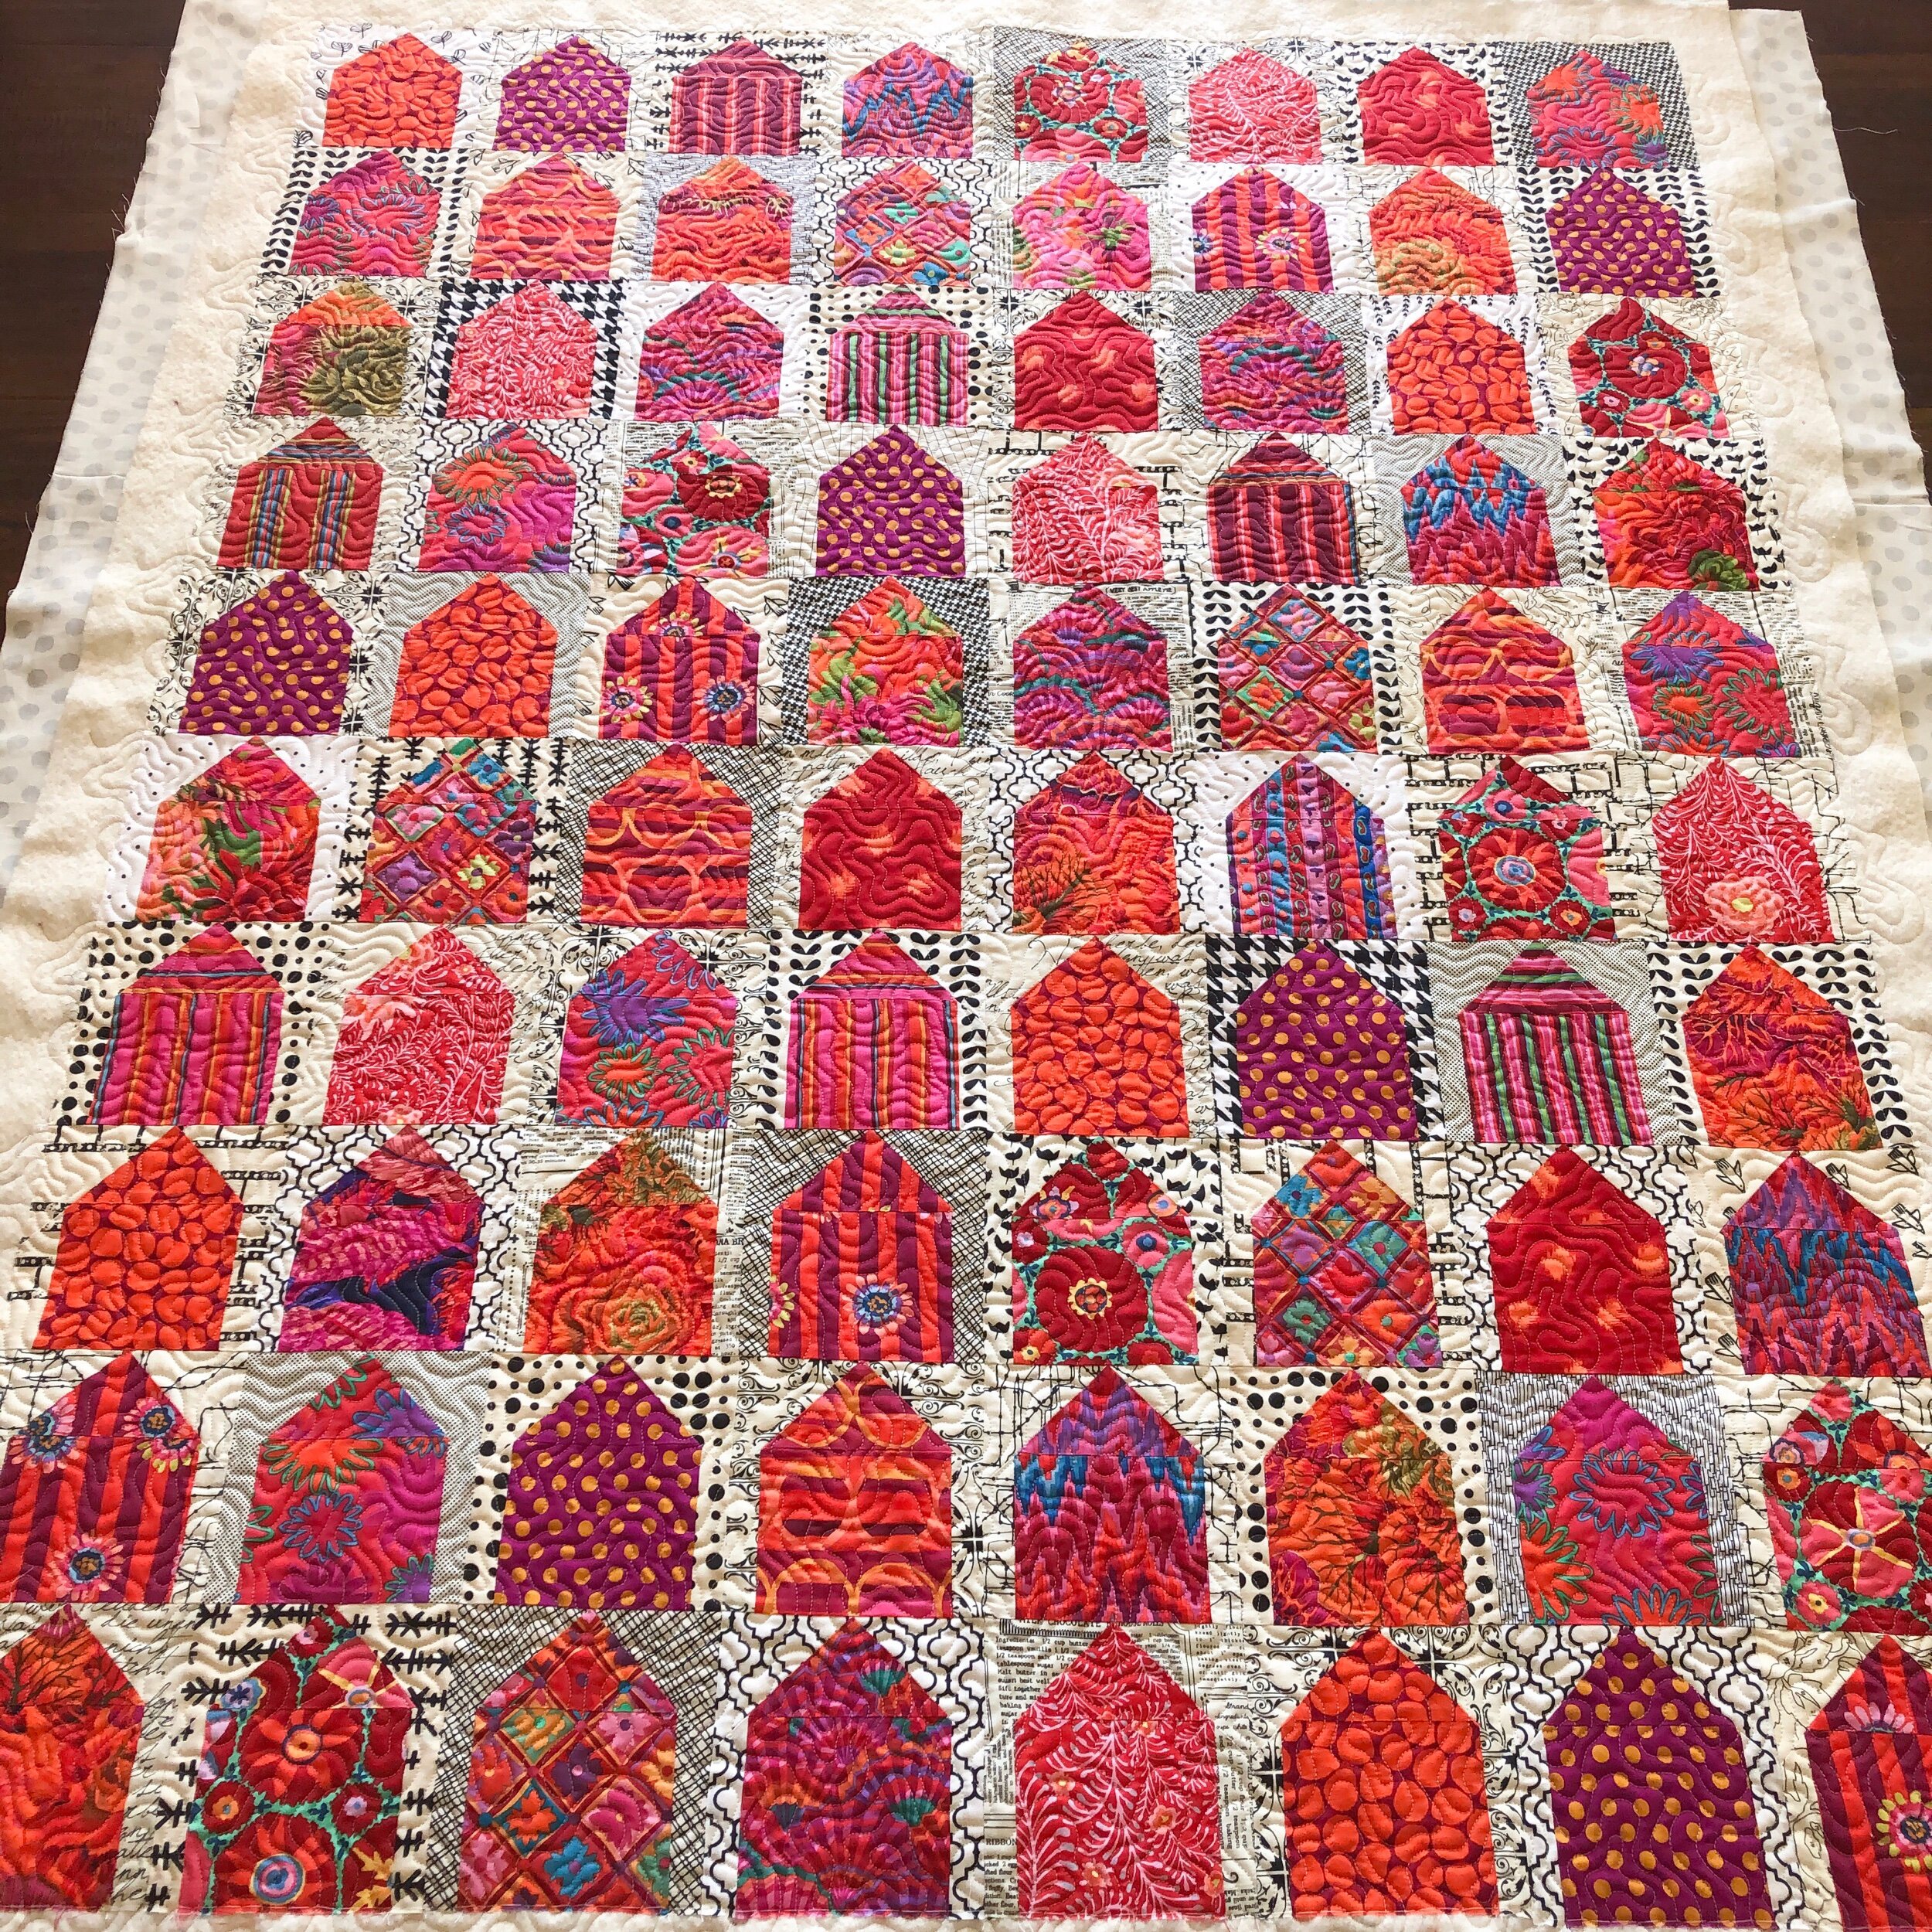
I used a Antique Cream 30 tex A&E Perma Core thread and Winline’s 8020 cotton poly batting.
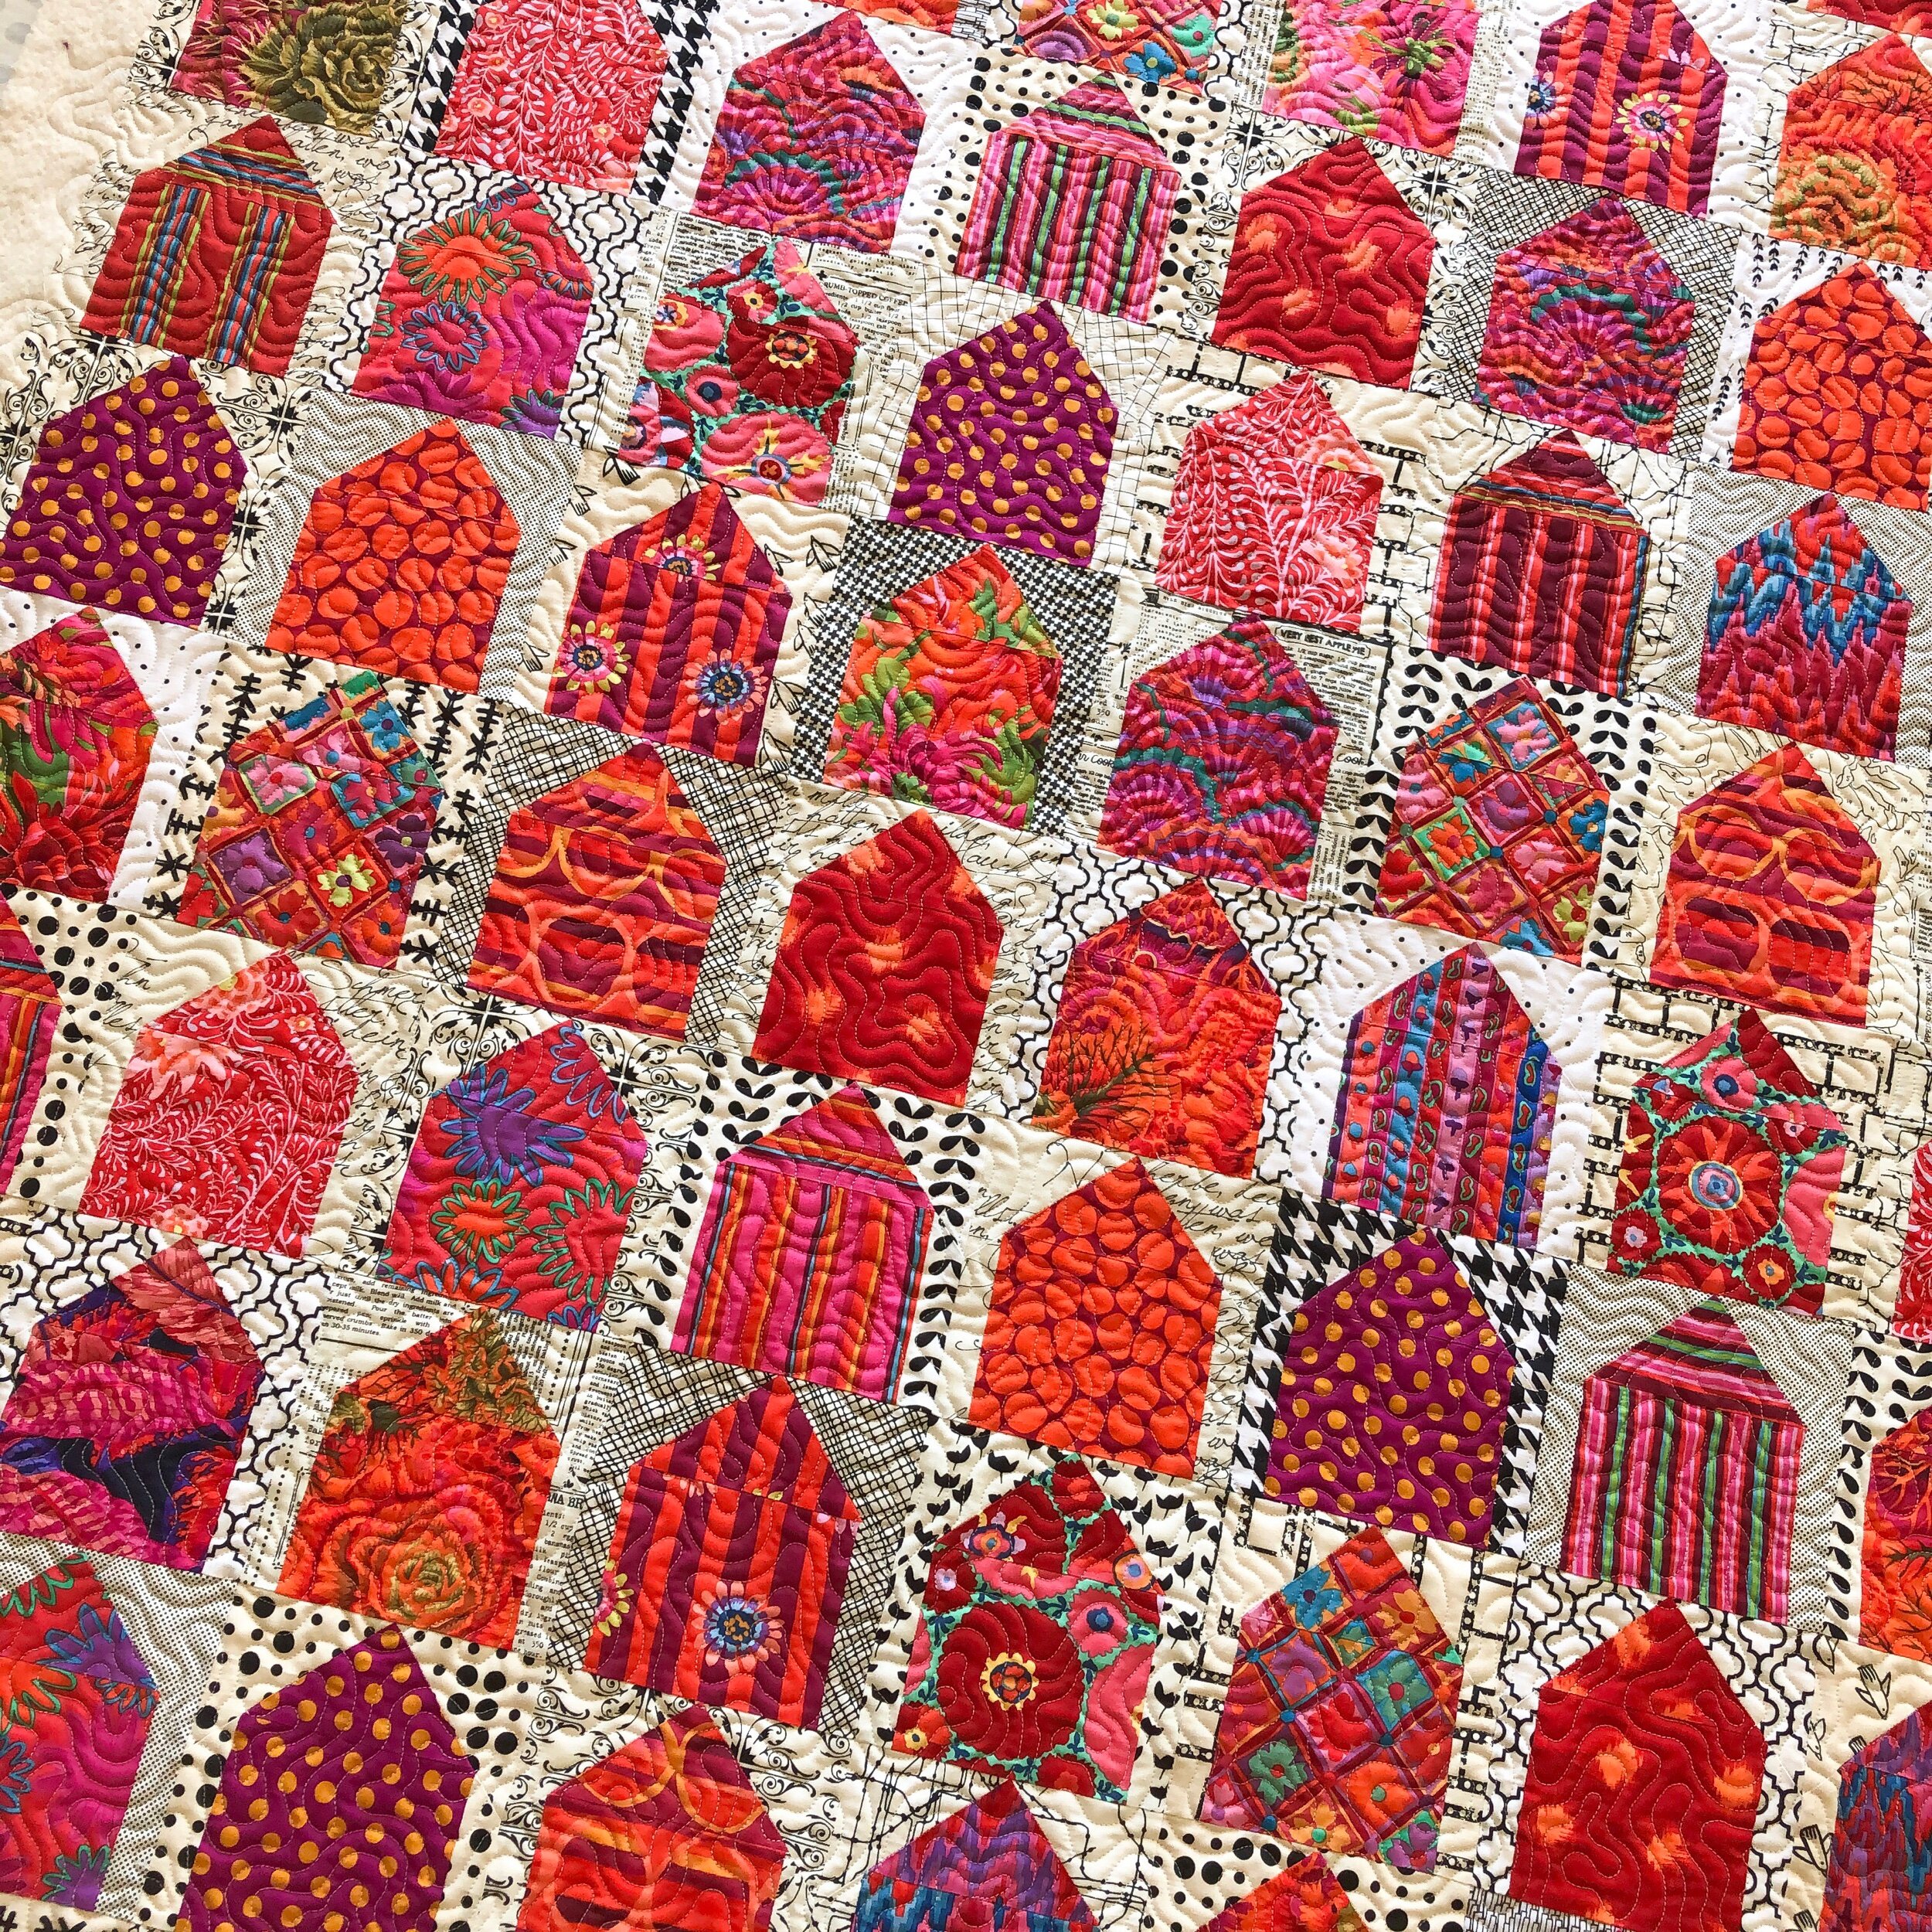
Look at the combination of these bold prints, even next to some of the bold low volume prints. Such a fun combo.
I’m not sure who this pattern is by, if I find out I will edit this post. There are a fun variety of house quilts.
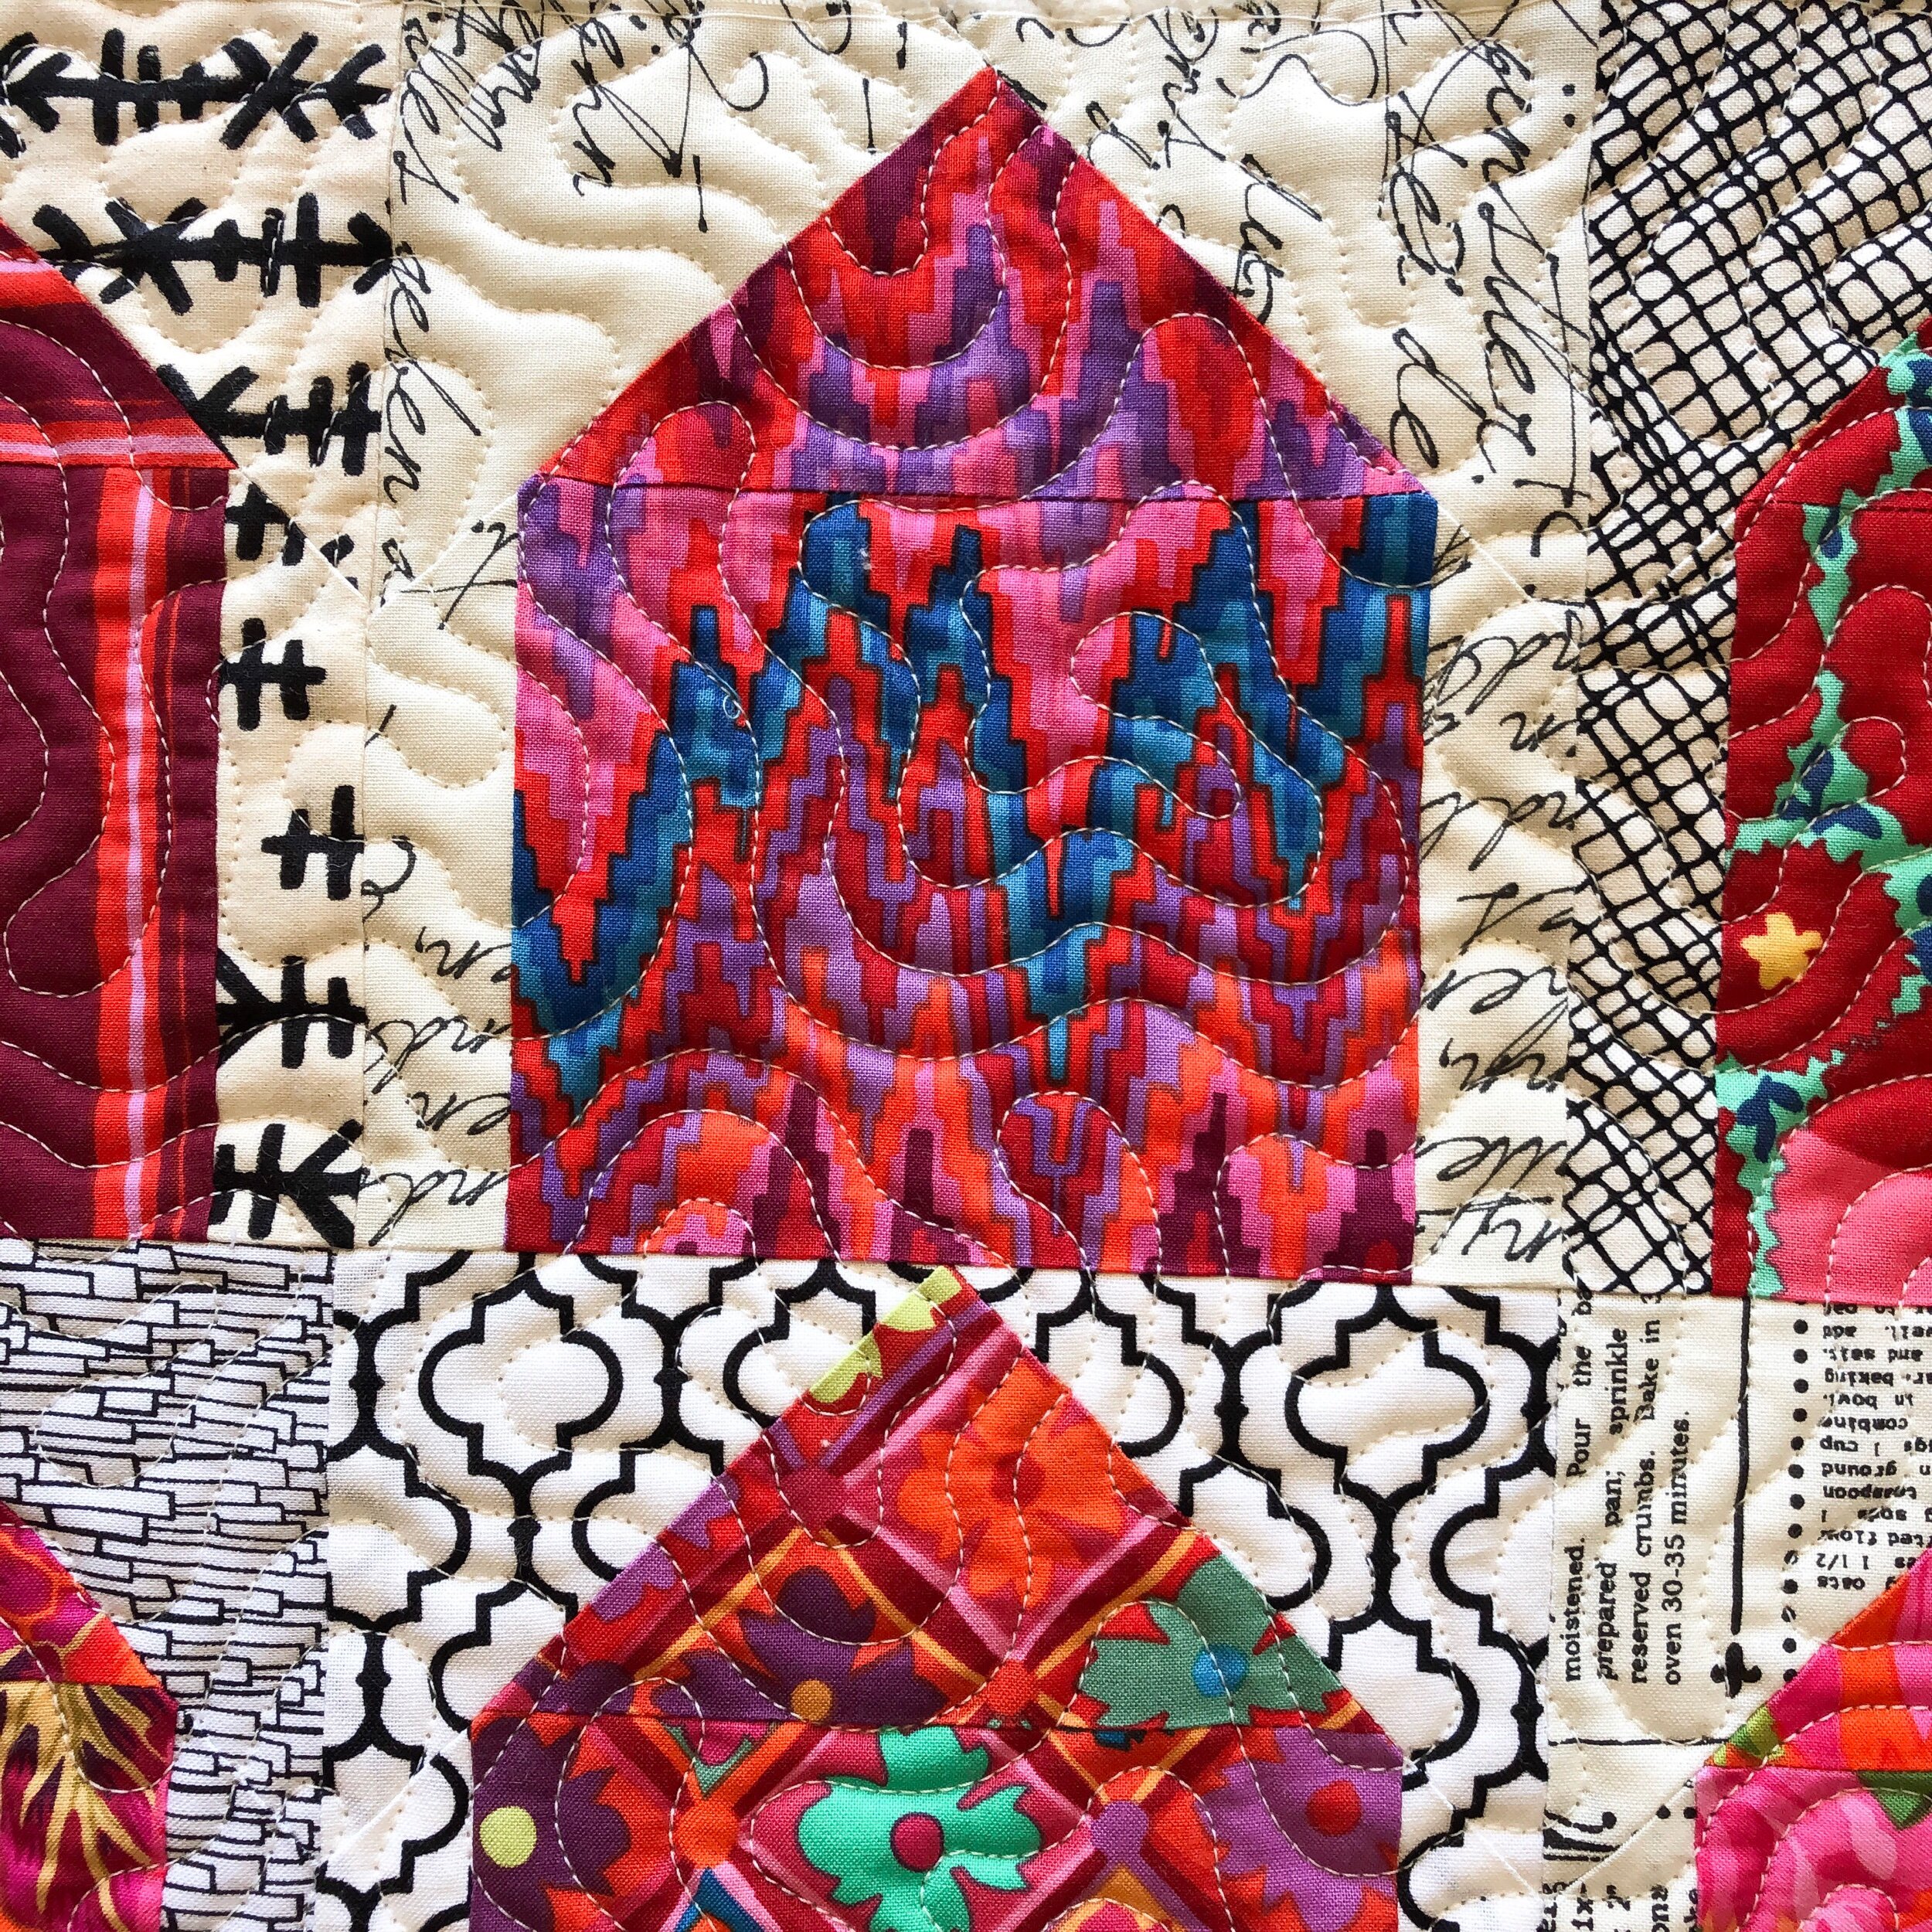
I suggested Malachite as a design for this quilt, and Kara Jo agreed. It’s by Patricia Ritter and is available at Urban Elementz. I love it with the variety and style of these fabrics. It’s such a versatile design.

That quilty texture is just so so good.

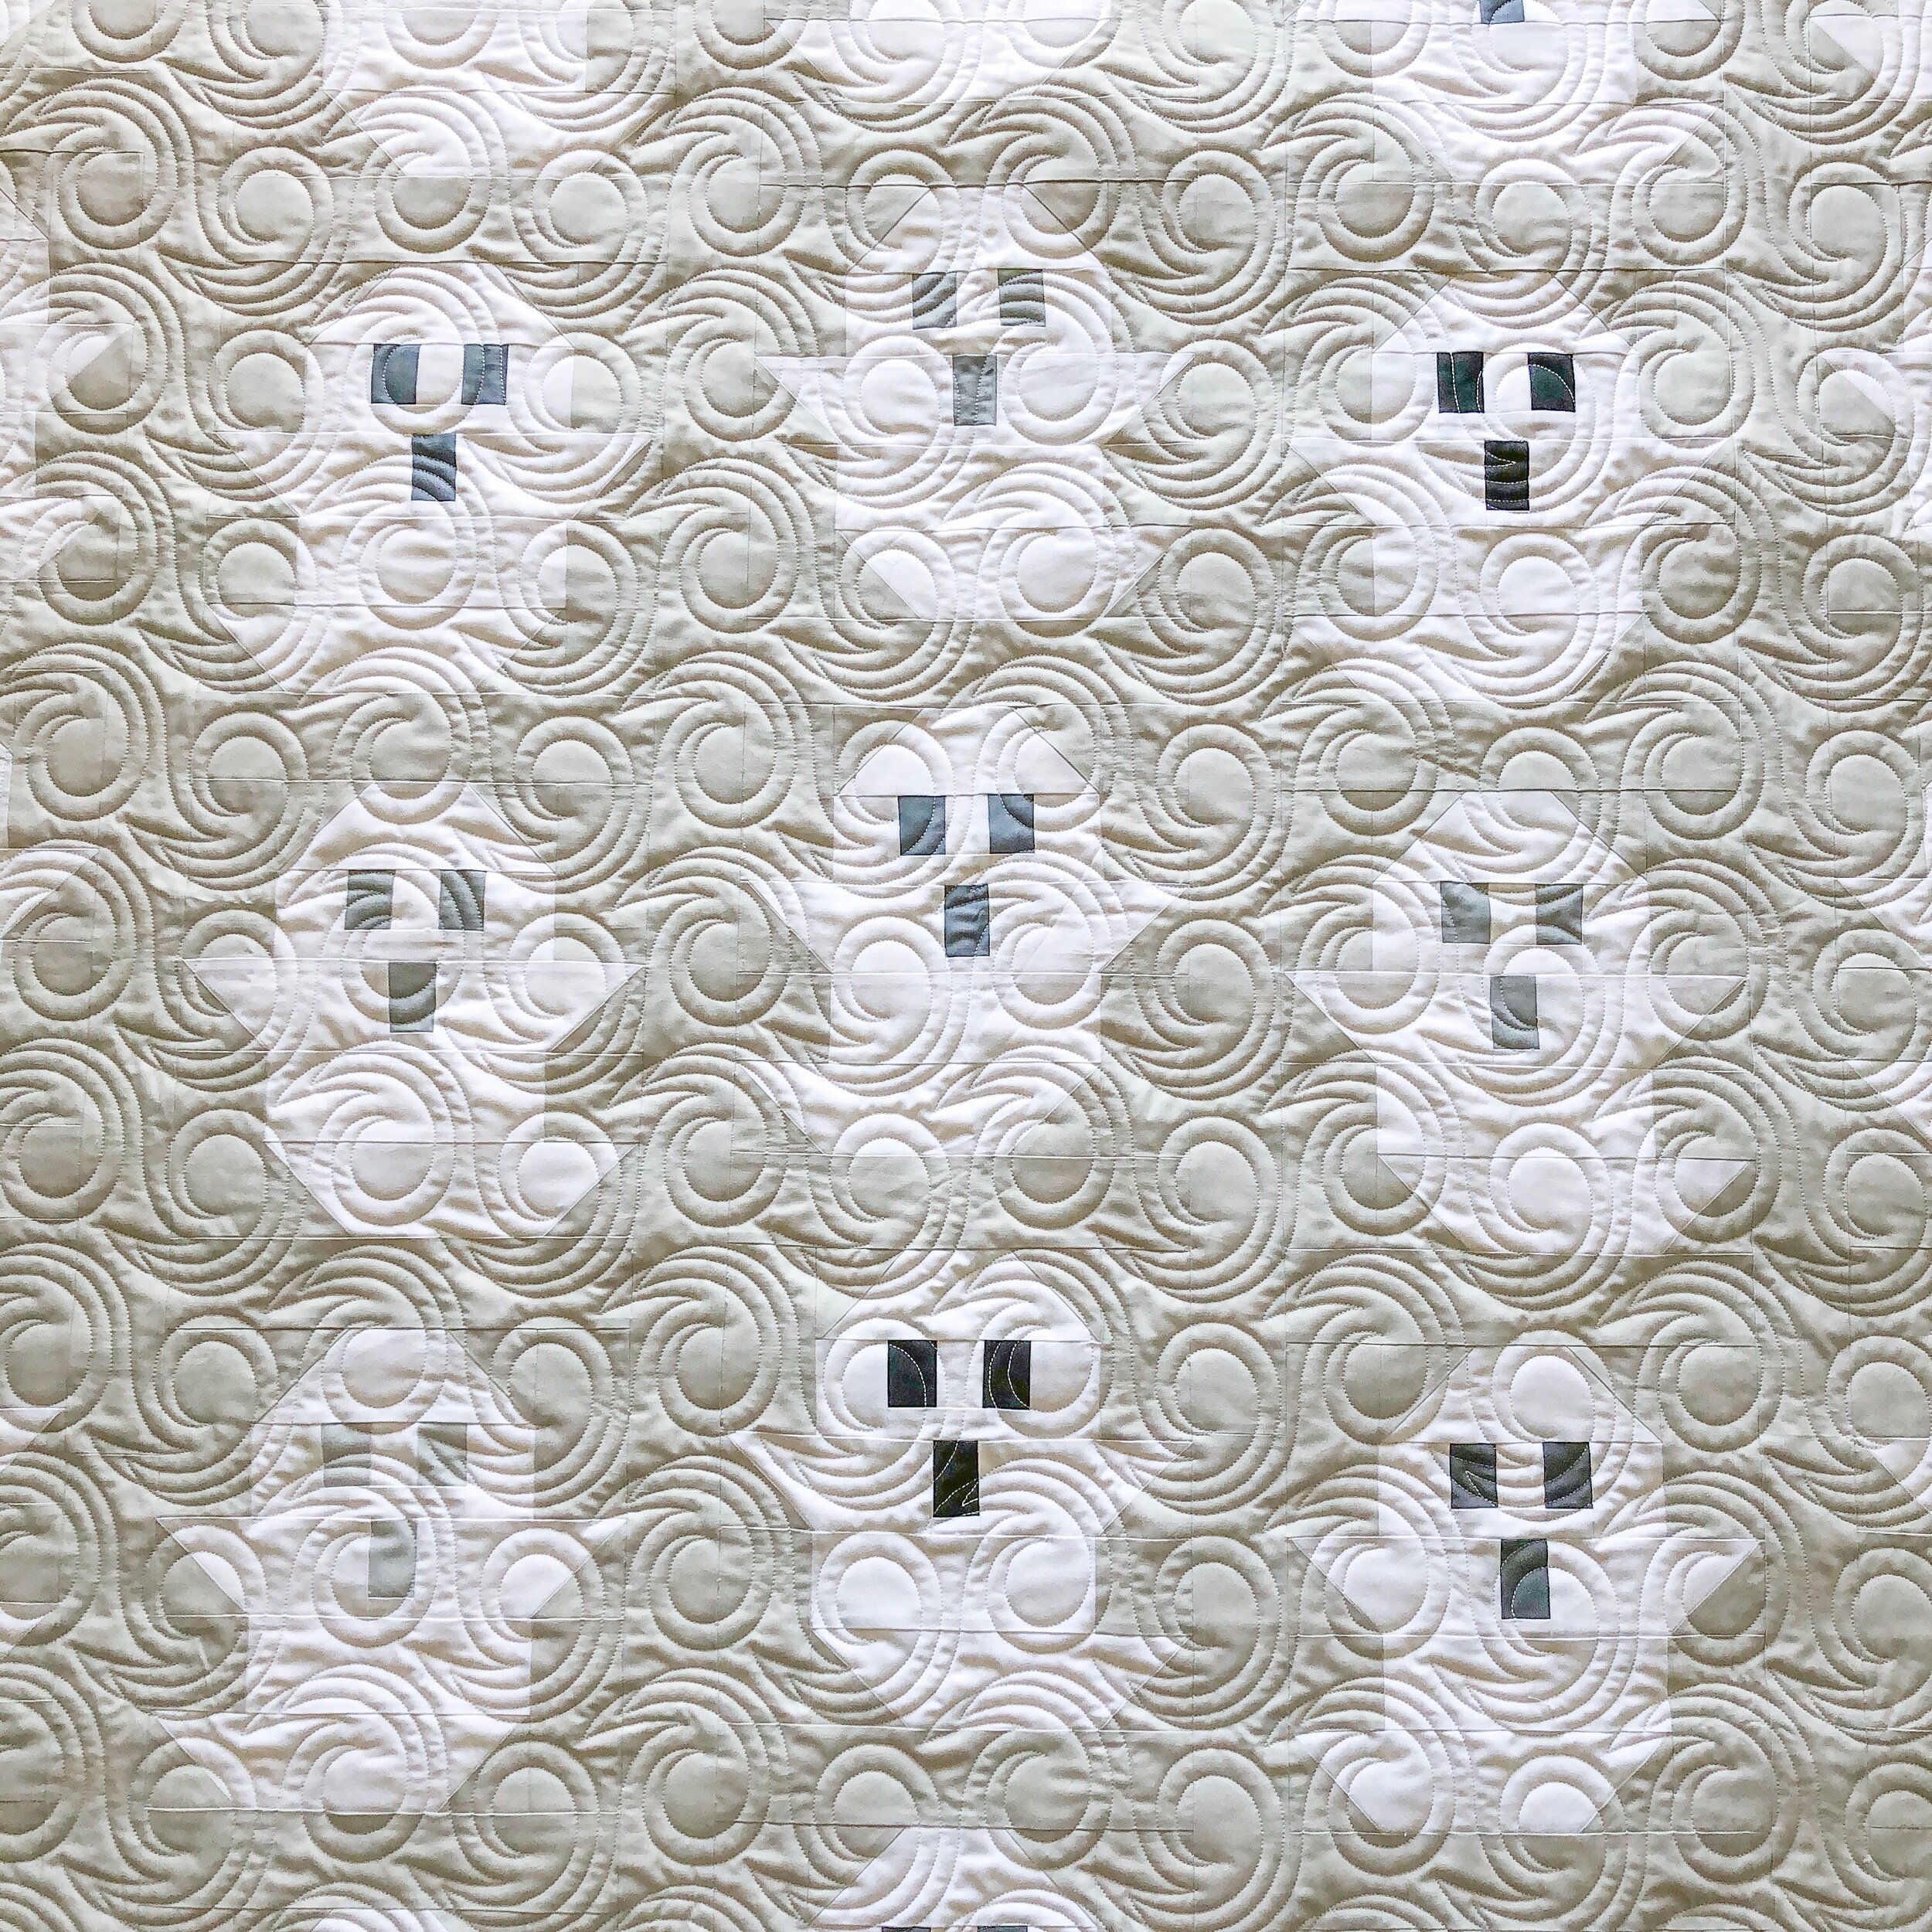
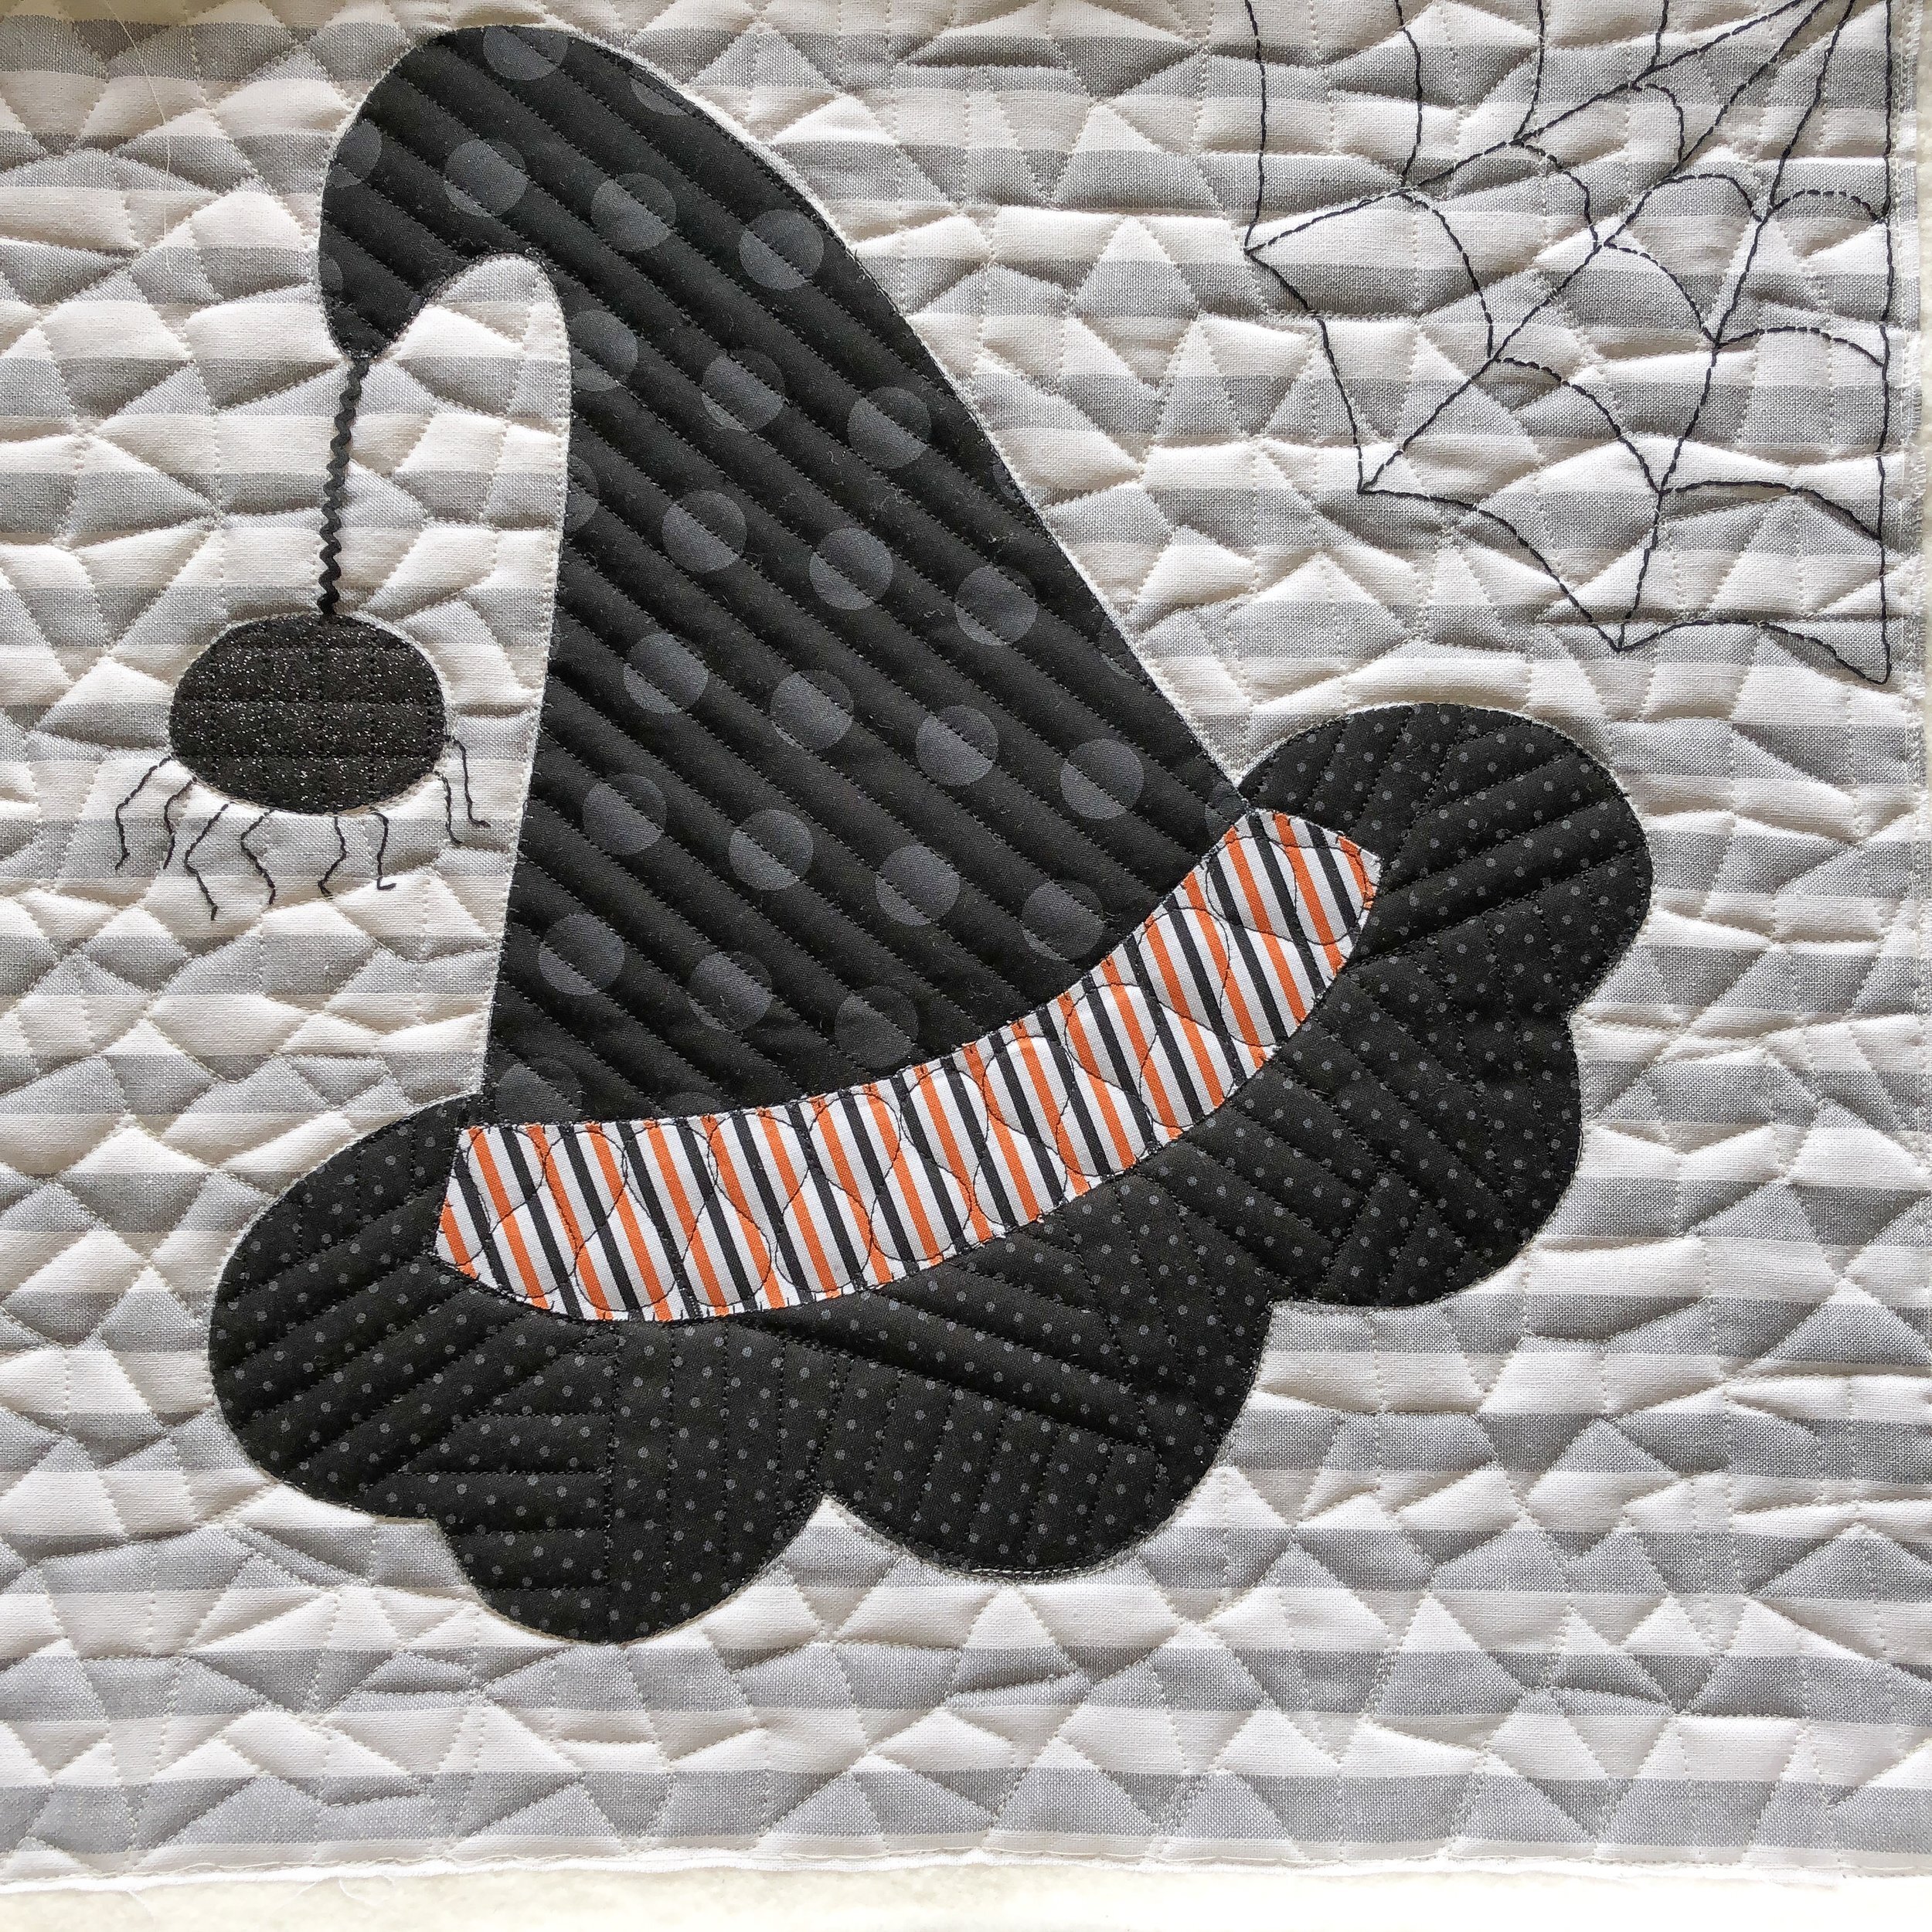
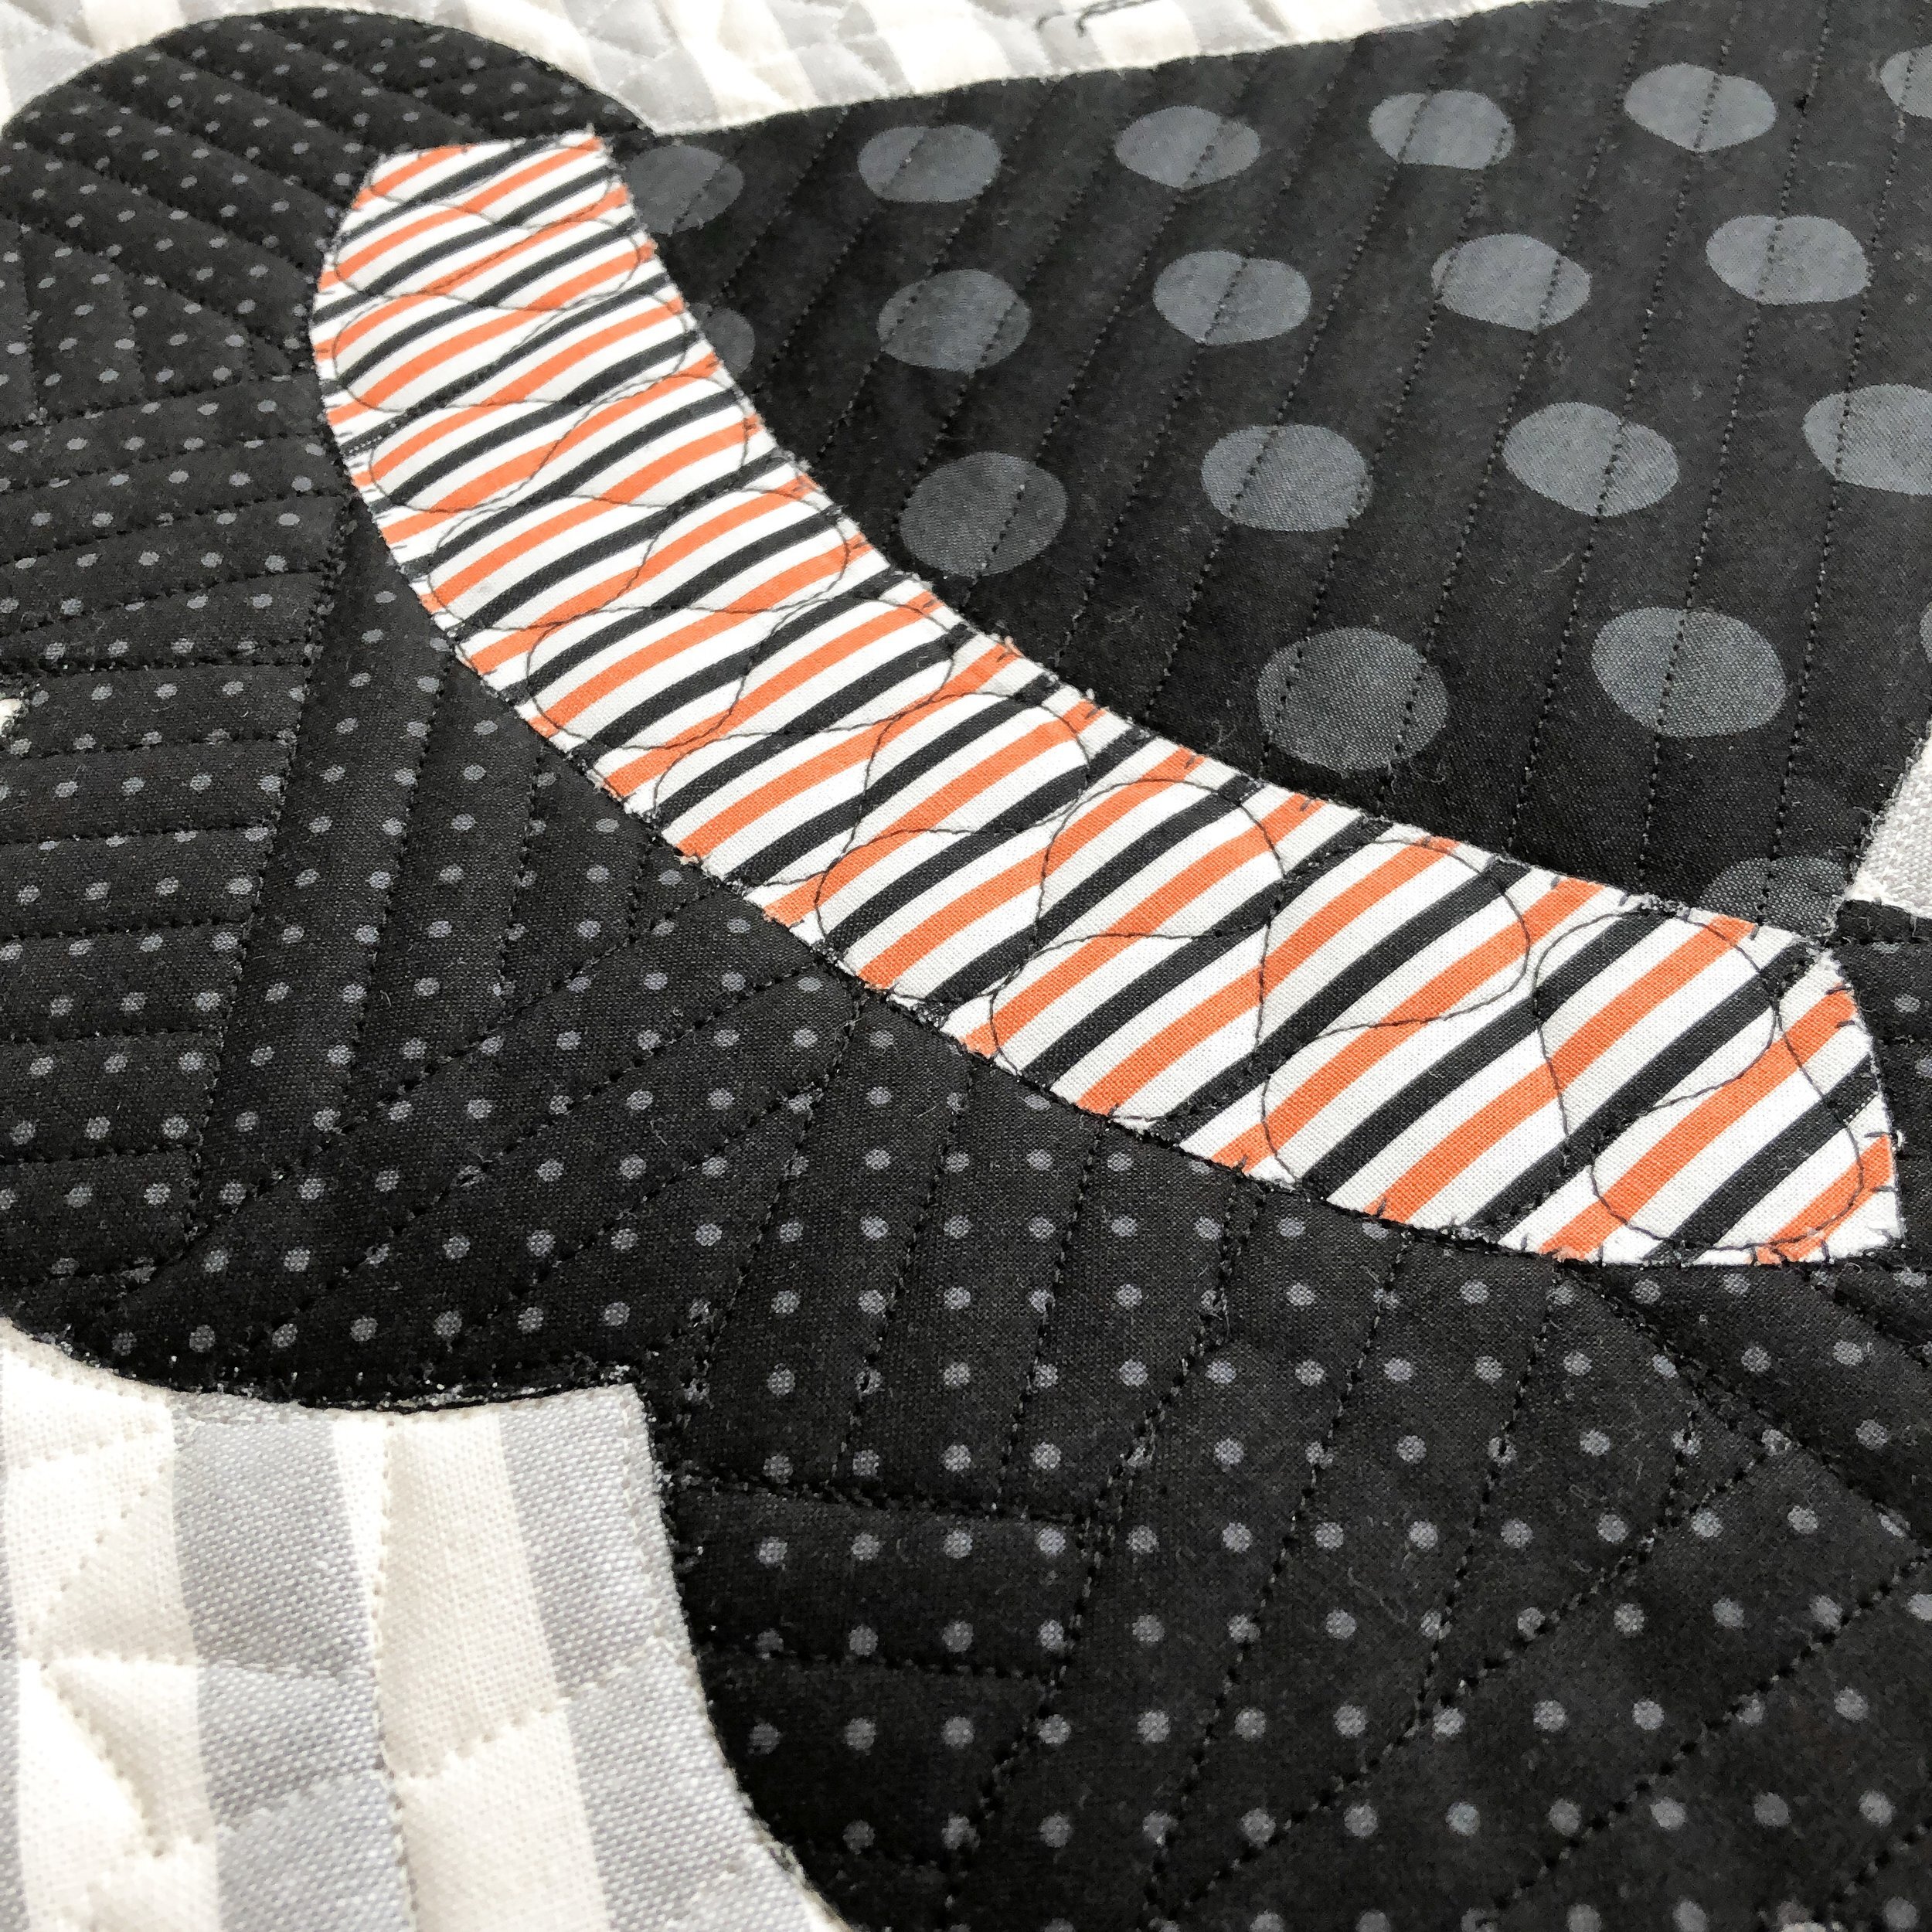
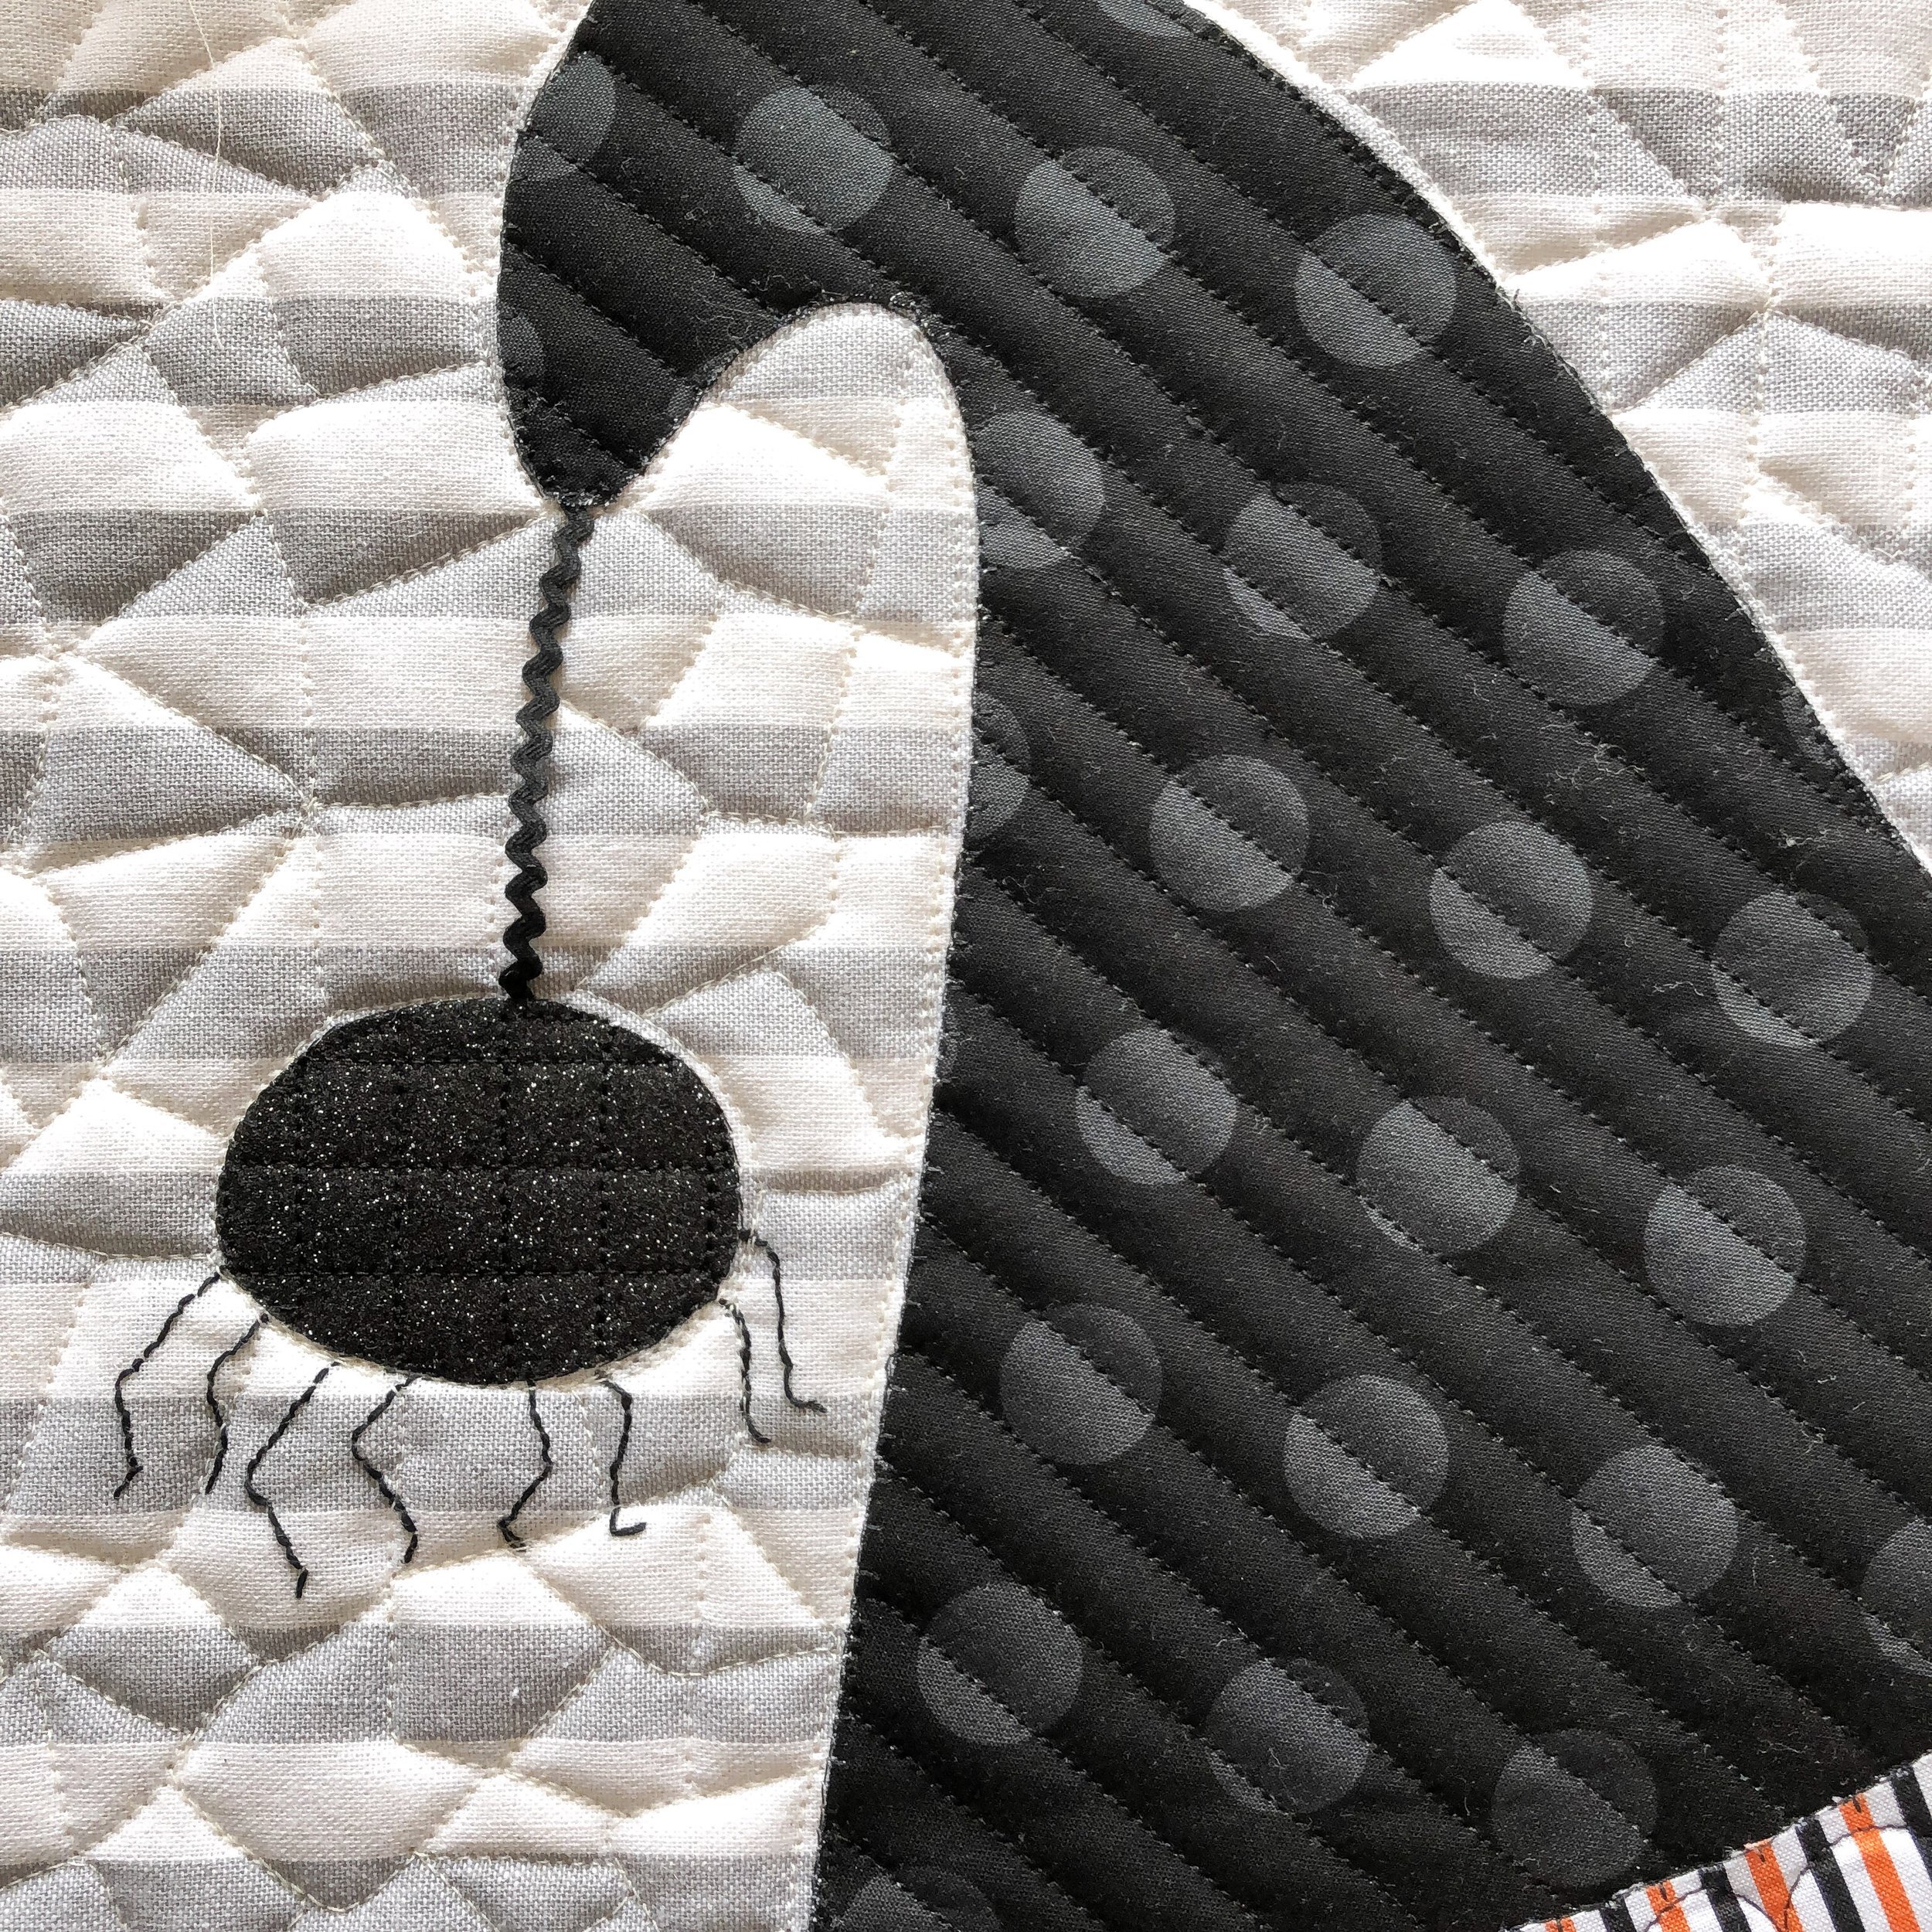
Lastly…this absolutely cute quilt, made by Sherry. It’s called Ghost Quilt by Then Came June. She has some pretty fun quilt patterns.

I’m not a huge Halloween fan, but this quilt just might change my mind. I love the different colors of ghost eyes and mouth. Light grey to black.

I stewed and stewed on how to quilt this. I saw a couple quilted that I liked, but one was custom and I knew I wanted to do something edge to edge. So I took a look at Sarah Ann Myers designs at Urban Elementz, because some of my favorites are hers, and I found Gale. The movement in this design, is just my favorite!!! It quilted beautifully!!
I used a white 30 tex A&E Perma Core thread and Winline’s 8020 cotton poly blend batting.
I think the point in the Gale quilting design, goes so well with the point on the ghost. That’s why I love them together.

I can’t believe it’s that time of year, when Halloween quilts are starting to get quilted. Anyone else feel like this year has flown right by.

The ghosts seem to be glowing in the picture below.

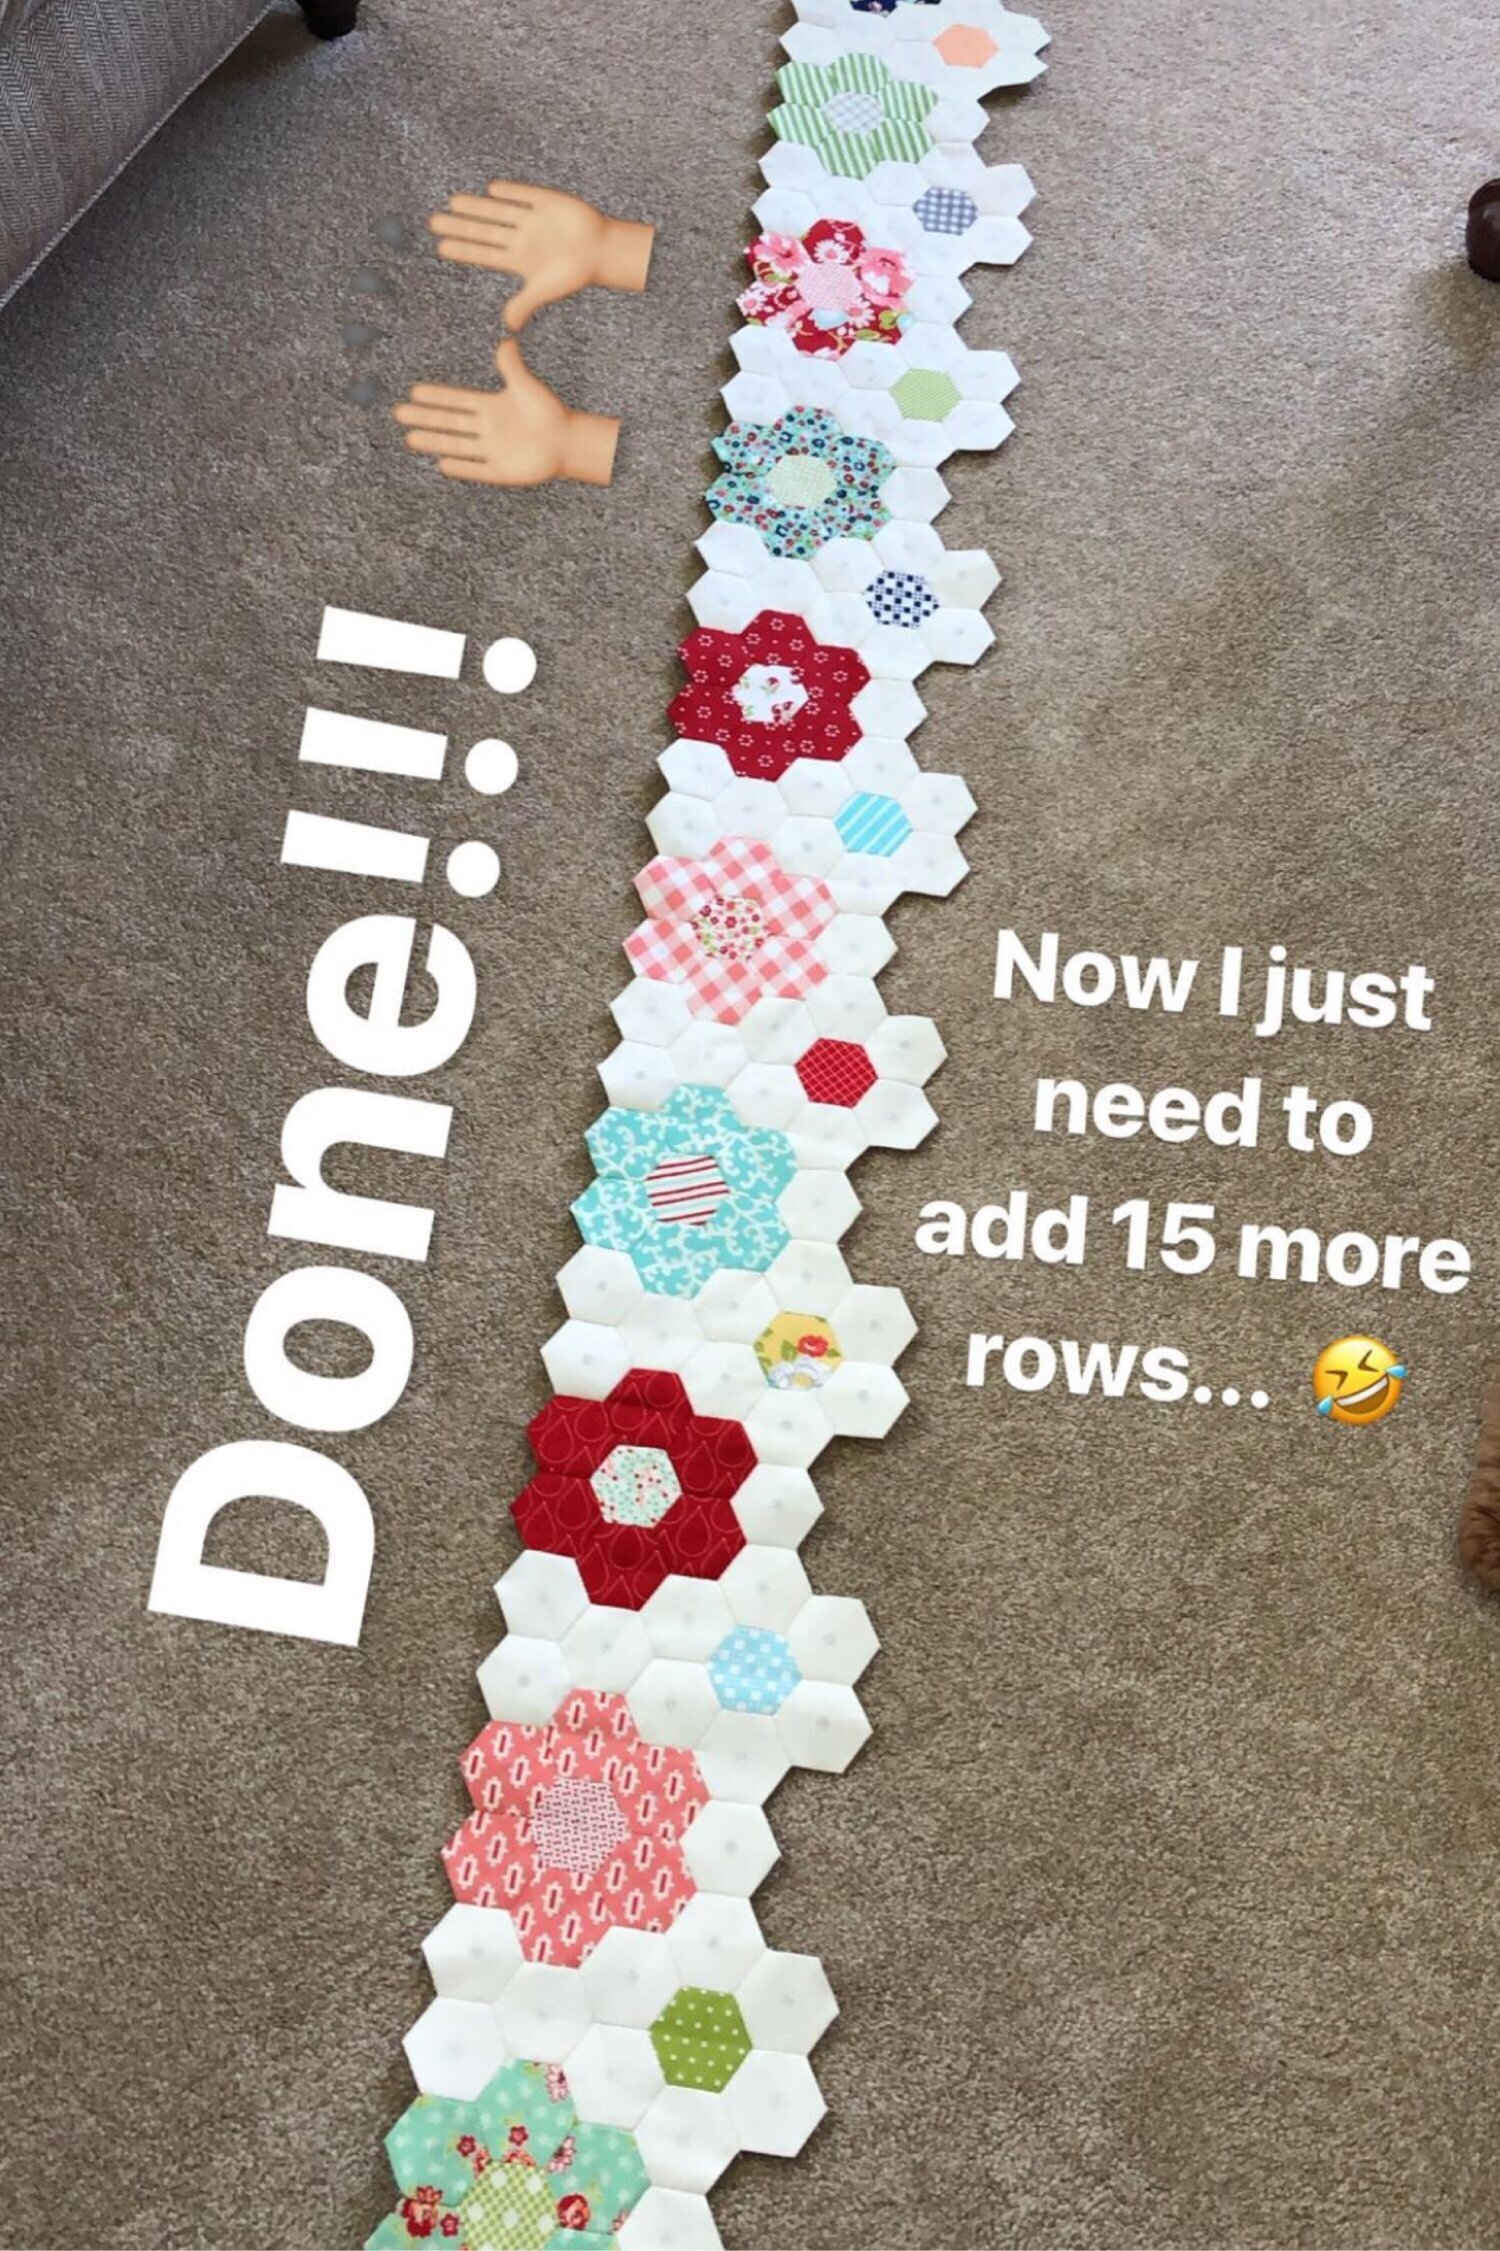
What have you been sewing this summer??? I’ve been making great progress on my Hexie Flower quilt, that I’ve been sewing together by hand…for the last 4 years. I shared a picture of a couple of the rows, a few posts ago. Right now, all the rows are sewn, and I’m starting to sew them together. That definitely takes more time, but it’s finally starting to look like a quilt. It’s been such a fun project. (Previous picture, so you don’t have to go looking for it)
Also, my Modern Vintage quilt is finally getting quilted!!!! Yay! It’s a pattern by Bonnie and Camille, and is in Bonnie’s Cotton Way Classics book. I used several different charm packs from several different Bonnie and Camille lines of fabric, to make this quilt. I’m so excited!! I’m going to quilt my Sweet Orange Peel©️ design on it, and it has a layer of Hobbs wool inside. This quilt was started almost two years ago. Yes, I’m slow at sewing. I prefer it that way. Take my time and enjoy the process.

Thanks for sticking around. I know that is a whole lot of pictures and quilts. But I love seeing a variety of ideas • for quilts and quilting. I hope you enjoy it, too. Happy sewing! • Leisha

Quilts, Designs, Sale, & Giveaway!!
Yes, that’s a lot to cover!! However, life is busy. So I thought a one and done blog/email, would be great.
I’ll get to the quilts in just a few minutes, first I wanted to remind you of the sales going on. Not only on my website, but also the 20% code from Flexi Fuse.

(My Harbor design)


This Sunday, June 30th, is the last day to take advantage of my 25% off quilting designs and $20 off my Circle2™ machine quilting circle ruler set. Use code “SUMMER25” at checkout for the quilting designs, and “CIRCLE2™” for $20 off of my Circle2 ruler sets. For more information about my Circle2 rulers, click here: https://www.quiltingit.com/blog/2018/10/10/introducing-my-circle2-longarm-circle-ruler-set • If you haven’t looked at my shop lately, you may have missed the few new designs that I have. I also uploaded 10 new designs by my friend Molly Dursteler, just last night. So go snag some while the sale is going on!! There are some amazing ones. https://www.quiltingit.com/shop
This is one of Molly’s designs, Luck O’ The Irish. Follow the link to my shop above to see her other fun designs.

Also, a quick reminder that my 20% off of Flexi Fuse expires on Sunday as well. Use code “leishakaye” at checkout: https://flexifuse.com/?ref:leisha
If you do any kind of appliqué, you need to try this interfacing. As a machine quilter I hate trying to quilt through appliqué, not the case when it comes to Flexi Fuse. Quilts like a breeze. I’m excited to make some things of my own.

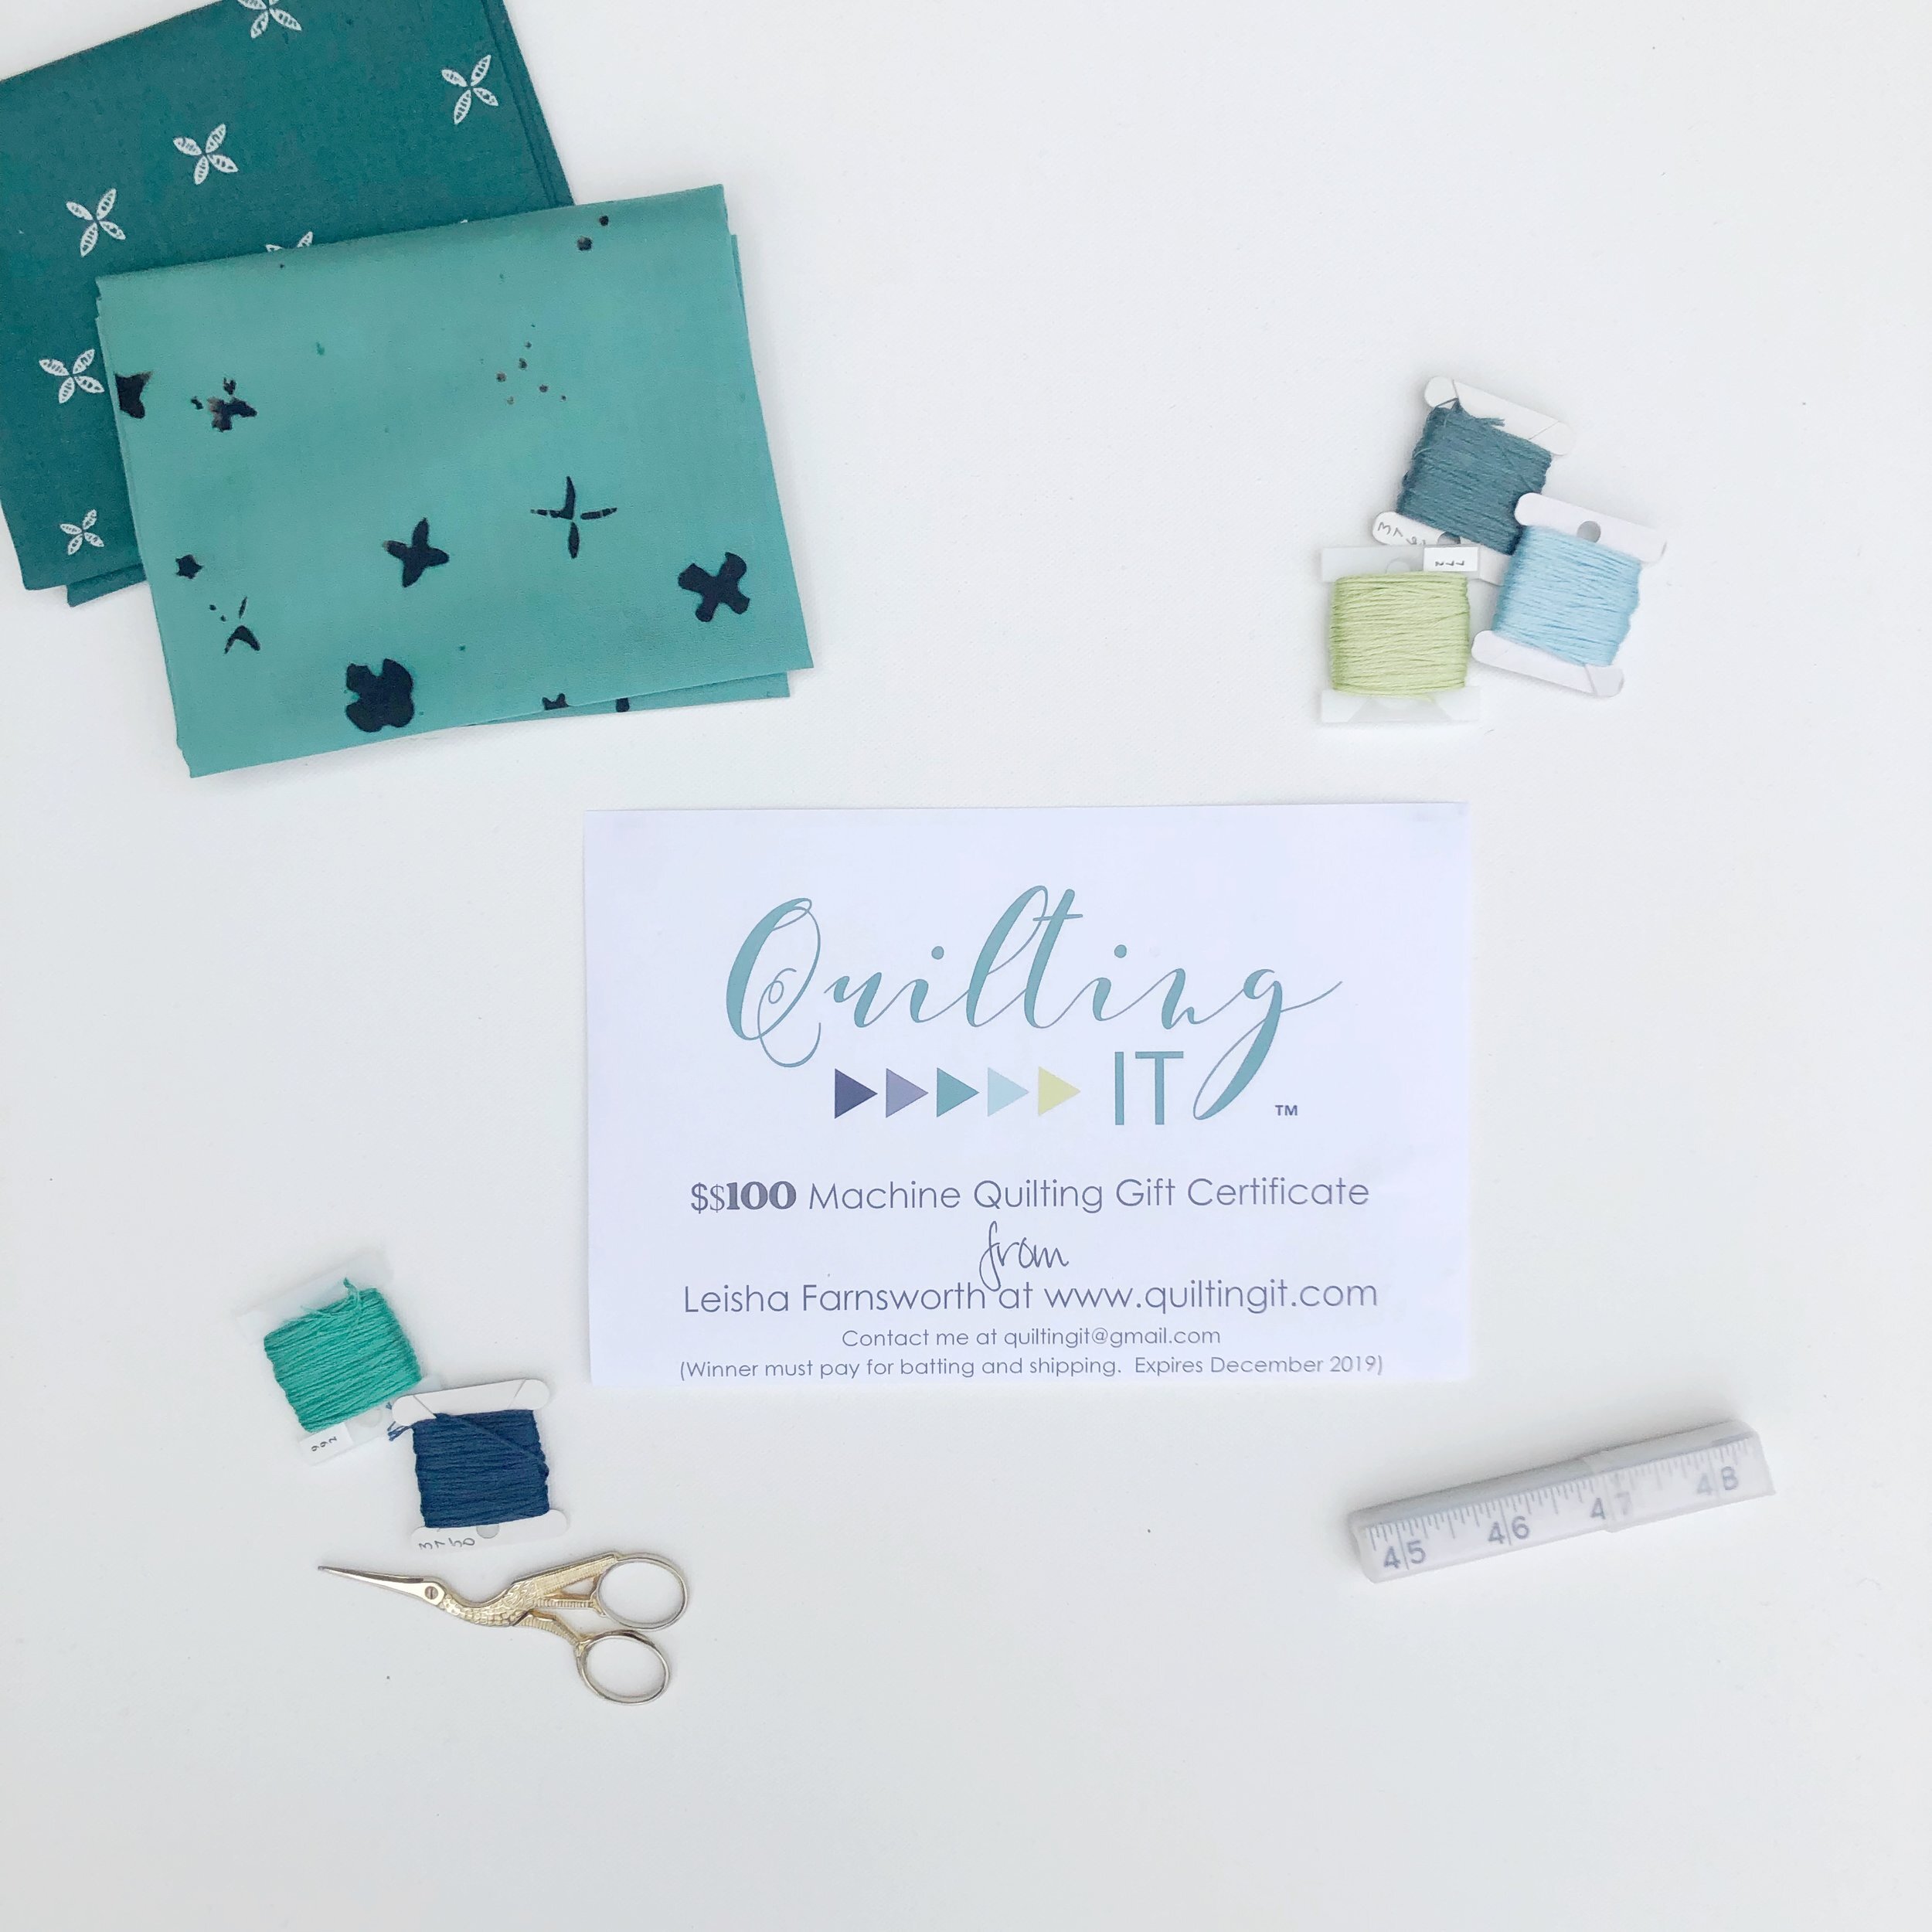
Now onto the giveaway!!! This giveaway is HUGE! I haven’t blogged about it just yet. I have joined with some pretty amazing sponsors to offer one lucky winner a prize worth more than $800. I’m including a $100 gift card for machine quilting!! There are several ways to enter, check here for all the details: http://www.flexifusegiveaway.com/
Please stop by and visit each of our Instagram accounts. Mine is @leishakaye and there is also @sistersandquilters (my favorite online fabric shop), @flexiefuse, @rilerblakedesigns, @kimberbelldesigns, @aurifil, and @tiedwitharibbon
This giveaway ends the 6th of July. The prize package includes thread, patterns, fabric, fusible webbing, quilting, and a light box.
Now for the amazing quilts that I’ve been able to quilt lately!!

Laurel from @snowberrystreet (on Instagram) messaged me and asked if I would quilt her Madame Butterfly quilt, pattern by Vanessa Goertzen from Lella Boutique. These are also Vanessa’s fabrics. I was so excited!! Seriously, this quilt is gorgeous!
Laurel asked for the antenna’s, and then left the rest up to me. I love what Natalia Bonner did when she quilted Vanessa’s, by out lining around the butterflies 1/4”. I did the same on this quilt, which makes the butterflies pop!! I used my favorite Edge ruler from Linda at www.thequiltedpineapple.com • I also used those same Edge rulers to quilt my favorite pinstriped border. 1/4” for the thin stripe and 1” for the wider stripe.

I quilted most of the butterflies the same. Same circles and swirls alternating on the body, feathers and swirls on the inside wings, ribbon candy on the outside tips of the wings, however the inside of the wings differs on each of the butterflies on each row. I chose four different designs, and then just alternated them throughout the quilt, making sure each design ends up in each column. I will share each of those below. You’ll also notice the feathers/swirls for the antenna’s.

On this first butterfly I quilted overlapping circles on that middle layer of the wings.

Next, you know I love mixing hard lines with the softness of the pebbles, swirls, and ribbon candy. So above is a 1/4” pin stripe, and below a 1/4” stripe going the opposite direction on the left wing, than the right wing.

Lastly, I love a good grassy texture (what I like to call it) on that middle layer of the wings, pictured below.
I hope you also noticed the variety of filler with the pebbles...swirls, echoes, overlapping circles, arcs and so on, in the background. A great way to make everything pop!

I used White 30 tex A&E Perma Core thread and Winline’s 8020 batting for this quilt. I quilted everything, except the lines, freehand. Quilts like this, with so much incredible texture, are just my favorite.

Next up, this sweet baby quilt made by Maria. I love a simple pinwheel quilt like this!! Especially with mint, pink, peach and coral fabrics.
I used Antique Cream 30 tex A&E Perma Core thread and Winline’s 8020 batting on this quilt.
Maria asked for a simple Orange Peel design to be quilted on it. I used my 6” Circle2™, machine quilting Circle2™ ruler, to quilt it. My Circle2™ set of rulers is available in my shop....and is a great addition to every quilting studio. They come in a set of 6 and range in size 2”-13”. Like I mentioned above, they are $20 off right now until Sunday, use code “CIRCLE2™ “ at checkout. Watch here to see my rulers in action. https://youtu.be/GWyDTymyzoE and are available here: https://www.quiltingit.com/shop

I love a simple Orange Peel!

A couple of close ups!!!
Kristin made this for her son who just turned 8! I love a simple quilt, yet striking because of the solid colors.
I don’t know the pattern name to this quilt, I bet the squares are around 6 inches and the rectangles 3”x6”, sewn. Add the 1/2” for seam allowance when cutting, and you’ll be good.
Kristin wanted simple 1” lines. I used my favorite 8020 cotton poly blend batting from Winline and white 30 tex A&E Perma Core thread.
I quilt on a Gammill 22” machine, with a Statler Stitcher. This one and the next quilt, we’re done by the Statler (computer). However the first two quilts in this post, I quilted myself. It’s great to have both options.
This next quilt was made by Kara Jo or her daughter. Or maybe they made it together. Her daughter loves Star Wars, and has wanted a t-shirt quilt.
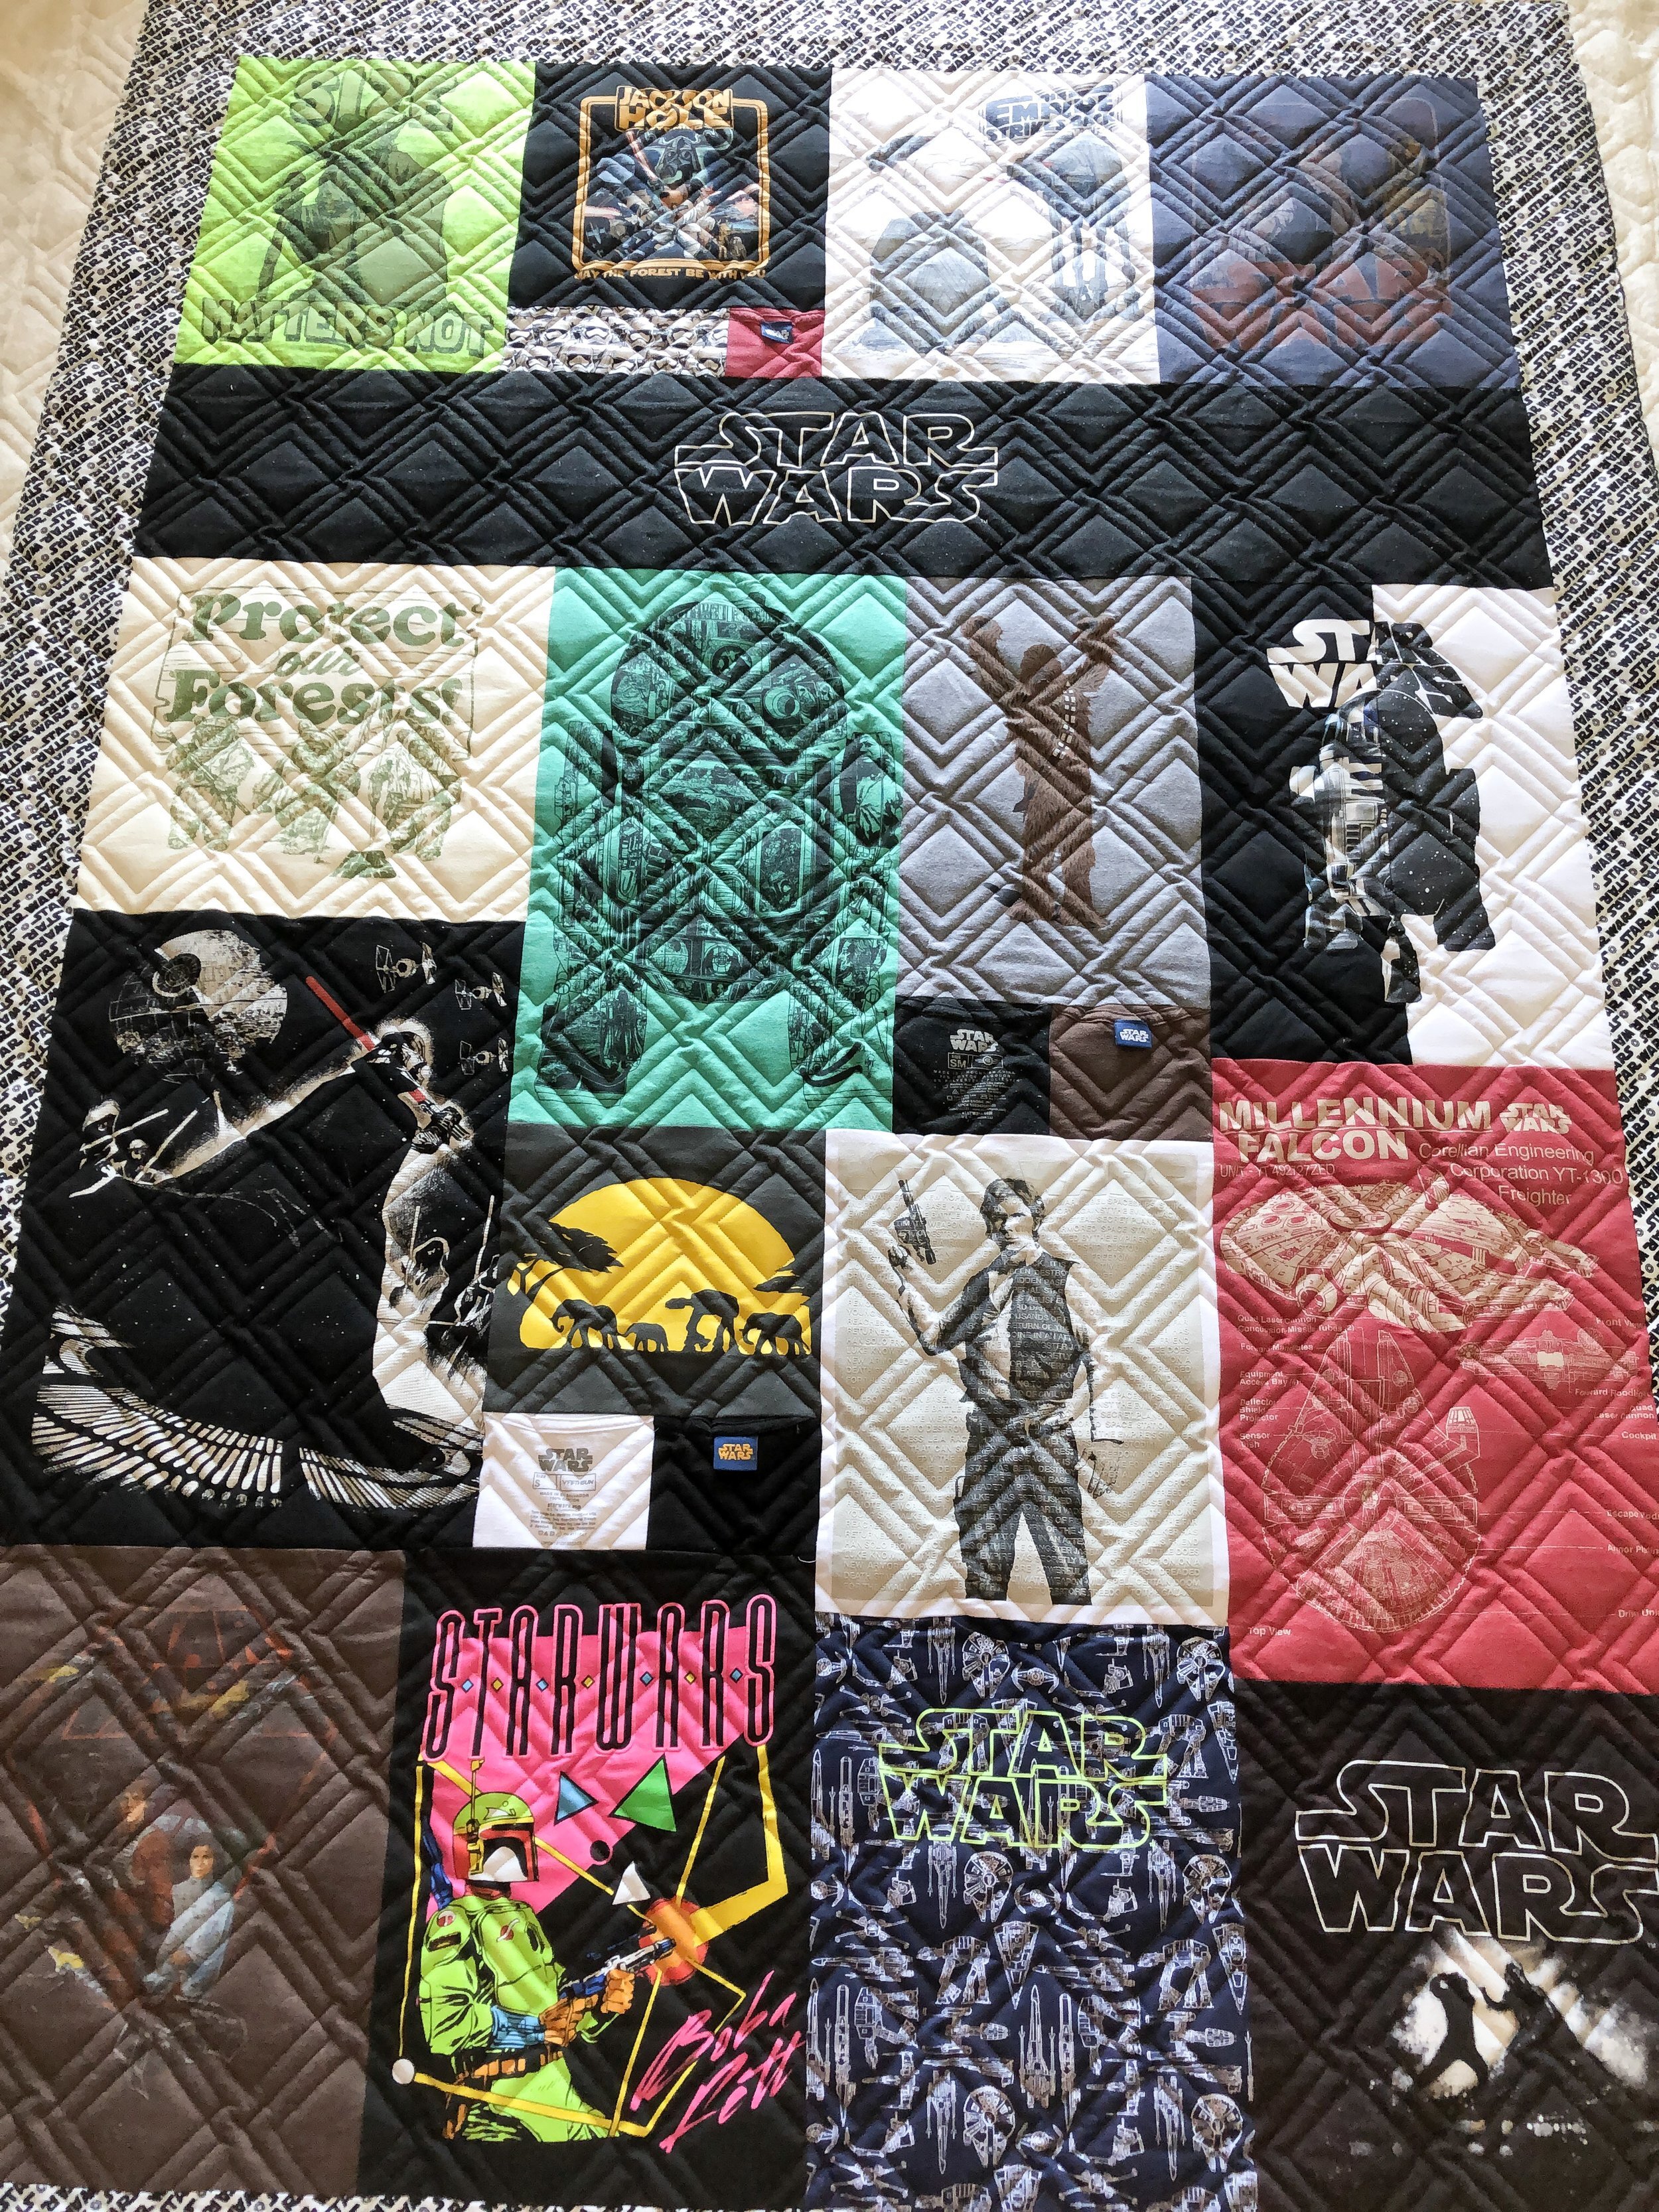
Initially we talked about possibly doing a Star Wars design, for the quilting. When I couldn’t find one that I loved. They decided on Diagonal Plaid, by Patricia Ritter from https://www.urbanelementz.com/?acc=12 and I’m glad they did. I don’t like doing the same kind of design on the same quilt, it’s just too much. I still want the design to compliment the quilt, but not be so matchy matchy or literal.

I used my favorite 8020 cotton poly blend batting and Antique Cream 30 tex A&E Perma Core thread to quilt this.

The block below is cool!! It’s two shirts sewn together. I do suggest when making a shirt quilt, that you iron the interfacing on really well. Especially when the shirts are a little thin. Otherwise the hopping foot can possibly cause a pucker, if the shirt starts to stretch. I have a spoon foot, but it’s difficult to mark the quilt as I advance the rows. So I prefer using my regular hopping foot.
Thanks for being here and reading through all of that. If you’d rather listen to my blog posts, click on the link at the end of the email that says read in browser, and then it should take you to my post. At the top of the post is a little sound icon. Click on that and you can listen while you sew. When I listen on my phone, it says to click here because my browser doesn’t support the audio. Click on that and it works great! Have a great week!
- Leisha

Summer Sales!!!
Starting today until the end of the month I have a sale on both my digital quilting designs (only in my shop) and my Circle2™ machine quilting circle rulers.
You can get 25% off all of my digital designs at https://www.quiltingit.com/shop • Use code “SUMMER25” at checkout. You can also get $20 off of my Circle2™ ruler sets by using “CIRCLE2™” at checkout.

My Circle2™ rulers come in a set of 6, ranging in sizes from 2” to 13”. Two sizes per ruler. They come in green or clear, high quality 1/4” thick acrylic. Made in America. For more info on these rulers head to this post: https://www.quiltingit.com/blog/2018/10/10/introducing-my-circle2-longarm-circle-ruler-set
To watch a video on them, go here: https://youtu.be/lDijS4EsPLY

To purchase a set of rulers go here and don’t forget to use the “CIRCLE2™” code at checkout: https://www.quiltingit.com/shop?category=Rulers

Pictured above is my clear 2”/8” ruler, which is the smallest of the set. Below is the green 7”/13”, which is the biggest.
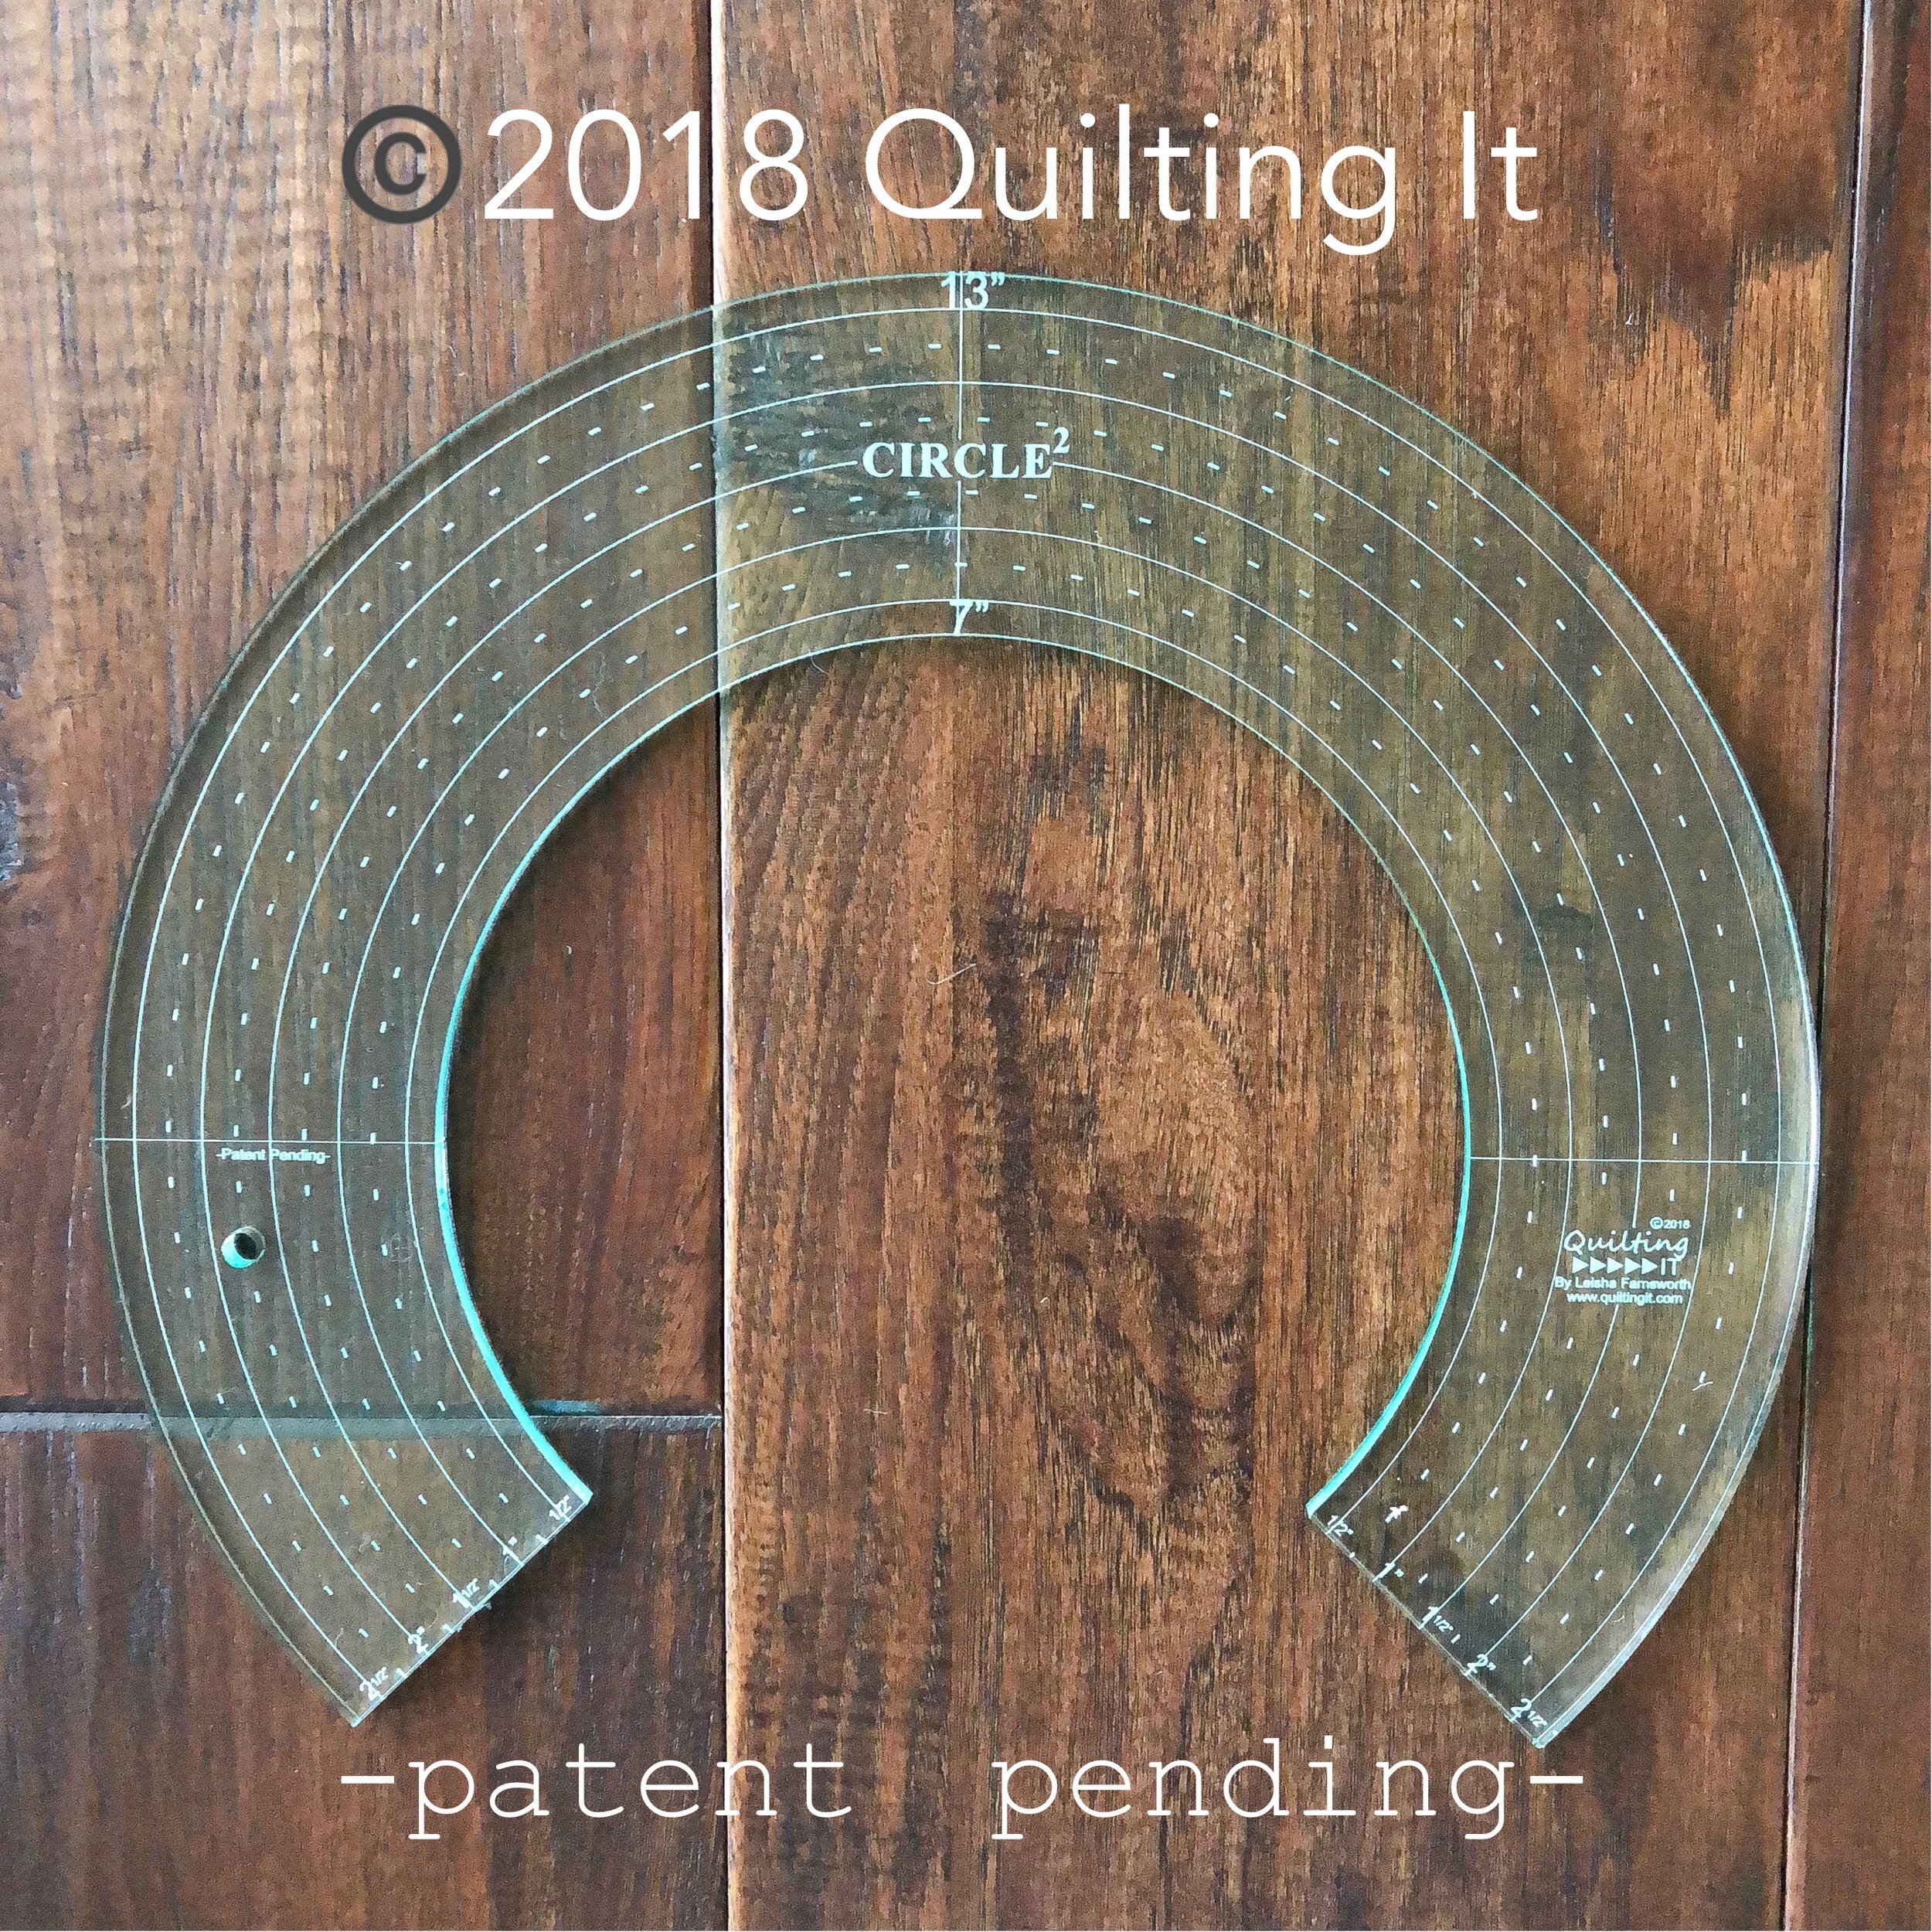
Below is an angled picture, to show the measurements along the straight edges of the rulers. The unique thing about these rulers, they were designed to give you the correct size of circle. The hopping foot adds a 1/4”, so I designed this set with that in mind. The 7” circle will quilt out at 7”.

I’m excited to introduce to you a few new digital quilting designs...first up Penelope©️!
Penelope actually comes with two different looks, using the same design. Pictured above is the original design, below is the same design offset at 50% and the vertical spacing adjusted until it looks as pictured.

Next up...Diamond Peel©️, which is a take on my Sweet Orange Peel©️ design. So excited to see this on lots of quilts.
Lastly, Steps©️! This fun geometric design has so much dimension.
All of these designs are available in my shop at: https://www.quiltingit.com/shop • Don’t forget to use the code: “SUMMER25” at checkout to get 25% off all digital designs.
Happy Summer!!!
- Leisha
Quilts & a Prickly Pillow!
Hello Quilty Friends,
Hope you’ve been well! It’s about time that I share with you some of the things I’ve been quilting lately...
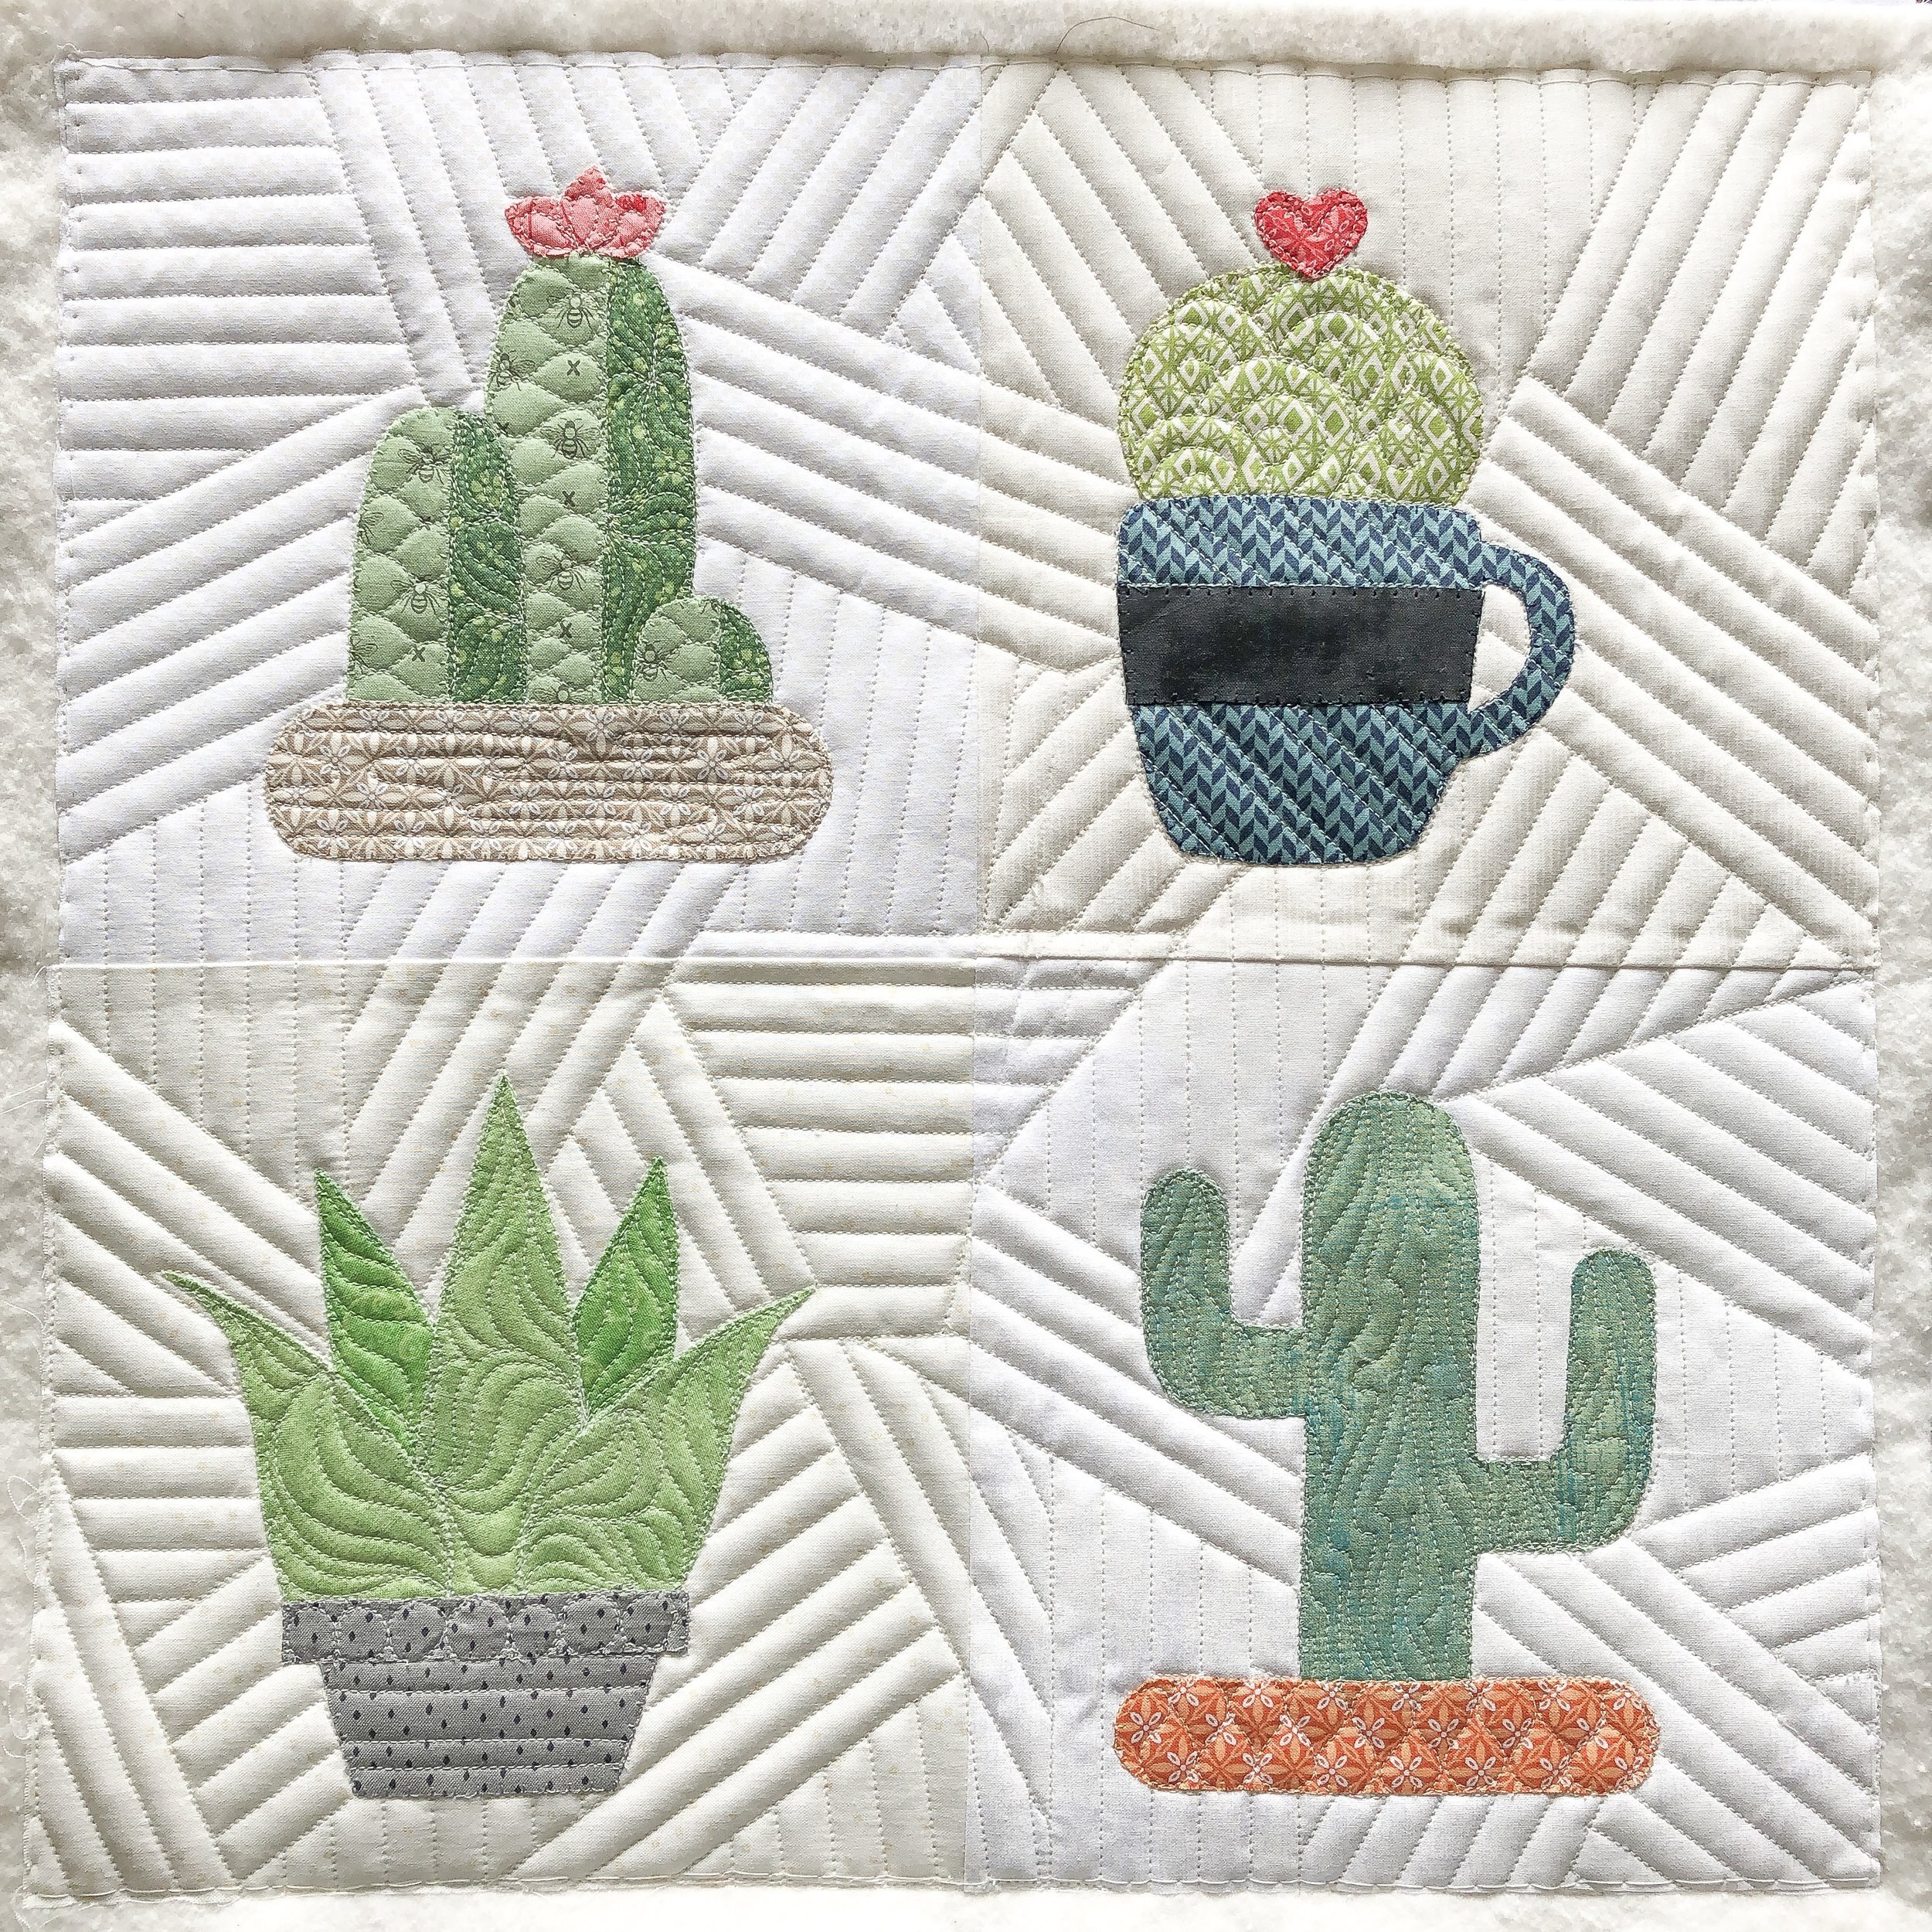
Starting with this super fun cactus pillow. I mean seriously!!! Love this!! If you’ve followed along for a little while, then you’ve probably seen some other pillows I’ve quilted recently. This is another pillow from the pillow of the month club that My Girlfriends Quilt Shoppe, here is Logan Utah, has available. This was last months pillow. Go to their website to contact them about a pattern or kit: https://mygirlfriendsquiltshoppe.com/
This one was made by Sherry!!

I knew I wanted to do this line design for the background, it just adds such a cool texture. I used my favorite Edge rulers from Linda at https://thequiltedpineapple.bigcartel.com/
I also wanted to add some more movement to the quilting in the cactus’ themselves...between the grassy freehand design and ribbon candy (shown above), I think it looks awesome!
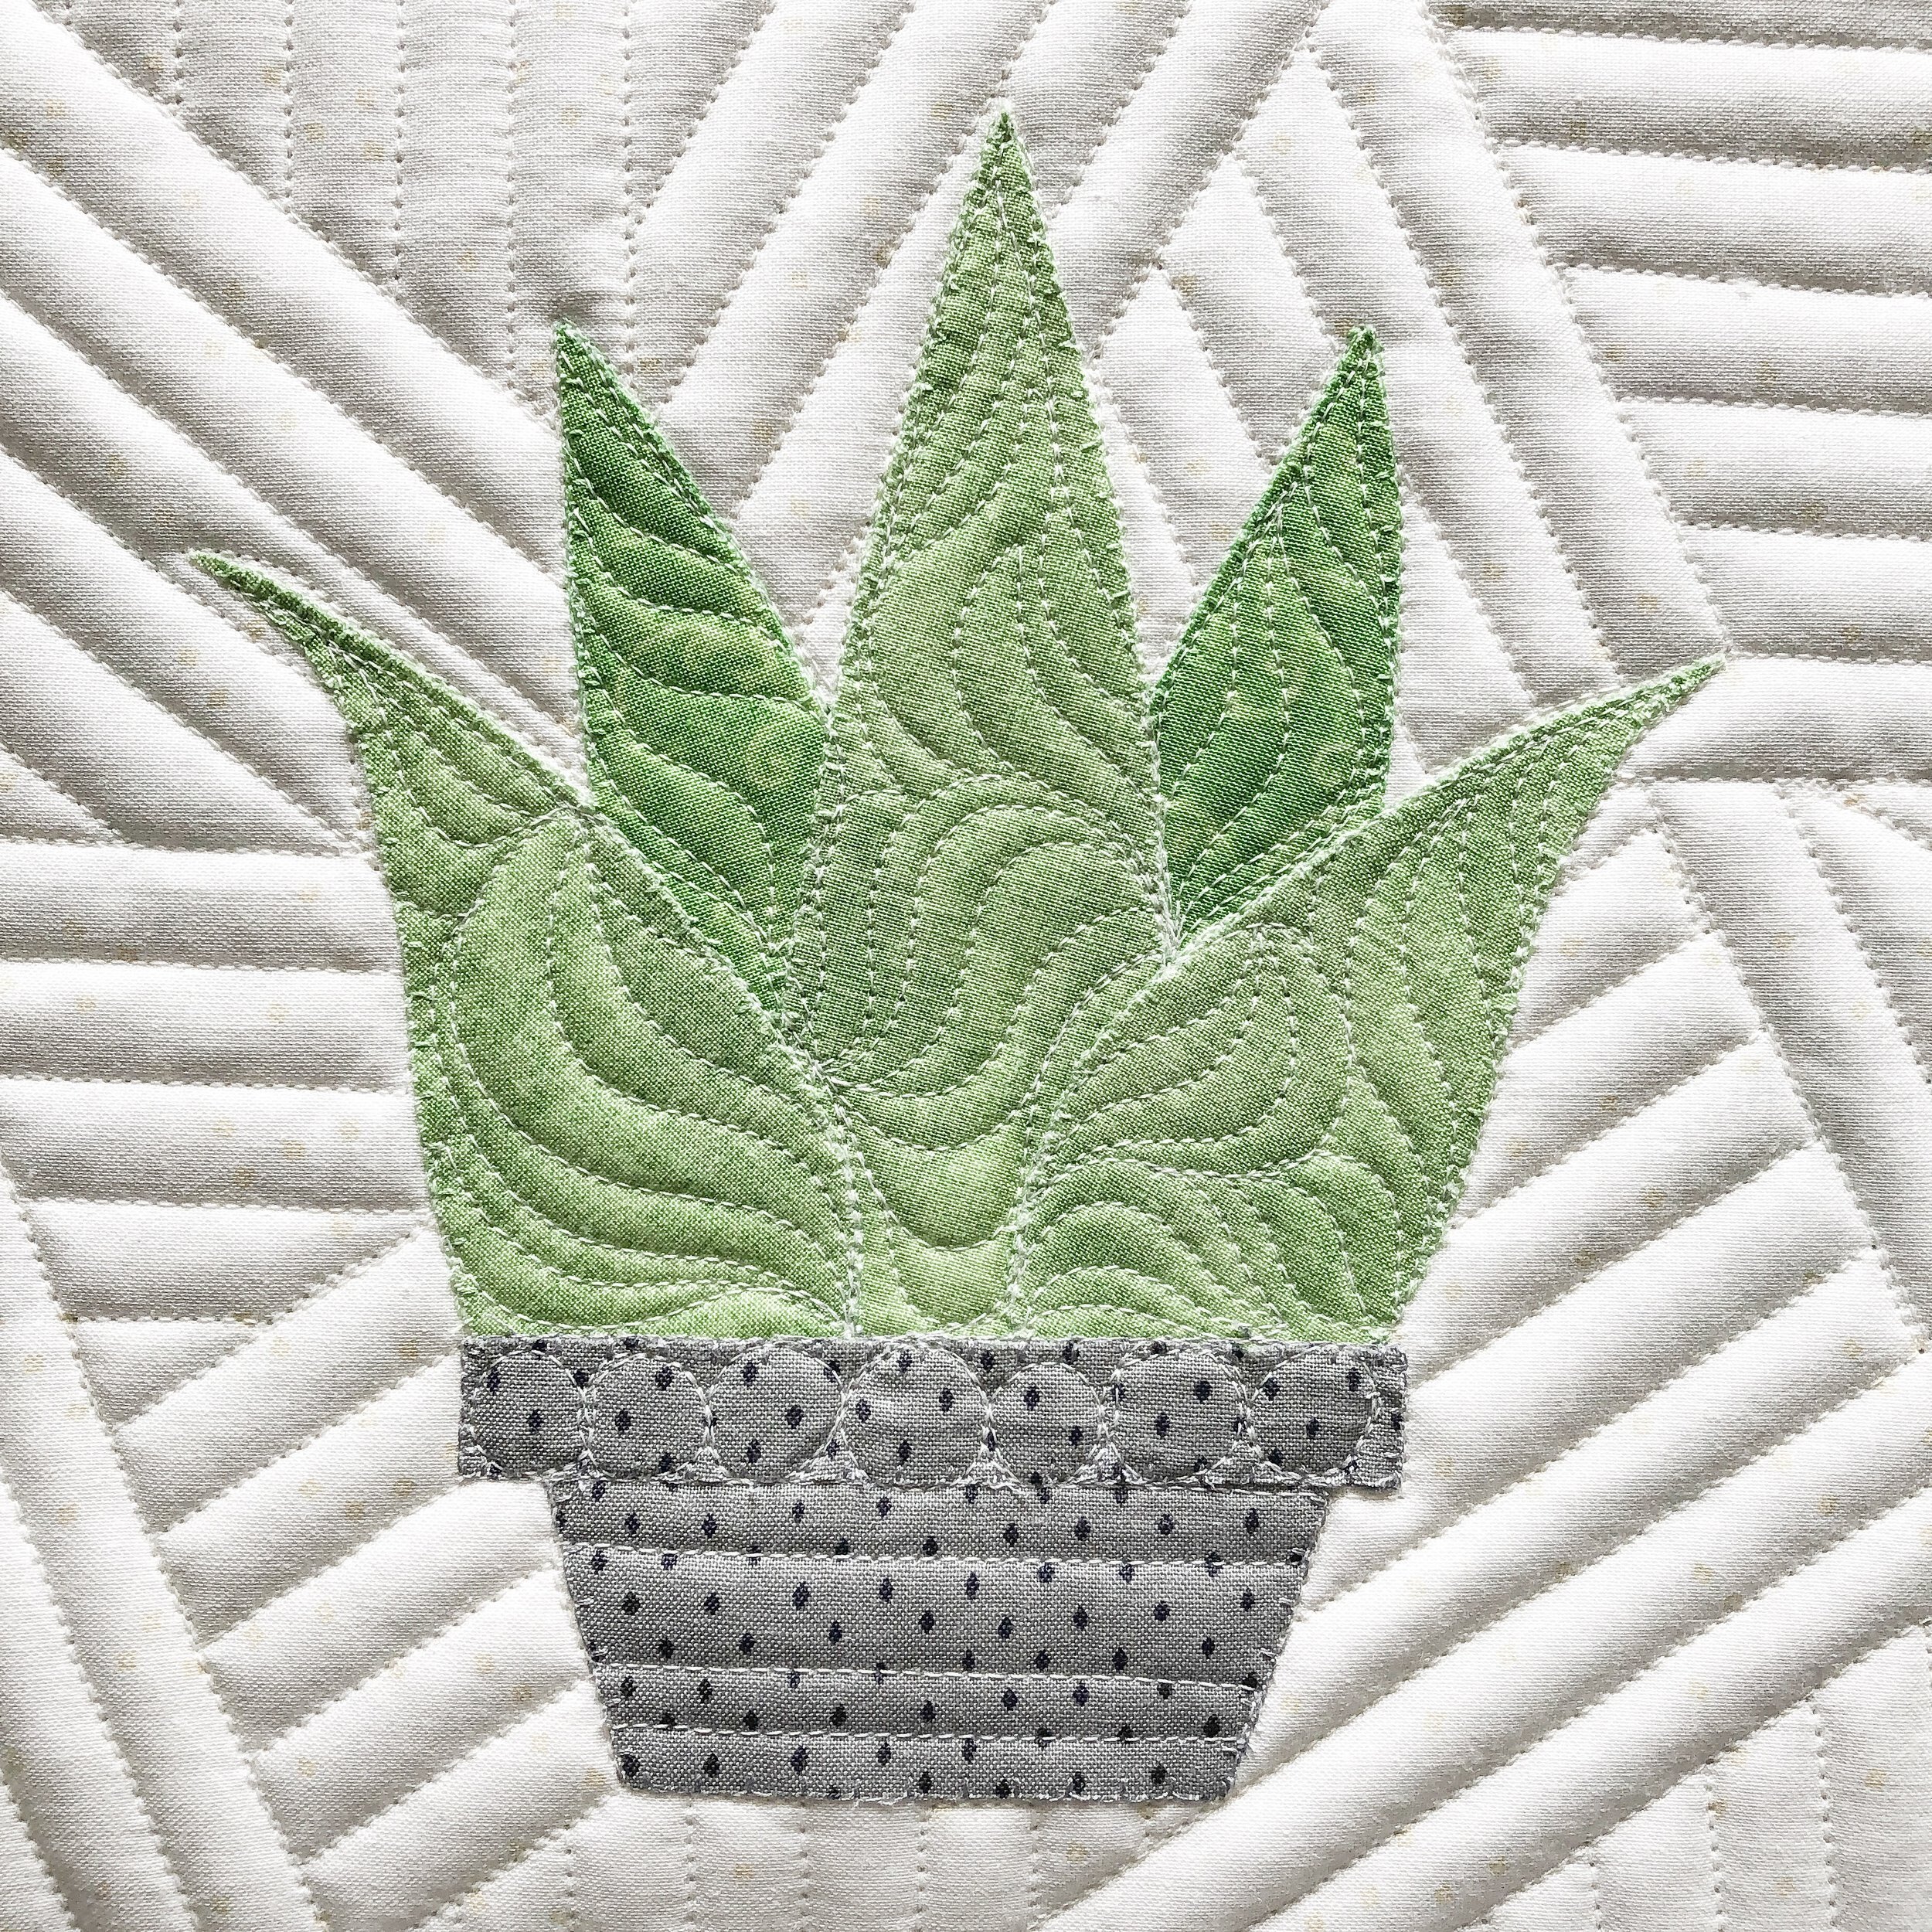
Some overlapping circles on this, play on the round shape of this one.
Sherry brought a scrap piece of batting, I’m assuming it was an 8020 cotton poly blend batting and I used the white 30 tex A&E Perma Core thread.
A little wood grain in this one...which I love! It fits the style of the pillow. It’s fun that something so little can have such a punch.

Next up...this gorgeous quilt made by Chris for her daughter and soon to be son in-law’s wedding. Chris makes the most thoughtful, beautiful, and perfectly pieces quilts.

This quilt has a backing that is perfect for their wedding guests to sign. It will be such a treasure.

I used my favorite 8020 Winline batting and Antique Cream A&E 30 tex Perma Core thread. I also used one of Linda’s Edge rulers to quilt all the cross hatching lines. In the center of the heart and on the border.
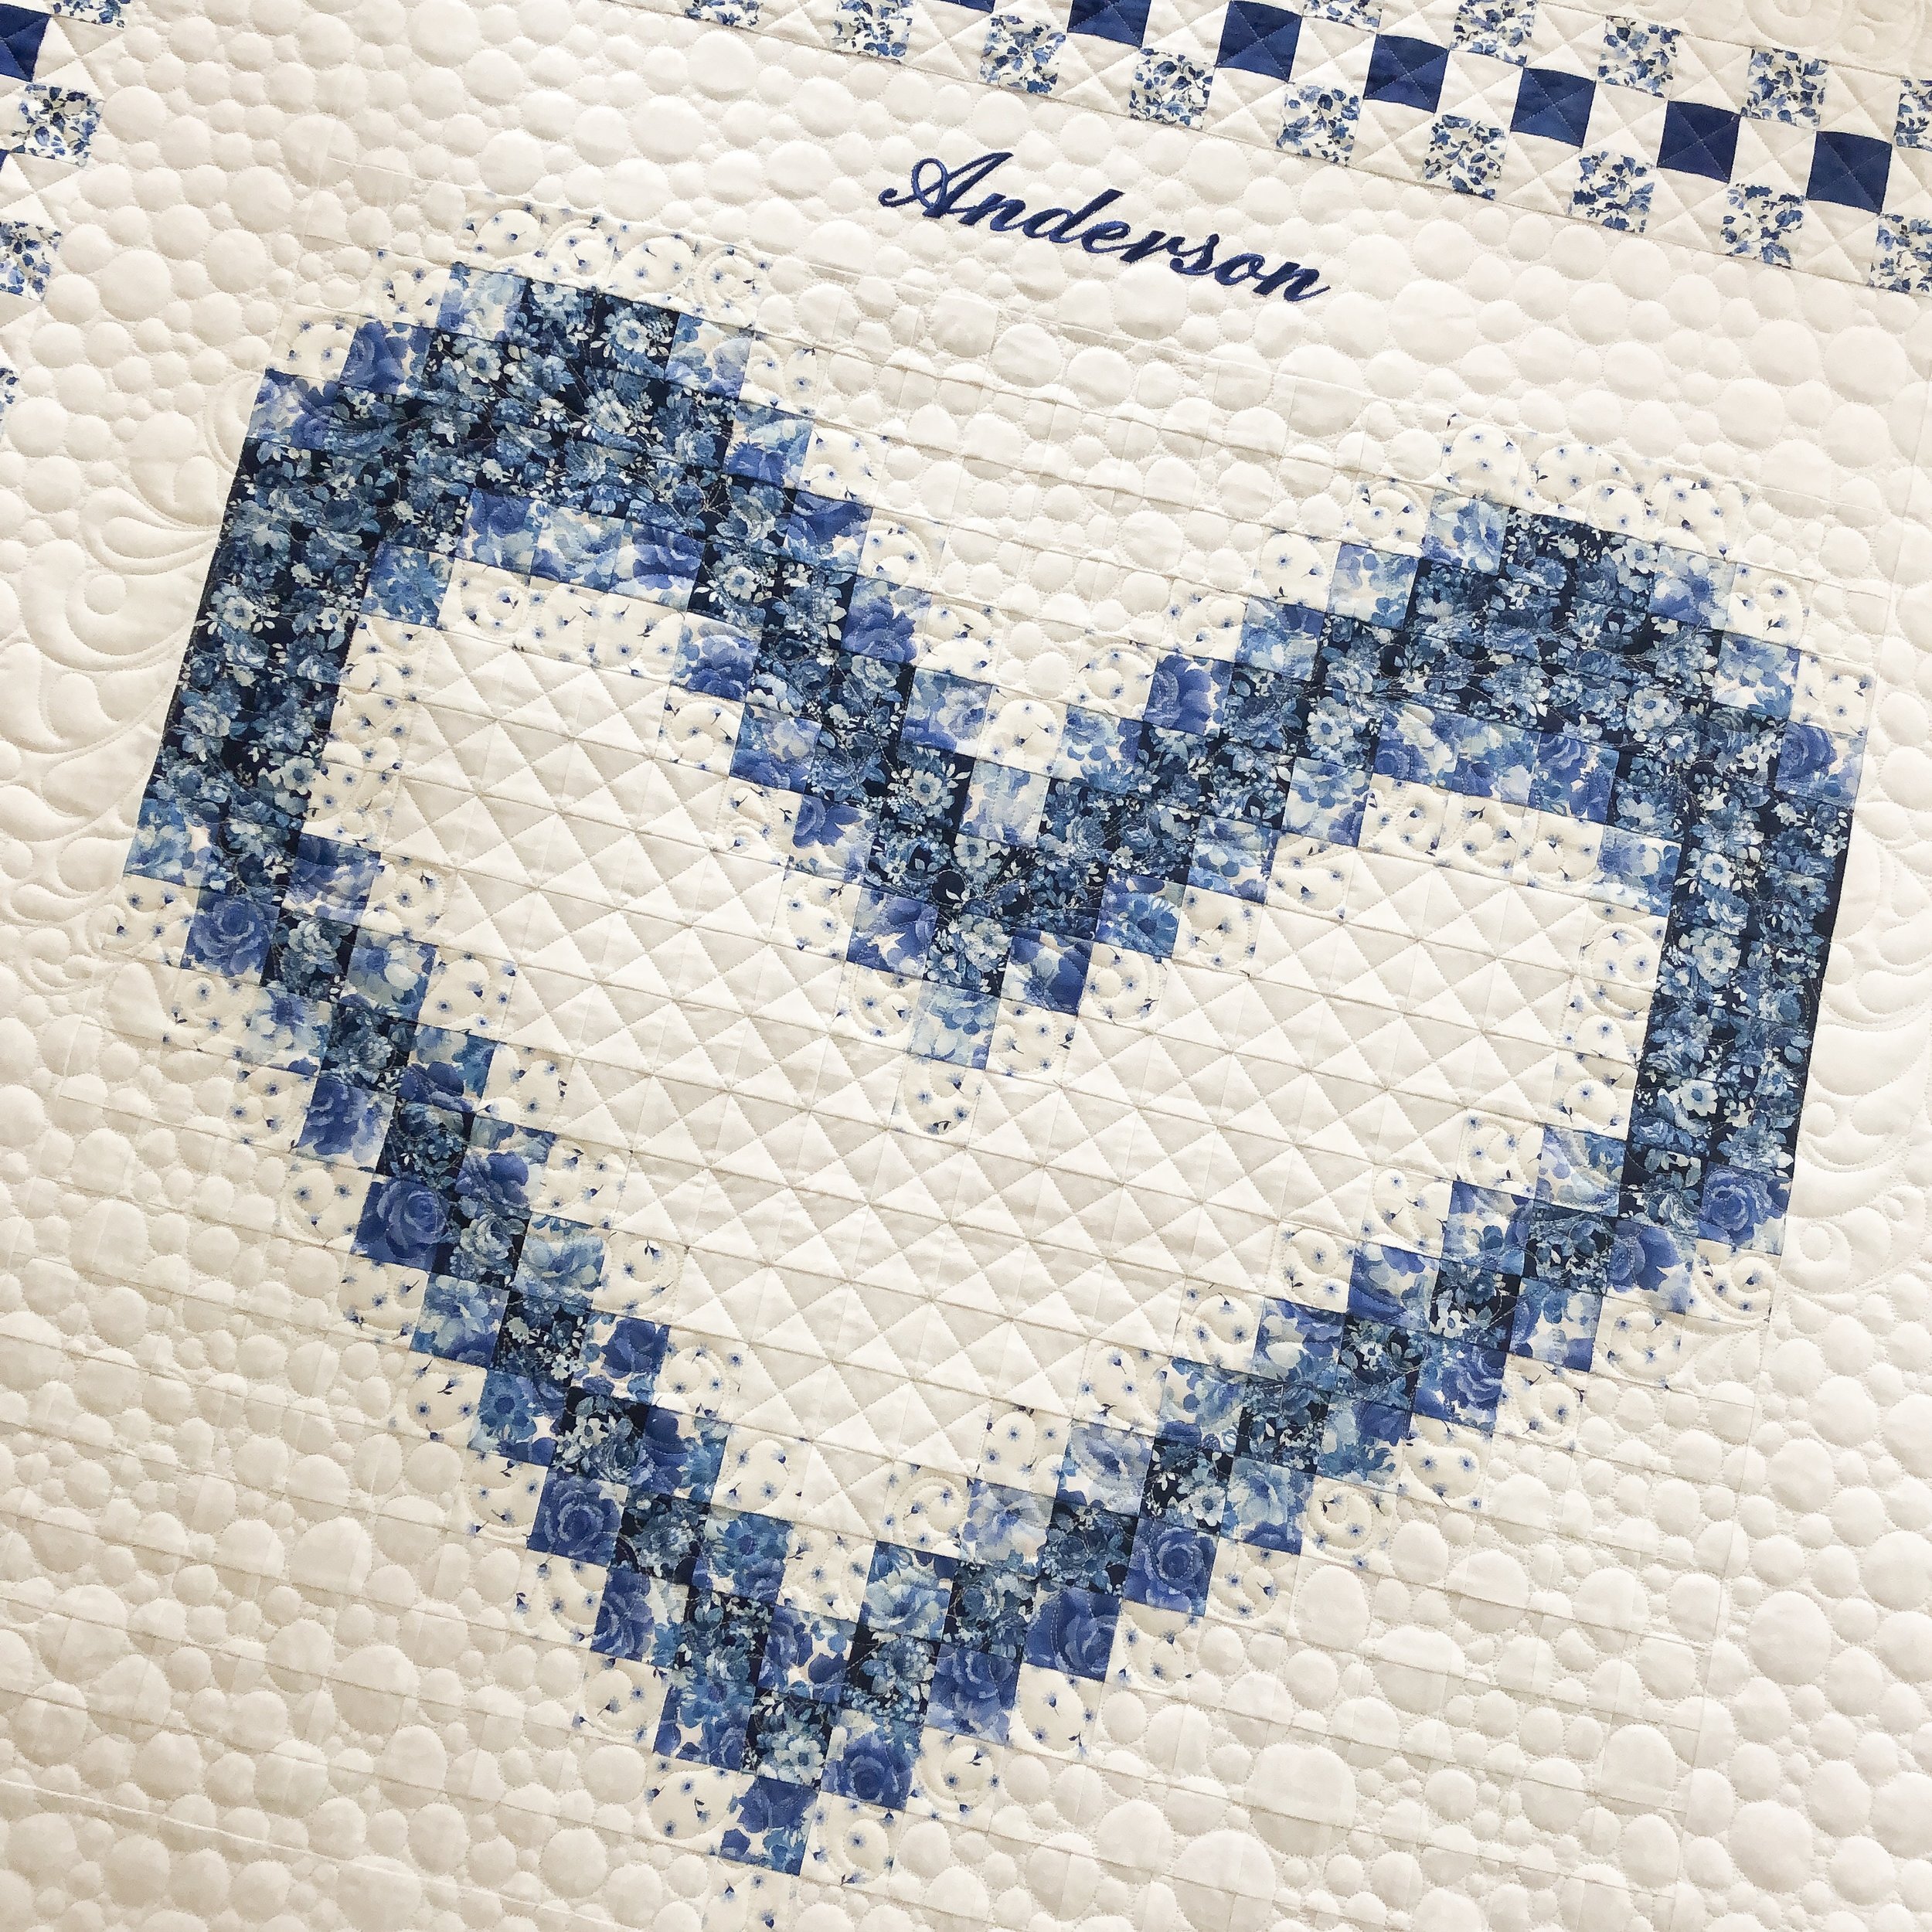
Kind of hard to see, because the thread blends so well, but I quilted a feather design on the blue heart. Some of which you can see along the sides at the top. Then I repeated the same design on the outer border. Then I just freehand pebbles the rest of it, in a variety of different sizes of circles.

I just love all these quilting designs together. Quilting adds so much dimension to every quilt. The quilt pattern is called Family Heart Quilt by Sweet On Stitches on Etsy. It can be found here: https://www.etsy.com/listing/225771503/heart-quilt-pattern-wedding-family-new?ref=shop_home_active_1&crt=1 Chris altered it a little, too.

Chris also made this for a girl who just graduated high school. She loved these fabrics long ago, and so Chris thought she would love them in a graduation quilt. If I remember right, the pattern is Turning 20.
Chris is a master at picking out quilt designs. She usually comes with an idea of how she wants it quilted, by looking at my machine quilting options here: https://www.quiltingit.com/machine-quilting-options-1 She picked this Moxie design, and it goes so well with these Verona fabrics from Riley Blake.
I used Dyed Natural 30 tex A&E Perma Core thread, and 8020 cotton poly blend batting from Winline.
There is definitely a place for edge to edge quilting. I’ve heard people say that it’s cheating or there is no creativity involved when it comes to edge to edge designs. I think there is plenty of creativity when matching designs to the quilt.

Even more creativity for me, because this is one of Patricia Ritter and my designs, it’s called Moxie©️ design. It’s available at Urban Elementz: https://www.urbanelementz.com/moxie.html
A close up and angled shot of all that fun texture!!

Next up!!! Denise made this amazing farm house quilt. I think she told me it’s one of Lori Holt’s quilt patterns, Farm Girl Vintage. Amazing huh?!?!?!!
Denise, her husband, and kiddos live on a farm...so she personalized some of the blocks to match their farm. Even some of the animals names are embroidered on the blocks.
If you notice, there isn’t a ton of machine quilting. I quilted the outside border, one of the inside borders, and the sashing. Now Denise is going to hand quilt each of the blocks. I can wait to see the hand quilting and machine quilting combo, I think it’s such a fun idea!
I used my favorite Edge rulers from Linda, to quilt the on point cross hatching. I pebbled the inside border and then quilted leaves inside the sashing. Love the combination of the 3. Great choices, Denise!!
I used Antique Cream 30 tex A&E Perma Core thread and 8020 cotton blend batting.
Here are a couple of my favorites!!
Next up, this beautiful quilt made by Sherry! Sherry used to be one of my leaders at church when I was 16. She and some other women would teach us lessons on Sunday and plan fun activities for us on Tuesday, all done out of service. Now, that’s something I get to do. Which makes me so grateful for what they did for me. So, you can imagine how fun it was to see her again, and get to quilt for her. She made a quilt for her daughter, that I’ve already shared, however this one is for her. It was the first quilt she’s ever made!!
I shared the progress of this on Instagram and there were some who asked what the pattern was...it’s called the bullseye block. If you google it, you can find tutorials. I recently found this video tutorial: https://youtu.be/zDFdTe9d4Vc
I quilted a bullseye quilt in the past year or so, and this is how I quilted it. Pebbles and swirls. It is definitely time consuming, but I love it!!

I love the mixture of corals and mint, with s touch of gold. You can’t tell from the pictures, but she used a variety of different low volume or tone on tone whites for the backgrounds.
I used my 5” Circle2™ machine quilting circle ruler to quilt the petals in the bullseye. If you follow me along on Instagram, you may have seen me sharing how I rotate the ruler while quilting. If not, go to @leishakaye on Instagram and check out my highlight bubble on my profile page, and watch the Circle2™ Rulers highlight. My rulers are available in a set of 6 on my website, click here: https://www.quiltingit.com/shop?category=Rulers
I do want to give you a heads up!! This weekend I’m going to have a sale on my Circle2™ Rulers and digital designs, so be watching for that announcement.
I just love angled shots, it shows off the quilting so beautifully.

I quilted some ribbon candy in the border and some swirly feathers in the outside border, a perfect frame for this quilt.

Lastly, I recently made this for a friend who’s daughter graduated from high school!
The embroidered blocks were done by a local shop, called the Logo Shop.
I gathered all the fabrics from https://www.sistersandquilters.com/ online store. They also have an Etsy: https://www.etsy.com/shop/SistersandQuilters They have such an incredible variety and selection of high quality fabrics and notions.
My mom finished off the binding for me!! She’s the best!
I used Soho by Sarah Ann Myers to quilt it, and it’s available at https://www.urbanelementz.com/?acc=12
This design is seriously one of my favorites!!

I backed it with Shannon Fabrics navy embossed dot.
Thanks for sticking around seeing what’s happening in my little quilting world.

I also recently started putting together my hexie flower quilt. Here are the first two of 17 rows. I started this almost 4 years ago. It’s fun to finally start seeing it come together. It may take me another long while to see it together. This is called English Paper Piecing, and I had a friend teach me how to glue and then baste. I’m sure there are some great tutorials out there on how to do this. Do a google search and find a method you like.
Happy Wednesday!! - Leisha

Quilts...quilts...quilts!
Hello Quilting Friends,
Hope that your week has been a great one! I told you last time that I have some fun quilts to share with you...so here goes!
First up, this lovely quilt made by Beth, using the Mini Metro Rings pattern from Sew Kind of Wonderful. If you haven’t and you’d like to try a curved quilt, take a look at Sew Kind of Wonderful’s pattern selection. I’ve made a couple of their patterns, and they make sewing a curve easy peasy!!

Beth used mostly Porcelain by 3 Sisters fabrics, from Moda fabrics.

This quilt is small, and yet oh so lovely. So fun to custom quilt. I used Antique Cream 30 tex A&E Perma Core thread and Beth provided a batting...I think it was bamboo.

I used my 3” and 9” Circle2™ machine quilting circle ruler to quilt the curves, except for the curve just inside of all the circles. I used a -10- curve ruler from Linda at www.thequiltedpineapple.com
My machine quilting circle ruler set, Circle2™, comes in a set of 6 ranging from 2”-14” circles. My sets are available in green or clear acrylic, on my website: https://www.quiltingit.com/shop?category=Rulers
Here is more info about my rulers: https://www.quiltingit.com/blog/2018/10/10/introducing-my-circle2-longarm-circle-ruler-set

These rulers are such a versatile set. Because they range in size from 2”-13”, that gives me a wide variety of options for curves.

I quilted a diamond shape, with lines 1/4” apart in the center. I freehand quilted swirls with a little tale, inside the “rings”. Pebbles and a little curve inside the rings, make the rings pop!! I love the combination all together.

Here is a great look at the backing. The backing is a minky, so the texture is lovely!!
Next up...Sherry’s Wagon Wheel quilt. This is a classic quilt block. Do a google search, I’m sure you’ll find a tutorial.

the black and white fabrics are so striking together!!
I used white 30 tex A&E Perma Core thread and Winline’s 8020 batting for this quilt.

I gave Sherry a few options for quilting designs, and she chose my Beaded Clam Take 2, which is available on my website as well as Urban Elementz. Go here: https://www.quiltingit.com/shop/beaded-clam-take-2 or here: https://www.urbanelementz.com/beaded-clam.html
We chose this design to soften the hard lines of the quilt blocks, and it goes well with the fabric prints.
Look at all that fun quilty texture!!

I quilted this with my Gammill 22” Statler longarm machine. All of the other quilts and runners I quilted freehand or free motion.
Here is a look at the quilt backing. Love it!!!

Next up...this absolutely stunning quilt made by Joleene!!! Joleene is the mastermind behind the Sew Red Glasses.
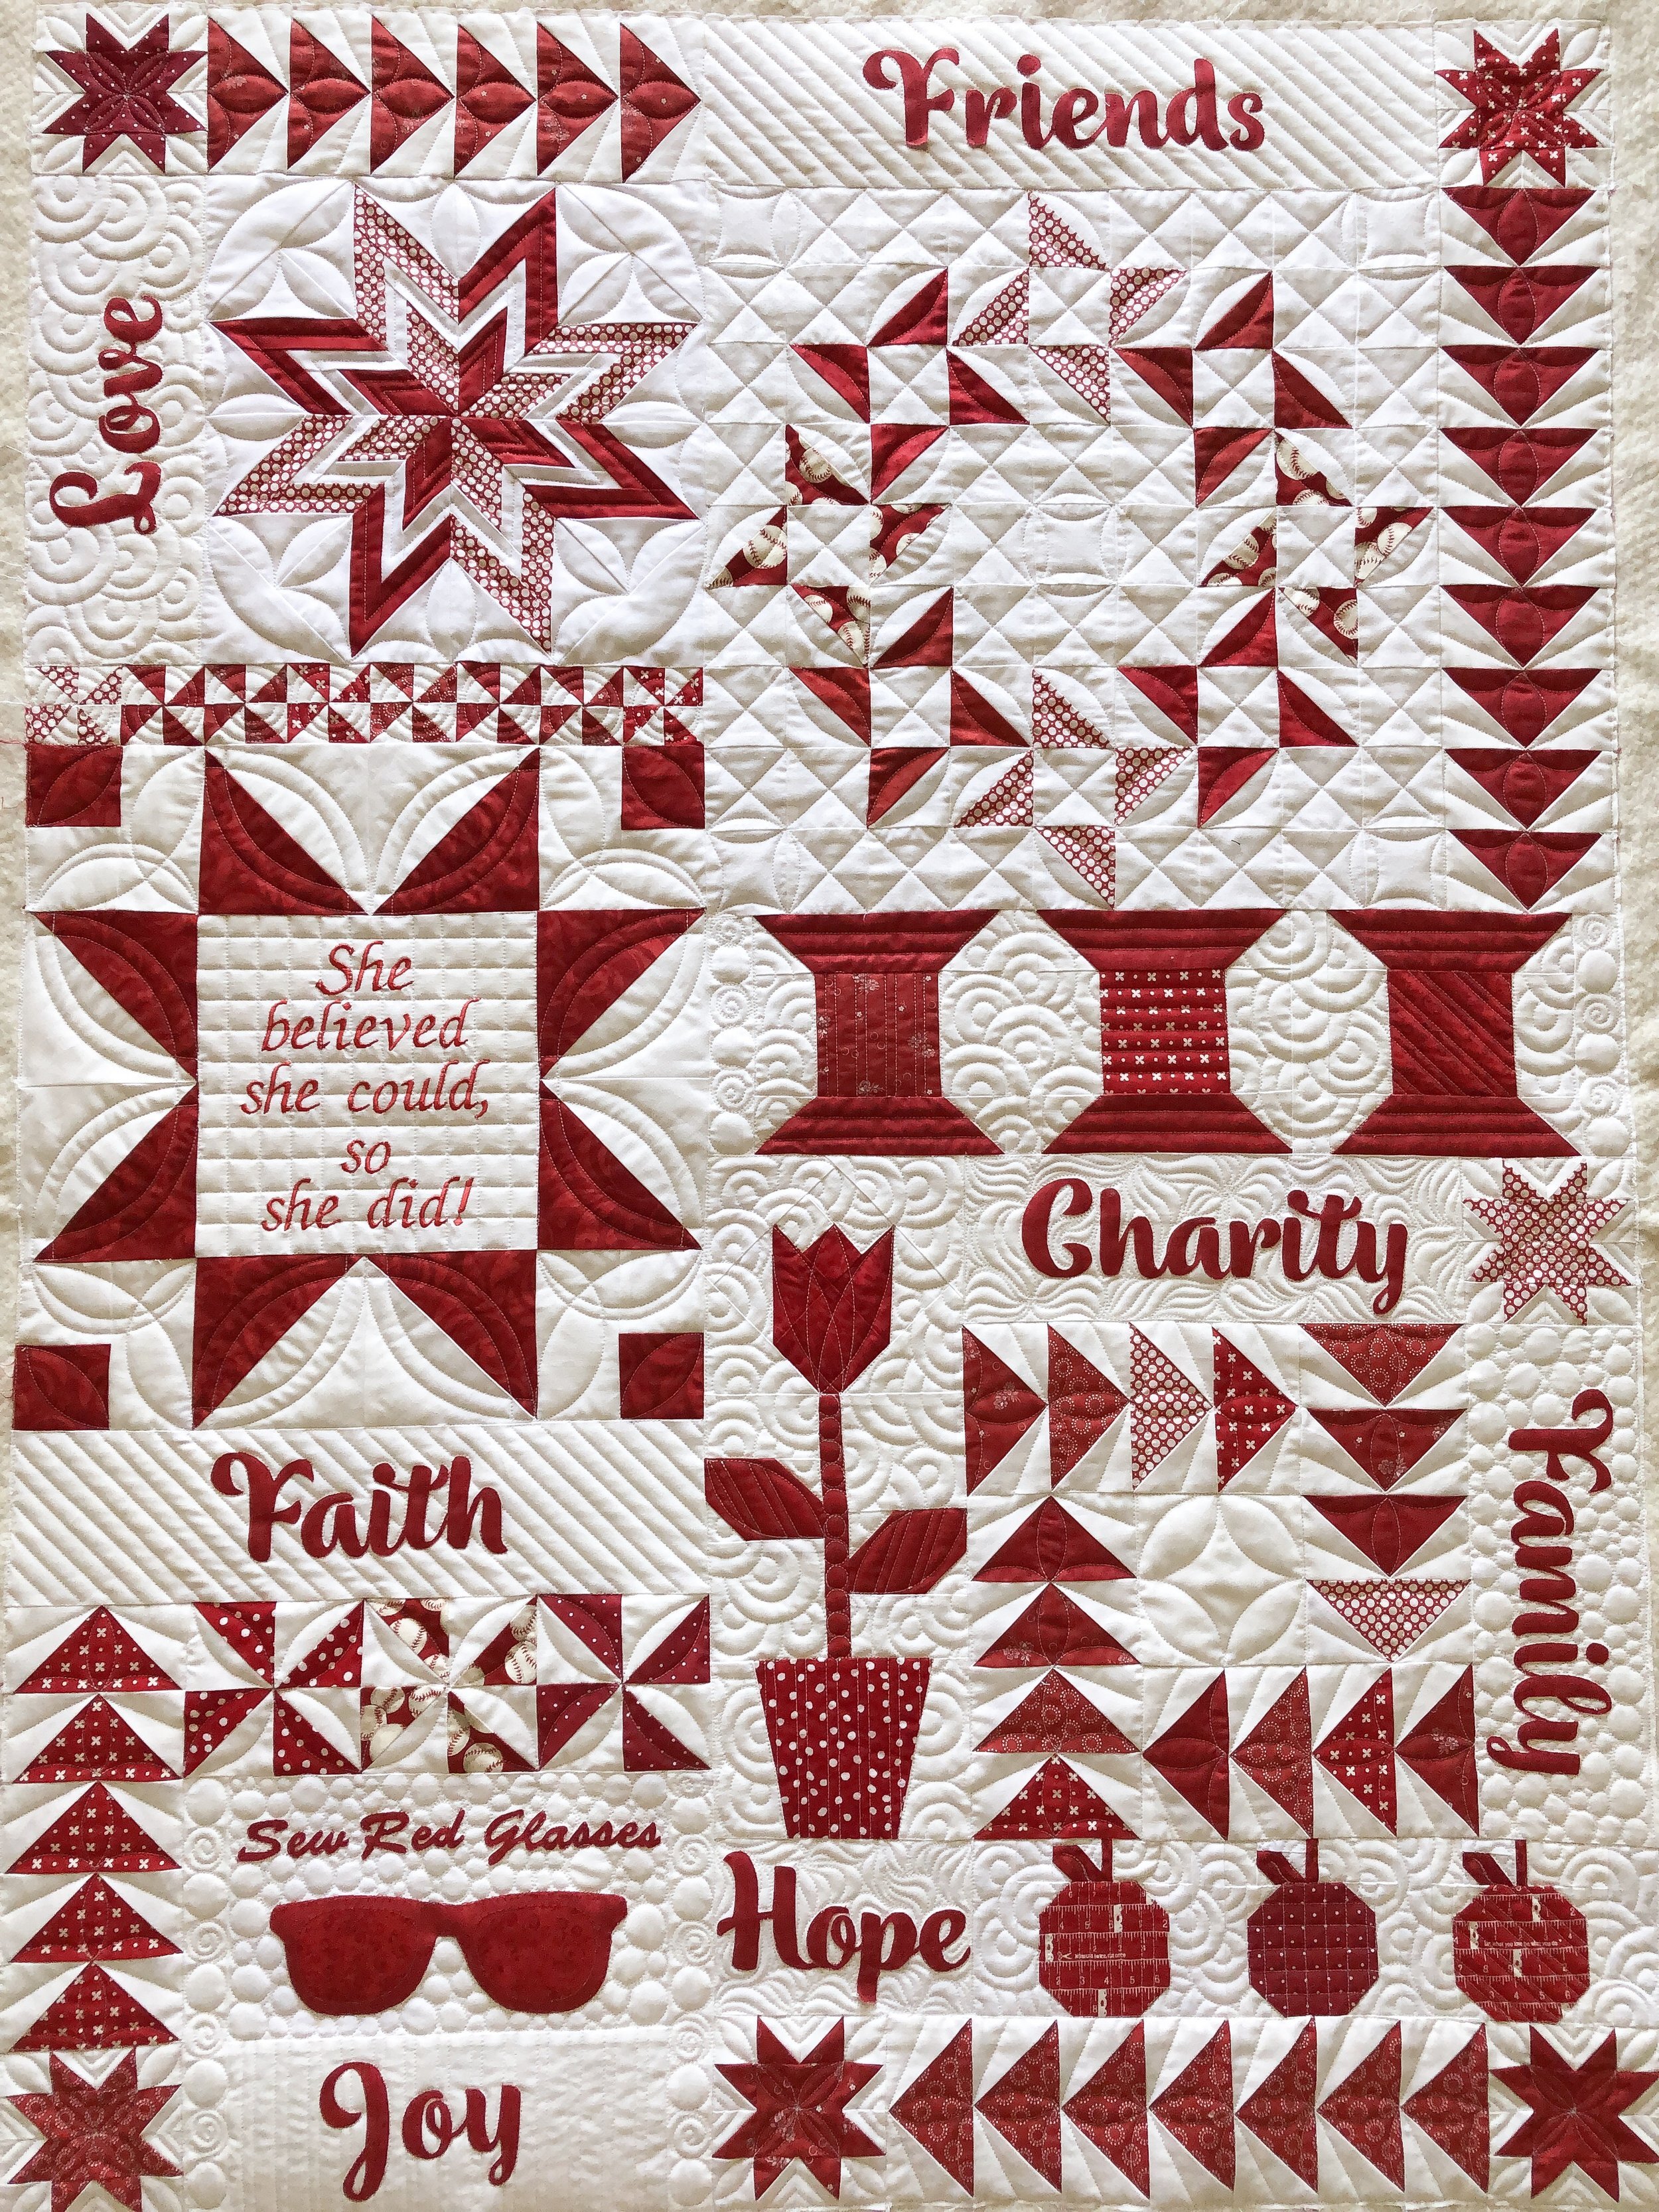
Joleene made this one of a kind quilt to represent the last few years of her life. Family, friends, faith, service, her Sew Res Glasses and so on. Beautiful!! I love the red and white!!
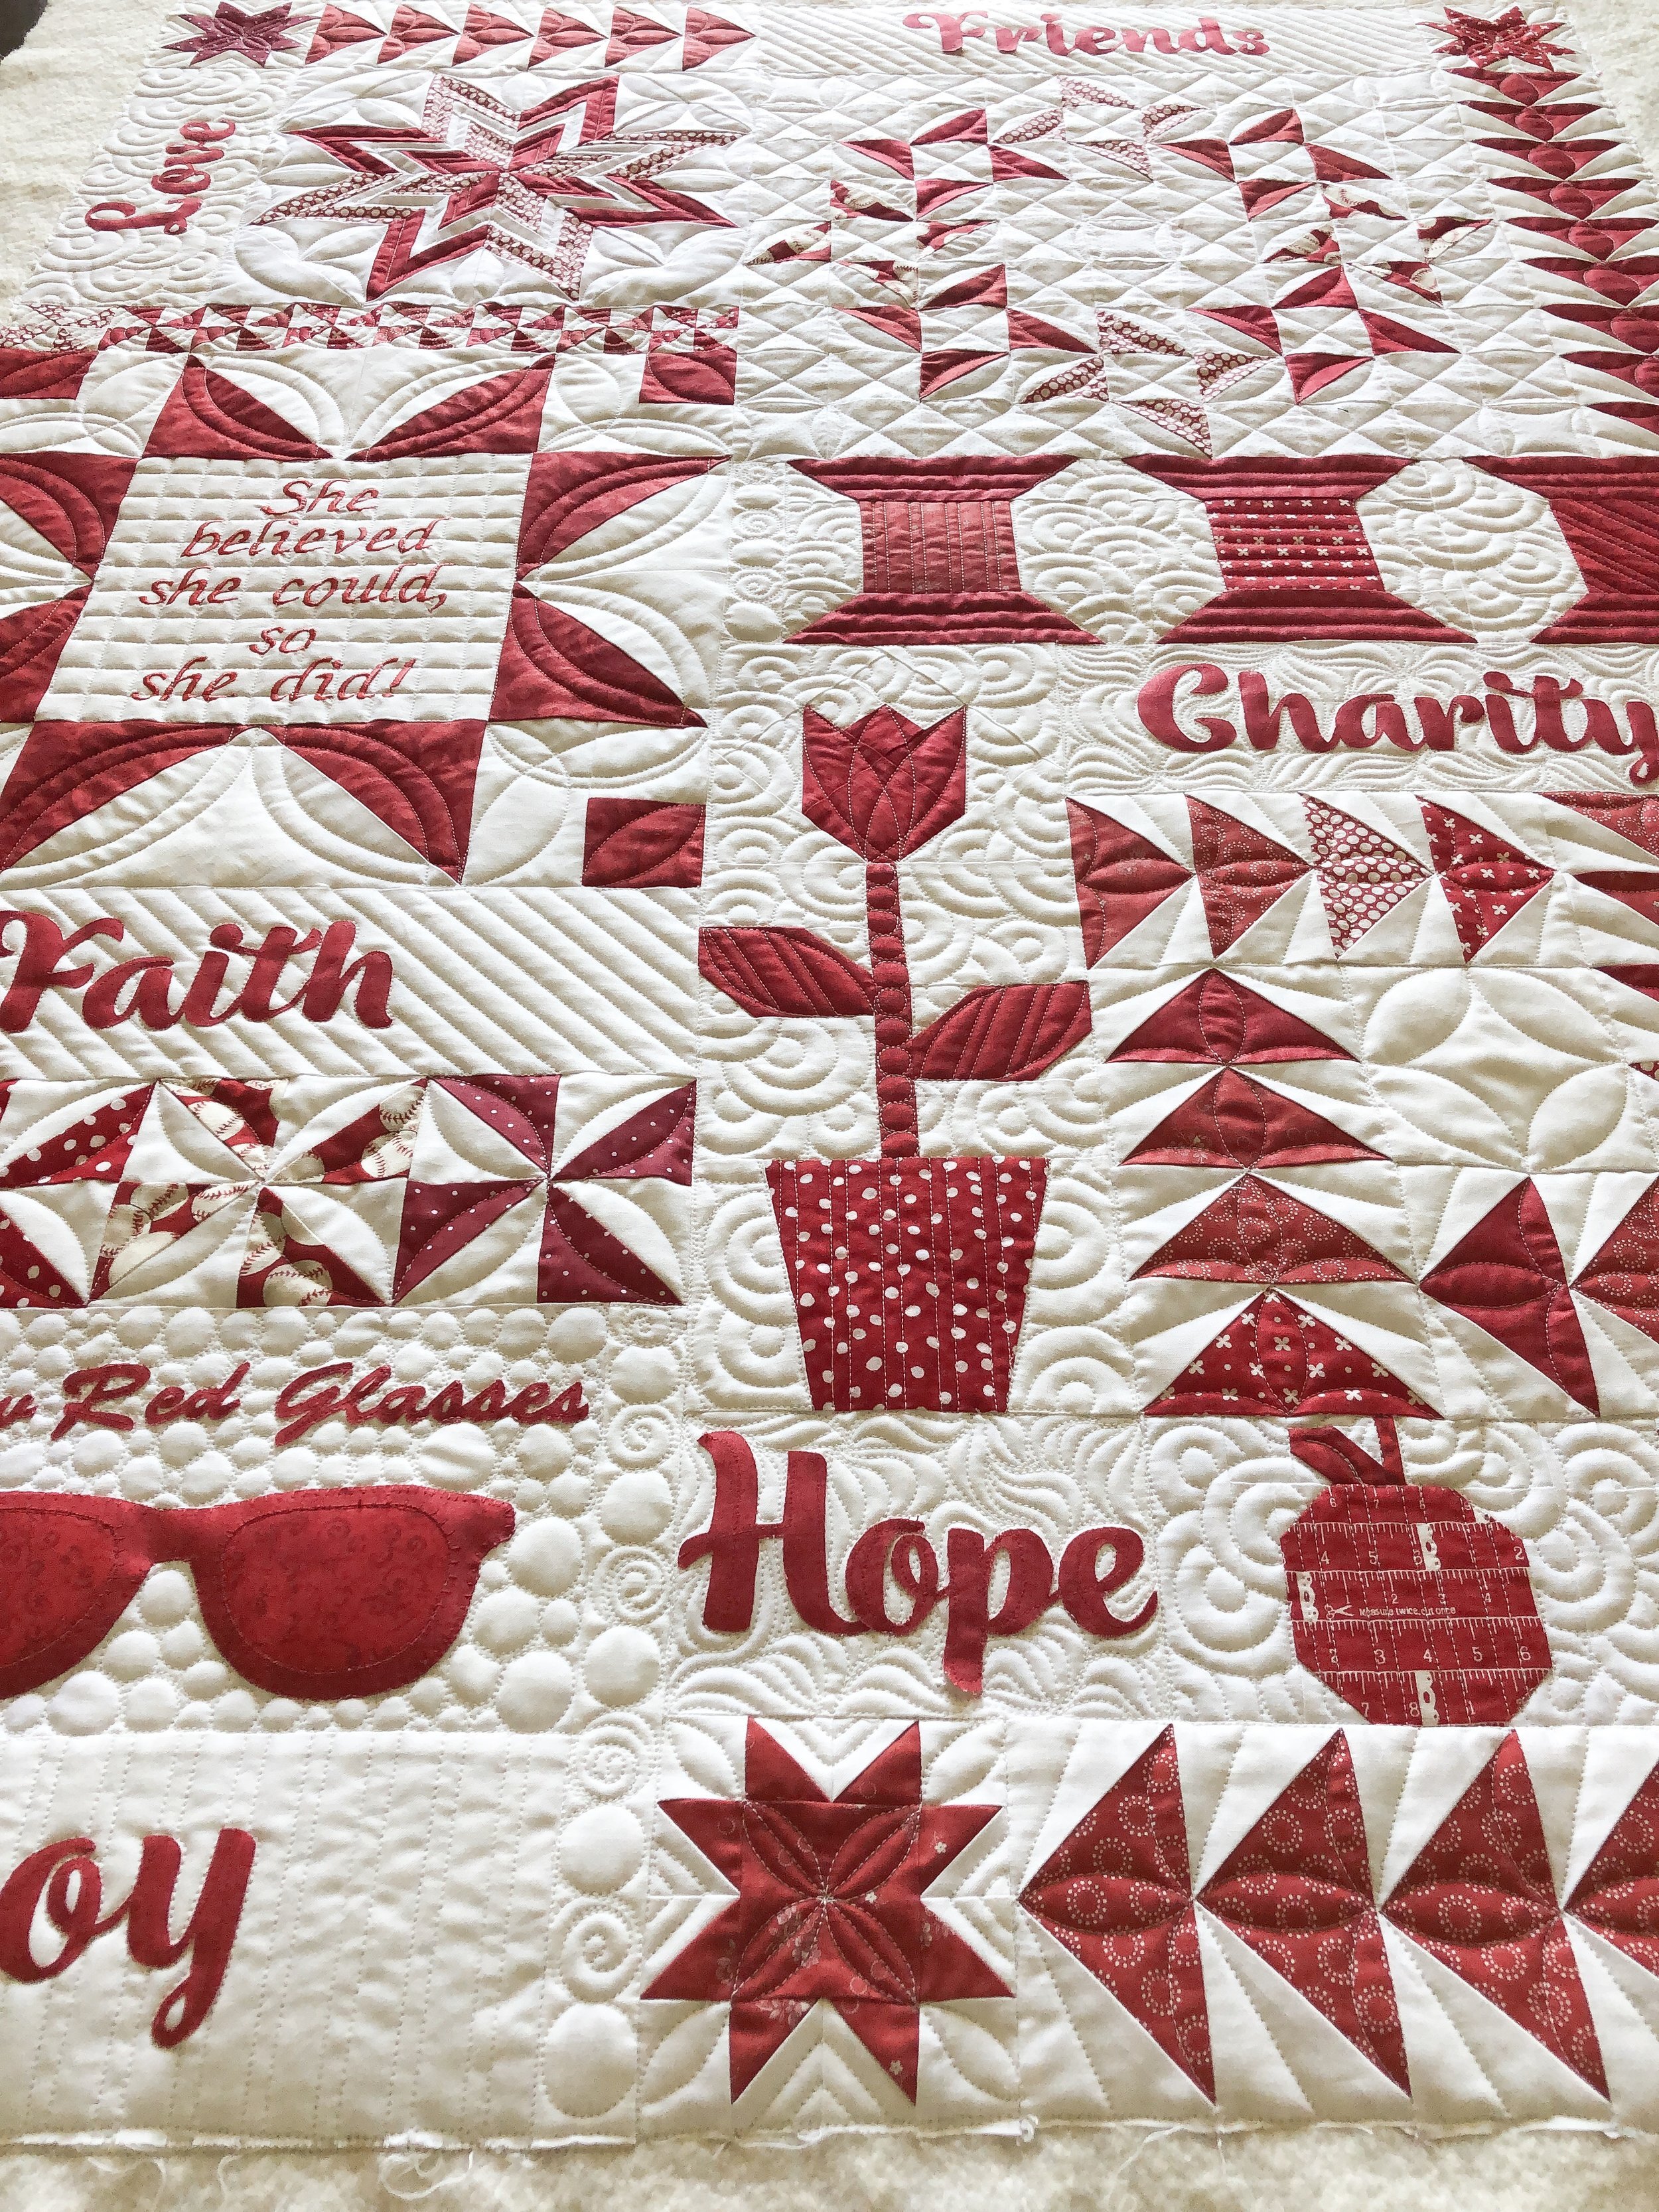
When I quilt a custom quilt like this, I want the designs to flow throughout. You’ll notice orange peels, crosshatching, overlapping circles, diagonal lines, circles, and so on. I try and replicate a design in multiple spots to compliment the quilting designs and help the eye travel throughout the quilt. I love how this one turned out.
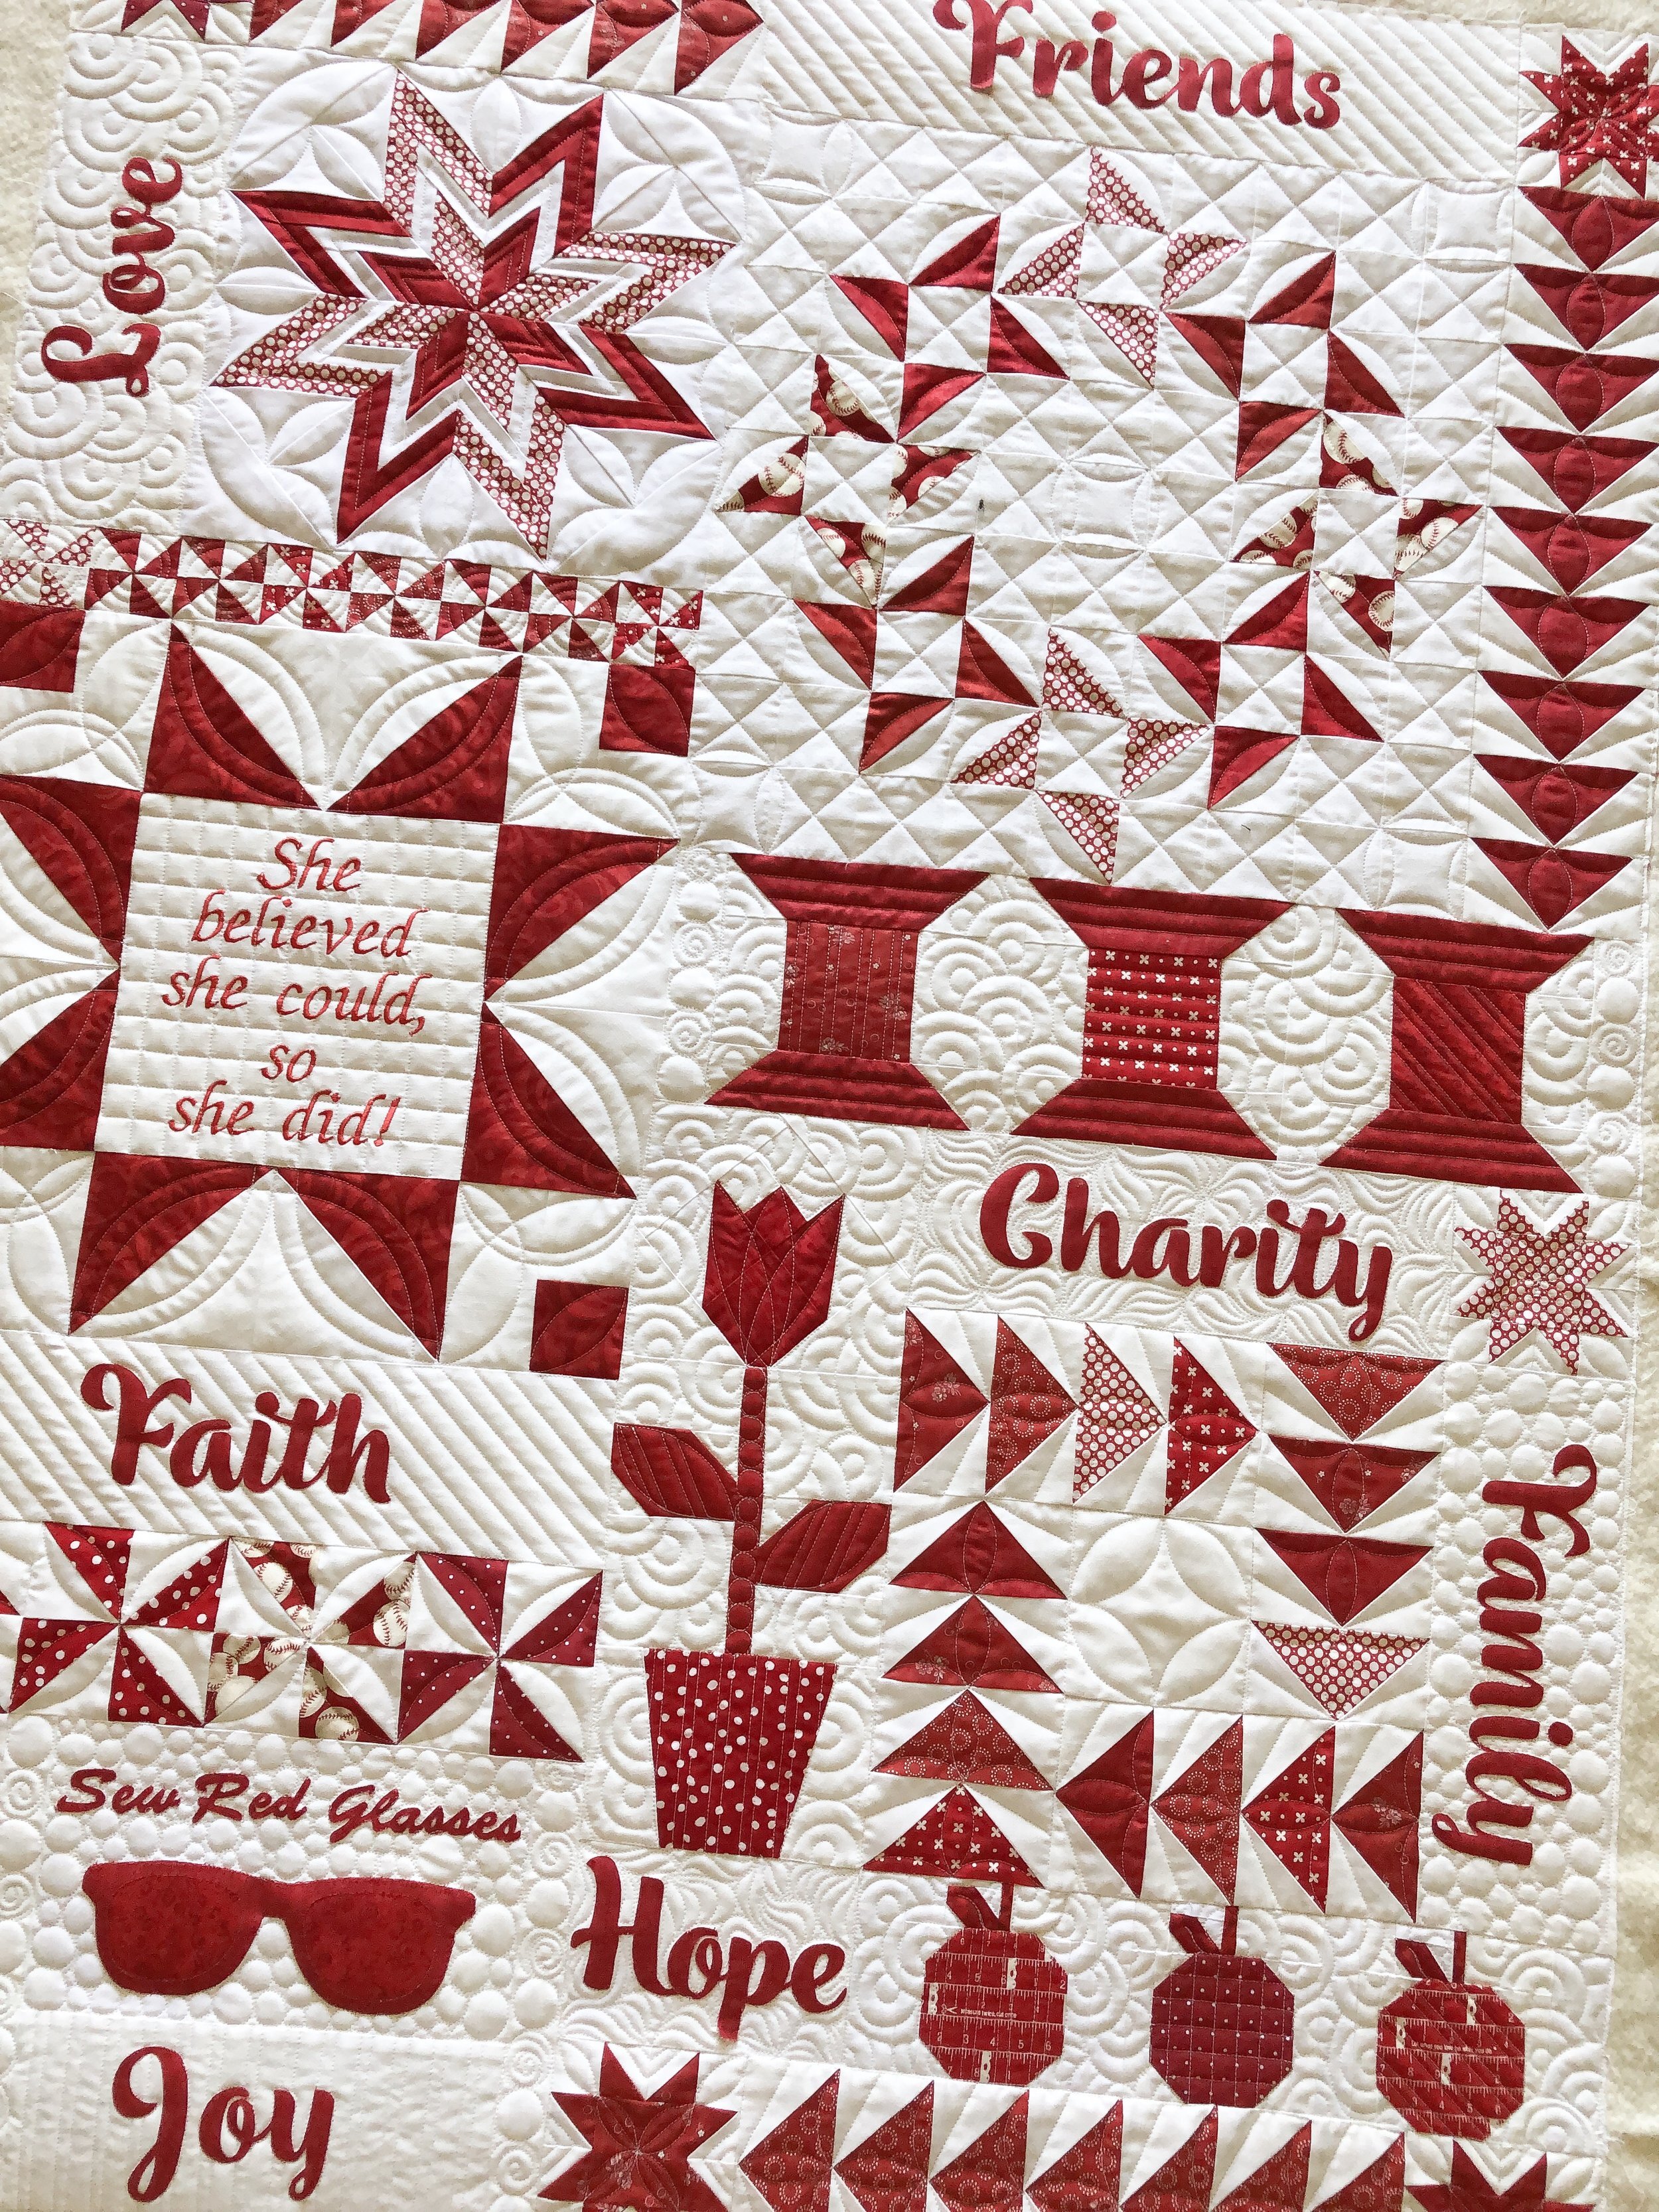
Here are some of my favorite blocks...first up, these 4” red stars were throughout the quilt. I thought the quilting on these were perfect to make the stars pop. I used my 2” Circle2™ machine quilting circle ruler to quilt the curves, and an Edge ruler from Linda at www.thequiltedpinapple.com
I also love this star!!! If I remember right I used the 12” and 6” Circle2™ rulers to quilt the curves in the corners. Then I just echoed the Star with some simple lines.
On this block I used 4 different rulers...the Edge ruler, and 3 different sizes of Circle2™ rulers. It might have used the 3”, 6”, and 13” circles to create all the curves. I remember using the 13” circle, but I’m guessing I used the 3” and 6” for the smaller curves. I actually ended up using 5 of the 6 rulers in my set, to quilt this quilt!! I didn’t use the 5”/11” ruler. Which is a great example of the versatility of this set of circle rulers. I’m also loving how nicely they fit in my hand as I quilt.
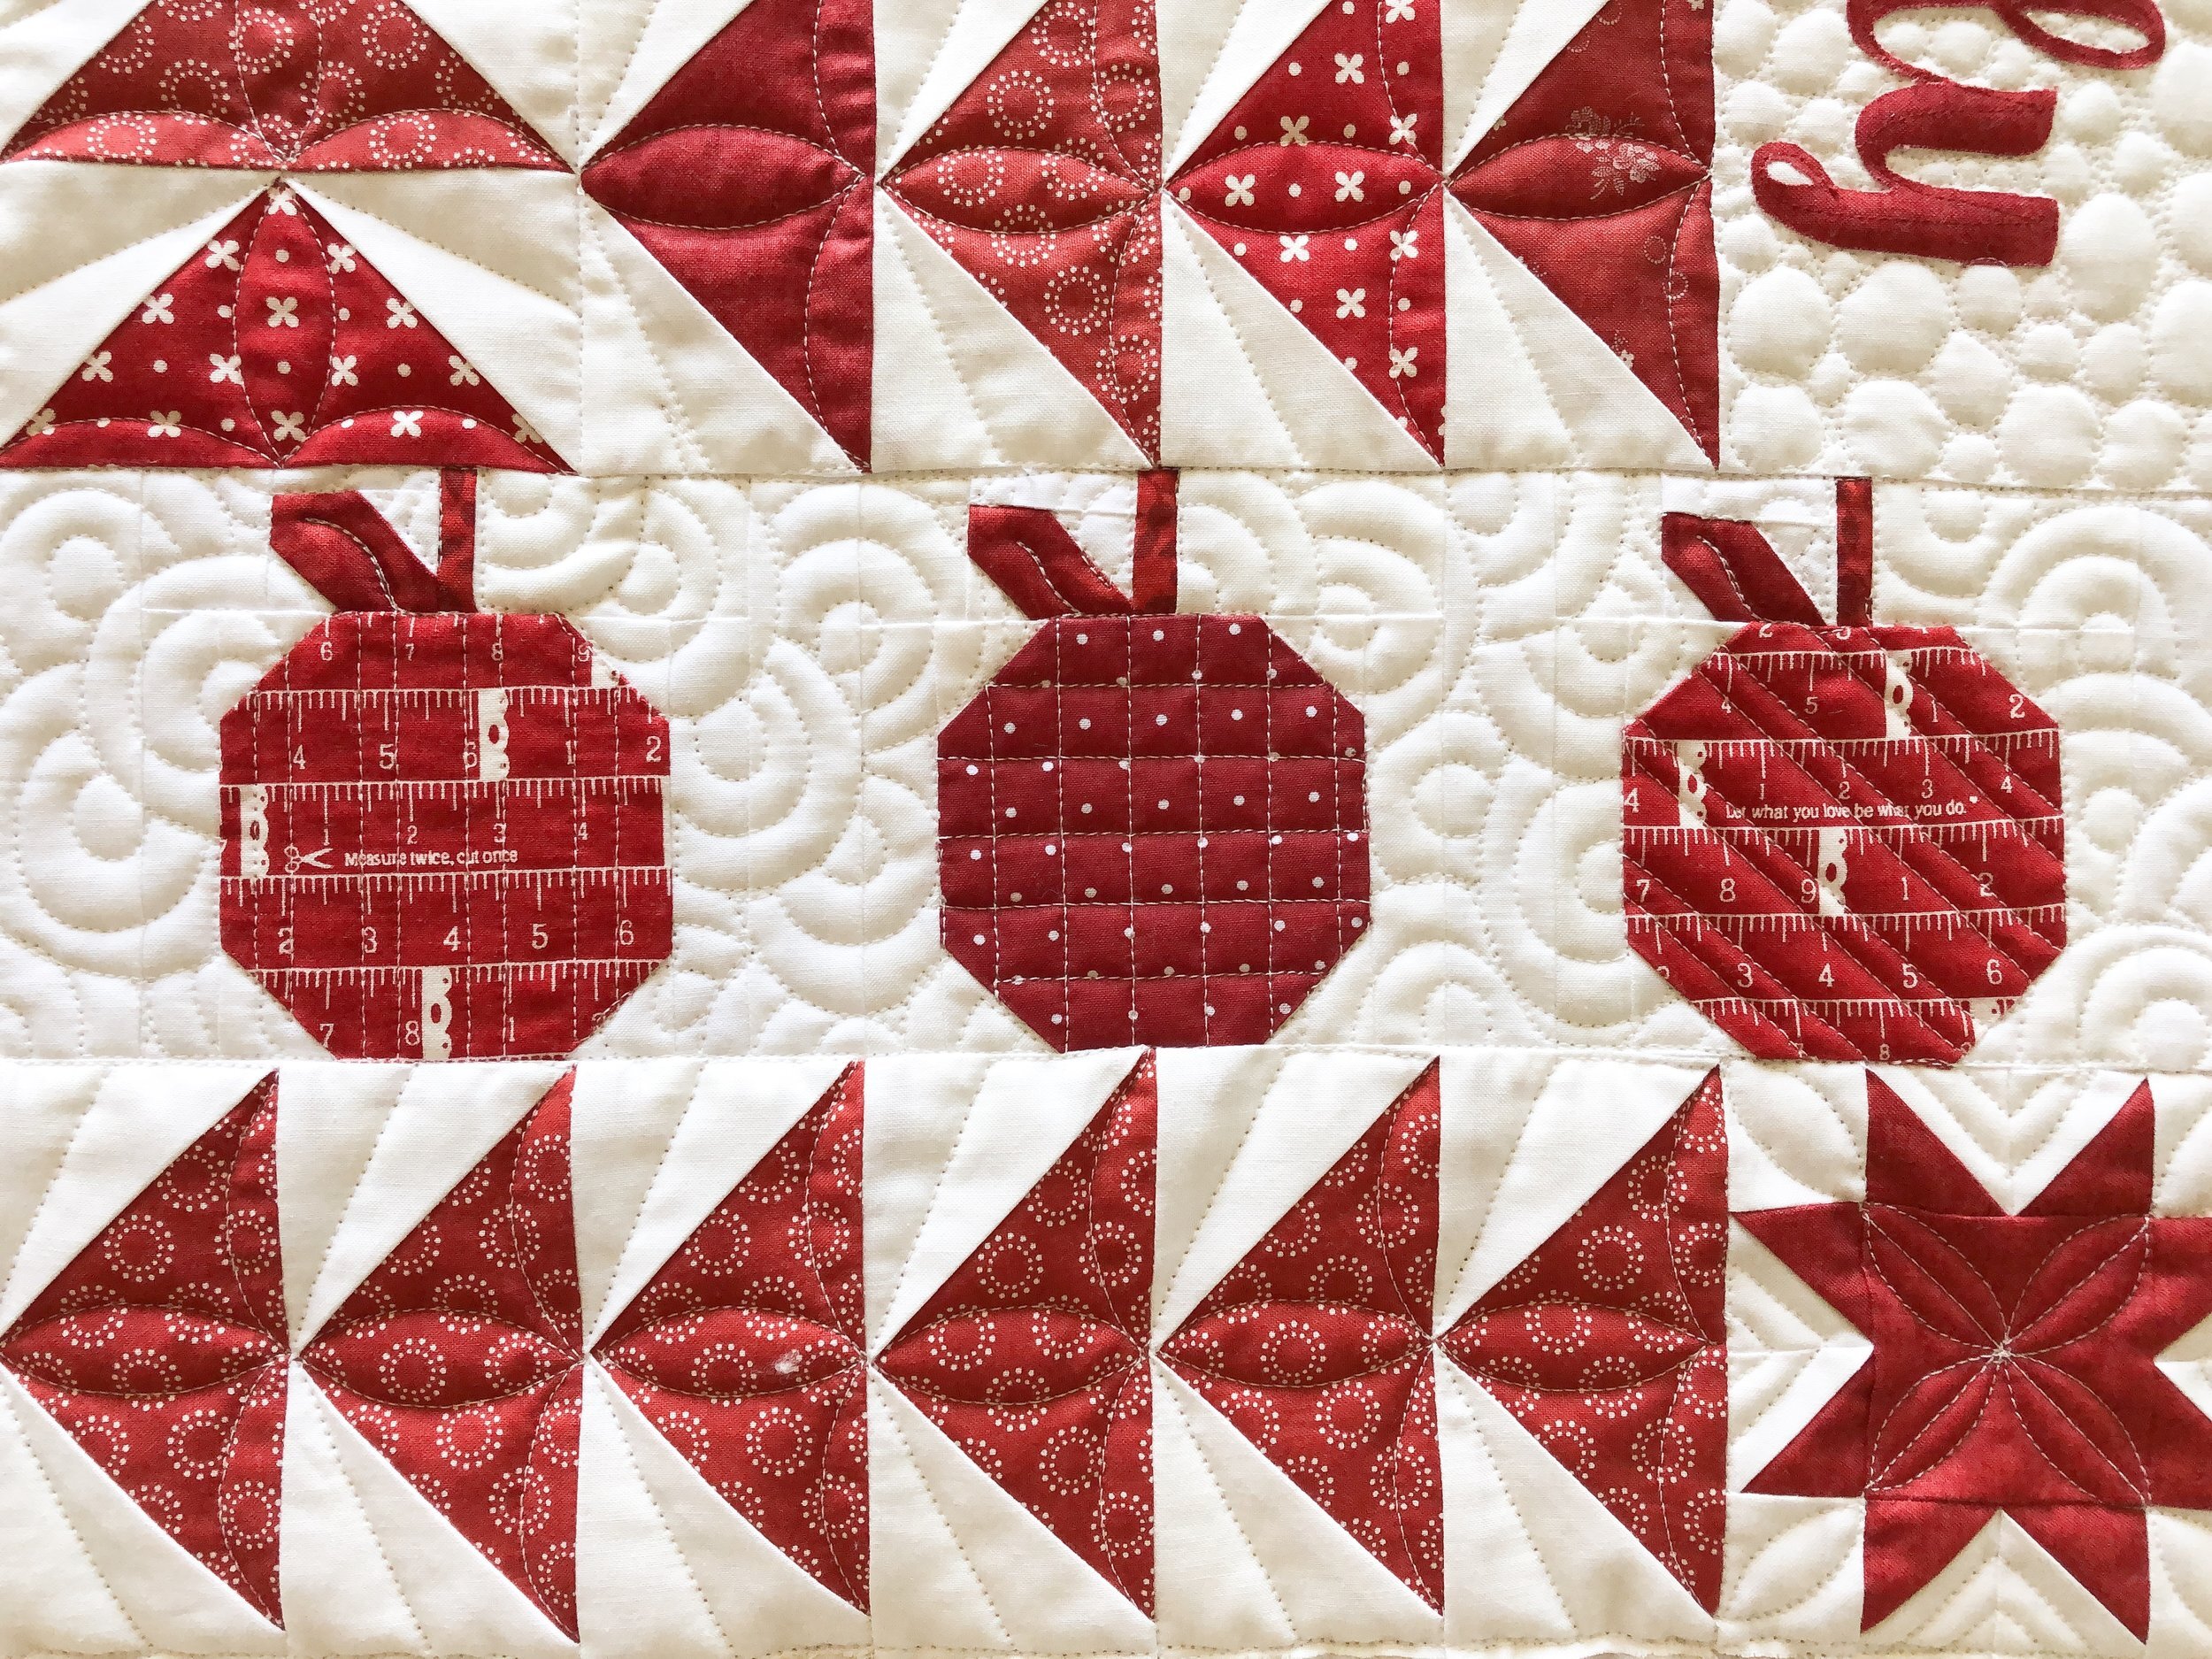
Okay...those apples are too cute!!
Here is a look at the amazing quilt backing Joleen pieced. Cute, huh?!?!?!! I used white 30 tex thread, and Winline’s 8020 cotton poly blend batting.

Here is a quick look at the clear set of my Circle2™ rulers. For more info or to purchase a set, go to: https://www.quiltingit.com/shop?category=Rulers

Here is a look at the smallest ruler, the 2”/8”. I designed them with the 1/4” hopping foot in mind. If you were to quilt a 2” circle, you would get a 2” circle. Not a 2.5” circle, like I’ve seen happen with other circle rulers.

Below is a look at the largest circle, 7”/13”. Check the link above to see a the other sizes. I’m loving seeing what your creating with these rulers. Please use the hashtag #circle2rulers on instagram, if you post pictures. I’d love to see them and share them. Thank you!!!

Next up, Barbara made these two lovely table runners.

This pattern is actually a quilt pattern by Down Grapevine Lane and is called Tumbleweeds Quilt, and she just made a runner.

I decided to quilt a variety of different designs to create some fun texture. Overlapping circles (video here: https://youtu.be/x0UNyEJdm9Y), swirls, ribbon candy, lines, feathers, and such!!

I love these fabrics with this pattern, so fun!!

I used white 30 tex A&E Perma Core thread, and Winline’s 8020 cotton poly blend batting.

And this lovely little runner is a pattern by Kim Diehl and is called Simple Whatnot’s 8.
I used a coordinating teal thread for the border, and a nice cream colored 30 tex thread, Dyed Natural, from A&E. I also used Winline’s 8020 cotton poly blend batting.

I freehand quilted a swirl feather in the center of the quilt, ribbon candy in the blue borders, and circles in the thin 1/2” cream border. Then I quilted a fun loopy freehand design in the 9 patches on the corners.
These fabrics are also from Kim Diehl.
I nice close up. Quilting just adds so much personality to a quilt, I love it!!
Thank you for stopping by! Have a great weekend!!
- Leisha

Make Yourself at Home + Pillows
Hope you’ve had a great week!! I spent most of mine with my baby sister and her husband moving and decorating their new townhome. It was so much fun!! I graduated in interior design, even though I fill my work time with quilting, it’s great to do some decorating every once in awhile.
So, I don’t have much to share with you in this week’s post. A wall hanging and some pillow fronts. I did freehand and or free-motion quilt them all. I do have lots of pictures!
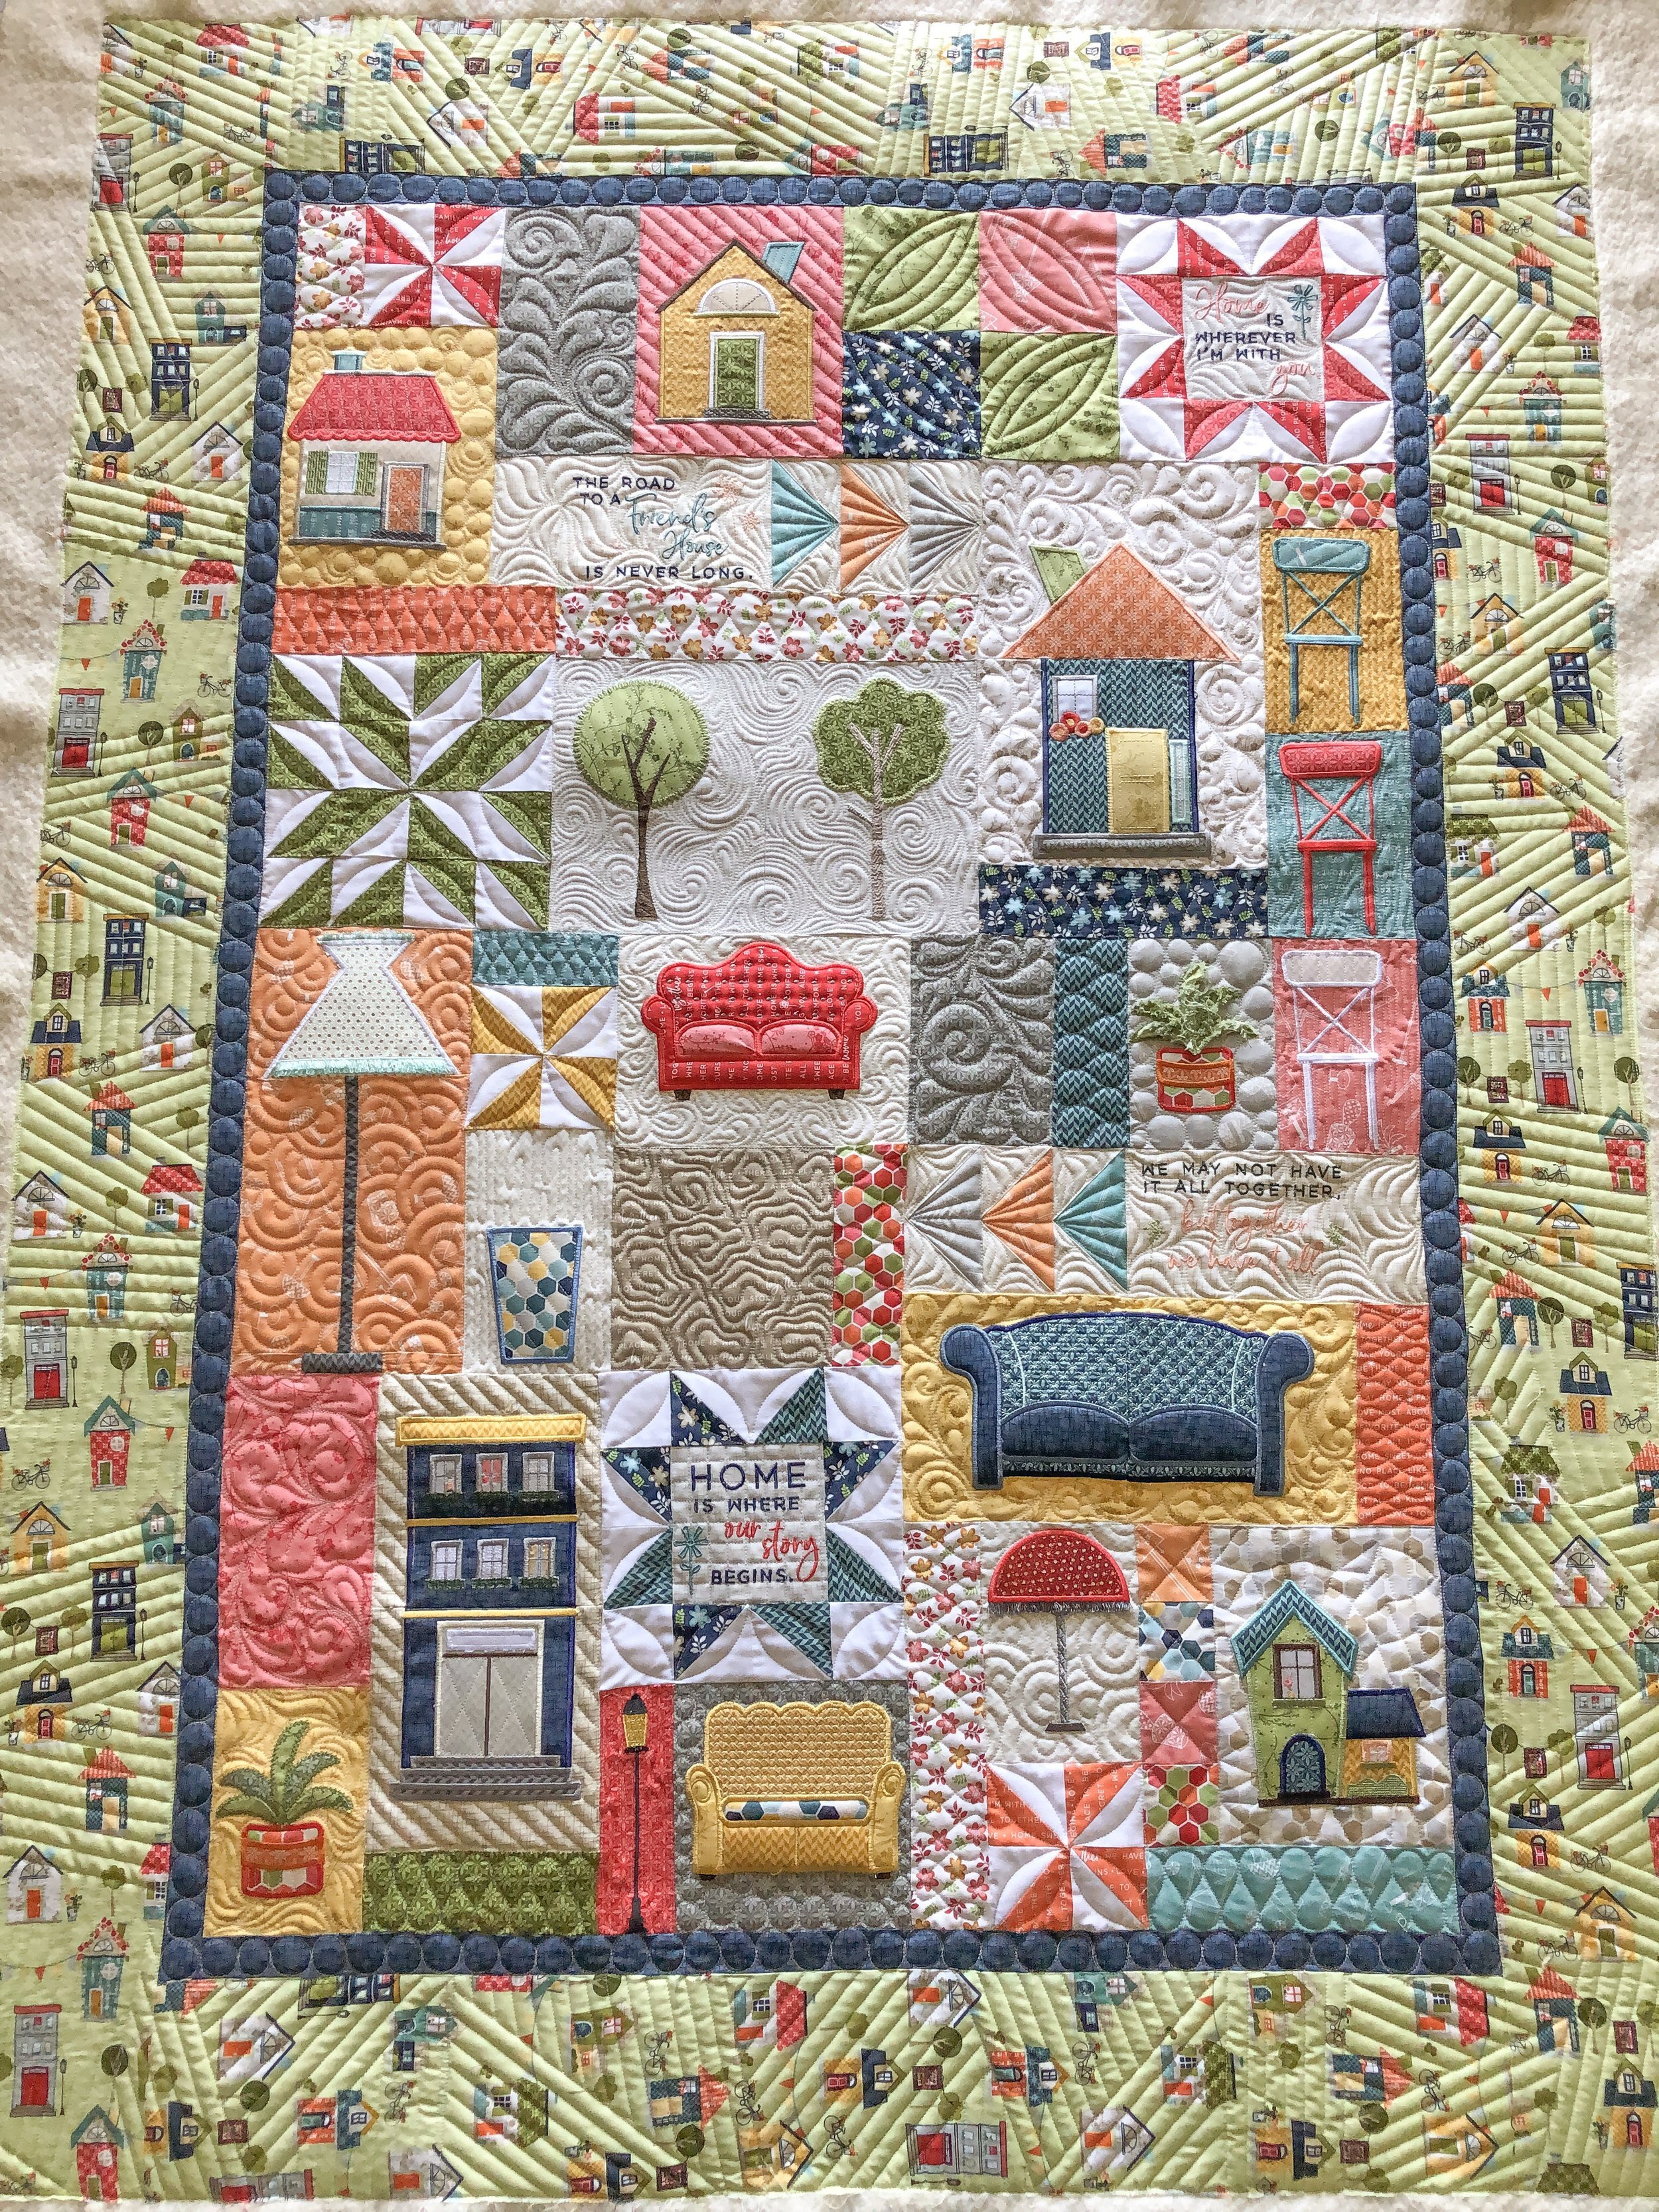
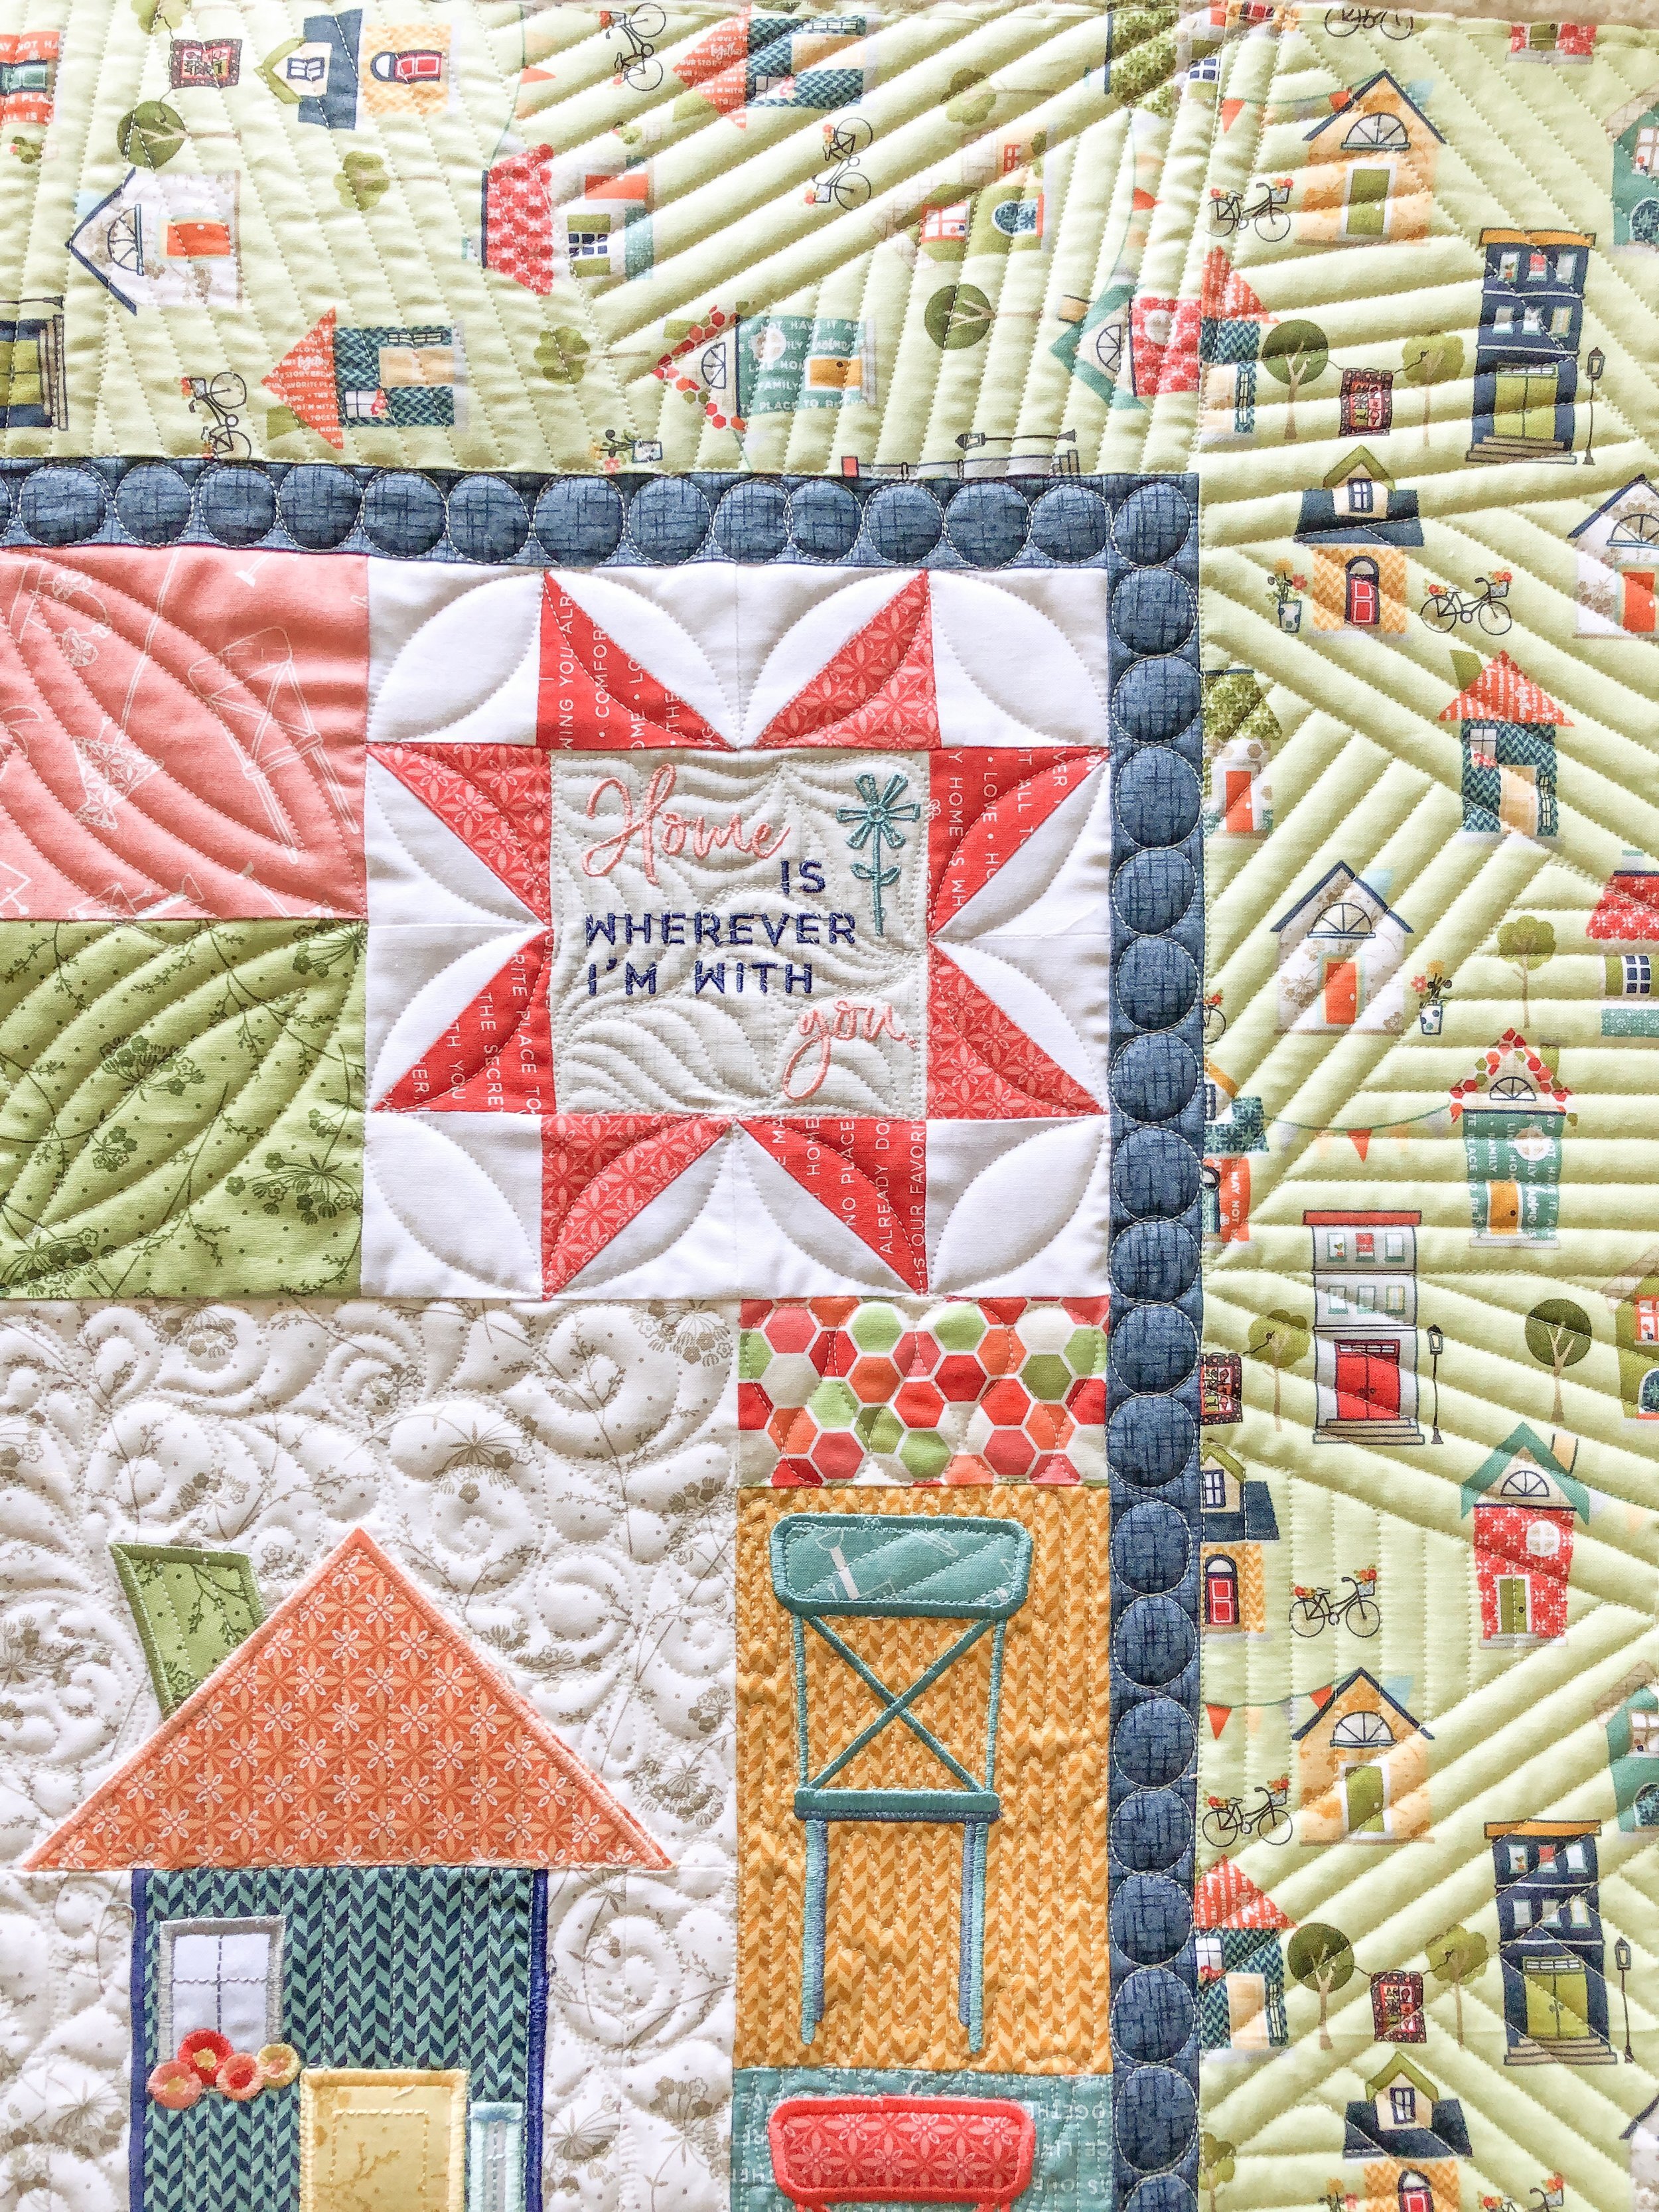
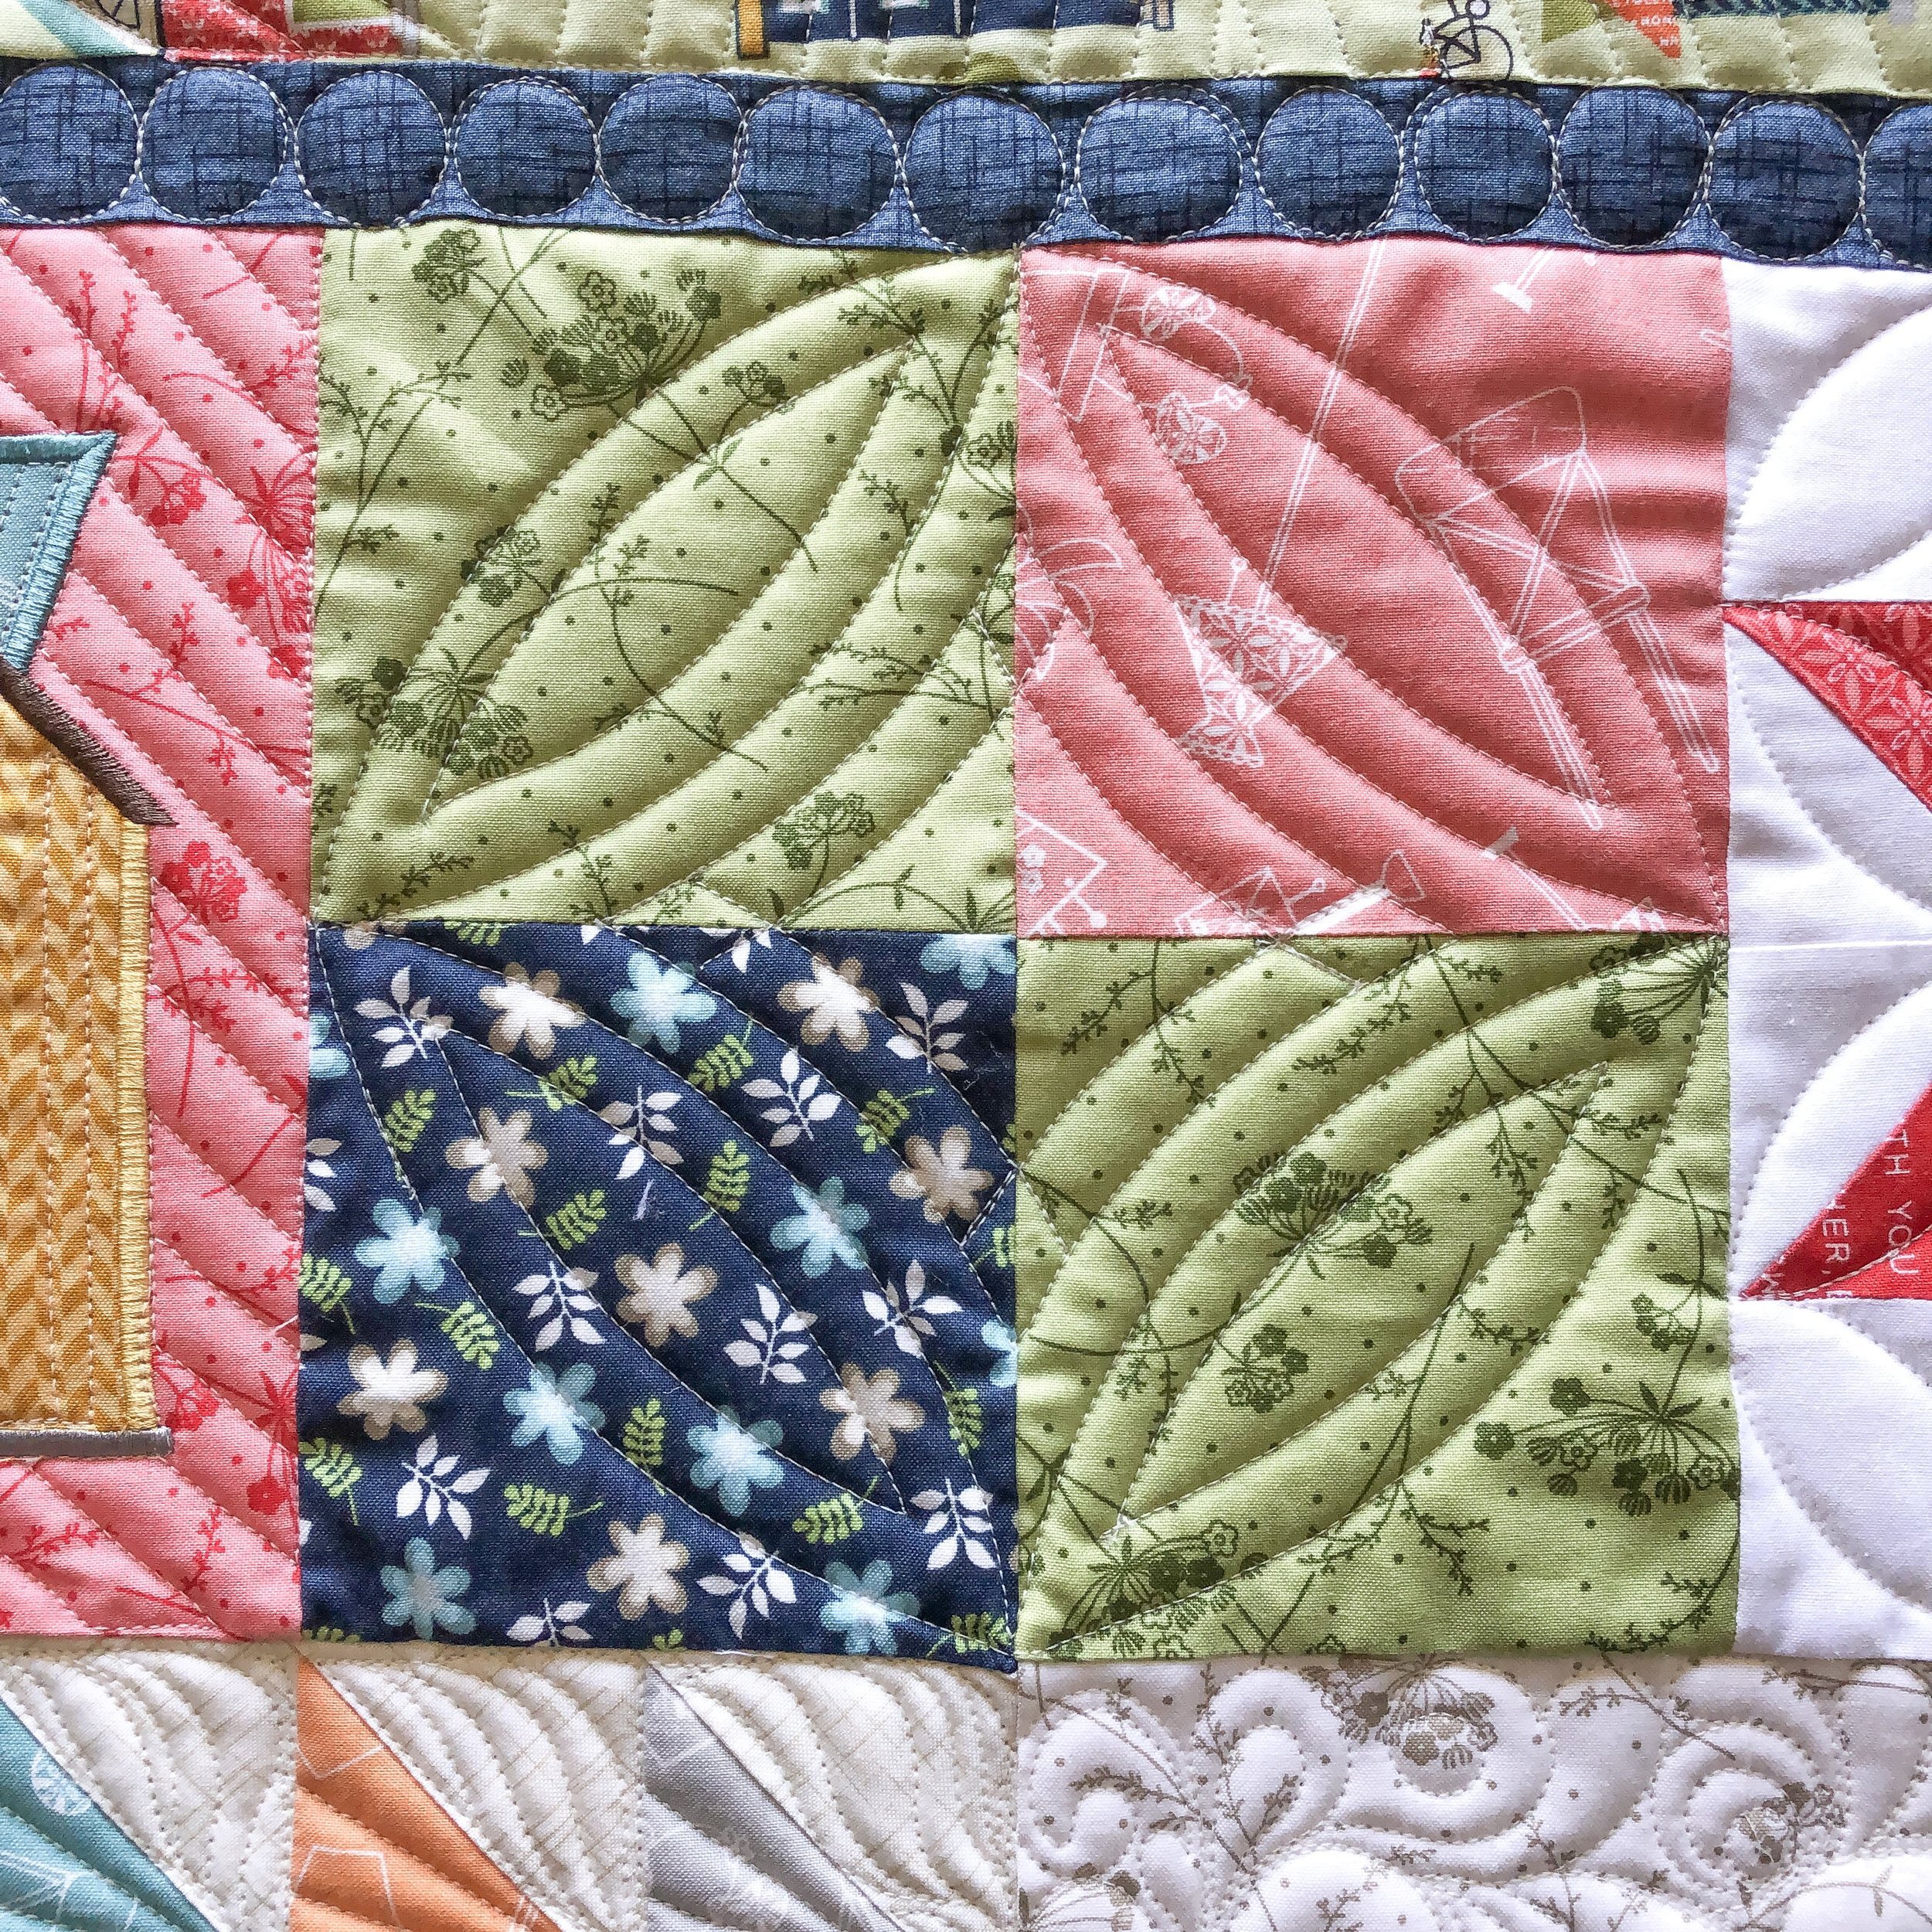
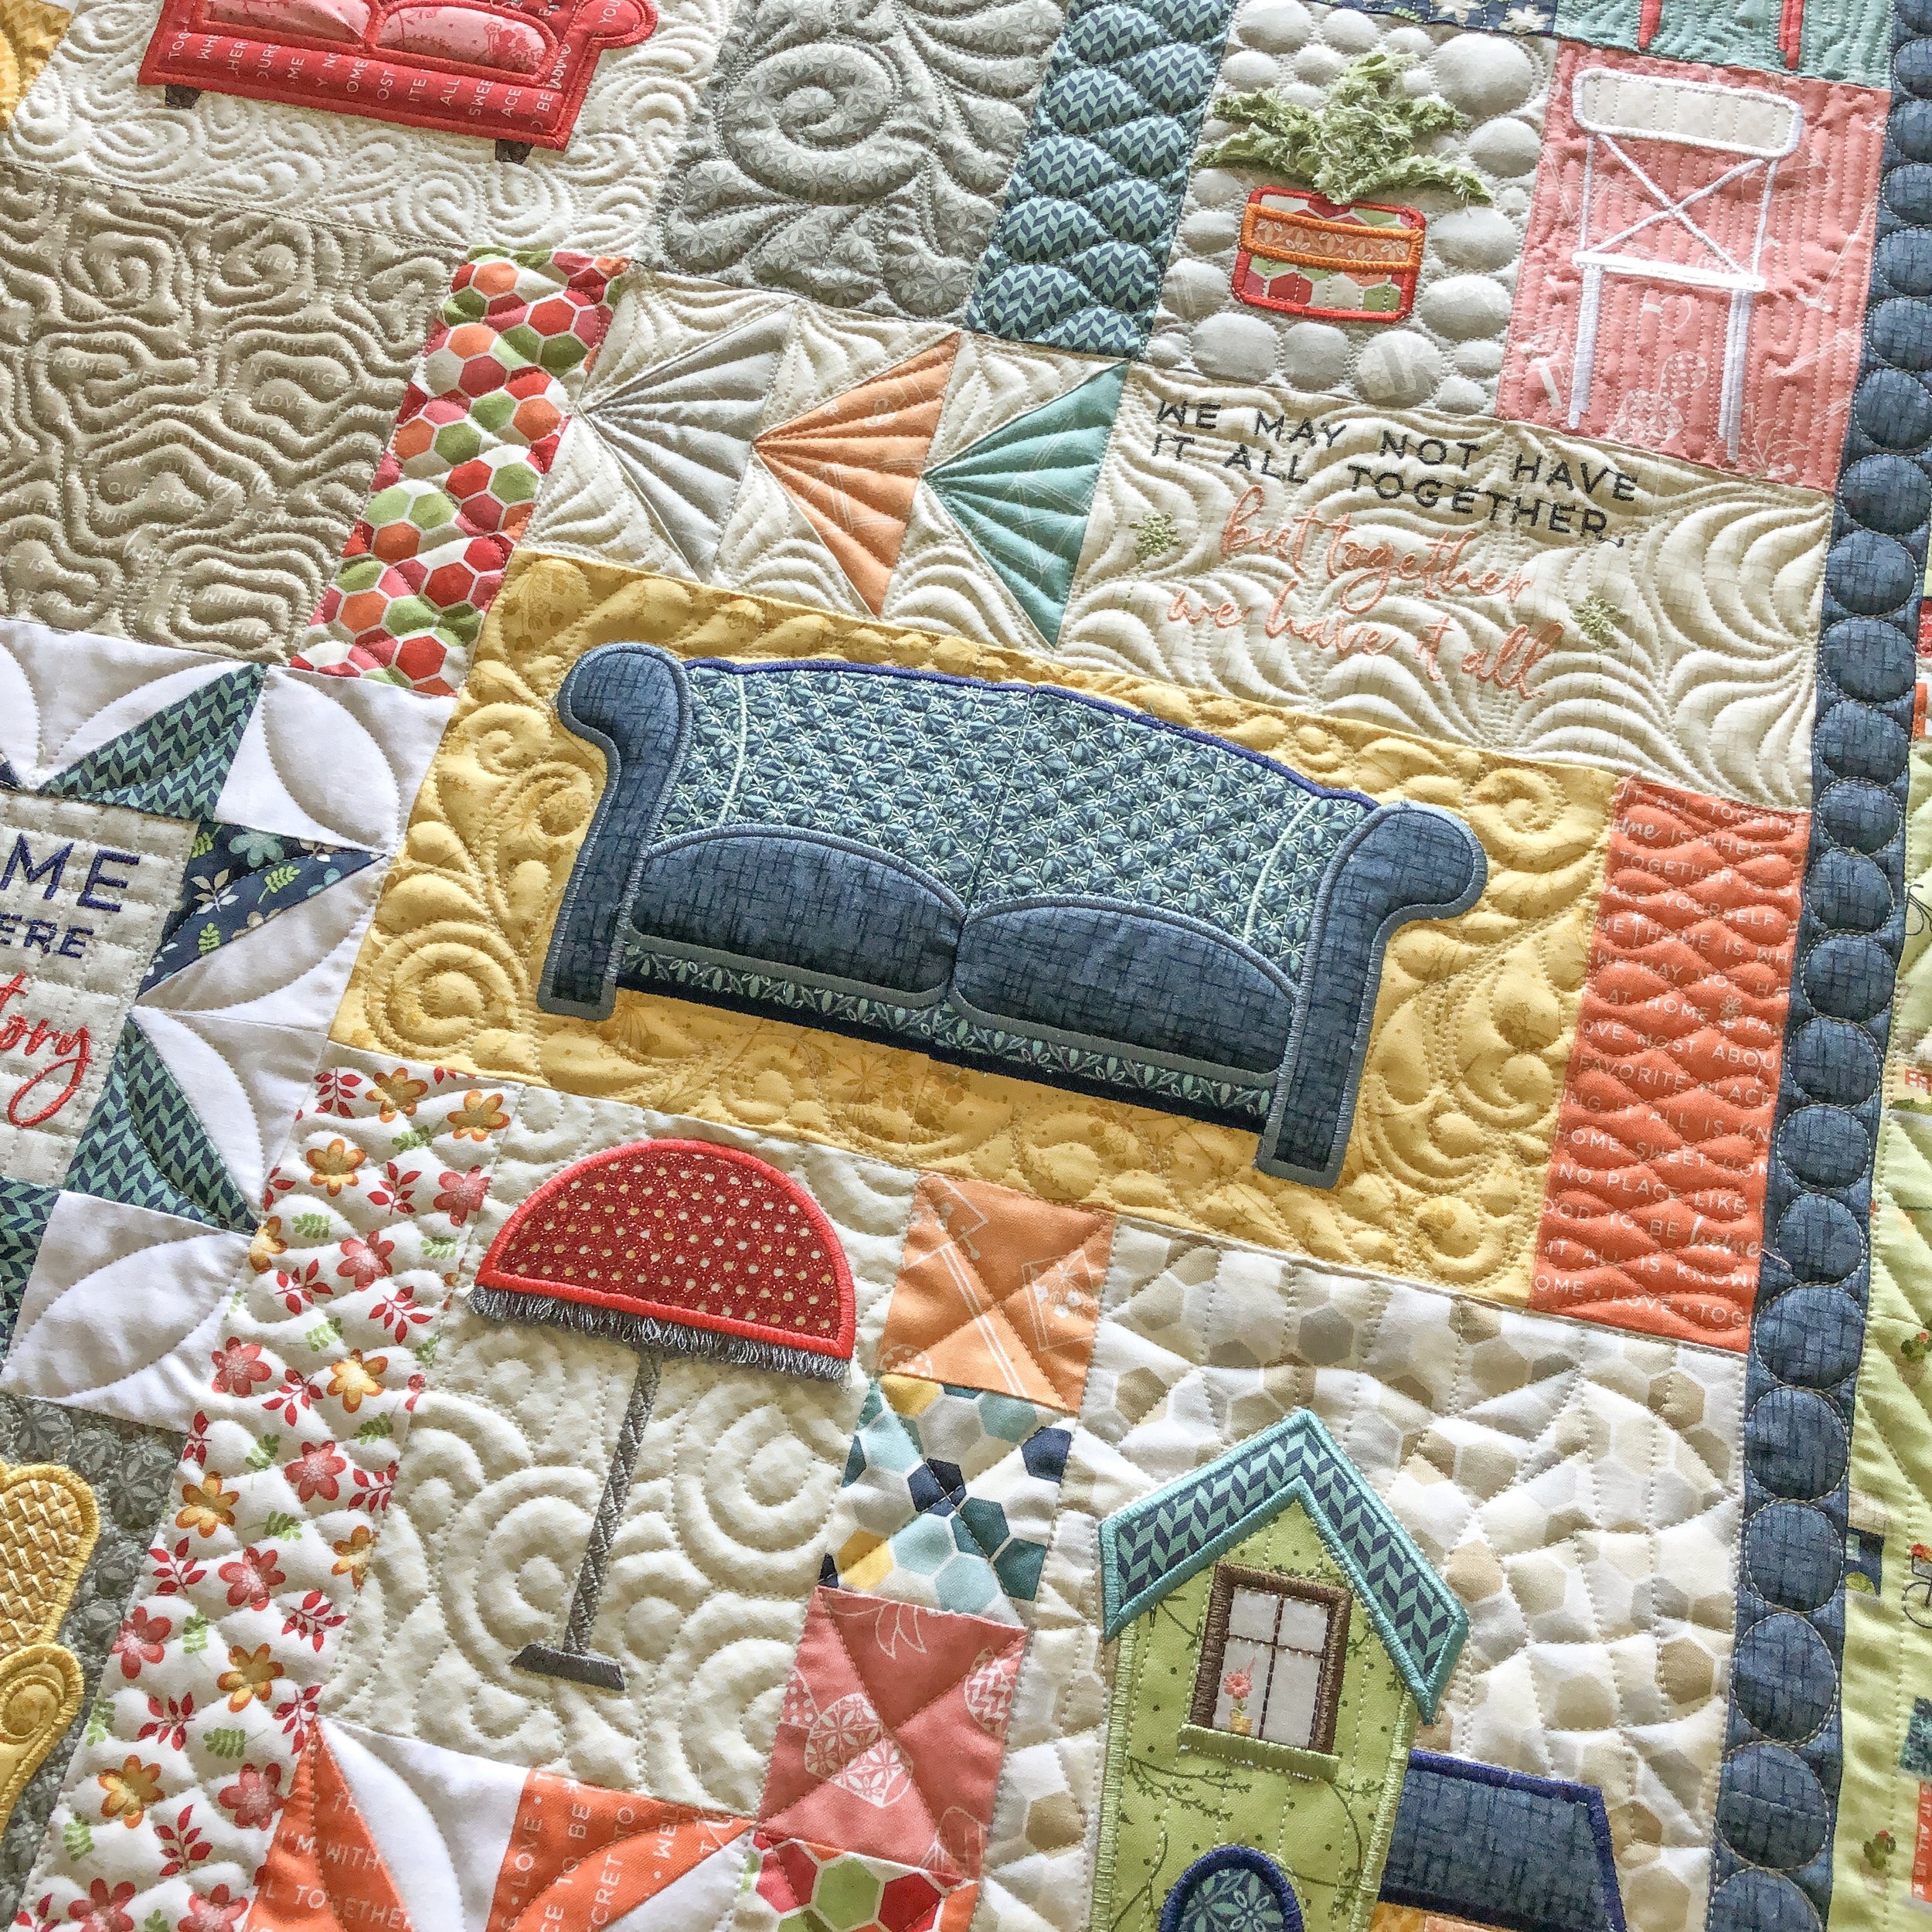
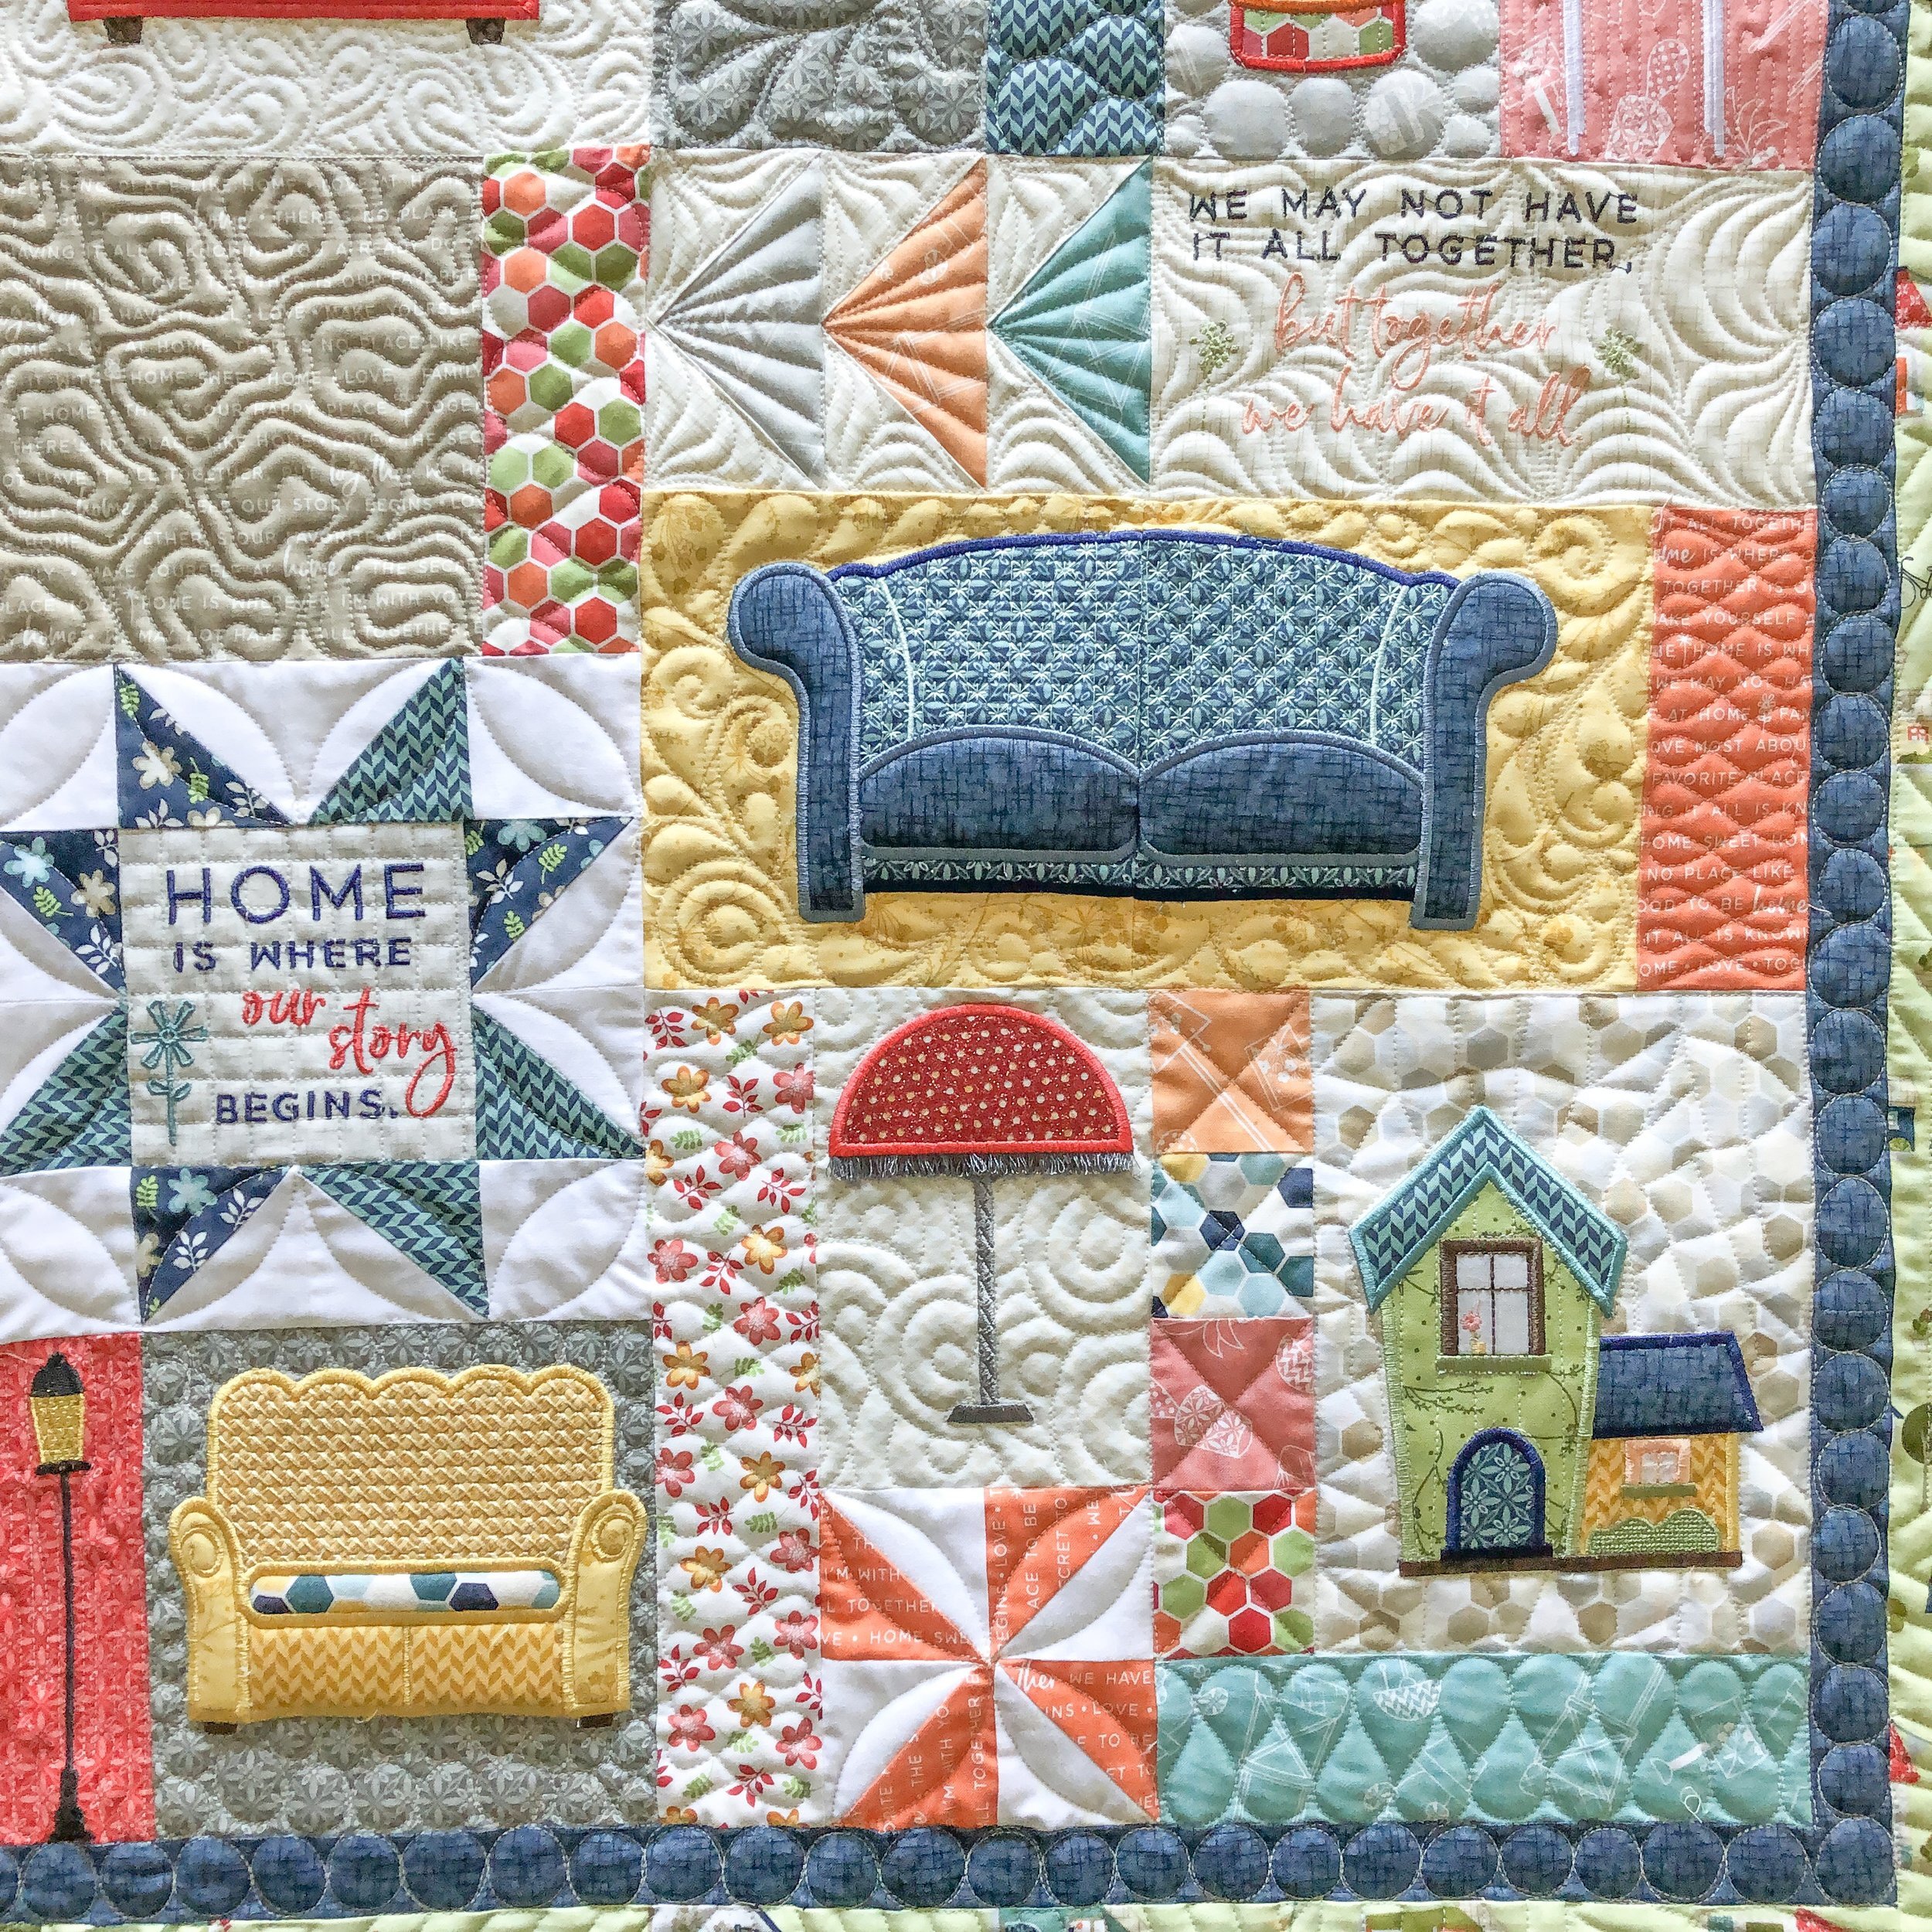
First up...this amazing quilt made by Jeanenne!! It’s called Make Yourself at Home by Kimberbell Designs. This pattern, like several of Kim’s patterns, is available in a machine embroidery or hand embroidery option. Jeanenne did the machine embroidery version.

My goal with the quilting on quilts like this, is to create lots of different textures that compliment one another. Curves, pebbles, lines, ribbon candy, leaves with swirls, and grassy texture. Love it all together!!
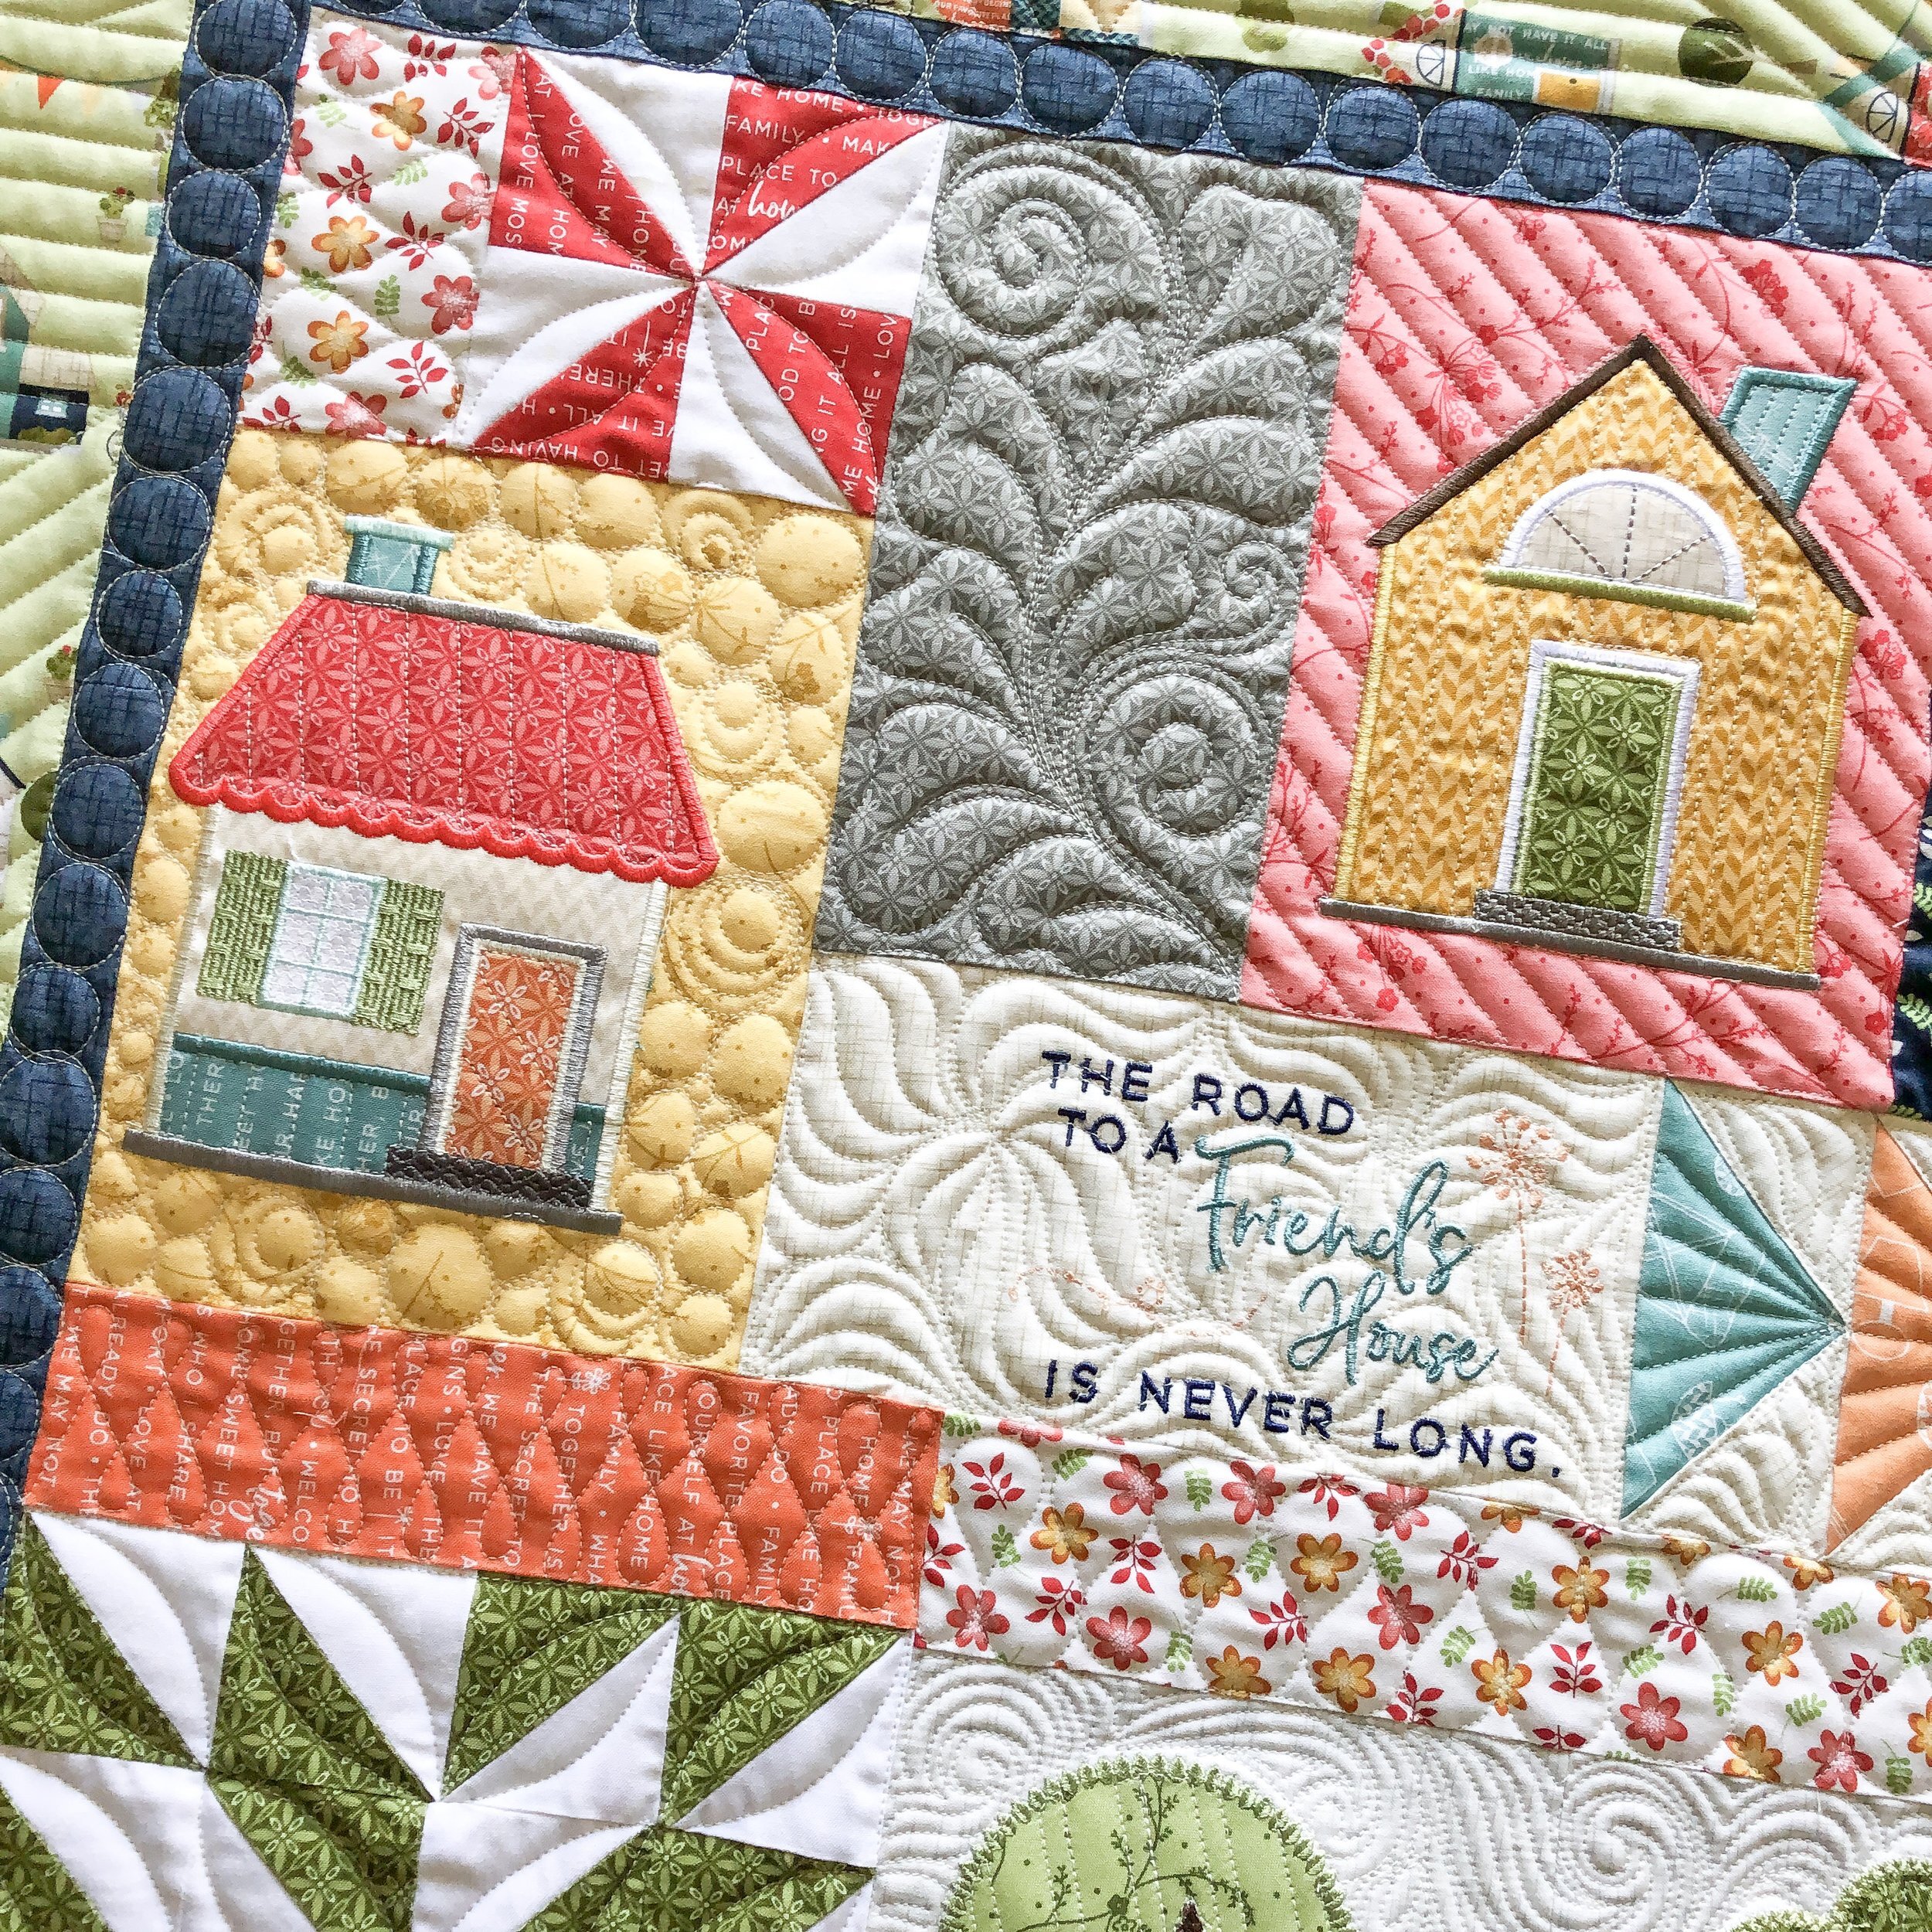
My favorite texture has to be the 1/2” inch random angular lines in the border. I just love doing that on a border. It makes such a statement. I used Edge rulers from Linda at The Quilted Pineapple, to quilt the lines. I did a video tutorial on quilting out these lines awhile back. Head here to check it out: https://youtu.be/m5UXfRD_ujY
Its also a great way to fill a large border, or random borders and sashing like I did in the video.
Aren’t all those different angles so fun!! Yes, I do them randomly. No need to mark anything, just vary the angles from the ones you’ve already quilted.

I used my 4” and 10” Circle2™ (said...Circle Squared) rulers on the star blocks, pinwheels, the green quilt block, and the circular design in the 4 patch. My Circle2™ (machine quilting circle rulers) are so versatile. Let your creativity run...and you’ll create some amazing designs with them.
My Circle2™ rulers are only available in my shop in a set of 6 ranging in size from 2”-13”: https://www.quiltingit.com/shop For more info on them, check out this post: https://www.quiltingit.com/blog/2018/10/10/introducing-my-circle2-longarm-circle-ruler-set They are available in green and clear, high quality 1/4” acrylic. They can be used on a longarm or on a sewing machine with a quilting foot.

Aren’t all those textures great together?!?!?!!! And below is a closer look at the fun design I quilted in the 4 patch.
I decided on a windy background for the trees...and if wind is anything like it is here, it’s going in all different directions. Wind is fun to freehand quilt...here is another video on my YouTube channel: https://youtu.be/qsLJOyP62sc

I’m trying to share enough pictures, so you can see all the great designs together. That overlapping swirl design, behind the lamp, is also a favorite of mine. Go to this video to see how I quilt out this design: https://youtu.be/x0UNyEJdm9Y

When I quilt a design on a quilt like this, I try to do it again at least once if not twice. By doing so it makes the designs compliment one another and helps your eye travel as you look at it.
I used my favorite 8020 cotton poly blend batting from Winline, and Antique Cream 30 tex A&E Perma Core thread on the entire quilt.
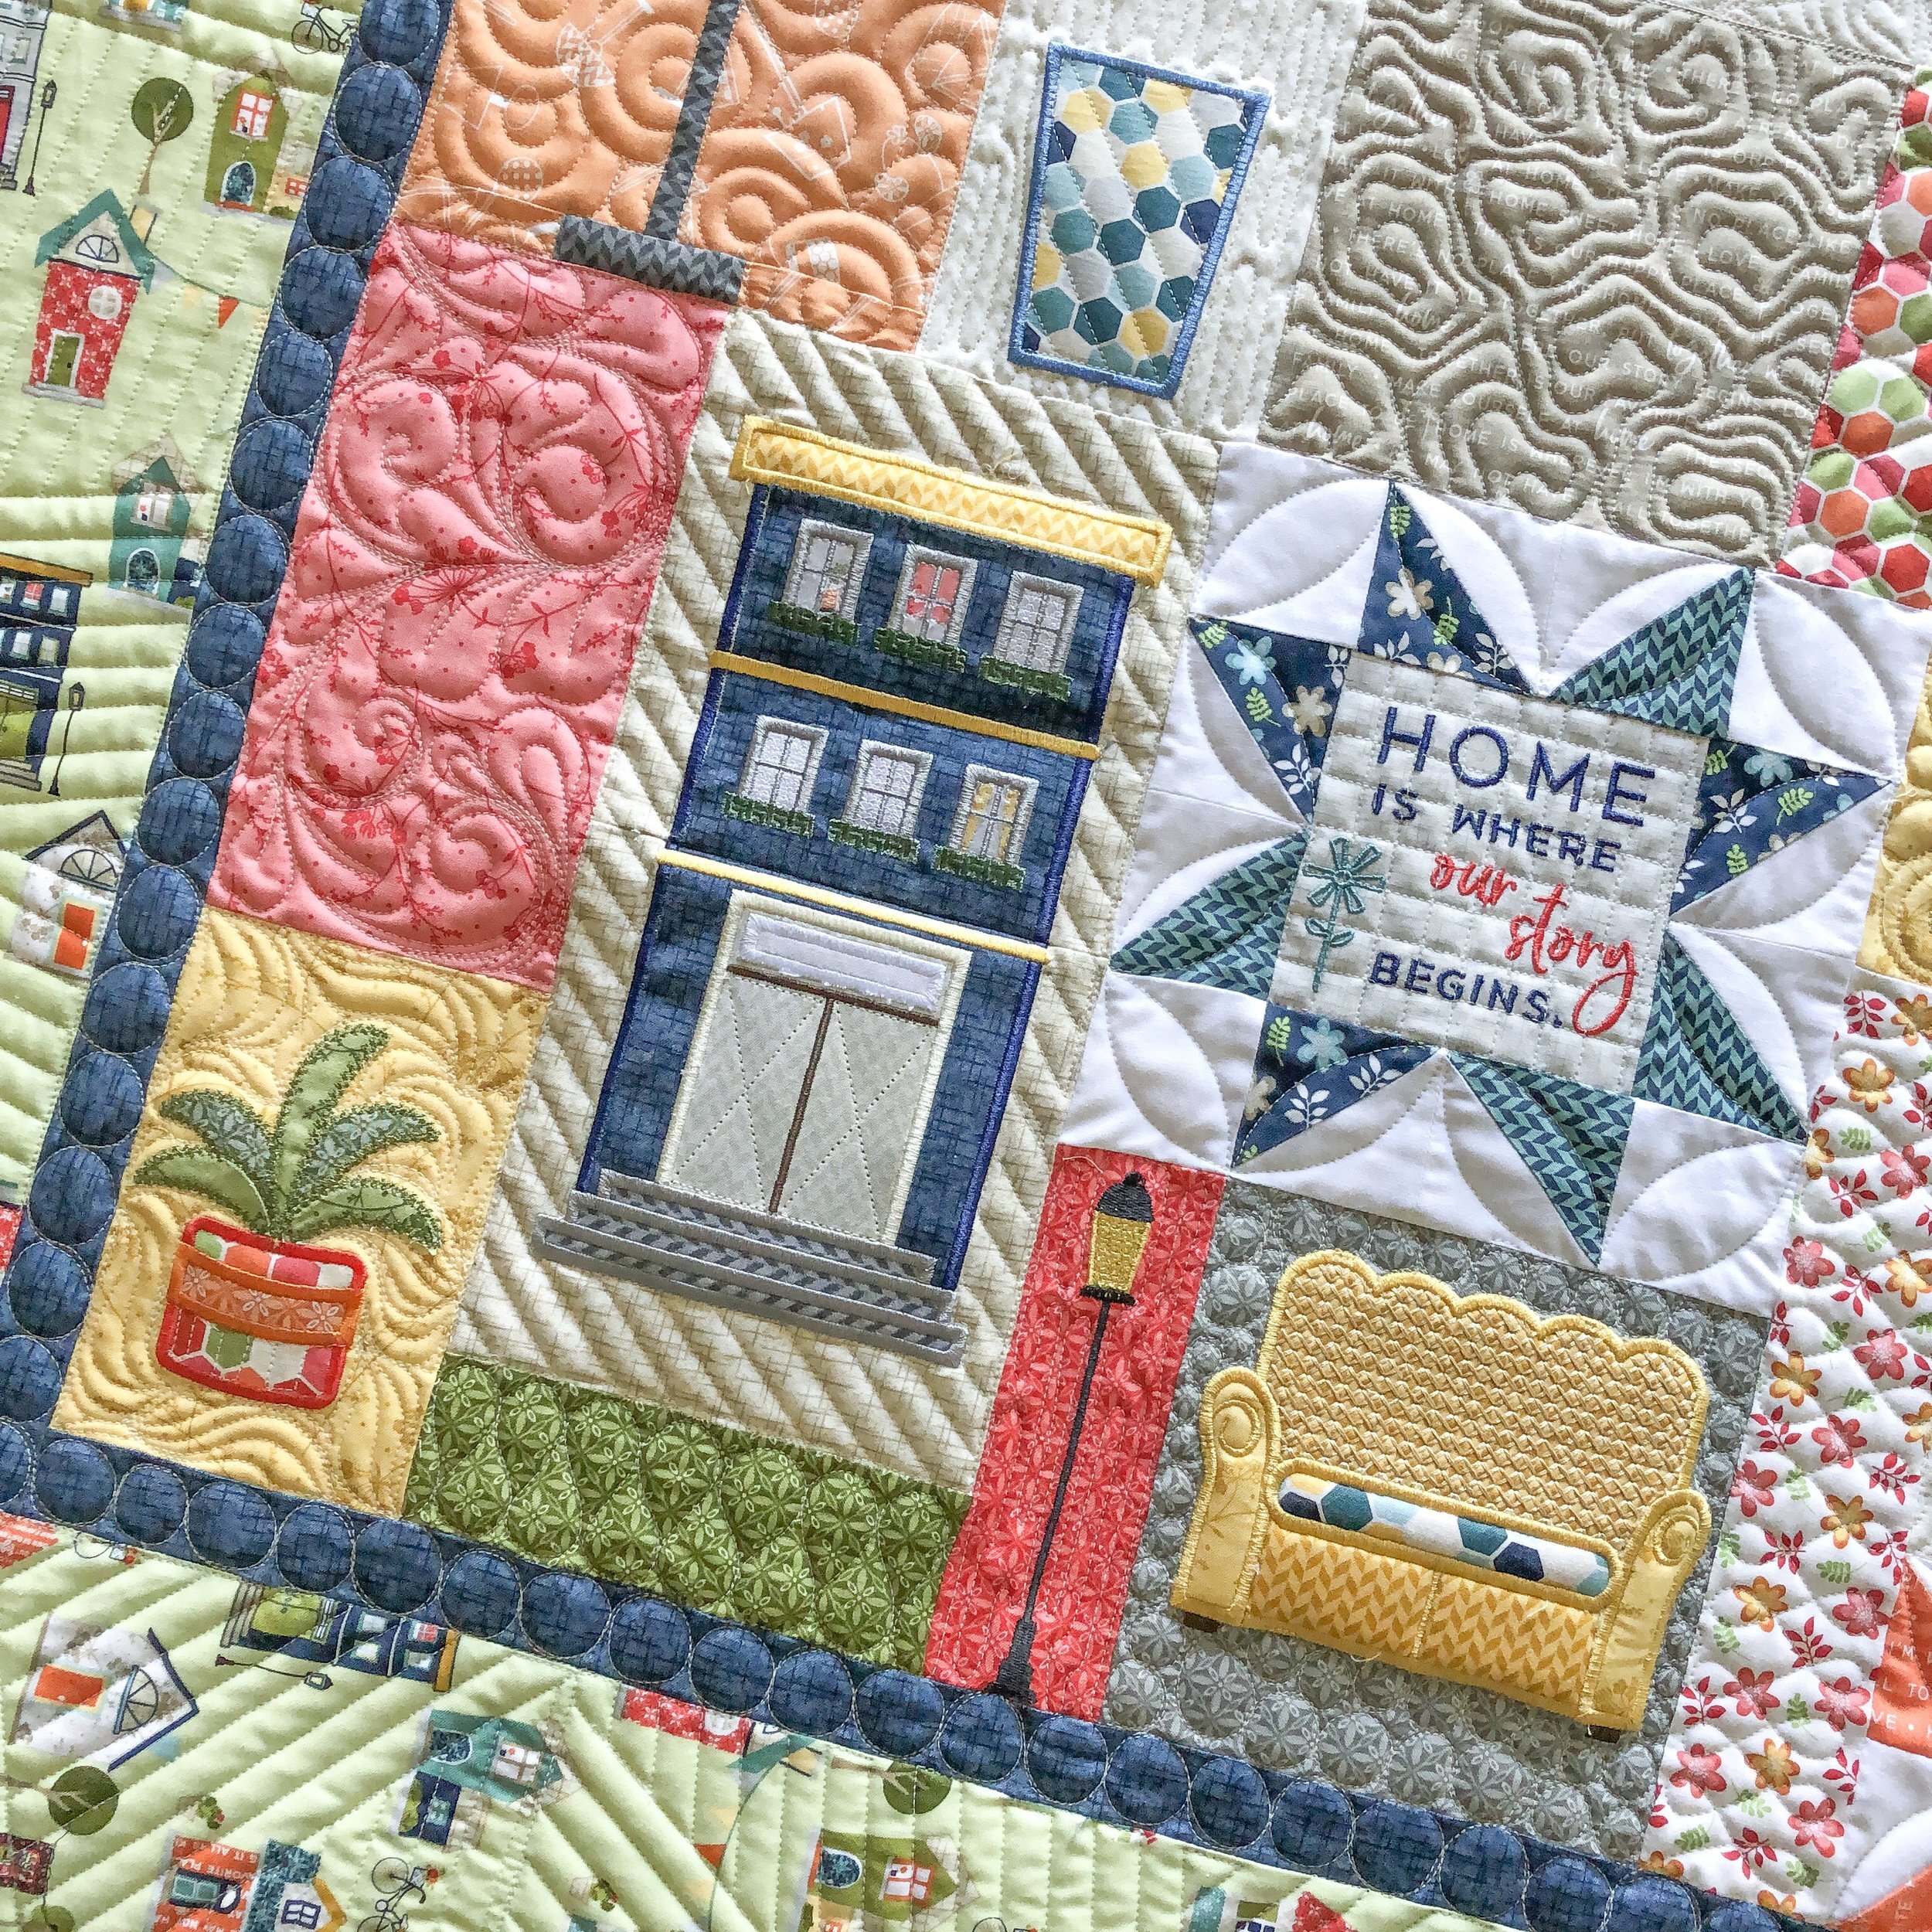
I don’t like to quilt a ton inside the appliqués...the couches on this quilt got no quilting at all...yet I quilted the pot on the plants and doors on the house above. My rule of thumb for quilting in appliqué pieces, only do it if they need it. If they aren’t laying flat or are too big, I definitely quilt something, even if it’s just simple lines.
I hope you’ve enjoyed this quilt!! It’s definitely a fun quilt.

Next up...pillows!! Lots of them! I actually sewed the backs together in one long piece, because they weren’t big enough to pin to the machine. It’s also faster to quilt them all on one backing. Below you are looking at 7 pillow fronts all in one piece because of the backings being sewn together. I just center the pillow front on the backing, so the seam doesn’t end up on the back of the pillow. Sherry will cut them on the seam, so then she can trim them.
These are part of the pillow of the month kits that My Girlfriends Quilt Shoppe has been doing for the past 8 months. They may still have some of the kits available, if not, I’m sure they have the patterns. Here is their website: https://mygirlfriendsquiltshoppe.com/

These were made by Sherry. A lot of these pillows will get more dimensional items added to them now that they are quilted.
Pebbles, swirls, and feathers for the background with a ribbon candy border.
She brought batting scraps for each of these, I think it’s an 8020 cotton poly blend. I used a white and a navy 30 tex Perma Core thread on this one, from A&E.
Next a cute witch hat! This one is quite simple, so creating great texture was important. I did that same line design, that I did on the border of the quilt above, on the brim of the hat. Add some crackle, 1/2” angled lines, 1/2” squares in the spider body, and ribbon candy sashing...a great combination! I used black and Antique Cream 30 tex Perma Core thread from A&E.
A closer look at the angled lines on the brim.
And squares on the spider.
Next the Valentine pillow. This one will have ribbons, like a bouquet of heart balloons.
Different quilty textures in the hearts with the pebbles in the background, add interest to this pillow. Bordering it with ribbon candy.
Next up...this cute gnome Santa!! He’s my favorite of the bunch. Sherry made four of these, which makes 7 pillow fronts in total.

I quilted that same freehand overlapping circle design in this background, link to the video is above. (With the lamp on the quilt). I added some vertical lines at 1/2”, in the hat and angled lines in the body. The beard has a wavy design and nothing is needed for the nose and the shoes.
The border has a repeat of these three designs, down both sides.

I used Antique Cream 30 tex A&E Perma Core thread on all 4 of these pillows.
For those who are wondering I have a $35 minimum, and so each of these pillows are $35 to quilt.
I’m off to quilt another quilt!! I have some fun quilts to quilt in the next few weeks, that I’m excited to share with you. Have a great weekend!!
- Leisha

Client Quilts & Pillows
Good morning! Hope you had a great weekend. This week I’m going to share with you a couple of quilts and then 4 pillow fronts, that I had the pleasure of quilting. This post has lots of pictures, tons of info, videos, and links. I’m just trying to share with you all my tips and tricks. I hope you find them useful.
First up, Beth’s quilt!
This quilt is amazing, and huge. So big, that I couldn’t get it all in the picture.

Beth used the Farmers Wife book to makes all these blocks. Such a labor of love!! She used all Bonnie and Camille fabrics from Moda. Which is my favorite!!
I sent Beth some options for quilting, and she chose Orange Peel. This design is by Marci Gore from Lily Street Quilts. Go here to check out her design: https://www.intelligentquilting.com/Orange-Peel-E2E-p/mg-orangepeele2e.htm
In the video above I share how I line up digital designs, using my Gammill Statler.
I love the orange peel design on this quilt, it compliments the blocks, instead of competing with them.

I used a white 30 tex Perma Core A&E thread and my favorite Winline 8020 cotton poly blend batting.

Loving this angled picture...and the texture on the minky backing below.
Next up...This incredibly fun quilt made by Joleen.

This pattern is by Angie Peterson, who is in Joleen’s quilt guild.

Joleen requested that I quilt her quilt, like Angie’s was quilted. Bubbles chaining throughout, with stippling in the background to make the bubbles pop. I think it turned out fun!! I also did some light quilting here and there in some of the appliqués, so they lay flat.

I used my 4” Circle2™ (Circle Squared) machine quilting circle ruler, to quilt the petals in the windmill blocks, as pictured to the right of the letter Z. My rulers are available here: https://www.quiltingit.com/shop?category=Rulers
This is the first of 4 different sizes of my Circle2™ rulers, that I used to quilt these client quilts or pillows.

I used a white and black 30 tex A&E Perma Core thread, in the white and black spots. I also used my favorite 8020 cotton poly blend batting from Winline. I used an Edge ruler from Linda at thequiltedpinapple.com to quilt the lines in the black squares, and in some of the appliqués.
I’m loving the circles dancing around the quilt!
Next up... Sherry made these 4 super cute pillows. My Girlfriends Quilt Shoppe, located here in Logan Utah, has a monthly pillow club. They are providing the patterns and fabrics. If you’d like to join, give them a call...435-213-3229 I’m not sure the cost or if they still have these available, but I’m sure they can help you out!
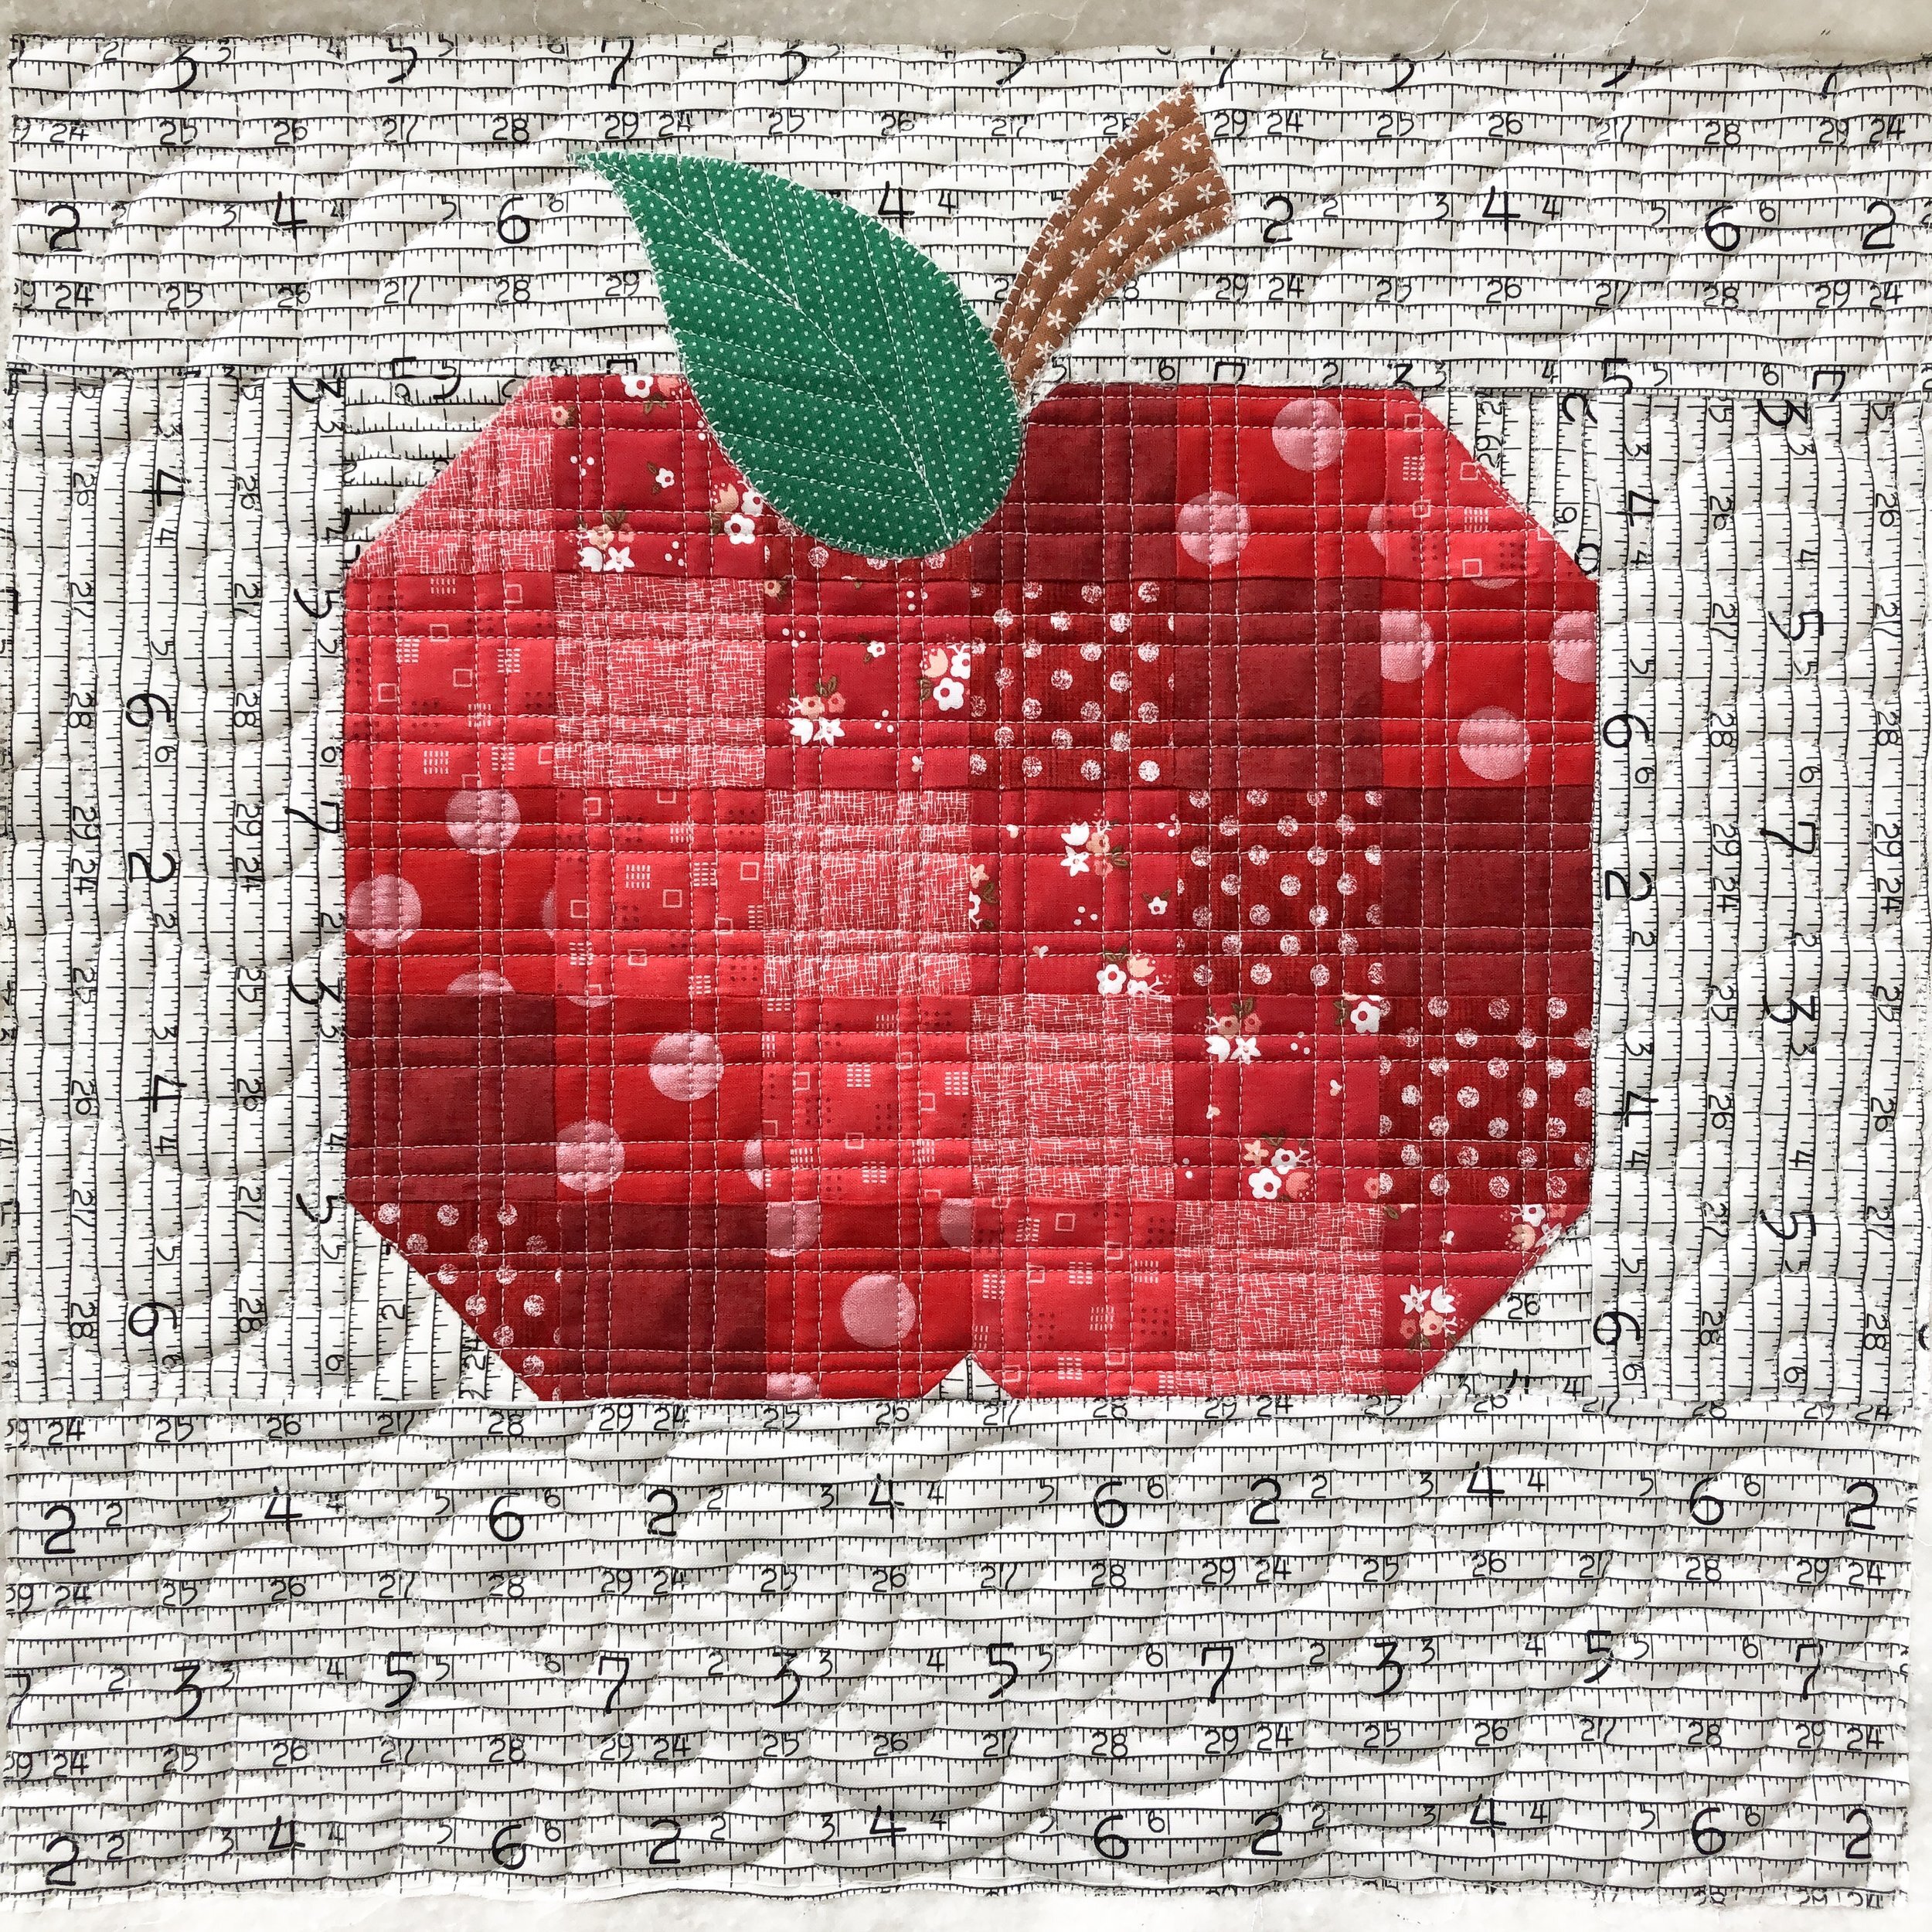
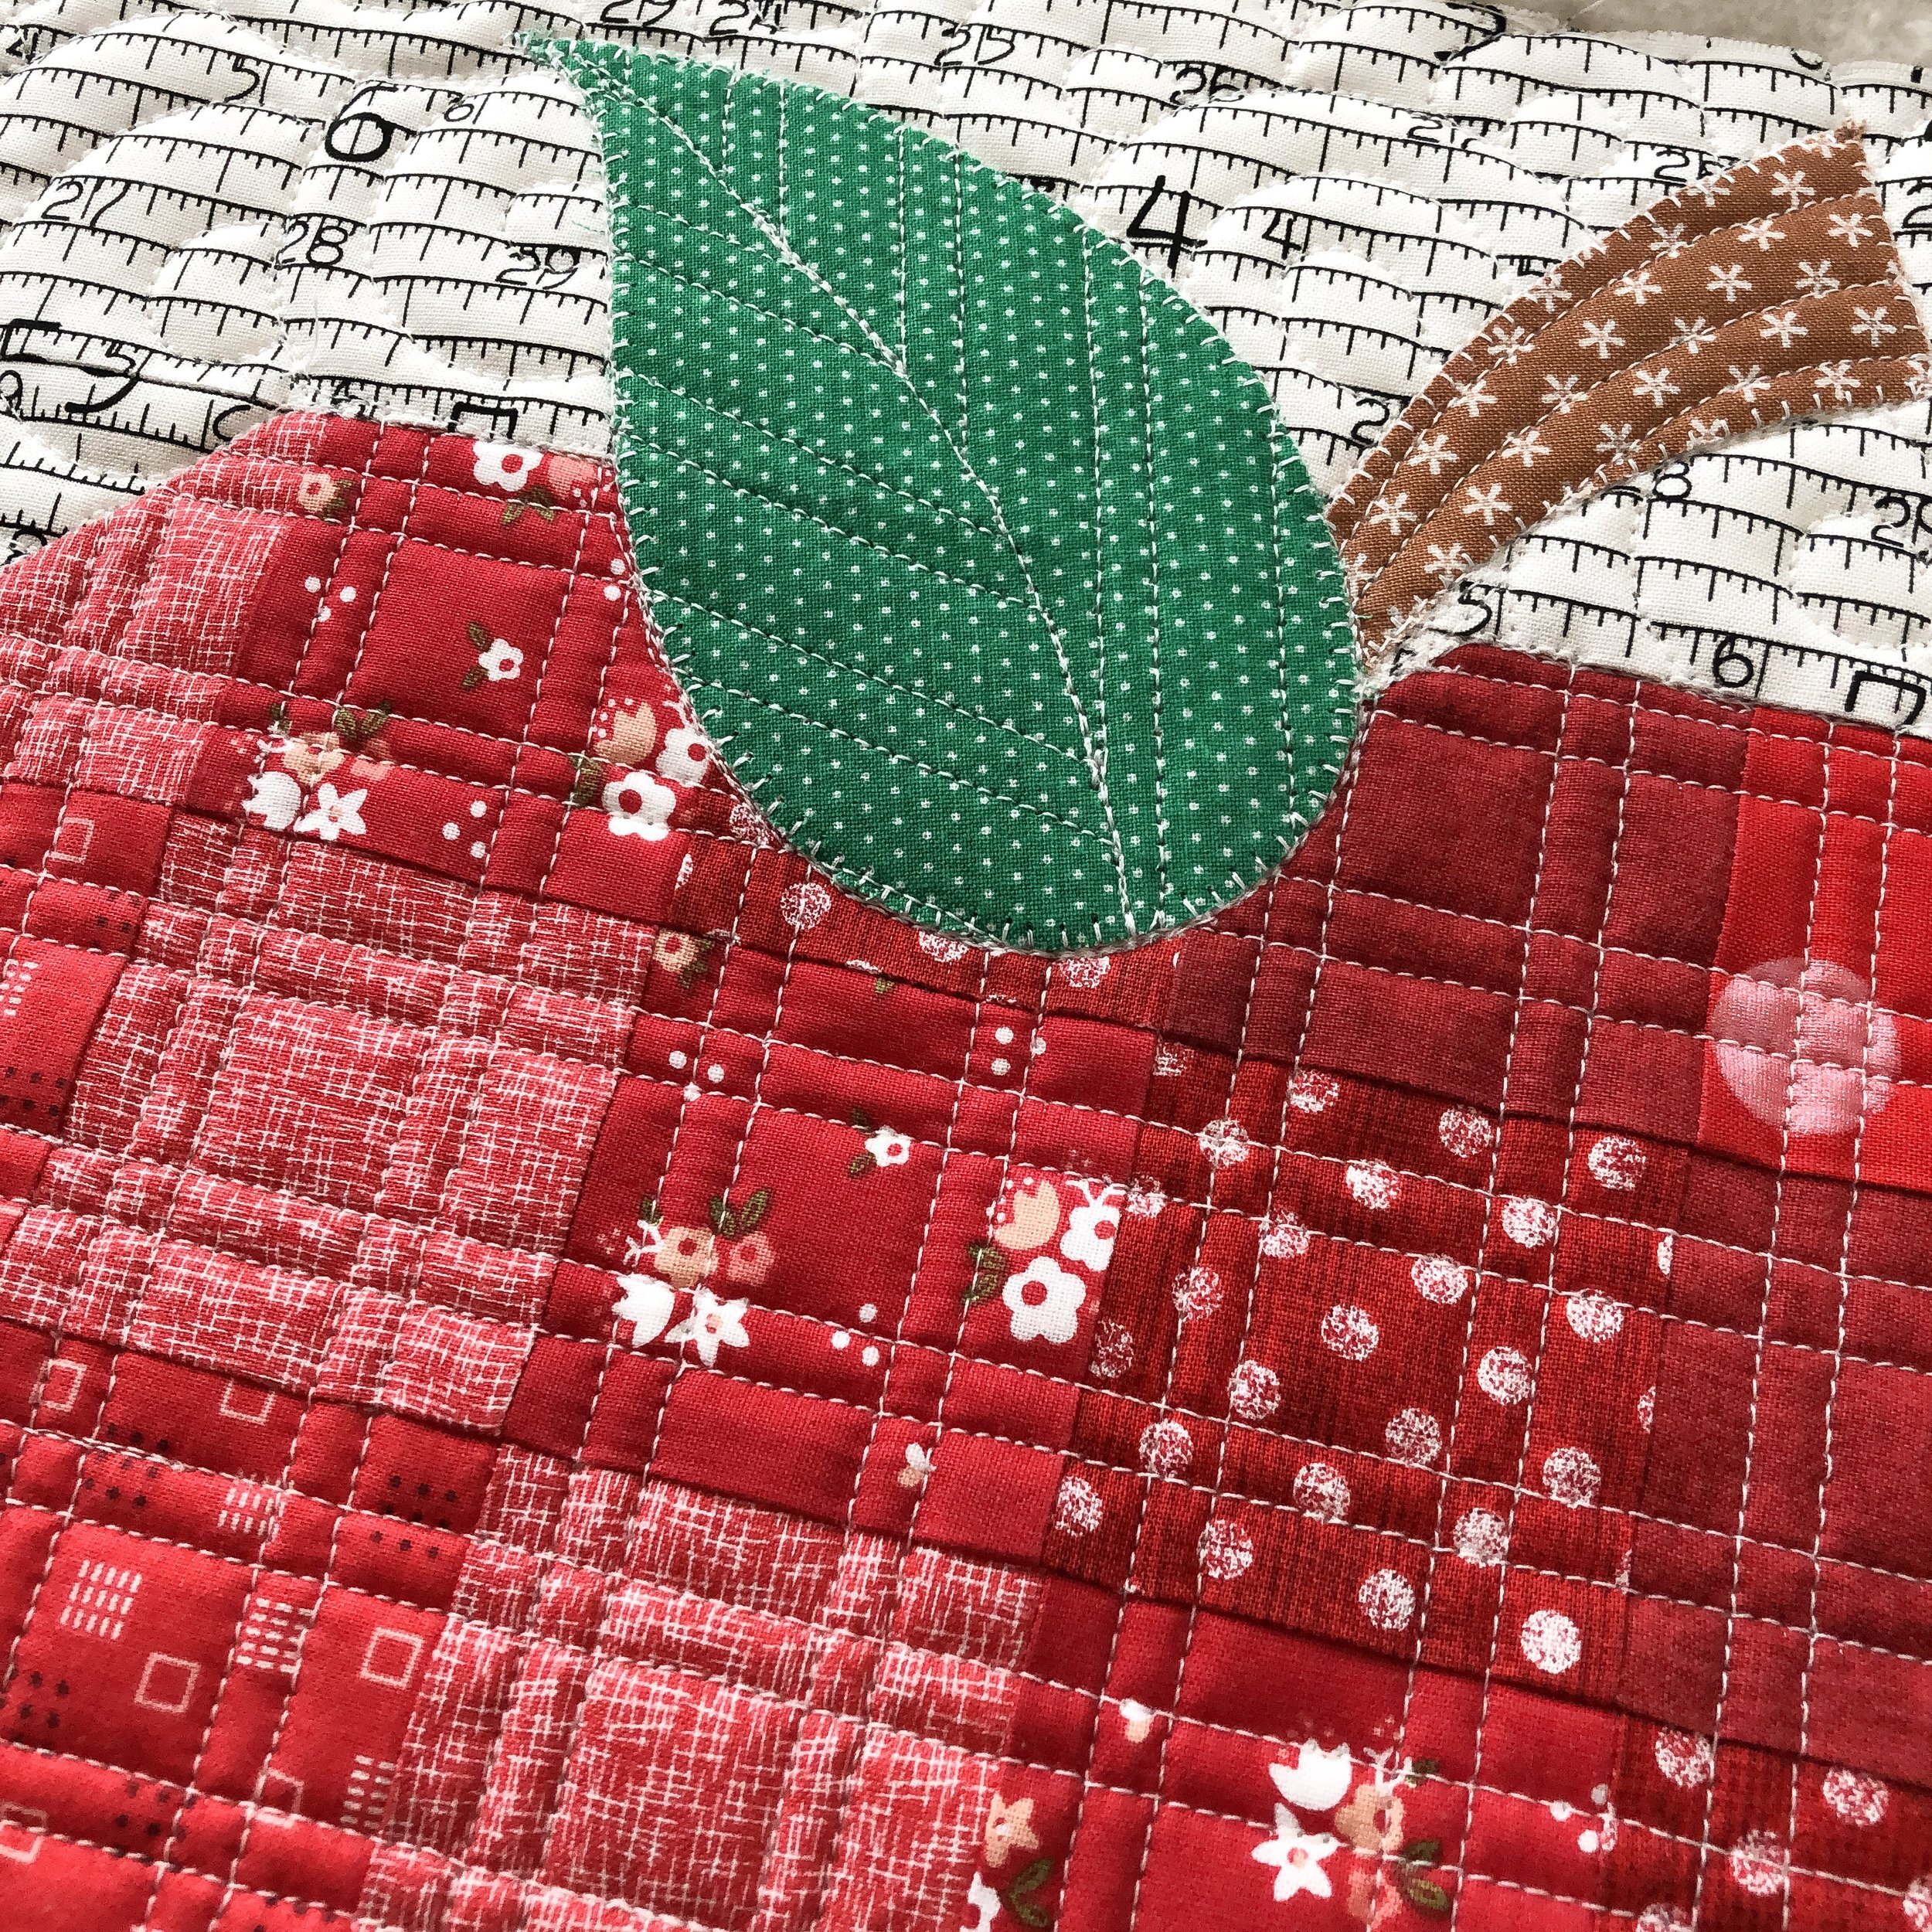
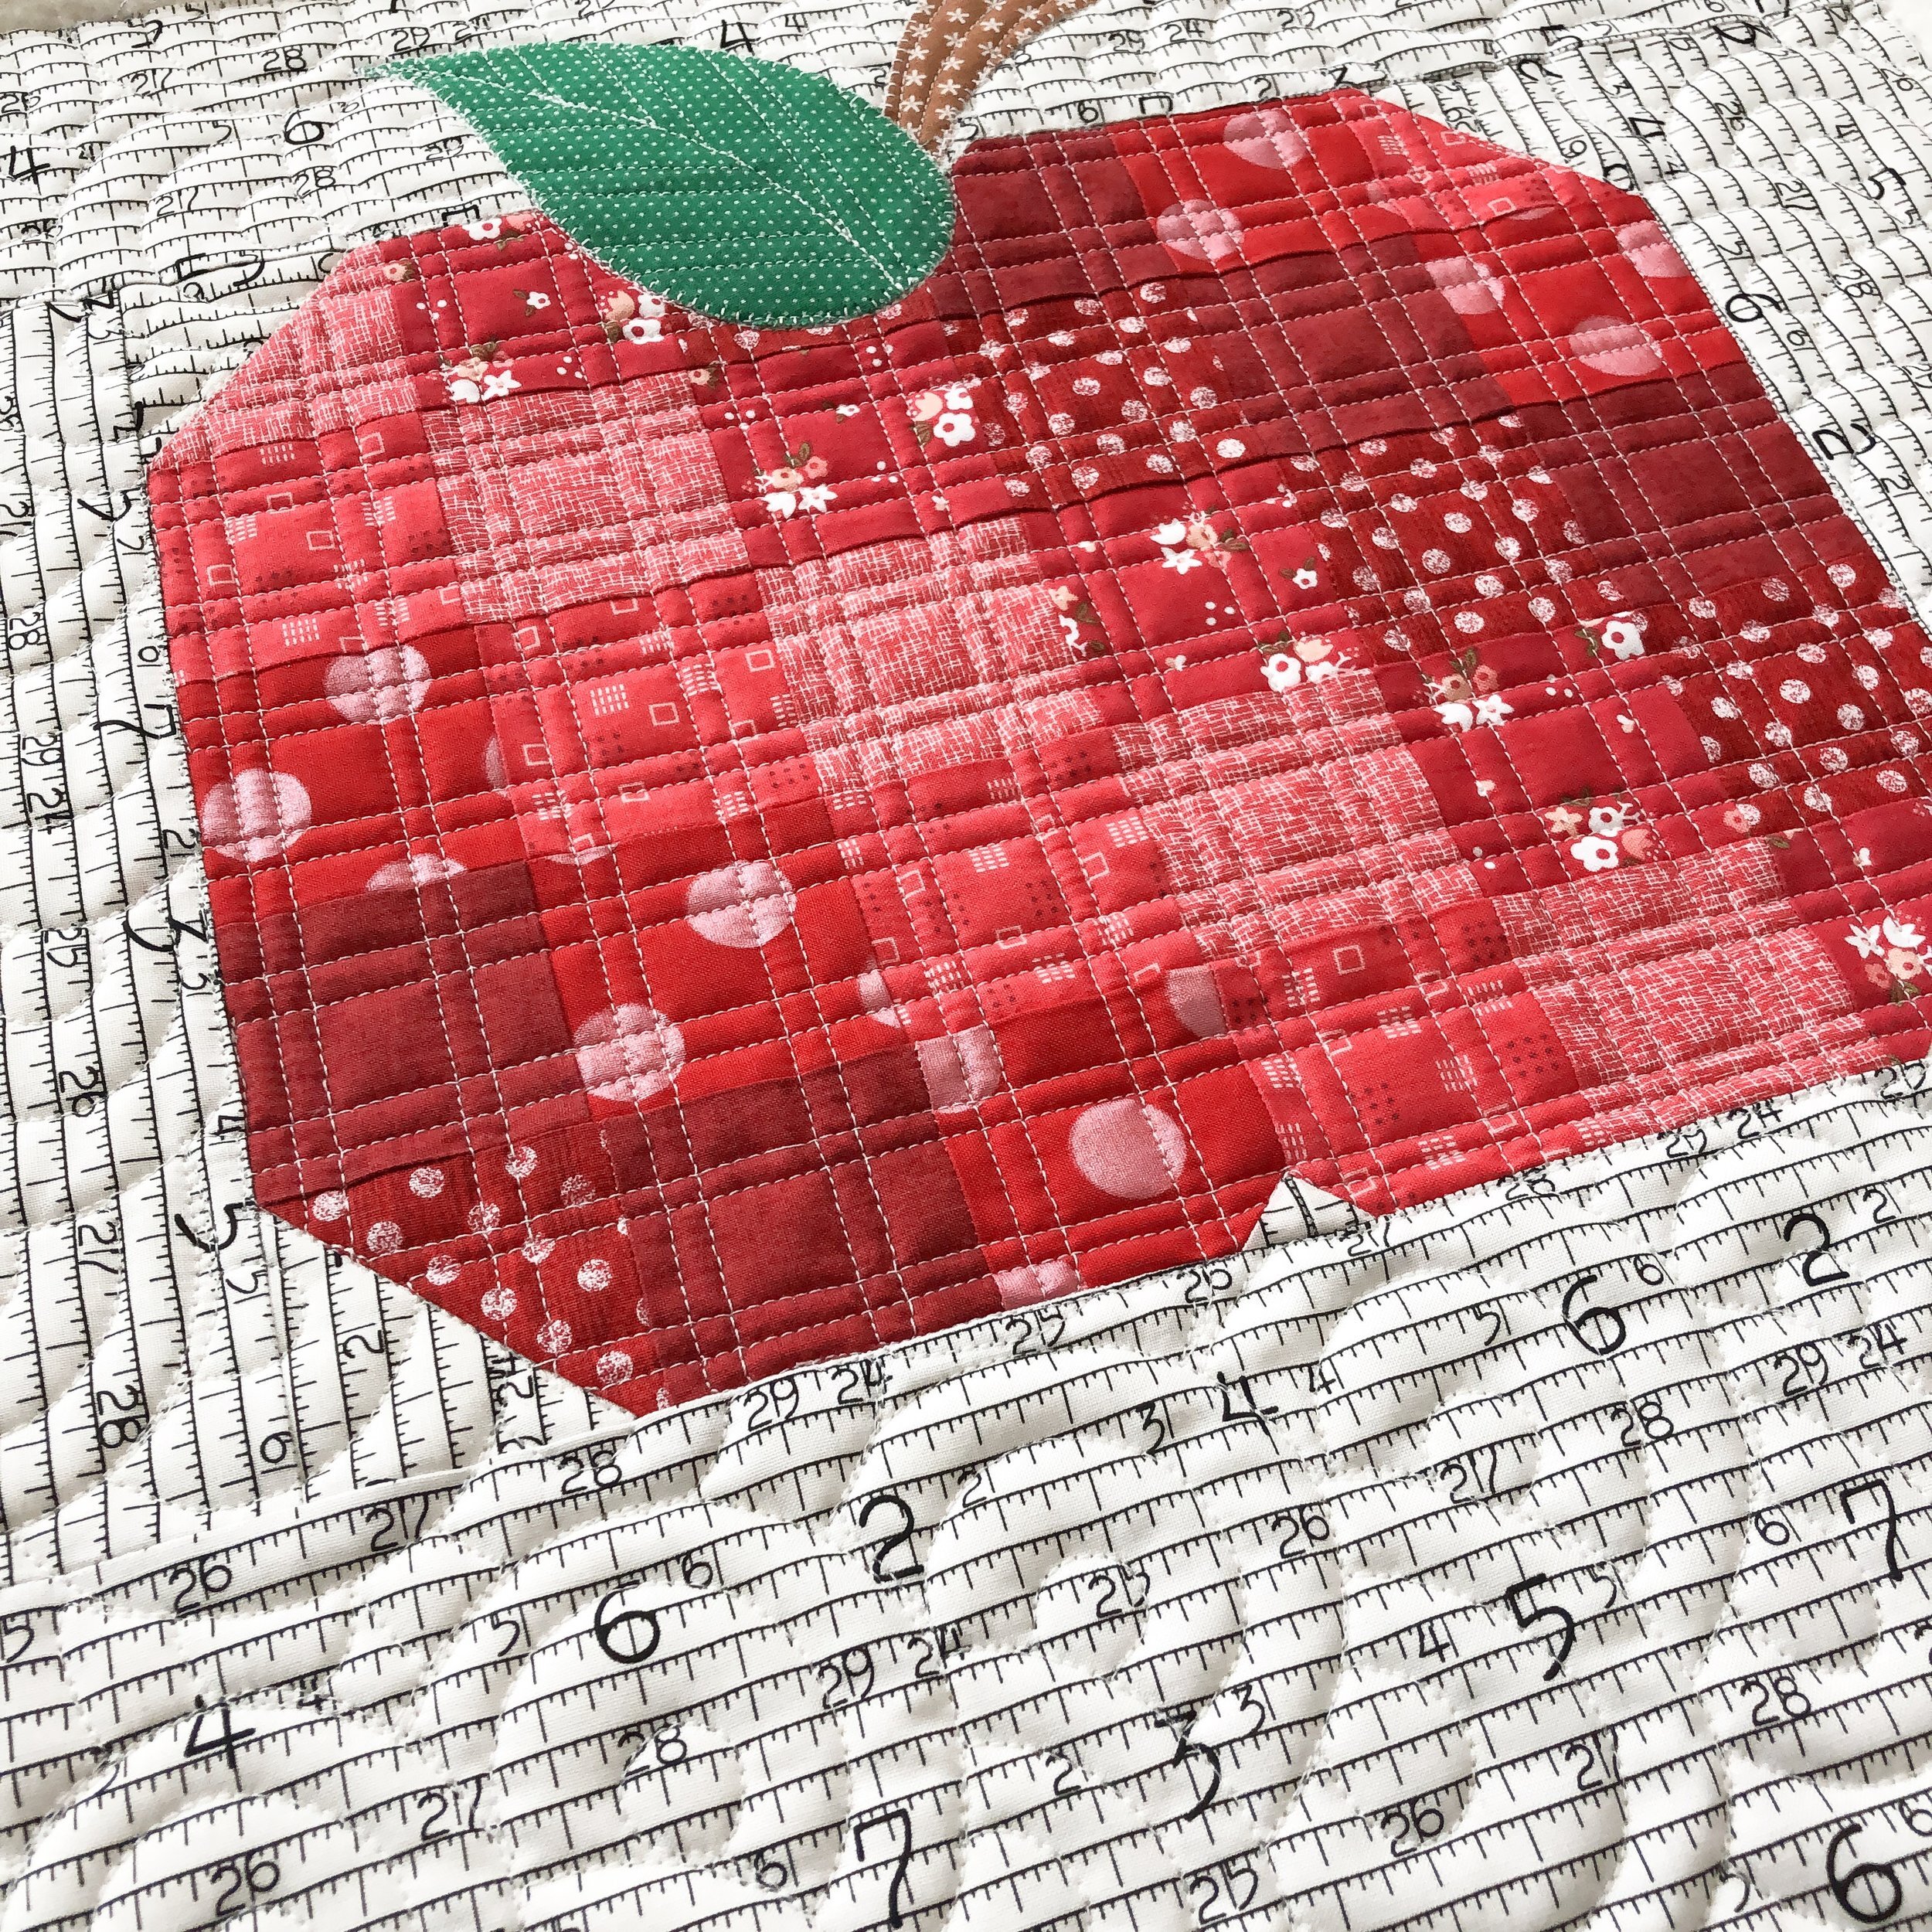
How cute is this apple?!?!?!!!! First the ruler fabric print on the background, love it!!
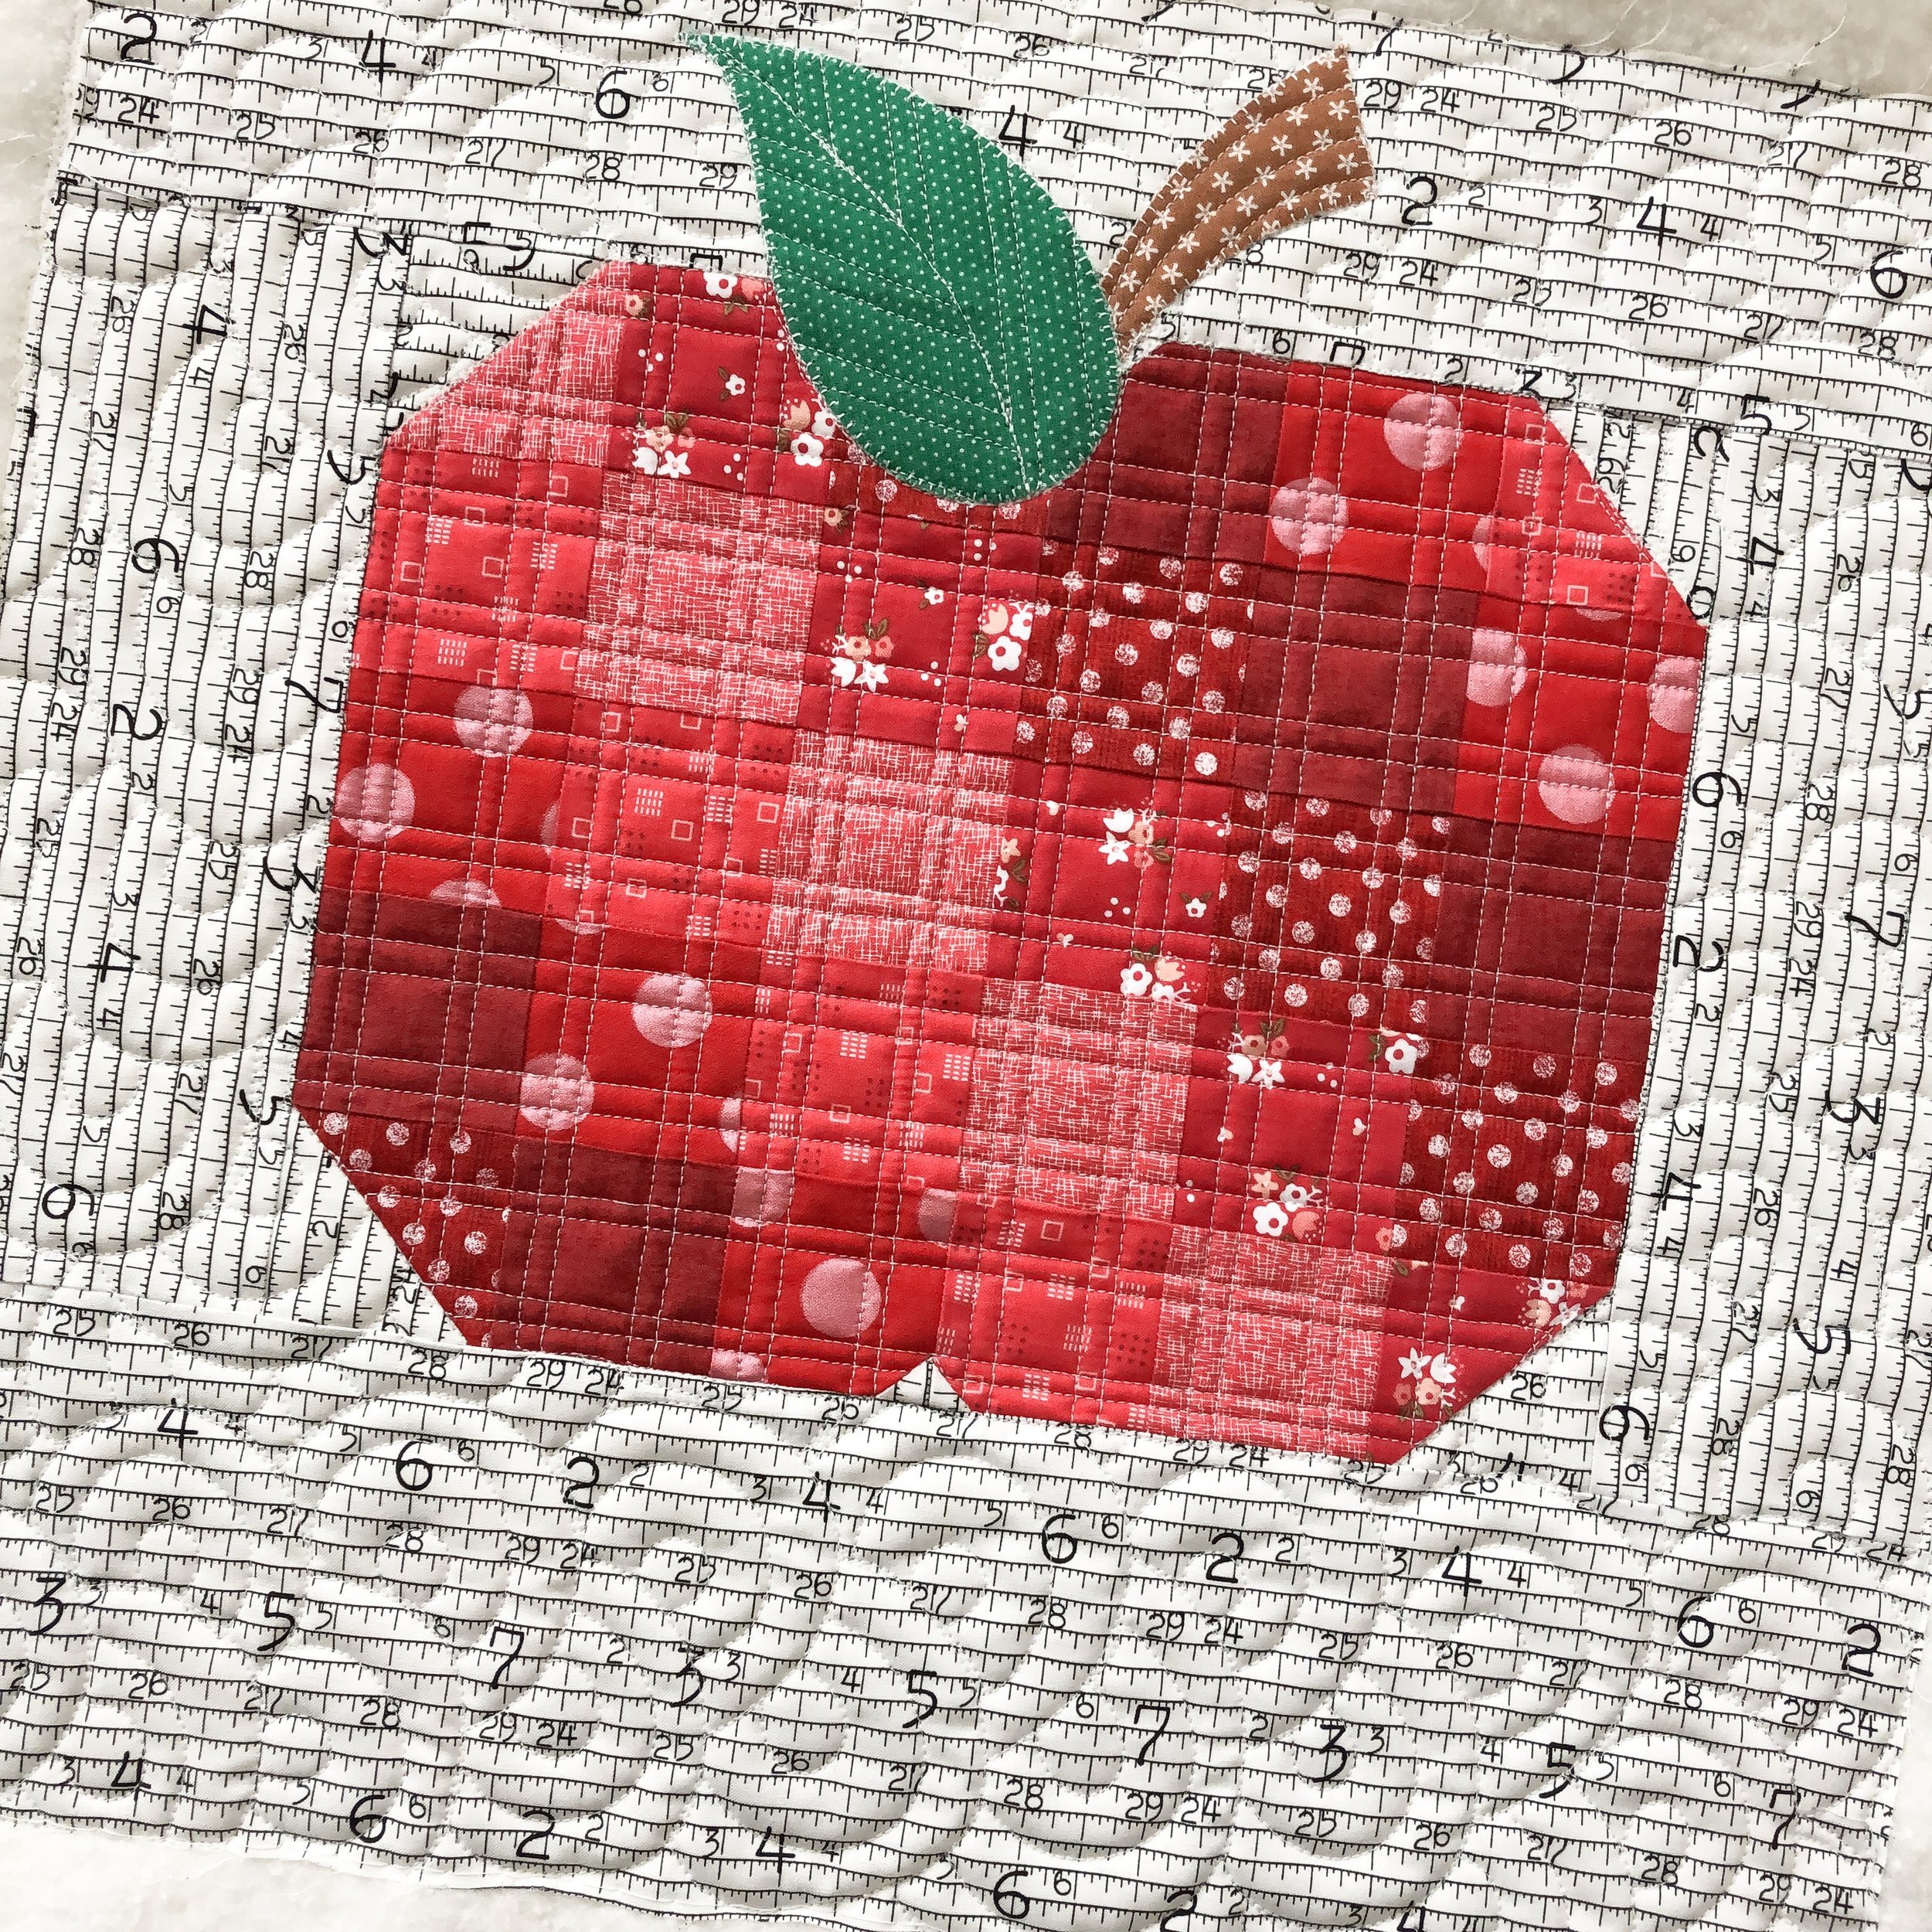
I wanted to have fun with the textures on this, something soft and curvy in the background with the pinstripe grid...that’s my kind of texture complimenting each other. I used a Edge ruler from Linda at thequiltedpinapple.com to quilt the lines. Her straight rulers are my favorite! I also did my favorite overlapping circle design in the background. I did a video a little while ago on how I freehand this design. Check it out here, if you haven’t seen it yet.
Overlapping circles is such a fun design to quilt...give it a try!
I used a white 30 tex A&E Perma Core thread and Sherry provided a 8020 batting on all the pillows. I do want to point out how nicely the white thread blends on each of these colors. It doesn’t distract from the pillow, and you can see the texture.
This snow pillow was fun to quilt!
I wanted to do a variety of lines in the background of the blocks, rulered lines and crackle. Crackle is a great design to freehand. It’s forgiving, easy, and a great design to quilt in the background when the shapes are hard to figure out what to quilt.
Here is a quick video on how to do a freehand crackle. (Note: I have a soft voice, if you’re having a hard time hearing me please try using a speaker of some kind.)

I used Linda’s Edge ruler again!! Seriously a great tool to have in your quilting studio!

For the bow tie blocks along the edge of the pillow, I used my 3” Circle2™ (Circle Squared) machine quilting circle ruler, to quilt the curves. These rulers fit so nicely in my hand, and are super fun to quilt with because of how easily I can move them around as I quilt. They are available here: https://www.quiltingit.com/shop?category=Rulers
To see a video of me using one of my rulers to quilt a continuous orange peel design, click here: https://youtu.be/GWyDTymyzoE

I used white 30 tex A&E Perma Core thread. This thread is my favorite. Why? It’s thick, I get nice stitches and it doesn’t break, like the thinner threads do on me. My machine just loves it!!

How cute are these leaves?!?!

I wanted to leaves to pop, so I decided on a circle and swirl background. This is a fun background filler to freehand quilt. I have another video here, you’d just need to add some swirls inside some of the bigger circles: https://youtu.be/-NNbKsFFYPg

I used the same white 30 Tex A&E Perma Core thread. Once again, look how nicely the white blends on the vibrant colors.
I used my 2” Circle2™ ruler to quilt the curves in two of the leaves. My rulers are available here: https://www.quiltingit.com/shop?category=Rulers
I used Linda’s Edge on this and the orange leaf. I just love this pop of red!

Lastly, my favorite pillow! Those bunnies, so cute!! Gets me more excited for spring to be here.
If you’ve followed along with my quilting for awhile, you may have noticed that I love to mix the curves with the hard lines. That’s what makes my quilty heart happy, and I think the combination is just beautiful.
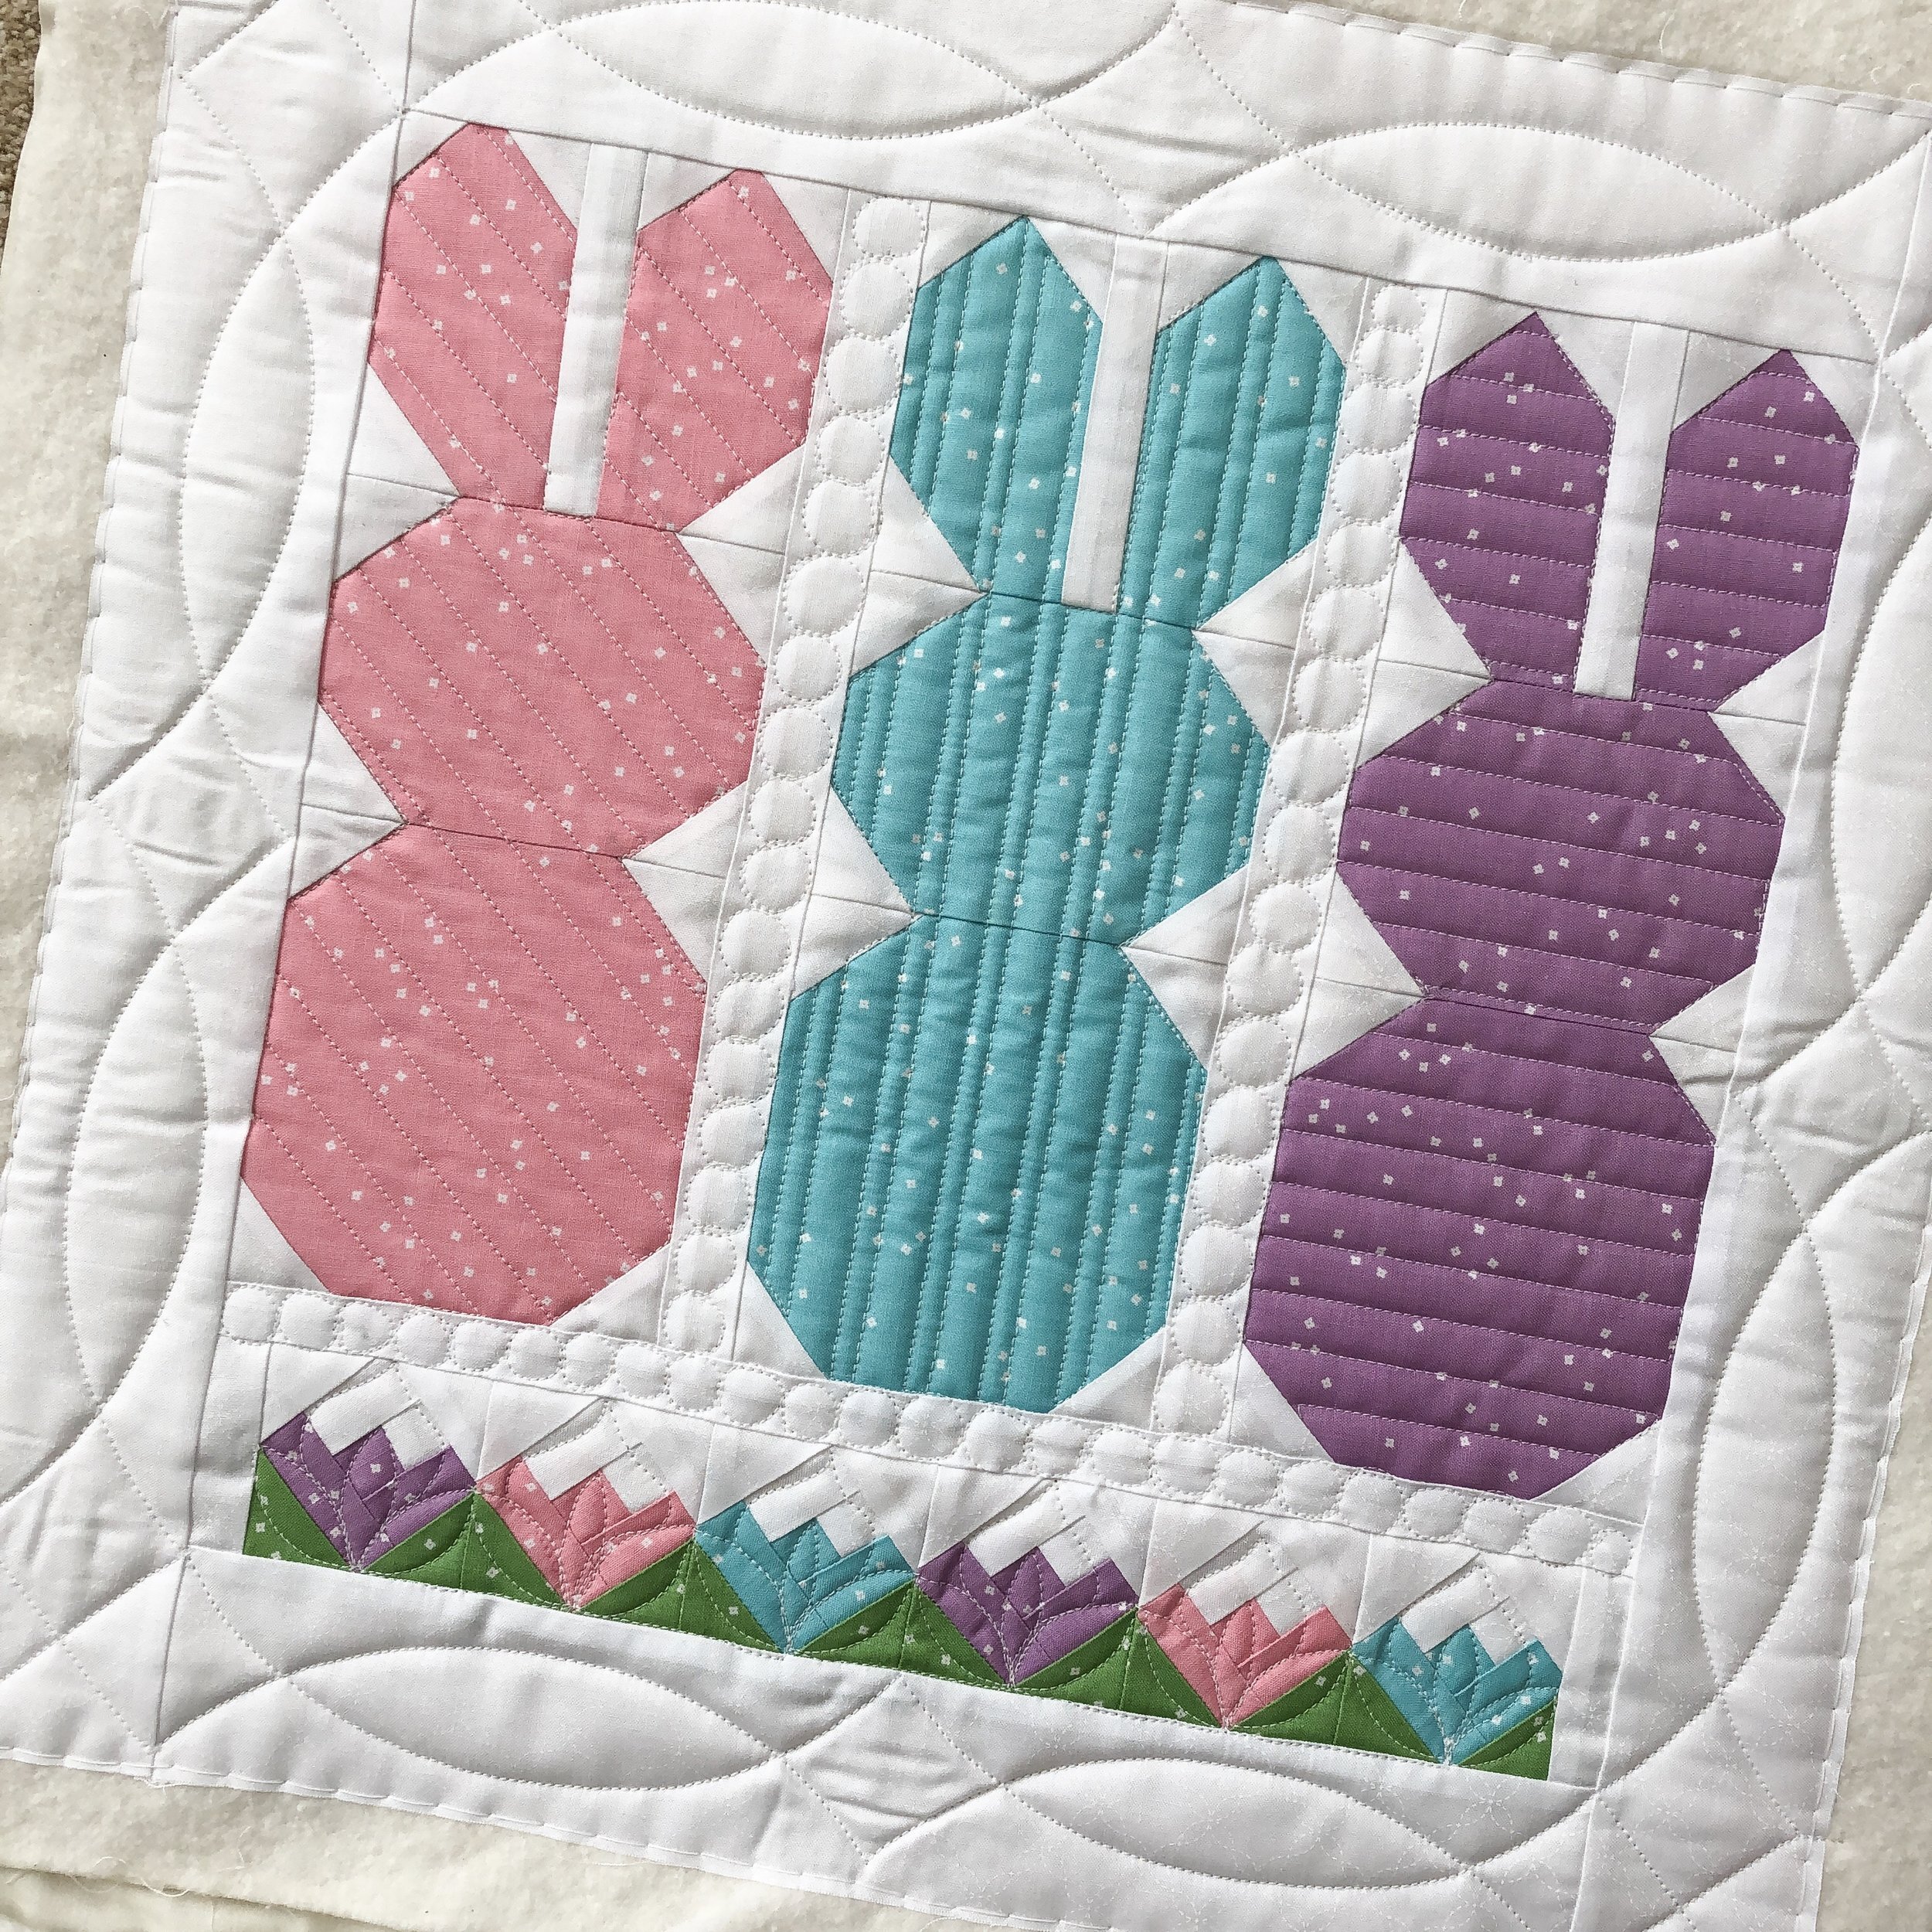
I used the Same white thread, and Edge ruler from Linda to get those lines. Angled, pinstripes, and horizontal...lines are a great way to quilt something that you are quite sure how to quilt.

My last of the 4 different rulers used in my Circle2™ set, is the 7” circle. It’s how I got those beautiful curves in the border. To figure out which ruler works best, I first divide up the border or sashing in 2 or 3 sections...then I try out a few rulers to see what is going to give me the best curve. I just hold the ruler up to the markings. You’ll see the curves cross, it creates that beautiful shape. I don’t want to be too close to the seams, but yet I want there to be a good space between the curves. If you’re interested in me doing a video on auditioning rulers for a design like this, let me know in the comments. My rulers are available here: https://www.quiltingit.com/shop?category=Rulers

I do want to point out, there are two sizes of circles in each of my Circle2™ rulers, which is why I named them Circle Squared.

If I’m quilting several things the same size, then I like to sew the backings together. Pin on one backing, the best!! I quilt one, roll the backing ...baste on the next one, quilt...roll...repeat...until complete. Haha! Seriously though, so slick.
Here is a look at my set of clear rulers, for more info on these rulers go here: https://www.quiltingit.com/blog/2018/10/10/introducing-my-circle2-longarm-circle-ruler-set

My rulers are available in green and clear, 1/4” high quality acrylic. Check them out here: https://www.quiltingit.com/shop?category=Rulers
There are 1/2” measurements along the edges. Pictured below is the green set.

I mentioned these rulers quite a bit this post, because I wanted to share with you the need and versatility for each of the sizes in this set. If you’re a longarm or domestic machine quilter, this set will be a great asset to your quilting. You never know the size of curve that you’ll need. With 12 different sizes of circles, ranging from 2” to 13”, the possibilities are endless. If you kept track, then you know I used the 2”, 3”, 4”, and 7” circles. I get asked a lot about the difference between the clear and green, the only difference is the color. The green set is a little easier to see the lines on the ruler, when quilting on lighter fabrics. If you’re used to using clear ruler, the clear set may be a great option for you. Please let me know if you have any questions.
Thanks for following along. Have a great week! - Leisha

Client Quilts!
Good morning!! In an effort to keep up with everything I’m doing, I may possibly do some blog posts where I share multiple quilts from some of my clients. For example, the following quilts were made by Loranne, Jeanne, and Kate.
Let’s first start with Loranne’s beautiful quilt...

Loranne is amazing!! She gets inspired by quilts and often makes up her own thing, I wouldn’t be surprised if this were the case.
I used an Omni dark grey thread for the background, and 3 coordinating variegated threads to quilt the stars. I also used 2 layers of batting. An 8020 cotton poly on the base, and Hobbs wool on top.
Loranne loved the overlapping circles design that I quilted recently on another quilt, and wanted it on this one. I love how it turned out. Such a fun design to do as background filler. I wish you could reach through the screen and touch that texture, it’s awesome!!
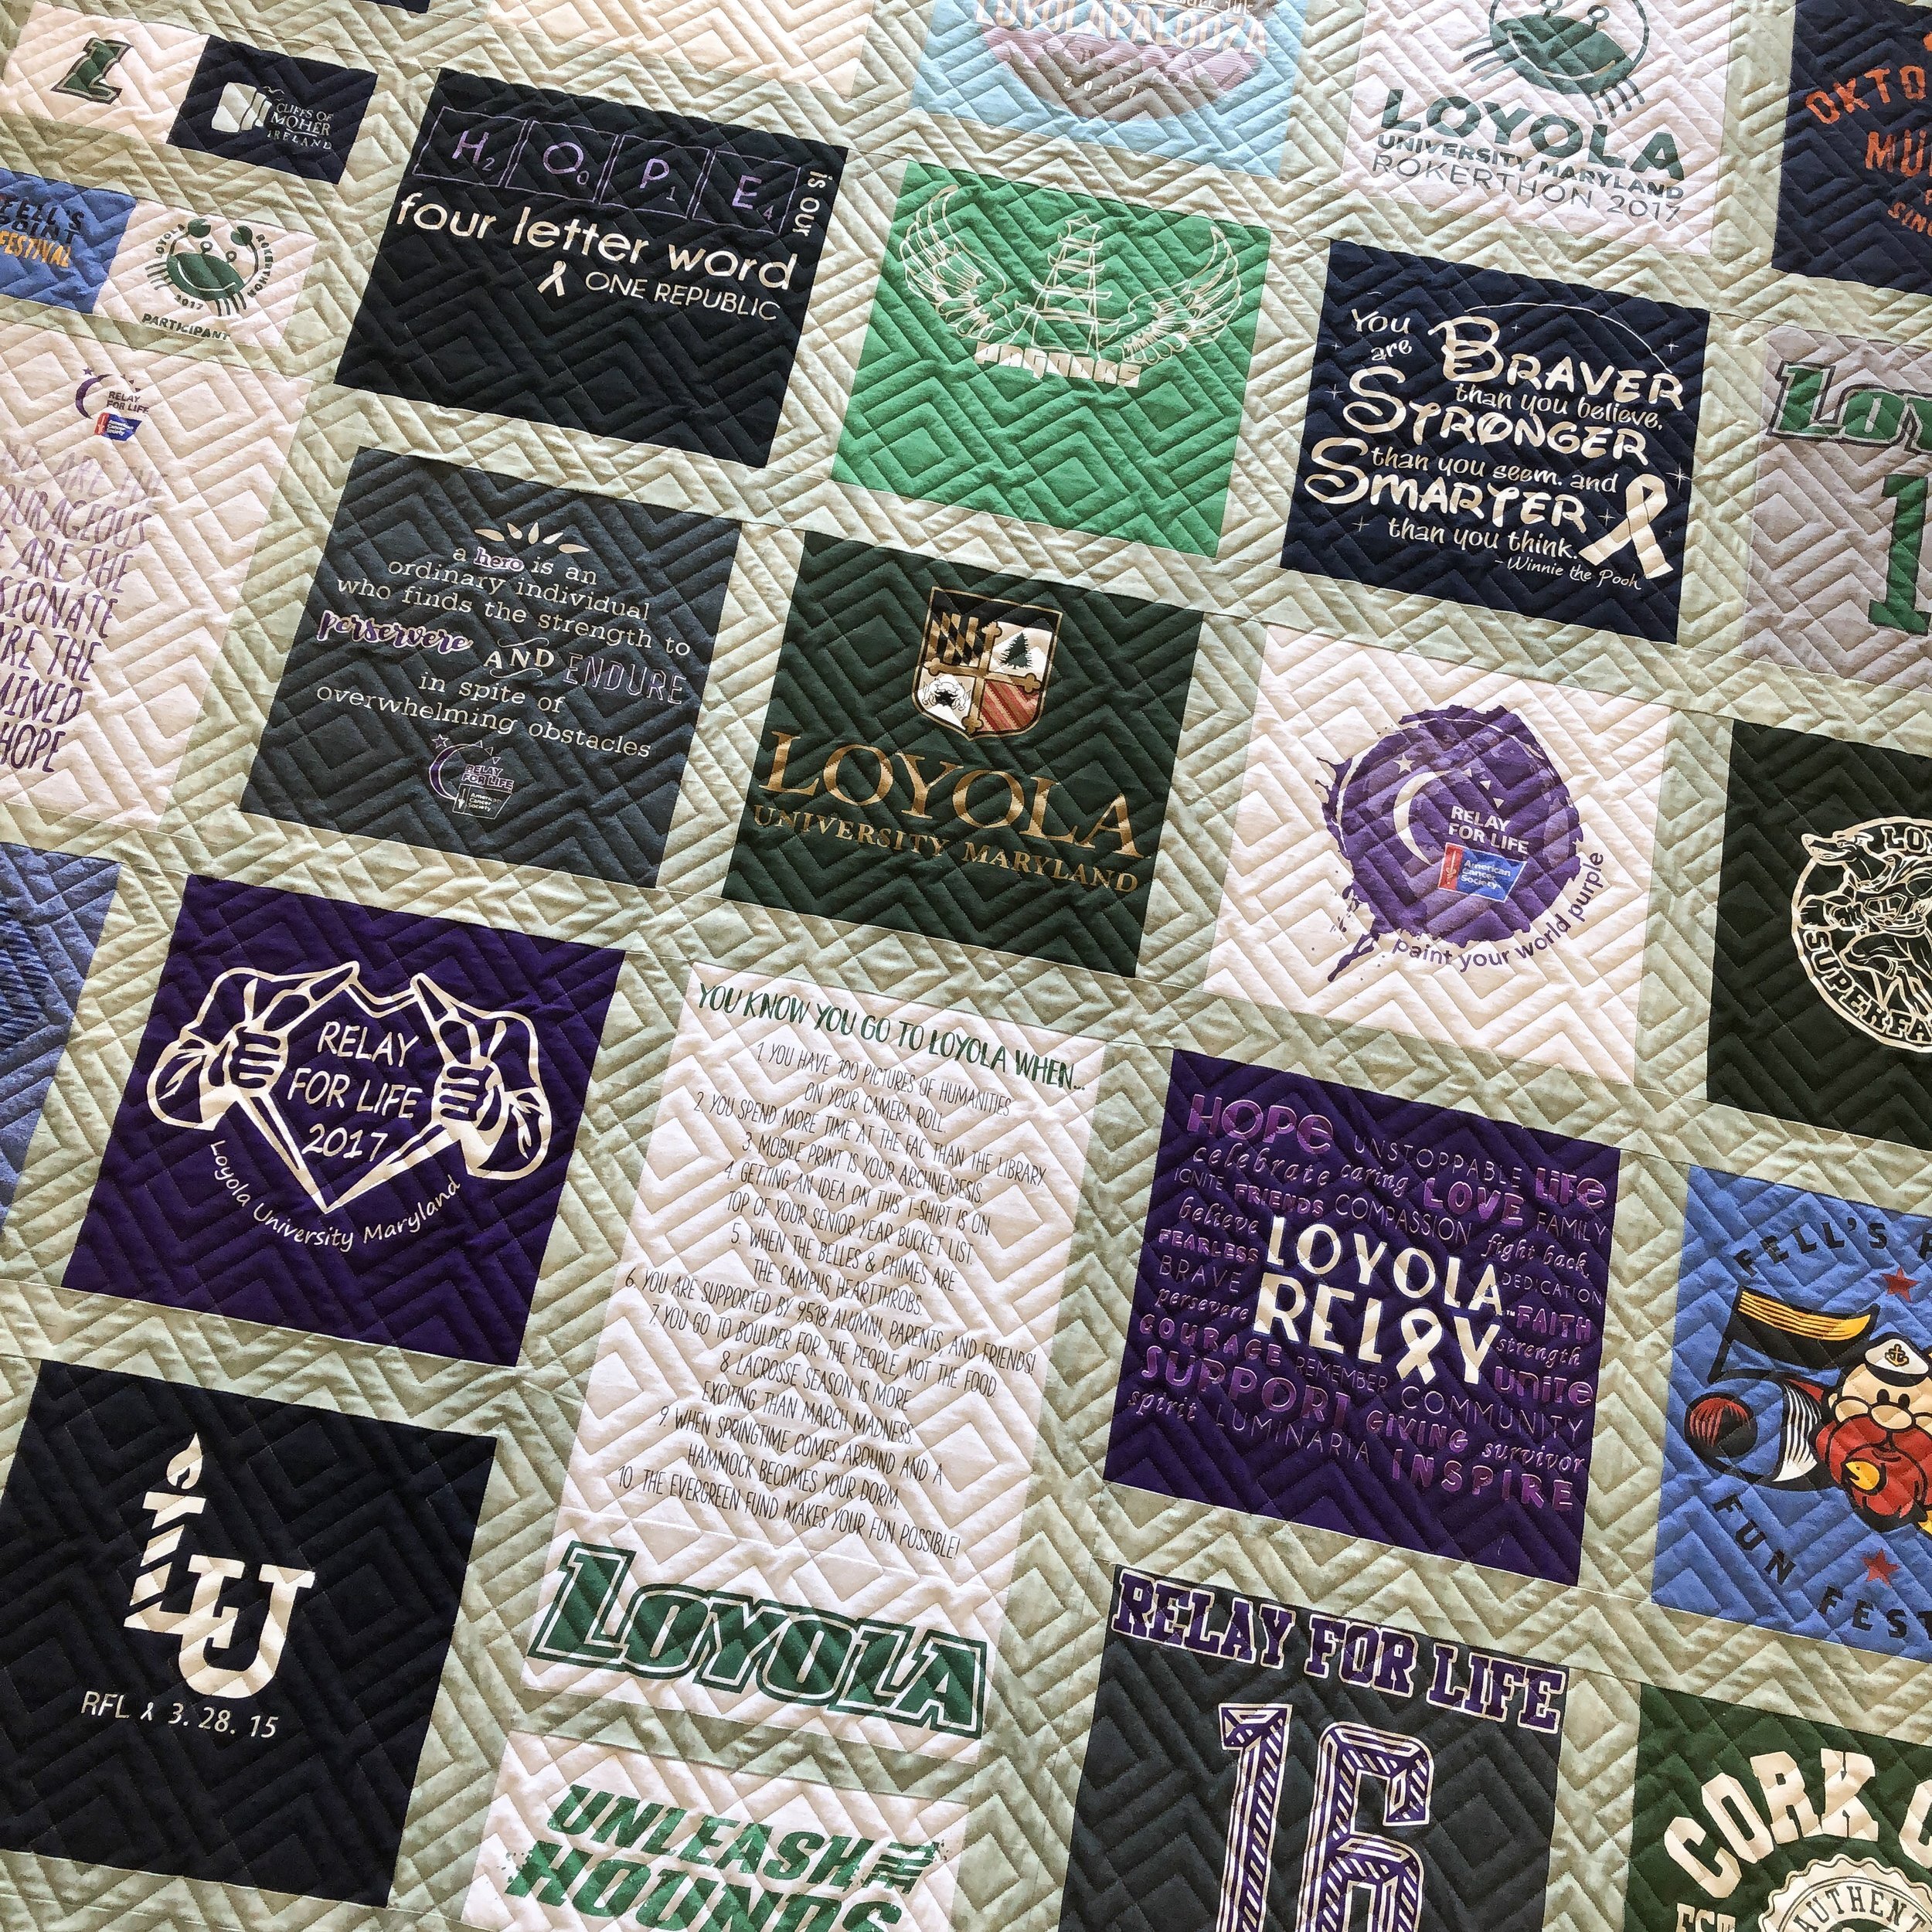
Next up Jeanne made this awesome t-shirt quilt for her daughter!!

Many of the shirts are from her college days at Loyola University, but some are to honor family and friends who’ve suffered from cancer. Love that!!!
I used a light gray 30 tex Perma Core A&E thread and my favorite 8020 cotton poly blend batting.
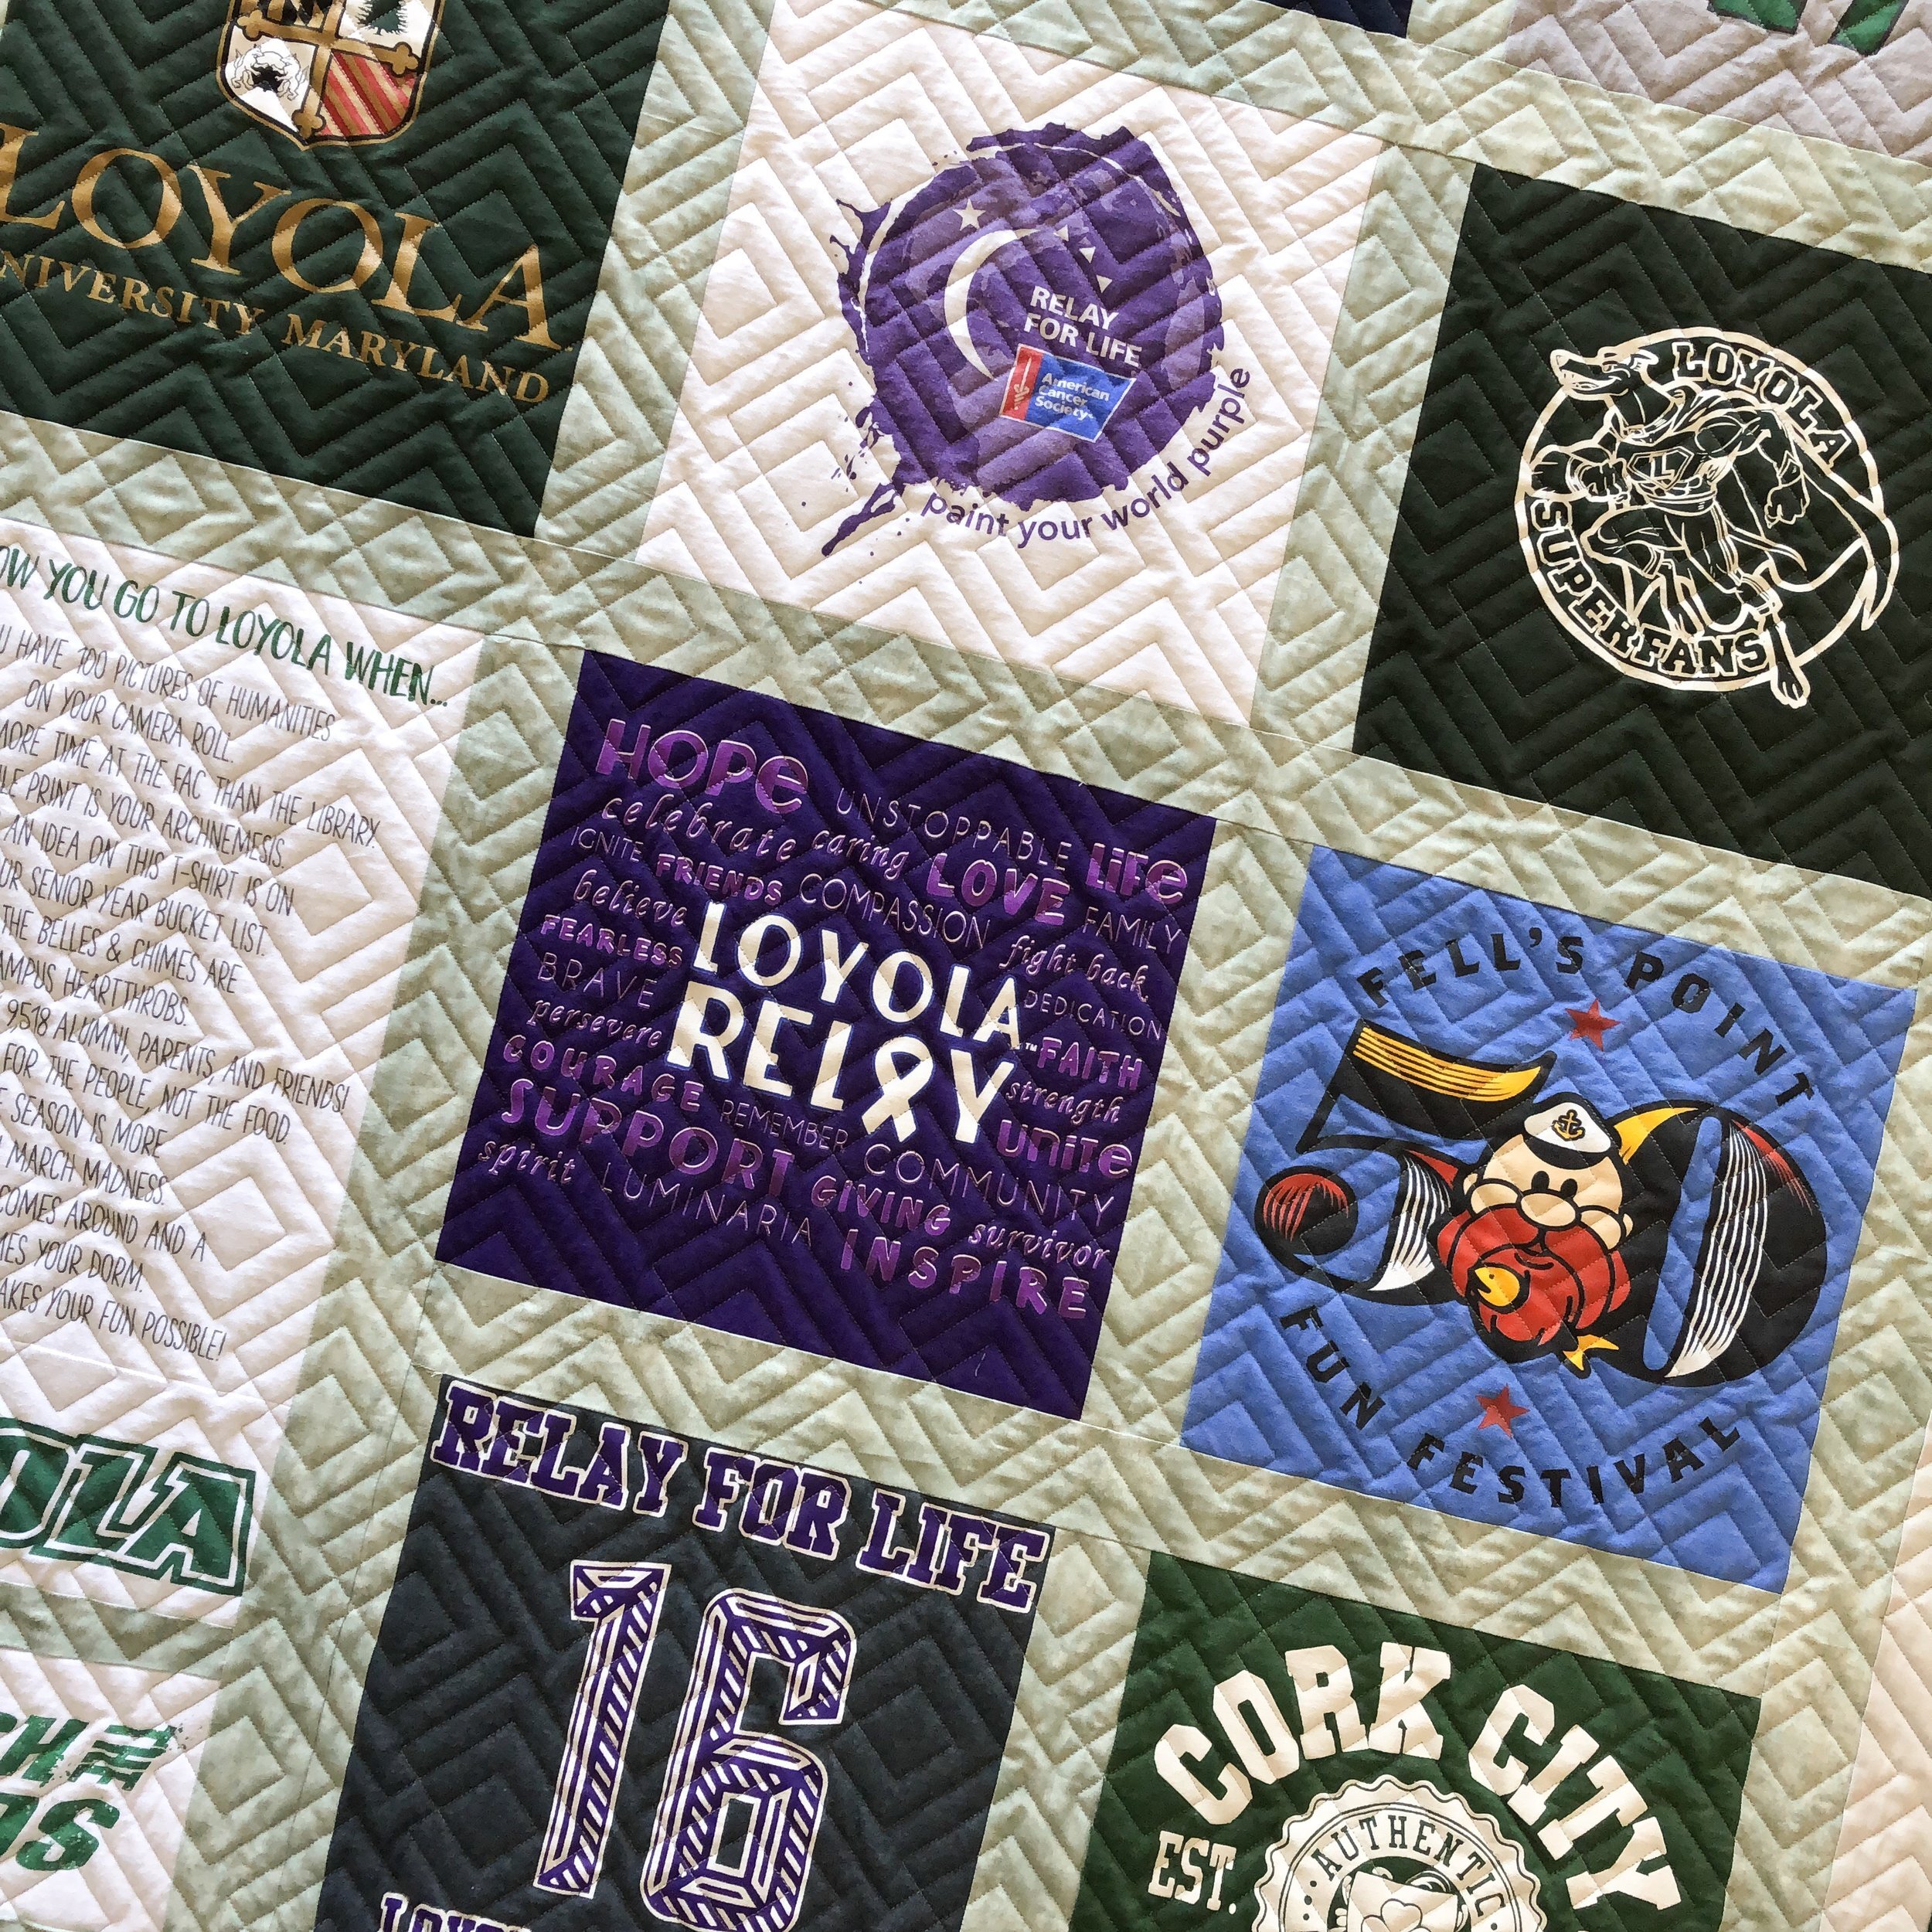
Jeanne’s daughter chose my Squared©️ design for the quilting. It’s available: https://www.quiltingit.com/shop/squared
A nice close up!! This design is great on so many different quilts.

Next up, Kate! Wow, huh?!?!!

Kate made this amazing collage quilt for a friend, of course the bear claw block is a perfect fit to border around the bear.
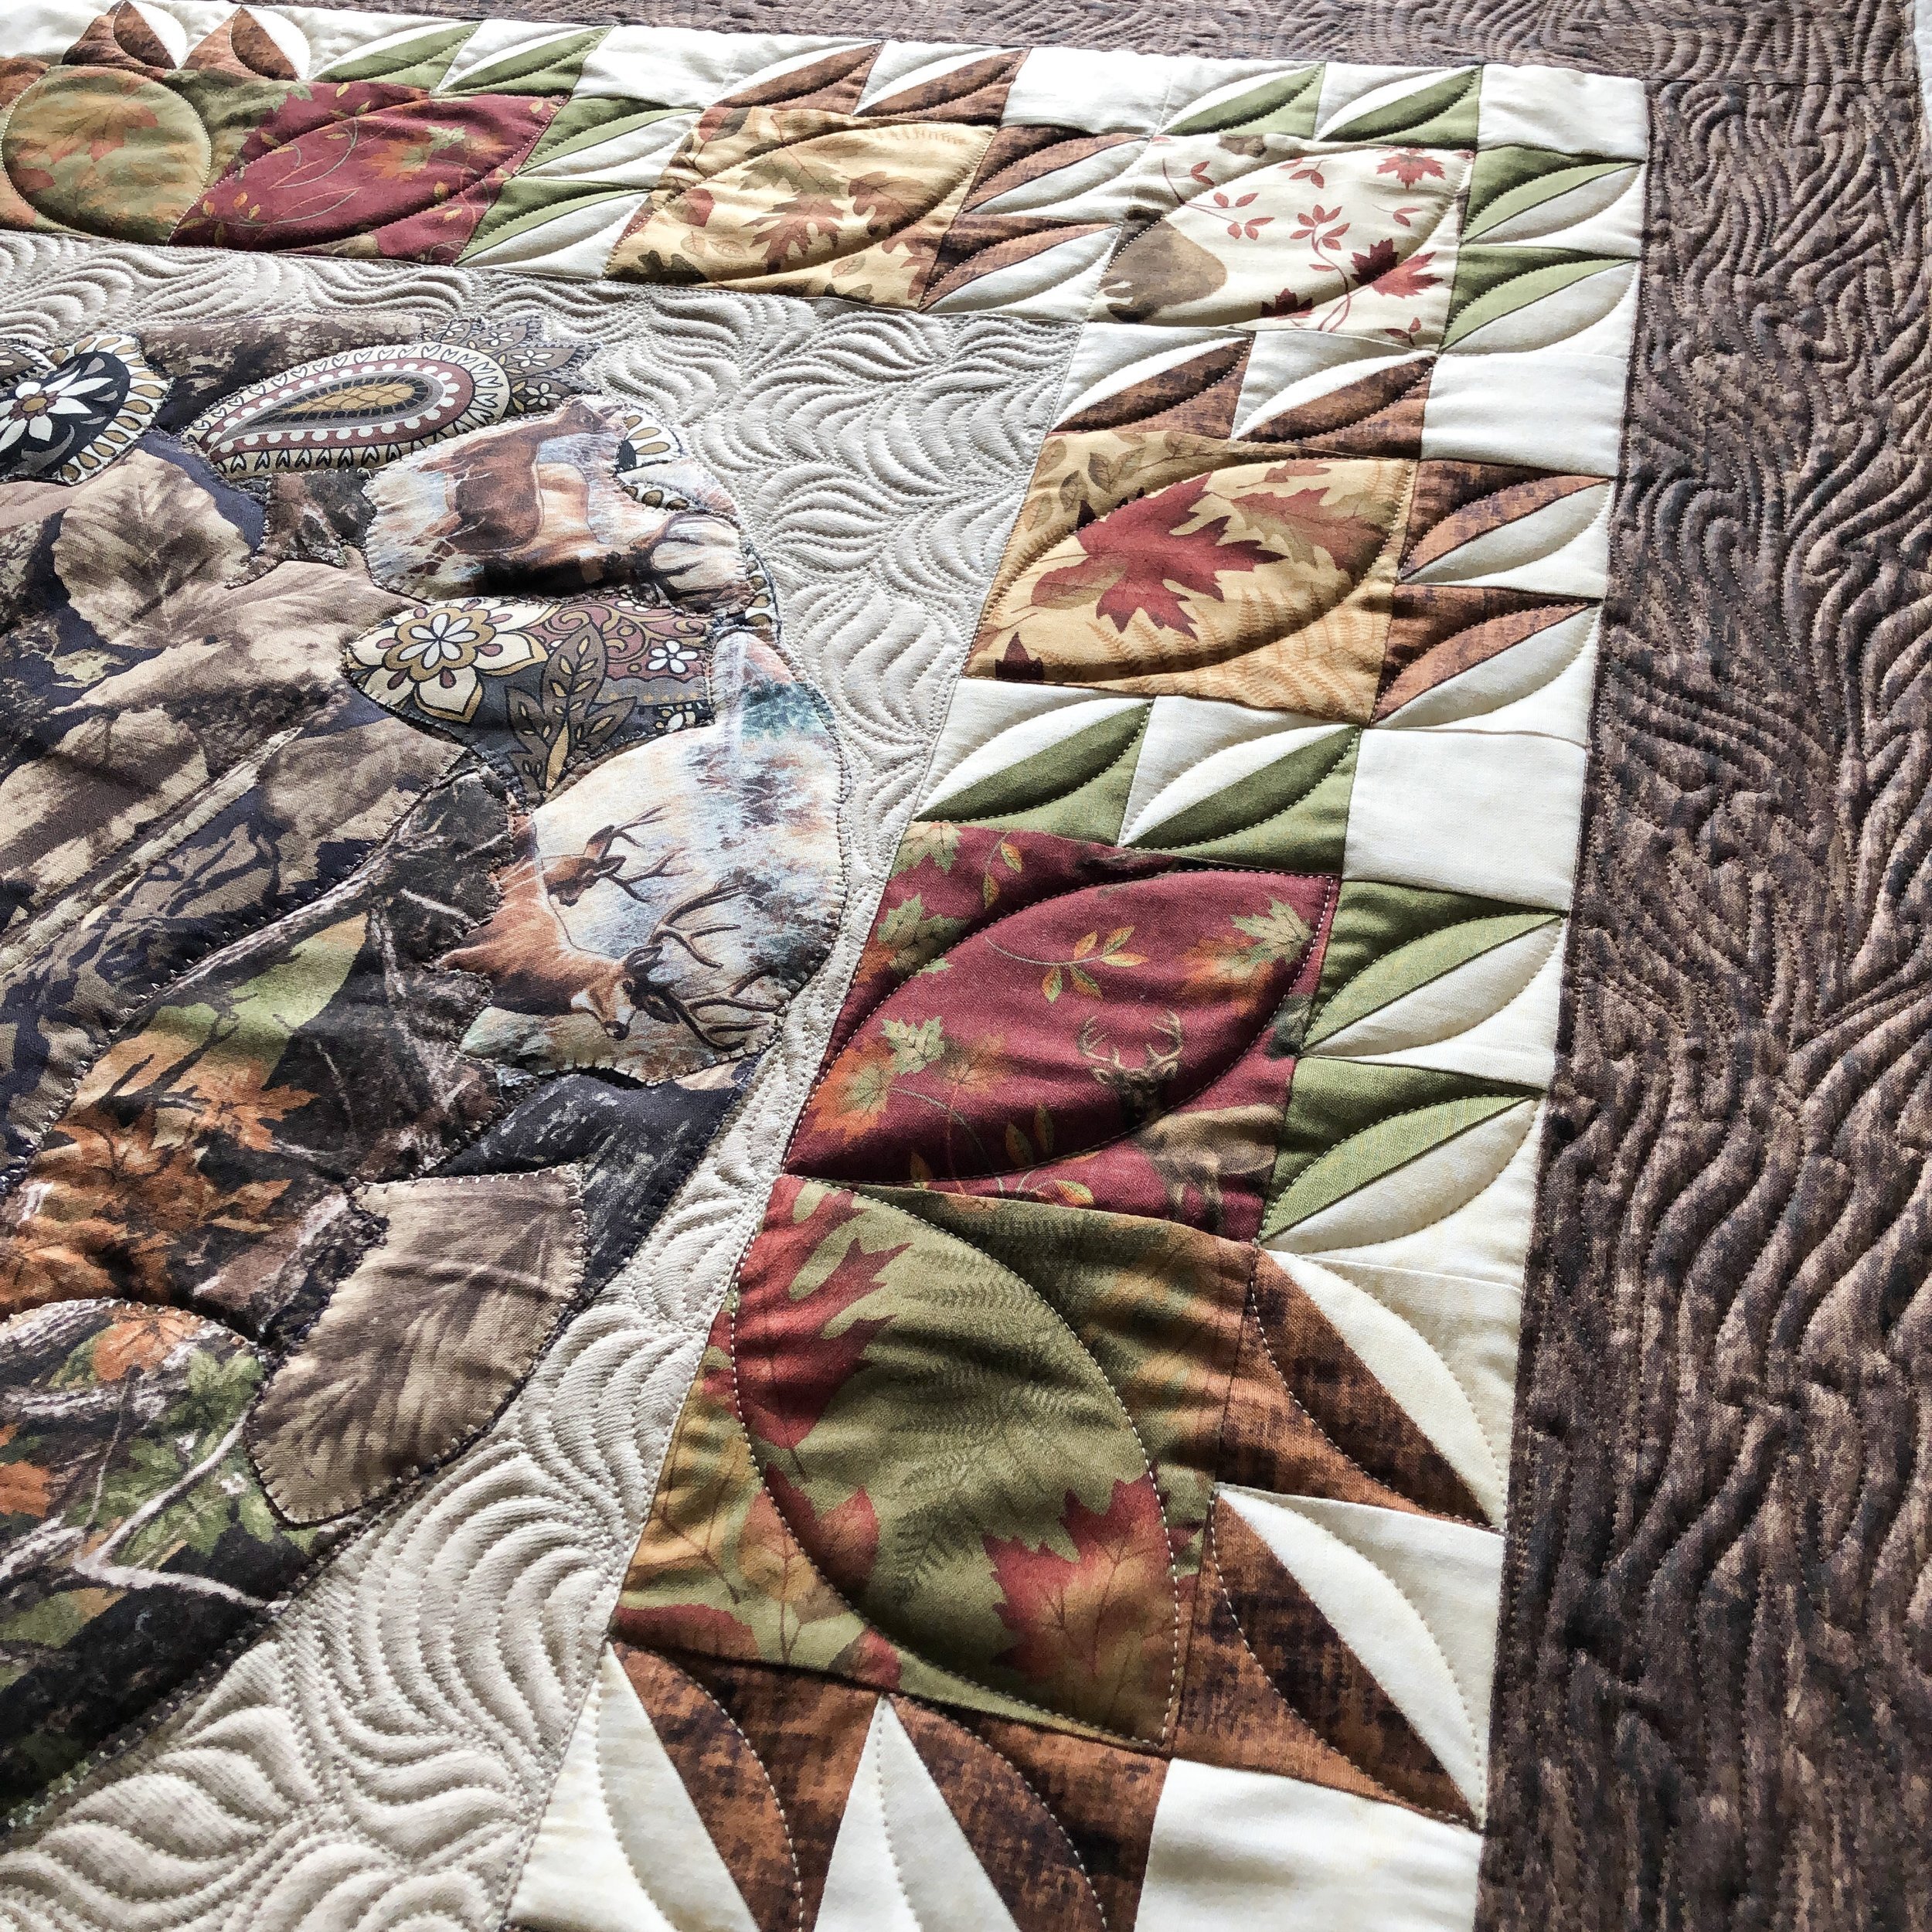
I used a brown 30 tex A&E Perma Core thread to quilt wood grain in the border, and also to define the bear. I used a toupe tan color to quilt the grassy design in the background behind the bear and also the orange peel shapes in the bear claw blocks. I also used my favorite 8020 cotton poly winline batting.
Here is a short video on how to quilt a wood grain design in a border.
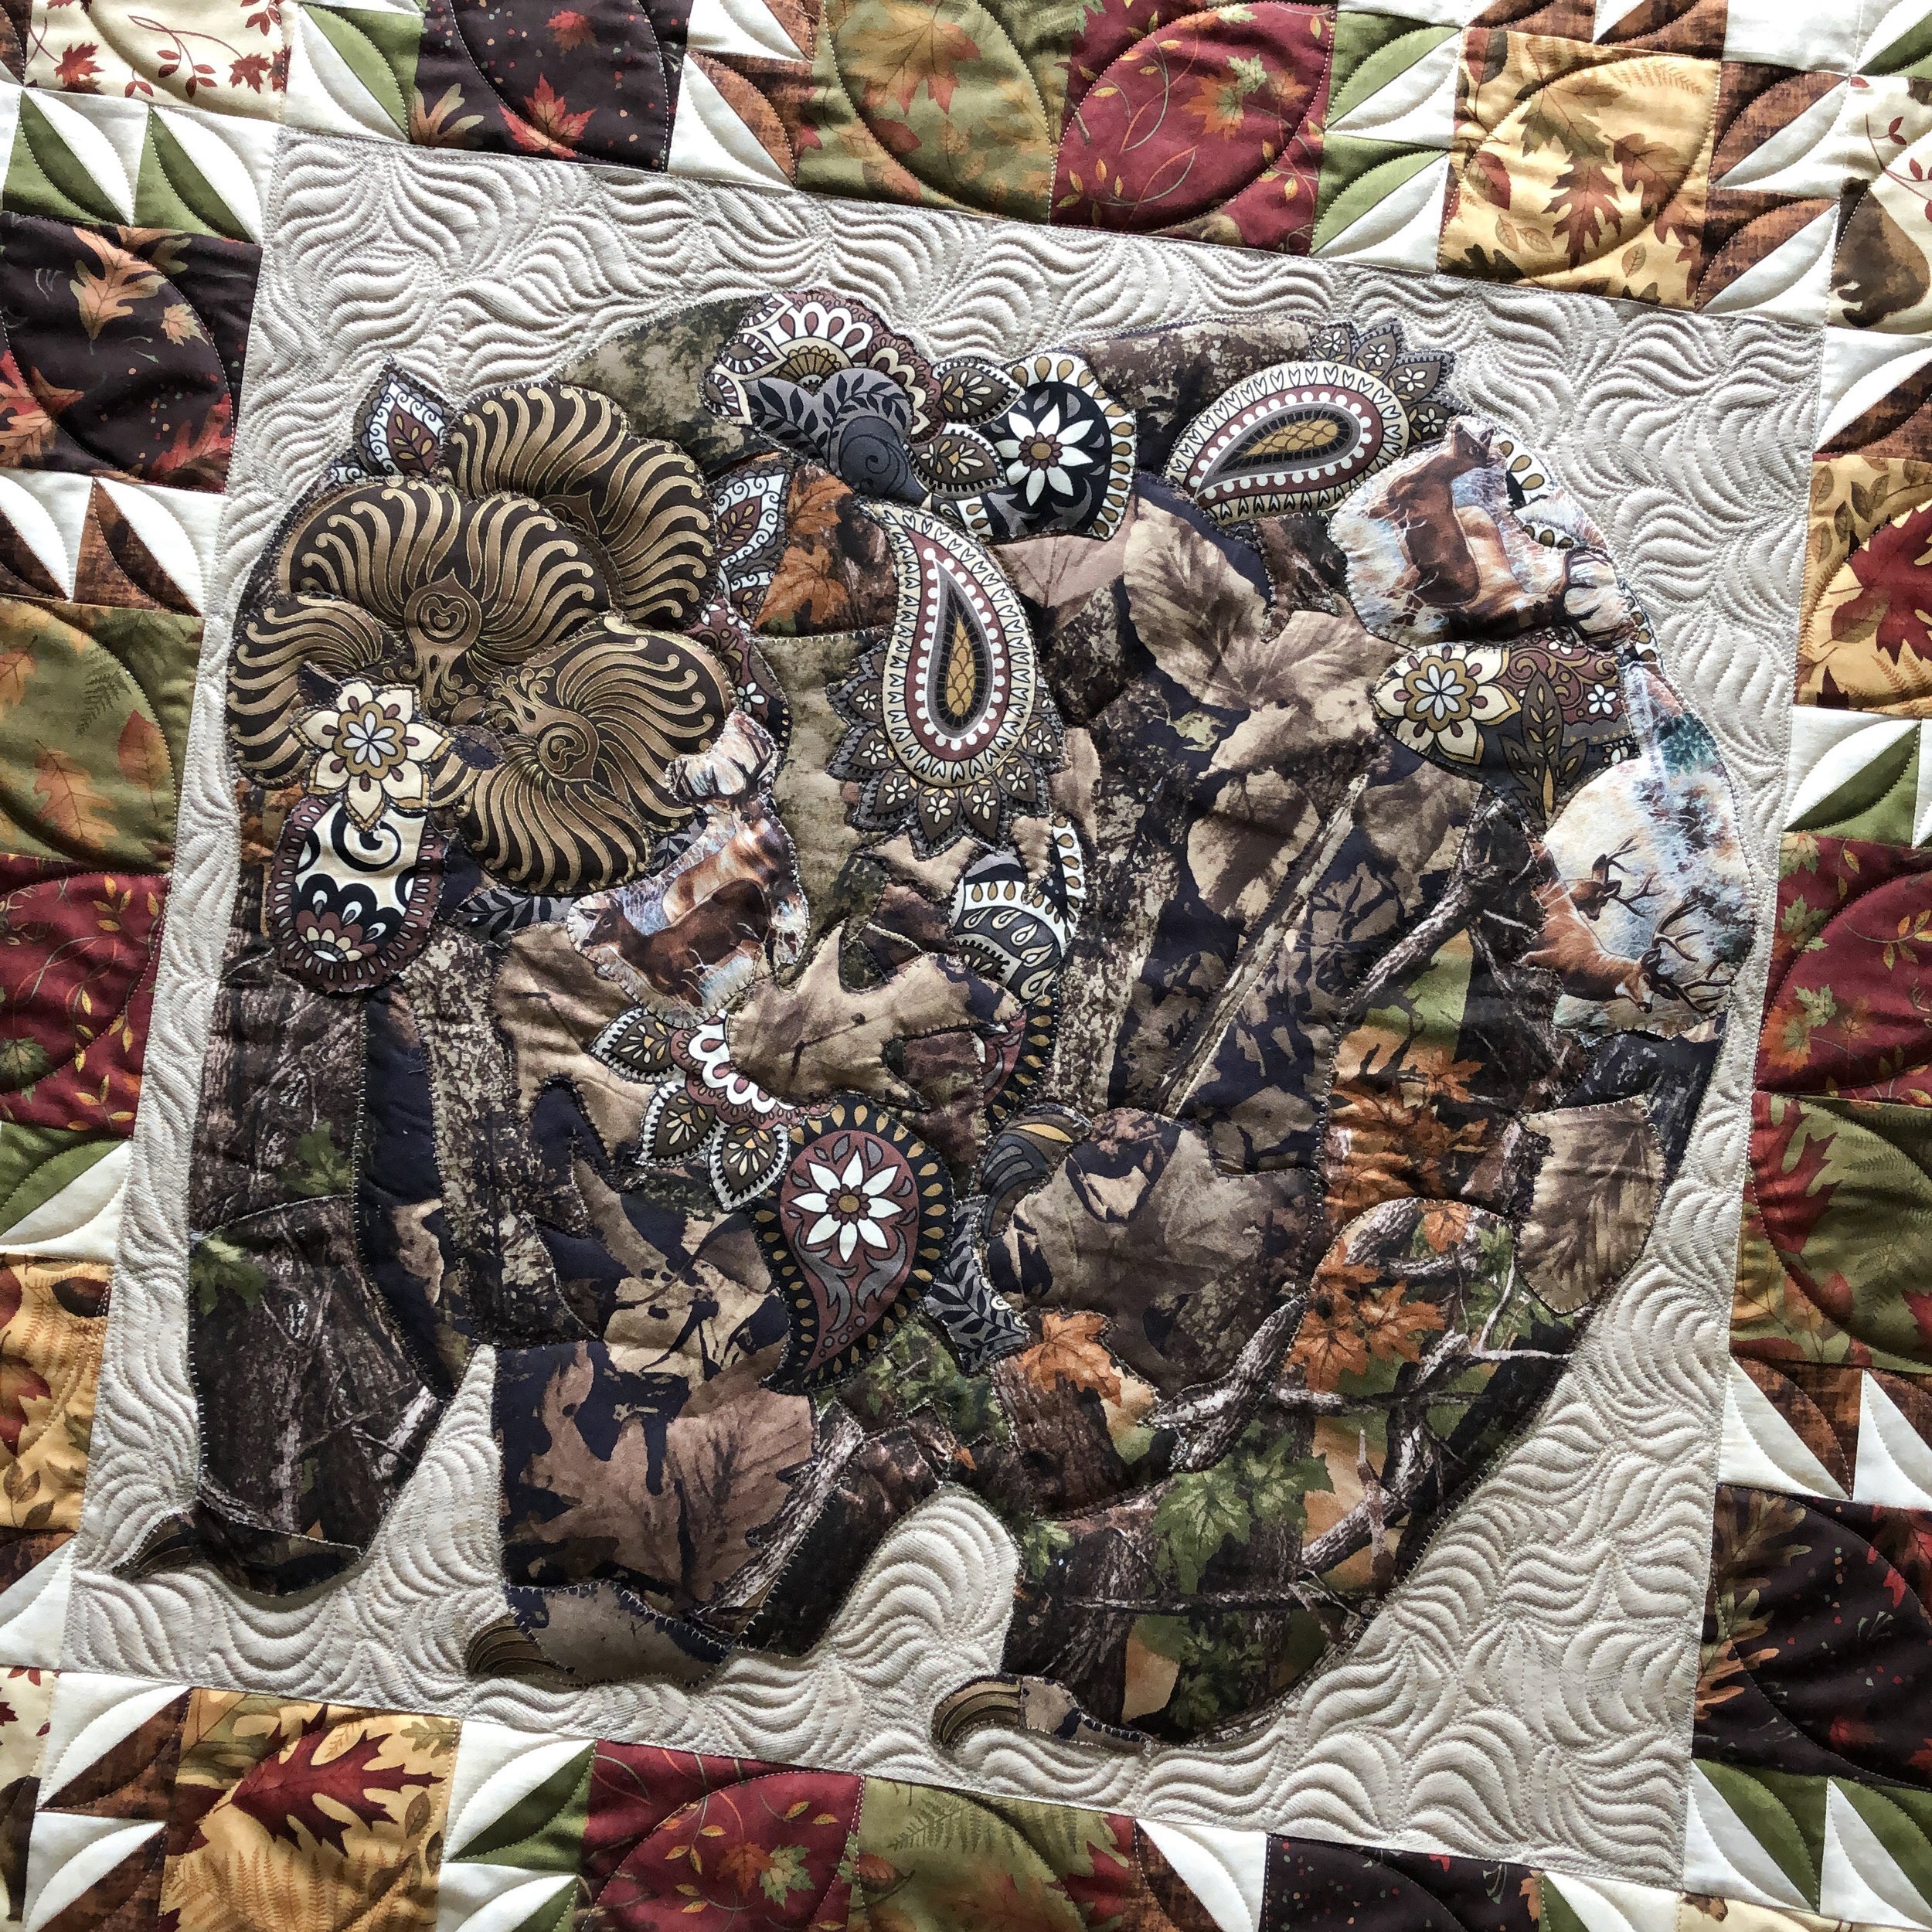
Isn’t that bear so cool??!!

I used my 7” Circle2 ruler to quilt the large orange peel curves.

I used my 4” Circle2 ruler to quilt the small orange peel curves. These are such fun rulers to use. Easy to rotate around the hopping foot.

The rulers can be found in my shop: https://www.quiltingit.com/shop?category=Rulers
Thanks!! Hope Spring has found you...it’s starting to show up here. - Leisha

Barbara’s Runner
Barbara made this beautiful Kim Diehl runner, it’s called Hen House Star and she used Kim’s fabrics, too.
Barbara wanted wool batting, so I used Hobbs Wool. I also used a 30 tex Perma Core A&E thread, my most favorite yellow cream...Dyed Natural.

I knew I wanted to quilt an orange peel in the center part, so I used my 4” Circle2™ machine quilting circle ruler, to quilt them. The design of the ruler makes it easy to rotate around the hopping foot to get to the next spot.
They are available in clear and green 1/4” high quality acrylic, and come in a set of 6. Ranging in size 2” to 13”. They can be found here: https://www.quiltingit.com/shop?category=Rulers
I’ve been asked a few times lately the difference between the clear and green sets of rulers??? Everything is the same, except the color. So, it’s really a matter of preference. The green are a better option to see the ruler lines on lighter fabrics. If you’re used to using clear, great!! I actually use both.

I also used an 8” Edge ruler, from Linda at thequiltedpineapple.com, to quilt the lines in the star. I freehand quilted circles and feathers in the background parts along the border.

I have some fun quilts coming up!! So excited to show you.

If you’ve baught a set of my Circle2™ (Circle Squared) rulers, I’d love to share some pictures or feedback. Please email me at quiltingit@gmail.com with “ruler feedback” in the subject line. I’d love to share pictures of your quilting, of course you’ll get credit. I’ve already seen some work that Sue Daurio has done with her set. Thank you sooo much!!
Happy Quilting, - Leisha
Barbara’s stunning wool quilt!!!
This stunning quilt is beautifully made by Barbara. The pattern is Farmhouse Wool 2 block of the month by Fig Tree & Co. Thanks for stopping by, I’m so excited to tell you about this quilt. One of my favorites for sure!! Yes, there are lots of pictures...I want you to see as much of this amazing quilt as you can.

I love the look of the colors of the wool popping off the cream background. After I started quilting, I sent a picture to Barbara, and we both felt it would be best to leave all of the wool unquilted.

I used Antique Cream 30 tex A&E Perma Core thread, and Hobbs wool batting for this one. Wool batting is perfect for those quilts that you want to add a little more pop to everything.

I don’t want to overload you with a close up on all 16 blocks, so I will share them in groups of 4, and then close up of the 4 different designs I did throughout the quilt. Doing 4 different background fillers, can be a lot, however because they are each used 4 times it works. They are also similar in style, and are very complimentary of one another.

To also keep the quilting complimentary, I did the same quilting in each 9 patch...which I used my favorite 8” edge ruler from Linda at thequiltedpineapple.com, I also used my 7” Circle2™ ruler to do the same curve throughout, and the alternating circles and swirls in the 1” square borders around each block. Here is a video of me quilting the swirls and circles:
I love what something as simple as swirls and circles can add to a quilt.
Here are the next two sets of four...isn’t this just so lovely?!?!!!!

The next four pictures show the four different background filler designs that I quilted. I did each background 4 times, so it worked out perfectly. I also alternated each design, so that each design was on each row and each column. That way I don’t have too many of one design all bunch together on the quilt. Plus, when you’re adding a variety to anything...whether it’s quilting or design, it’s best to mix things up and so your eye travels throughout, and it’s more harmonious to look at. More pleasing to the eye. If you’re reading this on your phone, you may be able to scroll in on the full pictures of the quilt, and see what I’m talking about.
This block (pictured below) is my favorite!! Everything about it. The color and shape of the flower petals. And, that background overlapping circle design is just so much fun to quilt, and the result is stunning. If you haven’t checked out my YouTube video on the overlapping circles, click here: https://youtu.be/x0UNyEJdm9Y

Echo circles, swirls, and pebbles are so great to quilt behind something, because you can get super close and it helps the appliqué pop. For a video on this freehand design, check out tis video on my channel: https://youtu.be/-NNbKsFFYPg
Next up the grassy design. This always adds fun texture, no matter what it’s quilted on. Here is a video of this design: https://youtu.be/eMDOzouOzXA

Lastly the arc echo. I don’t have a video of this one just yet, but it’s also a great background filler. I’ve also quilted this tons of times, at a larger scale, as the main design on a quilt.

Like I mentioned above, I used my 7” Circle2™ machine quilting circle ruler to quilt this fabulous sashing!! I used to hate quilting sashing. I just never knew what to quilt in it. Now it’s one of my favorite parts, because designs like this dress up the quilting a lot. Plus, it’s a bonus frame around each block.

My Circle2™ (circle squared) rulers are available in a set of 6, on my website. https://www.quiltingit.com/shop?category=Rulers They come in clear or green 1/4” high quality acrylic. I designed these so you have 2 circles in each ruler, only needing 6 rulers, instead of 12. 2” to 13” sized circles. They have excellent lines and measurements. They are 2.5” wide, so that you can hold them easily. They are also designed with the hopping foot in mind. The hopping foot adds a 1/2” to circles. With these rulers you’ll get full size, instead of half sized circles. I’m starting to hear how much quilters are loving them!! Which makes my quilty heart happy. I struggled with the circle rulers I got years ago. The problem, they weren’t designed by a quilter. No helpful lines, and not the right size. My hope with these rulers, is that you’ll enhance your quilting but enjoy using them as well.
As pictured below, I used the halfway mark on each of those 1” squares to know where to anchor the points on the curves.
Look how beautiful those curves frame those blocks. Seriously, my favorite thing!!!

I hope you enjoyed hearing more, and mostly seeing all these pictures of the loveliest quilt.
Happy quilting, happy weekend, and hopefully soon to be happy spring... to those of us who’ve been in winter for awhile.
Take care, Leisha

Barbara’s Shamrock Runner!!
How cute is this shamrock ☘️ runner?!?!?!!! Barbara made a runner using a couple of the blocks from Kimberbell Designs St. Patrick’s Wall Hanging.

I love the contrast of the white and green scrappy fabrics.
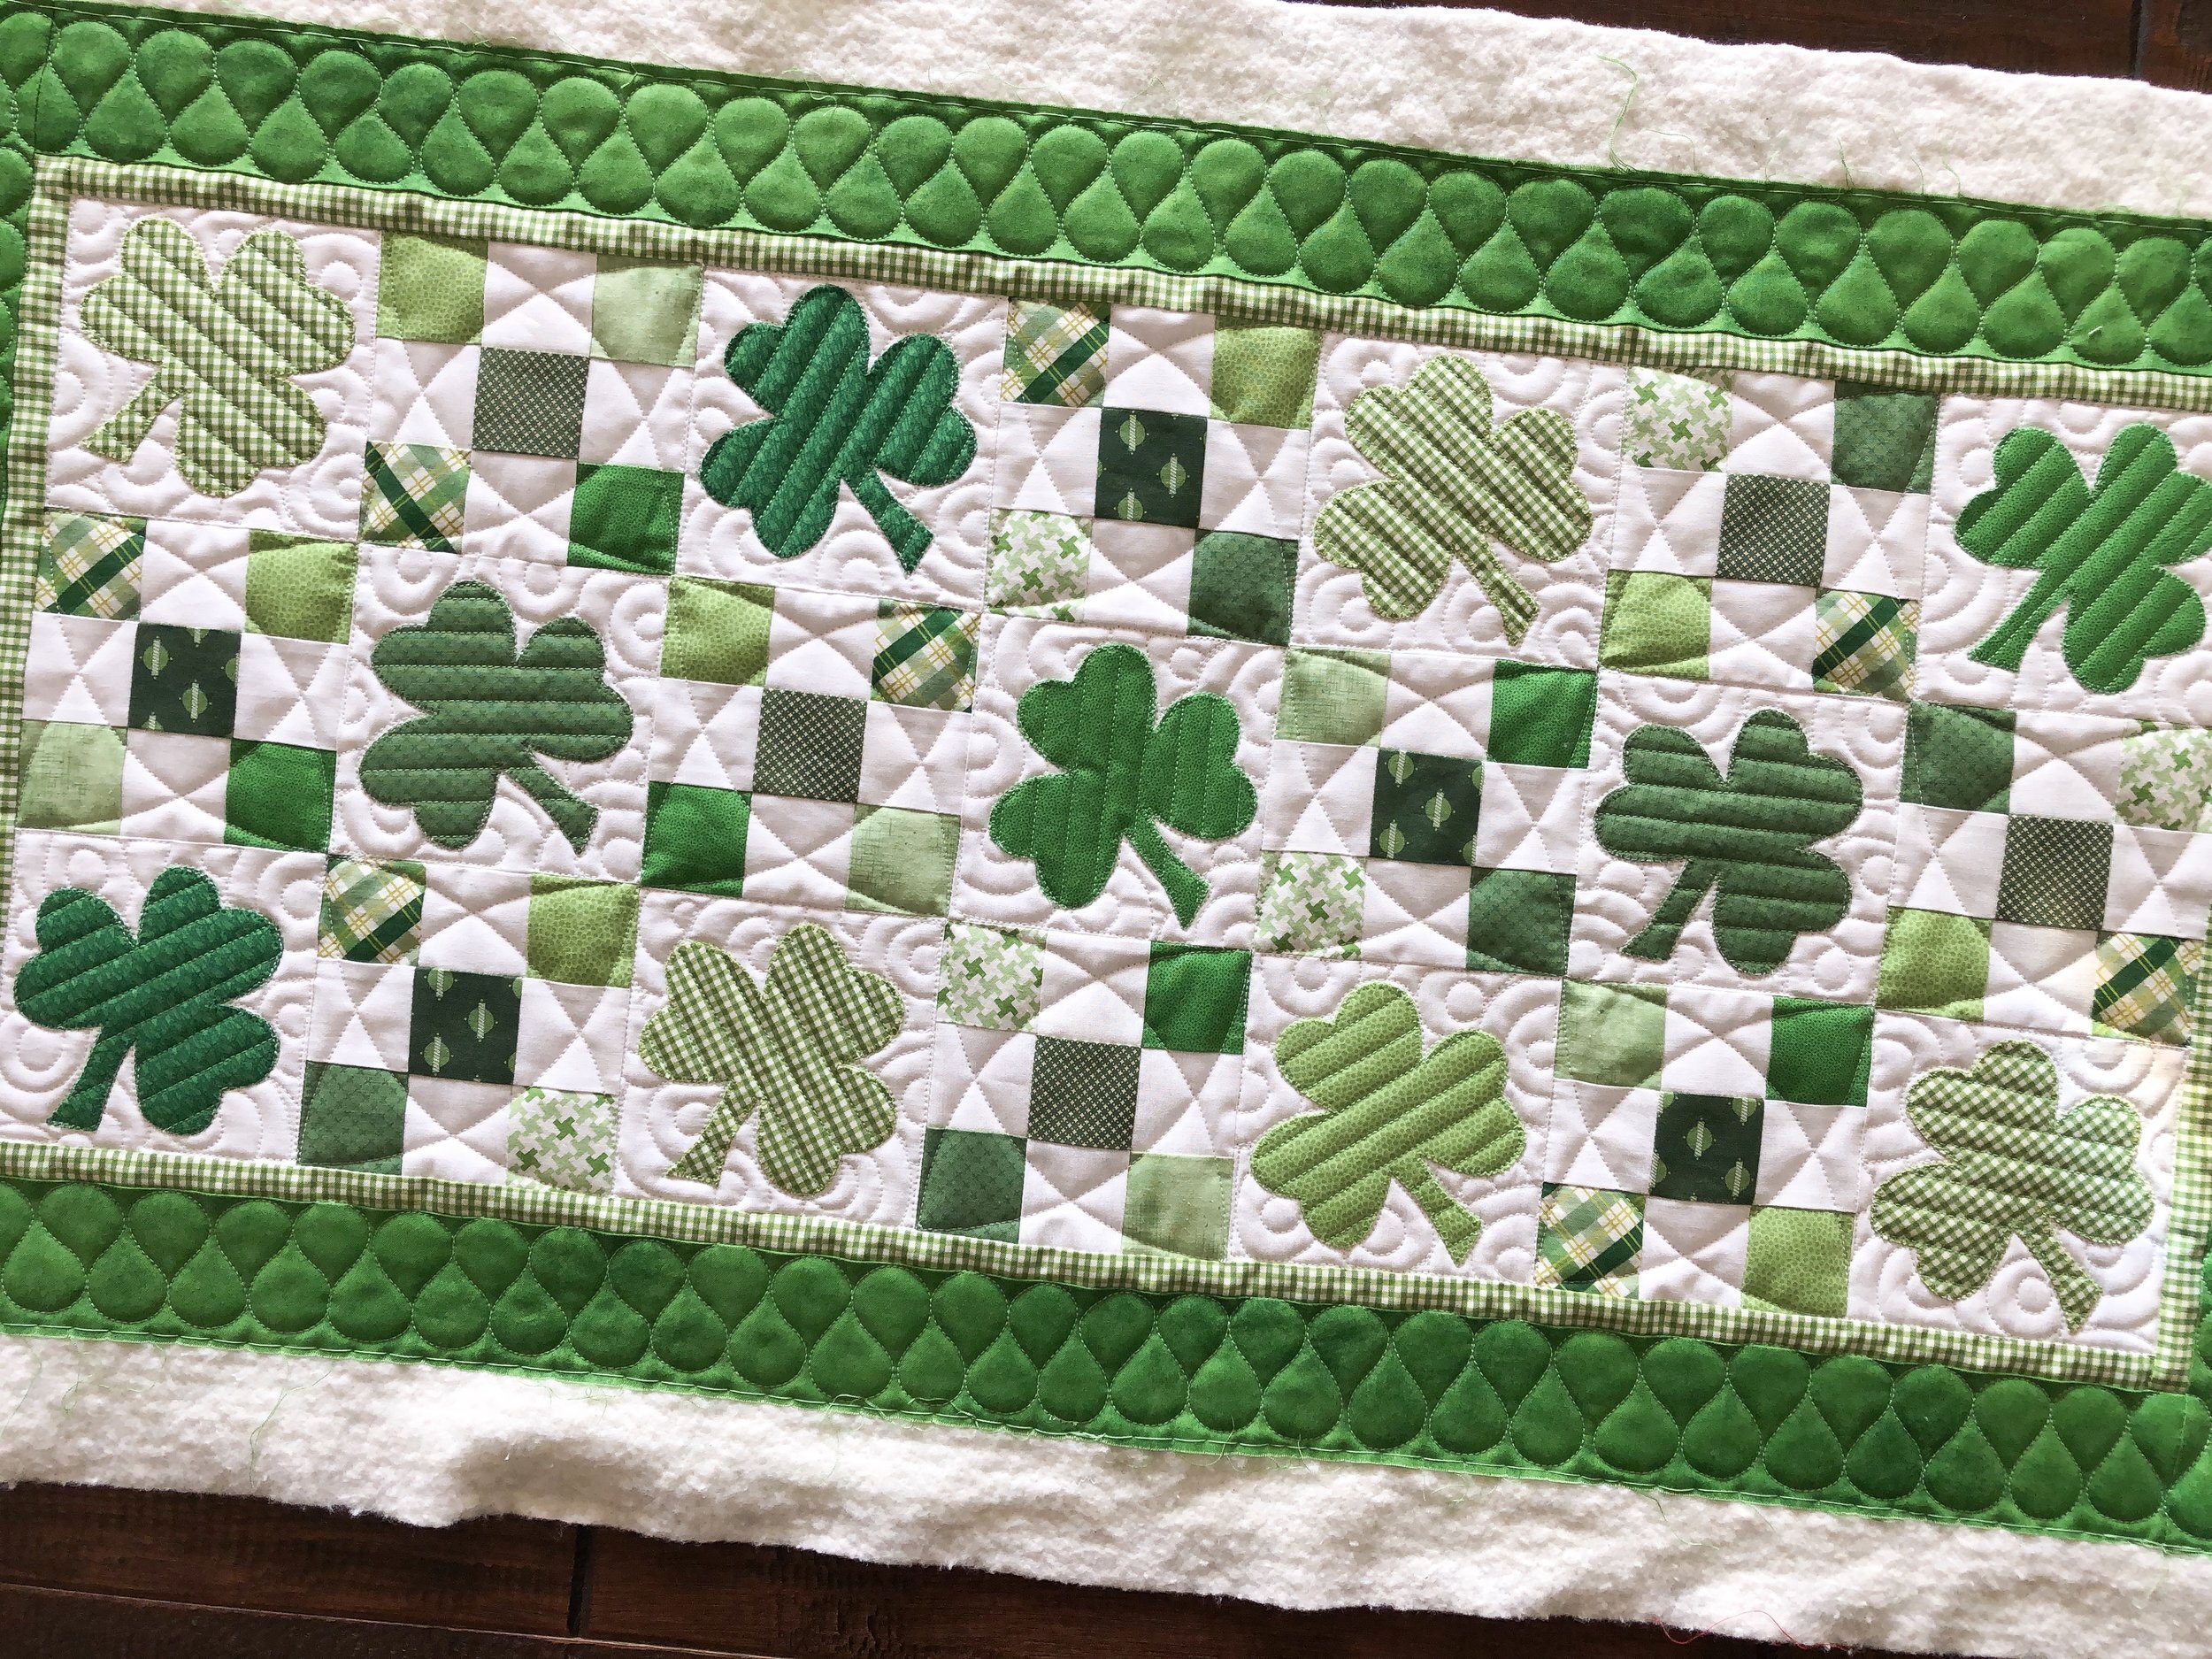
I used 2 different 30 tex A&E Perma Core threads, a lime green and a white. I also used my favorite 8020 cotton poly blend batting.

I love a little ribbon candy quilting on the green border, the overlapping circles behind the shamrocks, and the 1/2” lines in the shamrocks...it’s all about texture.
If by some chance you haven’t see. My video on quilting overlapping circles, check it out!! Looks like mini rainbows.

I used an Edge ruler from a Linda at thequiltedpineapple.com, to quilt the lines in the shamrocks. I use her 8” ruler the most, it’s the perfect length to quilt most small things. I'm love the chaining effect of the quilting in the 9 patch. It frames the shamrocks so nicely.

I used my 9” circle, from my Circle2™ ruler set, to quilt the design in the 9 patches. I love having such a variety of circles, because I know that at least one of them will work for any size that I need.

They are available in my shop at: https://www.quiltingit.com/shop?category=Rulers
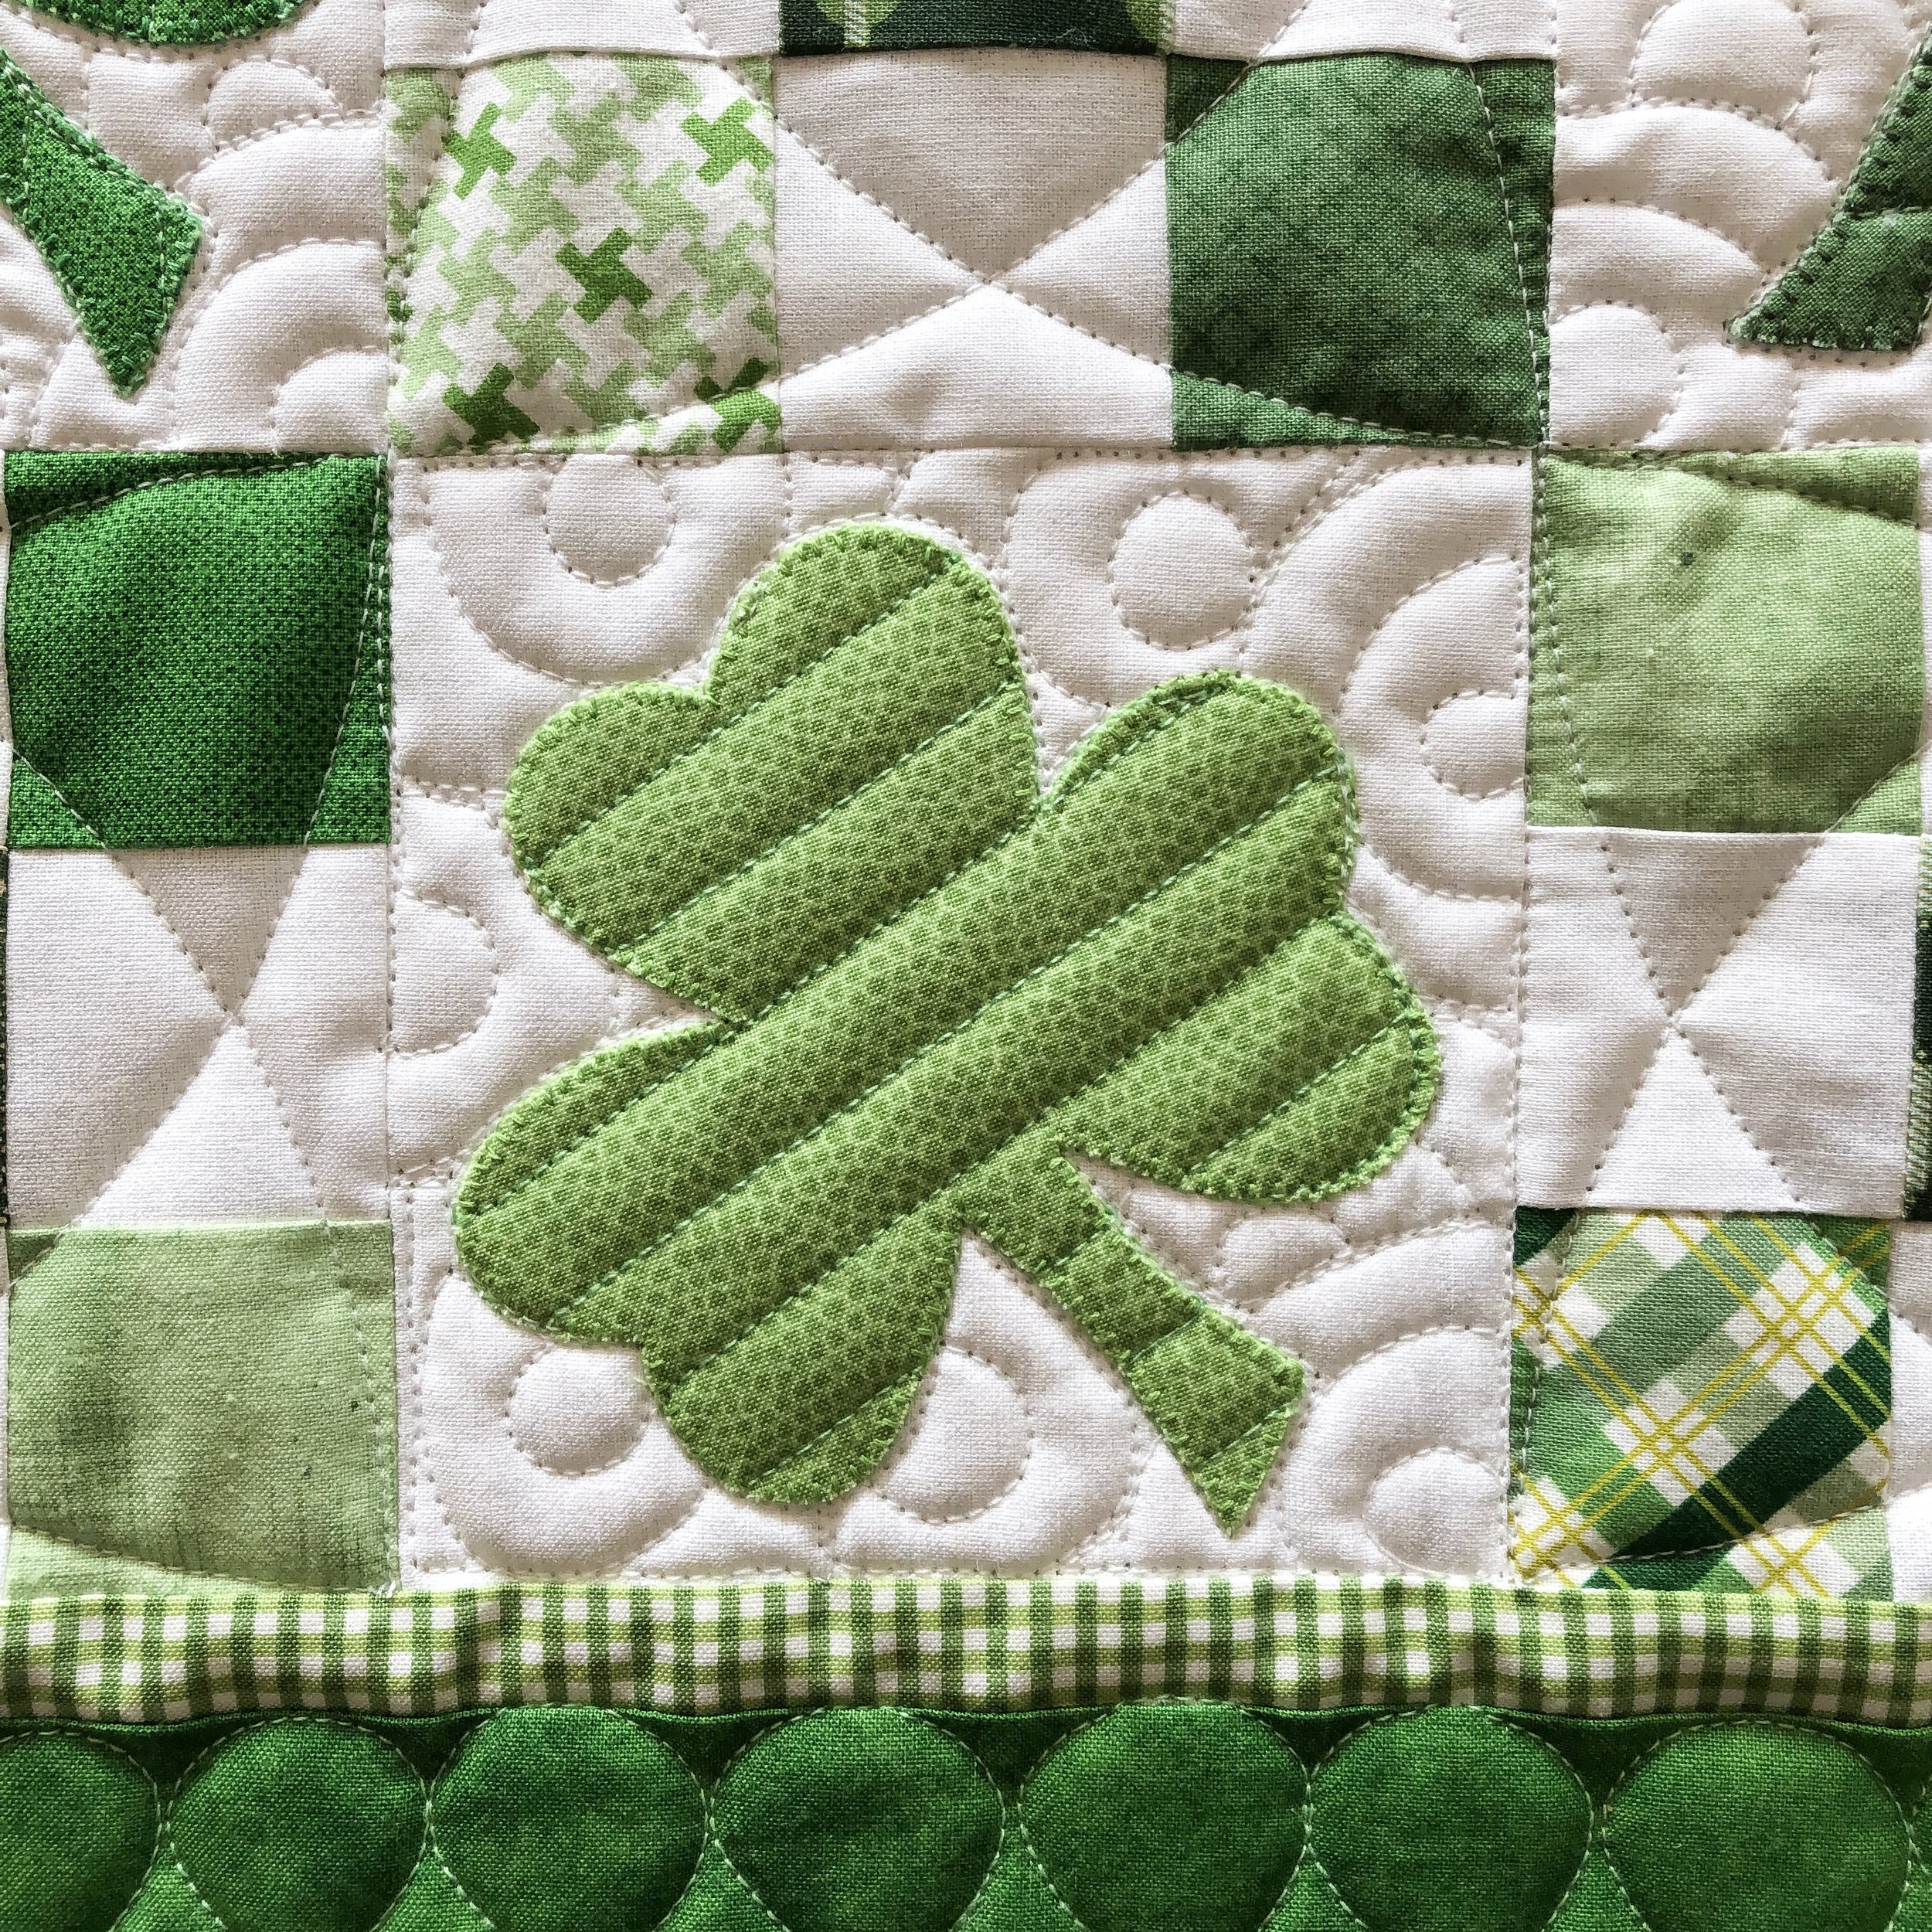
Thanks for stopping on by!! Wishing you extra luck this week, with whatever you’re doing. - Leisha

Sherry’s Adorable Easter Pillows
Sherry has me quilt a few of these bench pillow fronts, and they turned out so cute!! The pattern is by Kimberbell Designs, and she has a digitized version if you do machine embroidery.
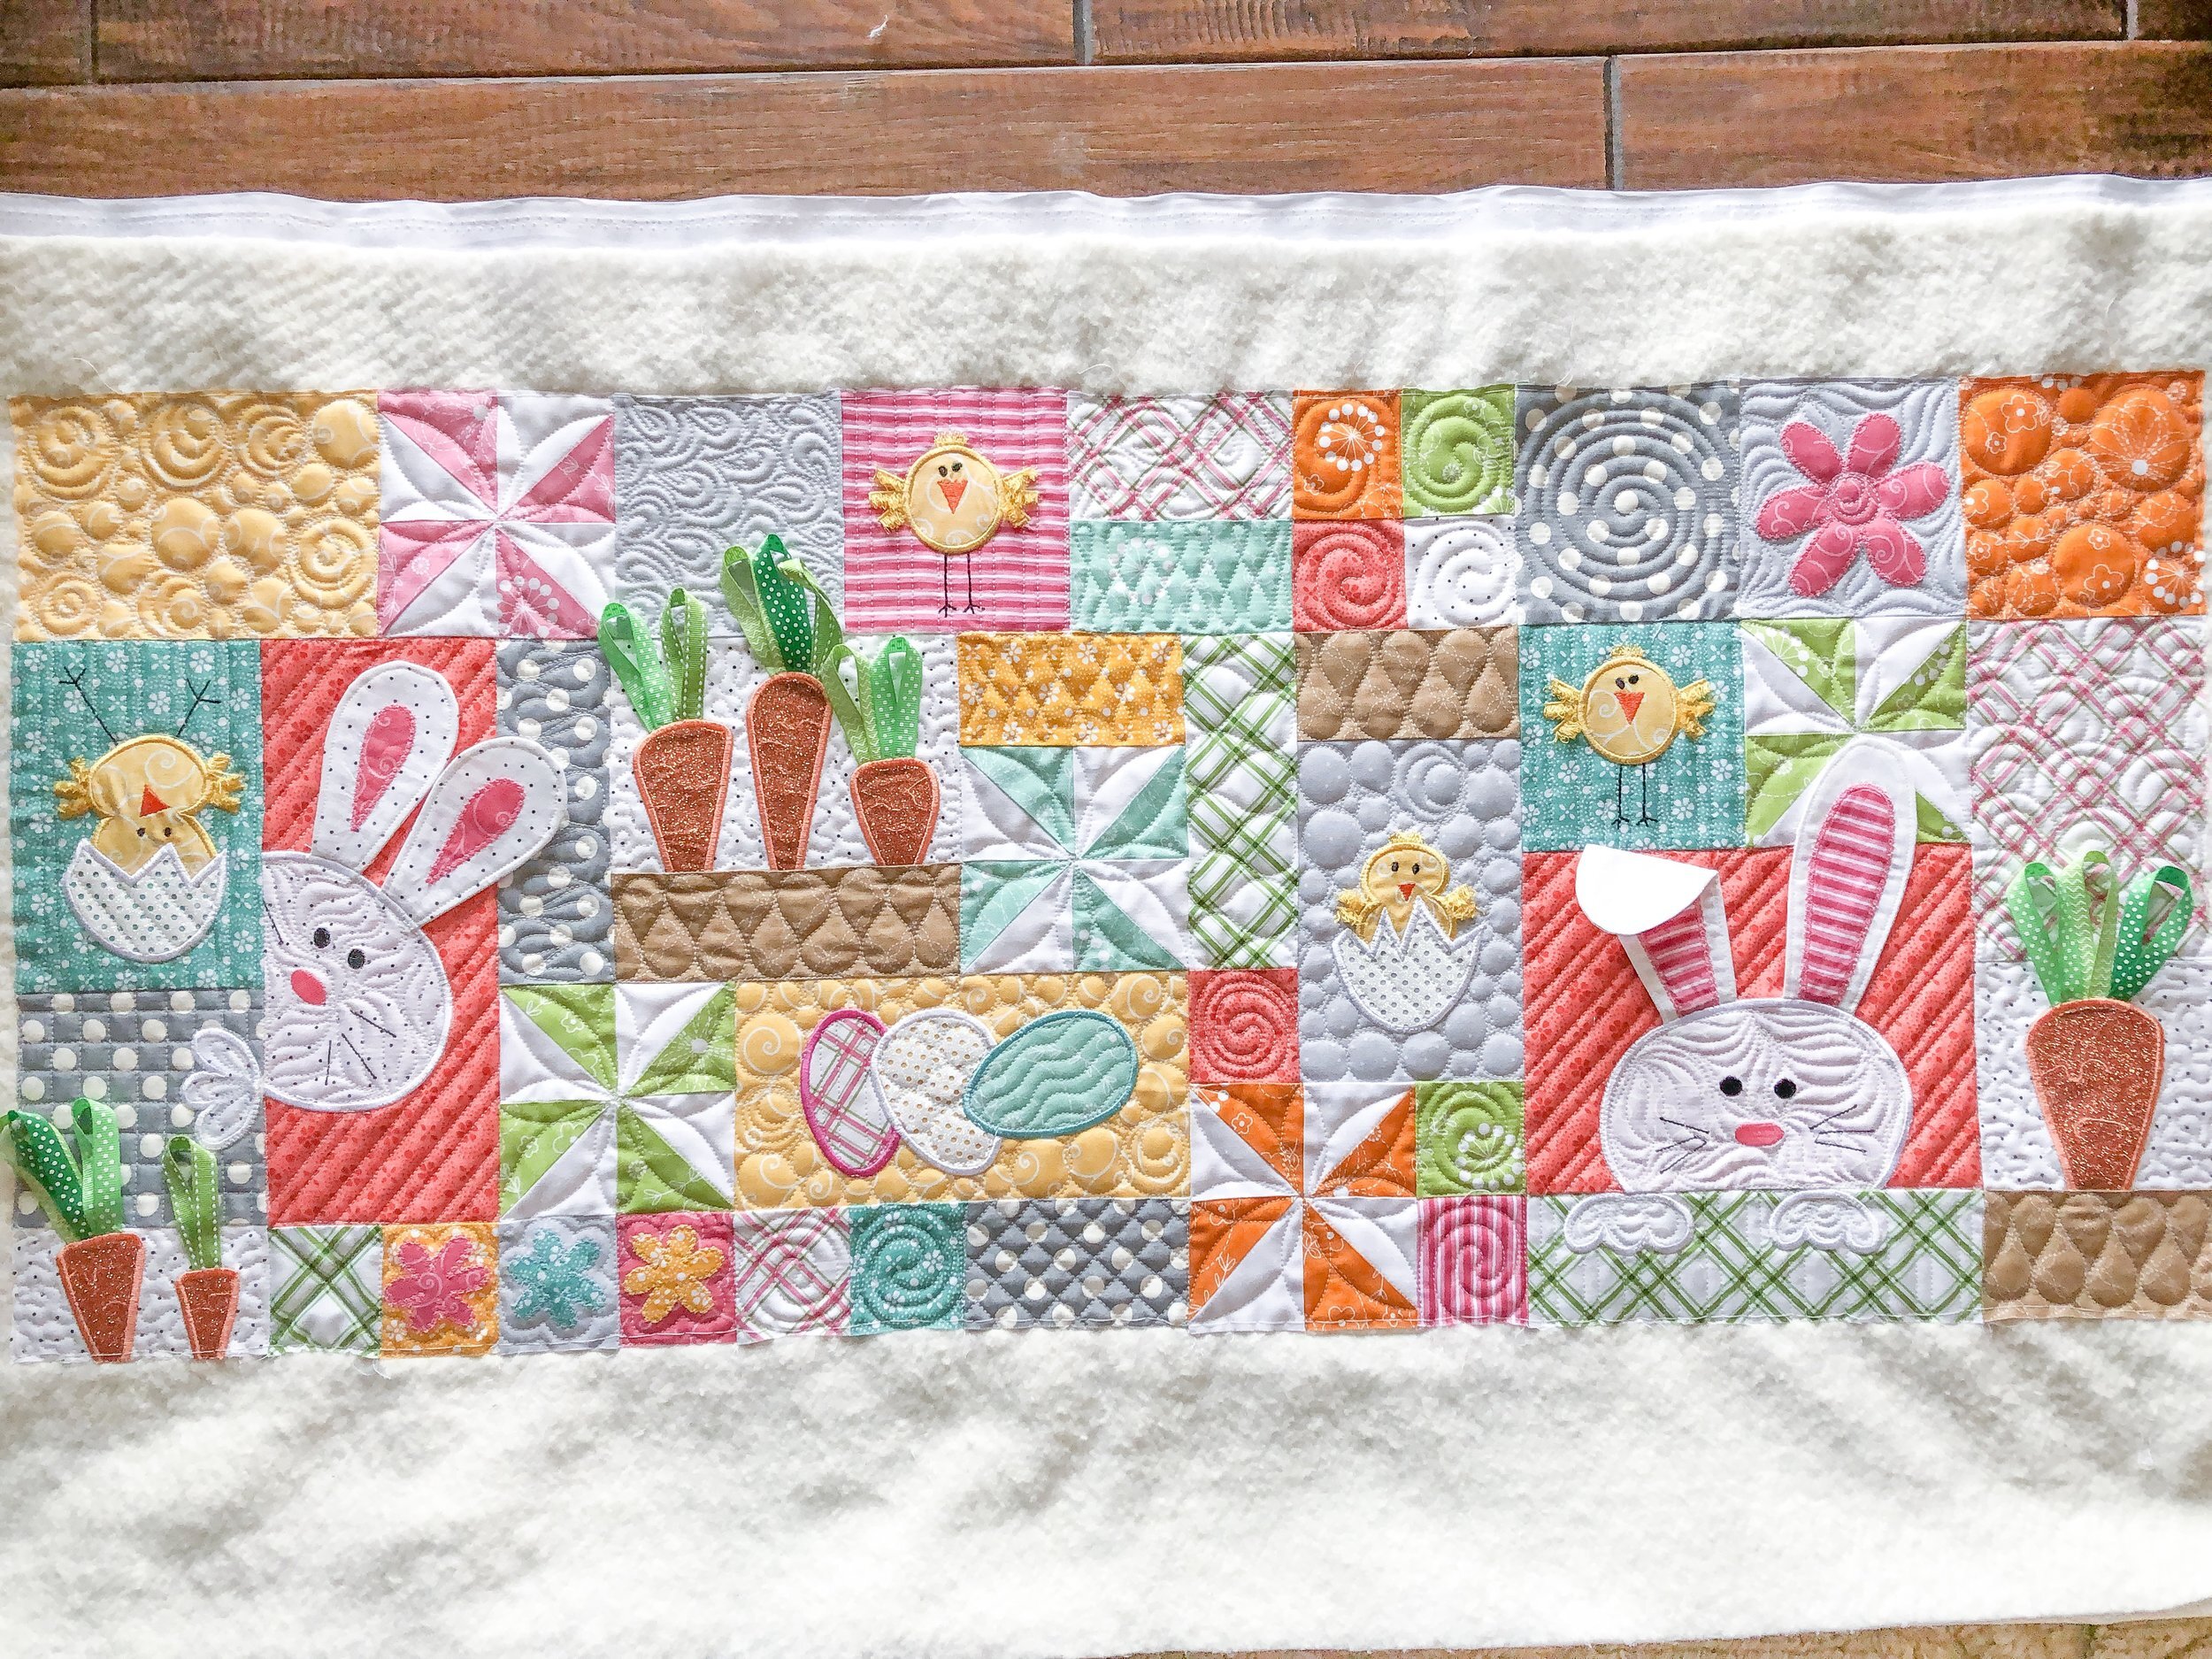
It’s so fun to add all these fun little details to these bench pillows.
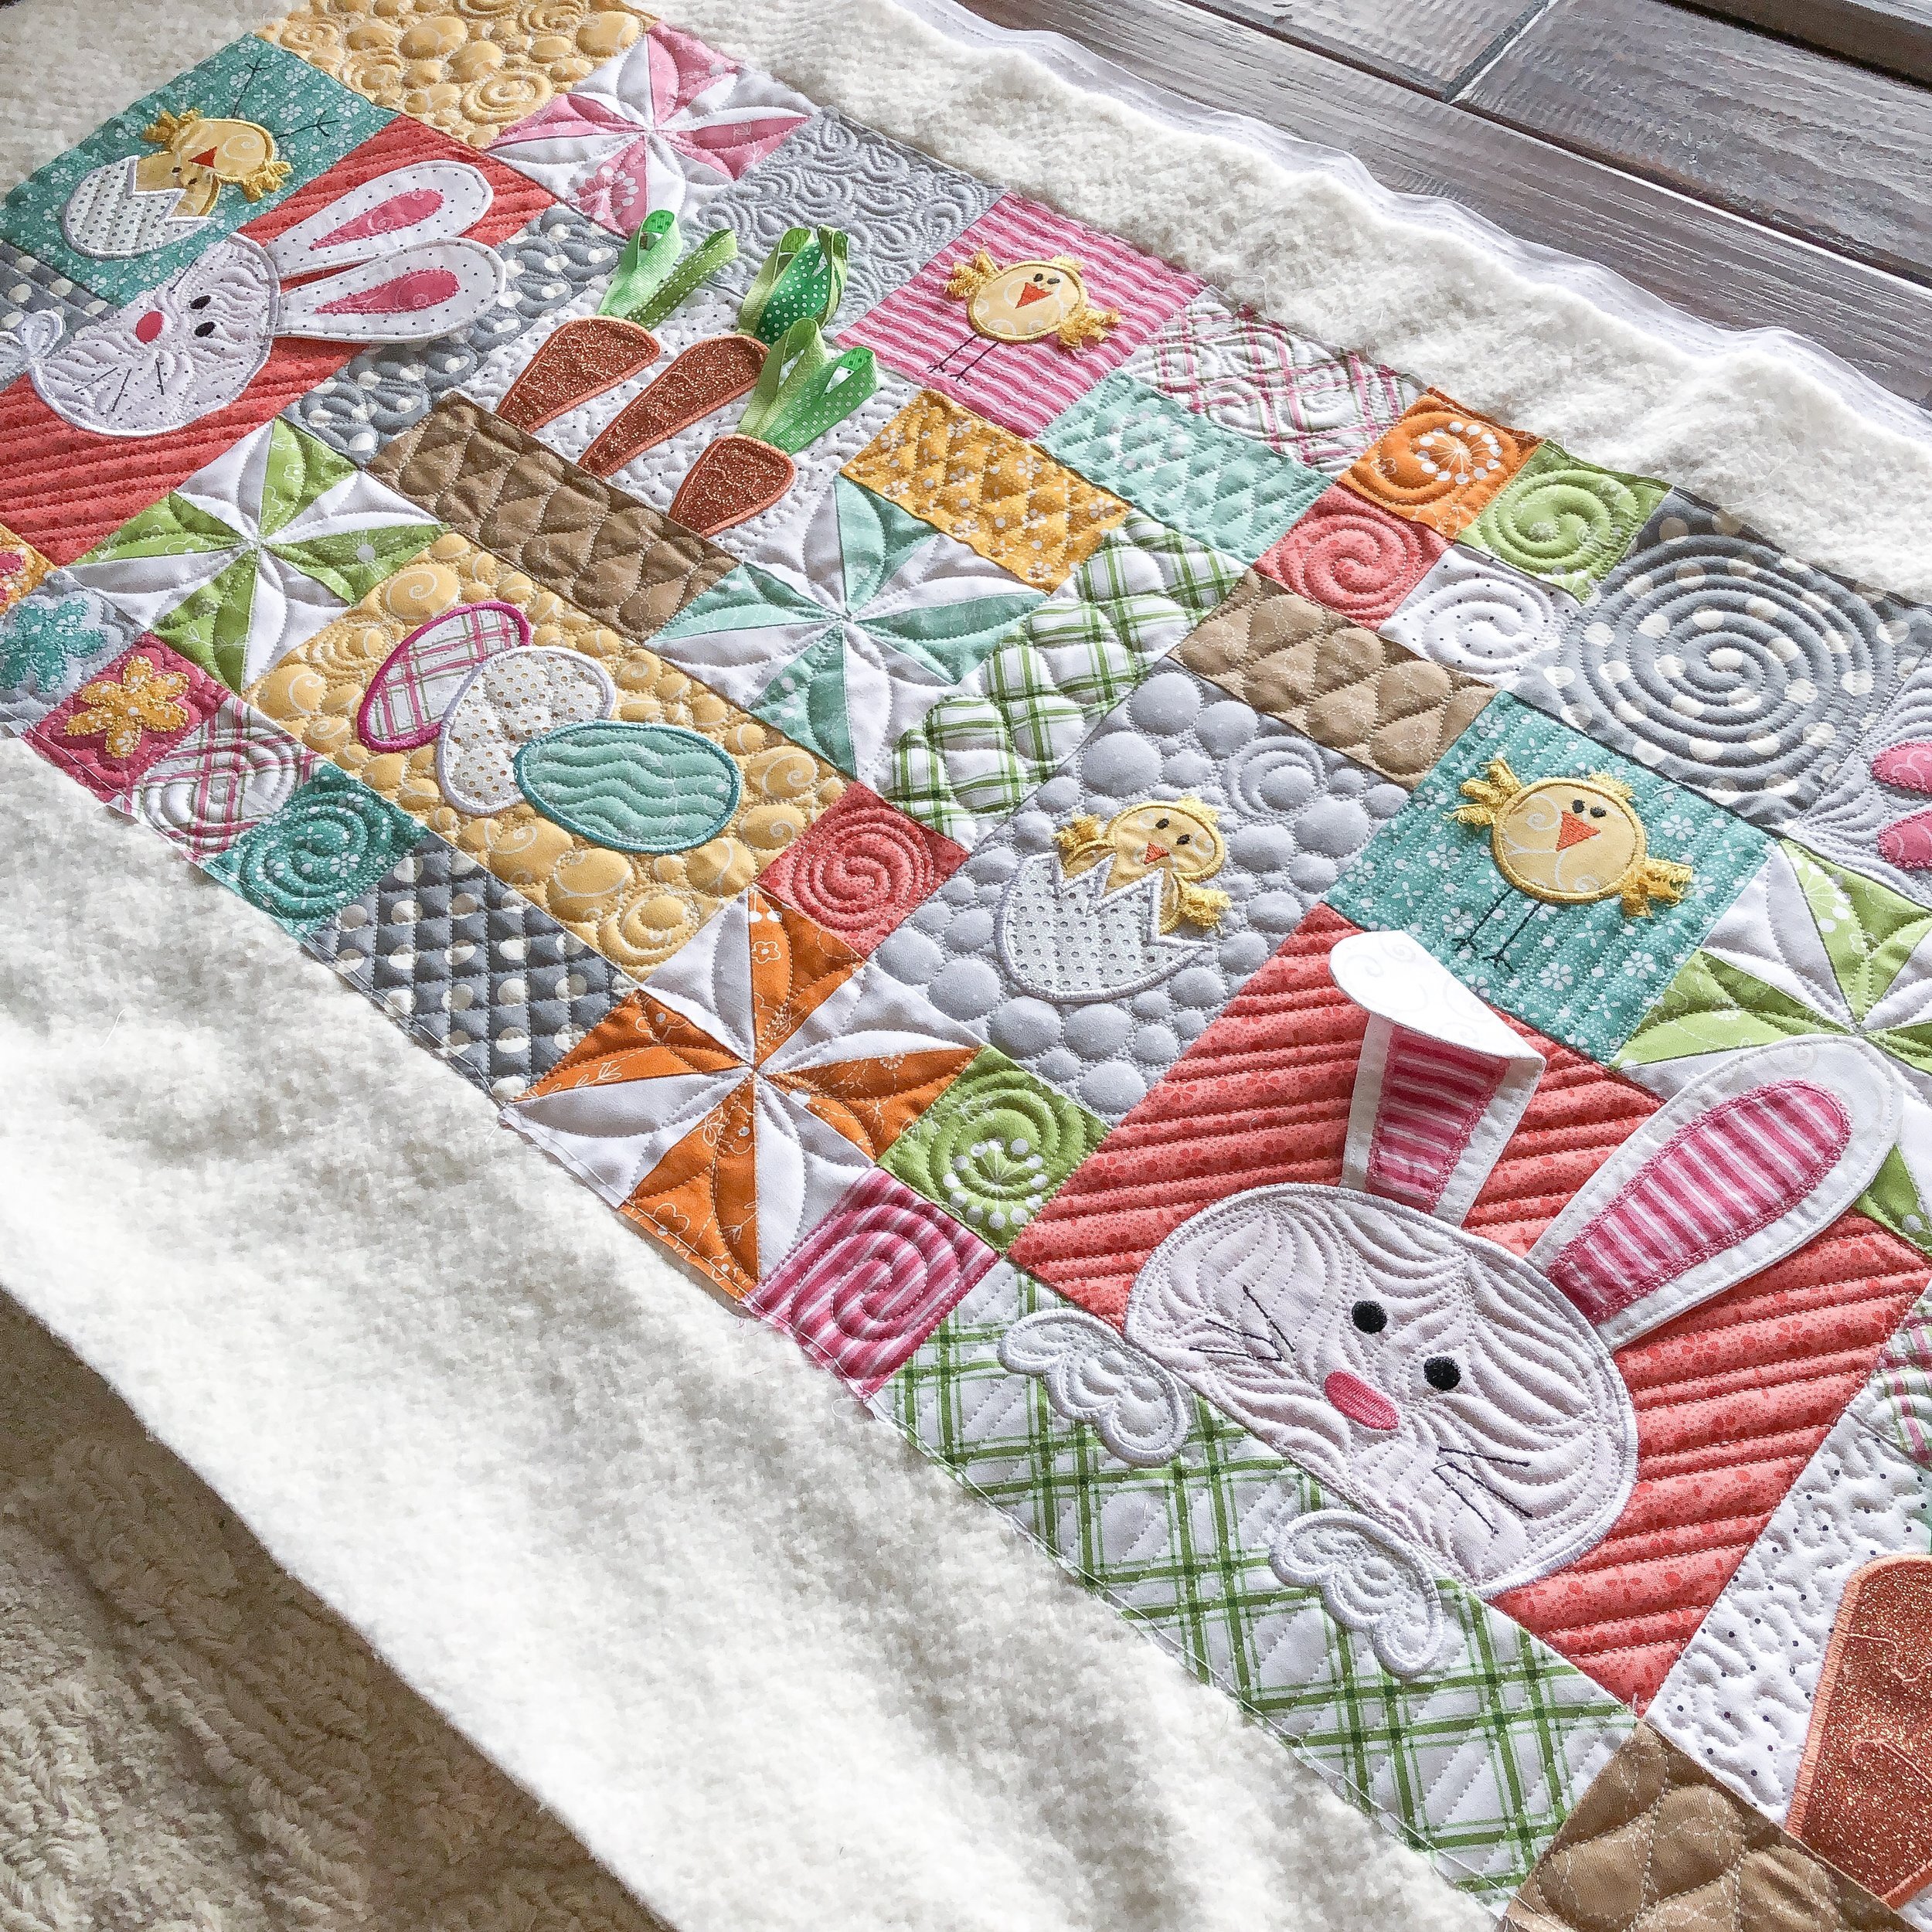
I used white 30 Tex A&E Perma Core thread and 8020 cotton poly blend batting from Winline.
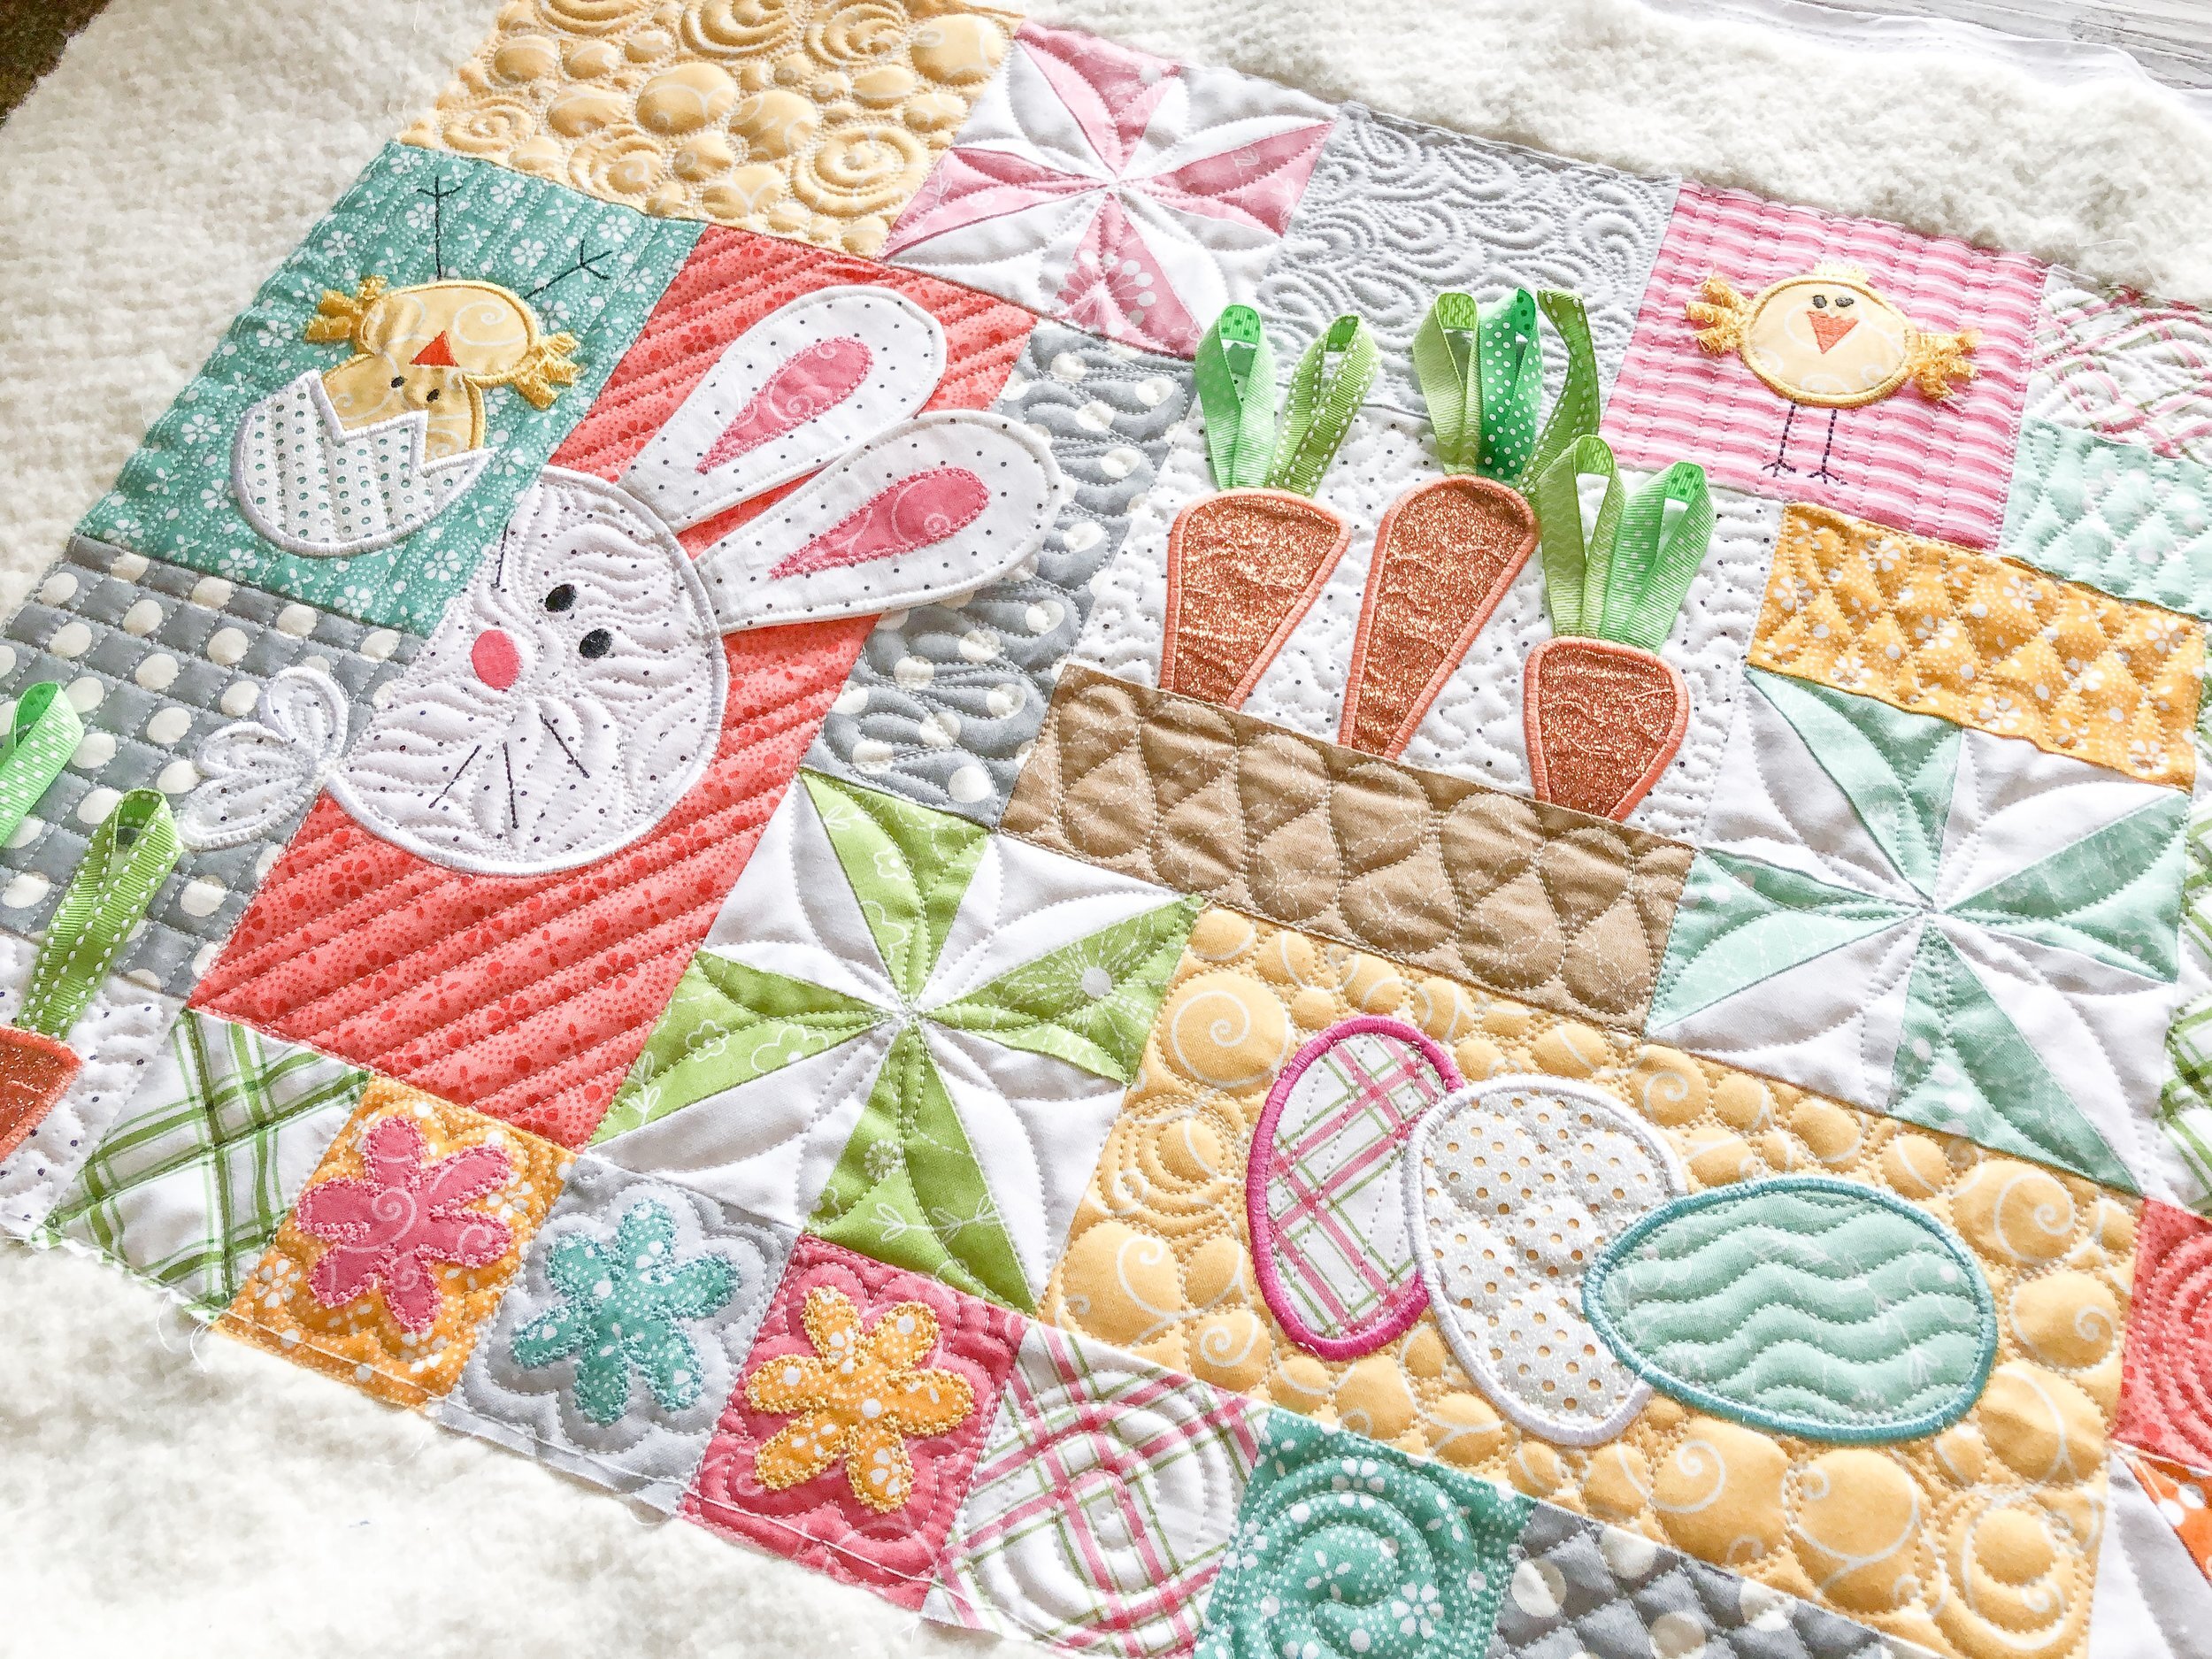
See that flower quilted on the green windmill block??? I quilted that using my 3” and 4” Circle2™ rulers.
My Circle2™ rulers can be used on a longarm and sewing machine (with a quilting foot). The circles range in size from 2” to 13”. They come in green or clear, and are made in America with high quality acrylic. AND right now they are 10% off, use code “THANKYOU10” at checkout. https://www.quiltingit.com/shop?category=Rulers
I also used Linda from https://thequiltedpineapple.bigcartel.com/ Edge rulers to quilt the lines throughout.
I love all the details...from the fabrics, to the embellishments, to the colors...it helps the quilting pop!

This overlapping circle design is something I just started quilting recently...and it’s so fun to do. I actually have a large quilt to do soon, and it will be the entire background filler. So excited!! Below is a video of me freehand quilting this design.
I will blog about this lamb quilt soon.

Okay, so how cute is mr. bunny??? I wanted to add some fur looking texture to his face. Check out the video below to see how to quilt this freehand grassy design.
I love how forgiving this design is, and it works on a variety of different quilts. Here are a couple of quilts I’ve quilted it on recently: behind Little Boy Blue - https://www.quiltingit.com/blog/2019/1/1/beckys-nursery-rhyme-quilt?rq=Becky and behind a couple of umbrellas on this fun quilt - https://www.quiltingit.com/blog/2018/11/17/cindys-raincheck-quilt-including-28-different-background-quilting-designs?rq=Raincheck
The great thing about starting to see Easter projects...spring is coming!!! Yay!!
Hoppy quilting!! - Leisha

HUGE GIVEAWAY!!!
Yes...I’m giving away a set of my clear Circle2™ machine quilting circle rulers...go to my Instagram post here to see how to enter: https://www.instagram.com/p/Bt4PmNHnSaT/?utm_source=ig_share_sheet&igshid=616rtzbt8xp5

This is a set of 6 high quality rulers, ranging from 2” to 13” circles. For more info on these rulers go to this post: https://www.quiltingit.com/blog/2018/10/10/introducing-my-circle2-longarm-circle-ruler-set?rq=Circle2
My Circle2™ rulers are only available in my shop. They come in high quality green or clear 1/4” acrylic, and are American made.
Go to: https://www.quiltingit.com/shop?category=Rulers
All details, including when the giveaway is over, is in my Instagram post.
Thank you!!! - Leisha
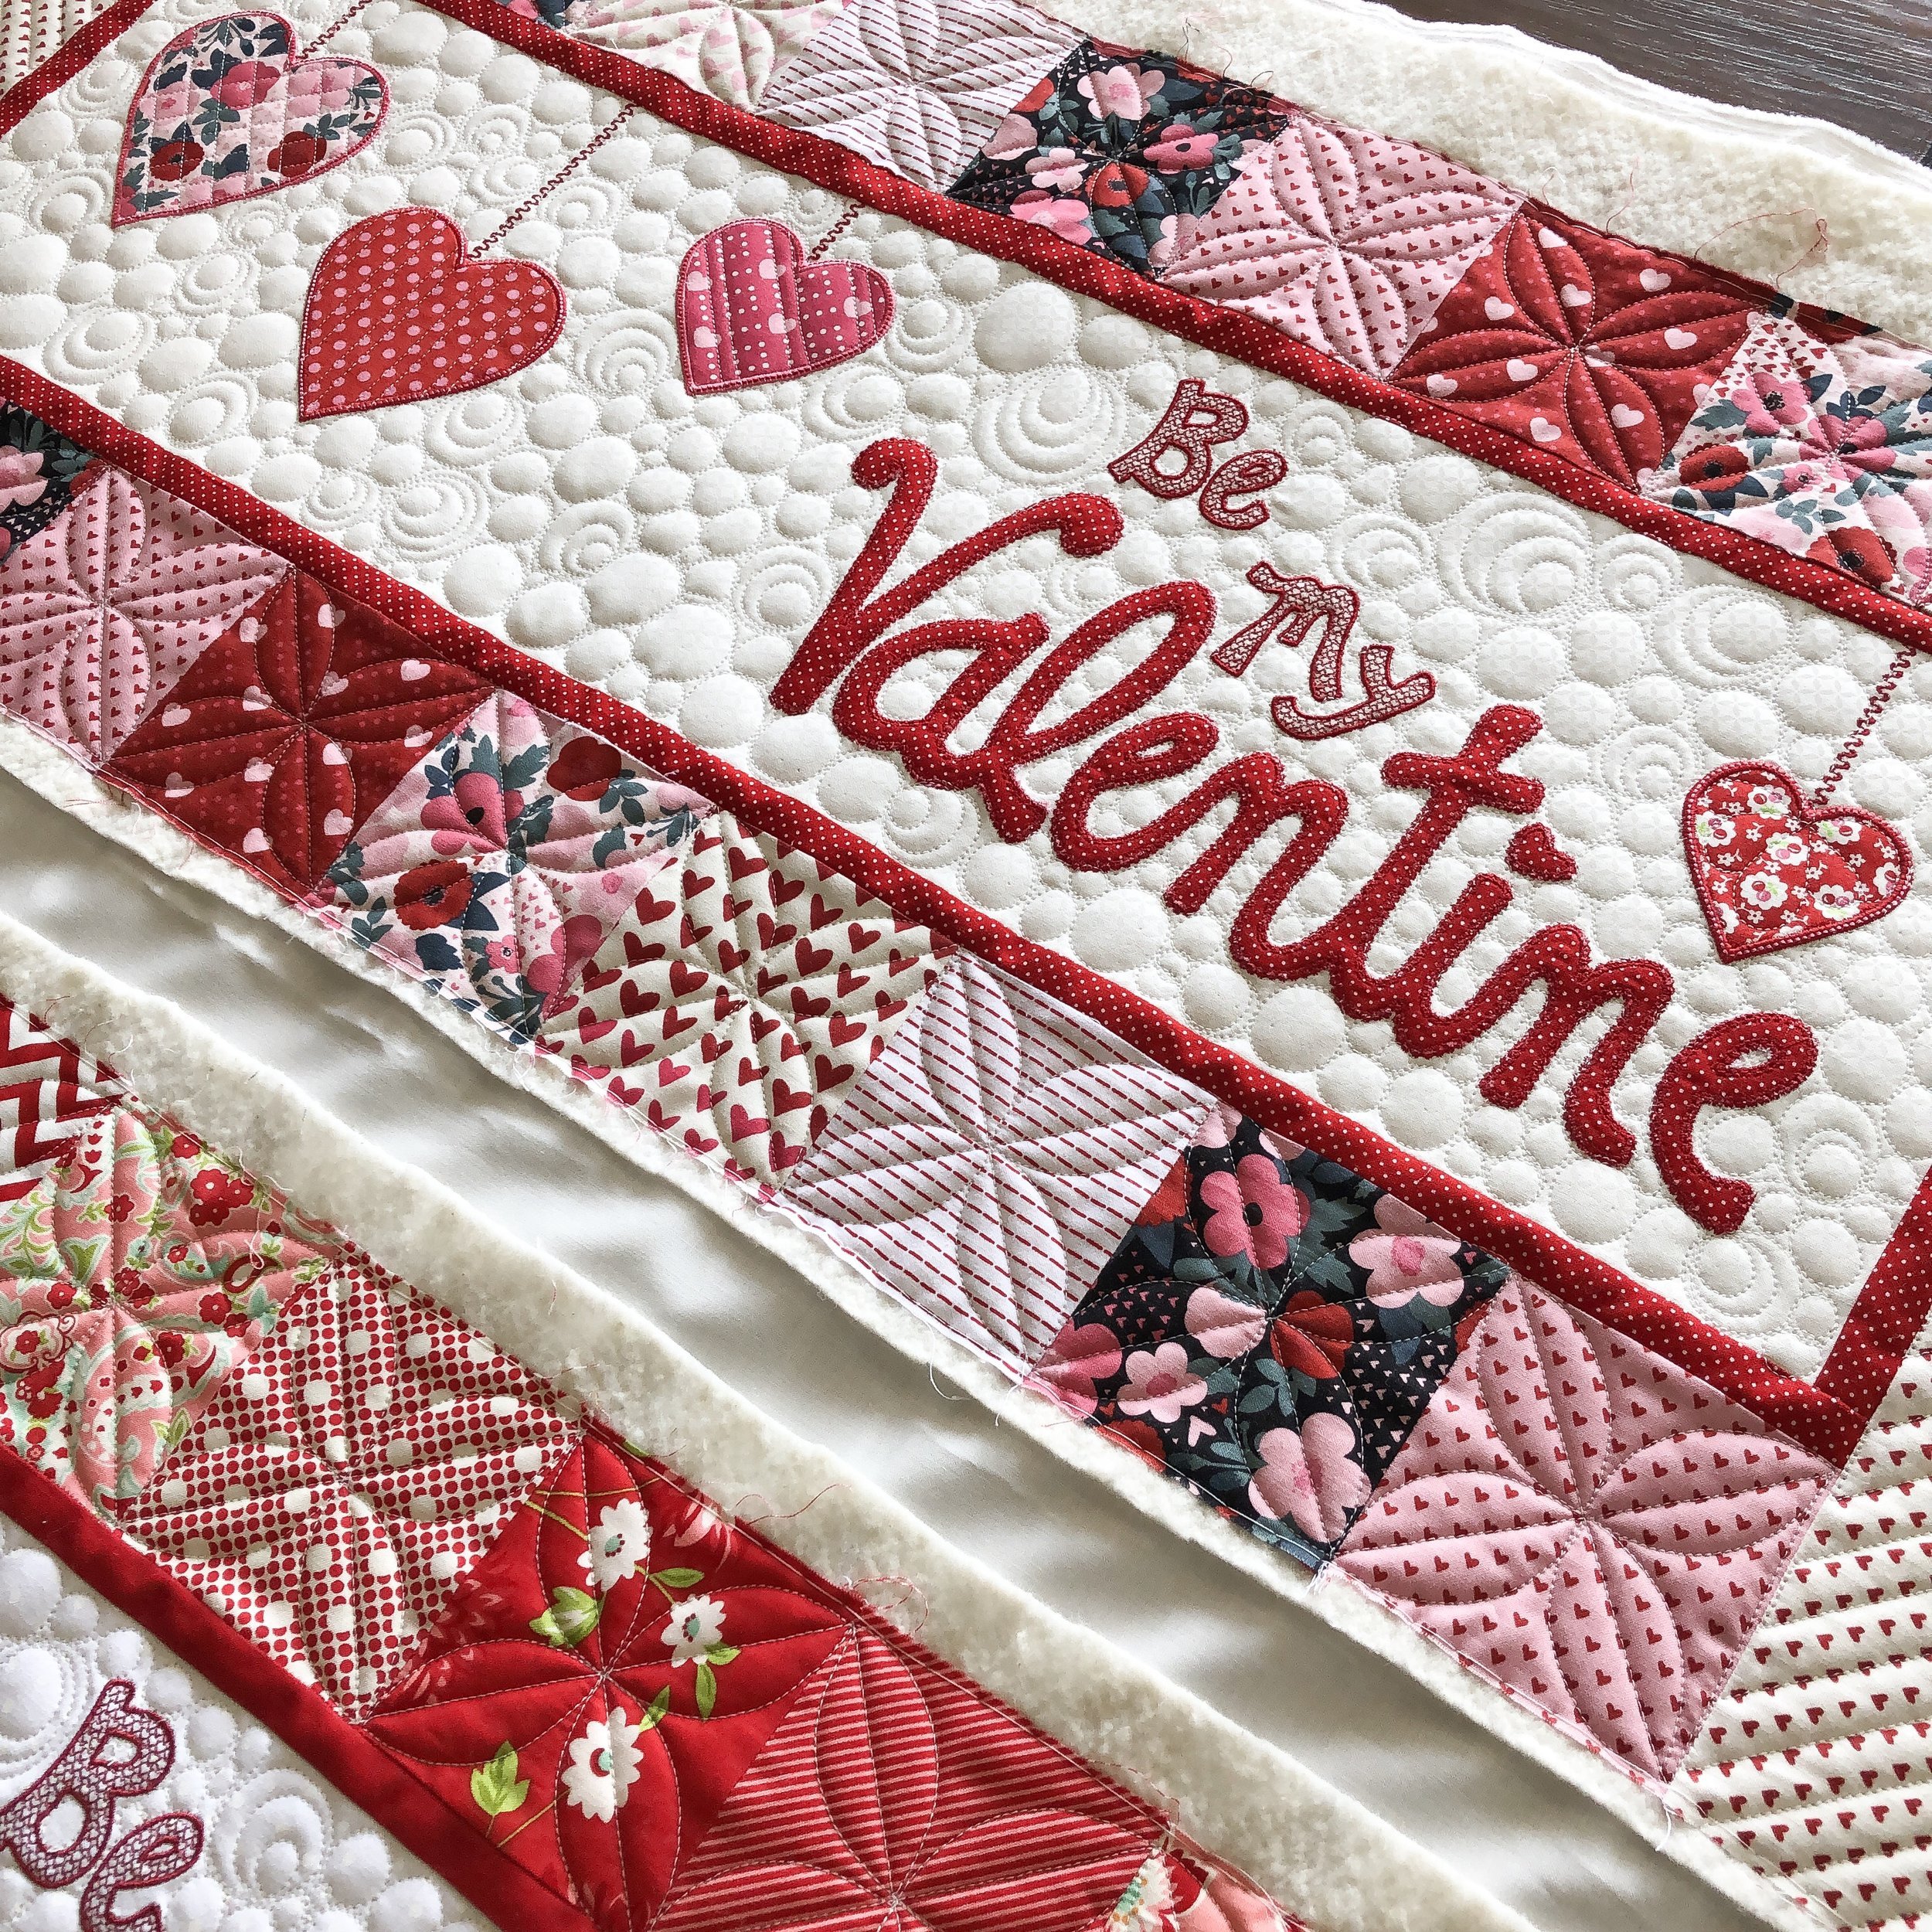
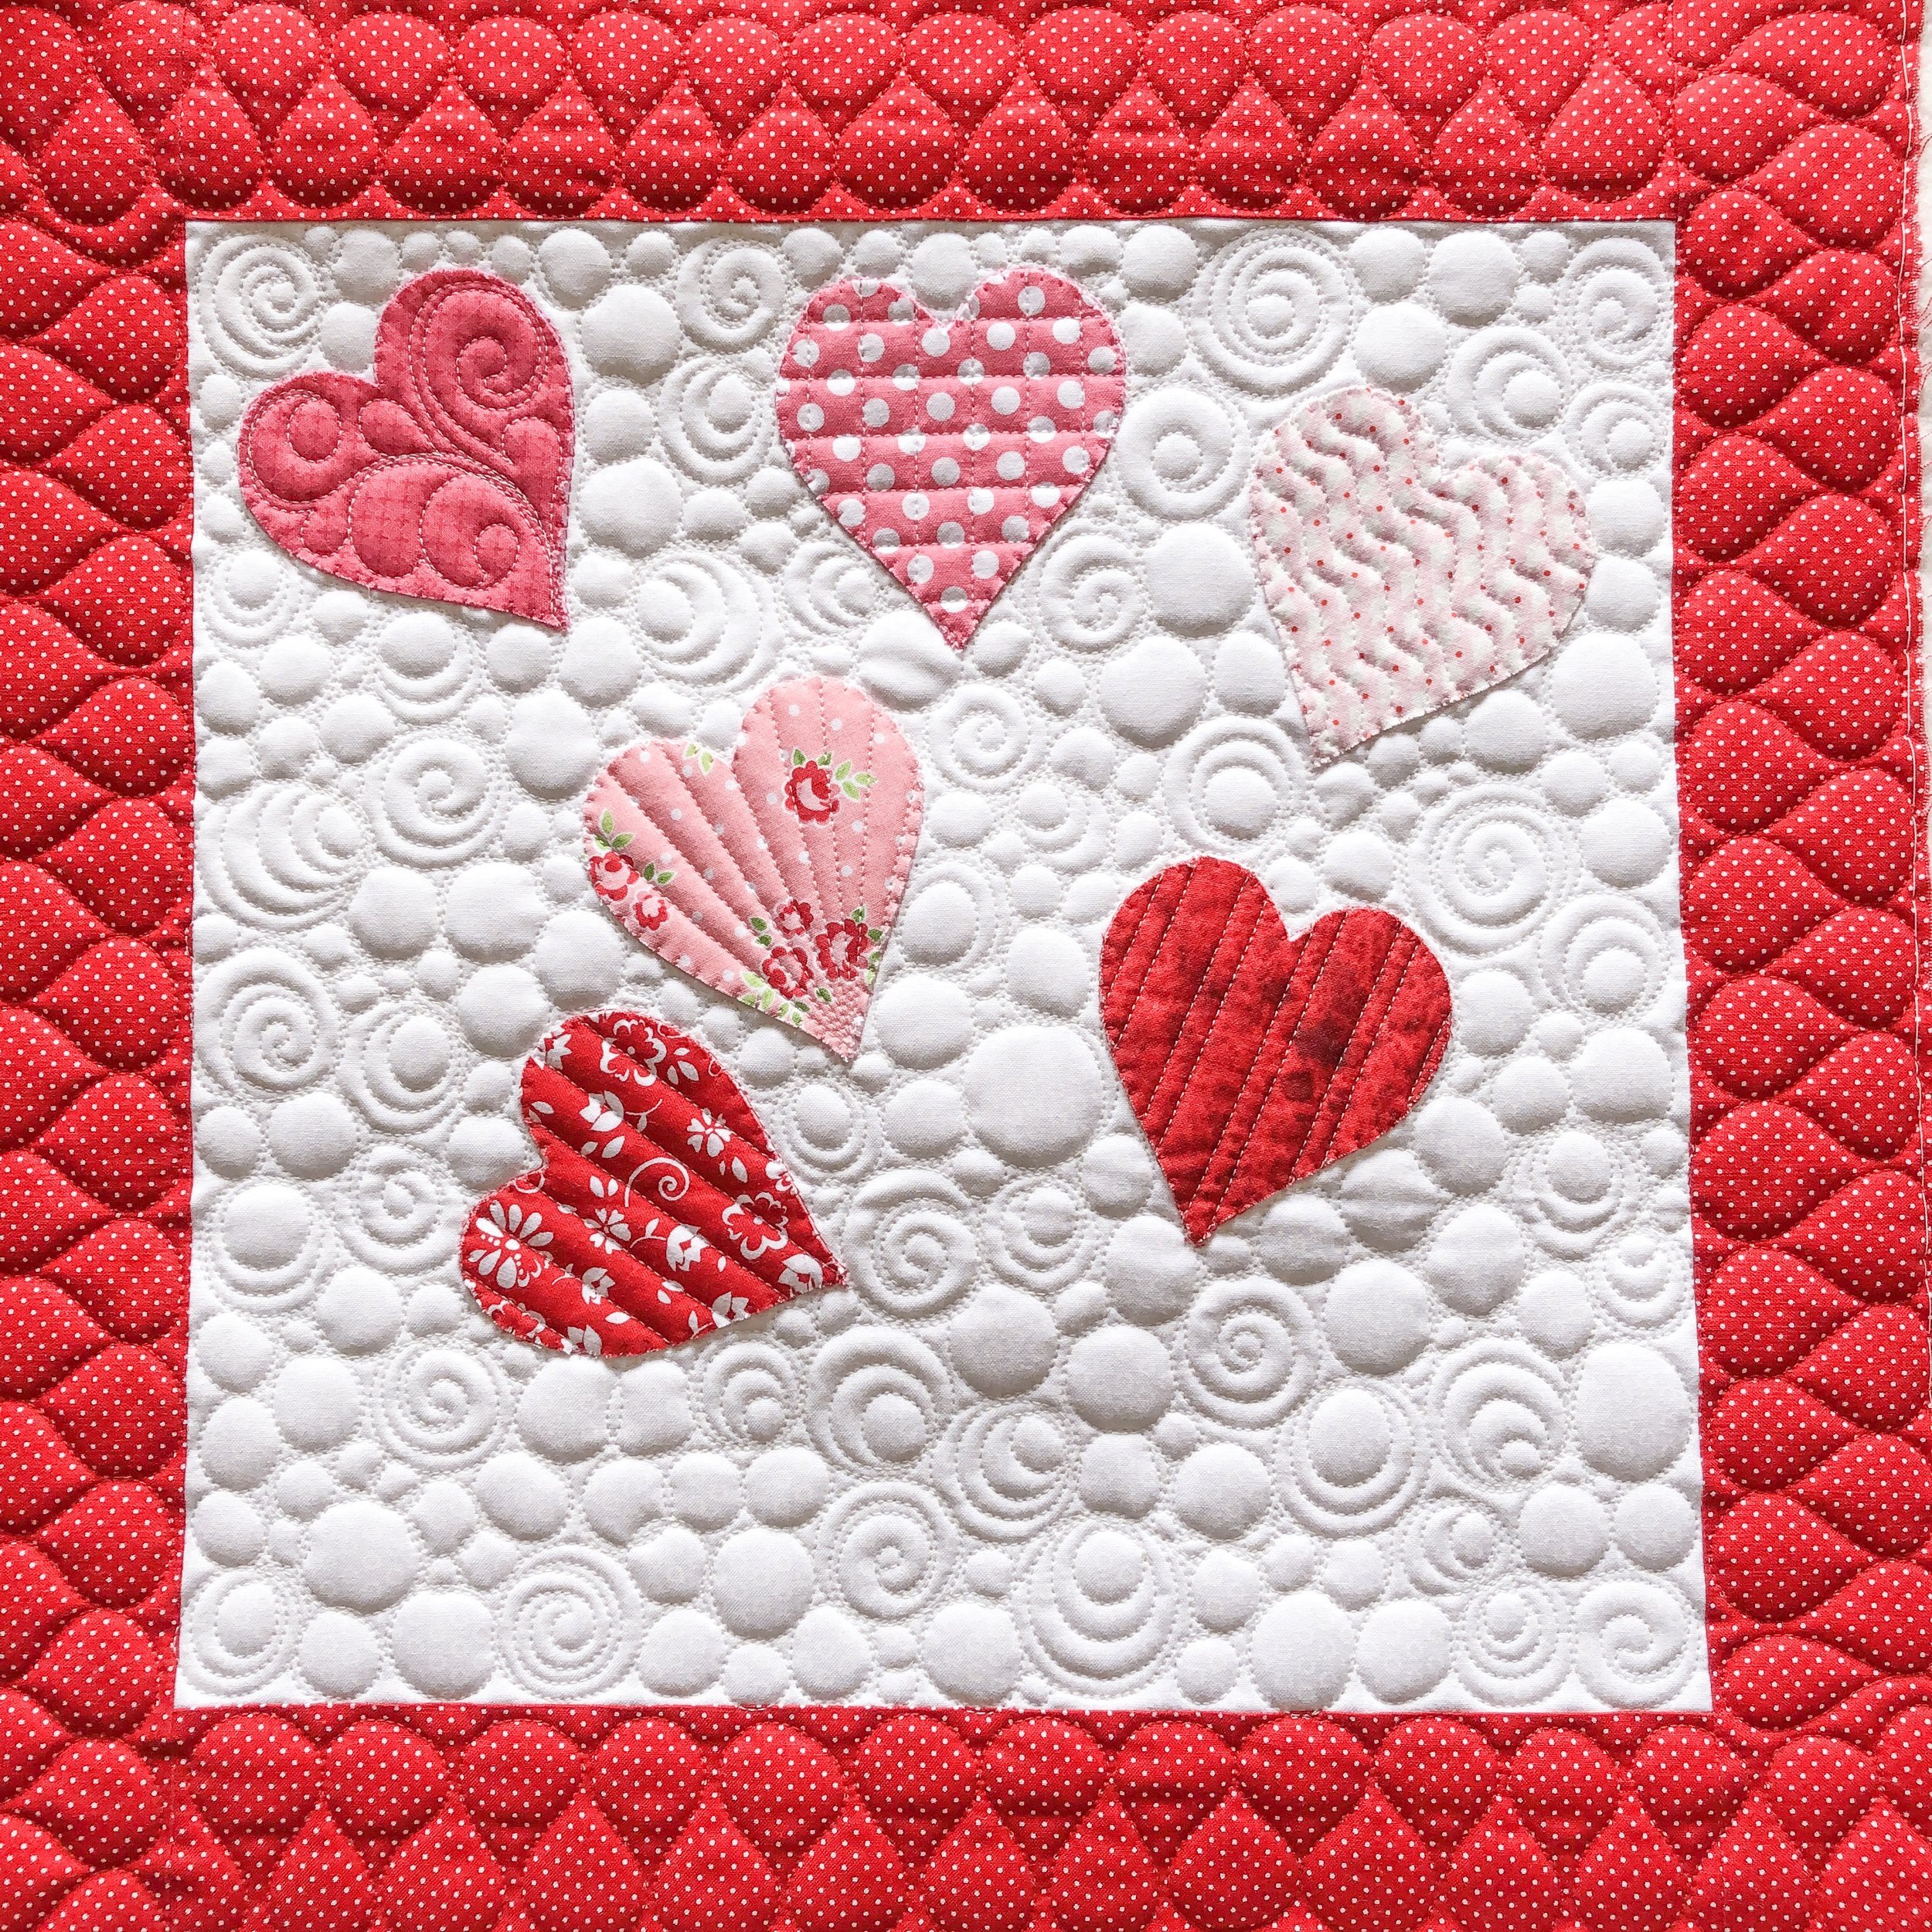
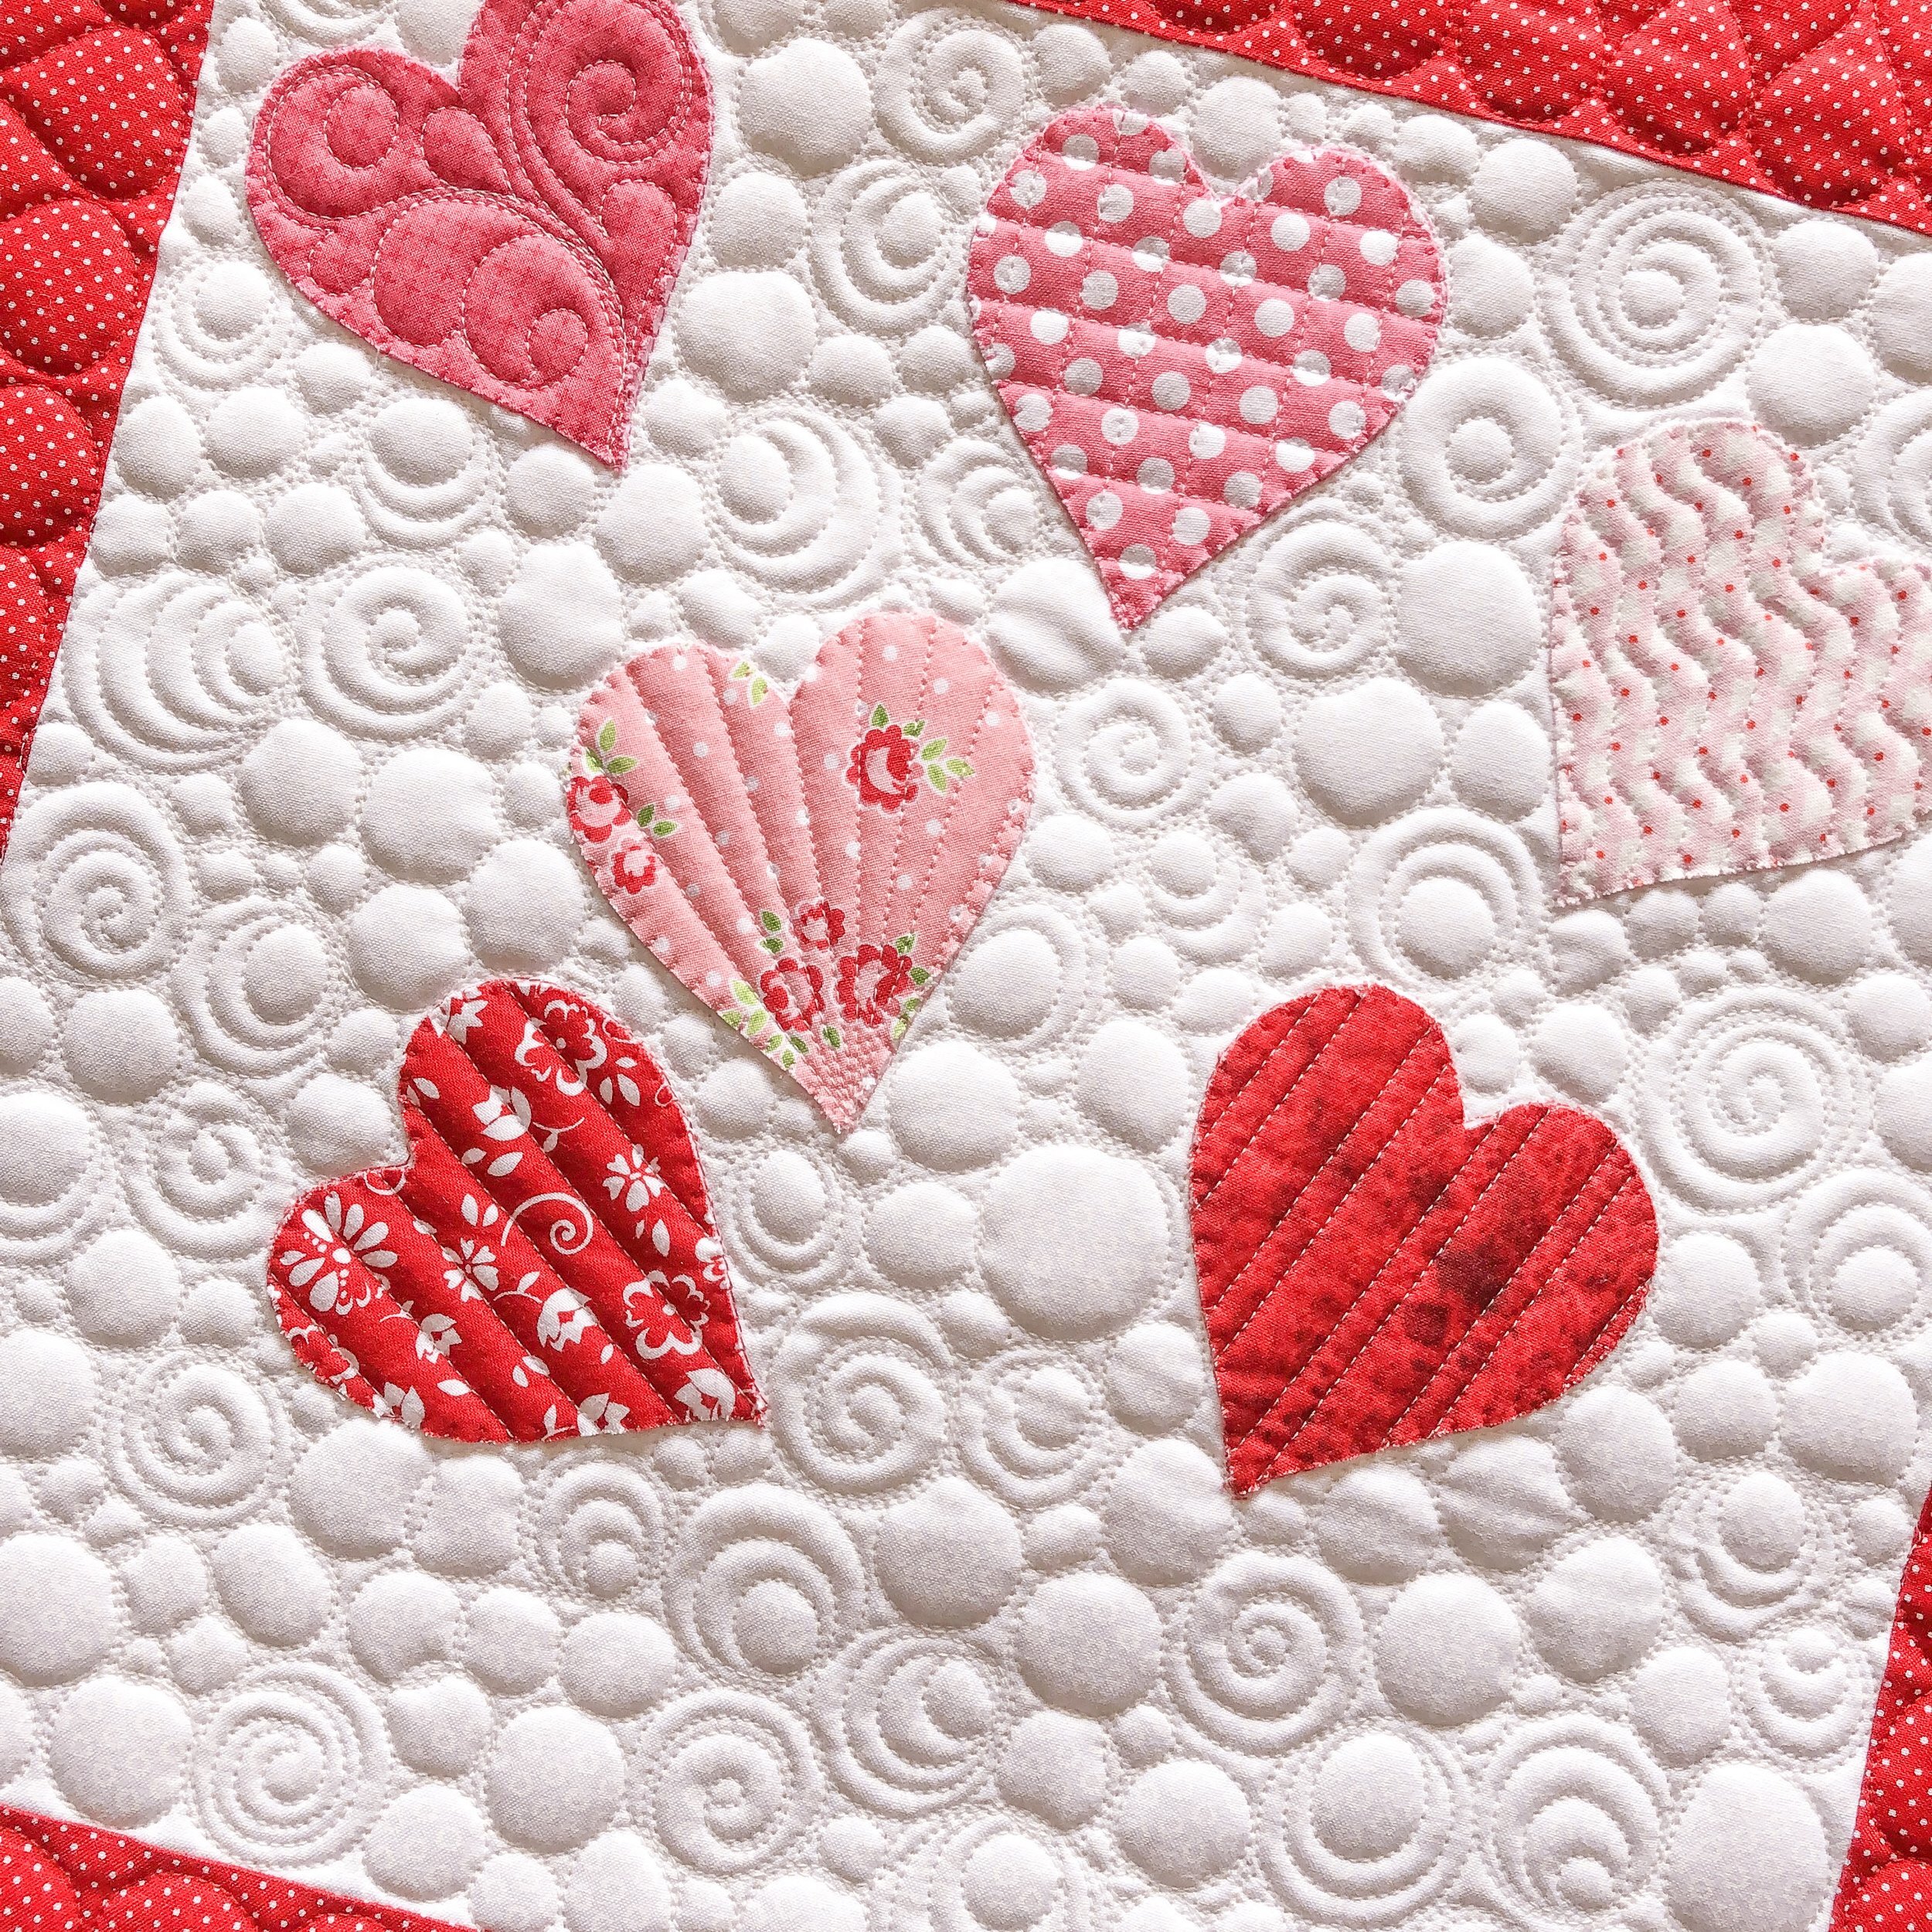
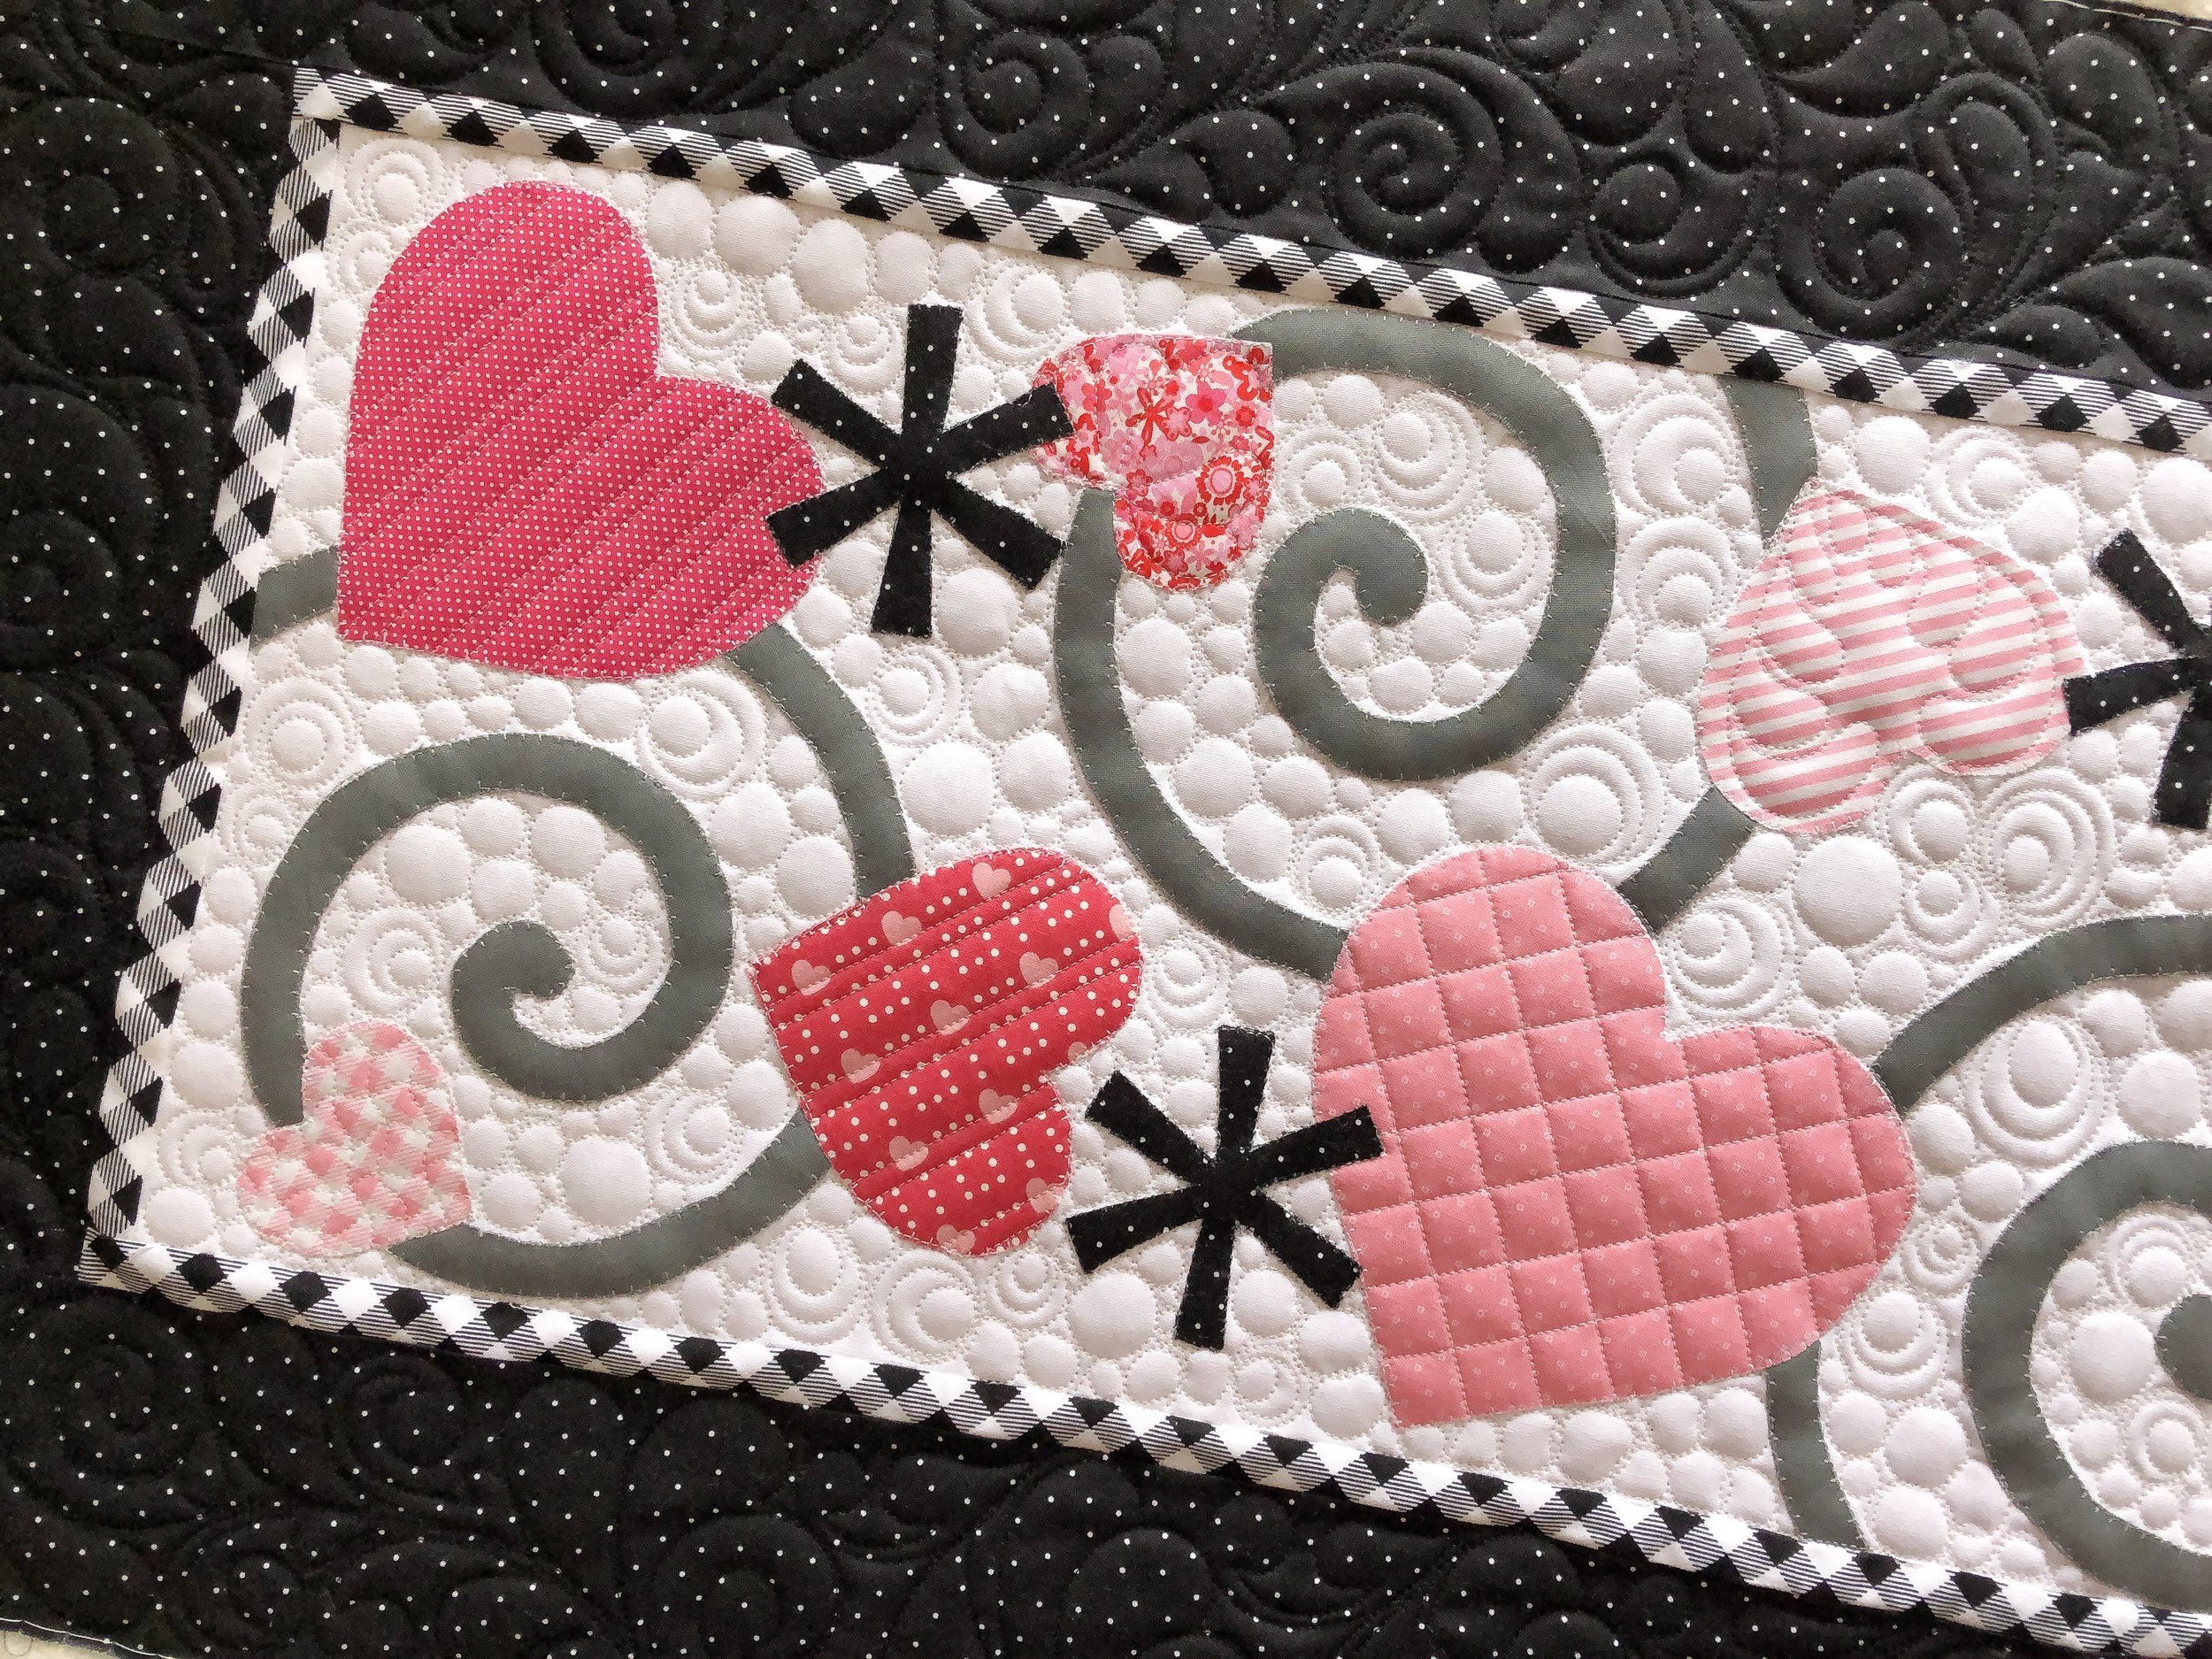
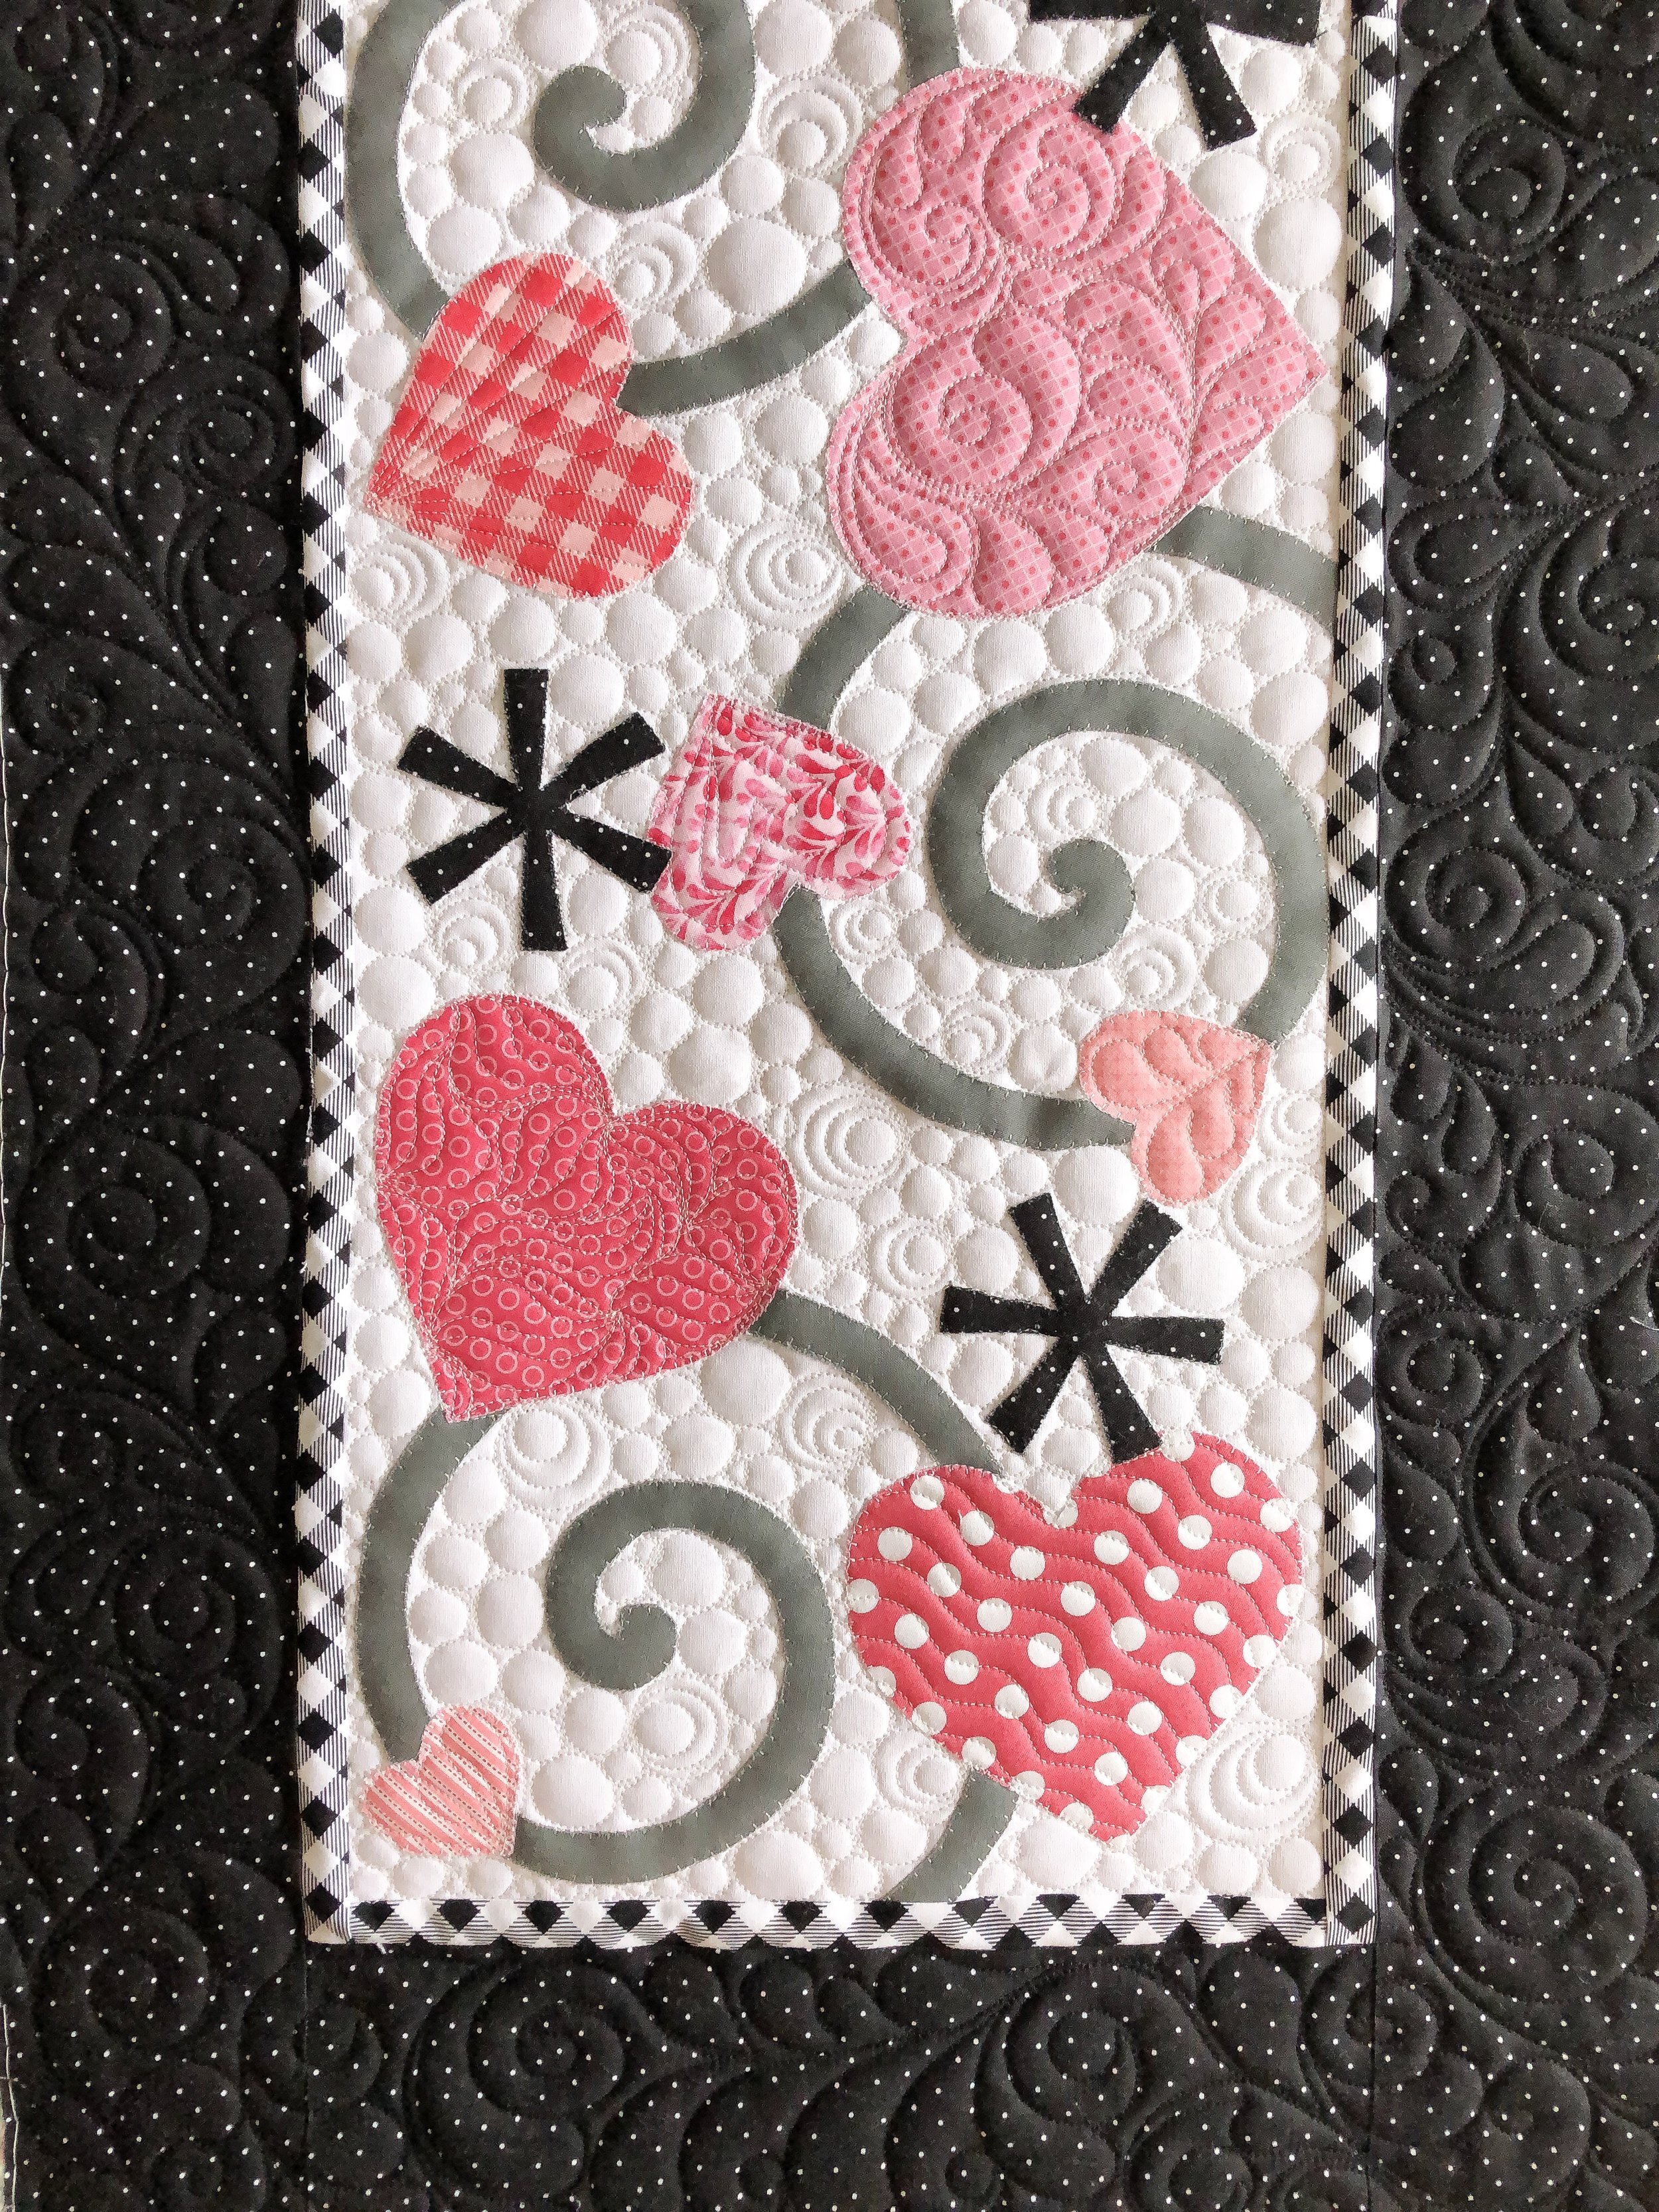
Hearts...hearts...hearts!
I have tons of pictures and videos to share in this post... it’s all about love!! Not just valentine’s... but all the quilty textures!! 💗
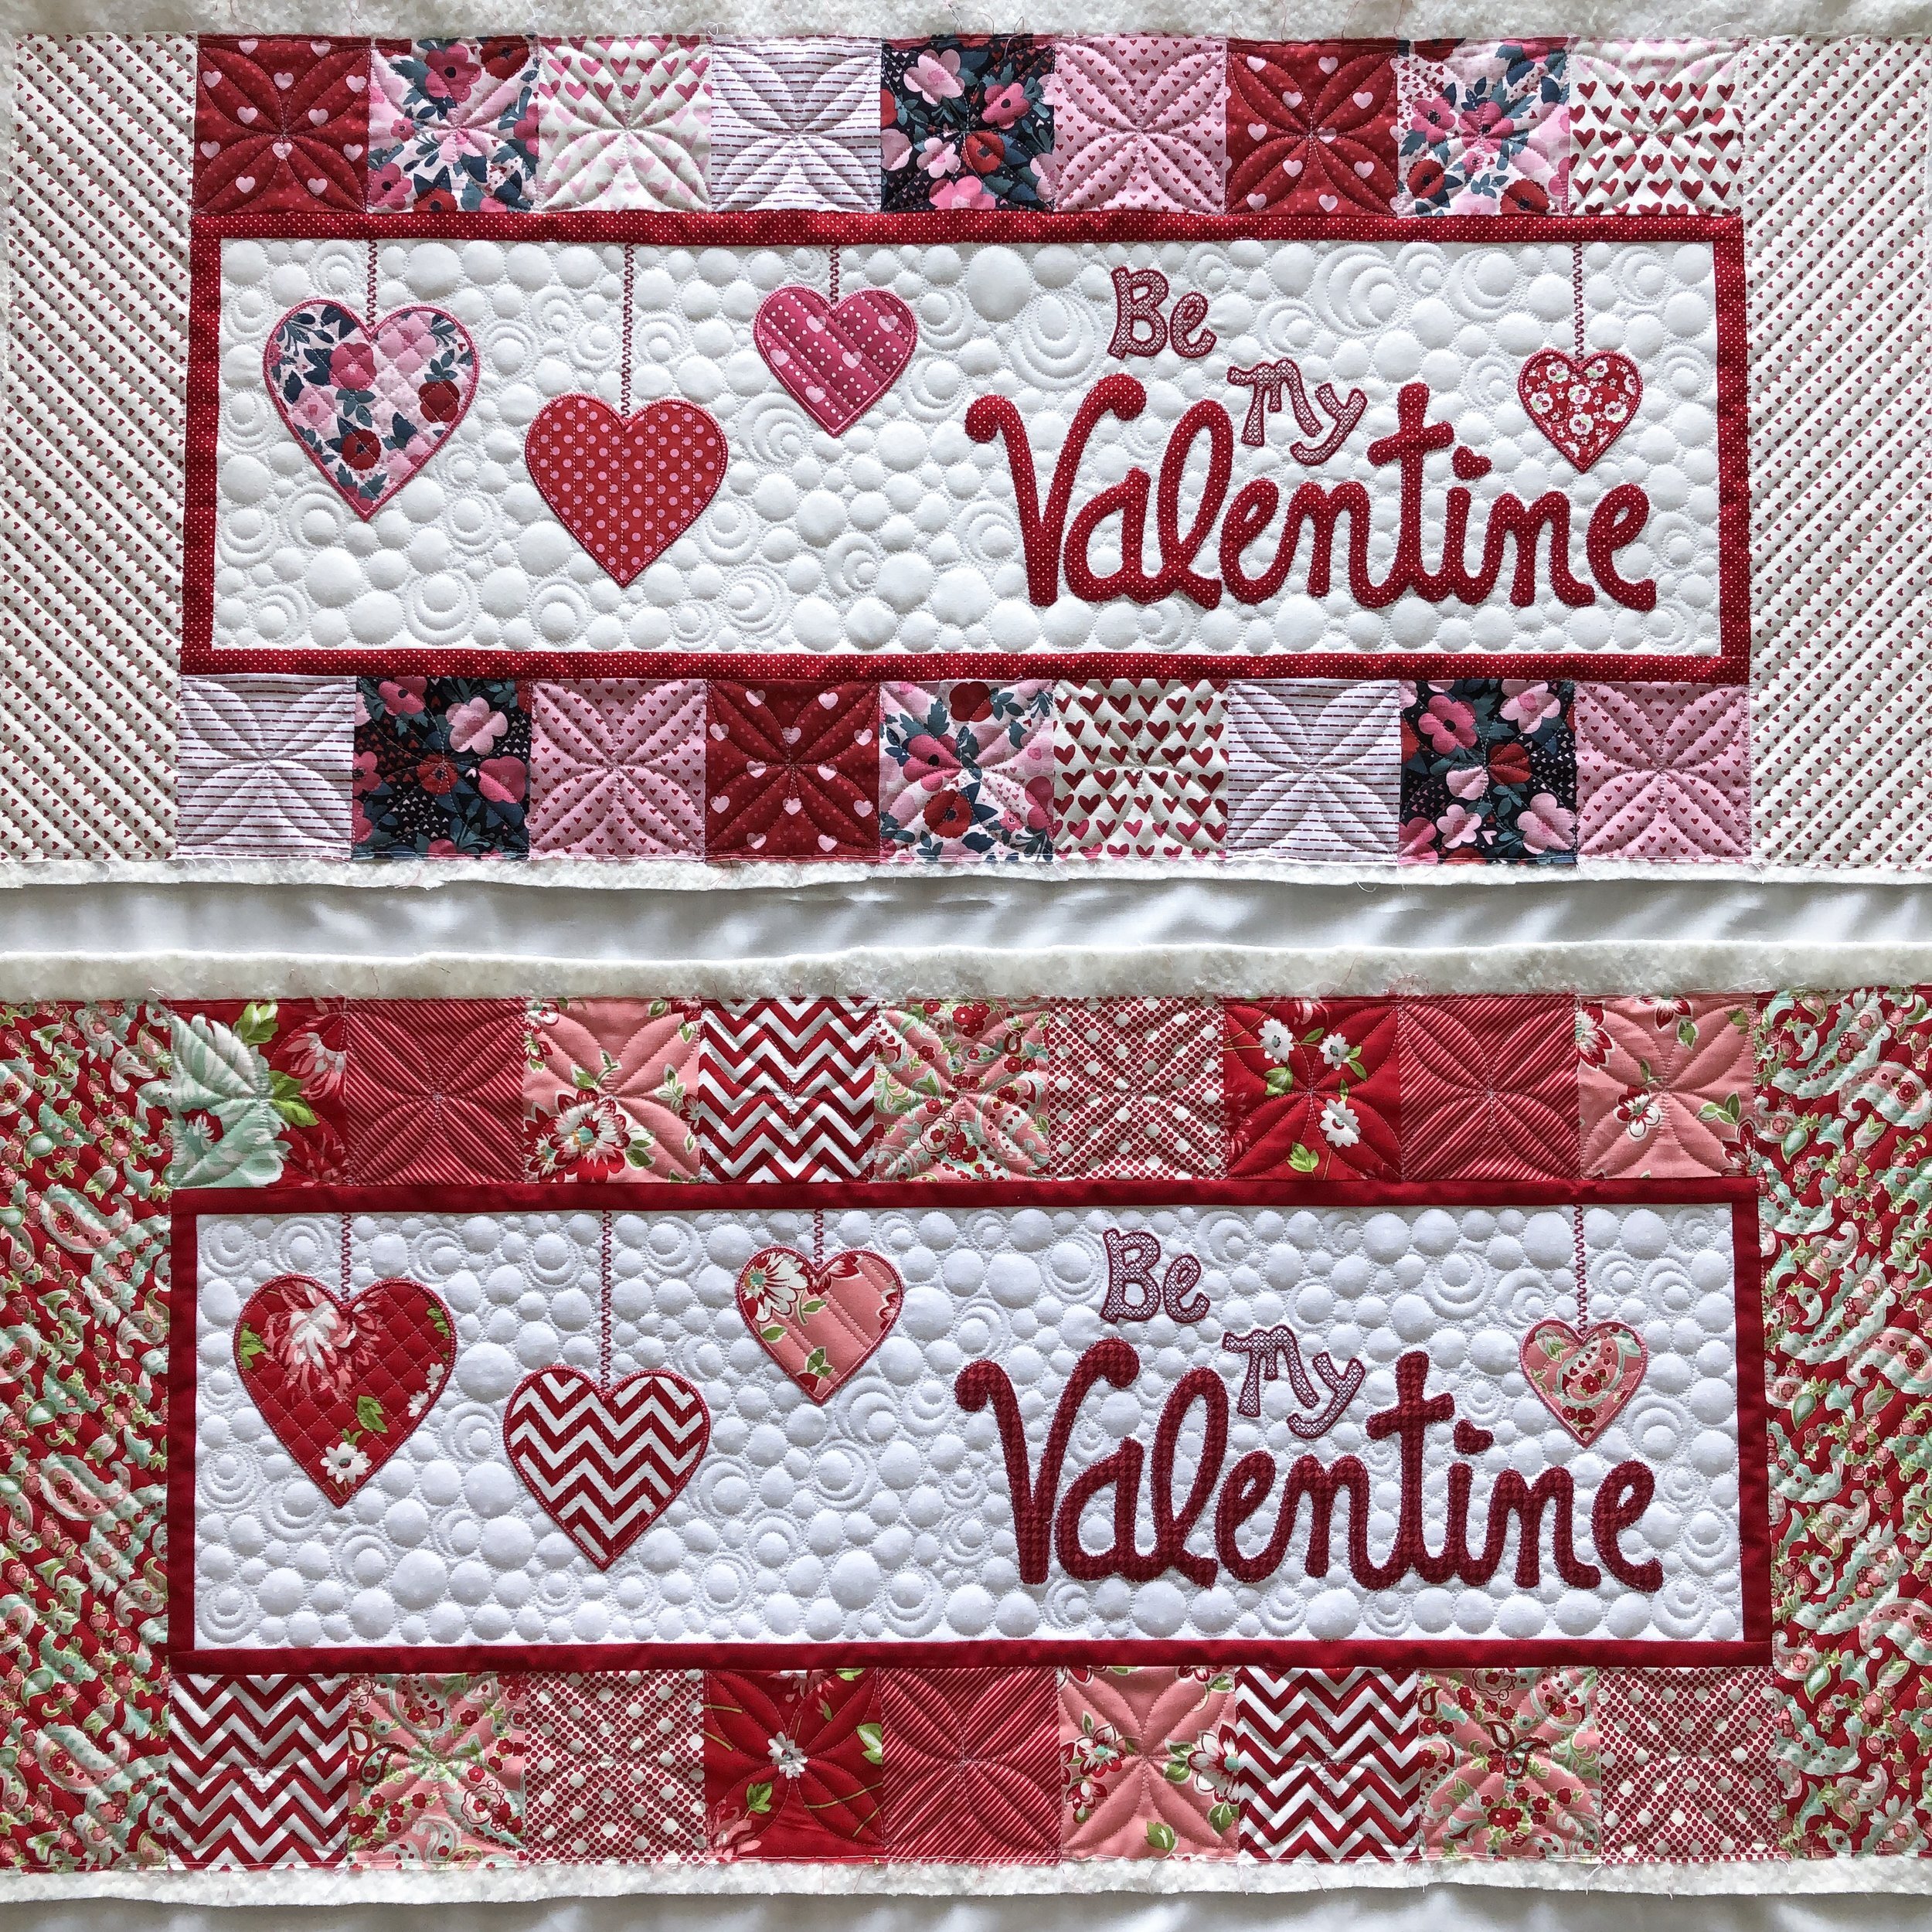
These bench pillows were made by Sherry...she made 4, so we double up two using the width of the fabric from selvage to selvage. I baste the first one onto the fabric, then quilt...roll, and baste the second one onto the fabric and quilt. It’s so slick, and saves so much time when doing multiples...to use one backing. The pattern for these bench pillows is by Kimberbell Designs.
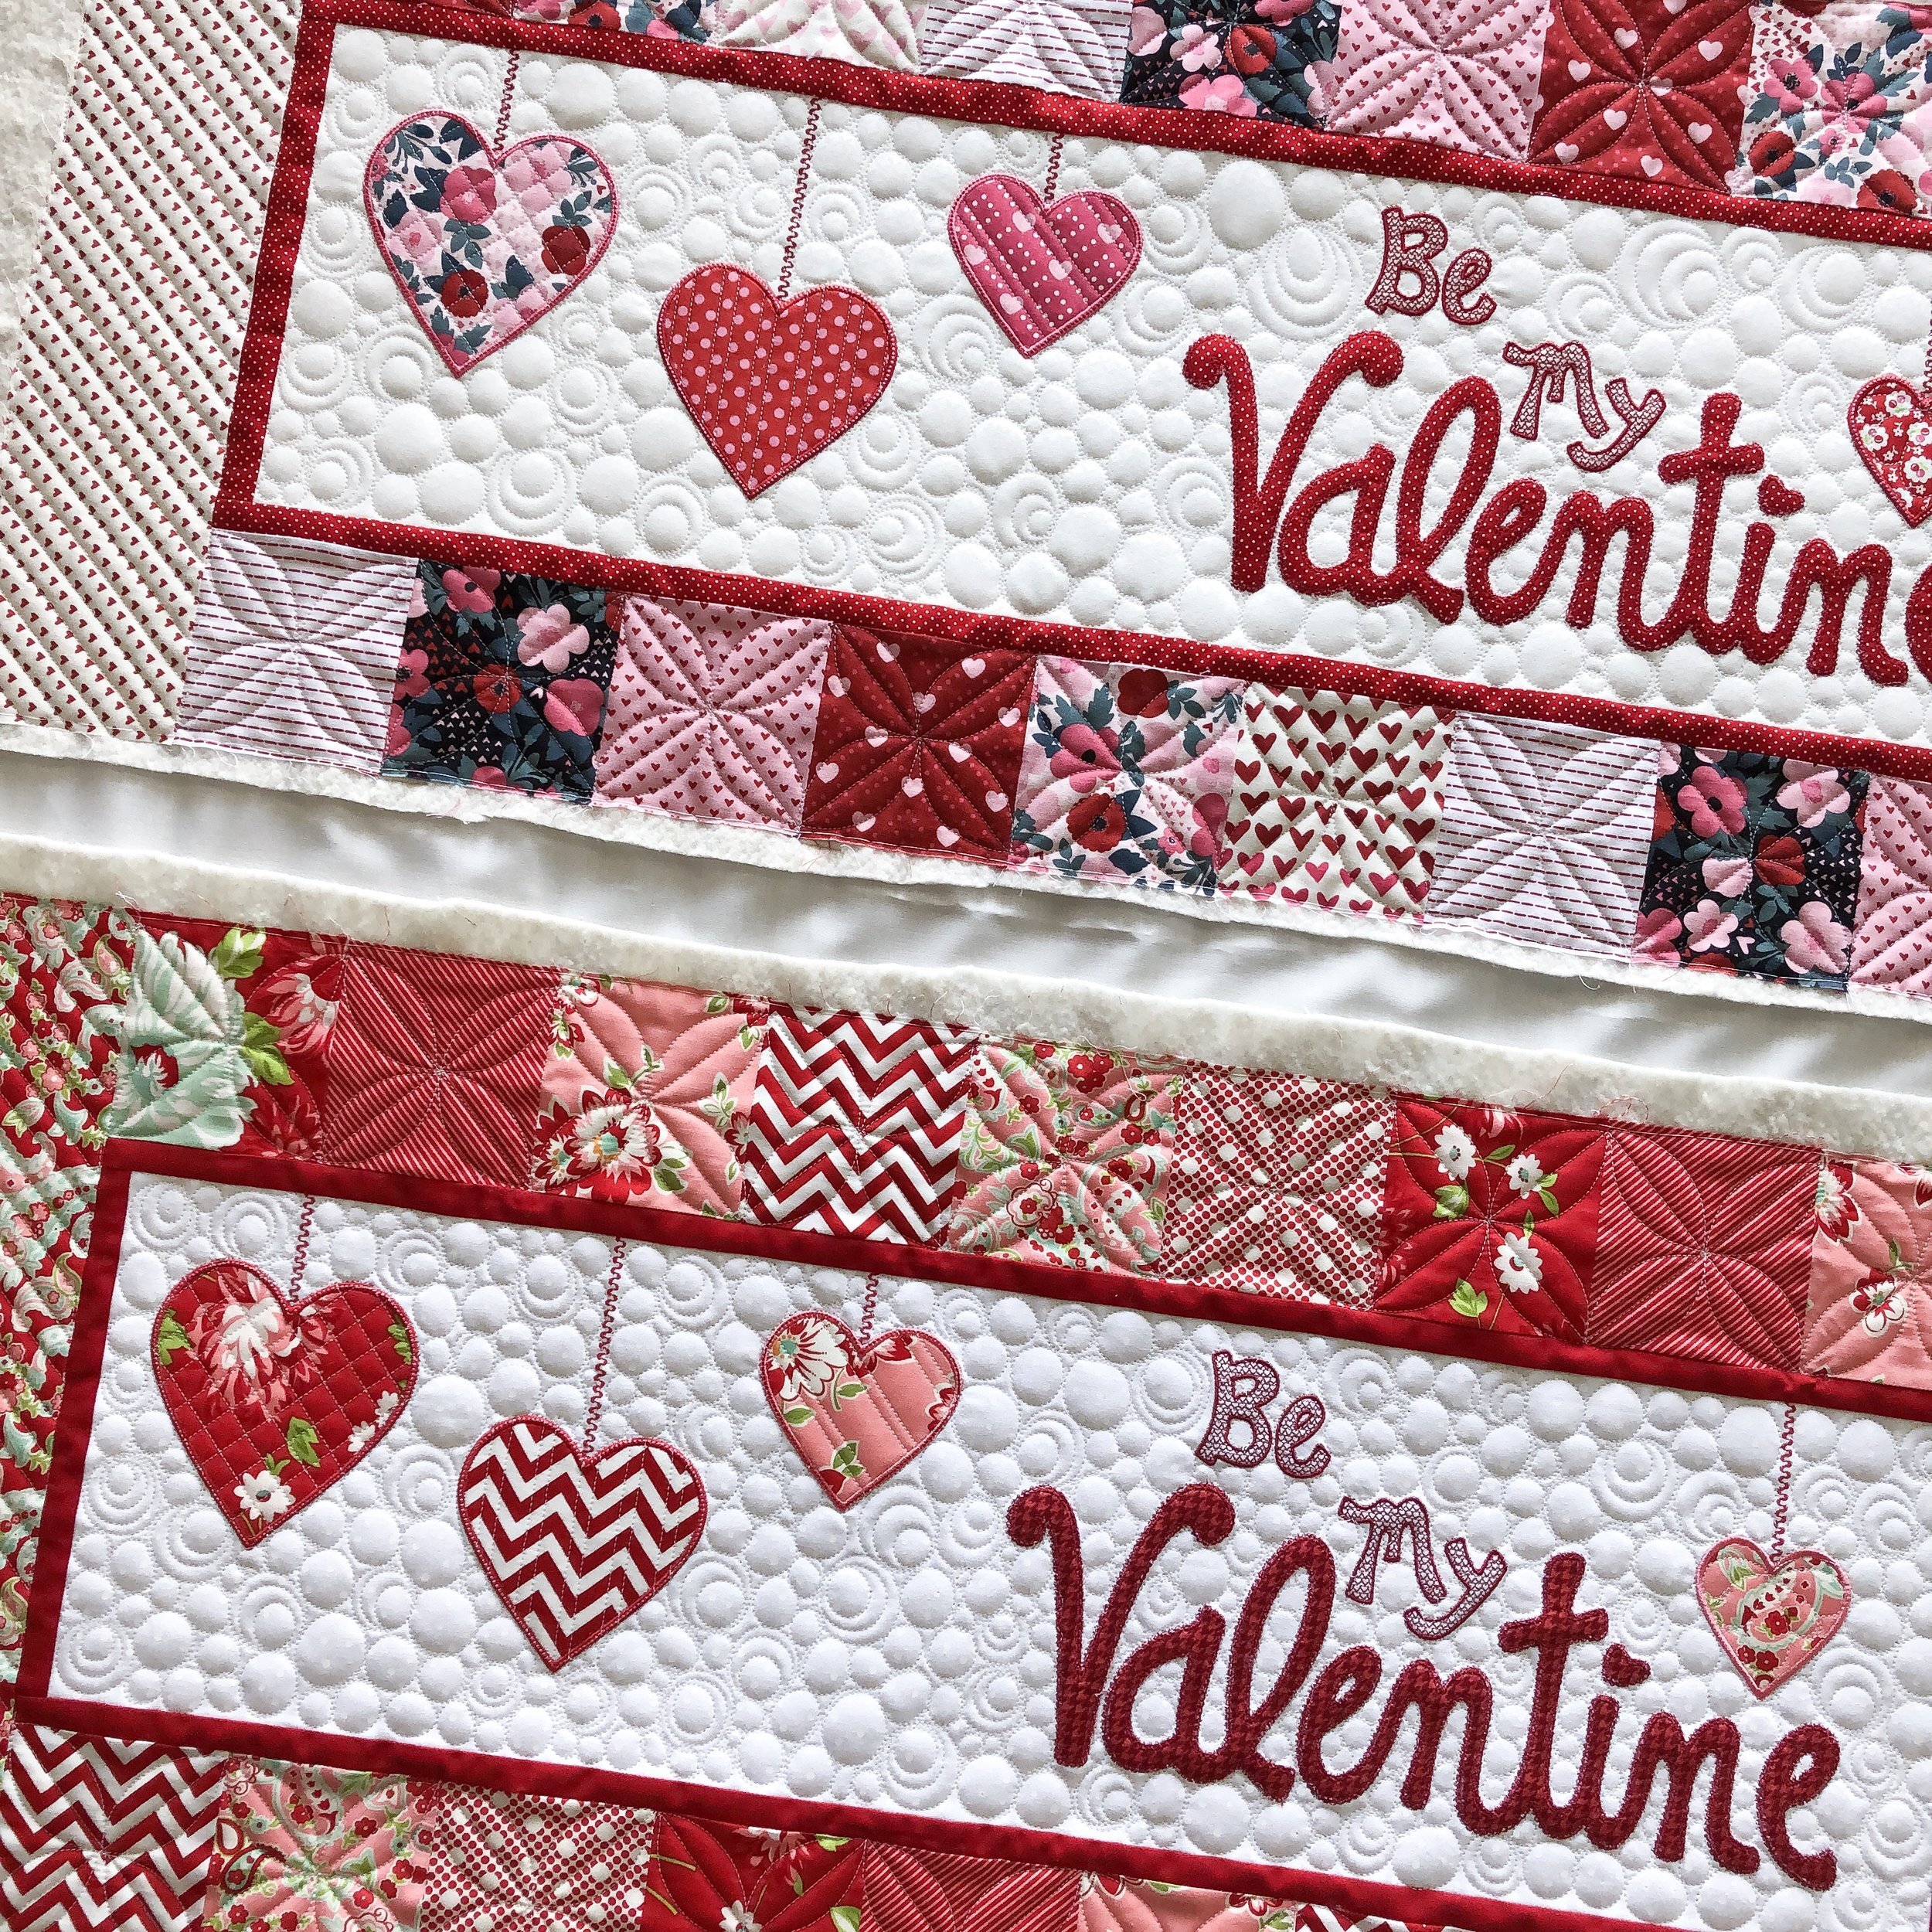
I love creating a variety of textures, so I’m sharing lots of pictures so you can catch all those fun textures.

I love the hard lines in the hearts with the softness of the pebbles in the background. I used one of Linda from www.thequiltedpineapple.com green Edge rulers to quilt the lines in the squares along the border, and inside these hearts. Her straight rulers are my favorite!!
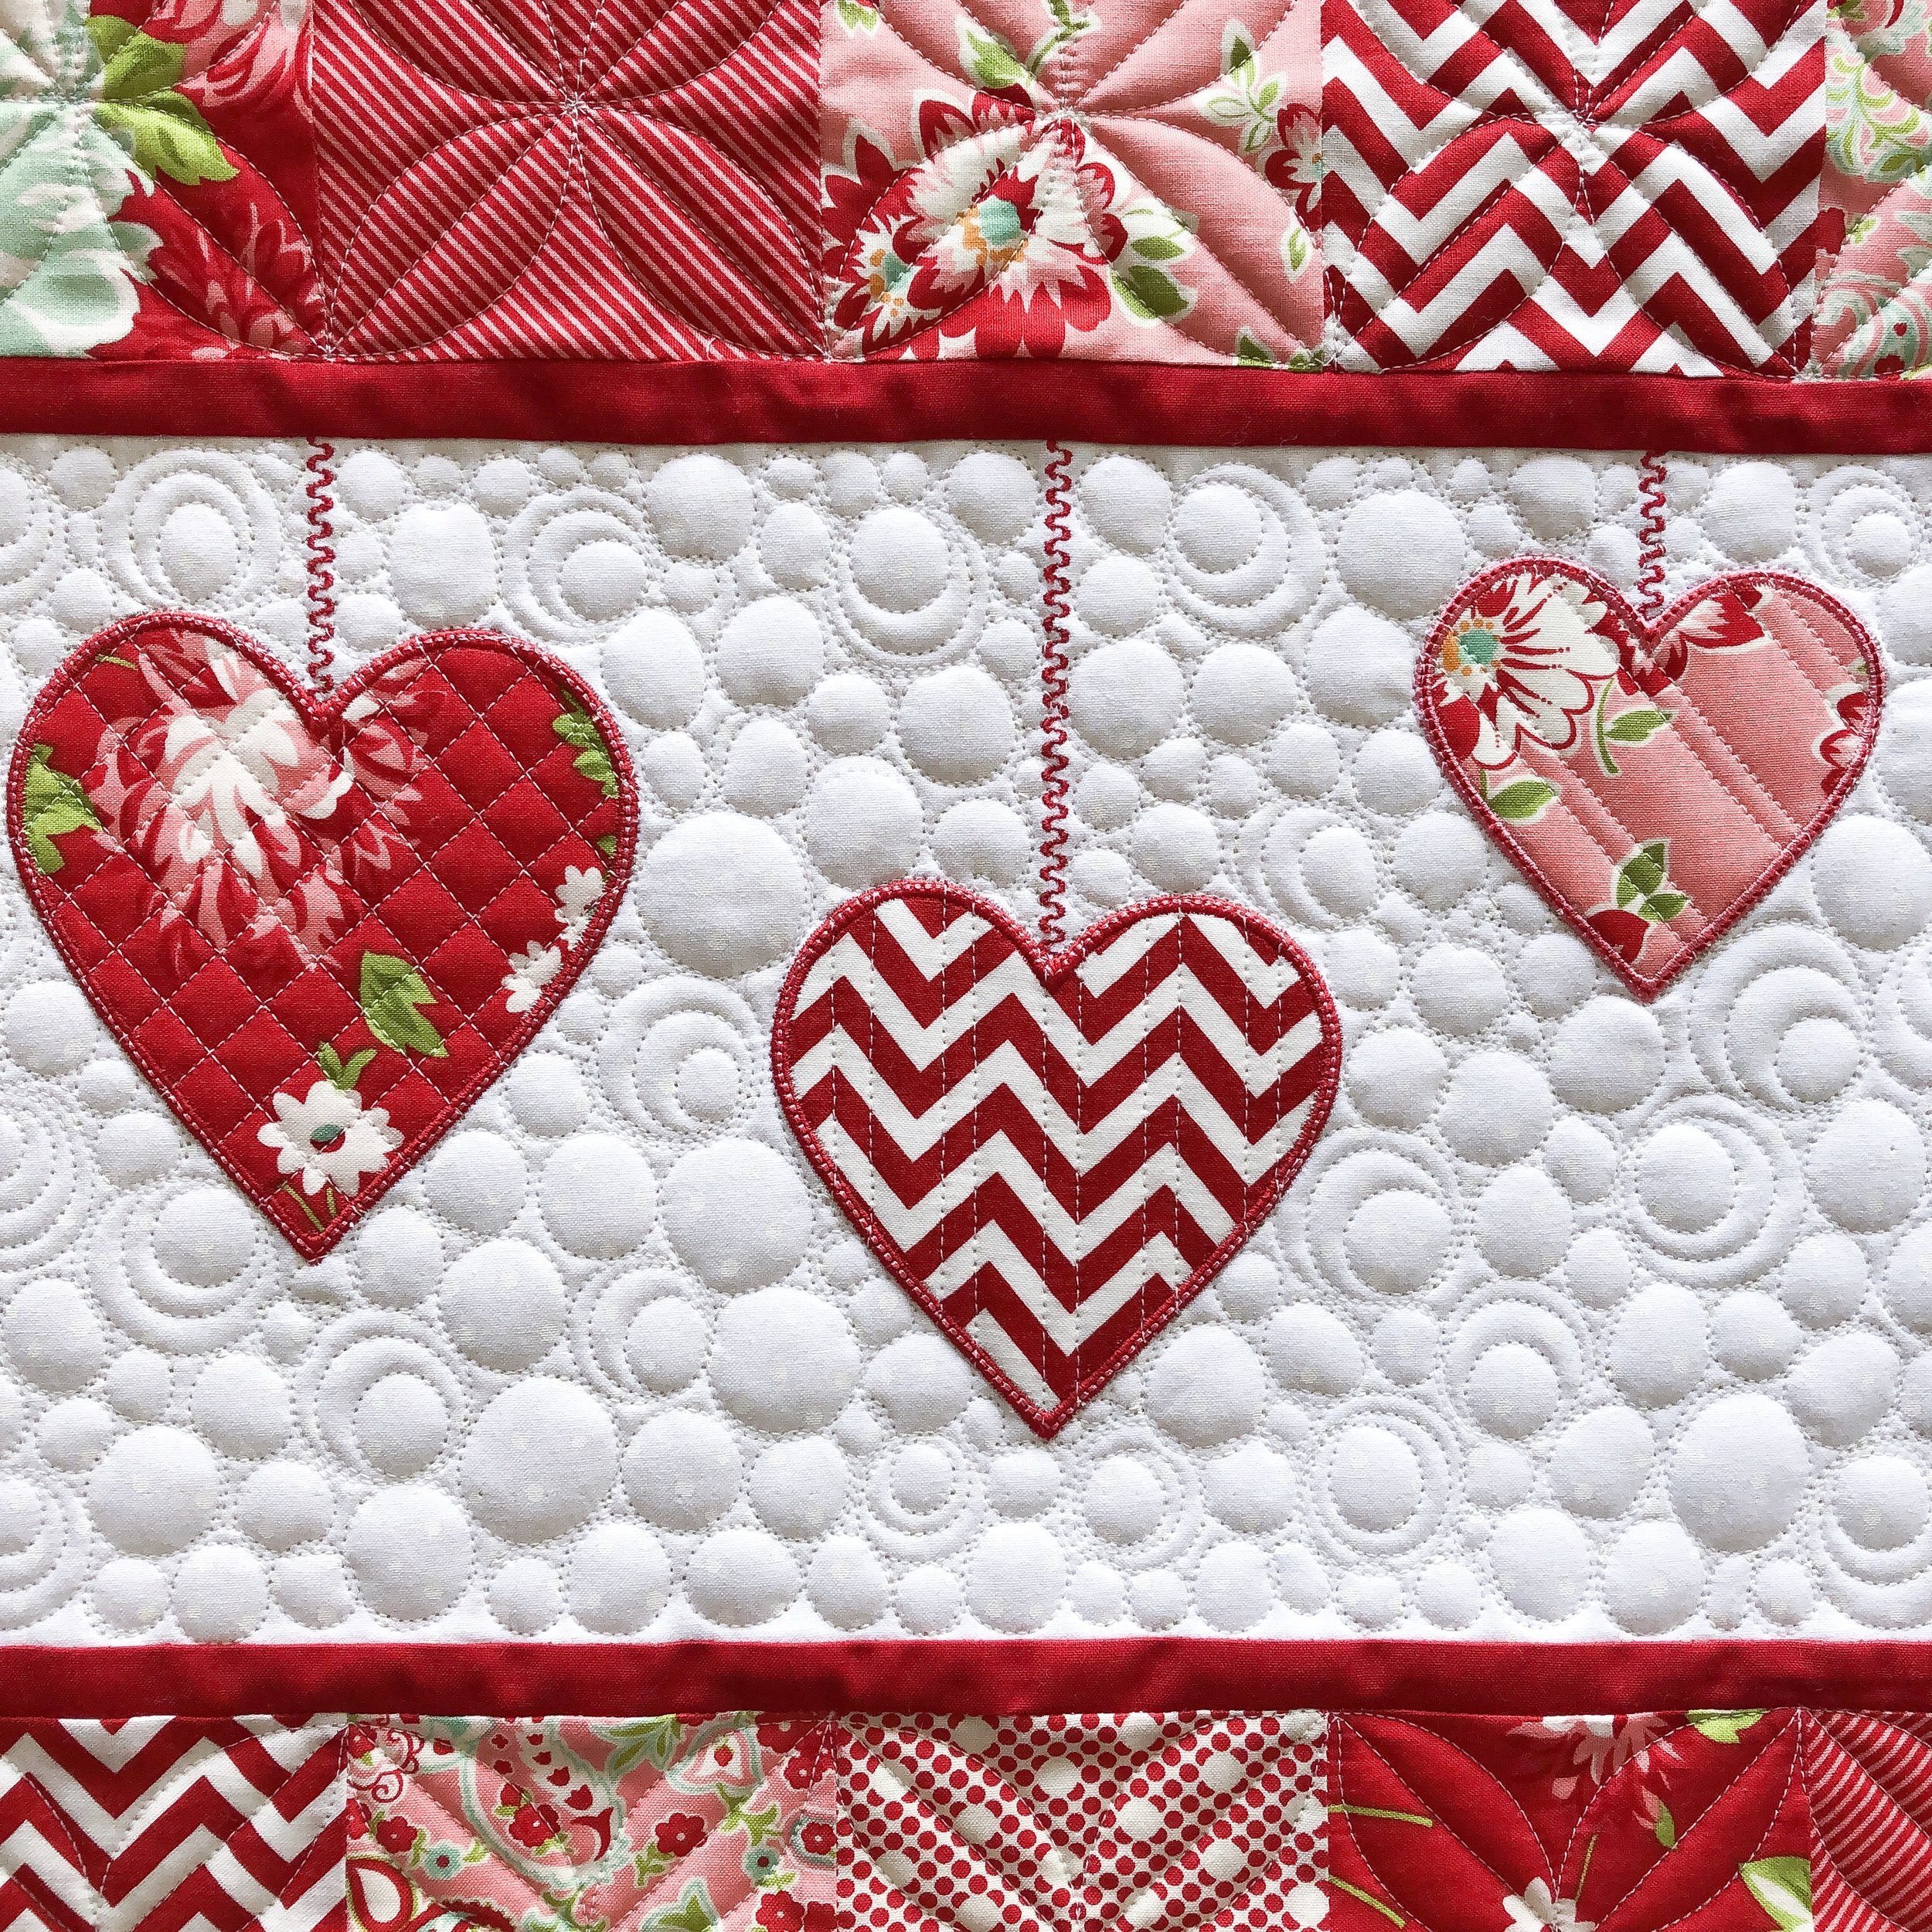
Awhile back I had some requests to video me quilting some of my freehand or freemotion designs. Below is a video of this fun to quilt pebble design. Adding the circle inside the other circles, adds interest to the design and more texture to the background.
I used a white 30 tex A&E Perma Core thread and 8020 cotton poly blend batting from Winline, on all of these bench pillows.

I love adding a simple orange peel to the border on this pillow front.

Below is a video of me quilting the orange peel curves continuously with one of my Circle2™ rulers...the 3”/9” ruler. Sorry my camera mount shakes while filming this one.
I have these rulers available in a set of 6....in both clear: https://www.quiltingit.com/shop/circle2-longarm-ruler-set-clear-acrylic
and in green: https://www.quiltingit.com/shop/circle2-longarm-ruler-set-green-acrylic
For more information about my rulers go to: https://www.quiltingit.com/blog/2018/10/10/introducing-my-circle2-longarm-circle-ruler-set

I also have my rulers individually listed... here is the clear 3”/9”: https://www.quiltingit.com/shop/circle2-longarm-28-ruler-clear-acrylic-lm6md
Check my shop for all the other sizes: https://www.quiltingit.com/shop/
I also quilted a 1/2” diagonal lines along the vertical border on each side, using Linda’s Edge ruler.

Sherry also made a couple of these super cute table runners!
The pattern is by Cynthia Muir from “Ahhh Quilting” .

Once again, I wanted lots of fun texture...the background, inside each heart...and the border. I also used 30 tex A&E Perma Core thread white thread on these...as well as their black thread for the border.
Below is a video of me quilting the border. This lovely design is great inside appliqué...as pictured in the biggest polka dot heart above, to a border...like what I videoed below, to even an entire quilt. I’ve quilted this design on so many quilts, it just adds such a fancy touch. To see more quilting videos, head on over to my YouTube channel and subscribe: https://www.youtube.com/user/QuiltingIt
I hope you’ll try this design when you quilt sometime!!

I just love how the light picks up all that quilting!!
Funny thing...two of my clients were making these, and brought them the same time. This one without borders, was made by Barbara. I quilted it the same as the ones I did for Sherry.
It’s so awesome to know what I can quilt something like...because I’ve done it once or twice before.
Thank you for being here, and letting me share all this quilty goodness with you!! Hope that you have a great week!
- Leisha
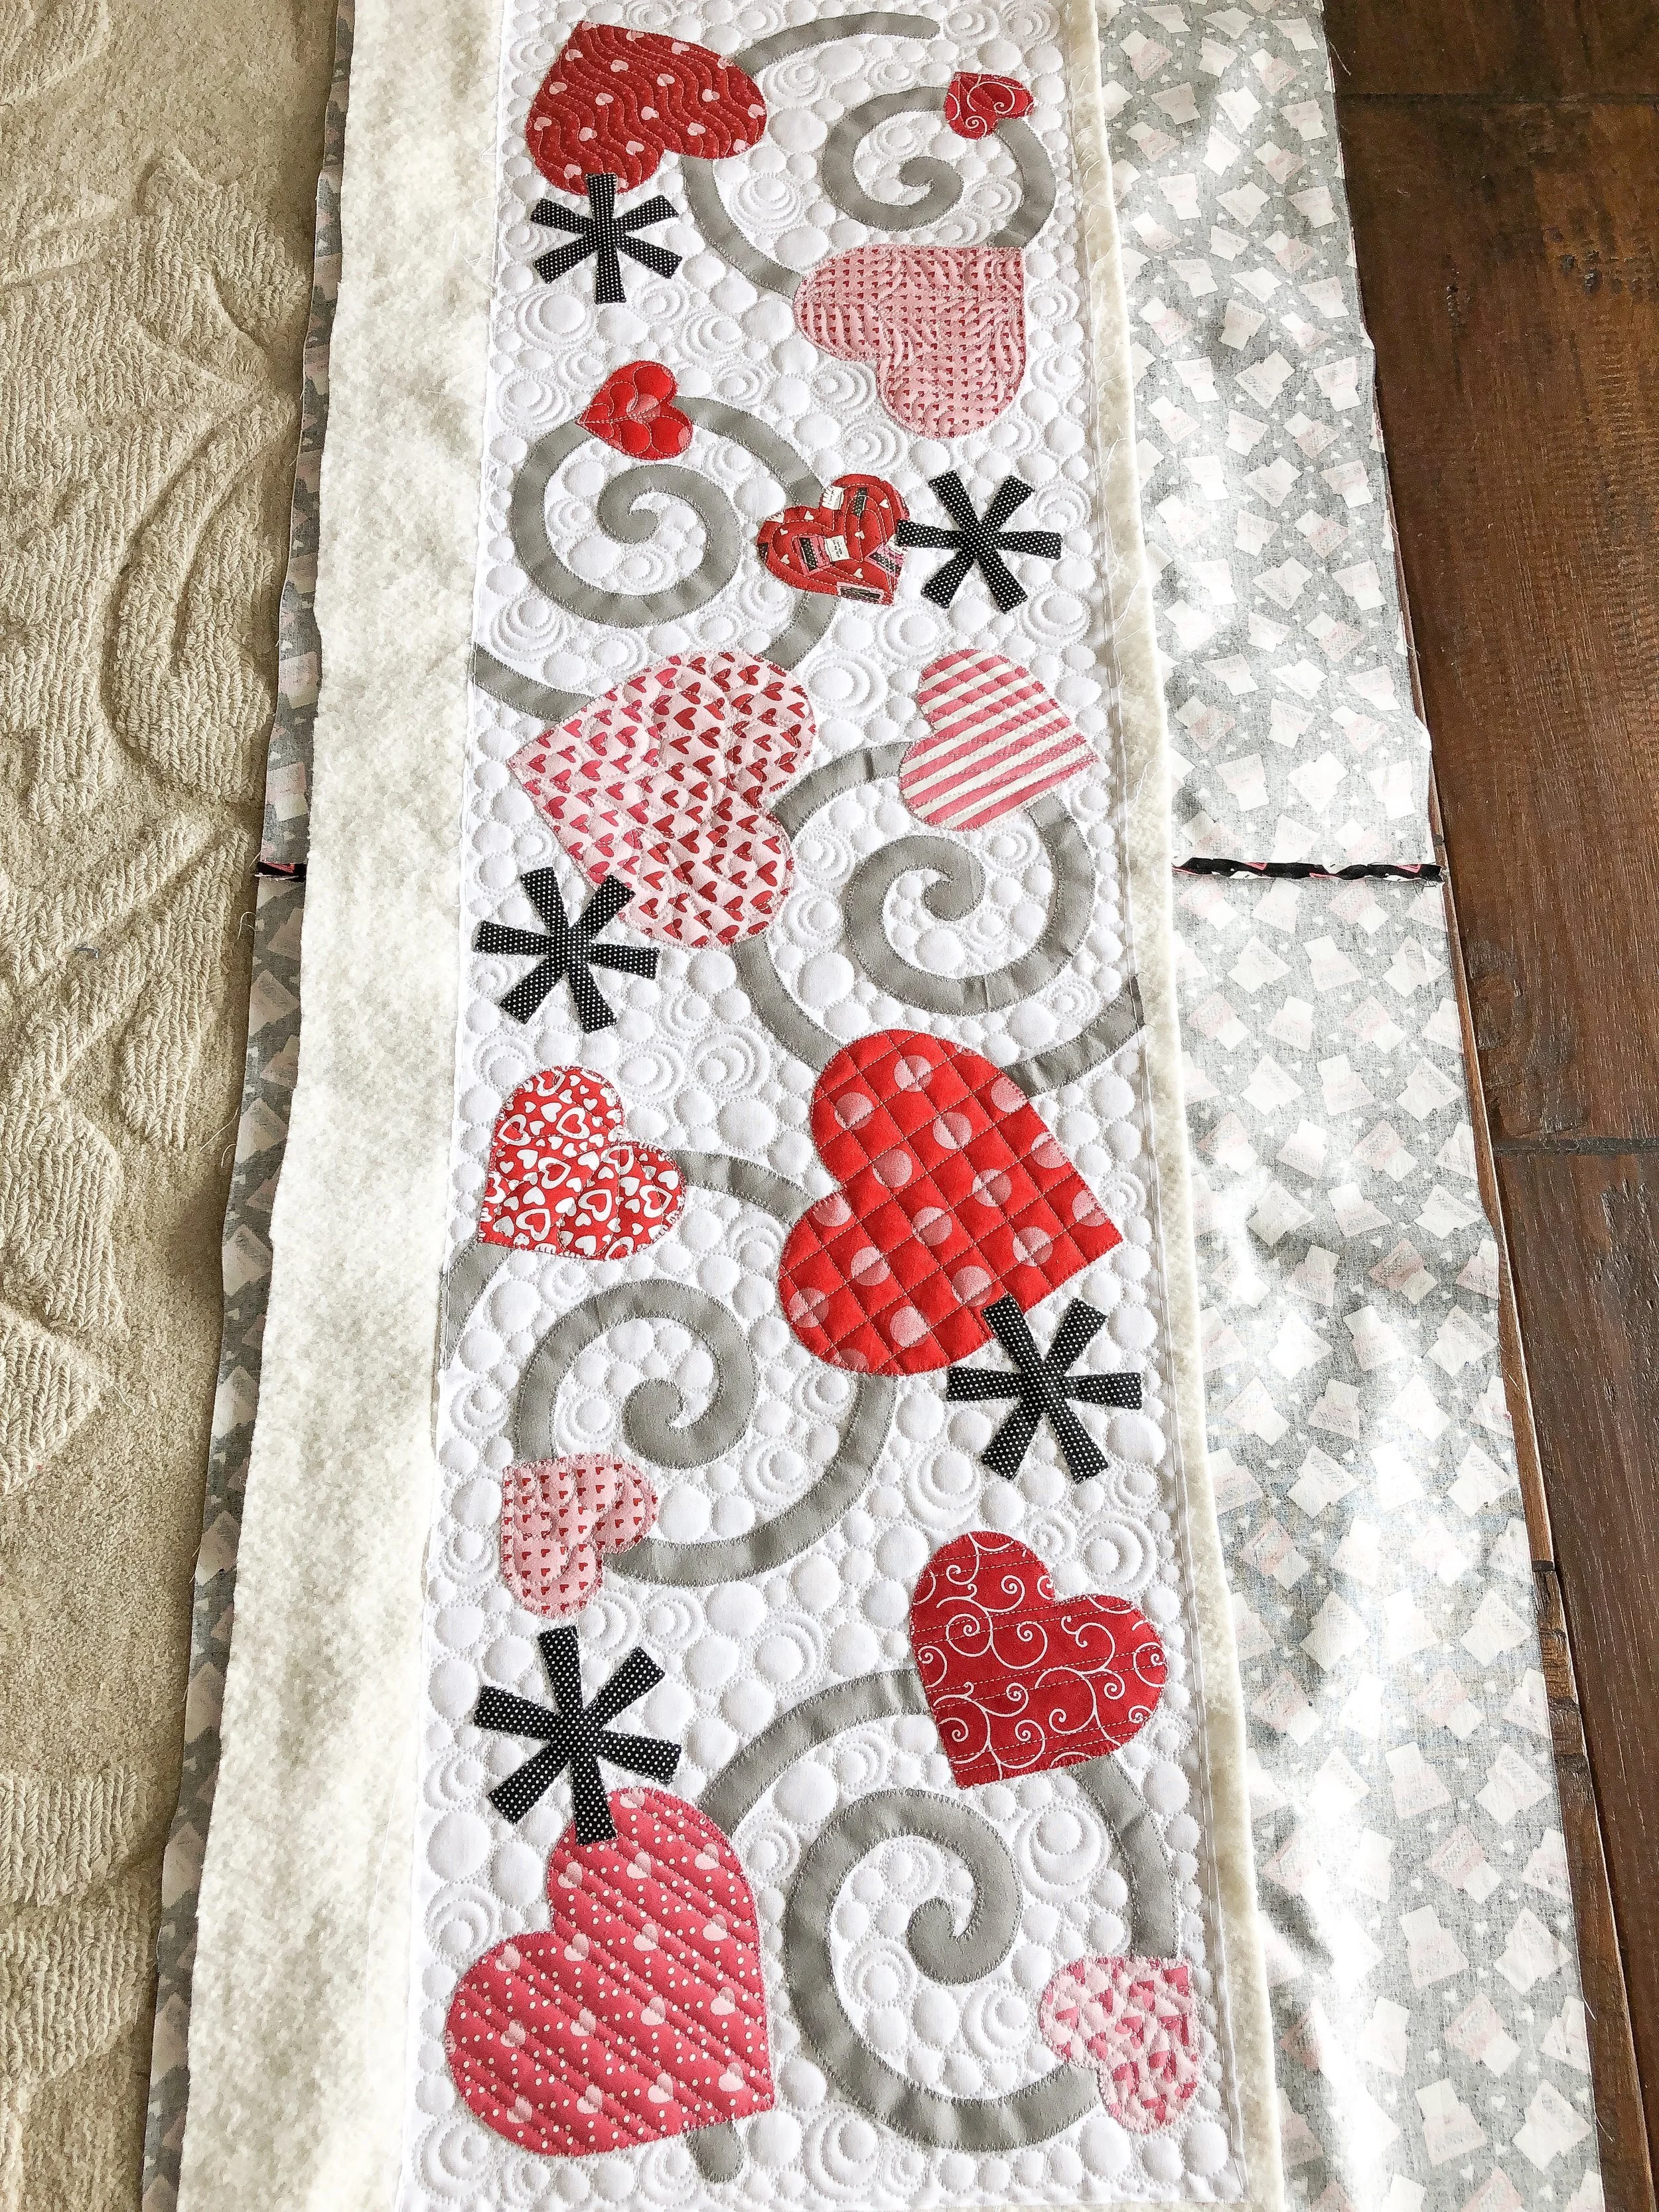
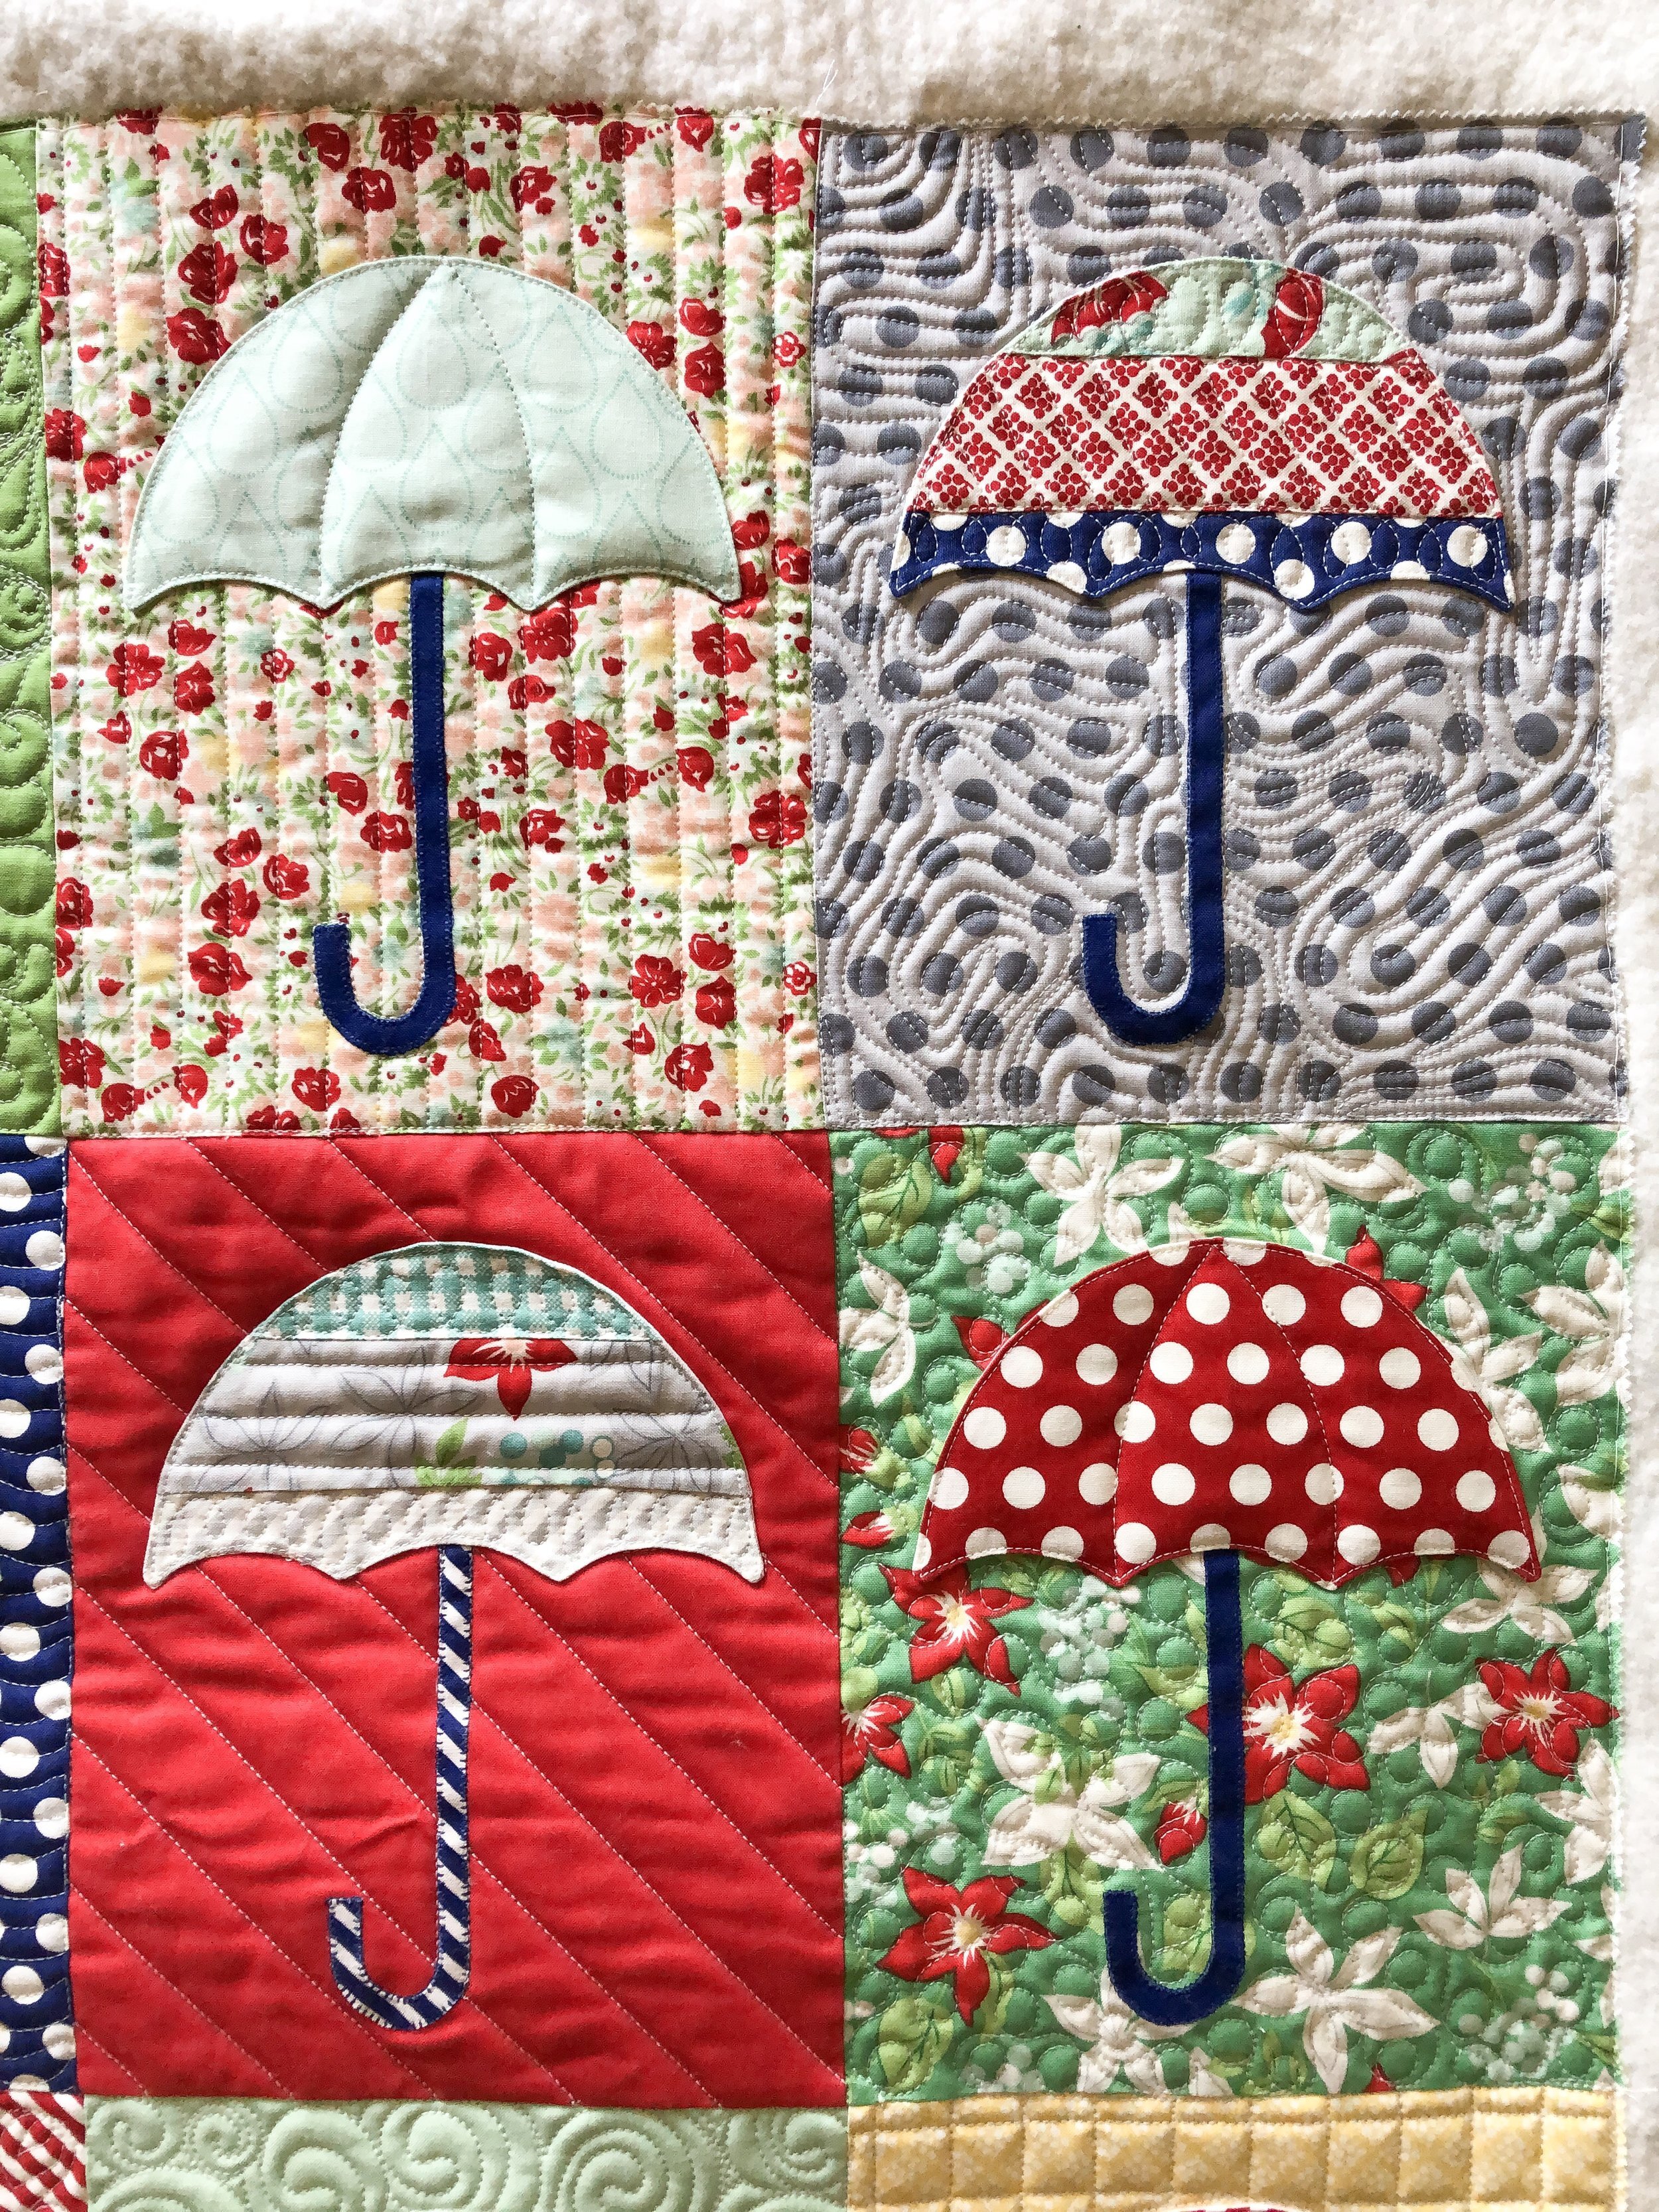
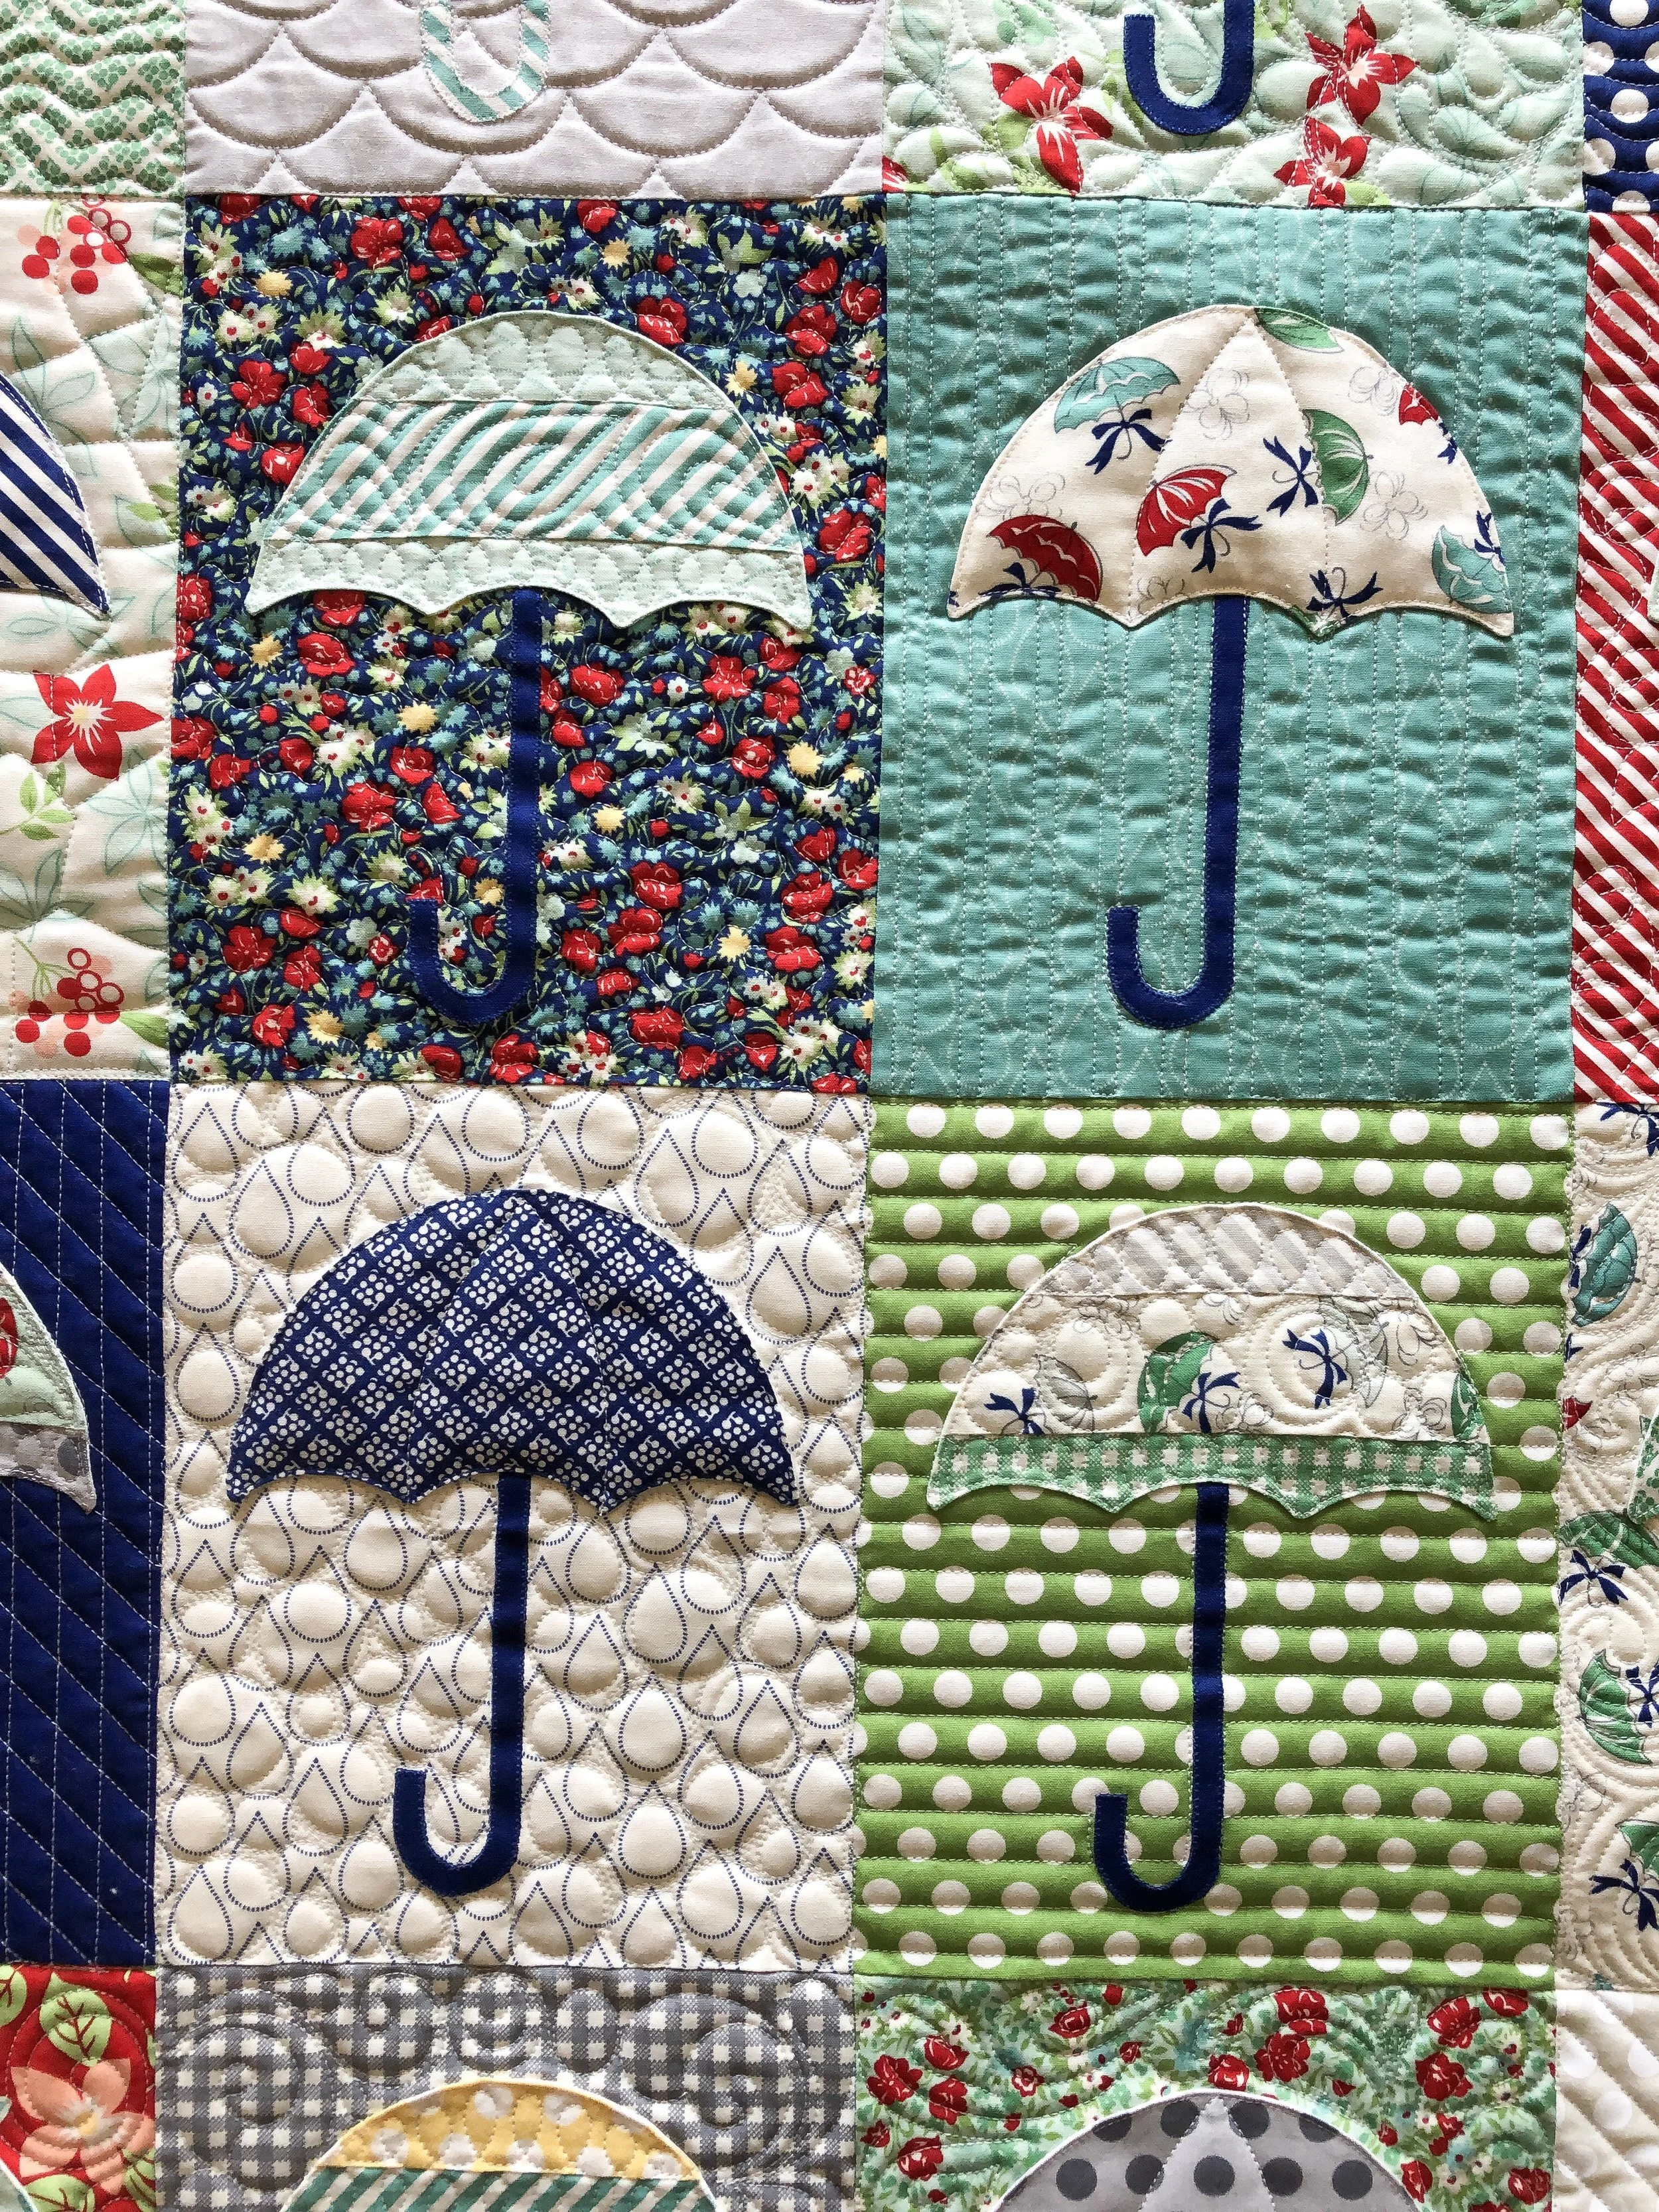
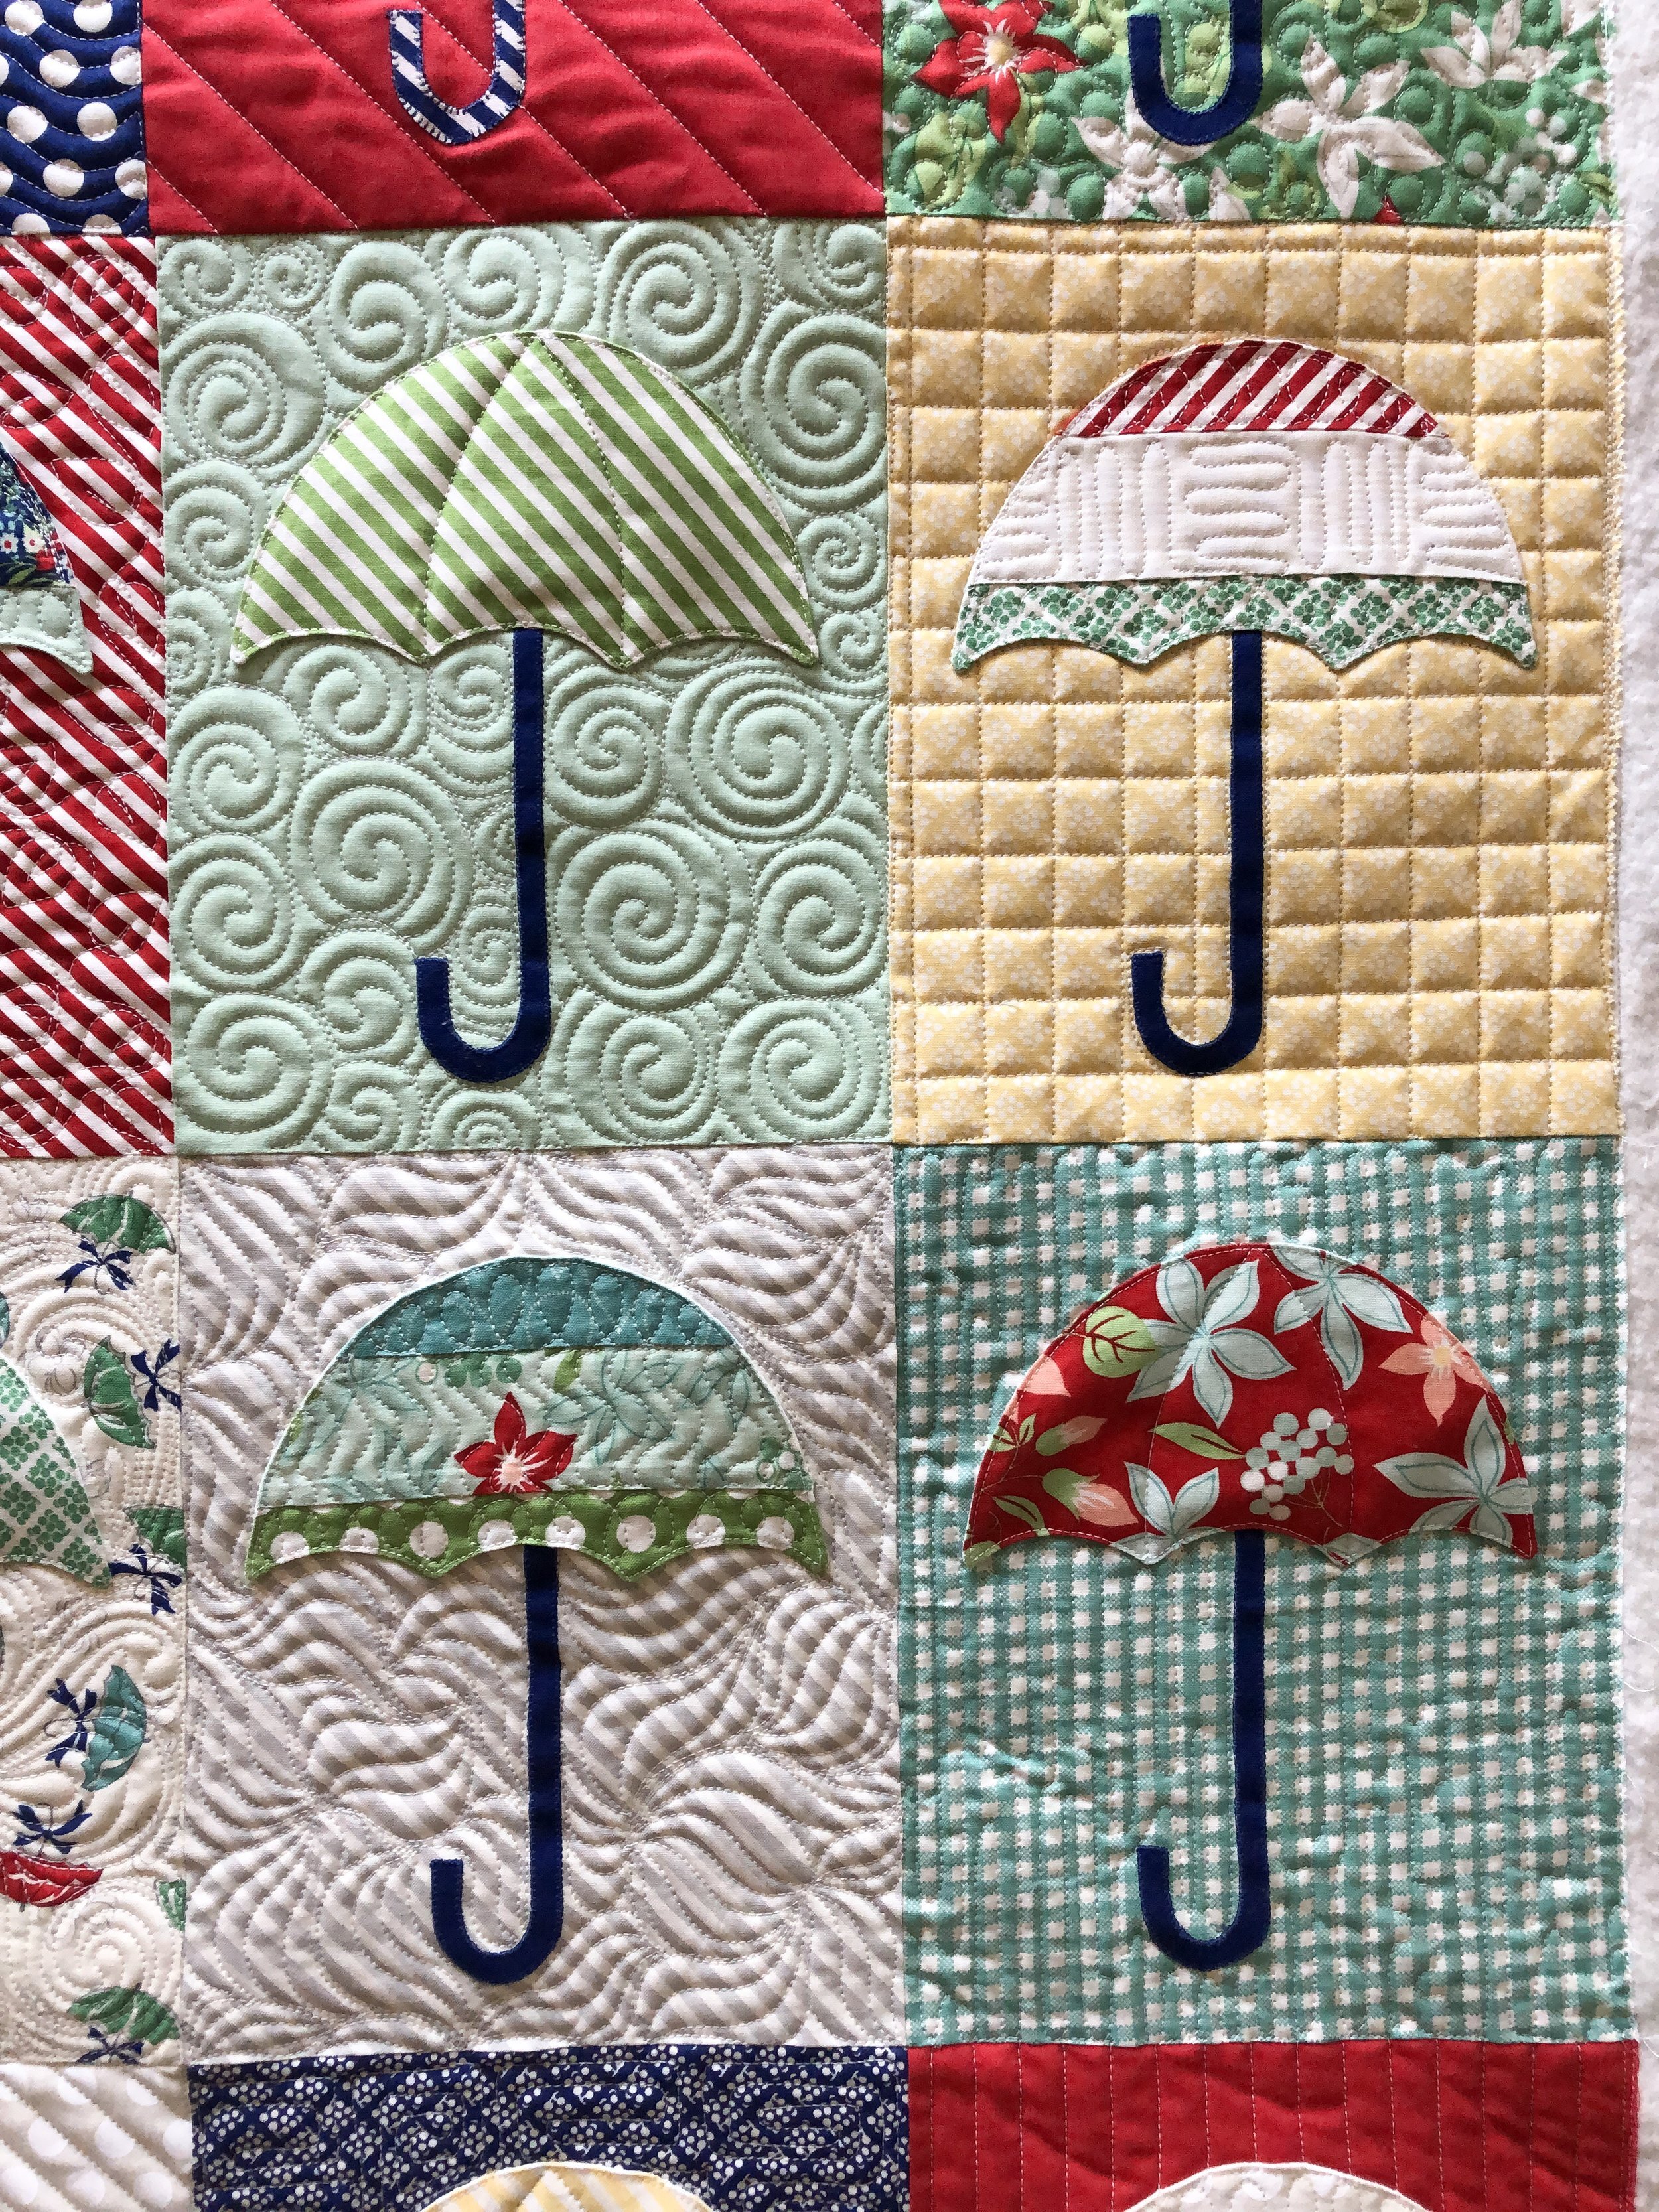
Cindy’s Raincheck quilt~! Including 28 different background quilting designs...
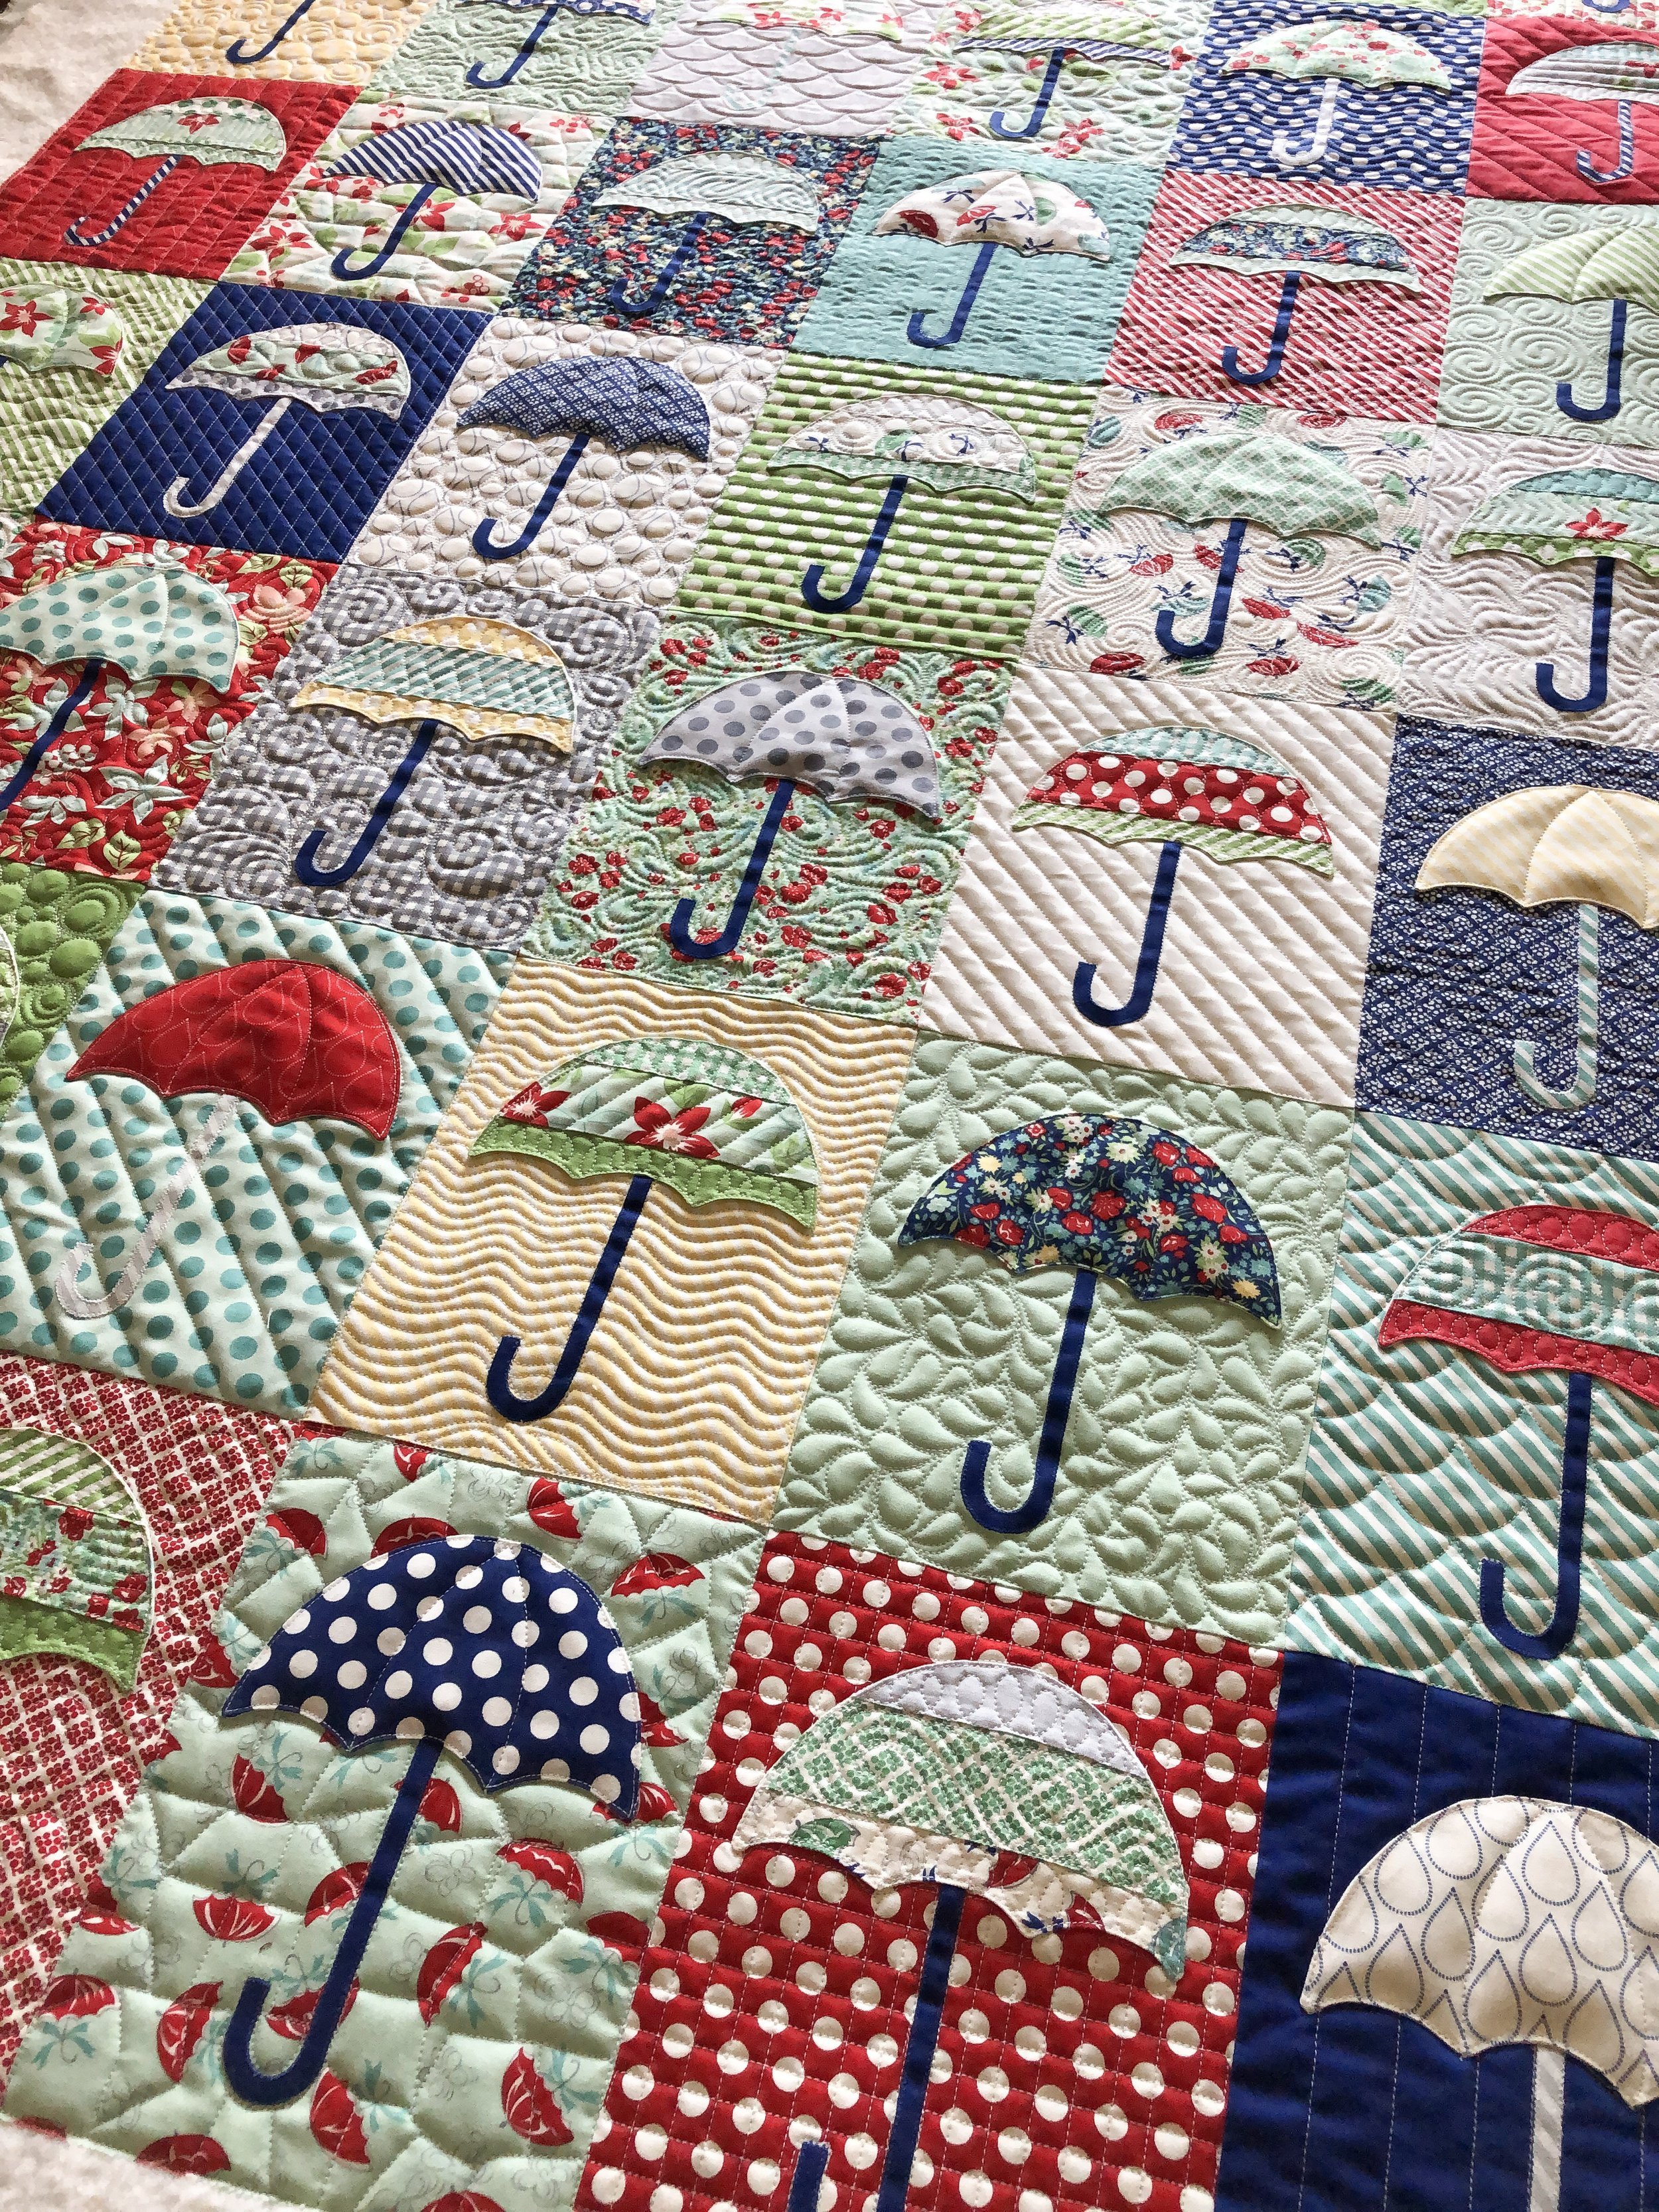
This beautiful quilt was made by Cindy, and she requested custom designs throughout. She sent me some pictures from Camille Roskelley’s blog, when she posted about this quilt back when she realeased the pattern in 2013. Pattern is called Raincheck, by Camille or you can find it on her Thimble Blossoms website. Fabrics are from her and her moms April Showers line.
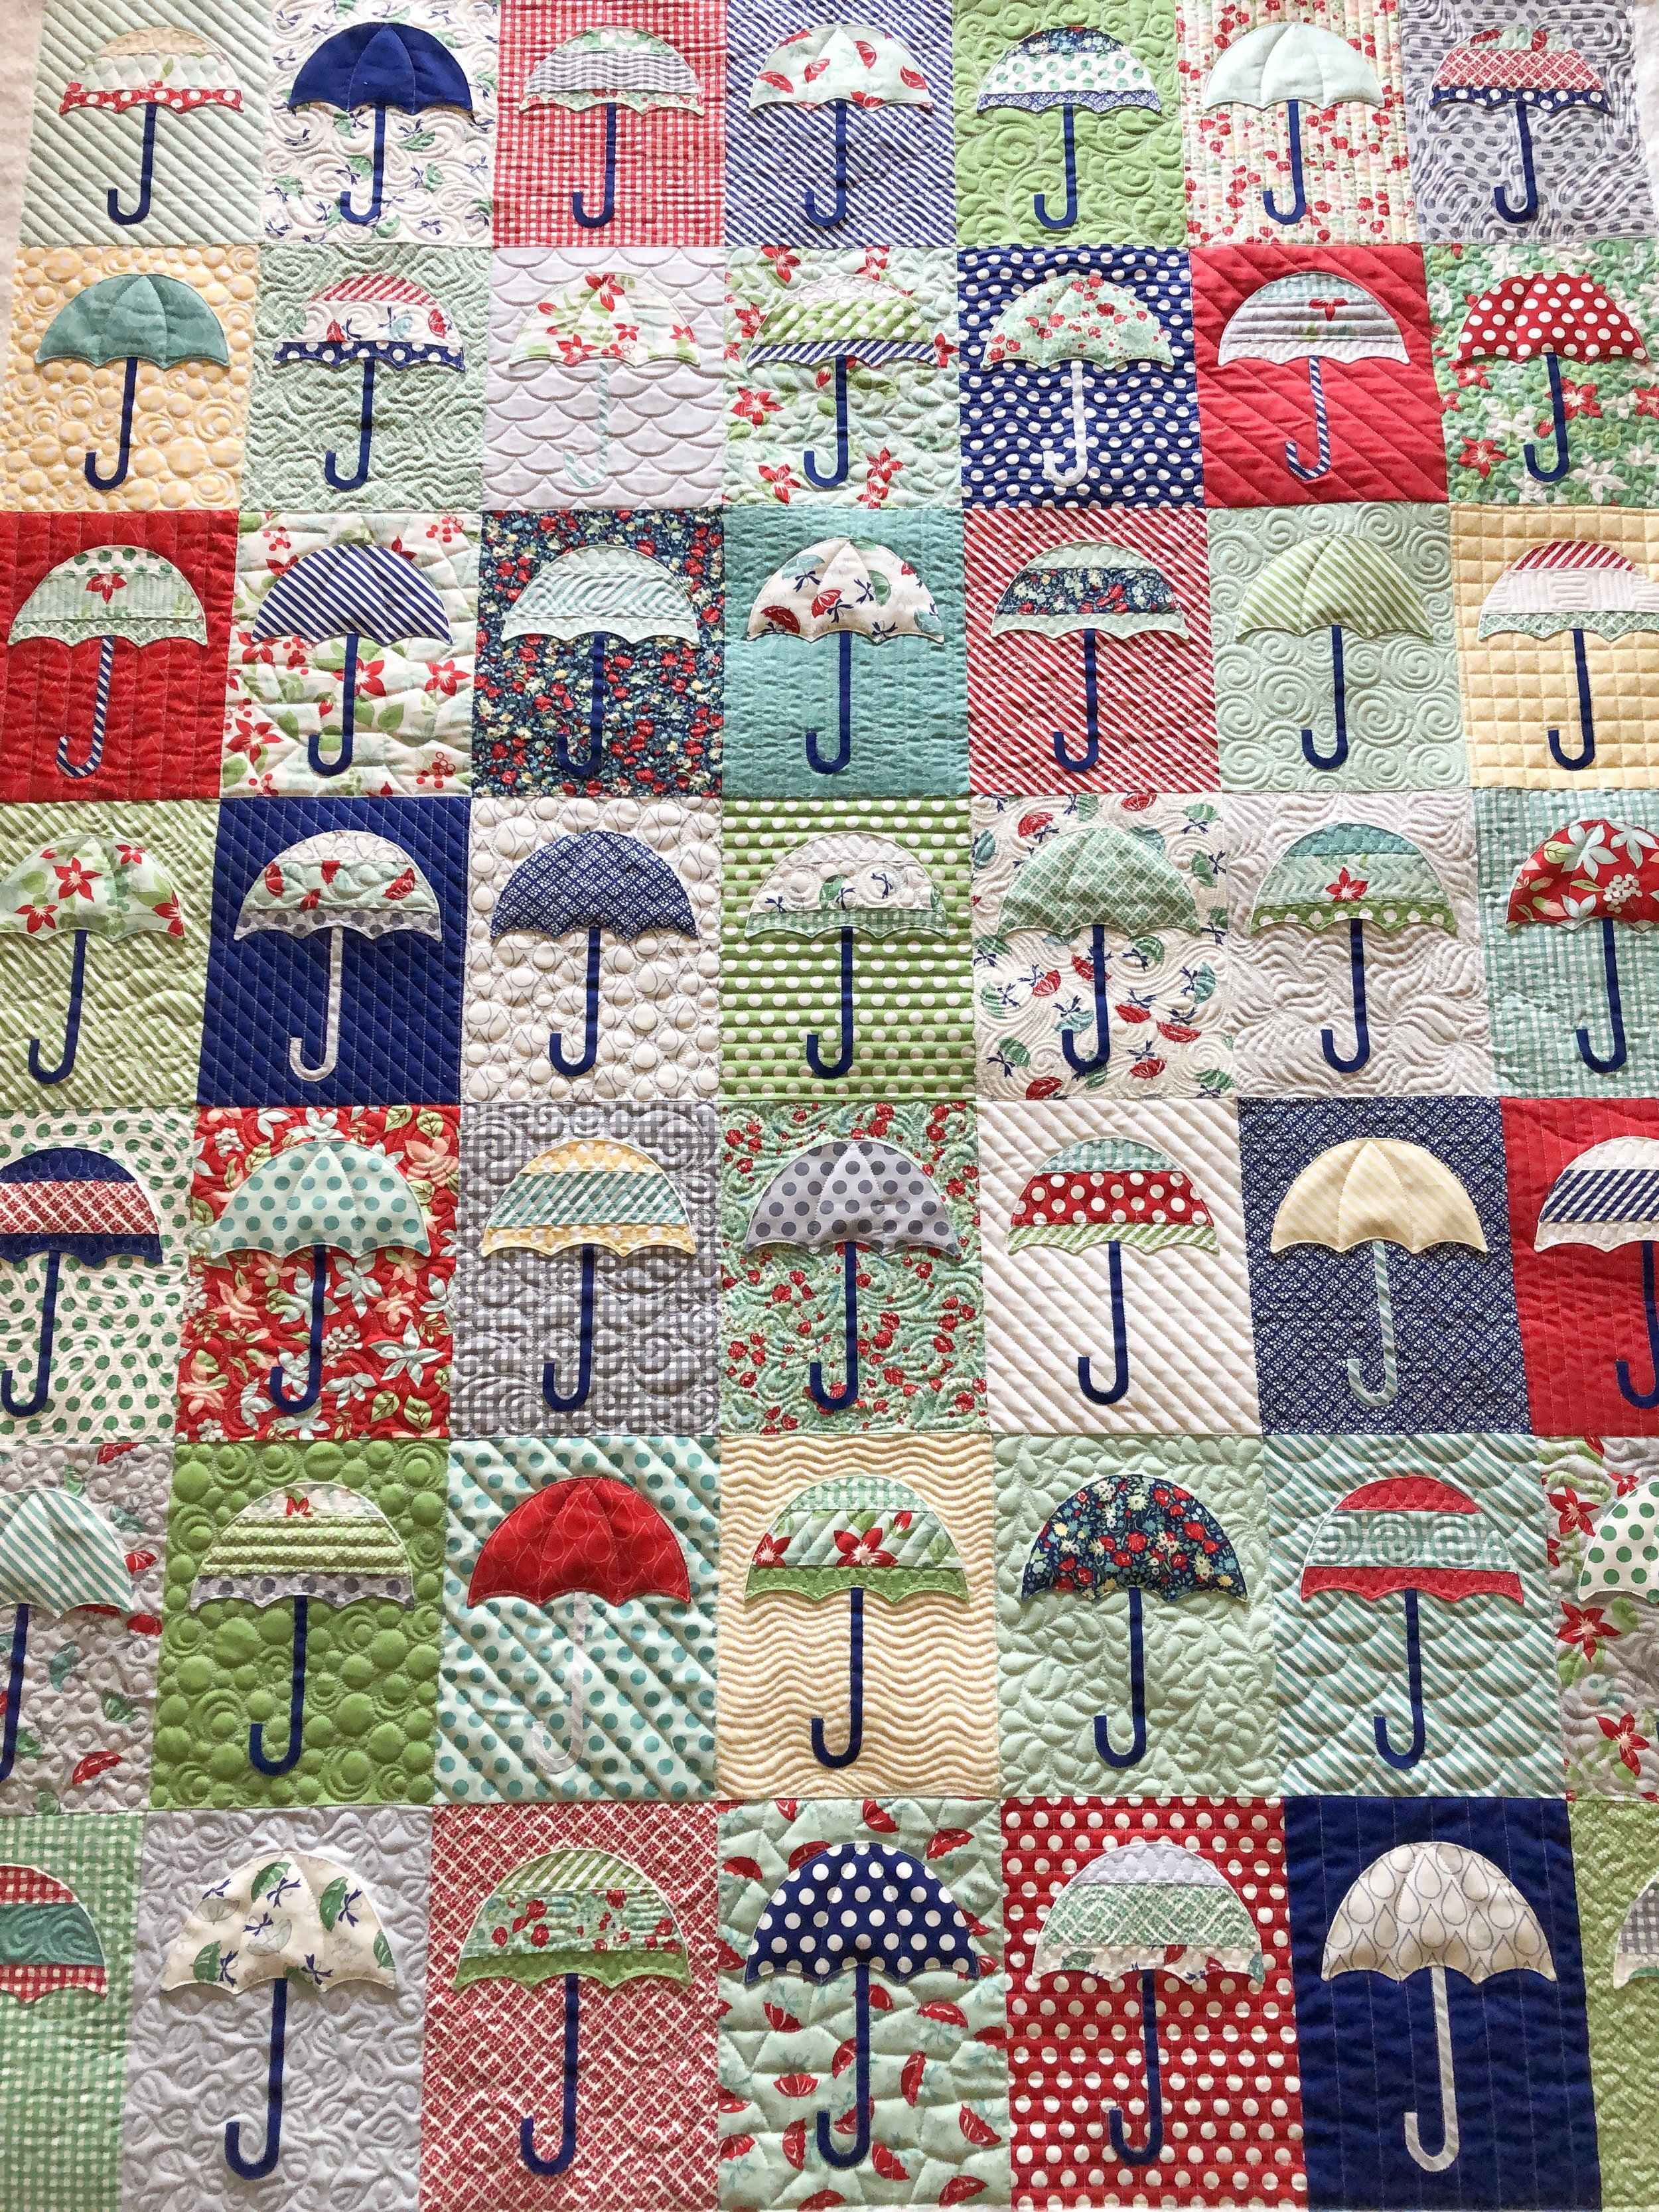
I noticed a variety of designs on Camille’s quilt, so I just went to town and did a variety of different free motion designs in the backgrounds of each umbrella block. This quilt has 49 blocks in it. I did do 49 designs, but I was able to do 28 different background designs. Some are similar, especially when it comes to lines, but they are still different in some way. So, I’m going to share oodles of pictures in this post, and hopefully I can show all 28.
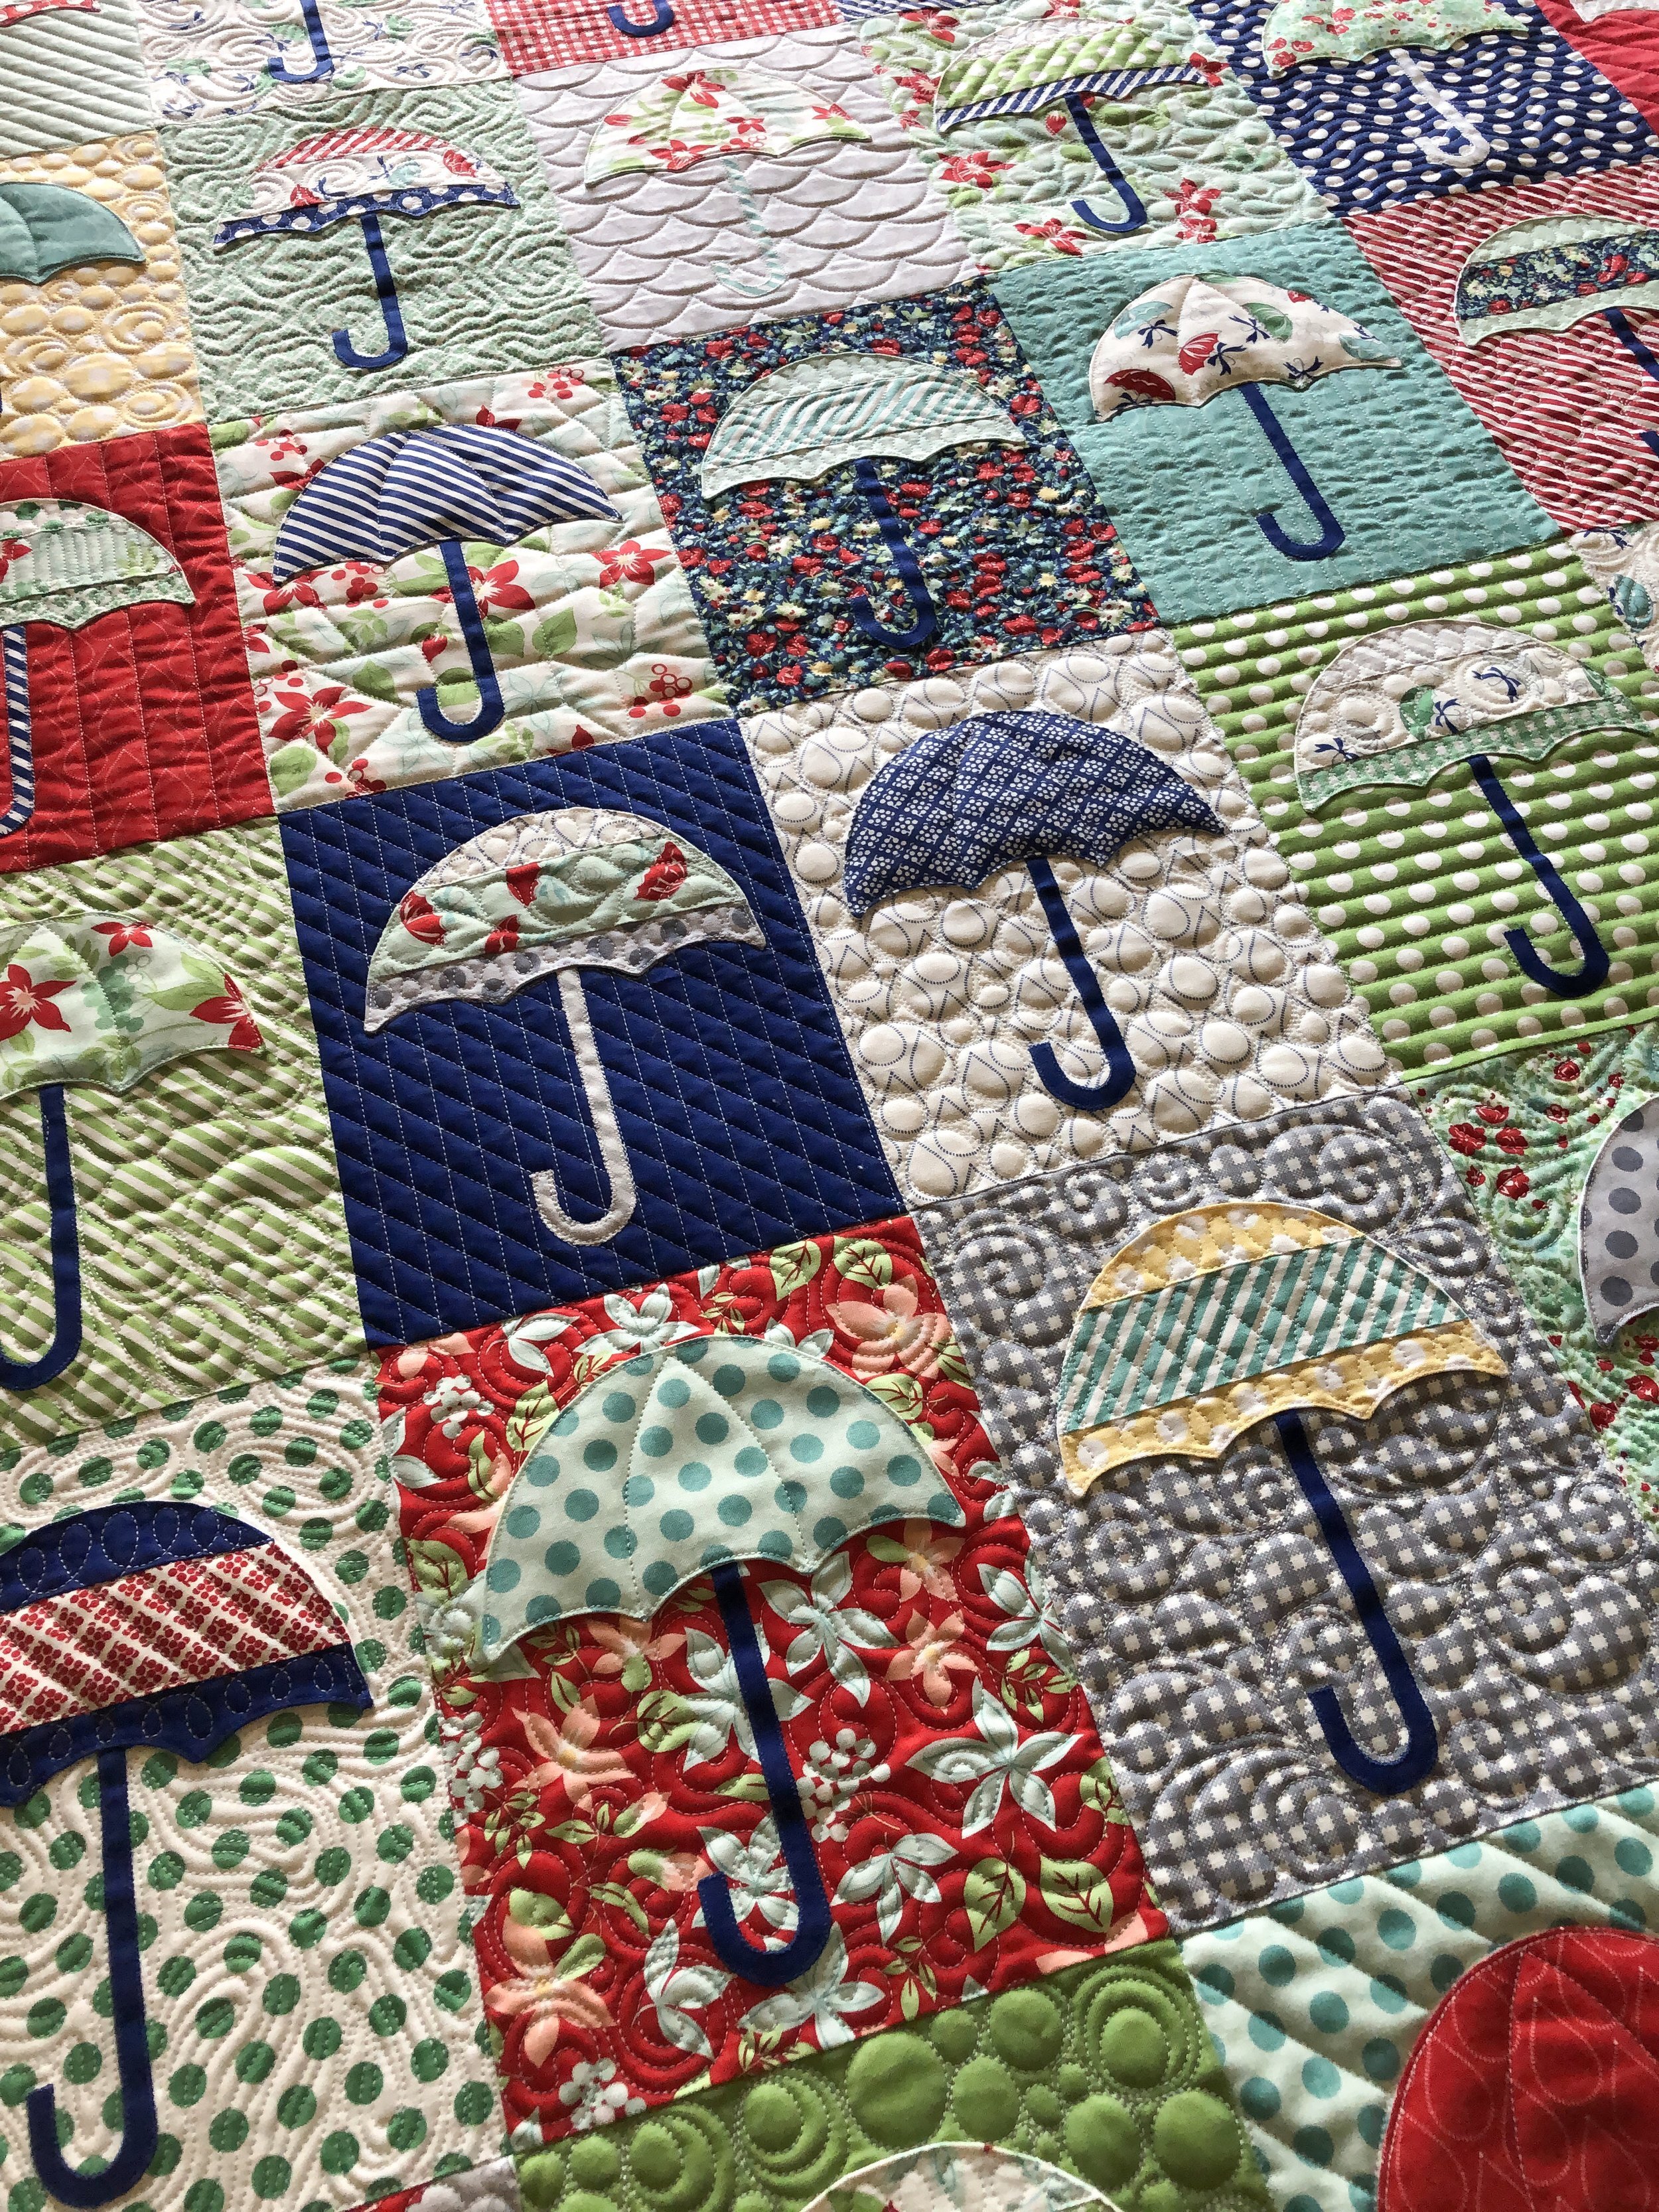
I used 2 rulers to quilt this quilt. I used Linda’s from thequiltedpineapple.com 16” Edge ruler for all the lines. If you’ve heard me talk about or read about her rulers, I love them. The lines on her rulers are an excellent guide, which means I don’t have to mark anything. I also used one of my Circle2™ rulers, the 2”/8” circle, to quilt all the arcs in the solid umbrellas. The umbrellas with stripes, got a variety of different designs in the middle stripe.

This is my 2”/8” circle ruler from my Circle2™ set, that I used for the arcs in the solid umbrellas. They are available in a set of 6 rulers, ranging from 2” to 13” circles. Go to: https://www.quiltingit.com/shop/?category=Rulers
Before I start numbering off all the designs, I used an Omni Superior Thread, color Pearl White. Cindy sent a Kyoto Bamboo batting.
Designs...I’ll write the description for the designs, below each picture.
1- 1/2” vertical lines
2- a rippled echo
3- 1” left diagonal lines
4- little tiny close together loops

5- swirls
6- swirly feathers
7- random petals or feathers
8- wavy horizontal lines
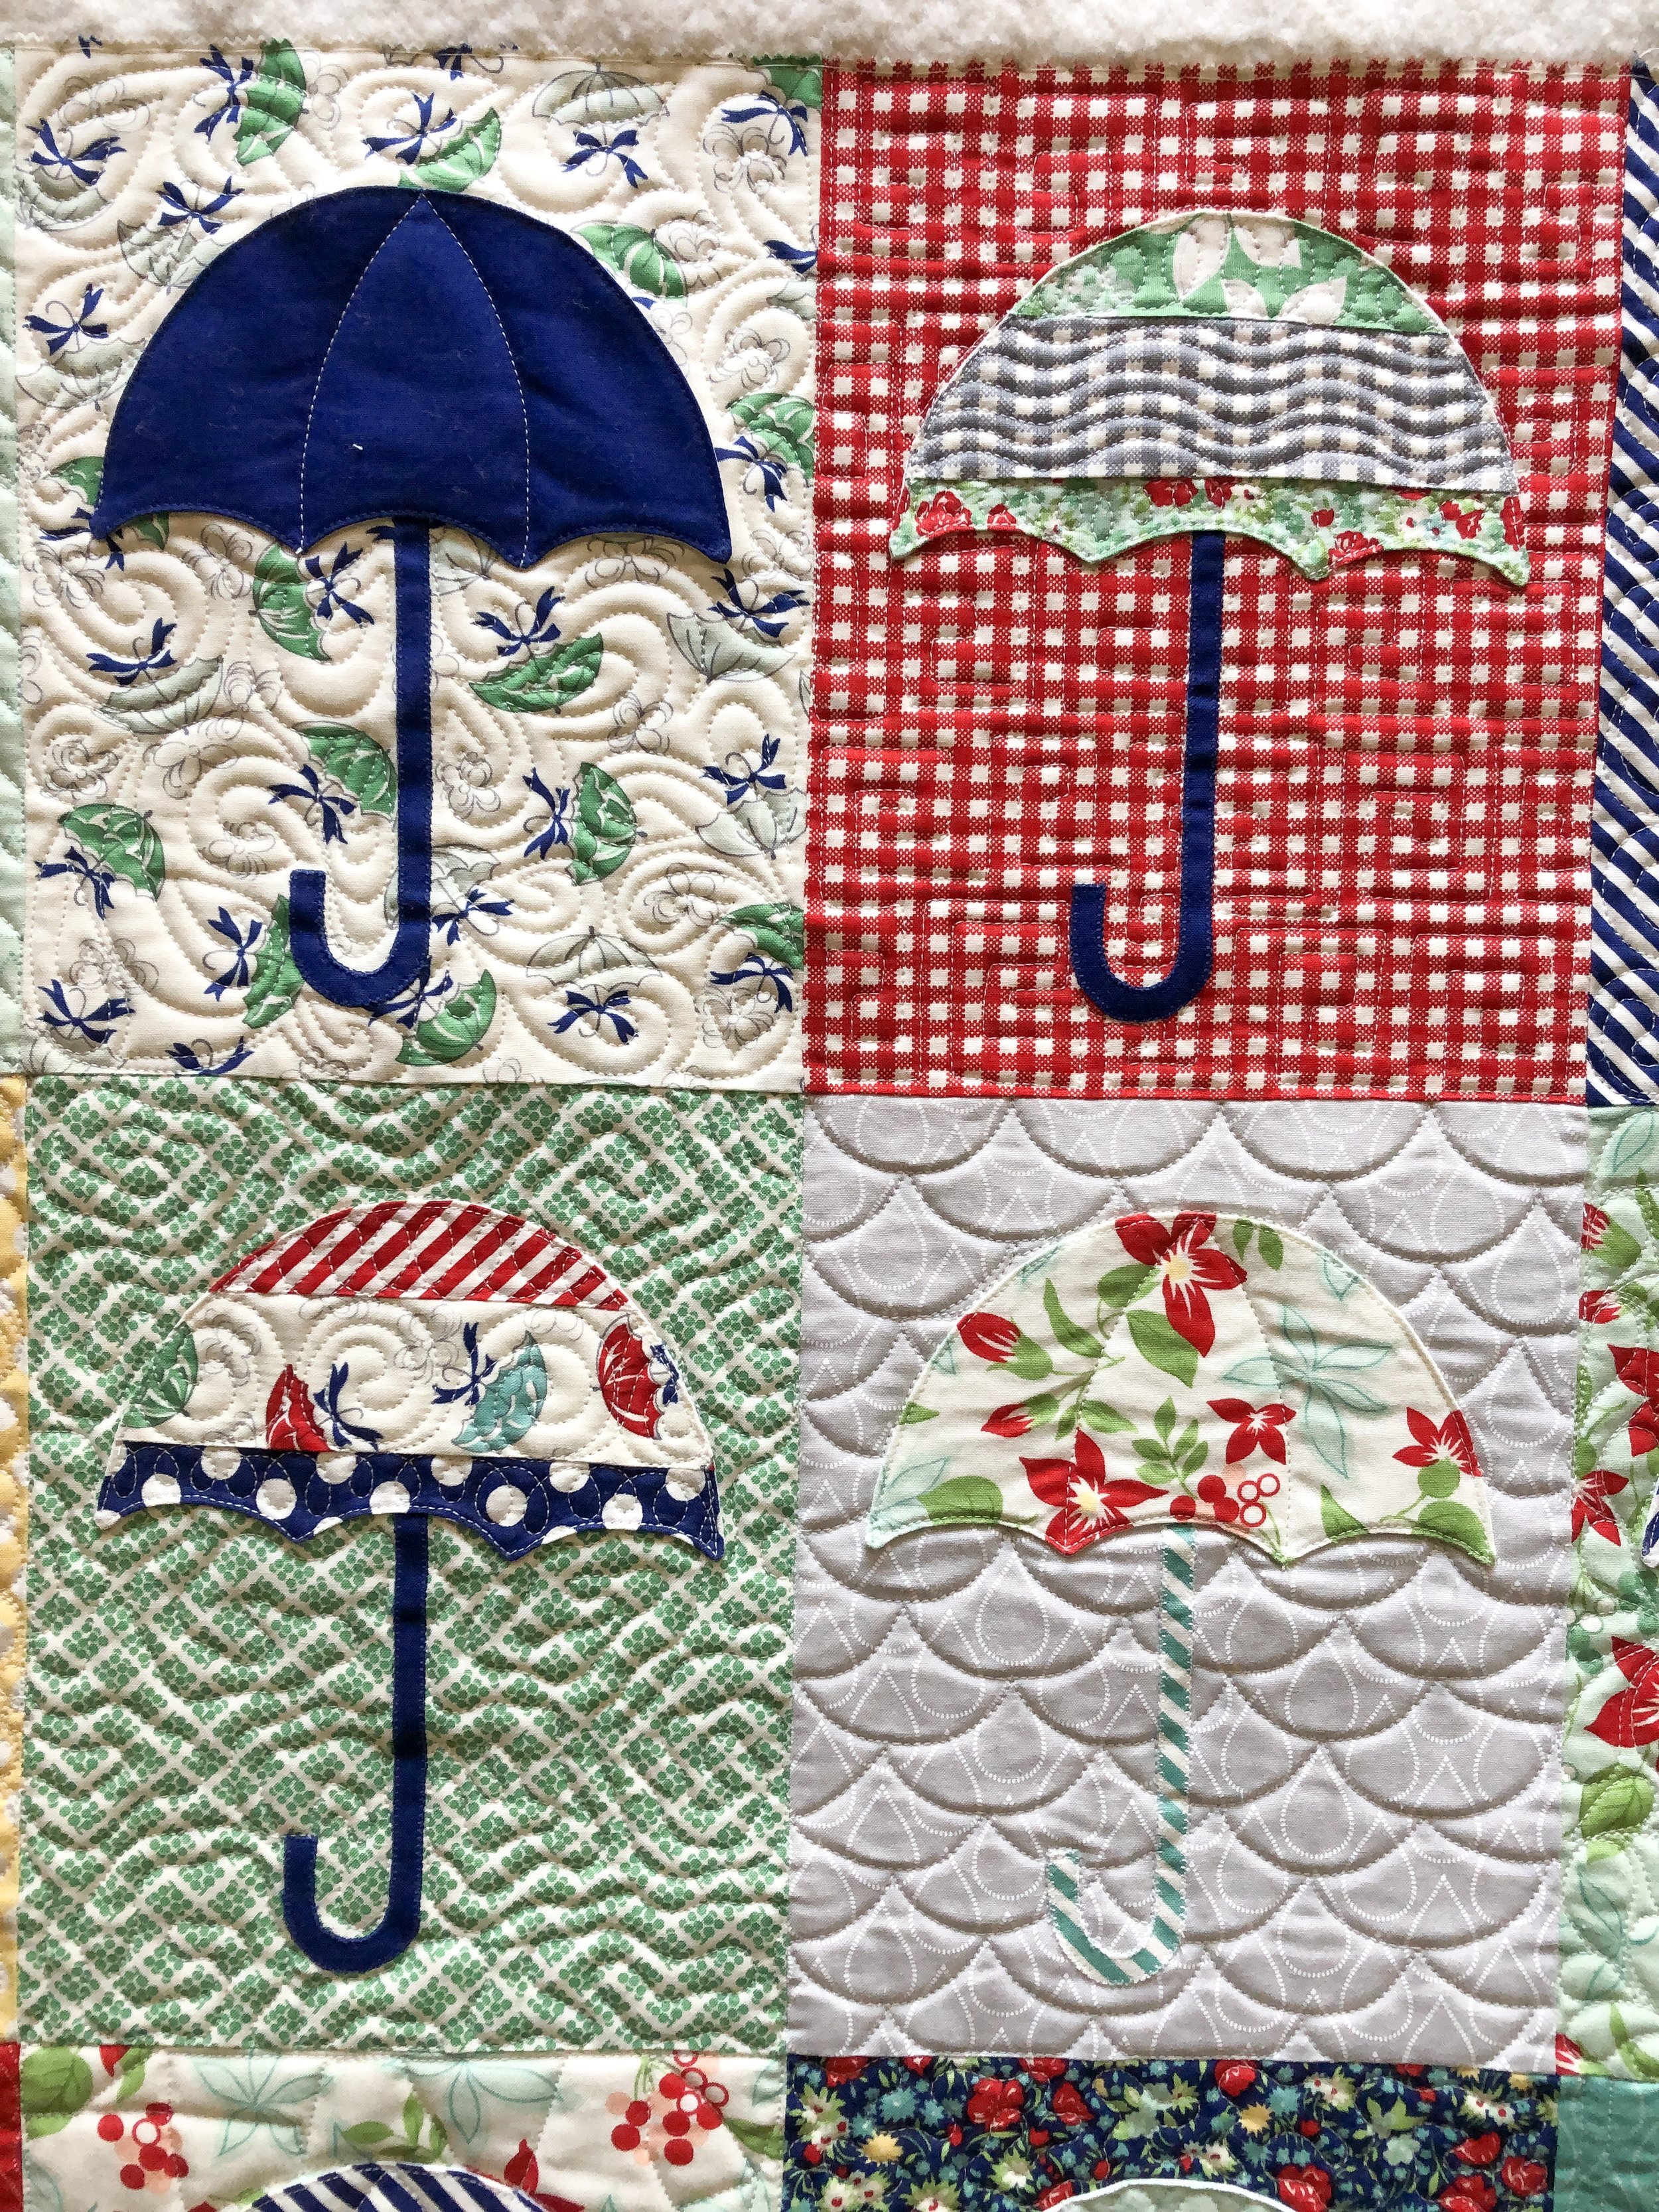
9- arcs
10- square swirls
11- wonky swirls
12- scallops

13- 1/2” left diagonal lines
14- pebbles with circles inside some
The other two were mentioned in the previous picture.

15- 1” vertical lines
16- crackle
17- flowers with feathers and swirls
18- 1/2” diagonal diamonds (created by quilting 1/2” vertical lines and 1/2” diagonal lines)
19- stipple
20- pinstripes (1/4” pinstripes with 1/2” spacing between each line)
21- echoed pebbles (by going around the pebbles a few times, the thread makes the pebble pop and be more defined). I love this!
22- horizontal 1/2” lines

23- a meandering leaf
24- overlaid swirls
25- swirly wind
26- grassy texture
27- 3/4” squares
28- vertical up and down design that kind of echos...I don’t know how to describe this one, zoom in to the bottom right umbrella with the aqua background and you can see the quilting better.
Yay!! I’m glad I had pictures of each of the designs. Because of fabrics are busy on some blocks, you can’t see the quilting very good. Just zoom in using your two fingers on your phone.
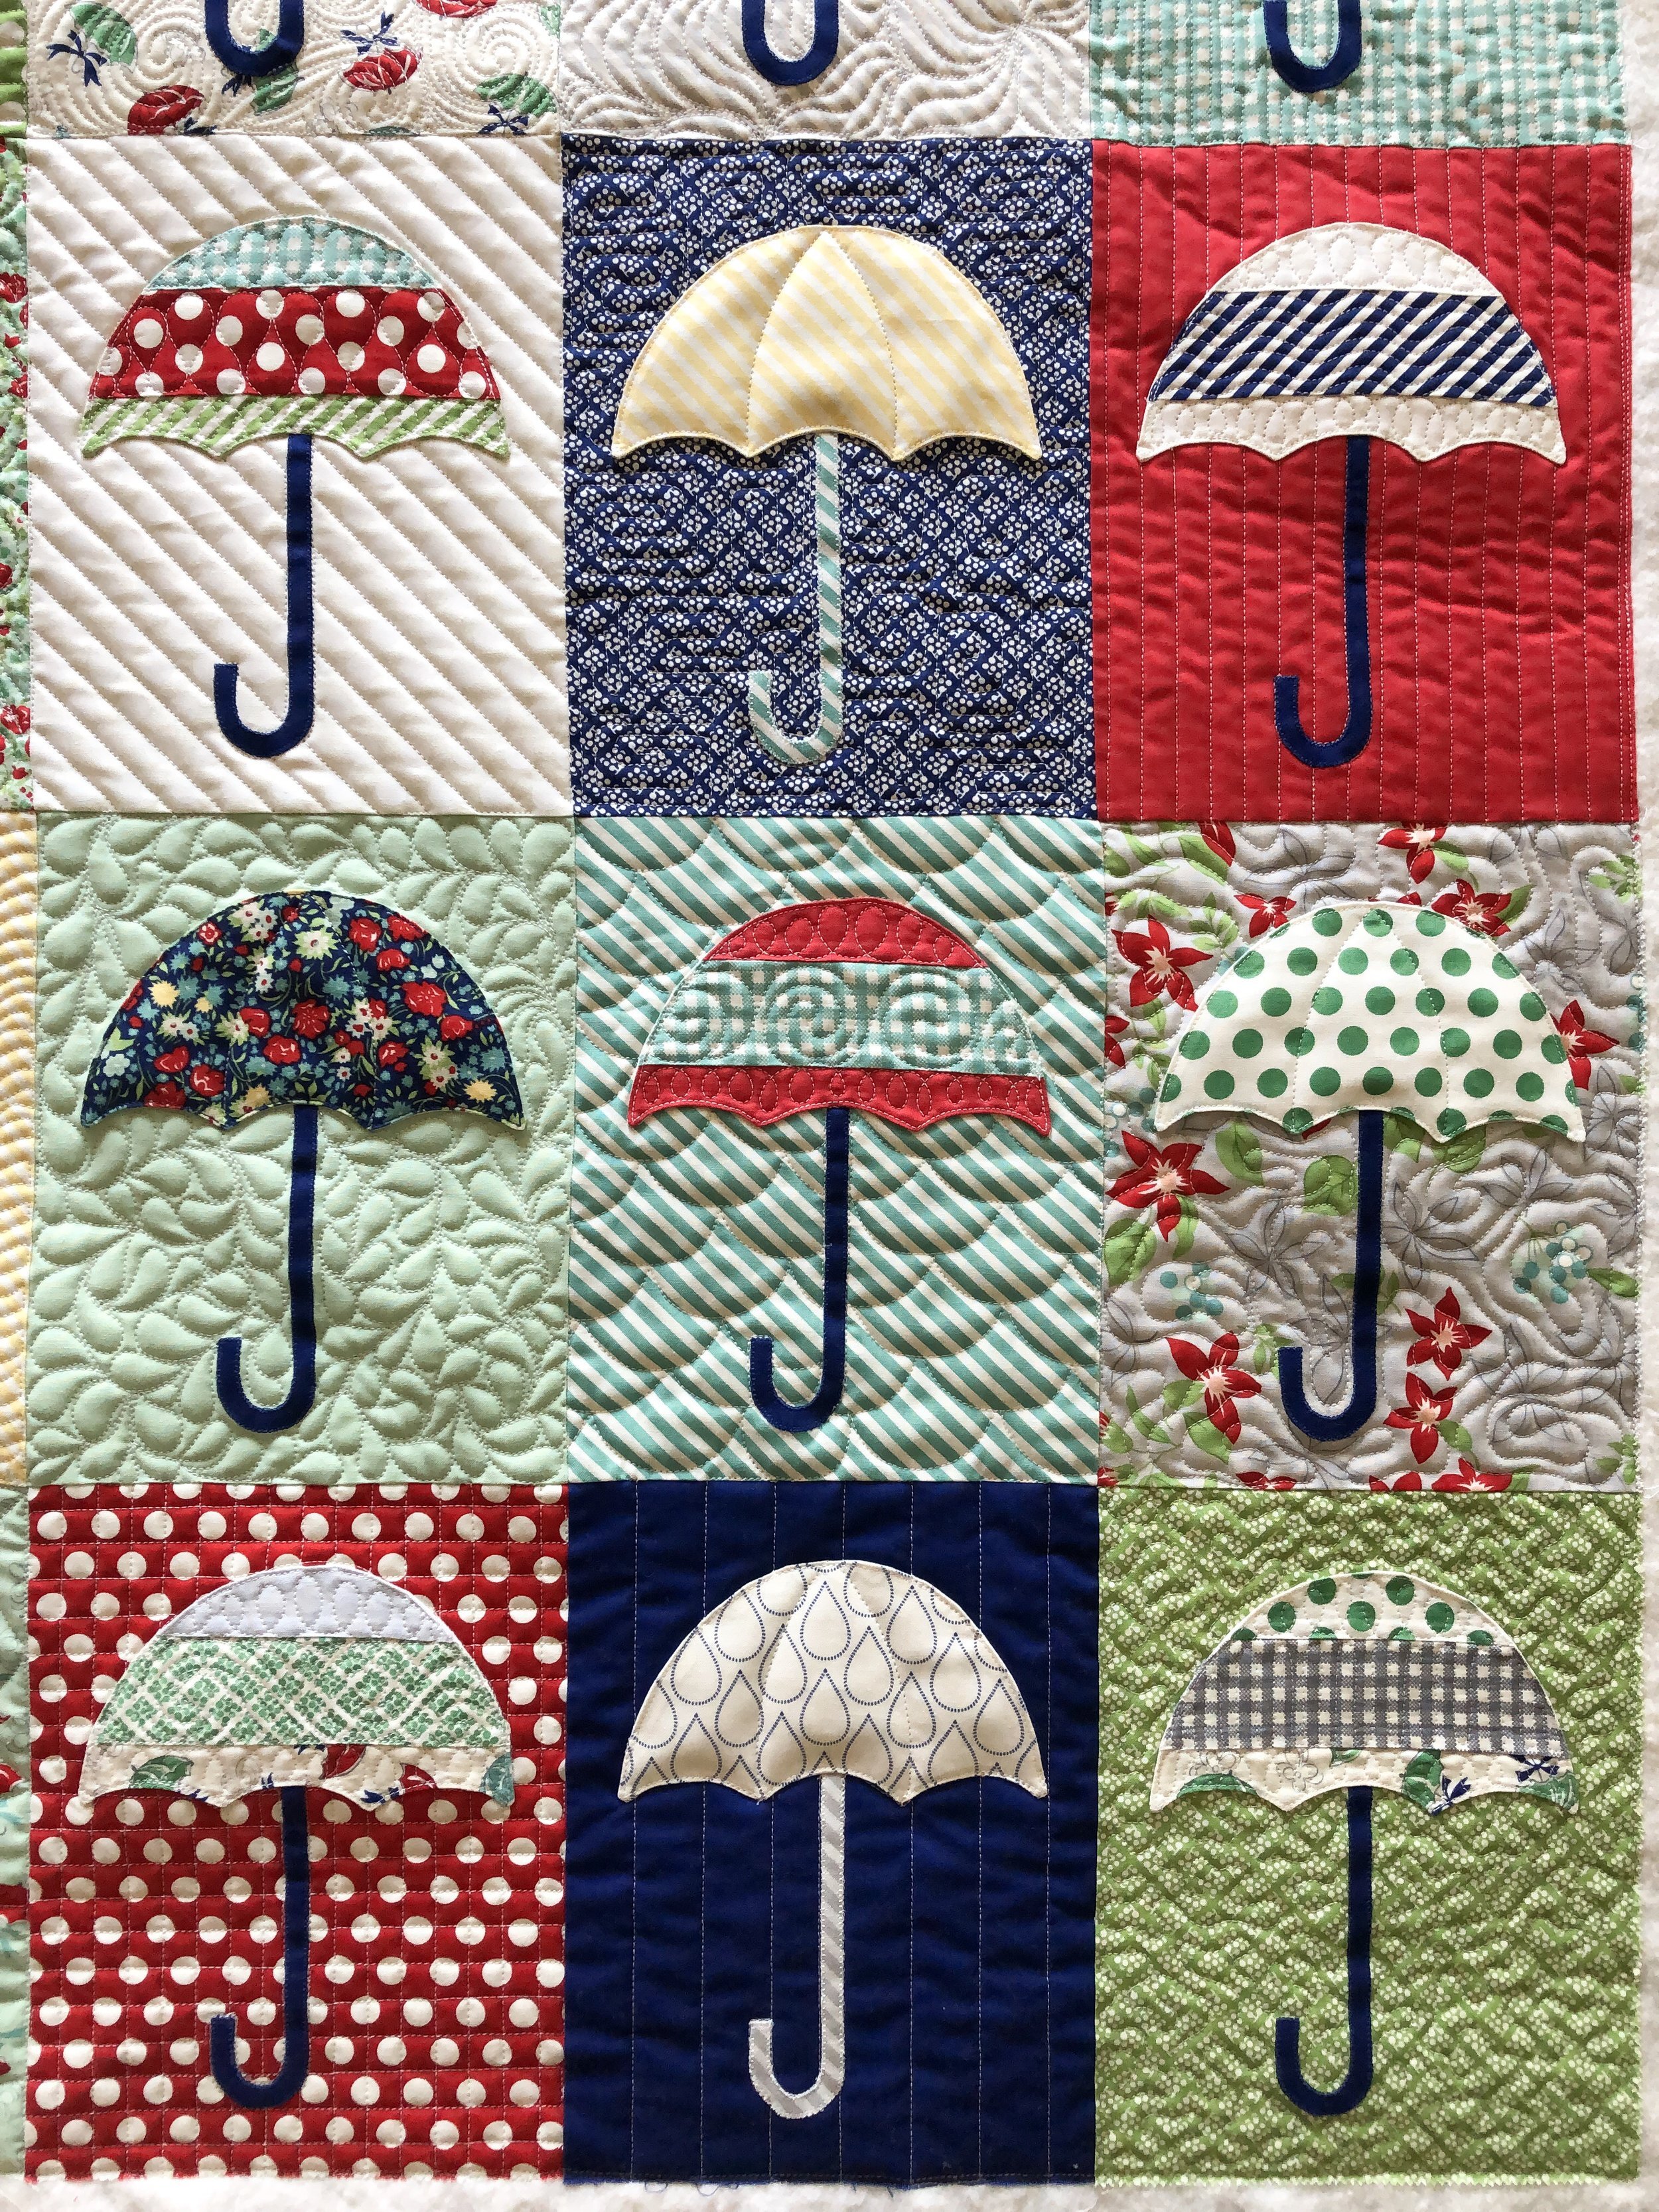
So, the first four rows have all different backgrounds. With the last three rows, I repeated the same designs from the first three rows. So row 5 got the same background designs, that row 1 has, I just mixed up the order to make it more random. Row 6 got the same as row 2, and row 7 got the same as row 3. Doing this made the backgrounds cohesive and travel throughout the quilt, without it having to be in the same spot on the rows where I repeated it. Now...you may be thinking awesome, there are a lot of different designs I can use or you may be thinking, they aren’t really different enough to count as 28 different designs. They are still different, even if it’s just a difference in measurement, and they create a different texture. So, one thing to keep in mind when doing so many different background designs, you need to keep it cohesive or it looks over done like nothing is flowing or harmonious. The variety of line designs are great, because they add variety and yet are similar enough to still work together. The freehand all over designs are also important to keep cohesive, and I do this by pulling inspiration from the fabrics and quilt pattern, or the overall theme of the quilt. That’s why I feel that these 28 designs work so well together.
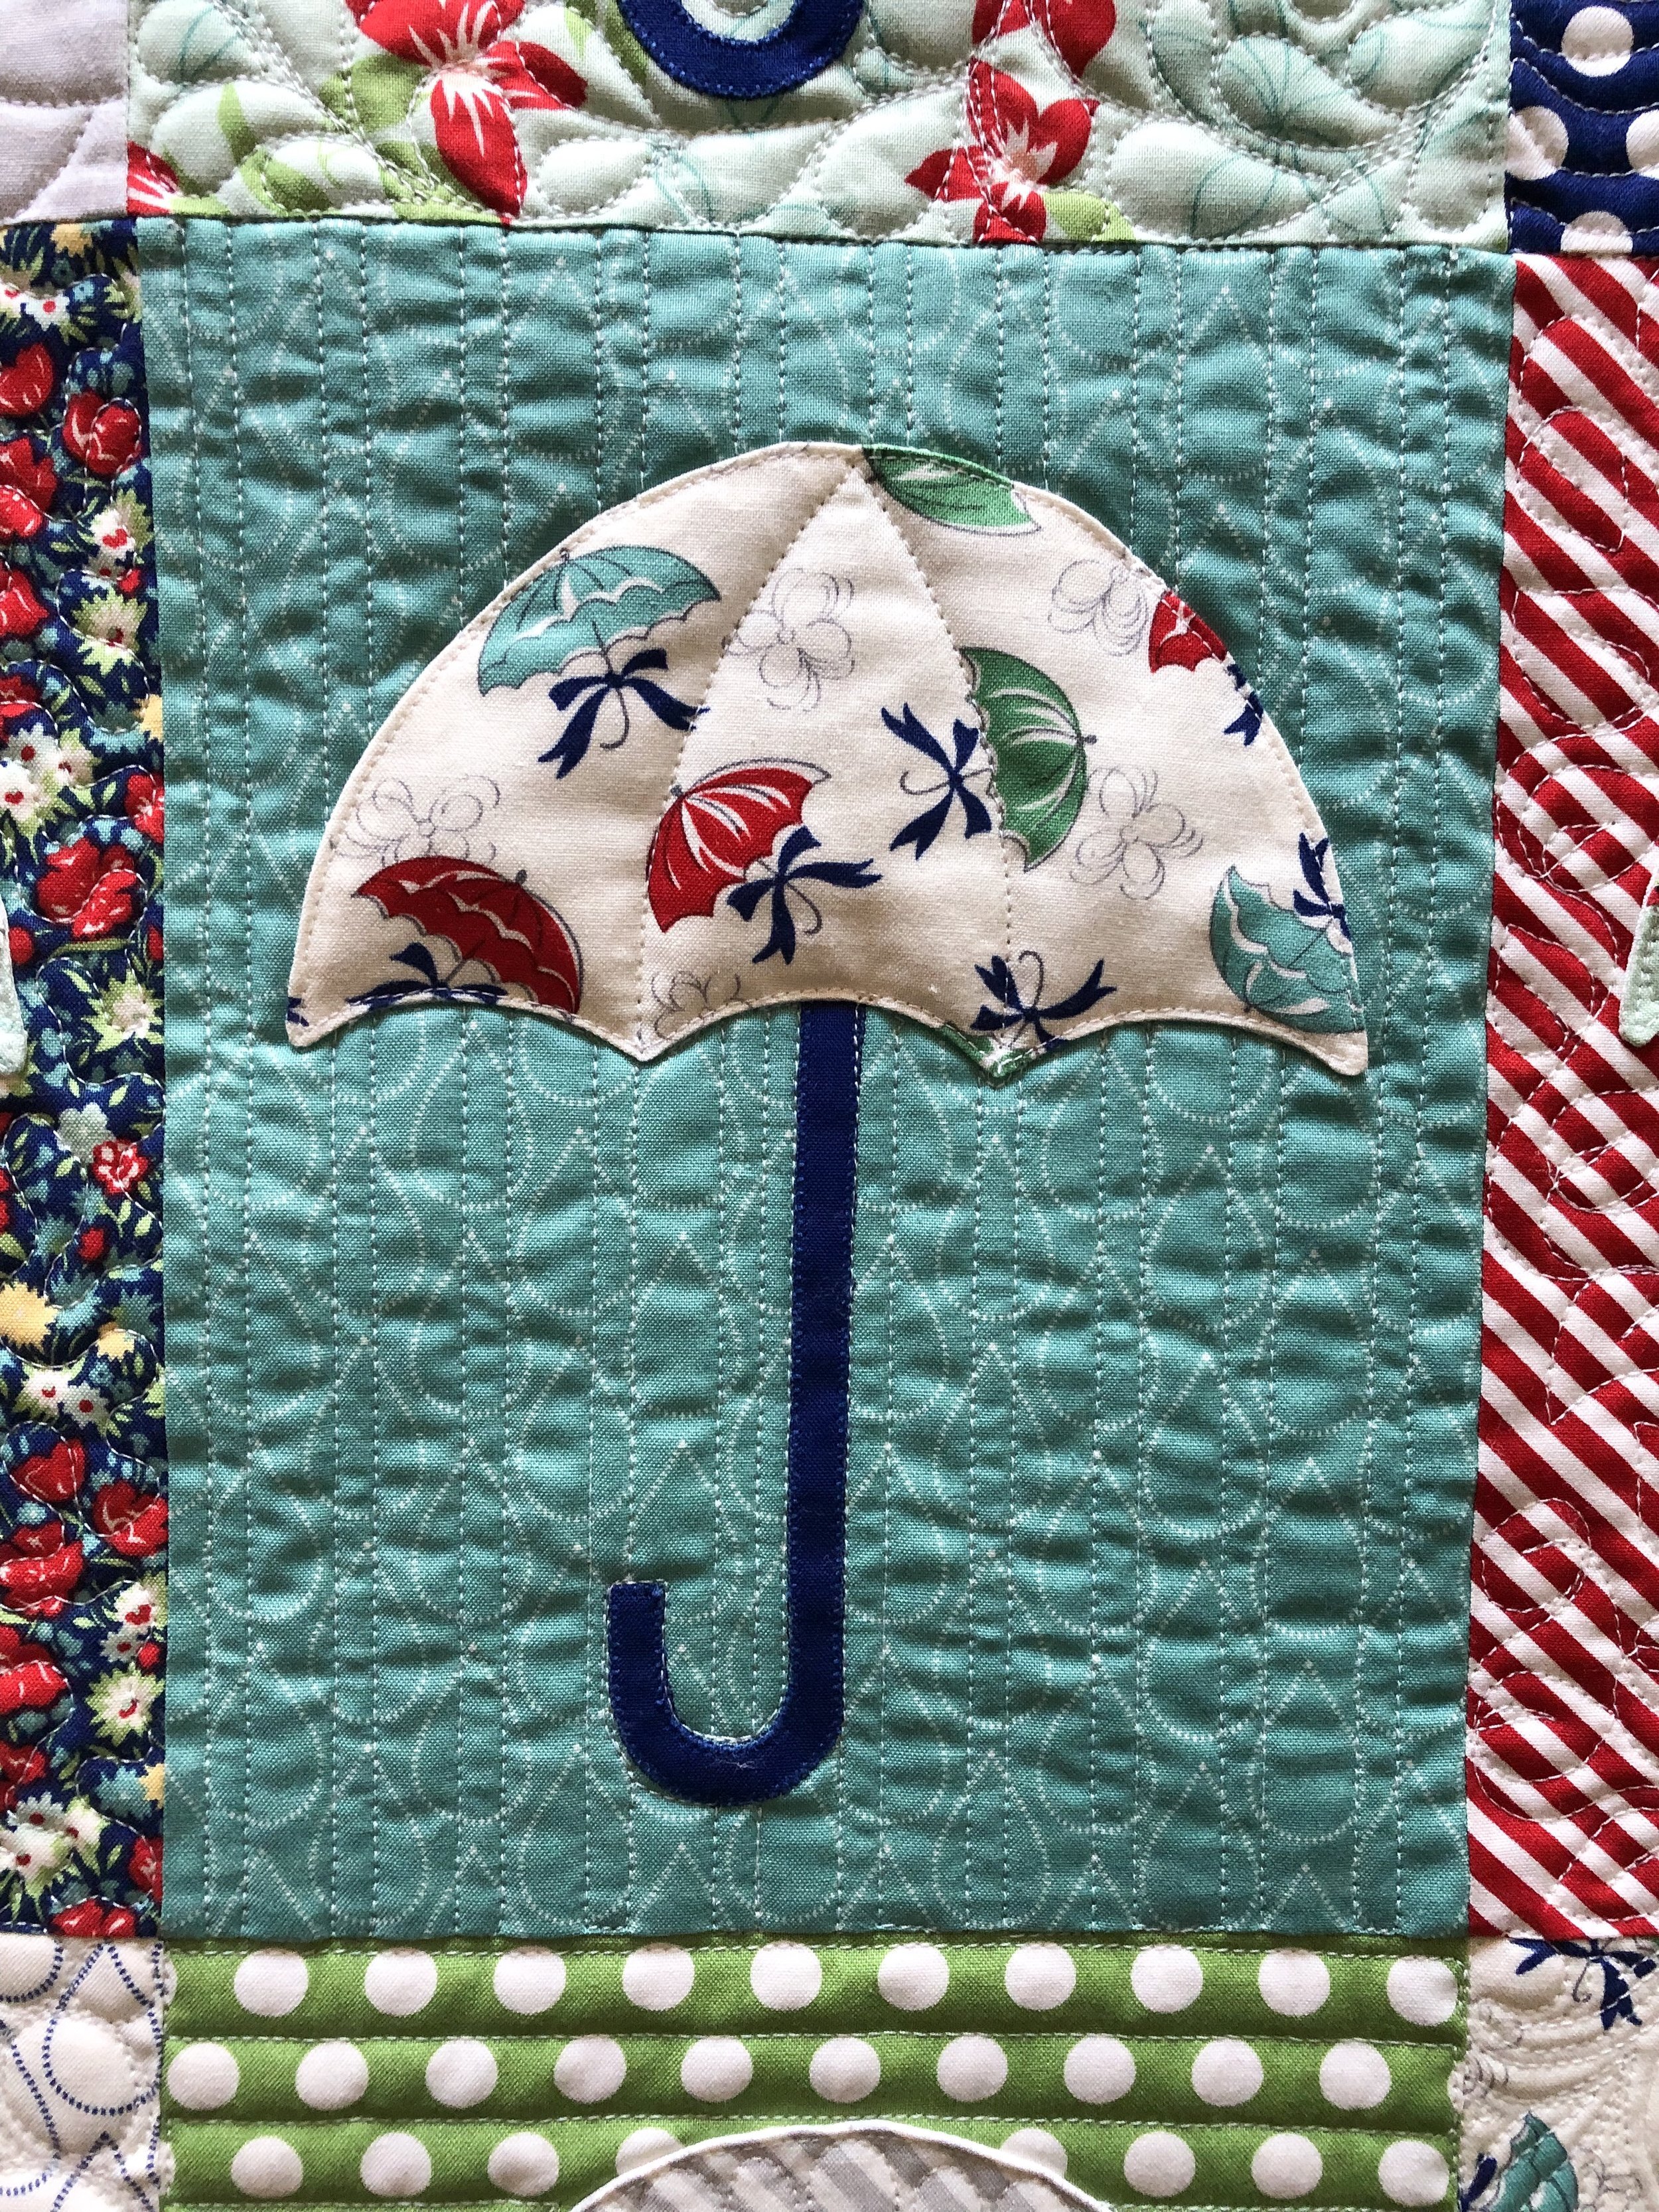
Now I want to show you a close up on some of my favorites. Pictured above and below are two completely different line designs, that I use quite a bit in small doses. For instance, I use them in all sorts of appliqué shapes. They are great on rooftops or bands on a hat, or even texture on the clothing of a character. Santa, witches, elves, ...you name it. I like textures like these in those random oddly shaped appliqué pieces. Lines of any kind are awesome appliqué filler. These two just dress it up a notch. I did both of them using Linda’s Edge rulers. Which I can’t give enough praises!! If you don’t have great straight rulers, check hers out at thequiltedpineapple.com
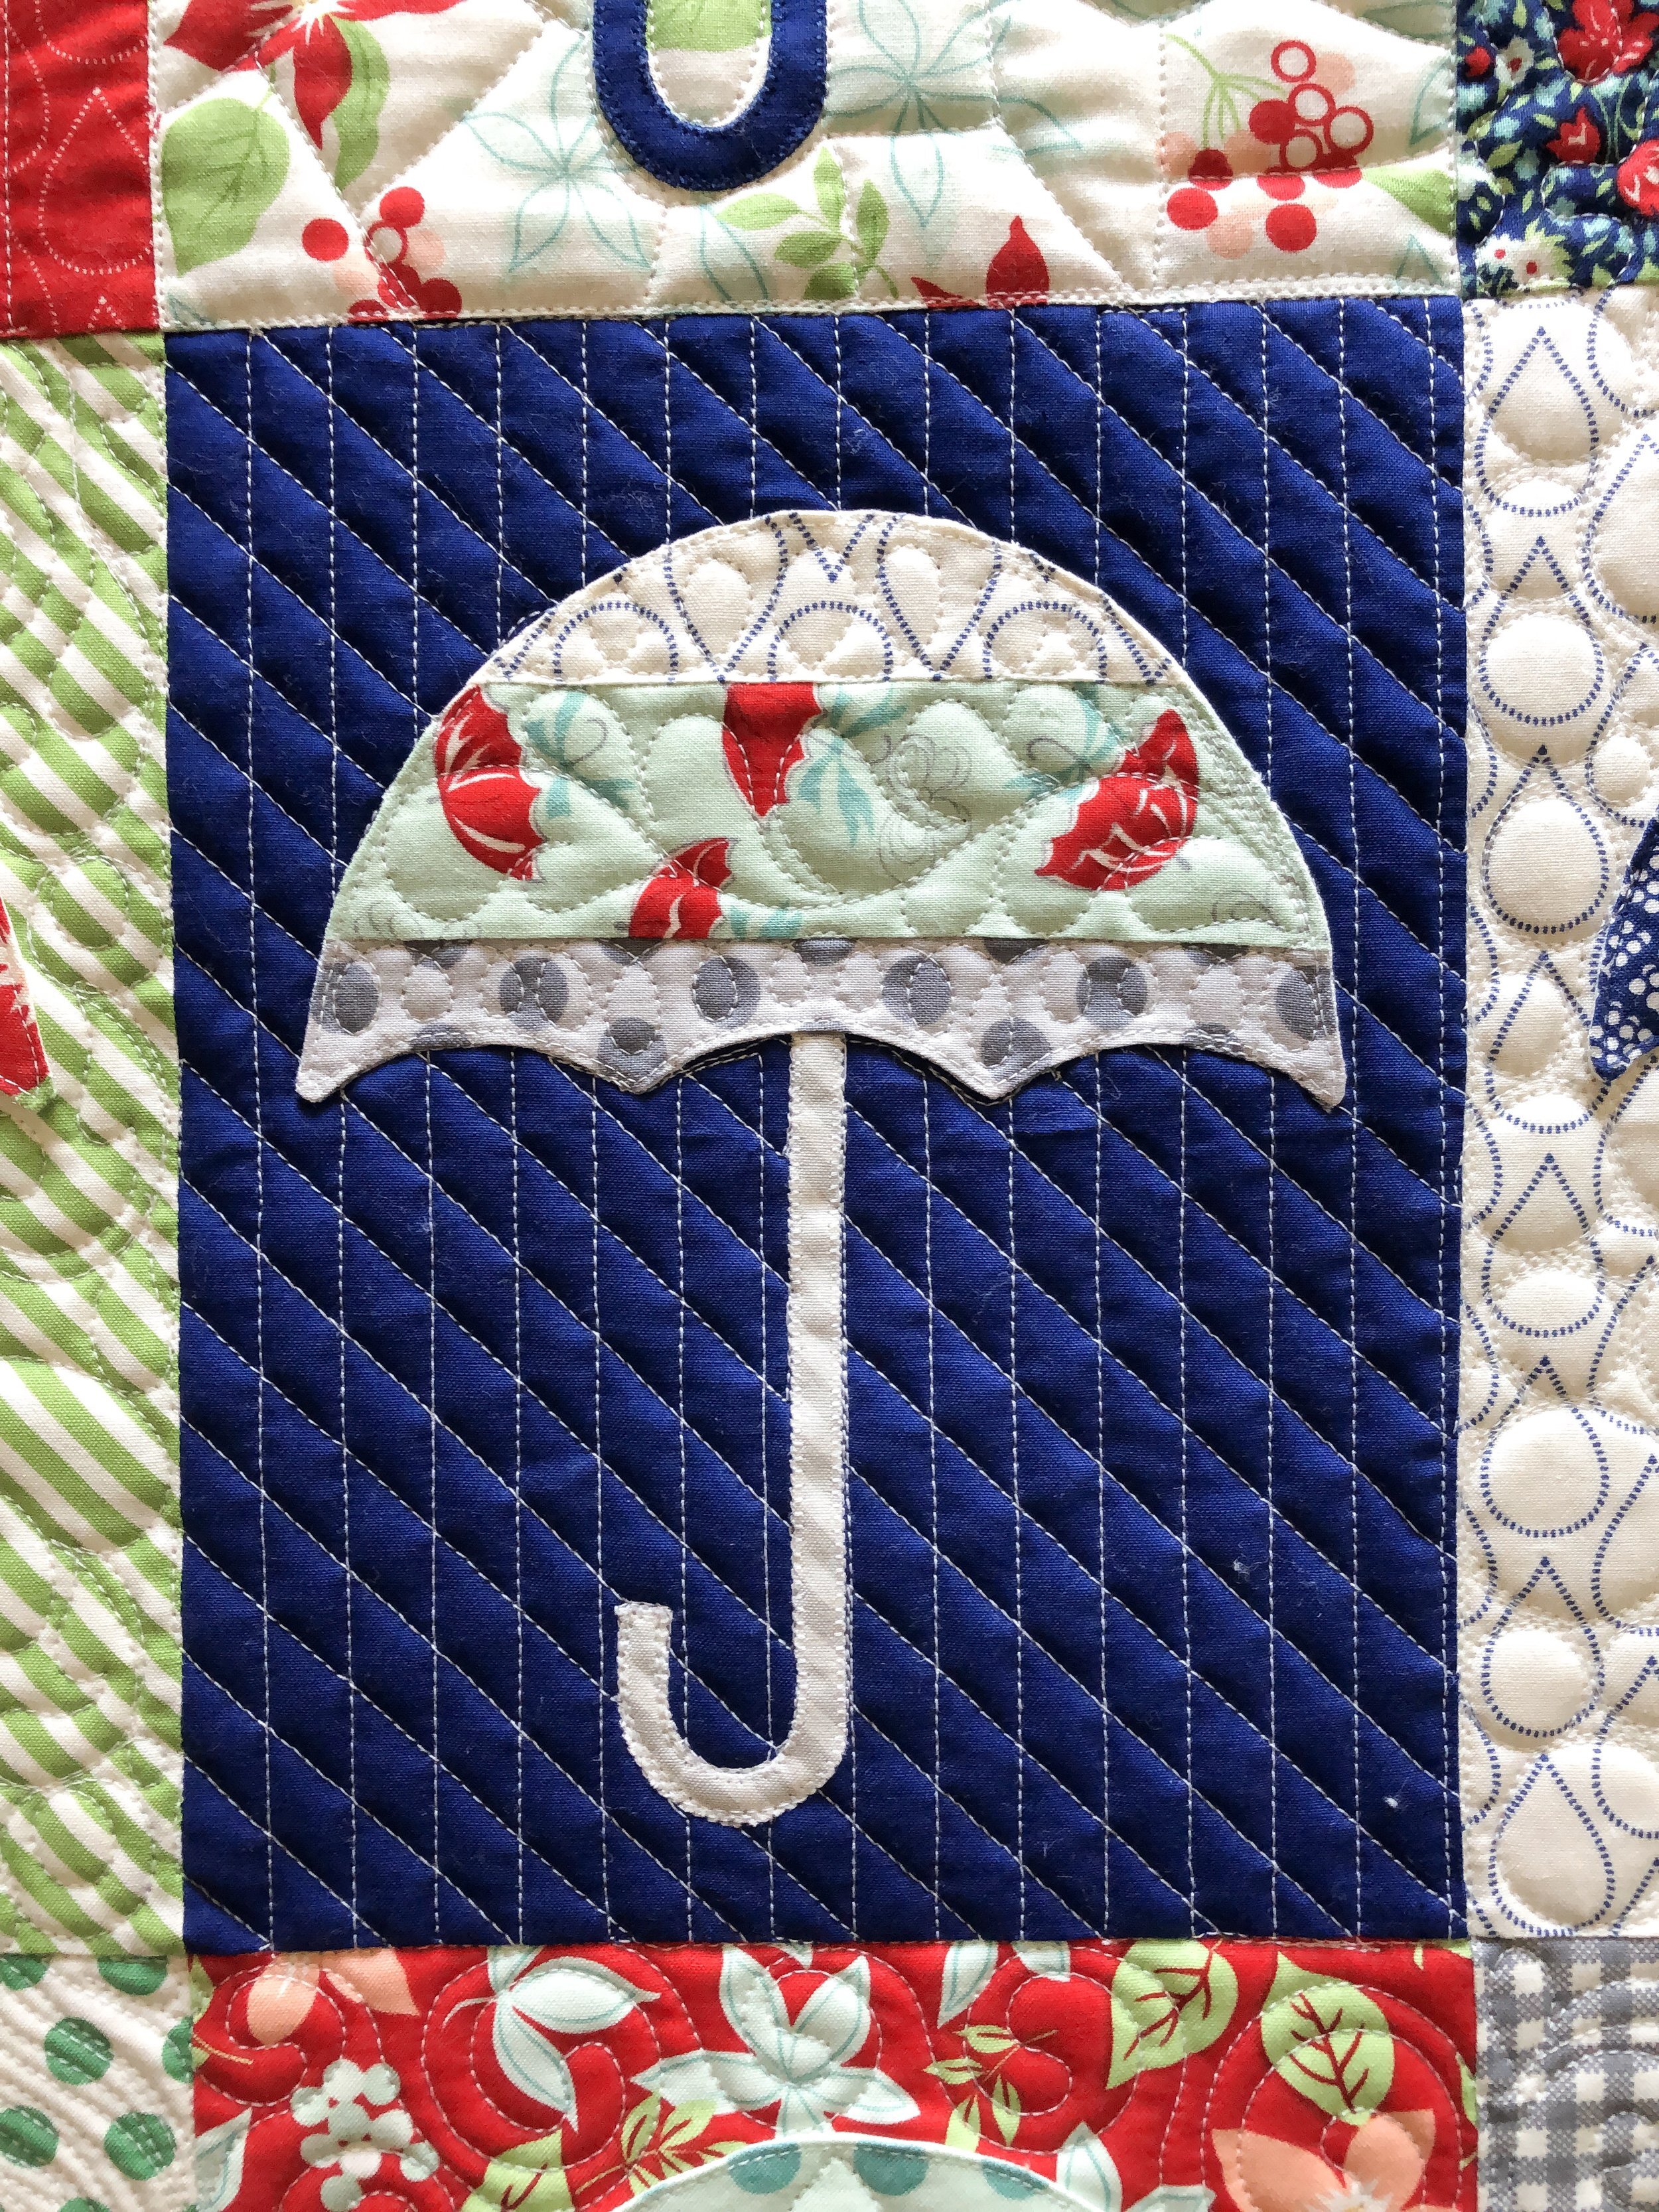
I talked about these pebbles a little in the description of design number 21, they really really make the batting pop and this is a thinner batting. I love the texture it creates. I love clean quilting, that’s my personal style, but sometimes the denser quilting is oh so good!!!
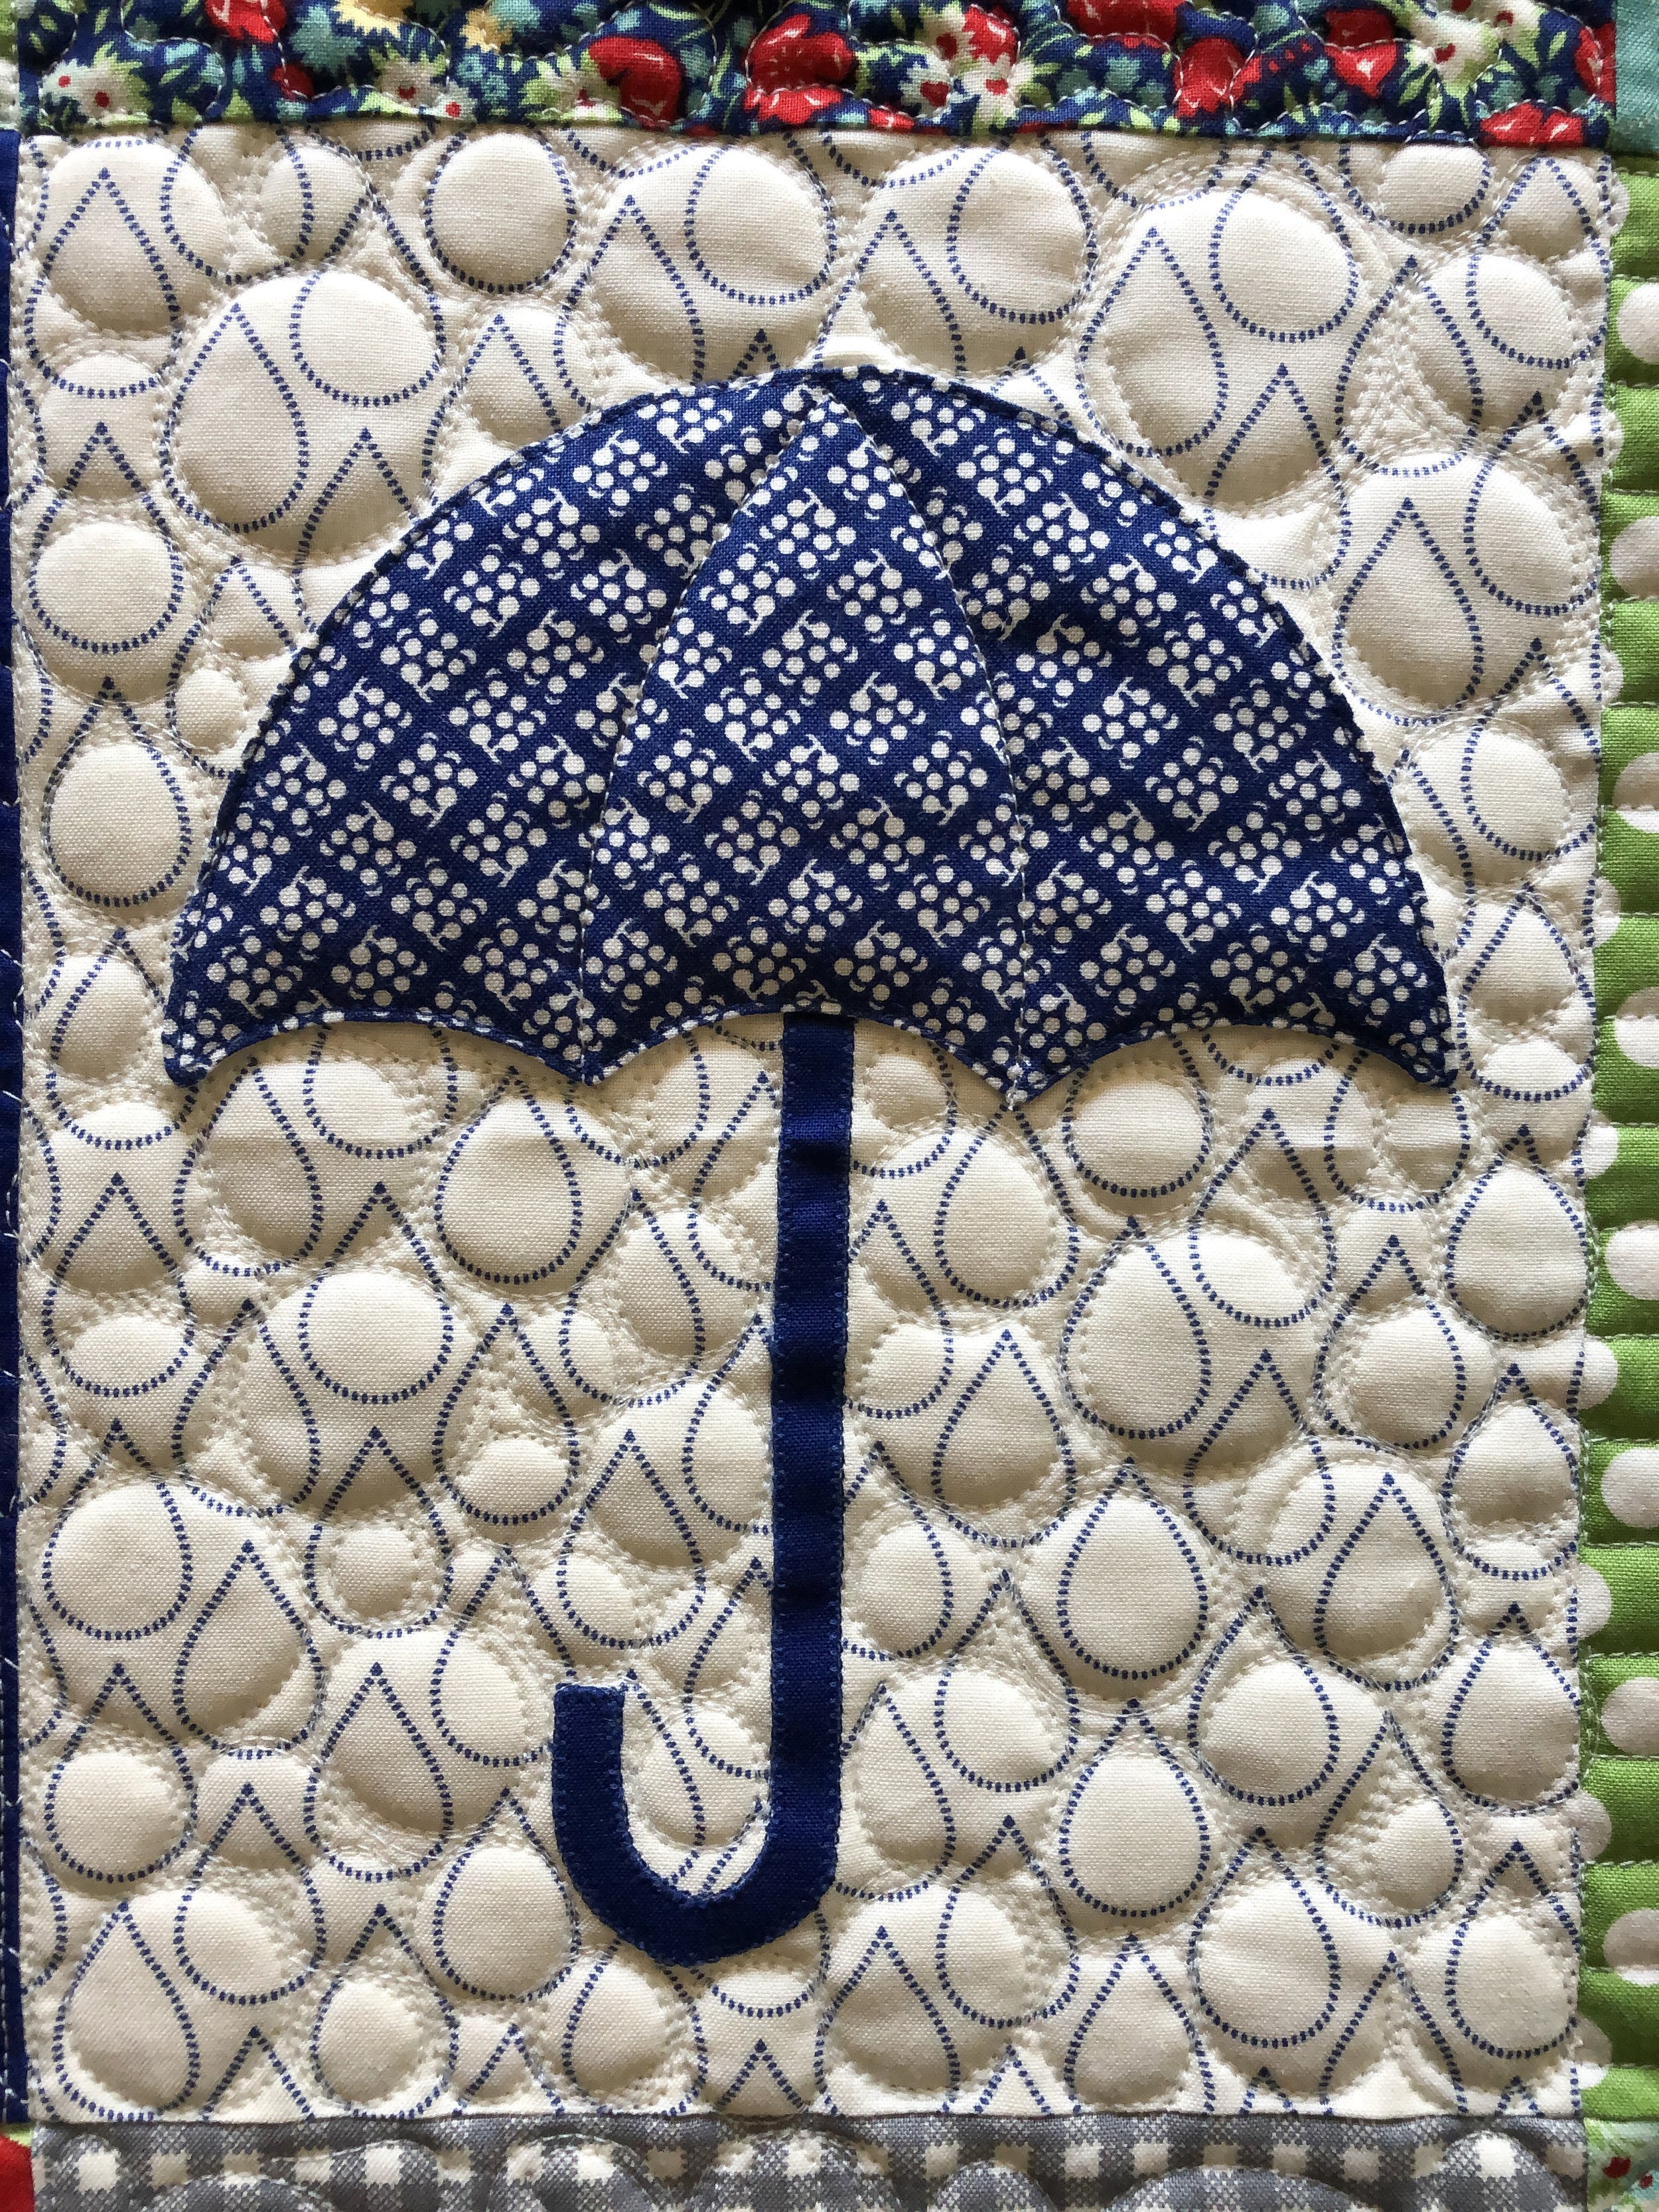
I love a good swirly wind, which is fun going in all different directions.
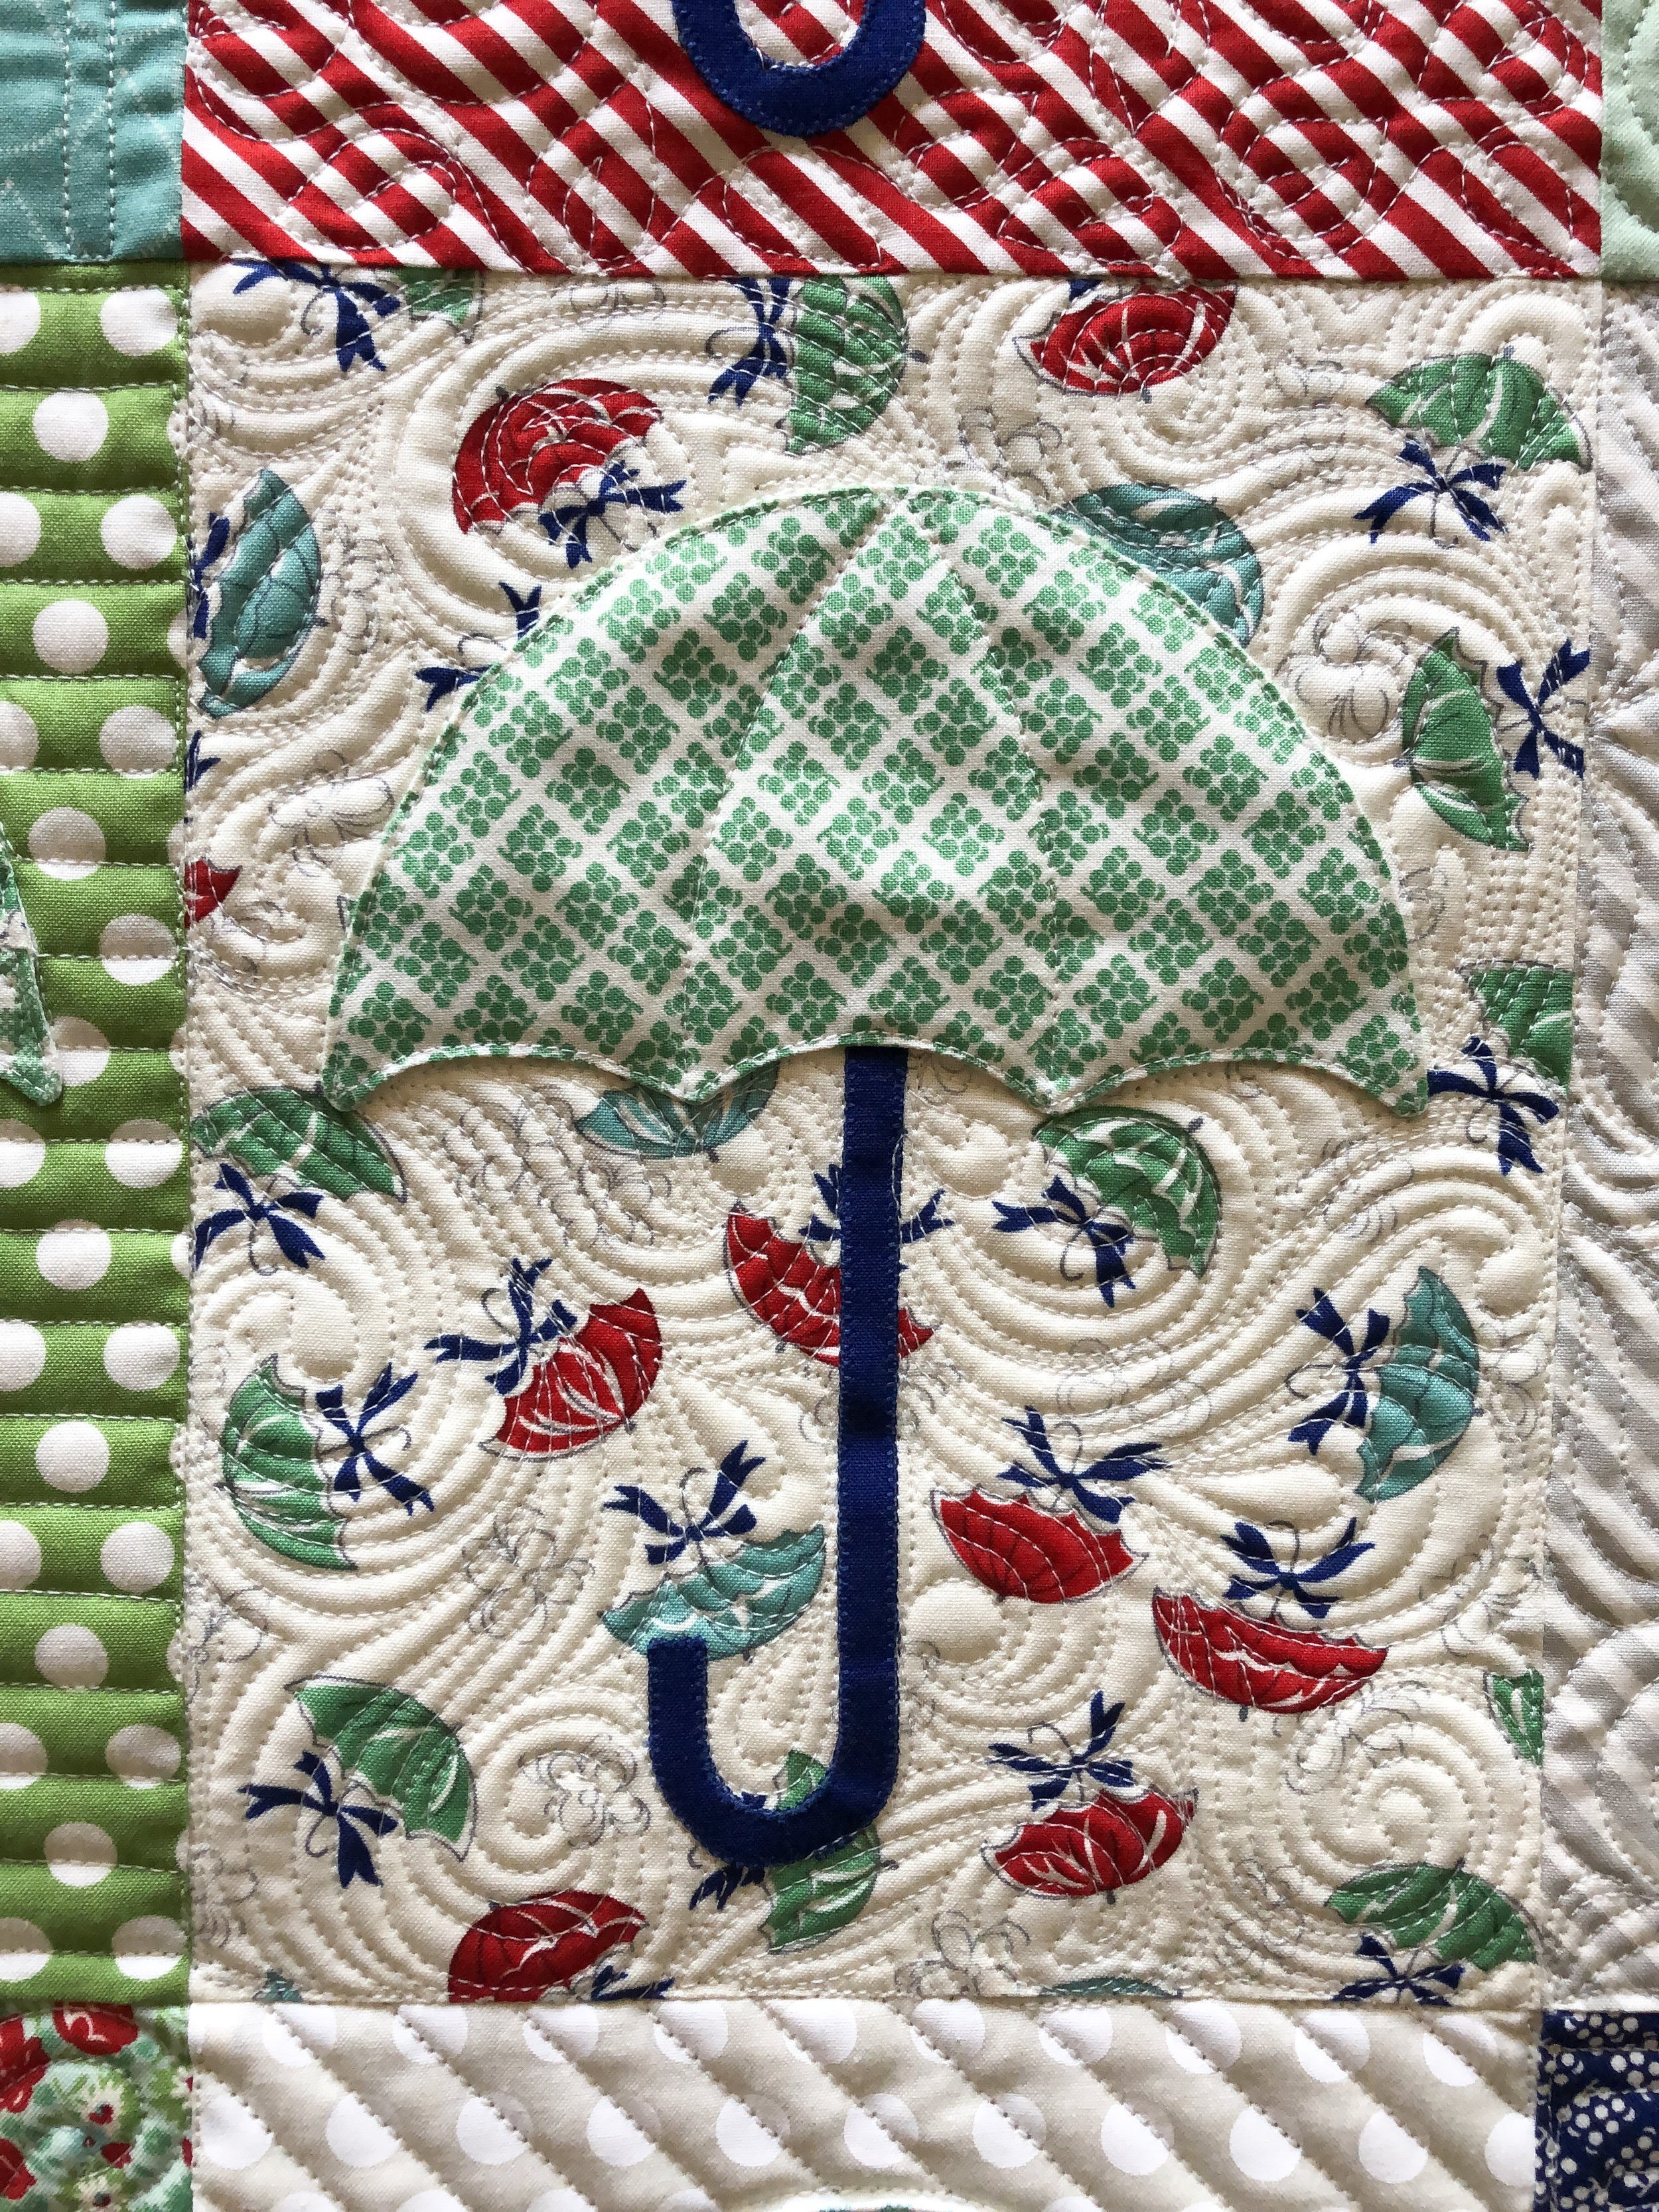
I tried to created ripple in the block, pictured below, and I think it turned out great with that polka dot background. I noticed some designs were just going to be too busy looking on some of the busy fabrics, that’s also why I did a variety of different lines designs.
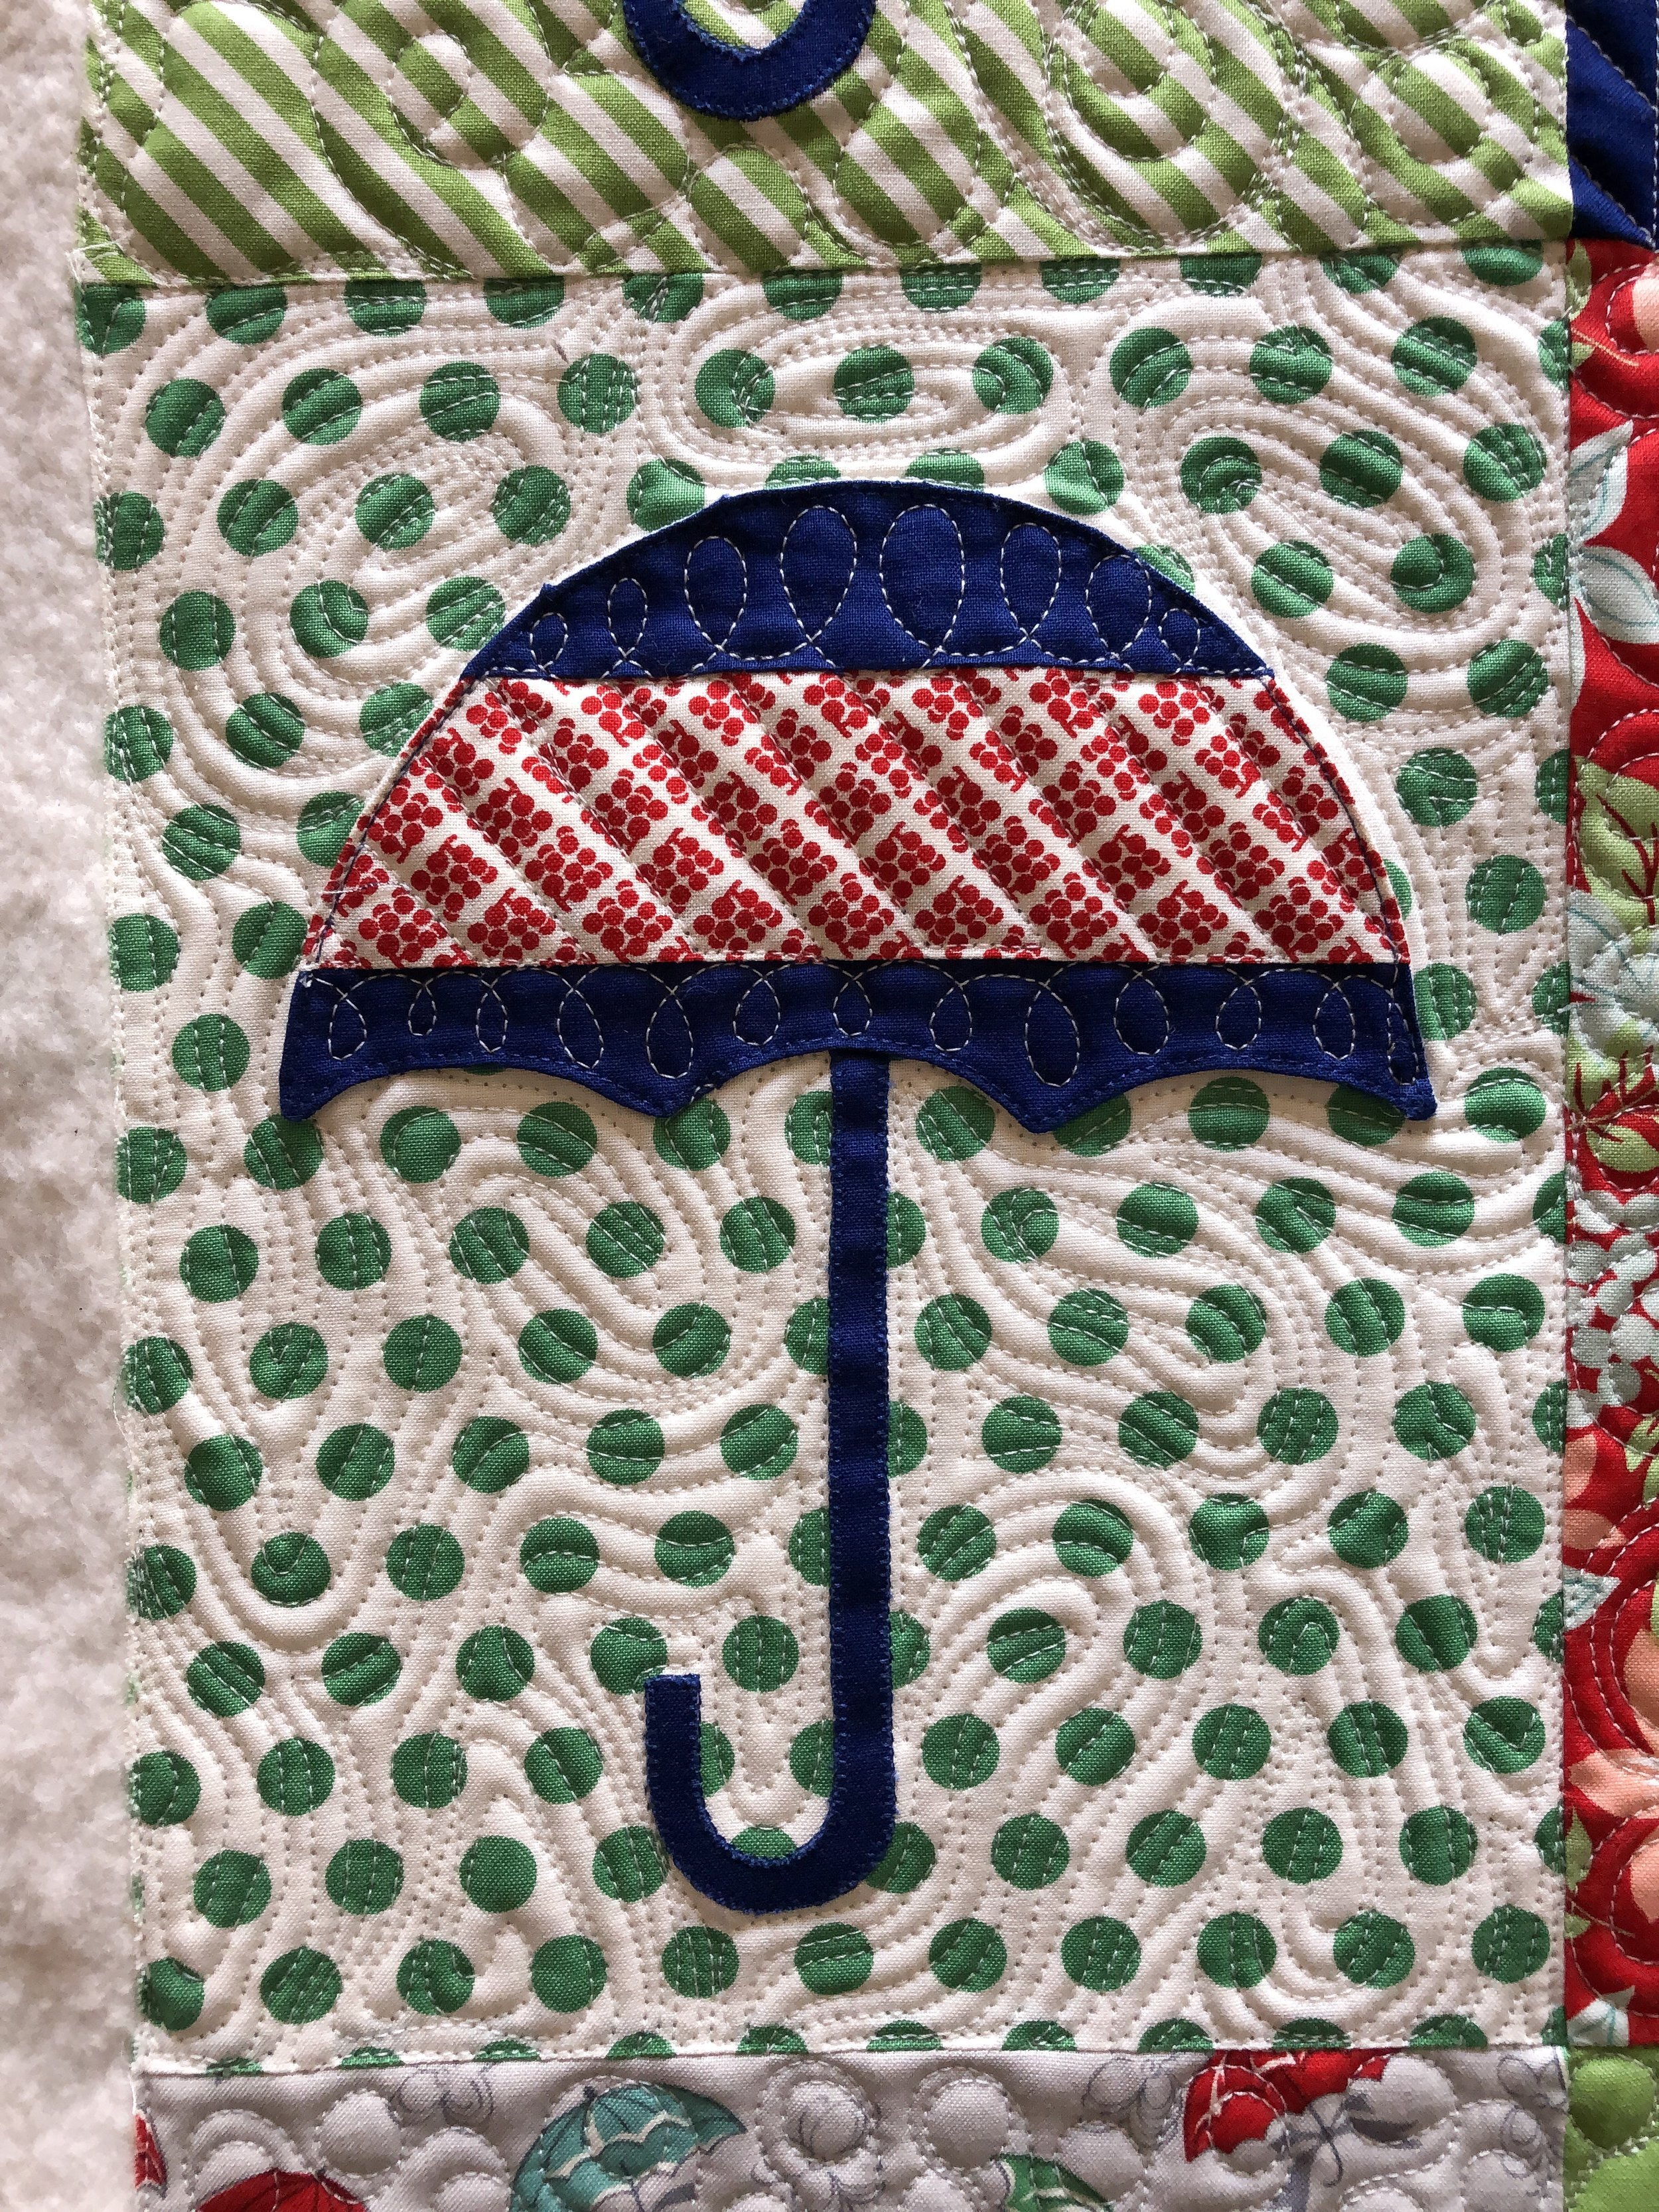
I should just call the background below bubbles...that what it reminds me of with the circles inside the circles. It’s great, because it adds interest to the freehand pebble filler. I also love to add swirls inside some of the circles sometimes. It adds variety and helps in the overall randomness of the design. It’s important to distribute the filler inside the pebbles so it helps the eye travel and not just focus on one spot.

Below is one of my very favorites!! I love the randomness of the feathers or petals going in a bunch of different directions. It’s such a fun design to freehand.

You should get an award, if you read through this whole post. And, I know 21 pictures is a ton, but it’s much easier to see what I’m talking about, if you have a visual to look at. Thank you!!

I hope this post is a great reference for the variety of different designs and textures you can create in the custom quilting that you do. You may have a whole slew of other designs that you do...I’d love to hear about them in the comments below, and if you have a post including some background fillers, please include a link. I’d love to check it out. Thanks again for coming to my little place in the quilting world
Happy Quilting!!
-Leisha

Early Holiday Sales!!!
With the holidays fastly approaching, I thought I would do my holiday sales early, so you don’t miss out on them...if you’re a Black Friday shopper. These are going to be my best sales, and they both last until Saturday November 10th at midnight. (EST)
First up...25% OFF all my digital quilting designs...use code “HOLIDAY25” at checkout, available only on quiltingit.com go to this link to check out all of my designs: https://www.quiltingit.com/shop/?category=Digital+Quilting+Designs each design is available in several different digital formats, which are listed in each design listing. Here is a sample of a couple of the designs...

My Squared©️ design, More on this quilt, in this blog post: https://www.quiltingit.com/blog/2018/10/4/baby-quilt

This design quilts out beautifully!!
My Beaded Clam©️ design. For more info on this quilt go to: https://www.quiltingit.com/blog/2018/8/26/beth-sweet-quilt
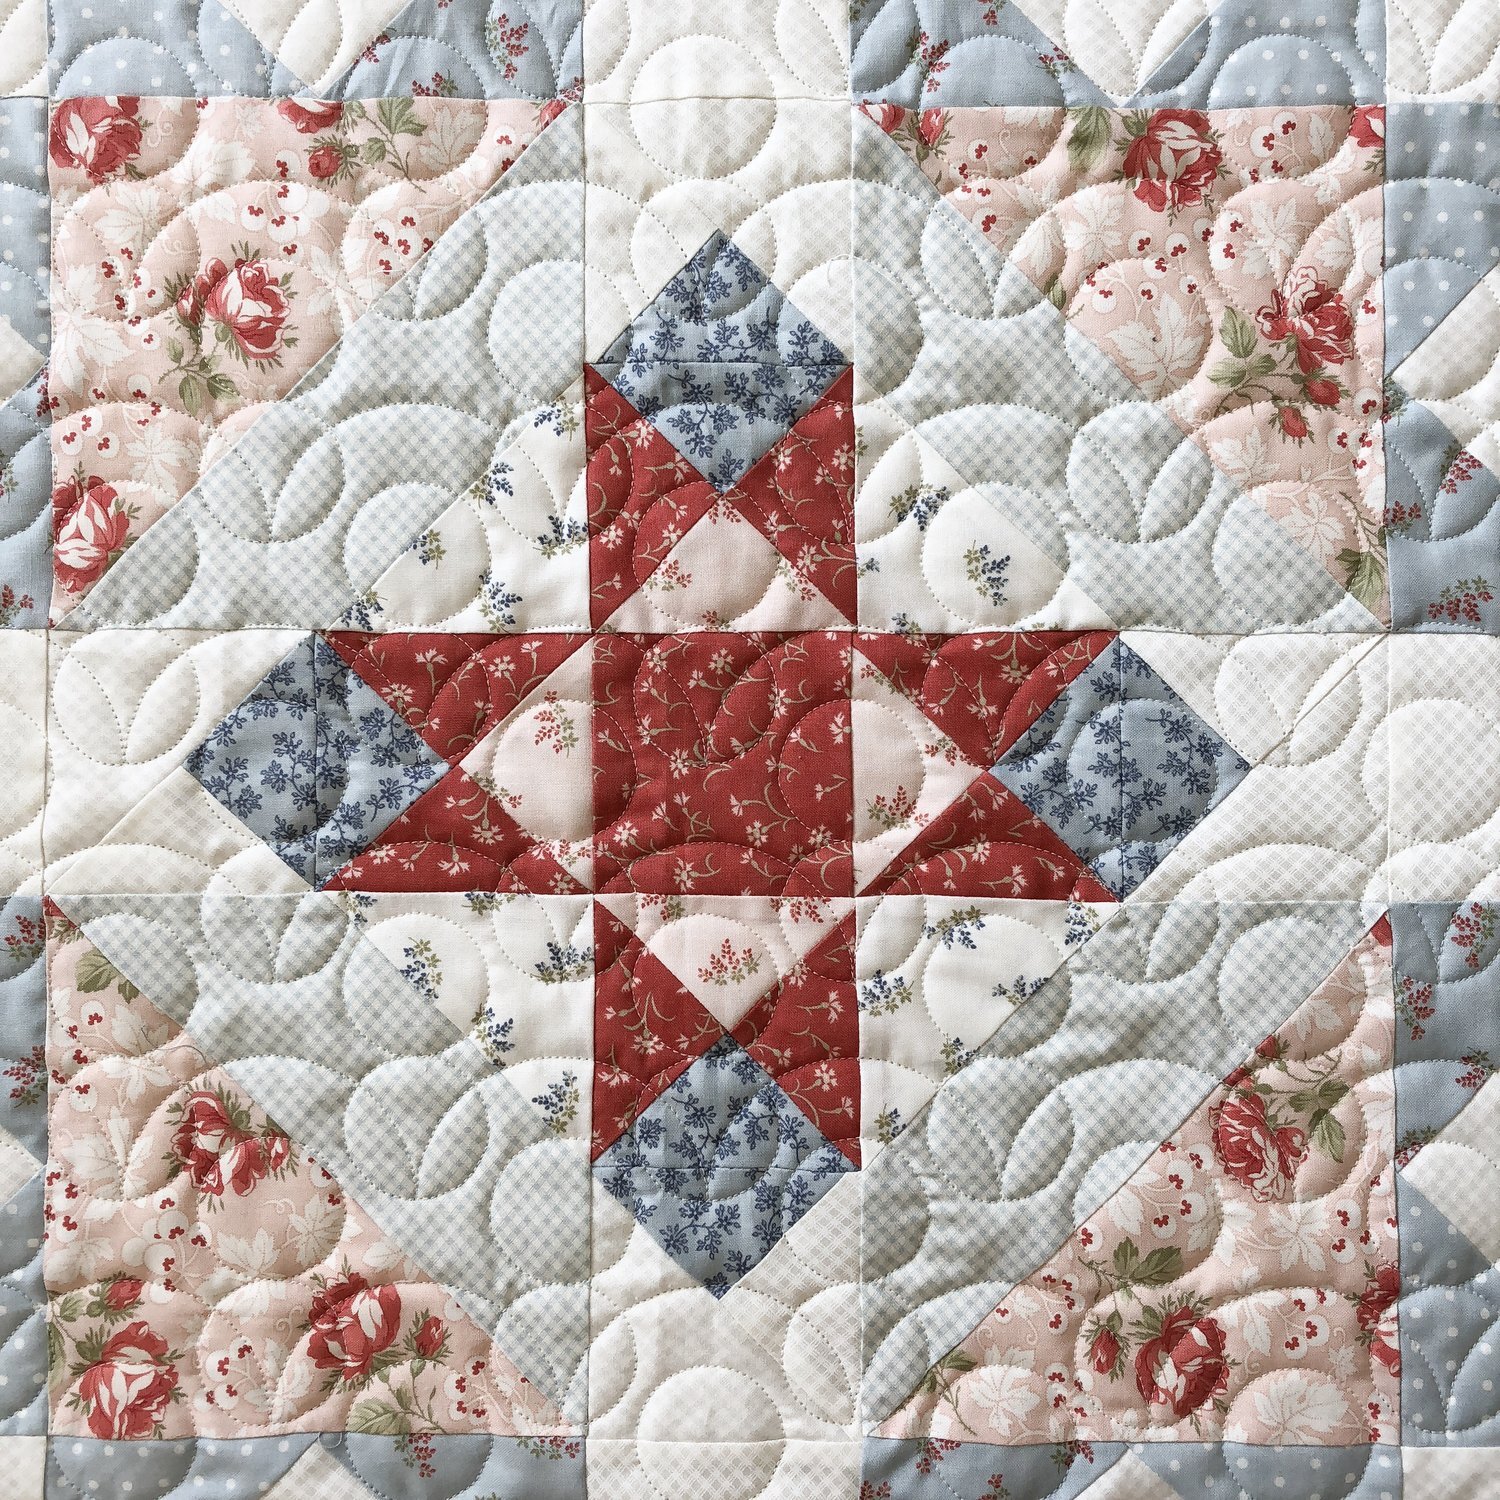
Here is Beaded Clam on the minky back of Beth’s quilt. Love this texture!!

There are many more to choose from, go to: https://www.quiltingit.com/shop/?category=Digital+Quilting+Designs

I’m also offering $15 off, my Circle2™, machine quilting ruler sets...which is in addition to the sale I’m already having. Go to: https://www.quiltingit.com/shop/?category=Rulers
So it’s like you’re getting free shipping in the US and $15 off shipping for those of you who are International. Use code at checkout: “HOLIDAY”. This also lasts until Saturday November 10 at midnight (EST), while supplies last. This is the best sale I’m offering on my rulers, so if you’ve been wanting a set, don’t hesitate. For more info on these machine quilting rulers go to: https://www.quiltingit.com/blog/2018/10/10/introducing-my-circle2-longarm-circle-ruler-set

If you prefer watching a little video about my Circle2™ rulers, check this out!! https://youtu.be/lDijS4EsPLY

This set is everything I’ve ever wanted in a circle ruler set. You’ll get 6 different rulers with 12 different sized circles, circle sizes ranging from 2”-13”. These will be a great investment to add to your quilting rulers!
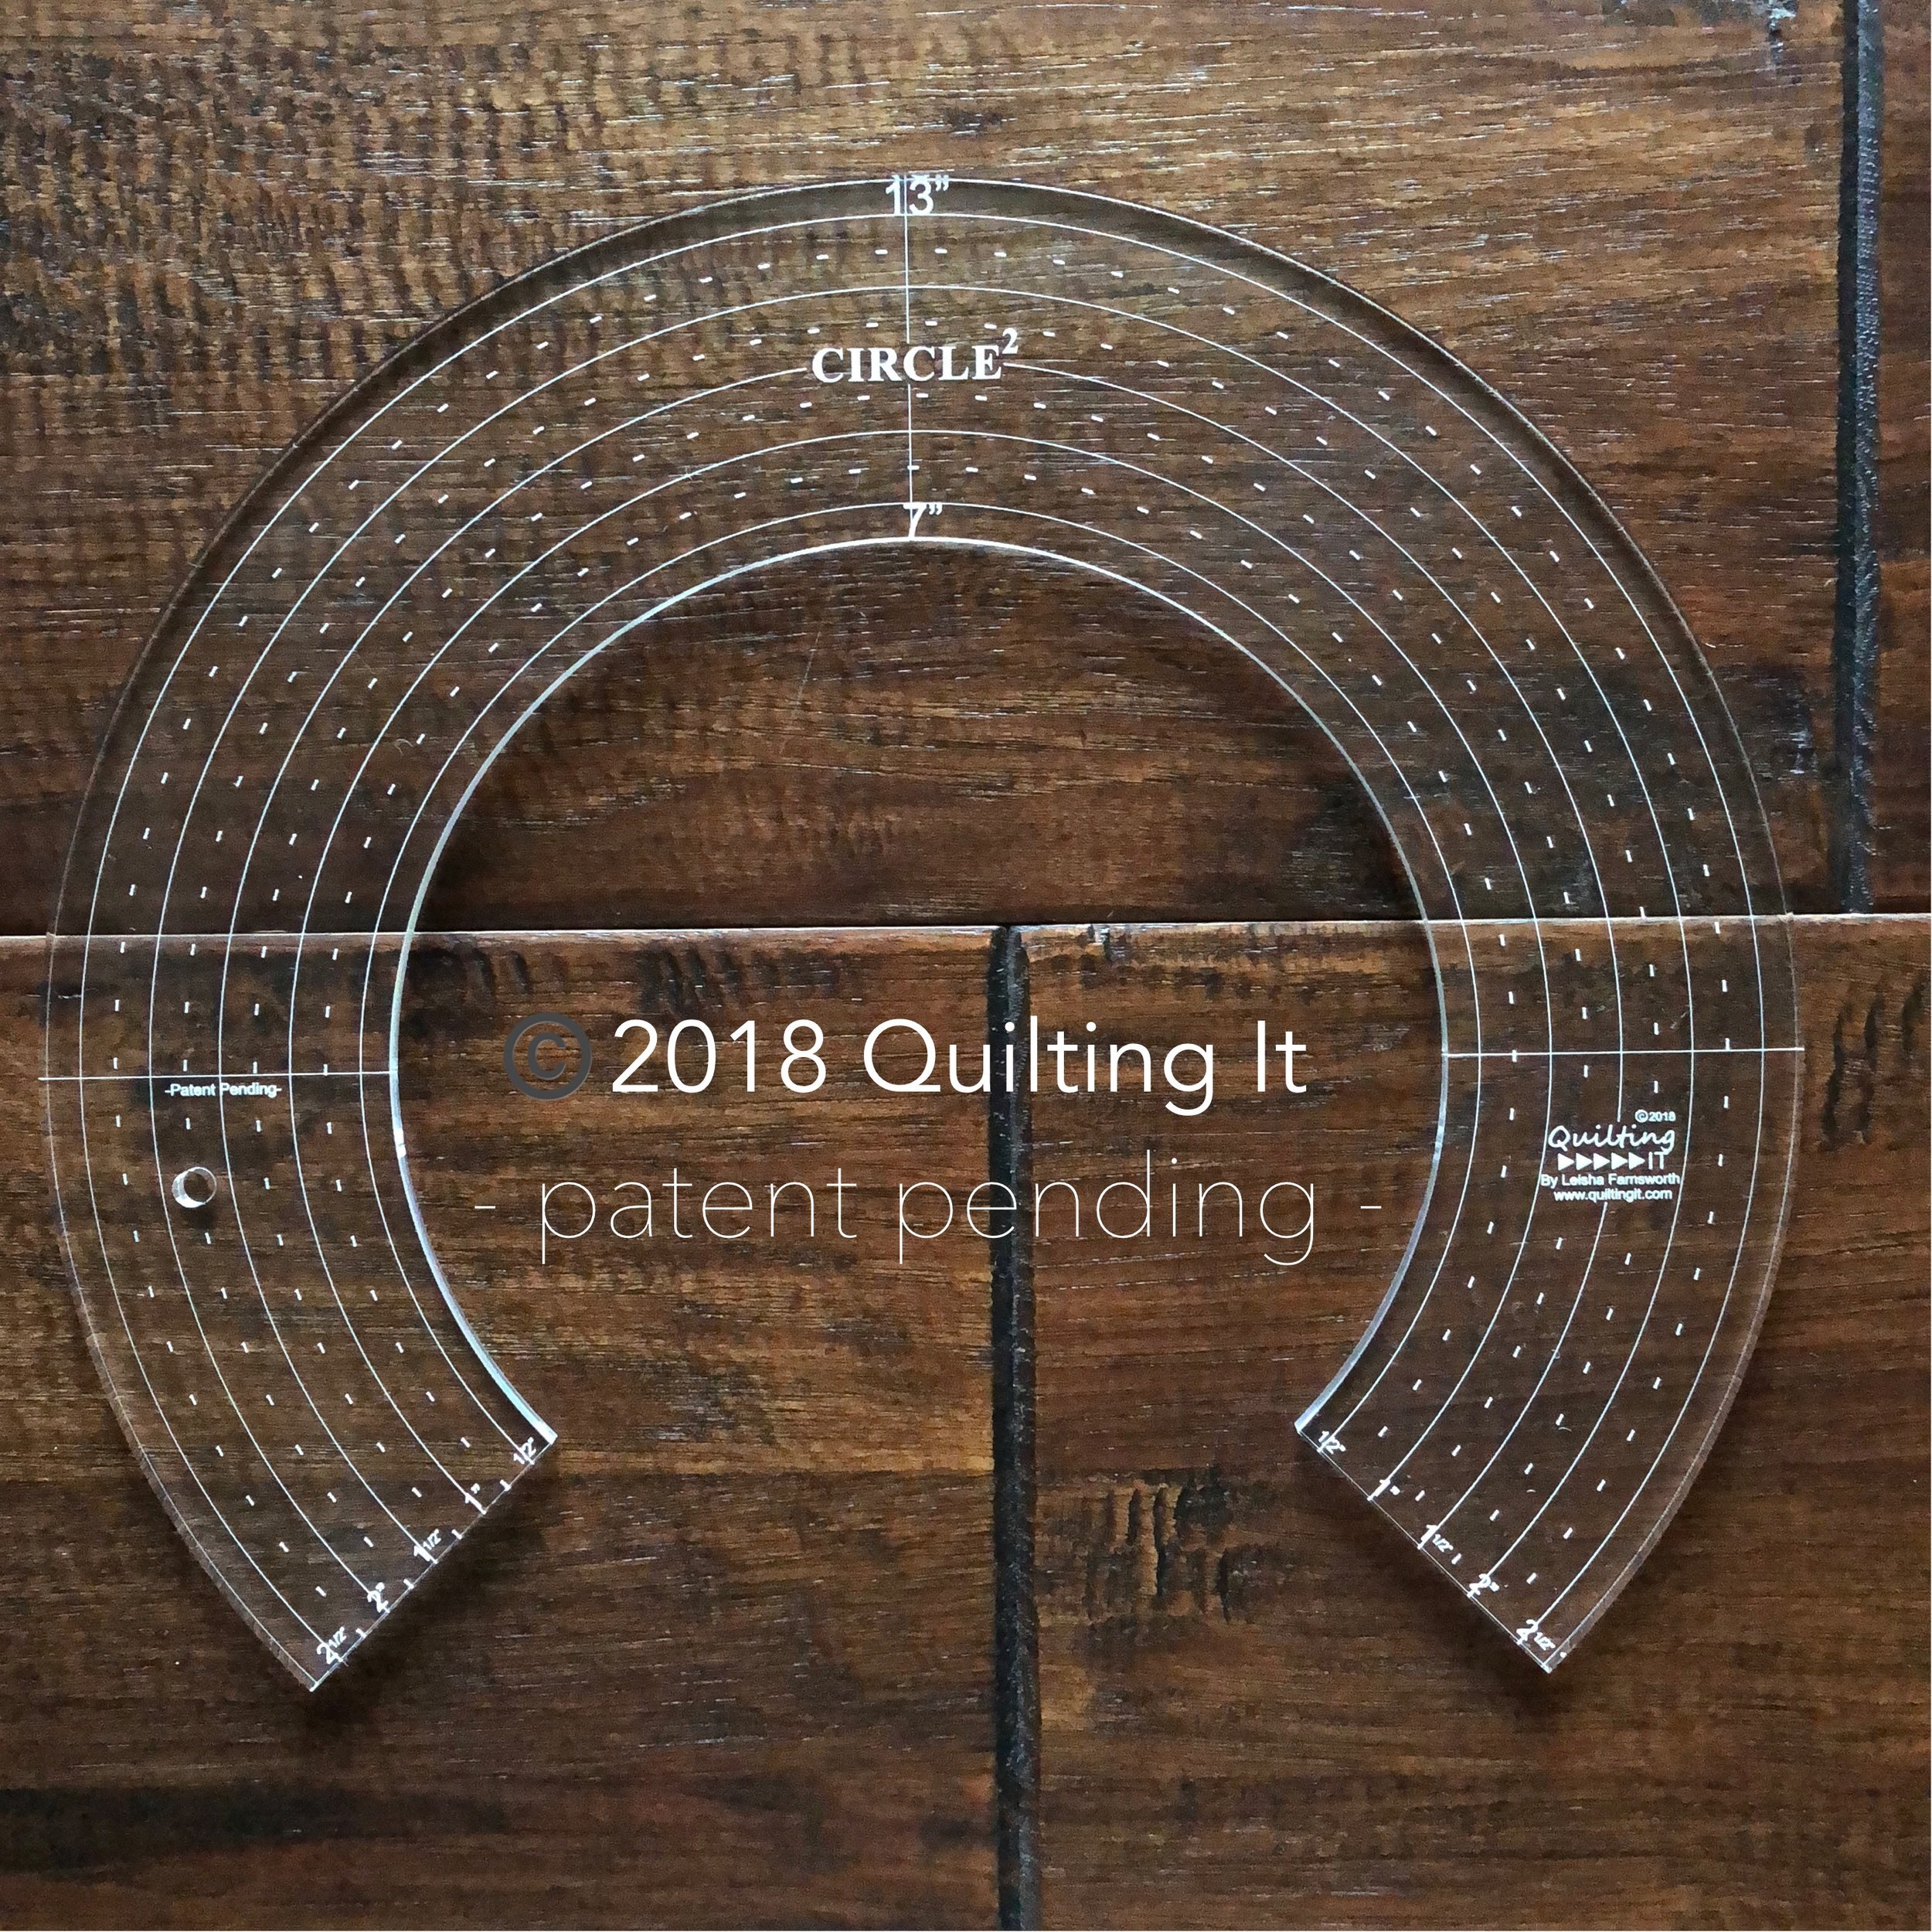
The Circle2™ ruler sets come in either clear or green high quality acrylic, as pictured.

Above is the biggest ruler, the 7”/13”, and below is the smallest at 2”/8”. The measurements indicate which size of circle you’ll get. And yes, if you were to use the 2”/8” ruler to get a 2” circle, your circle will actually measure 2”. That’s what is unique about these rulers, correct sized circles.

If you’d like to see more tutorials on how I’m using these rulers, head on over to my YouTube channel https://www.youtube.com/user/QuiltingIt more tutorials will be coming all the time, so hit subscribe while you’re there and you won’t miss any.
Thank you so much for all the amazing feedback, that I’ve gotten on my rulers and digital designs. I’m so grateful I get to do what I love, and share it with you!!
-Leisha
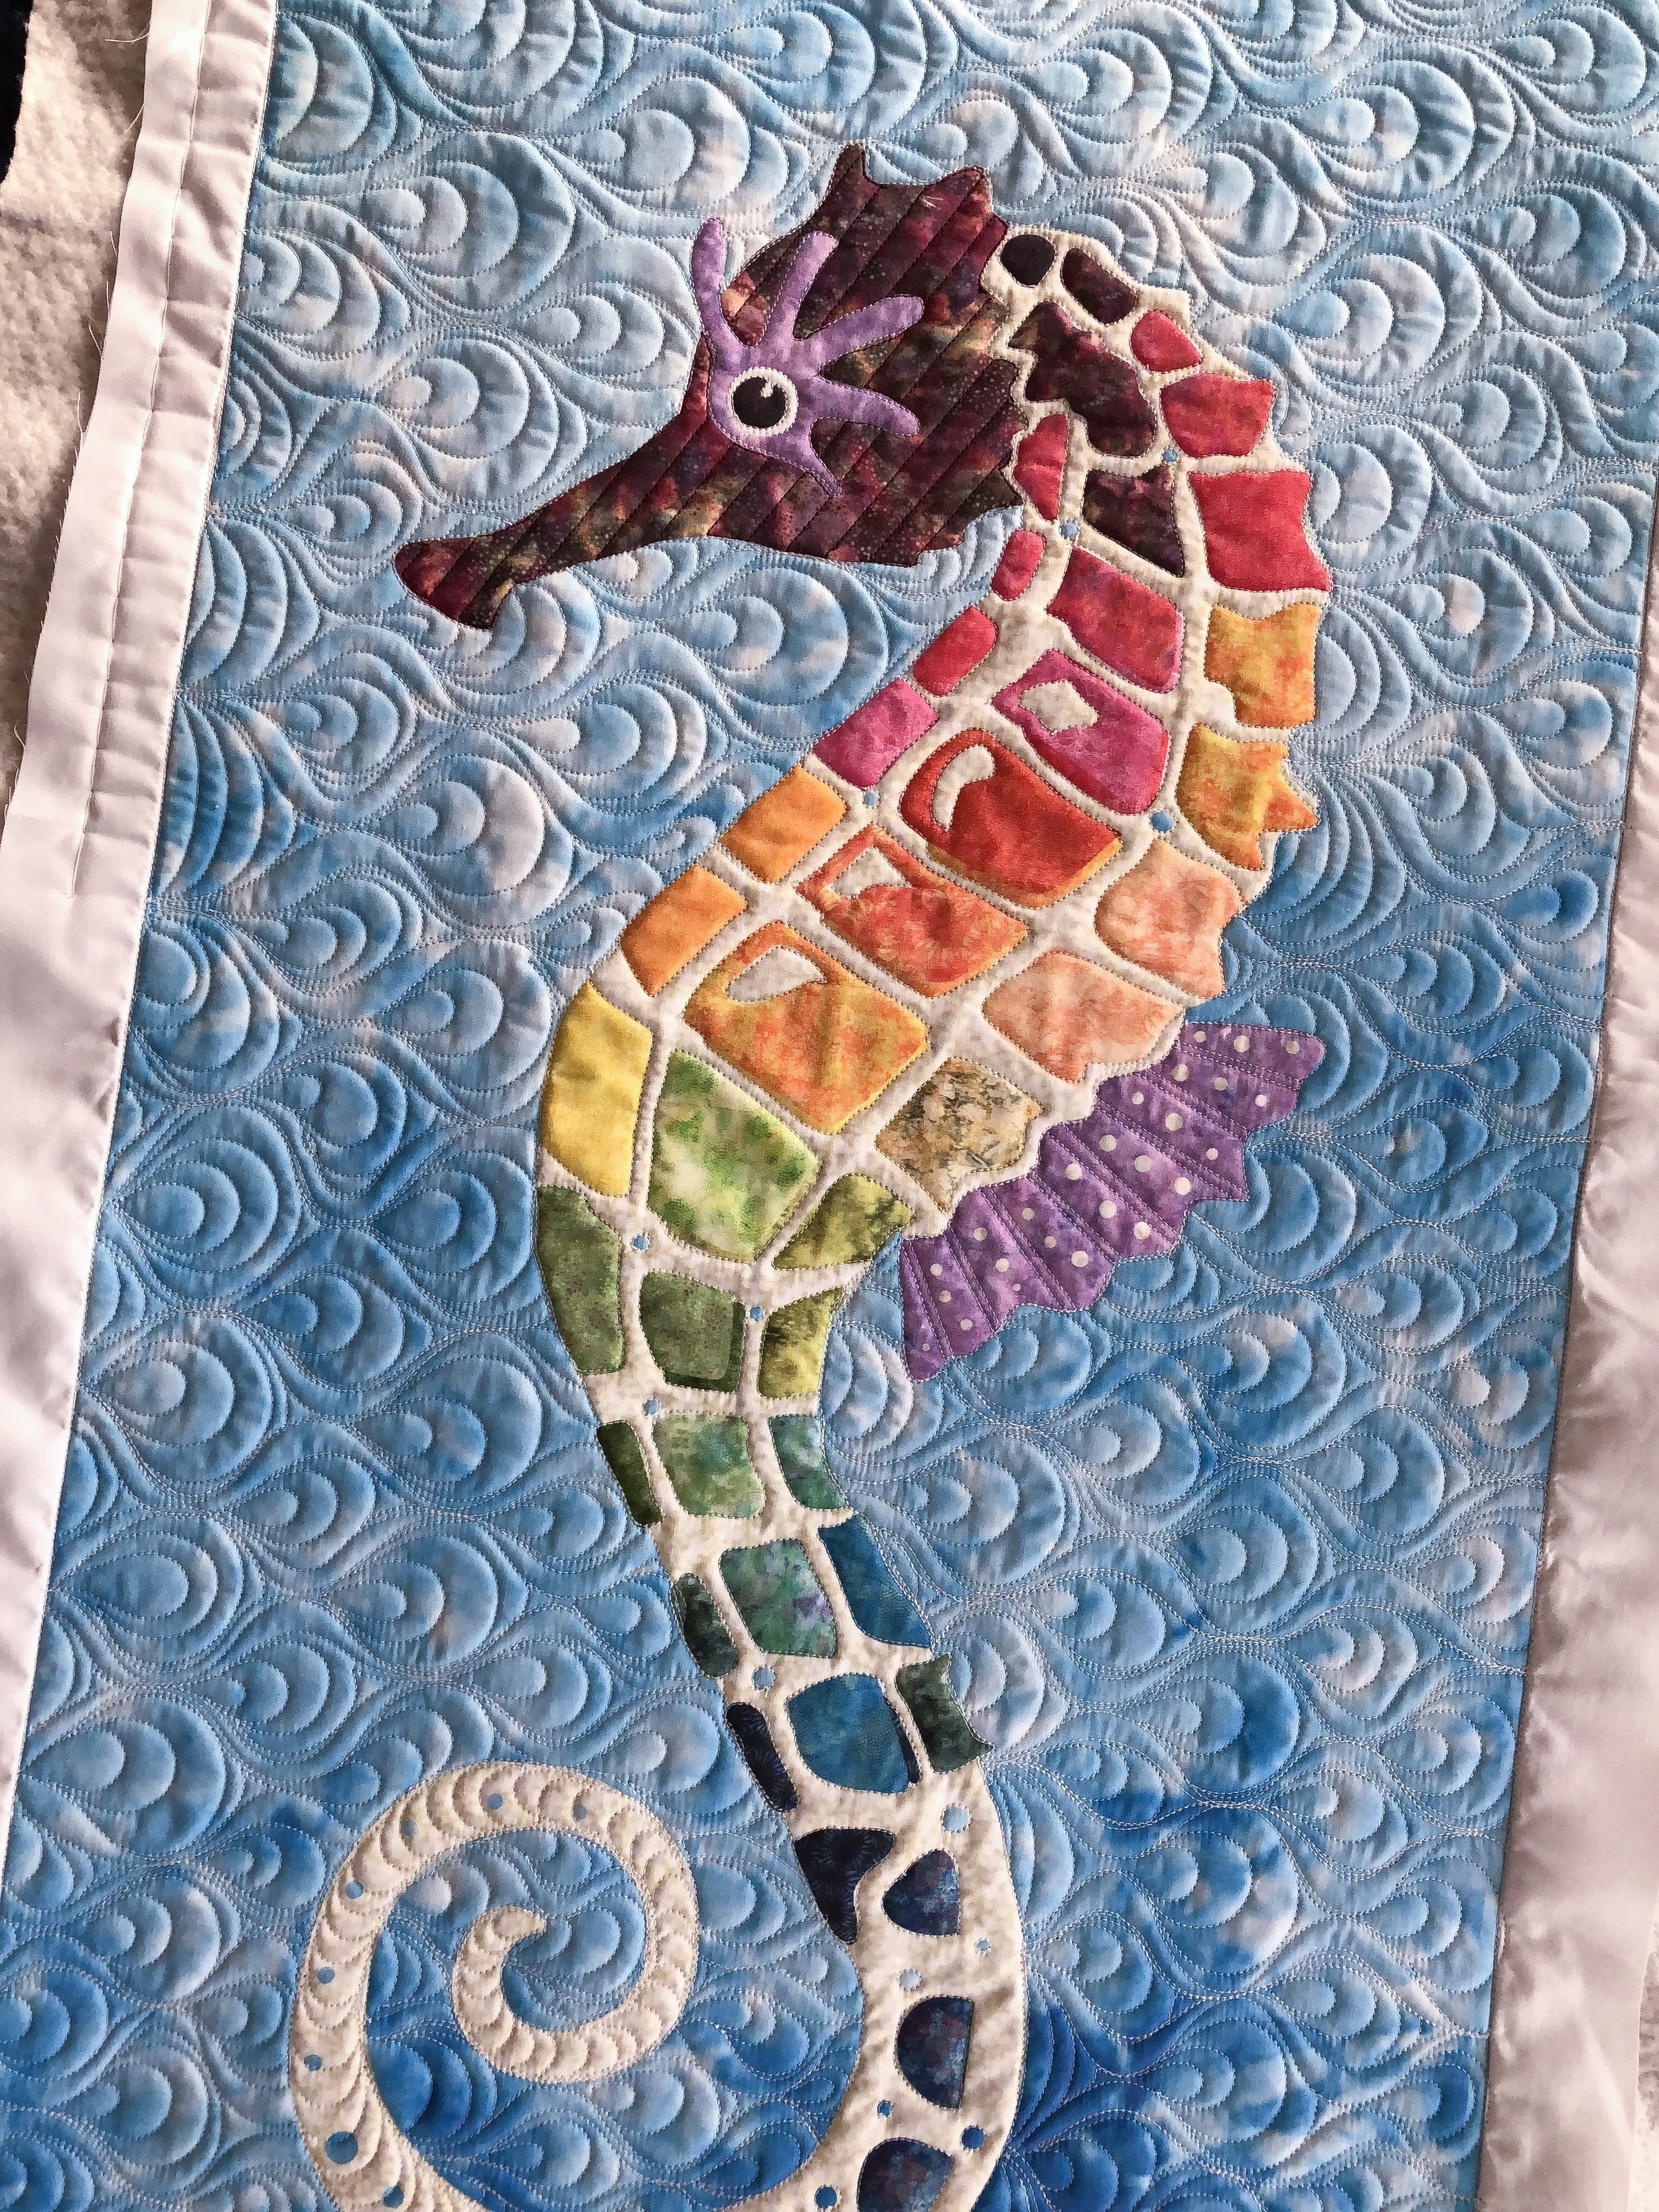
Laser Cut Quilts - Quilt Market release!
If you’ve been following along on my blog or social media, you may have seen, that I had the opportunity to quilt for Laser Cut Quilts for International Quilt Market. They have several new kit releases, and these are my most favorite!!! Lots of pictures...I just want to share all the awesome texture I was able to create on their beautiful quilts. Laser Cut Quilts specialize in laser cut fabrics, with fusible webbing, ready for you to iron down. They take care of all of the cutting for you!! They announced yesterday that they developed their own fusible webbing, called Flexi Fuse. As a quilter, when I quilt appliqué...it’s not always easy. The needle has a hard time going through all the fusible webbing, especially when there are multiple layers. Flexi Fuse was soooo easy to quilt through. Go to their website for more information: https://lasercutquilts.com/
Meet Sylvester Seahorse! Isn’t he cute!!!

I outlined all of his spots to make them pronounced, quilted lines on his head, and scallops on his tail...but the real texture I wanted to create, was all in the water. Let me know if you’re interested, and I can do a tutorial on this design. It’s super fun to quilt and is very forgiving.
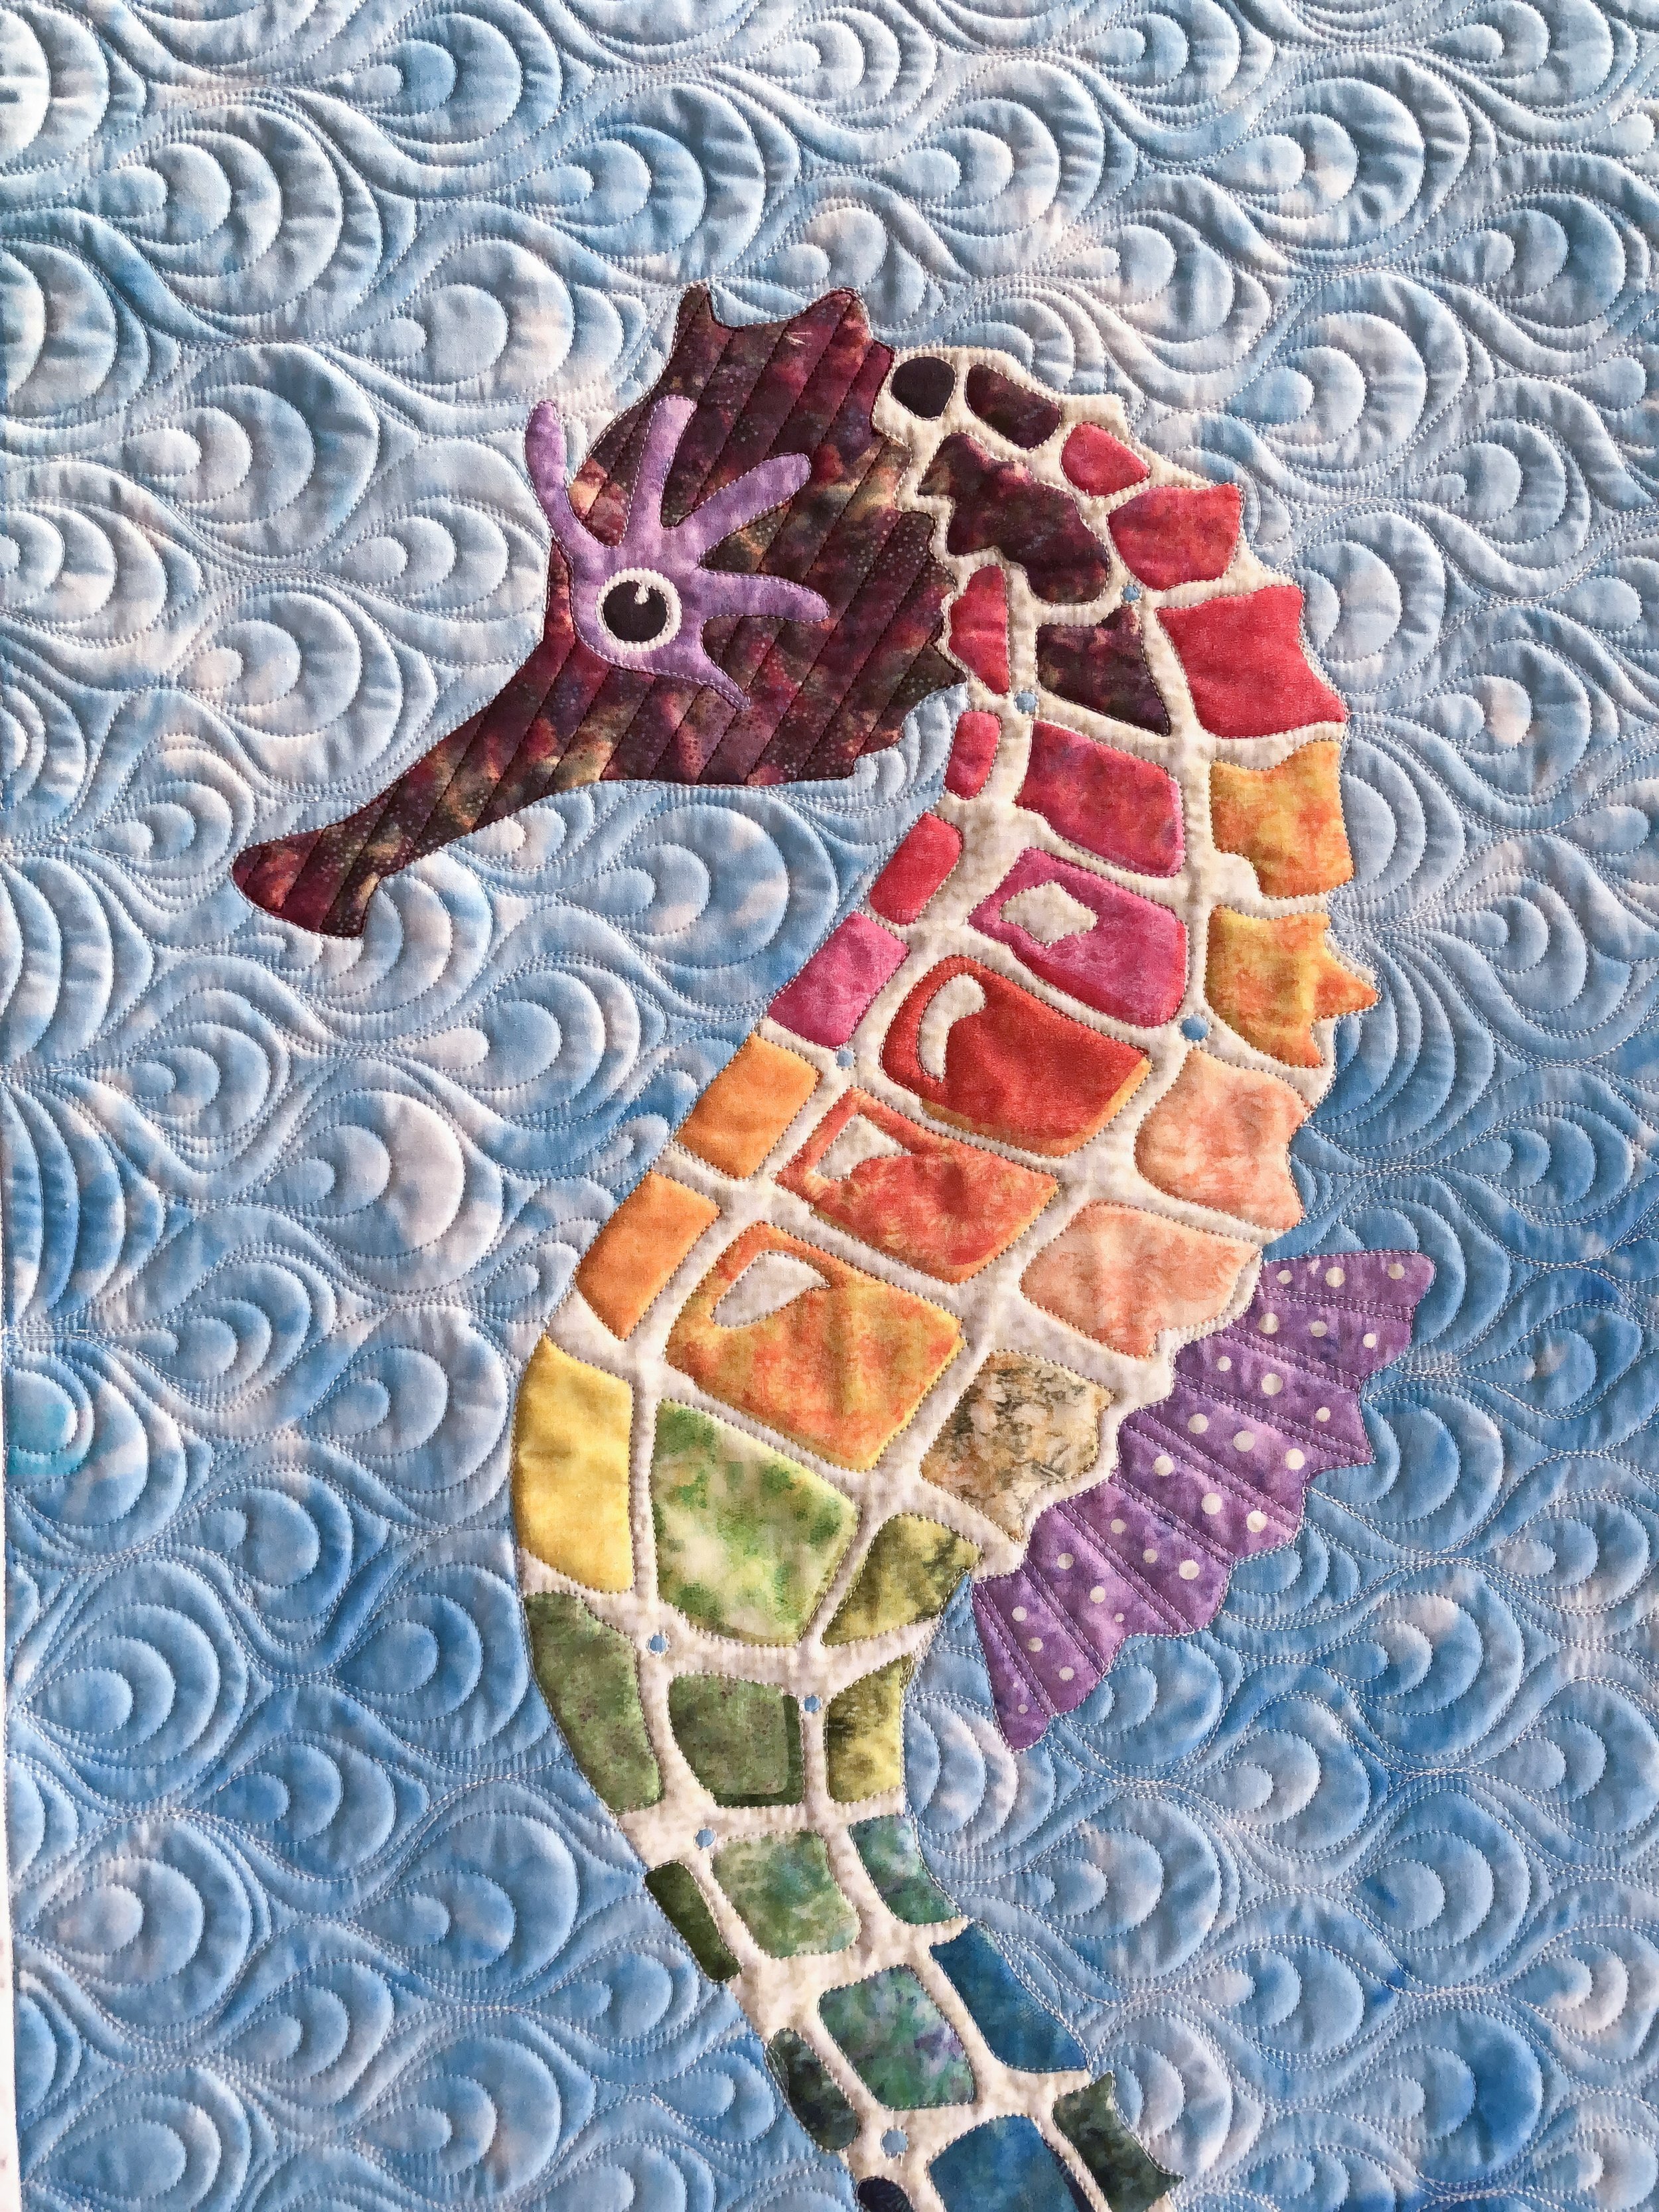
I used a white or cream Perma Core 30 tex A&E thread, and I used 8020 Winline cotton poly blend batting for all of these quilts.
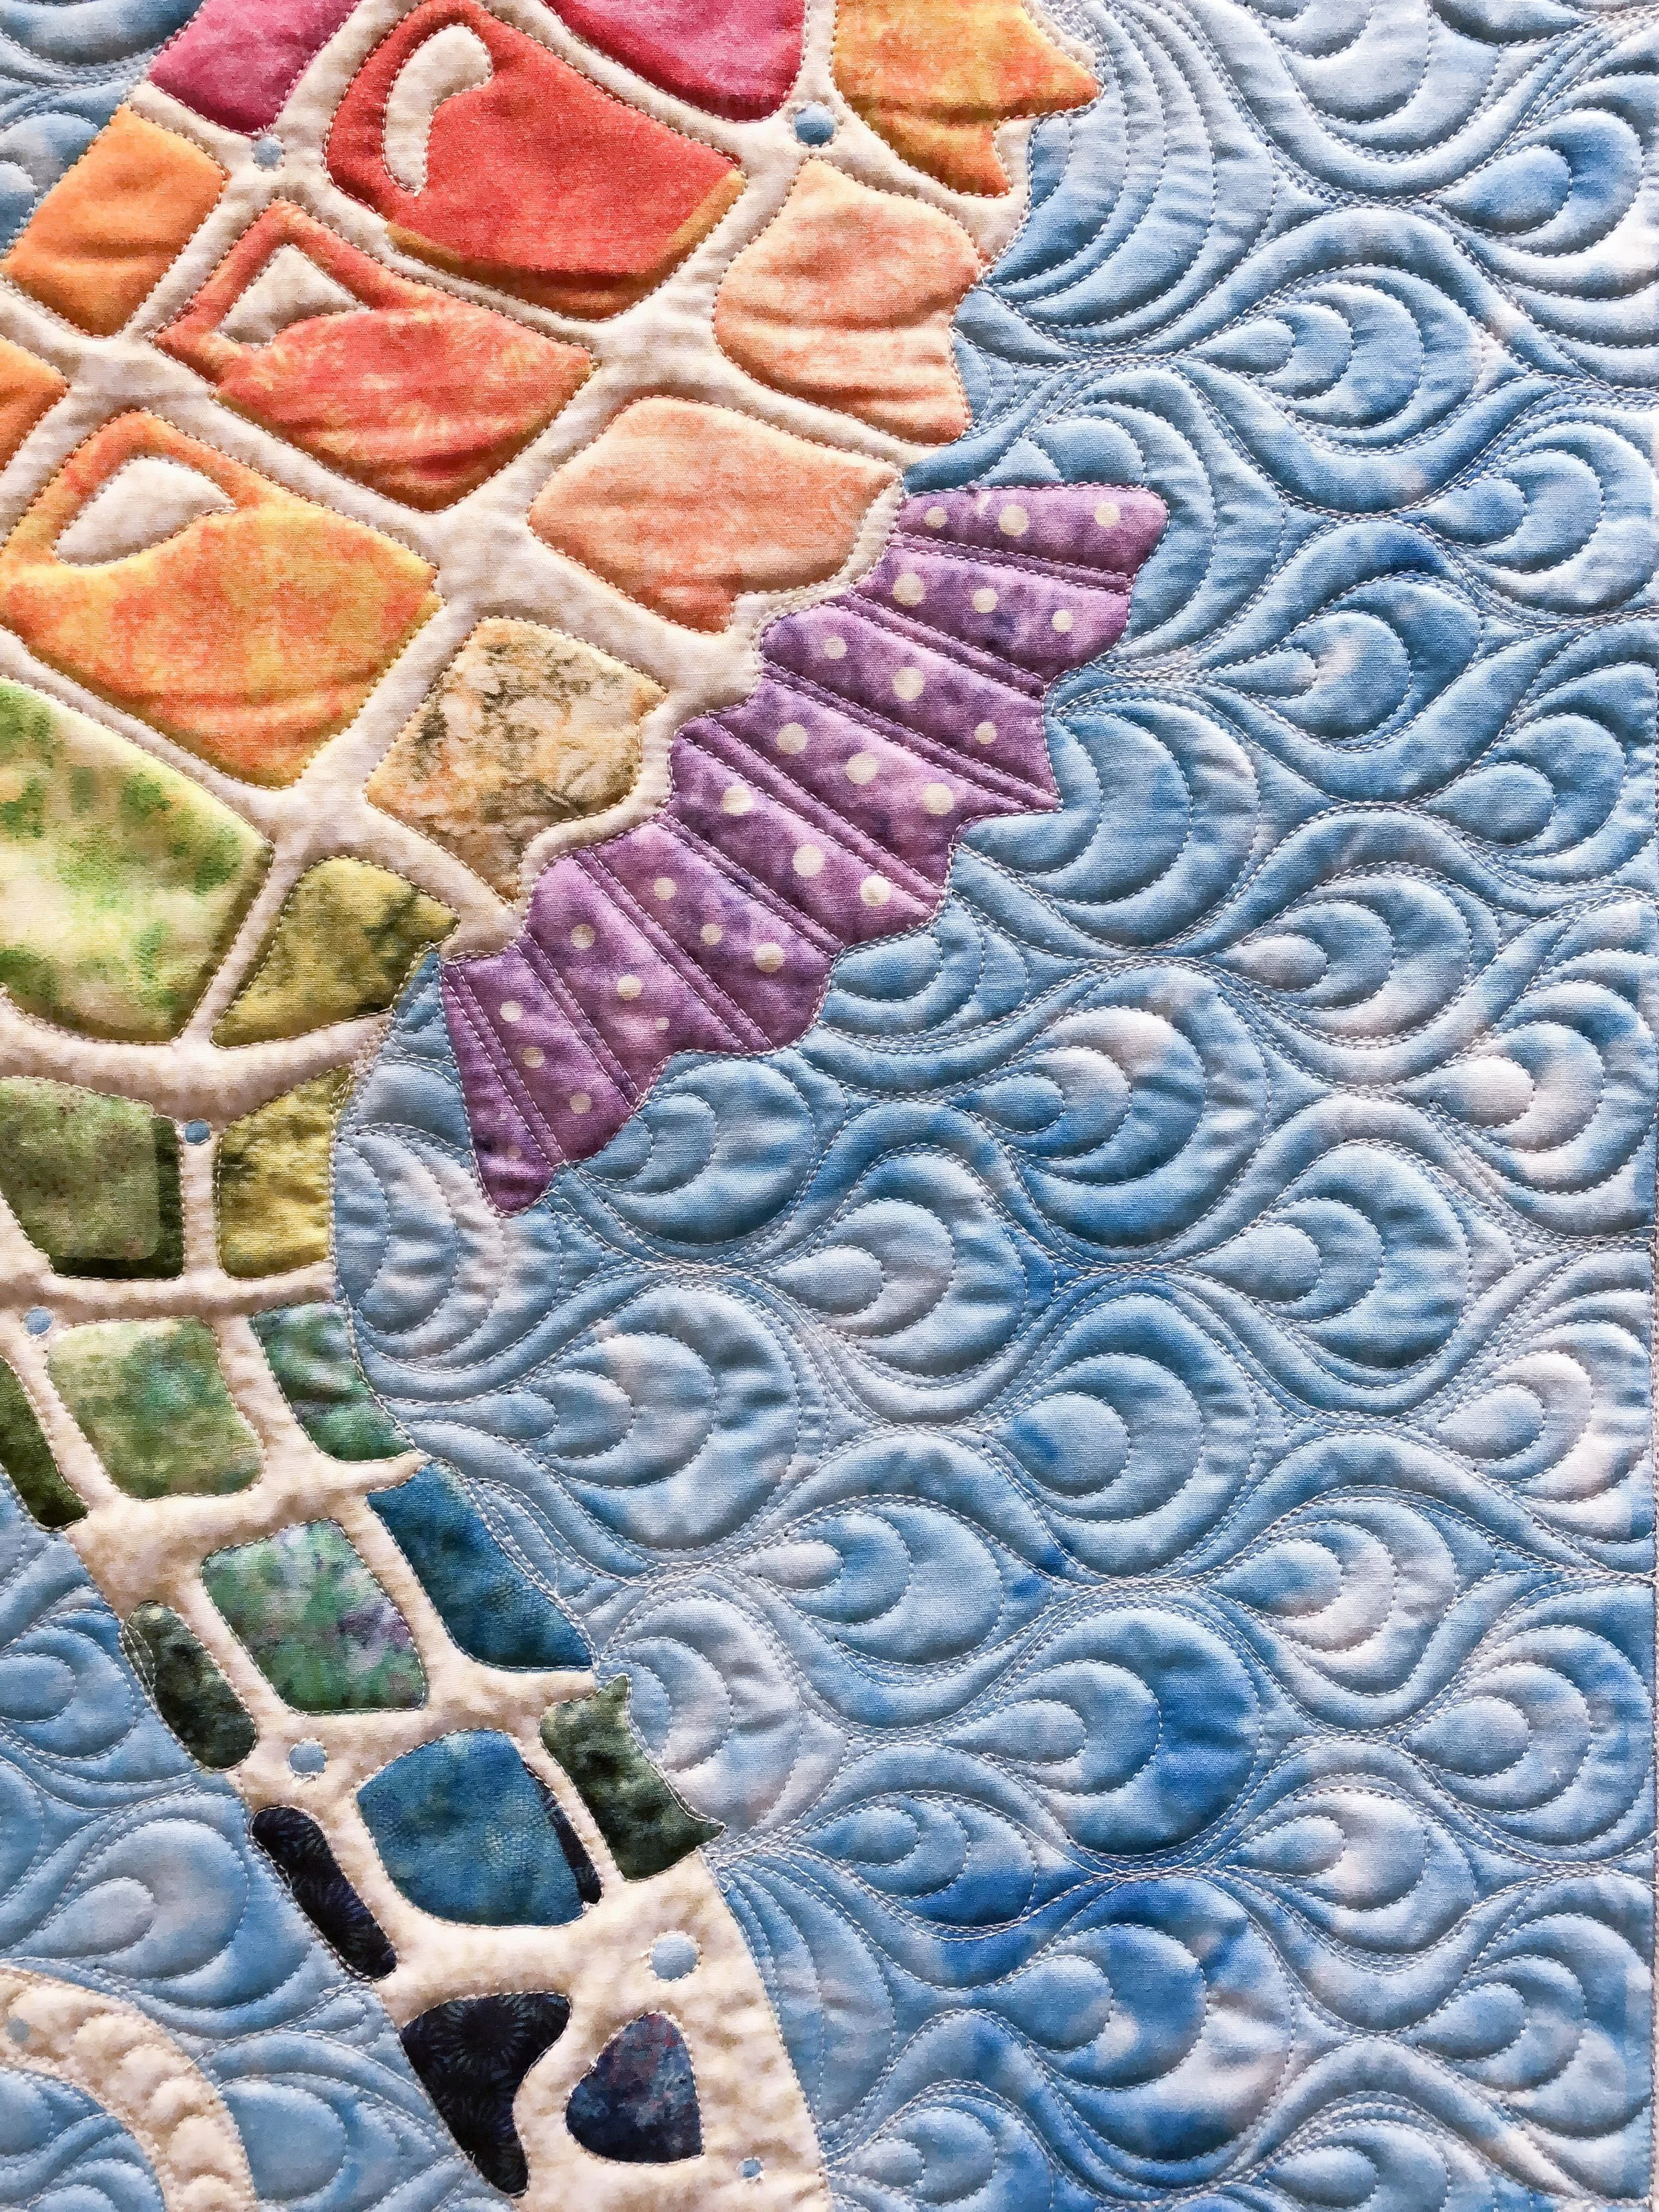
I quilted some simple lines on the fin. Love it!!

I’m not sure the name of this design...we will go with Happiness! The next 3 quilts, happiness...maker...and I will cut you, are all designed by Punkin Patch Craft Designs. Kits will be available through Laser Cut Quilts.
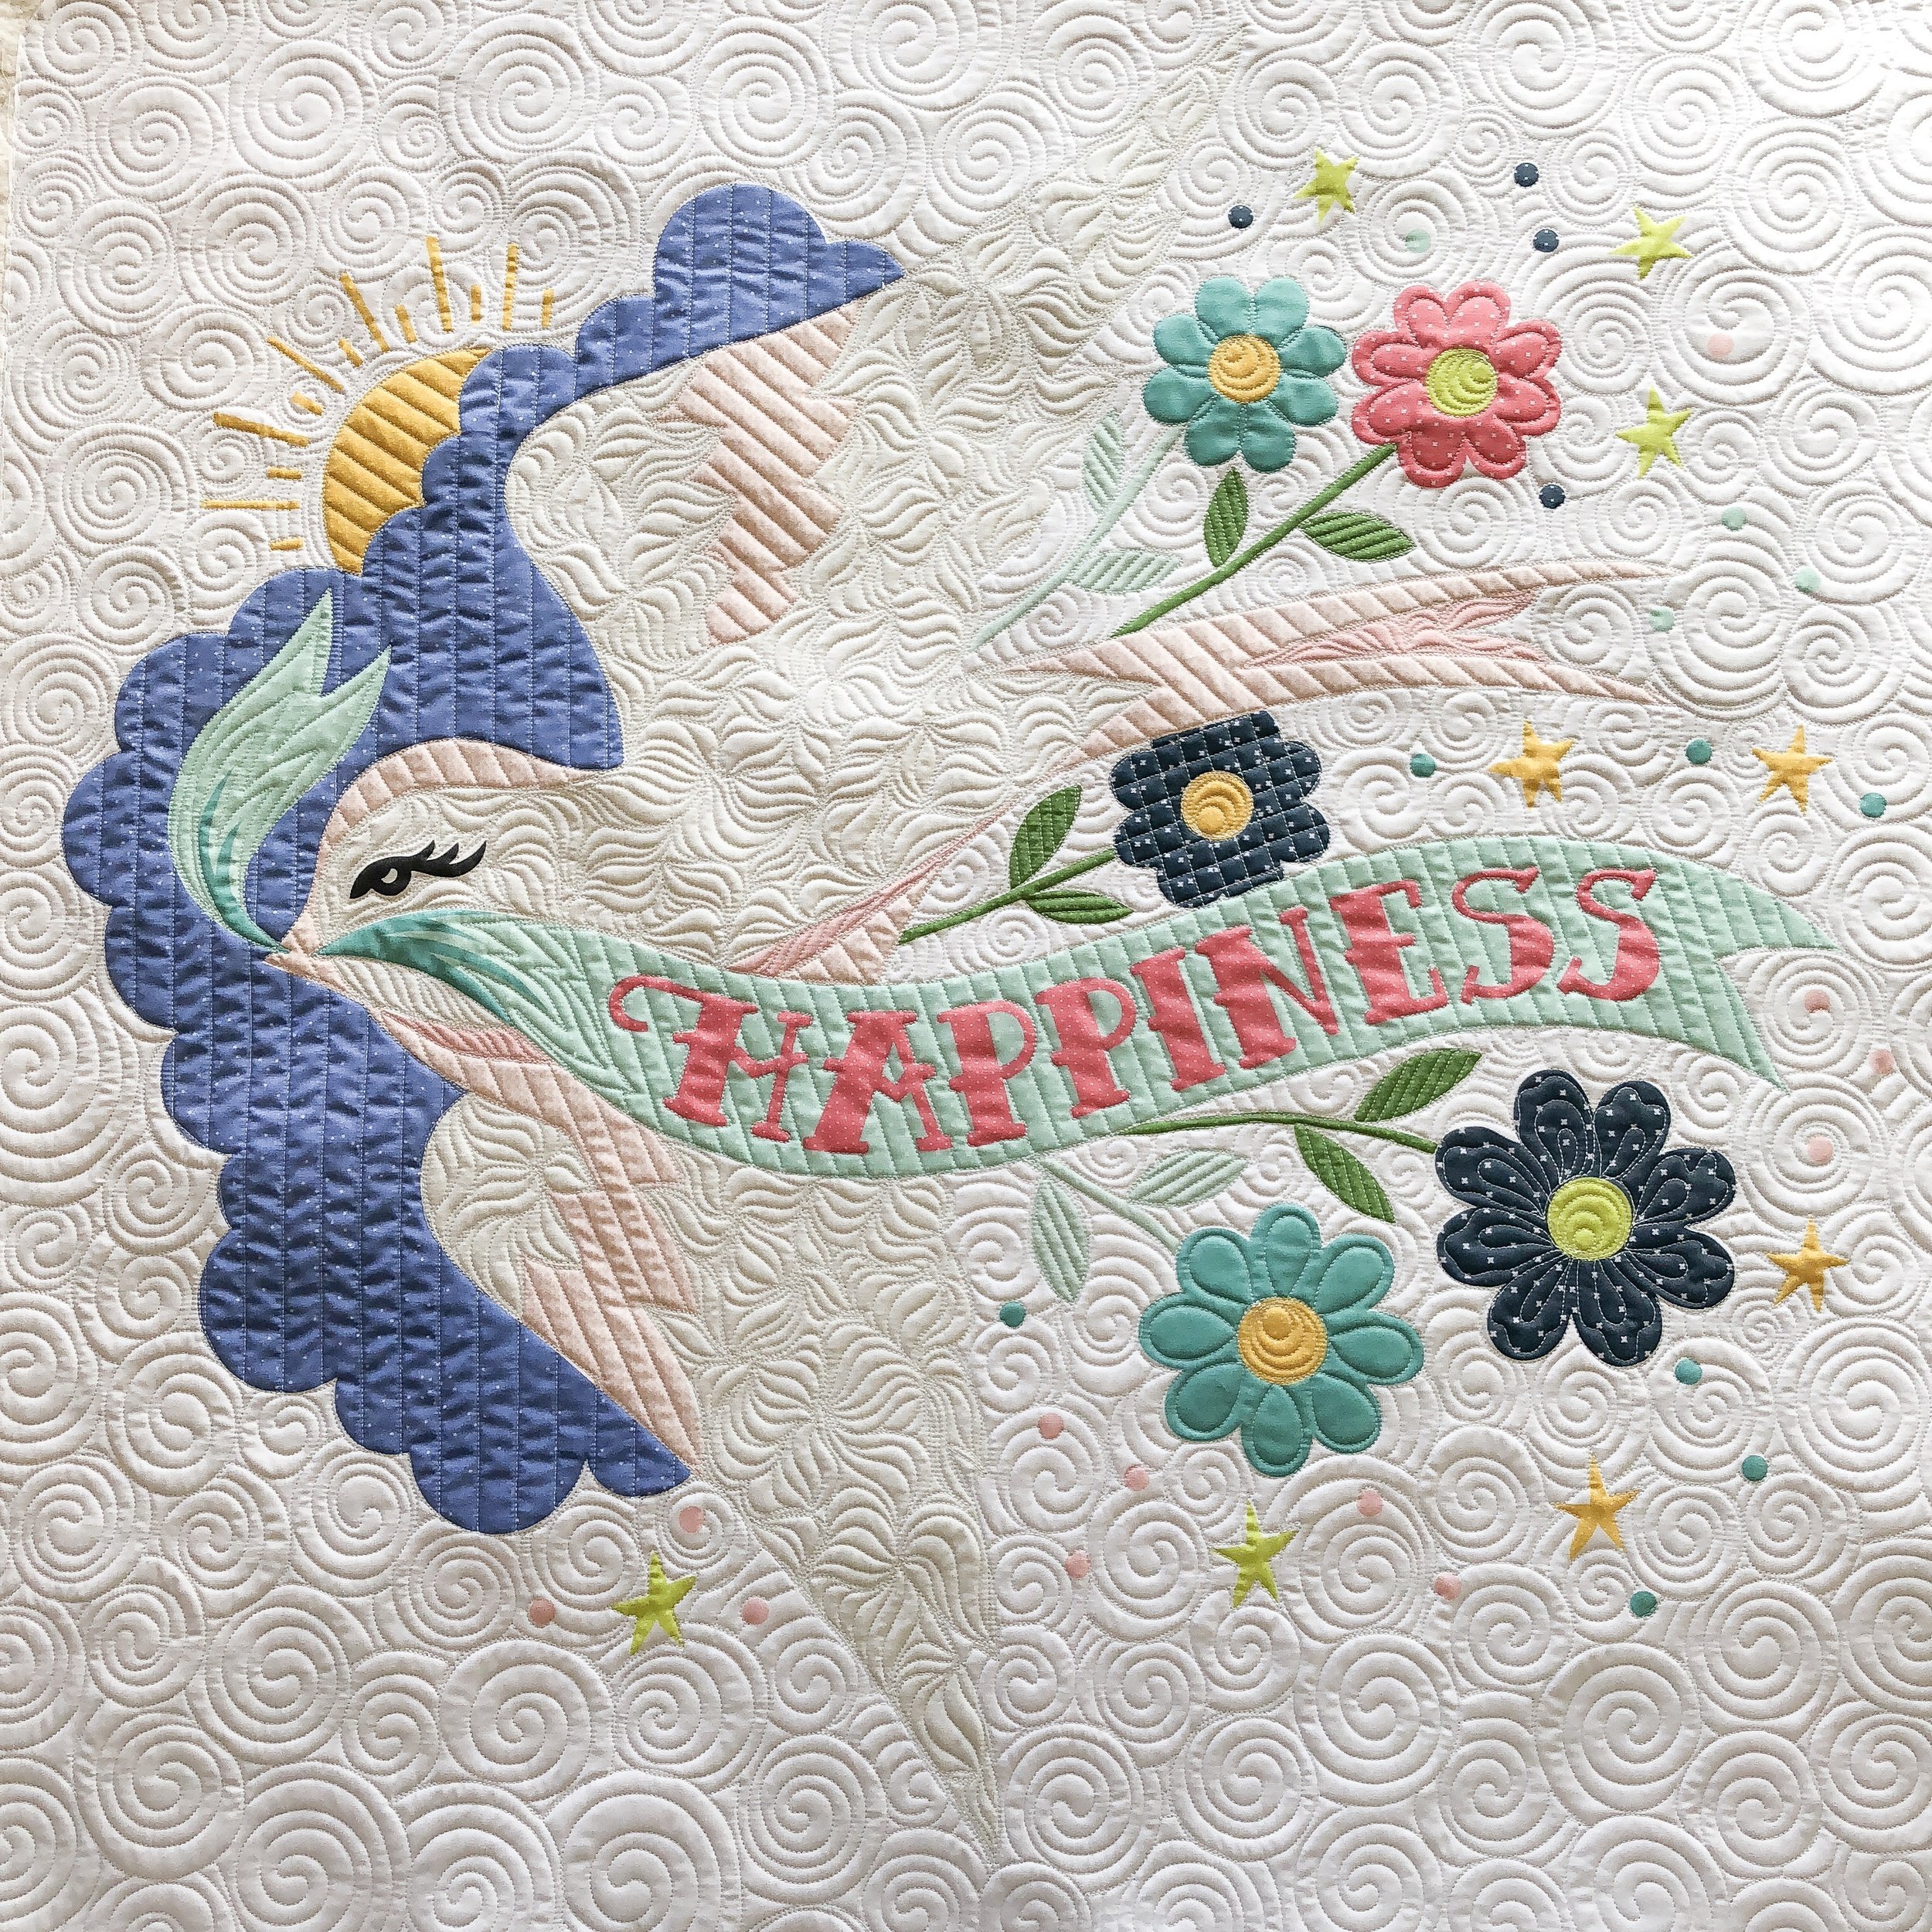
I decided on swirls for the background, because the texture they create is sweet and happy, which goes perfectly with this beautiful bird. I did a grassy/feathery texture in the bird, with some lines to define the shape. Mixing hard and soft quilting designs is fine, I just like to keep the overall design cohesive.
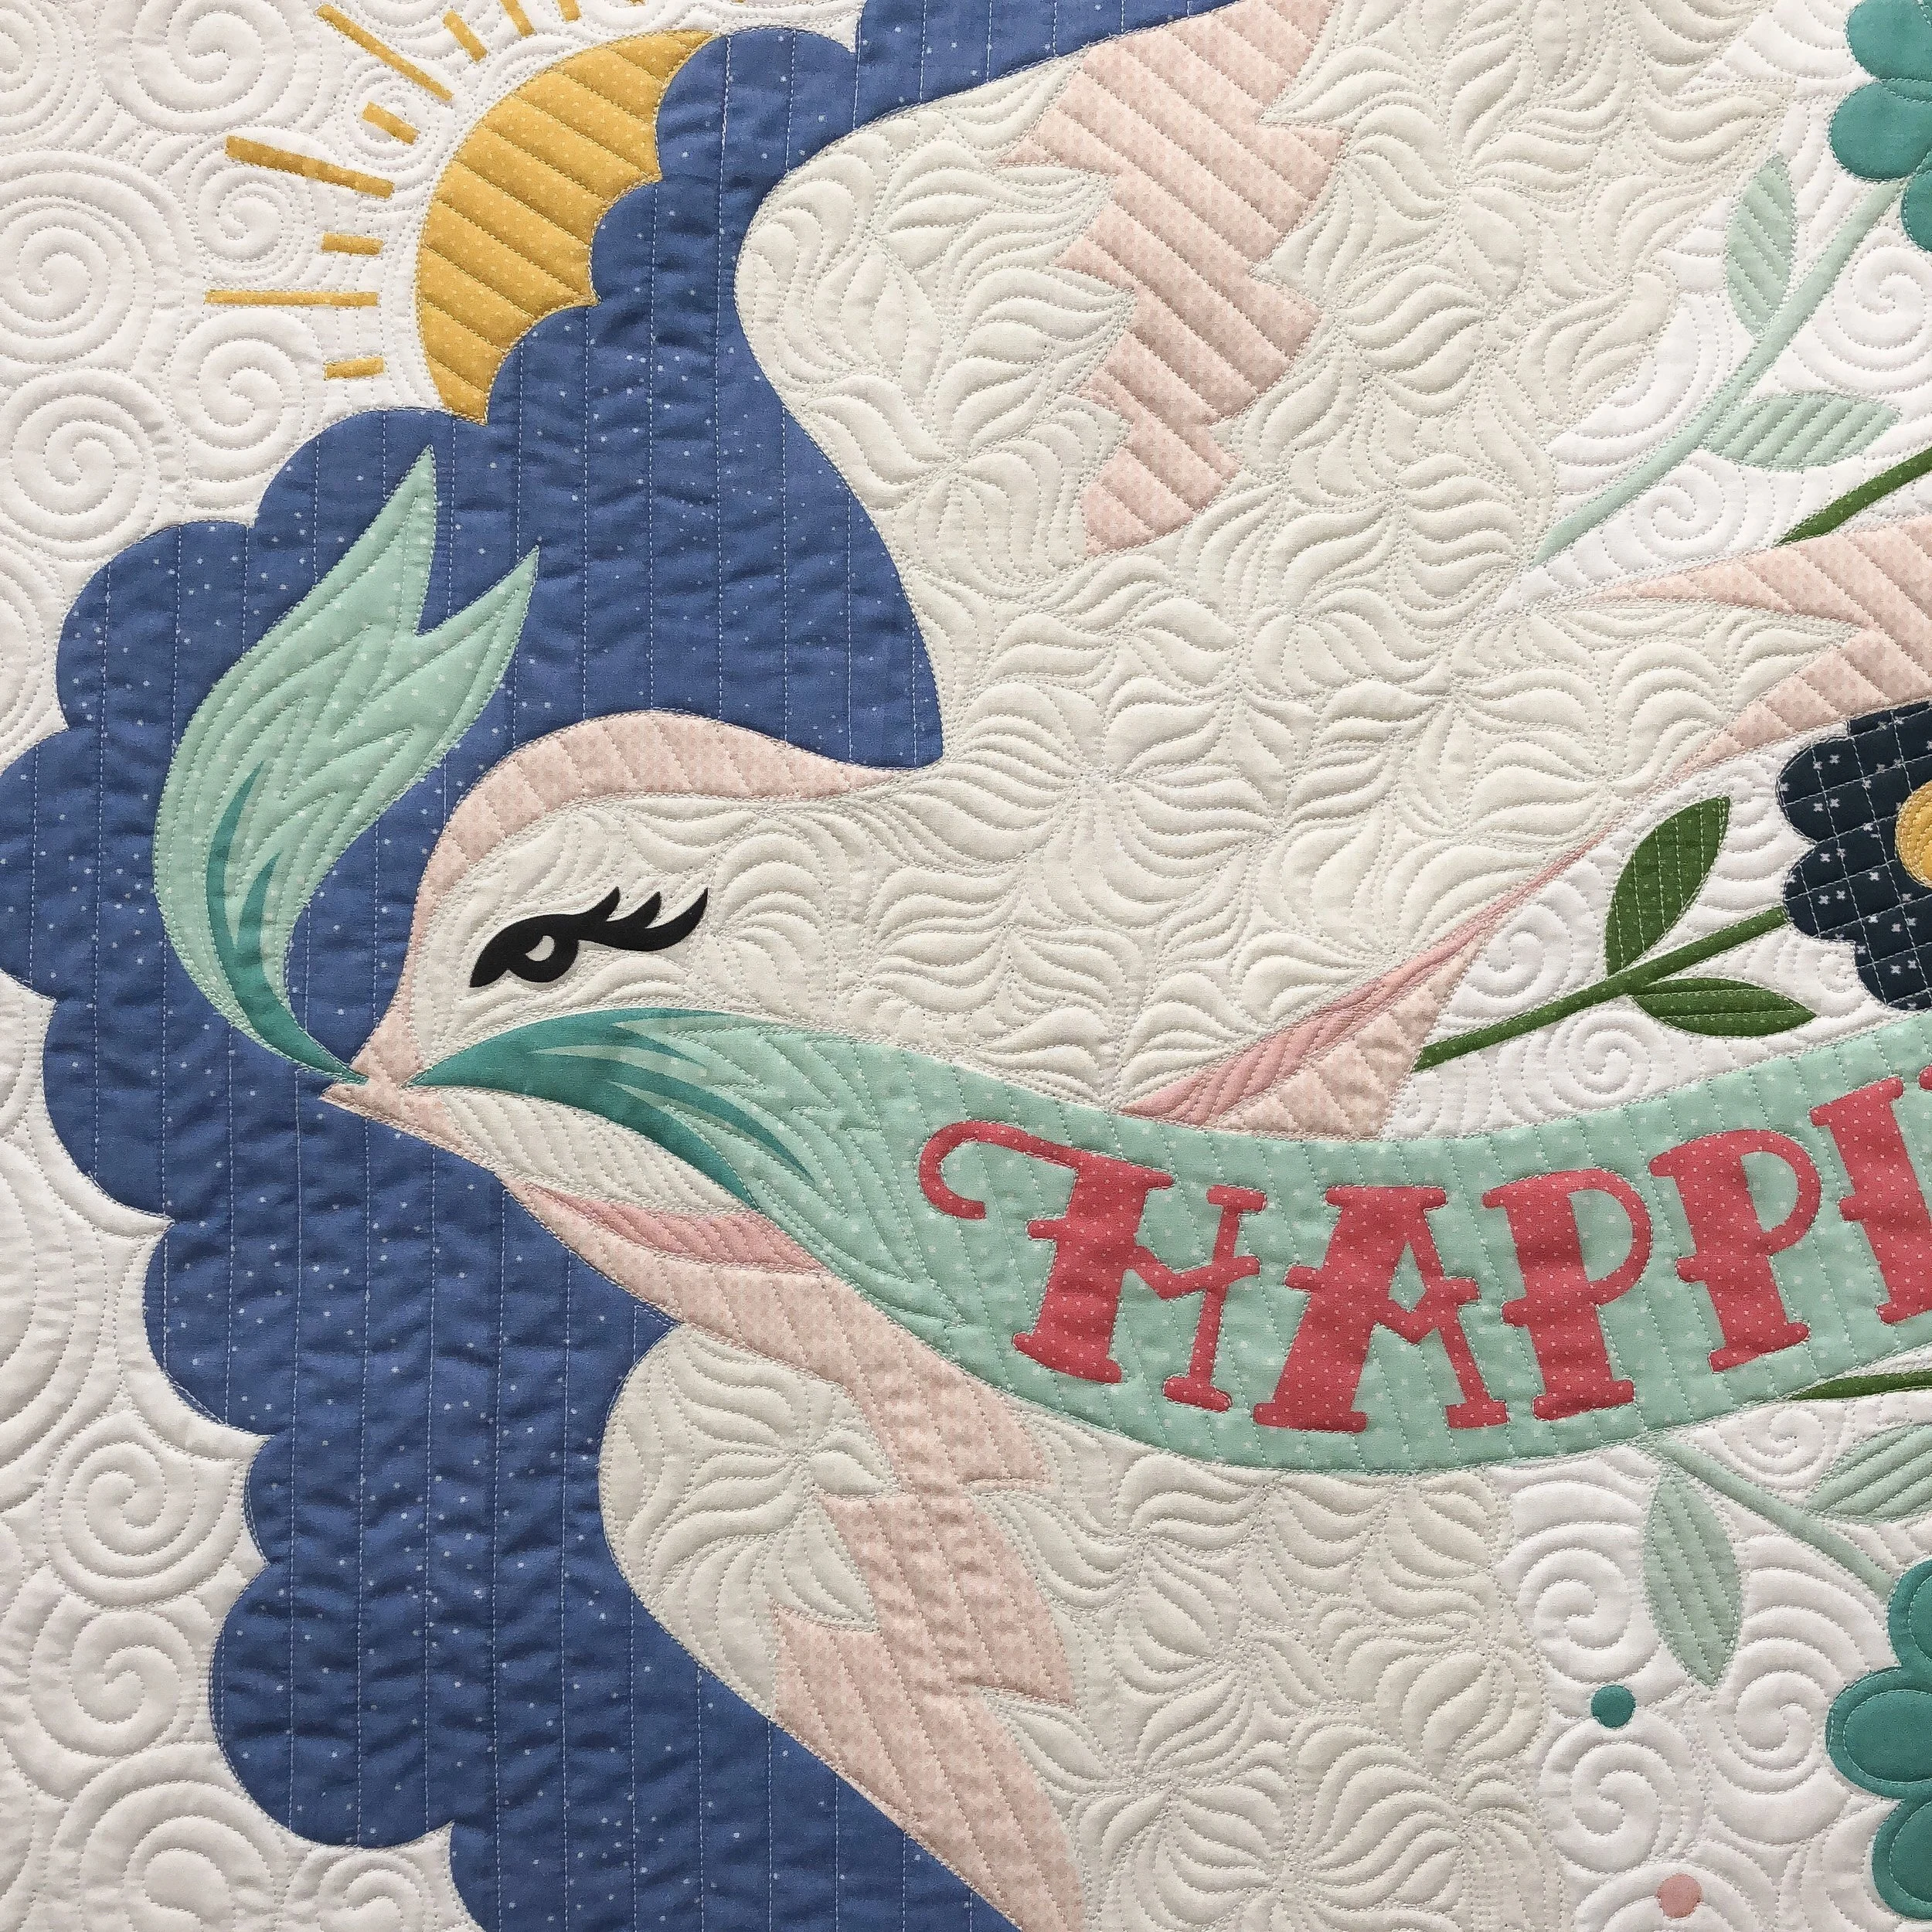
I used white Perma Core A&E 30 Tex thread, for this entire quilt.
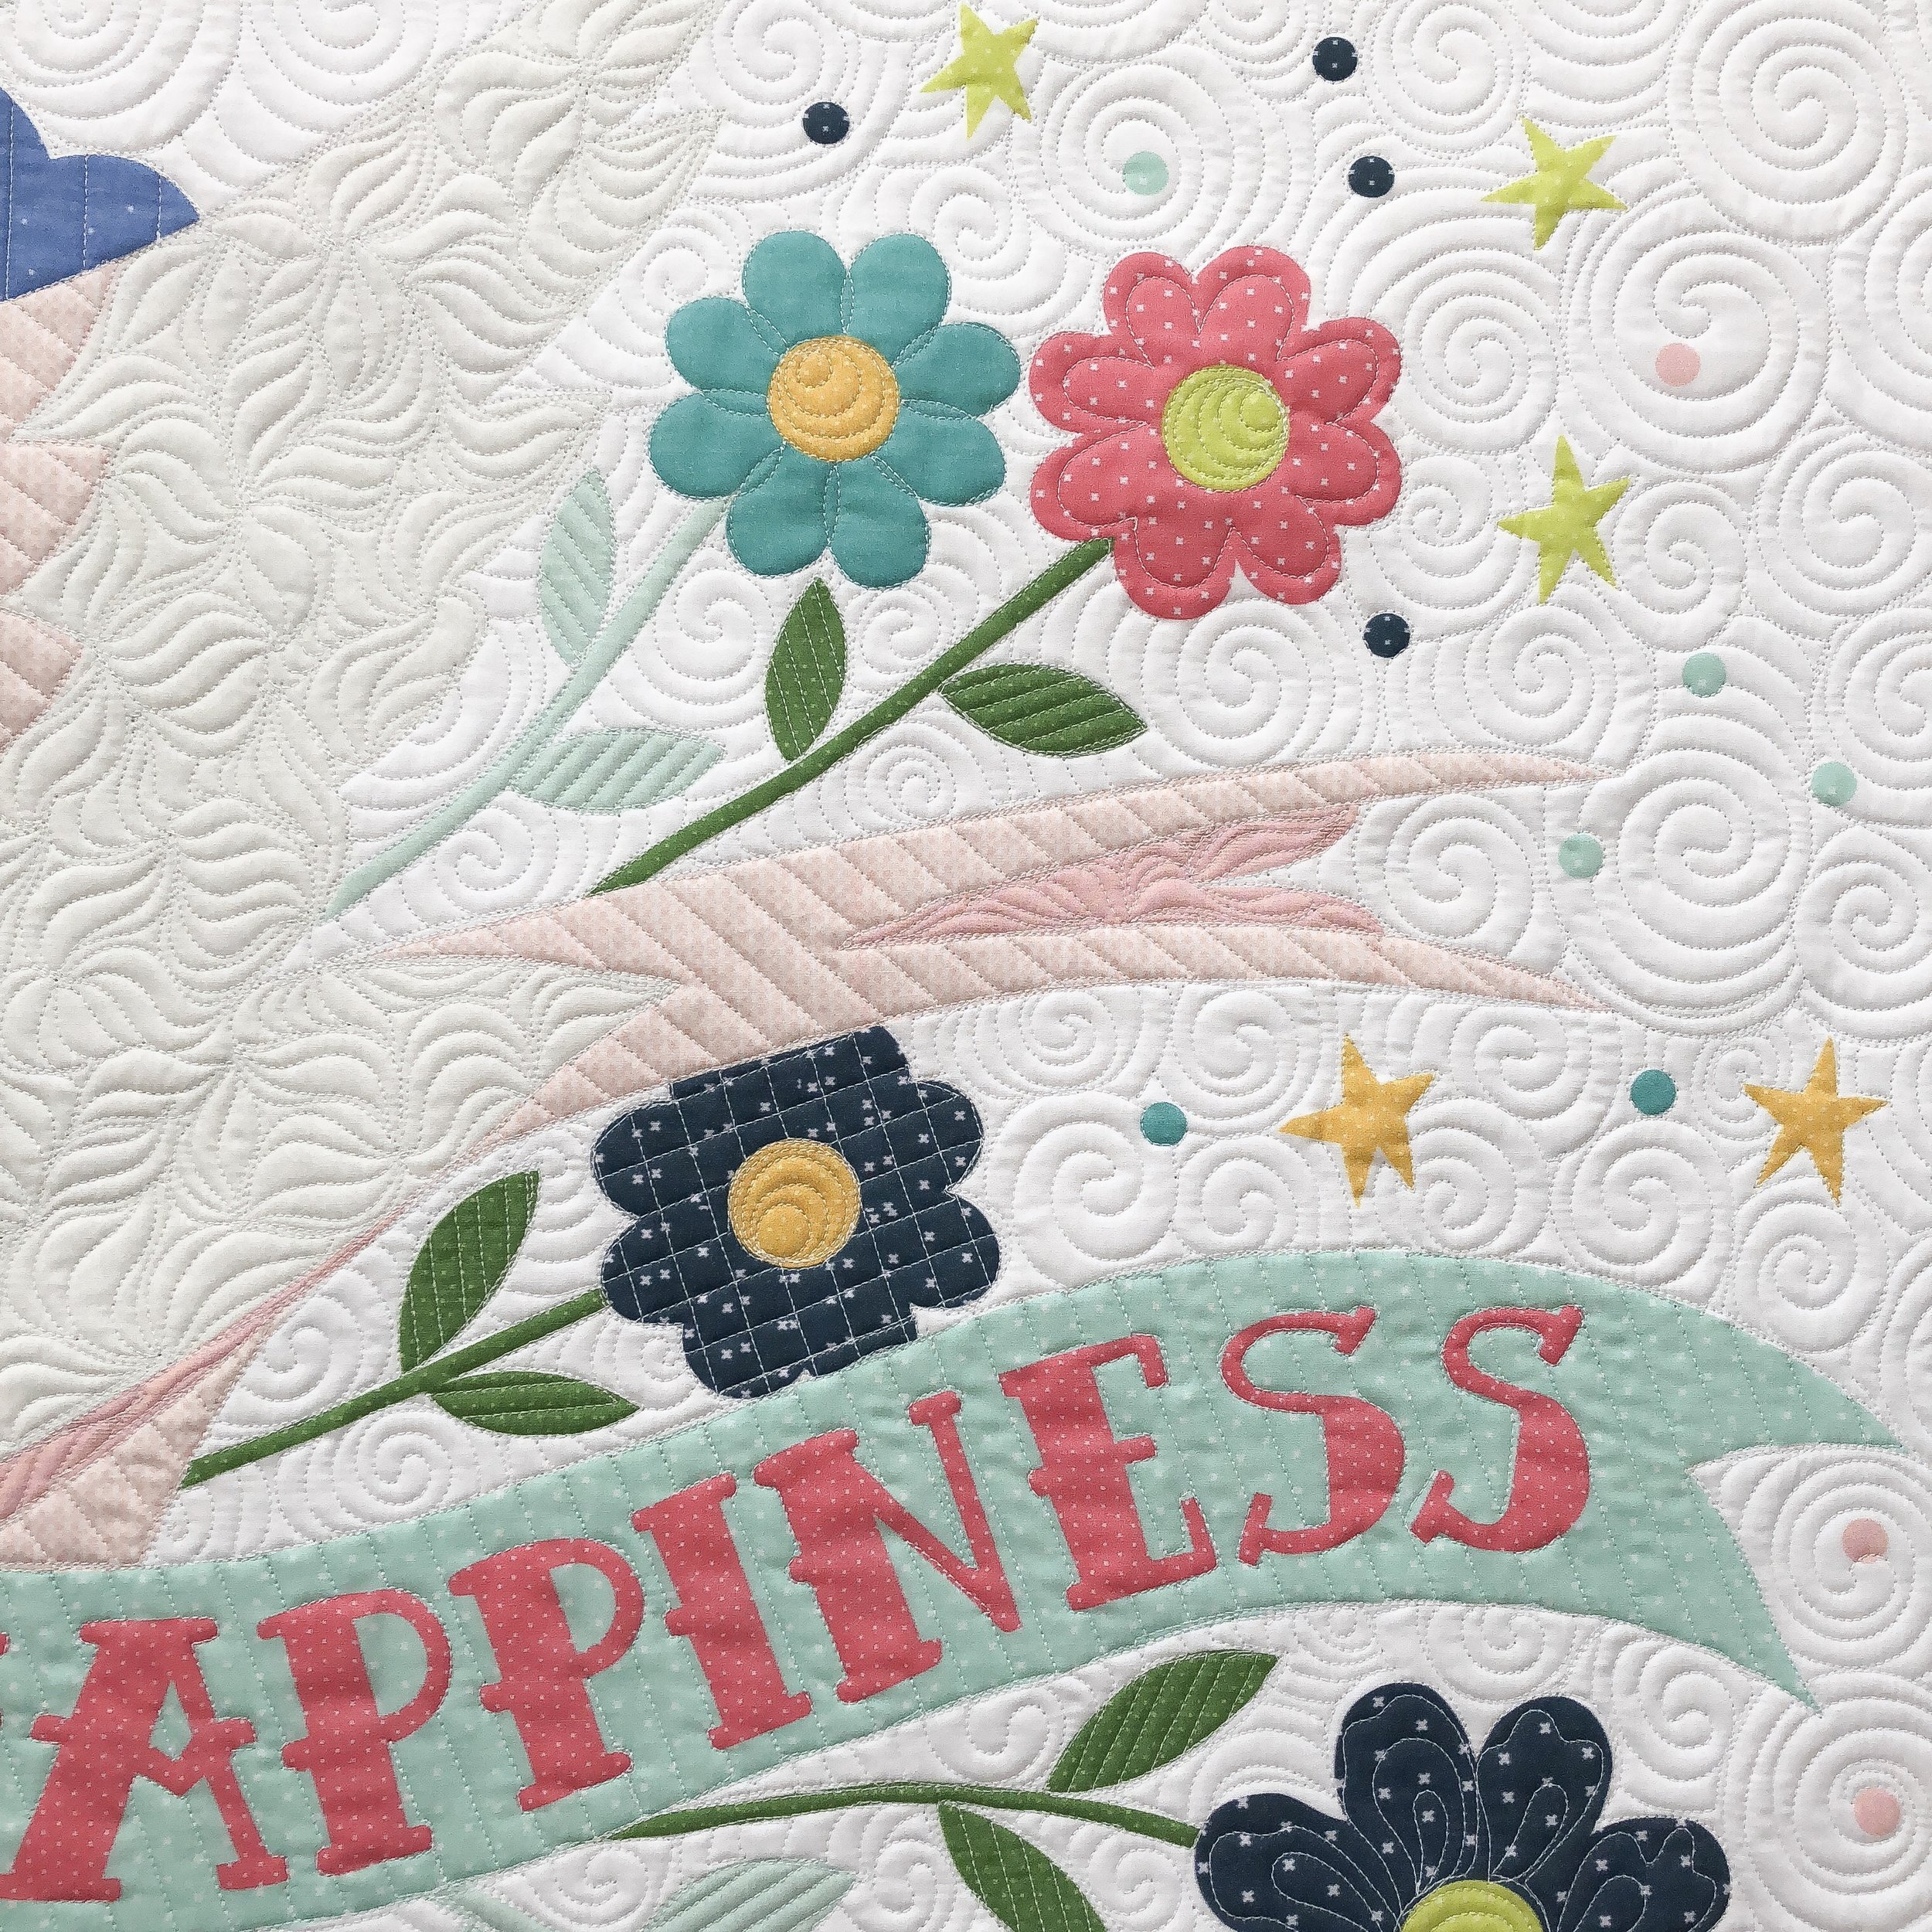
The lines in the sun and cloud are simple, but they aren’t the main attraction. I wanted the bird to stand out!
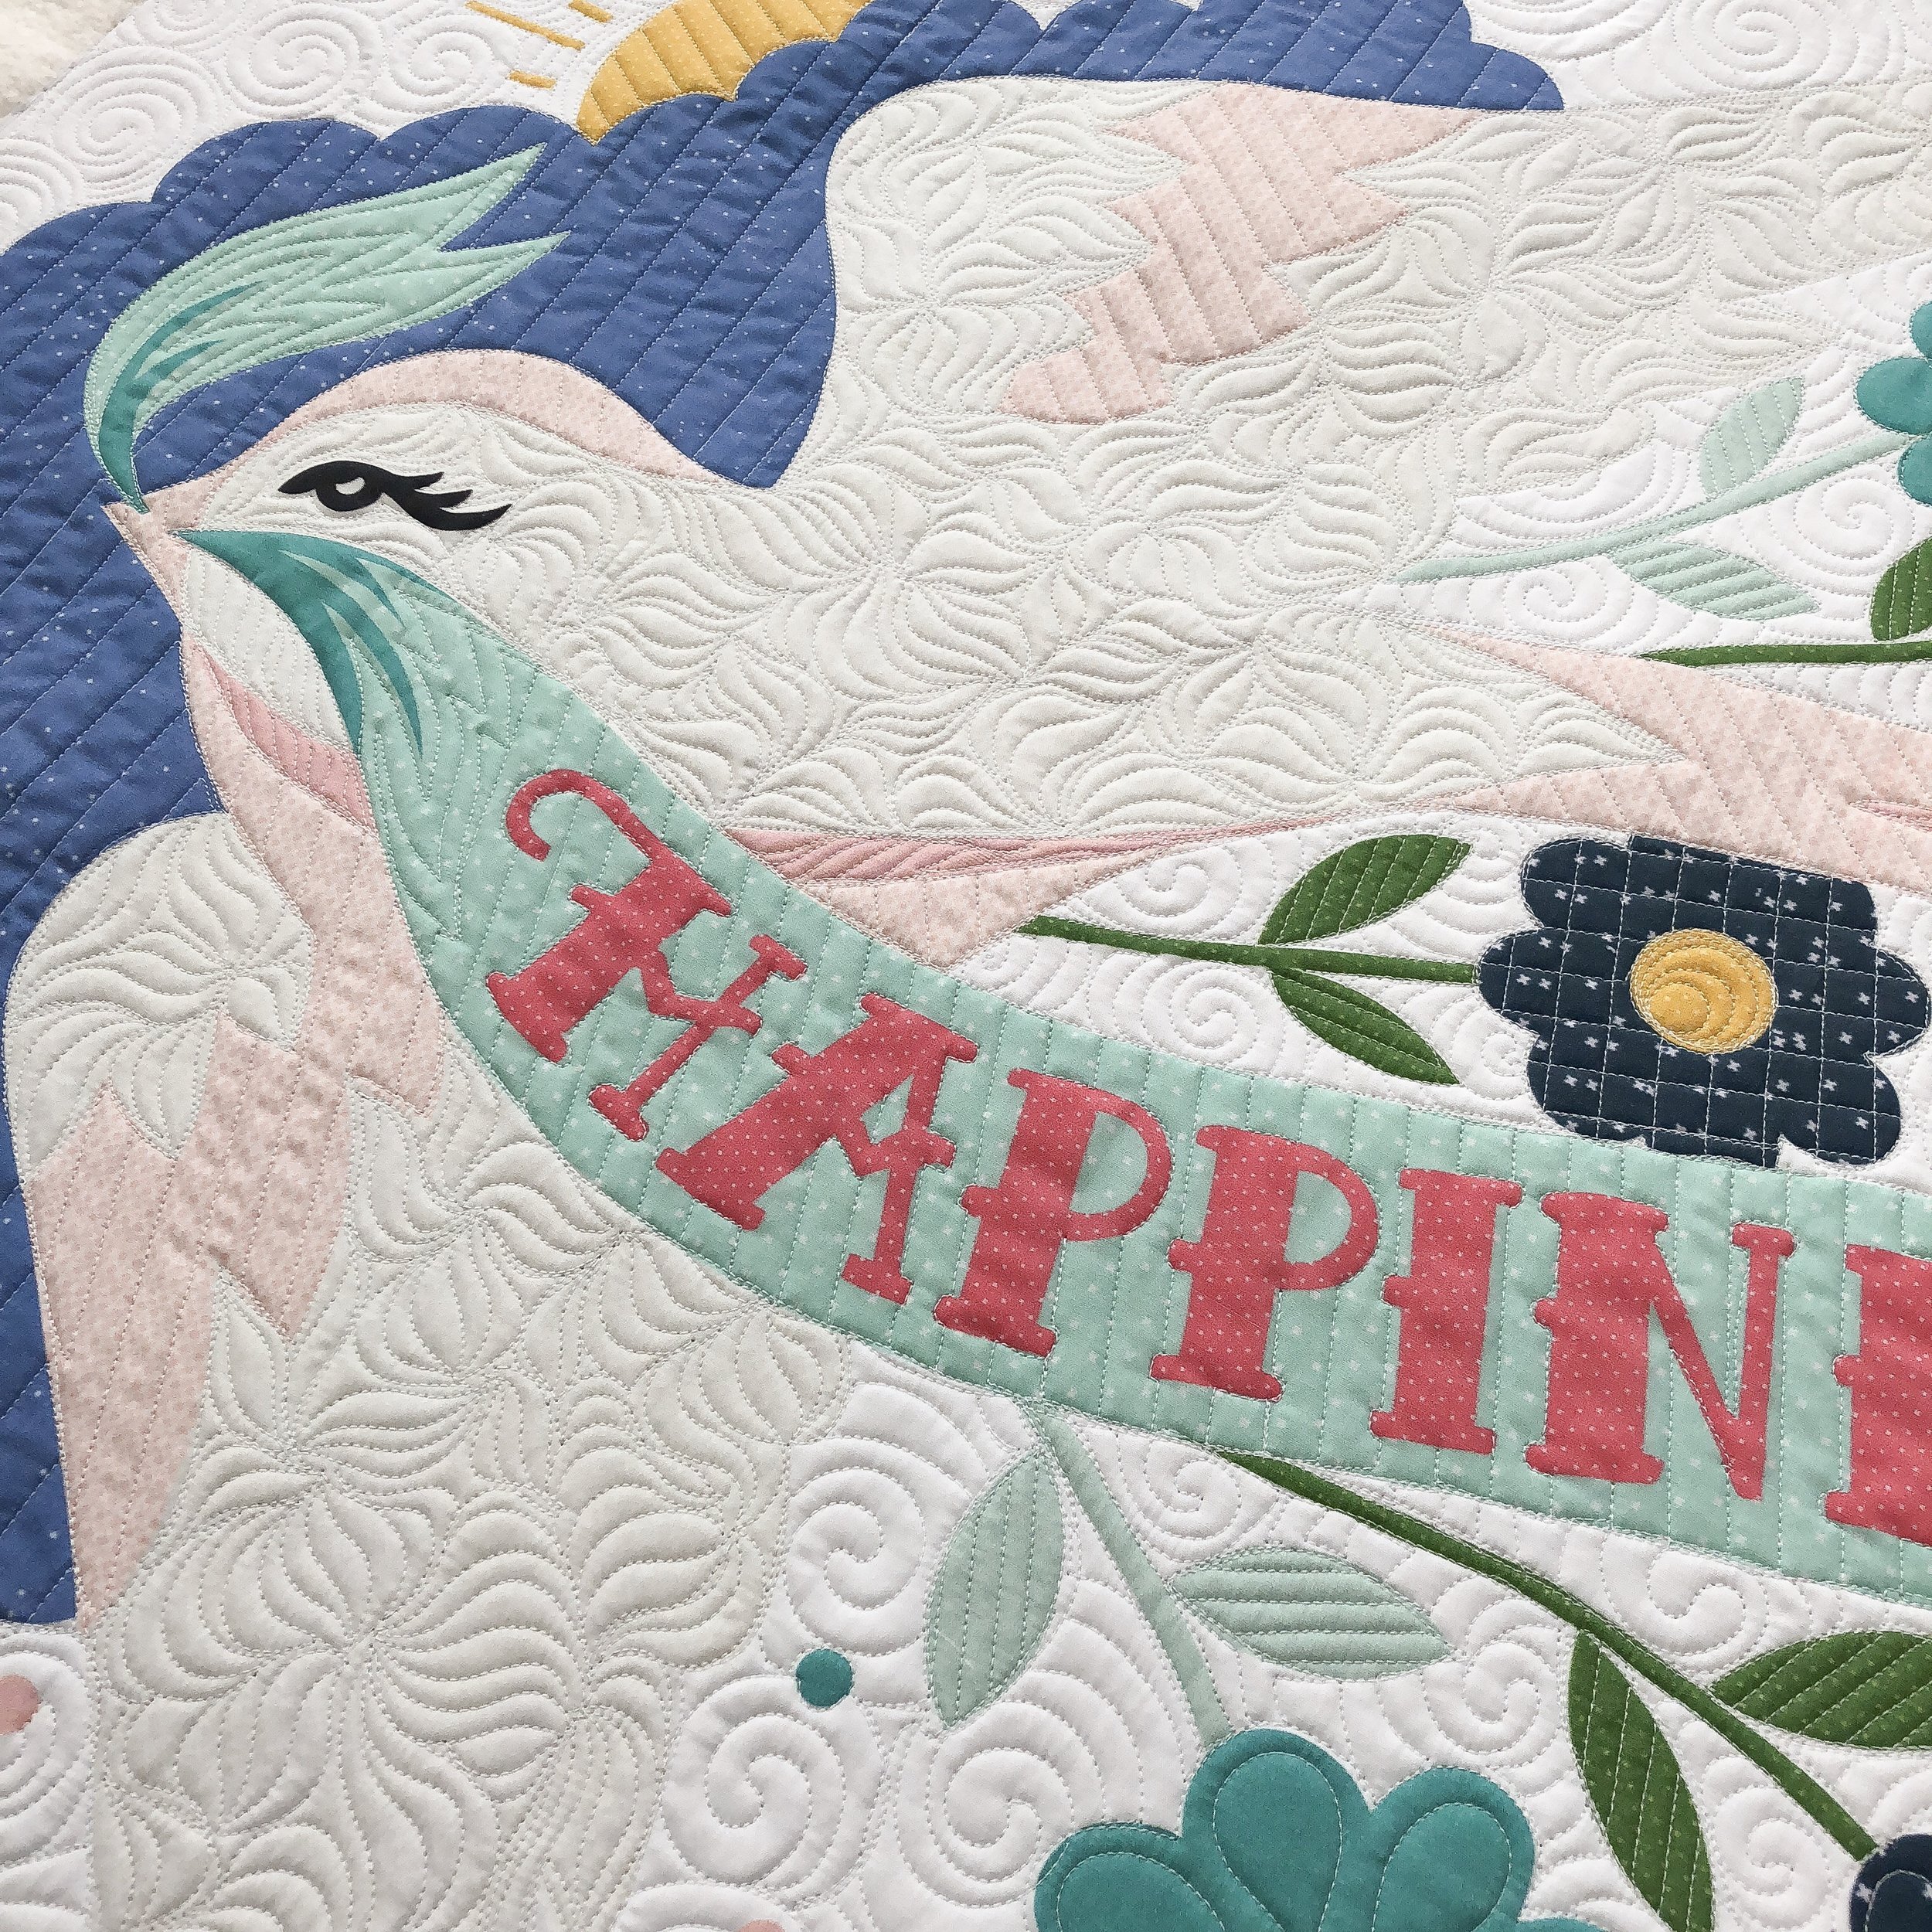
Happy perfectly describes this quilt!

Maker, isn’t she lovely!!

I decided to use two of my Circle2™ machine quilting rulers to quilt the scallop around the edge. I used the 2” and 3” circles. For more information on them go to... https://www.quiltingit.com/shop/?category=Rulers or https://www.quiltingit.com/blog/2018/10/10/introducing-my-circle2-longarm-circle-ruler-set

I’ve never quilted hair and a face, like this before. I was a little intimidated to do the face. The texture in the hair was easy to quilt out, I just followed the design to know what direction to quilt and I think it turned out great. For the face, I just wanted to make sure there were cheeks, and definition around the eye, brow, nose, and chin. I couldn’t be happier with the results. I used a light pink thread on the face and light tan/brown on the hair.

As makers, I’m sure we would have some quilting on our scarves, right?!?! I used a Edge ruler from Linda at TheQuiltedPineapple.com to quilt these perfect 1/2” squares. Her rulers are so awesome, I never have to mark anything, I just follow the lines.
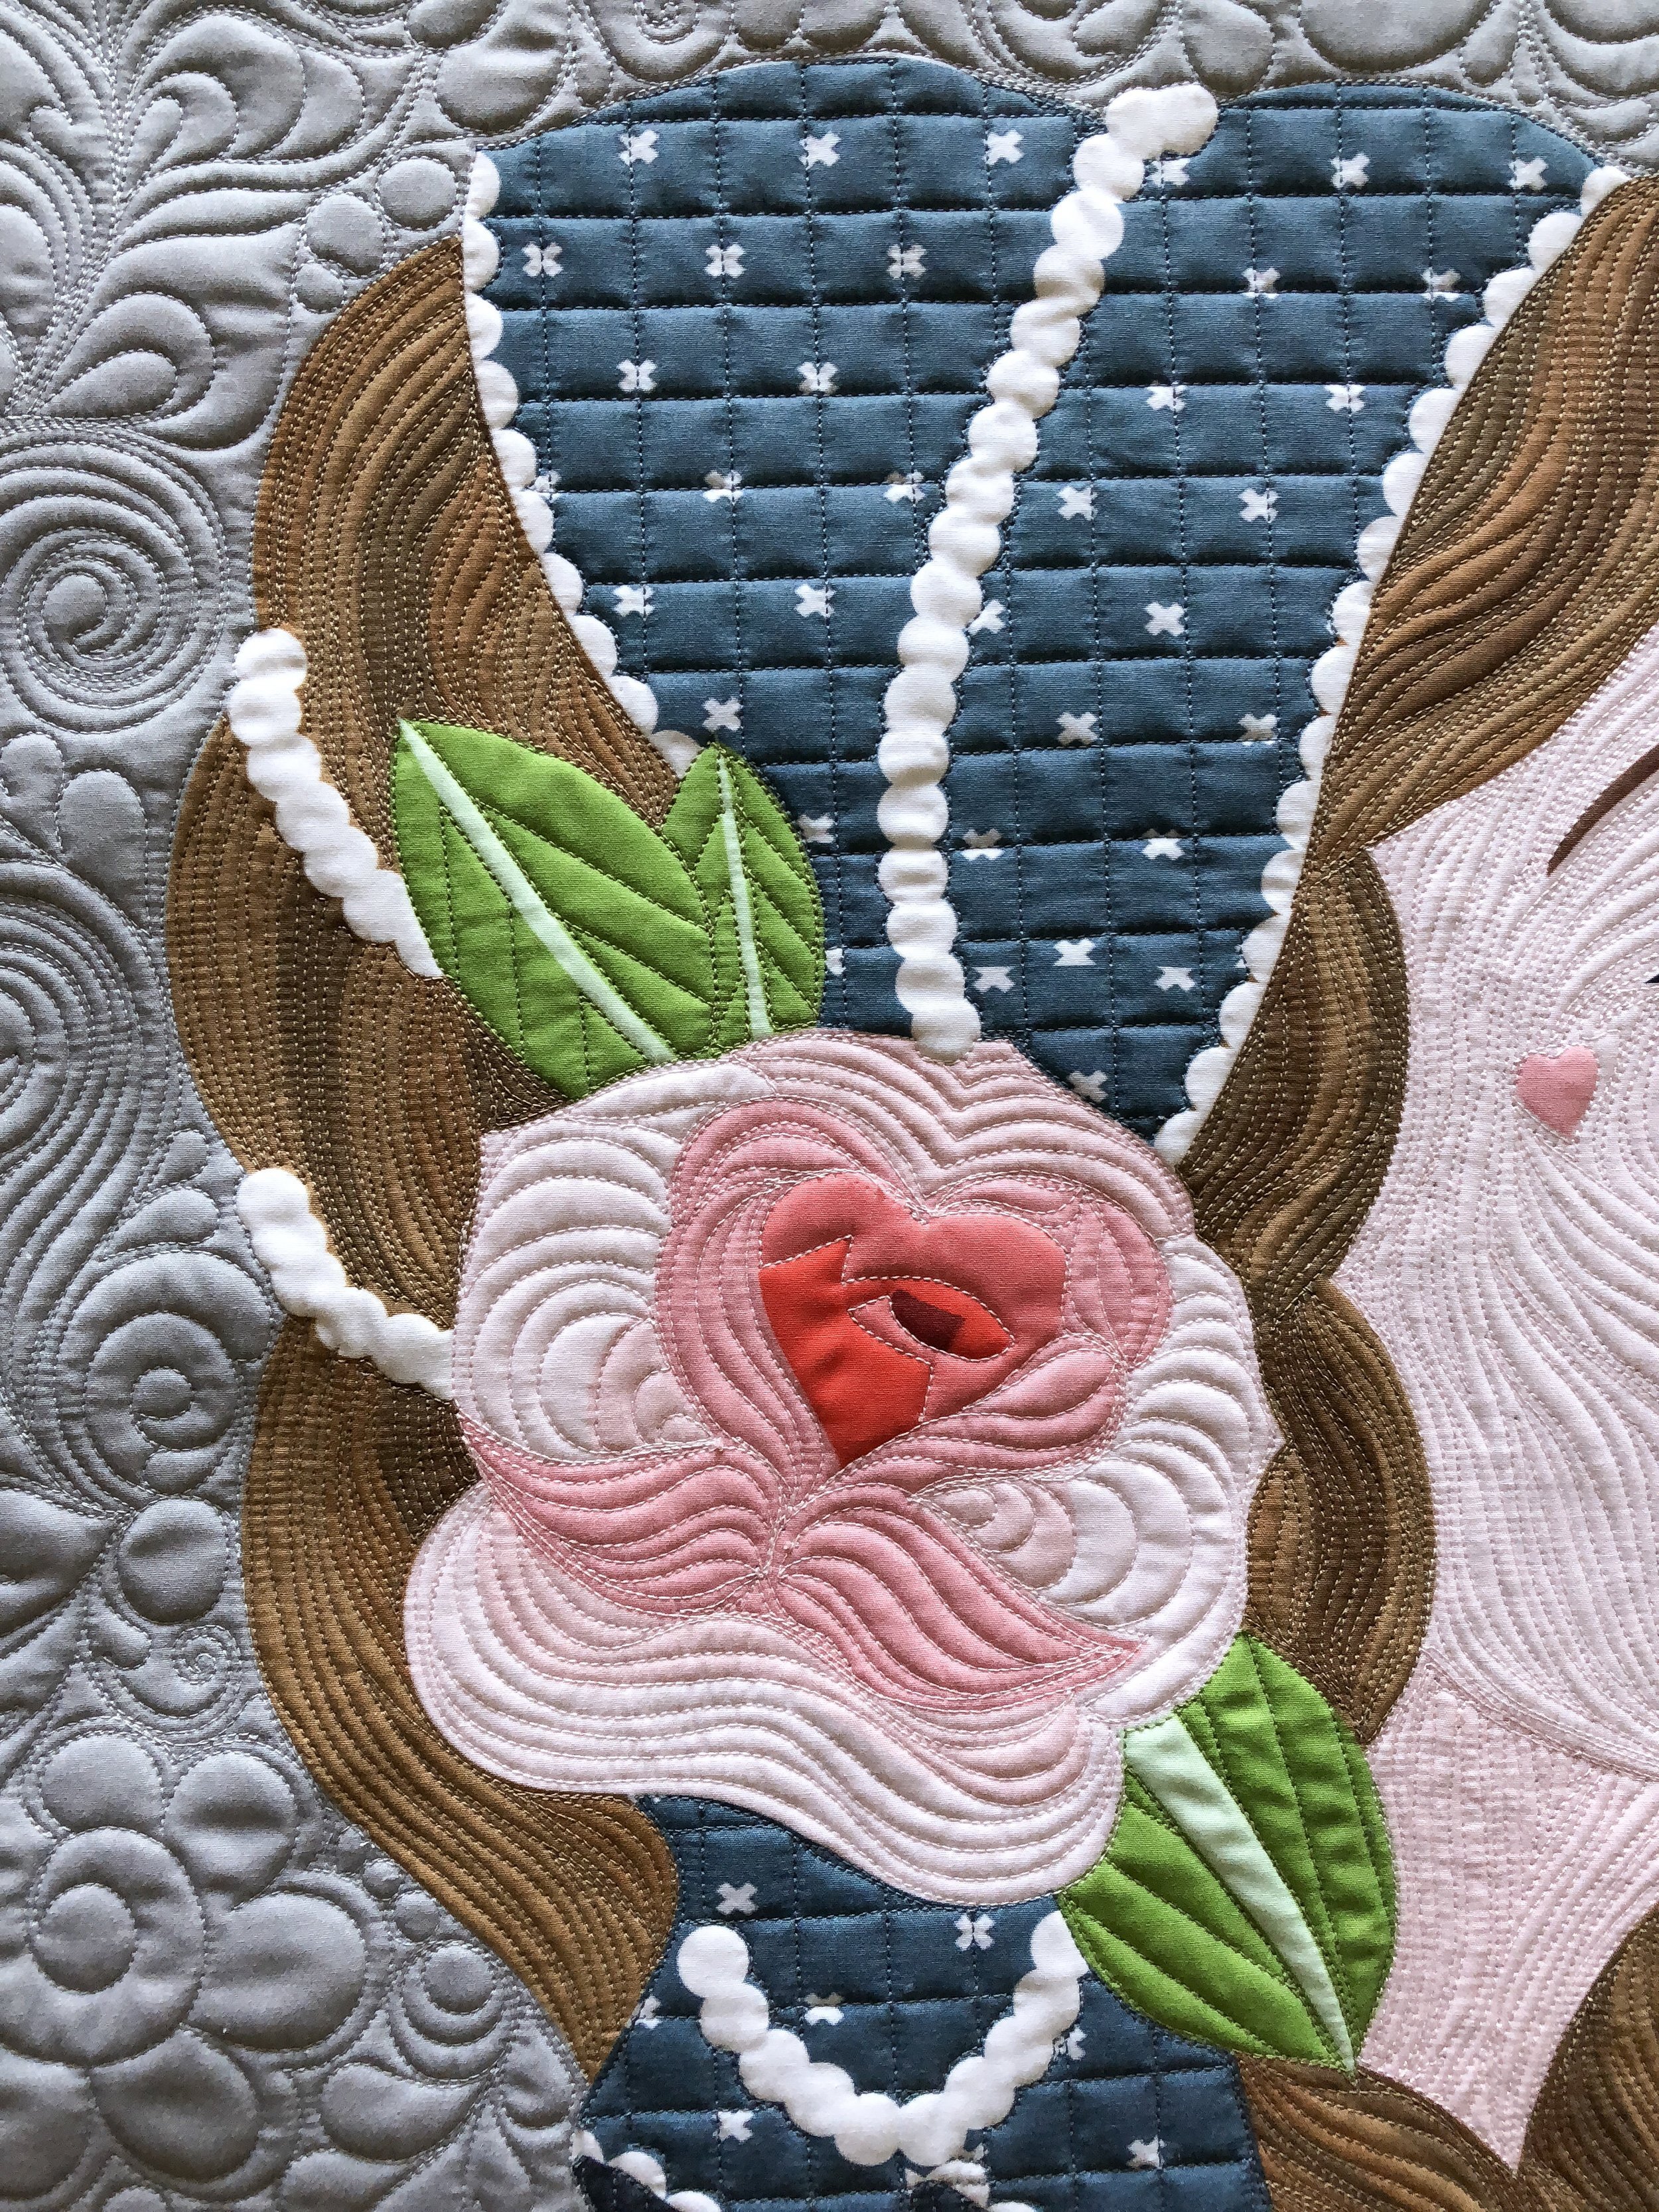
That Maker banner is pretty cute!
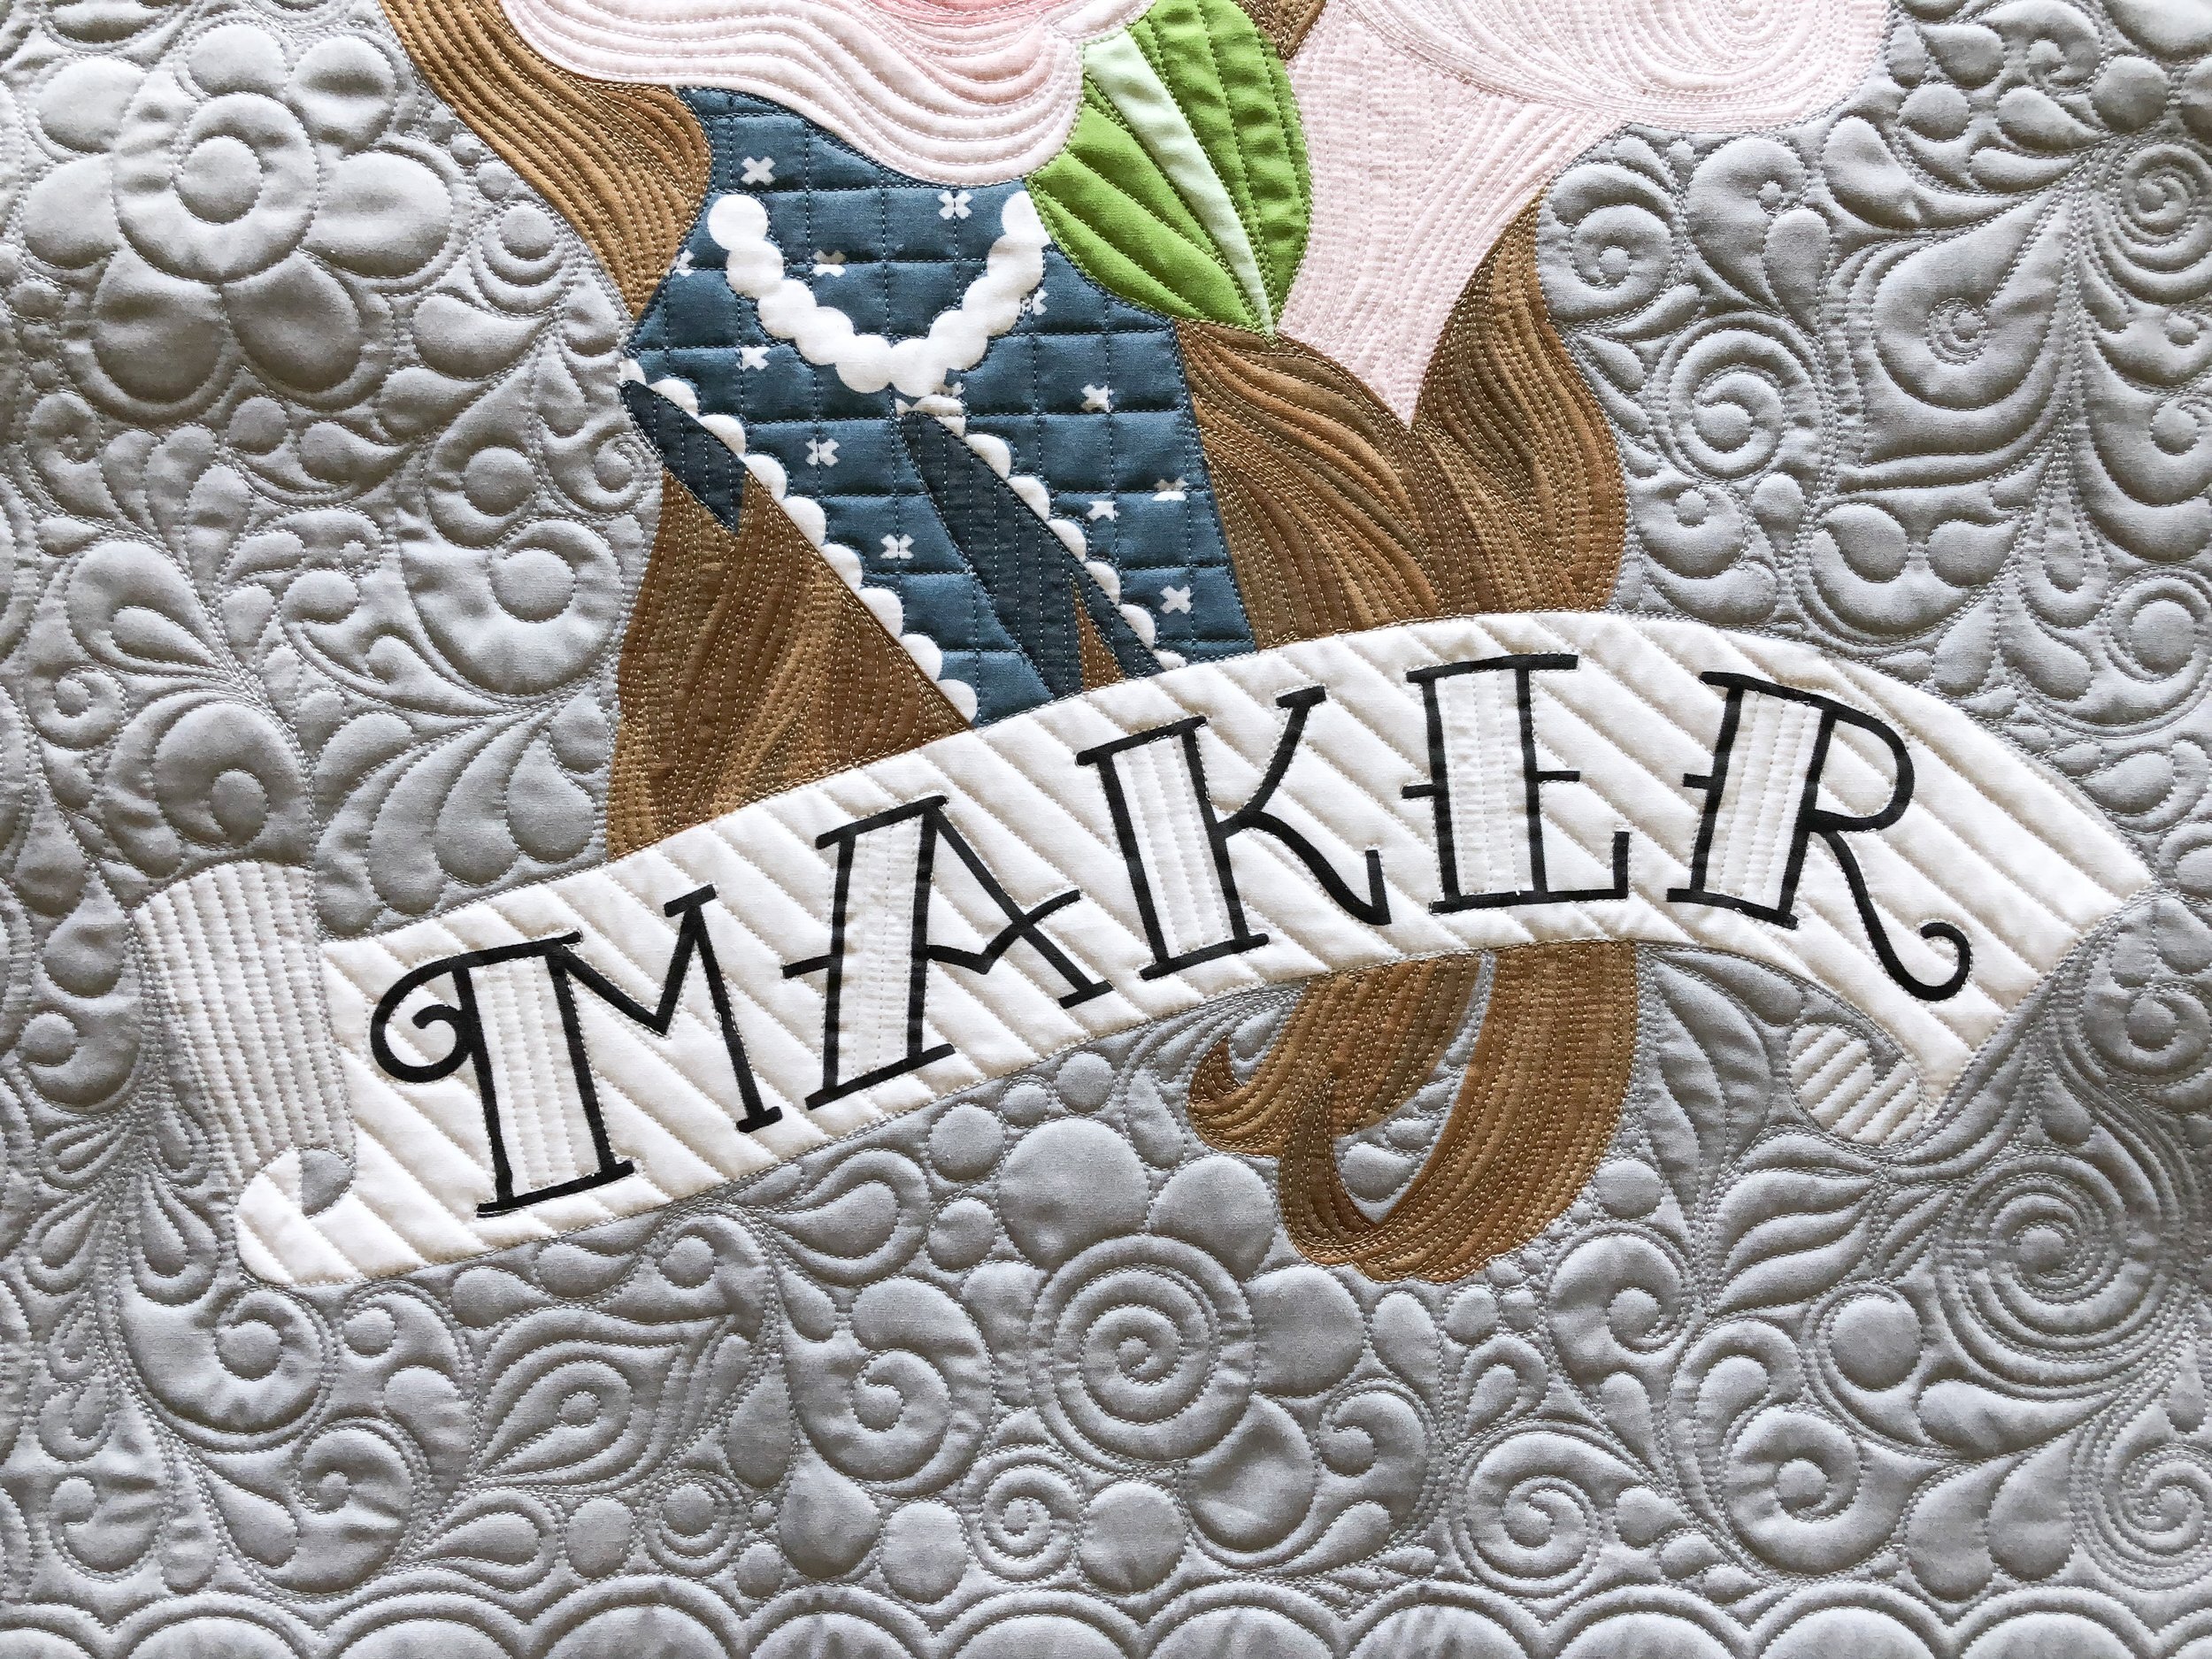
One more look! I used a light grey thread in the background, and coordinated threads in all the other parts. The scarf, leafs, and rose.

I will cut you...I’ve heard...this is what people say if you were to use their sewing scissors to cut something else.
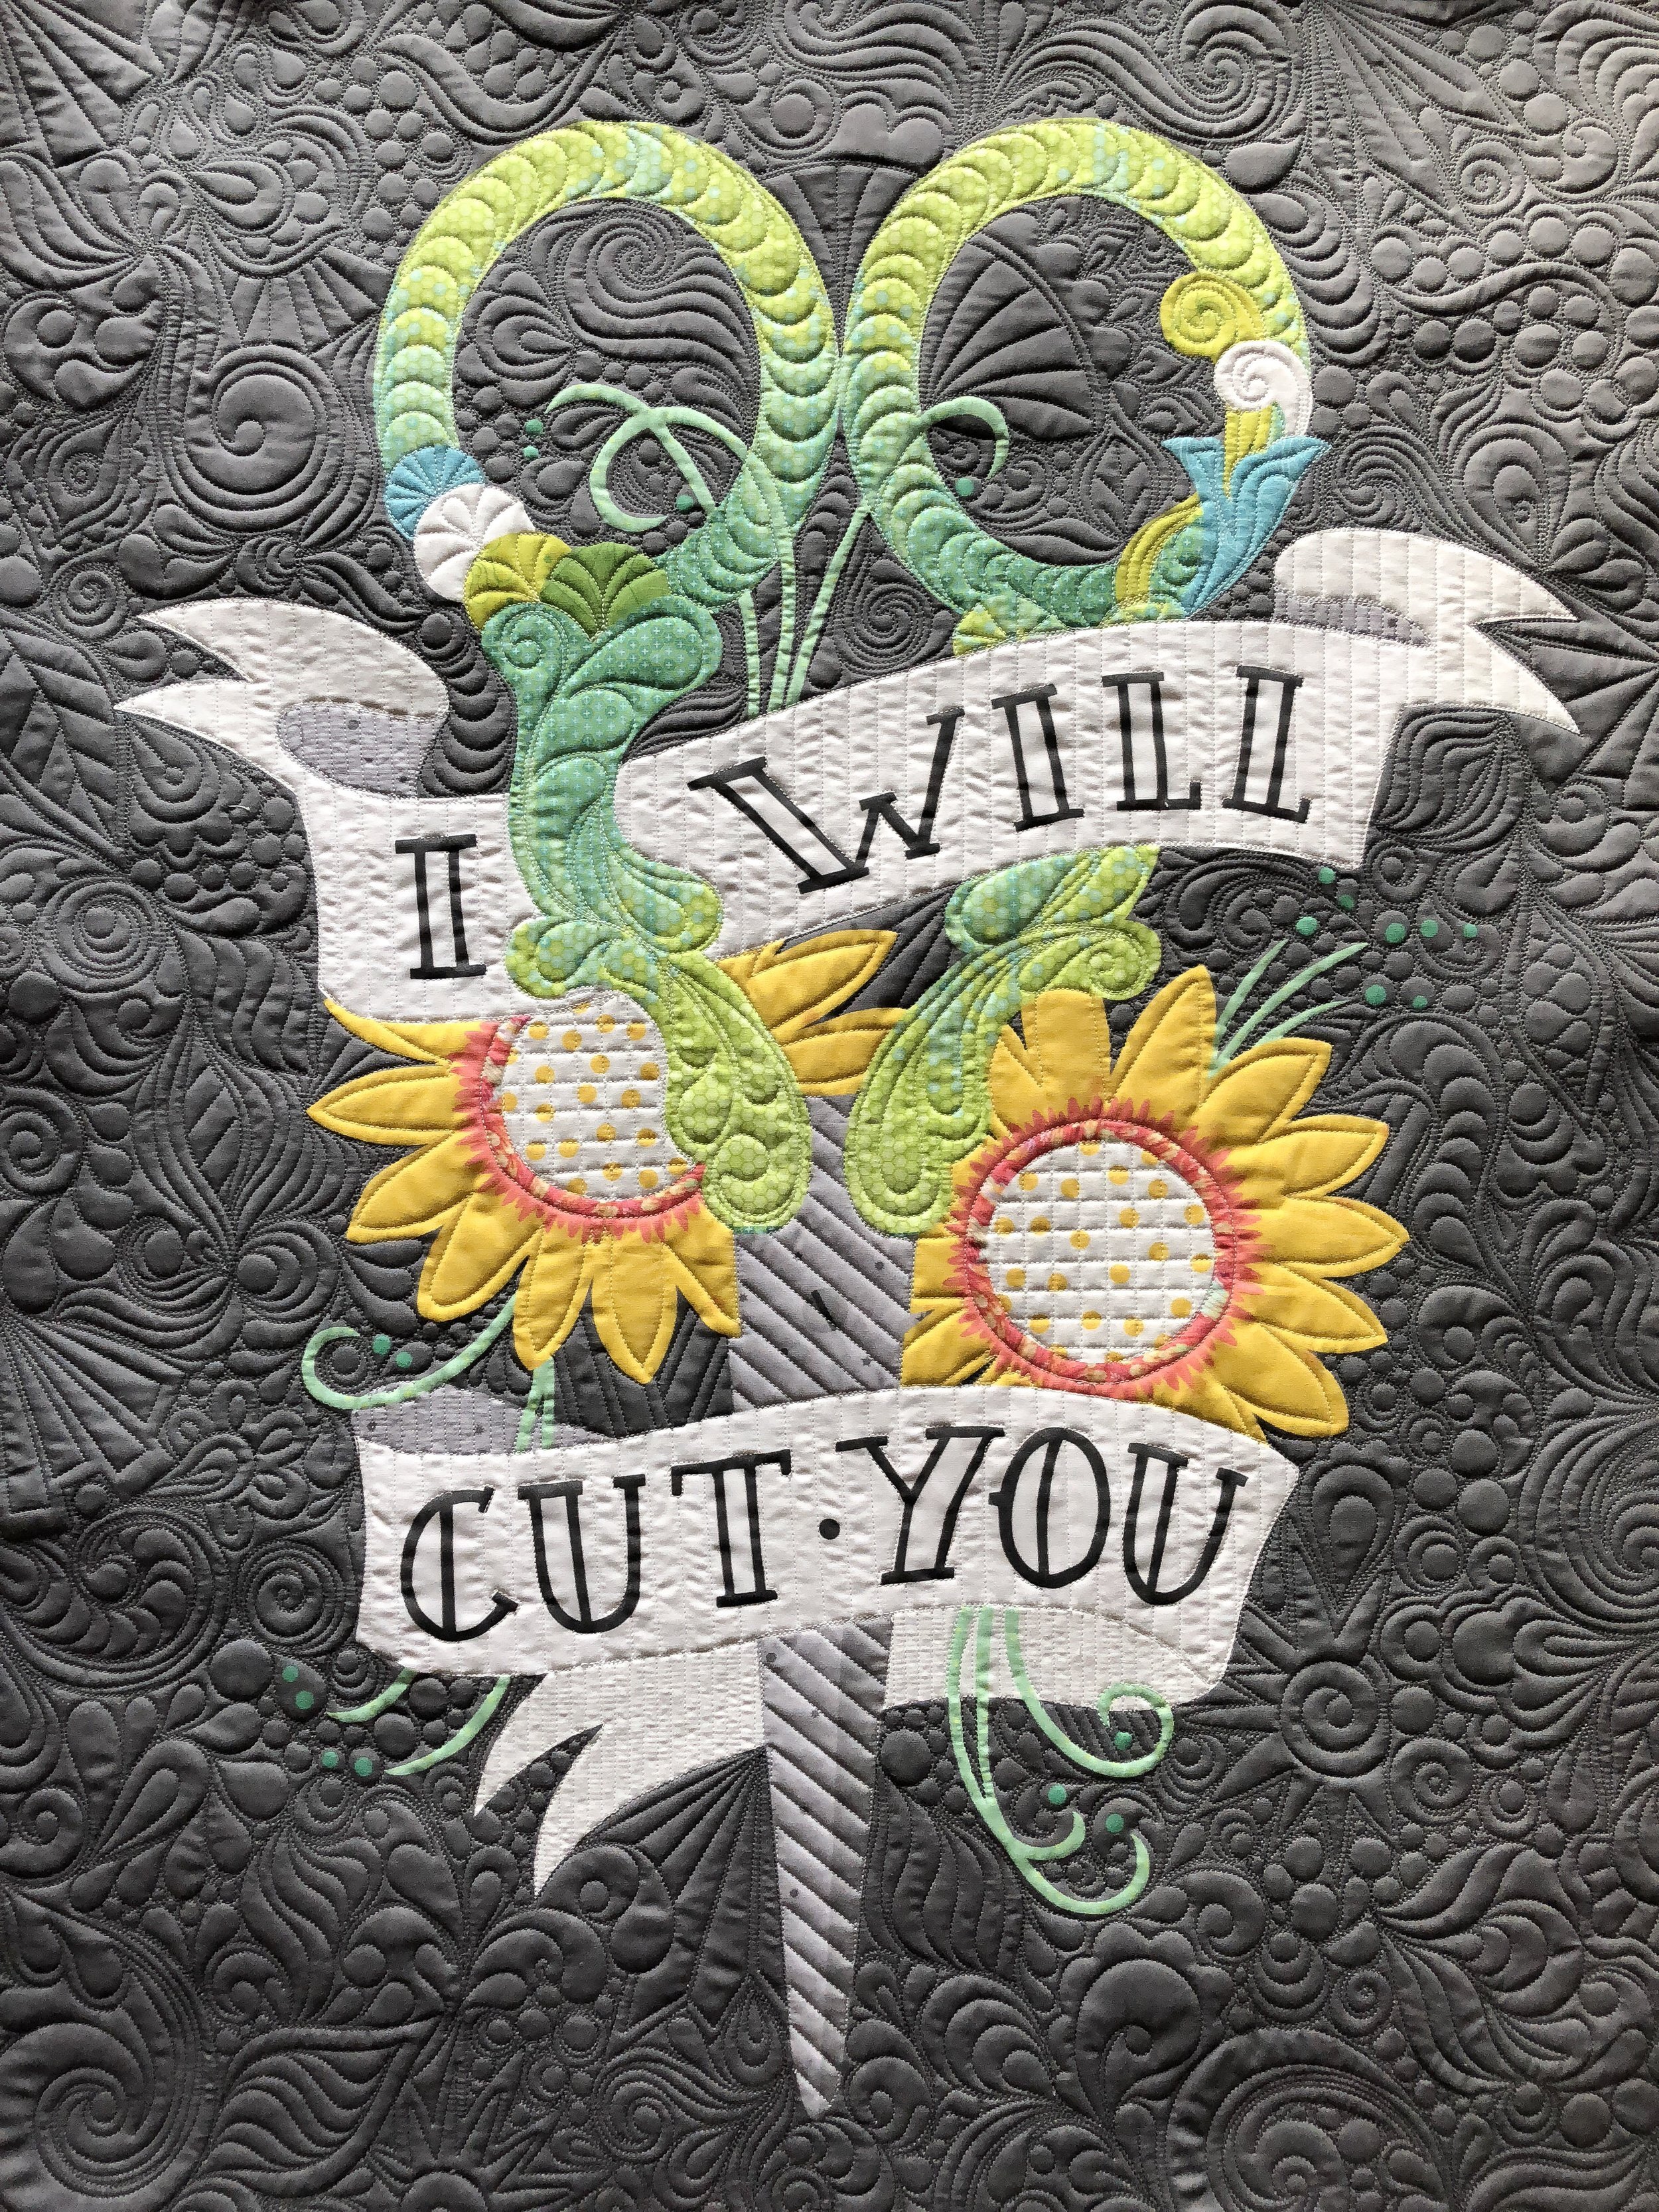
For this quilt, I decided on Graffiti Quilting in the background. It’s inspired by the amazing quilting that Karlee Porter does. It wasn’t easy to be so random at first...then it was fun, and I wanted to keep going. I’m sharing lots of pictures, so you can see all the different textures in the background.

I love how the scallops and feathers on the scissors, turned out!! As well as the hard diagonal lines in the scissor blades. I used the same Edge ruler from Linda, to quilt all those fabulous lines and squares.

I used a dark gray thread in the background, and a white thread everywhere else.
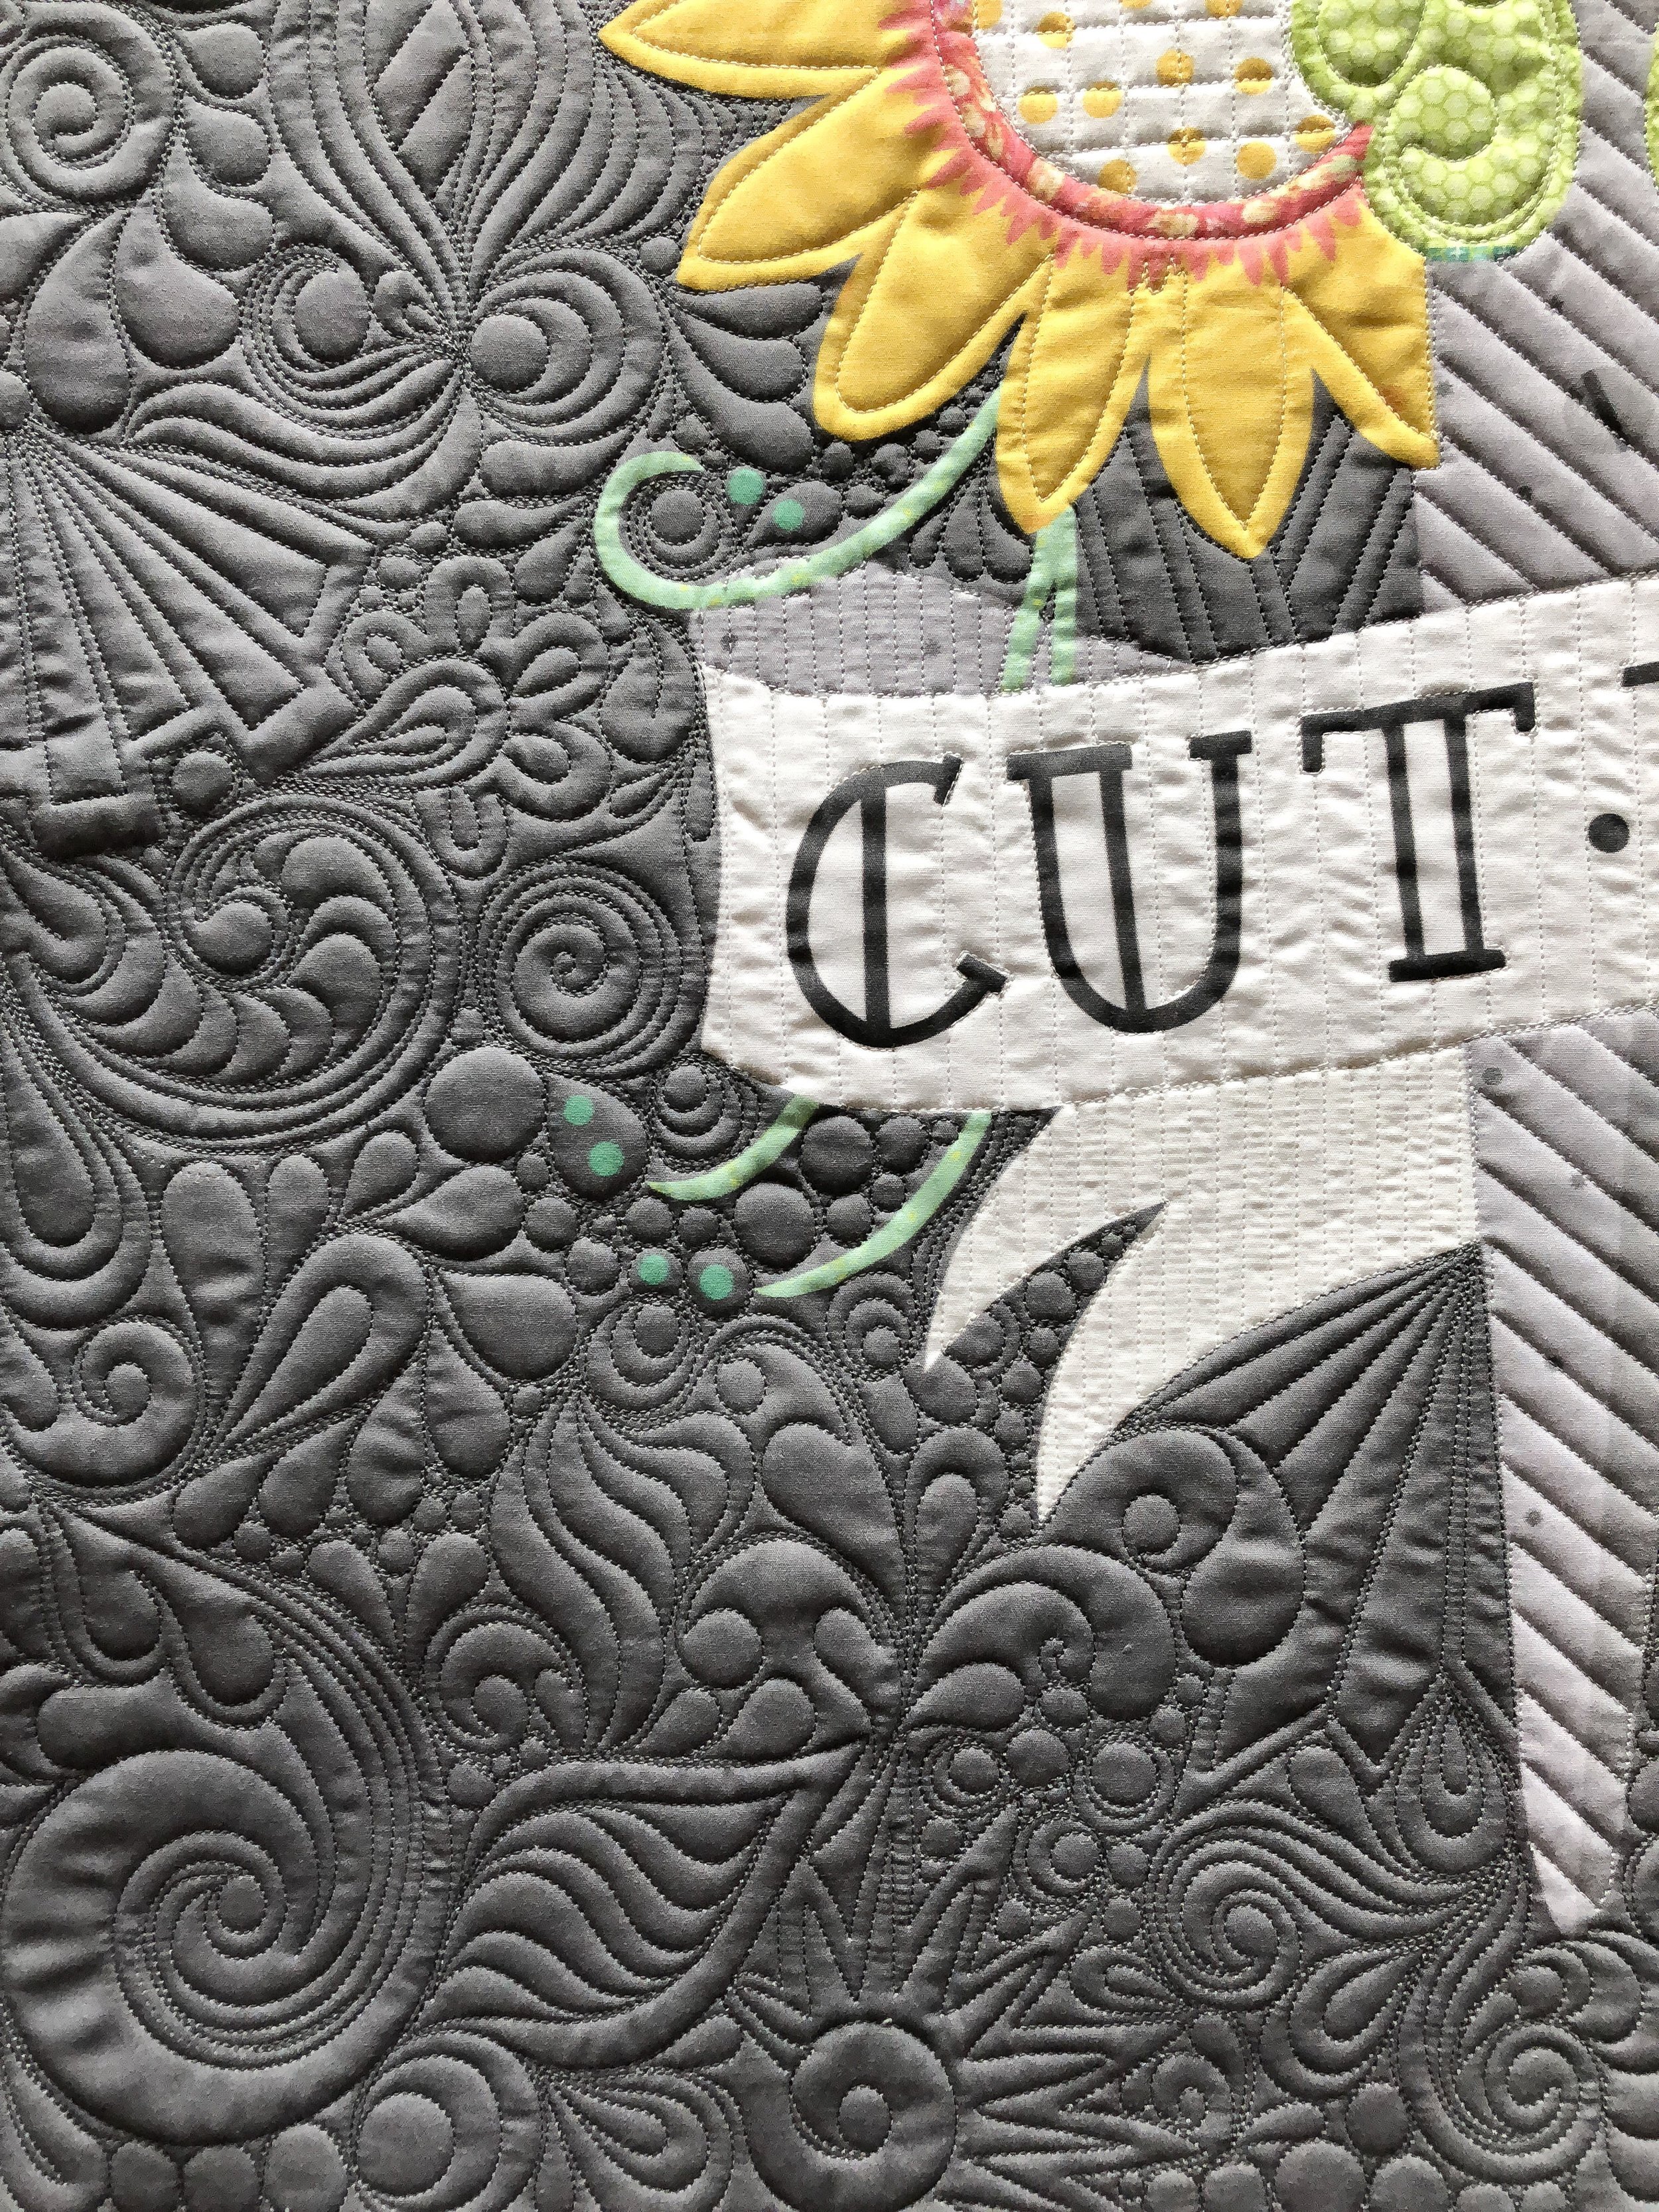
I love the mix of swirly, hard lines, feathers...it’s just so fun to think out of the box, when it comes to quilting.
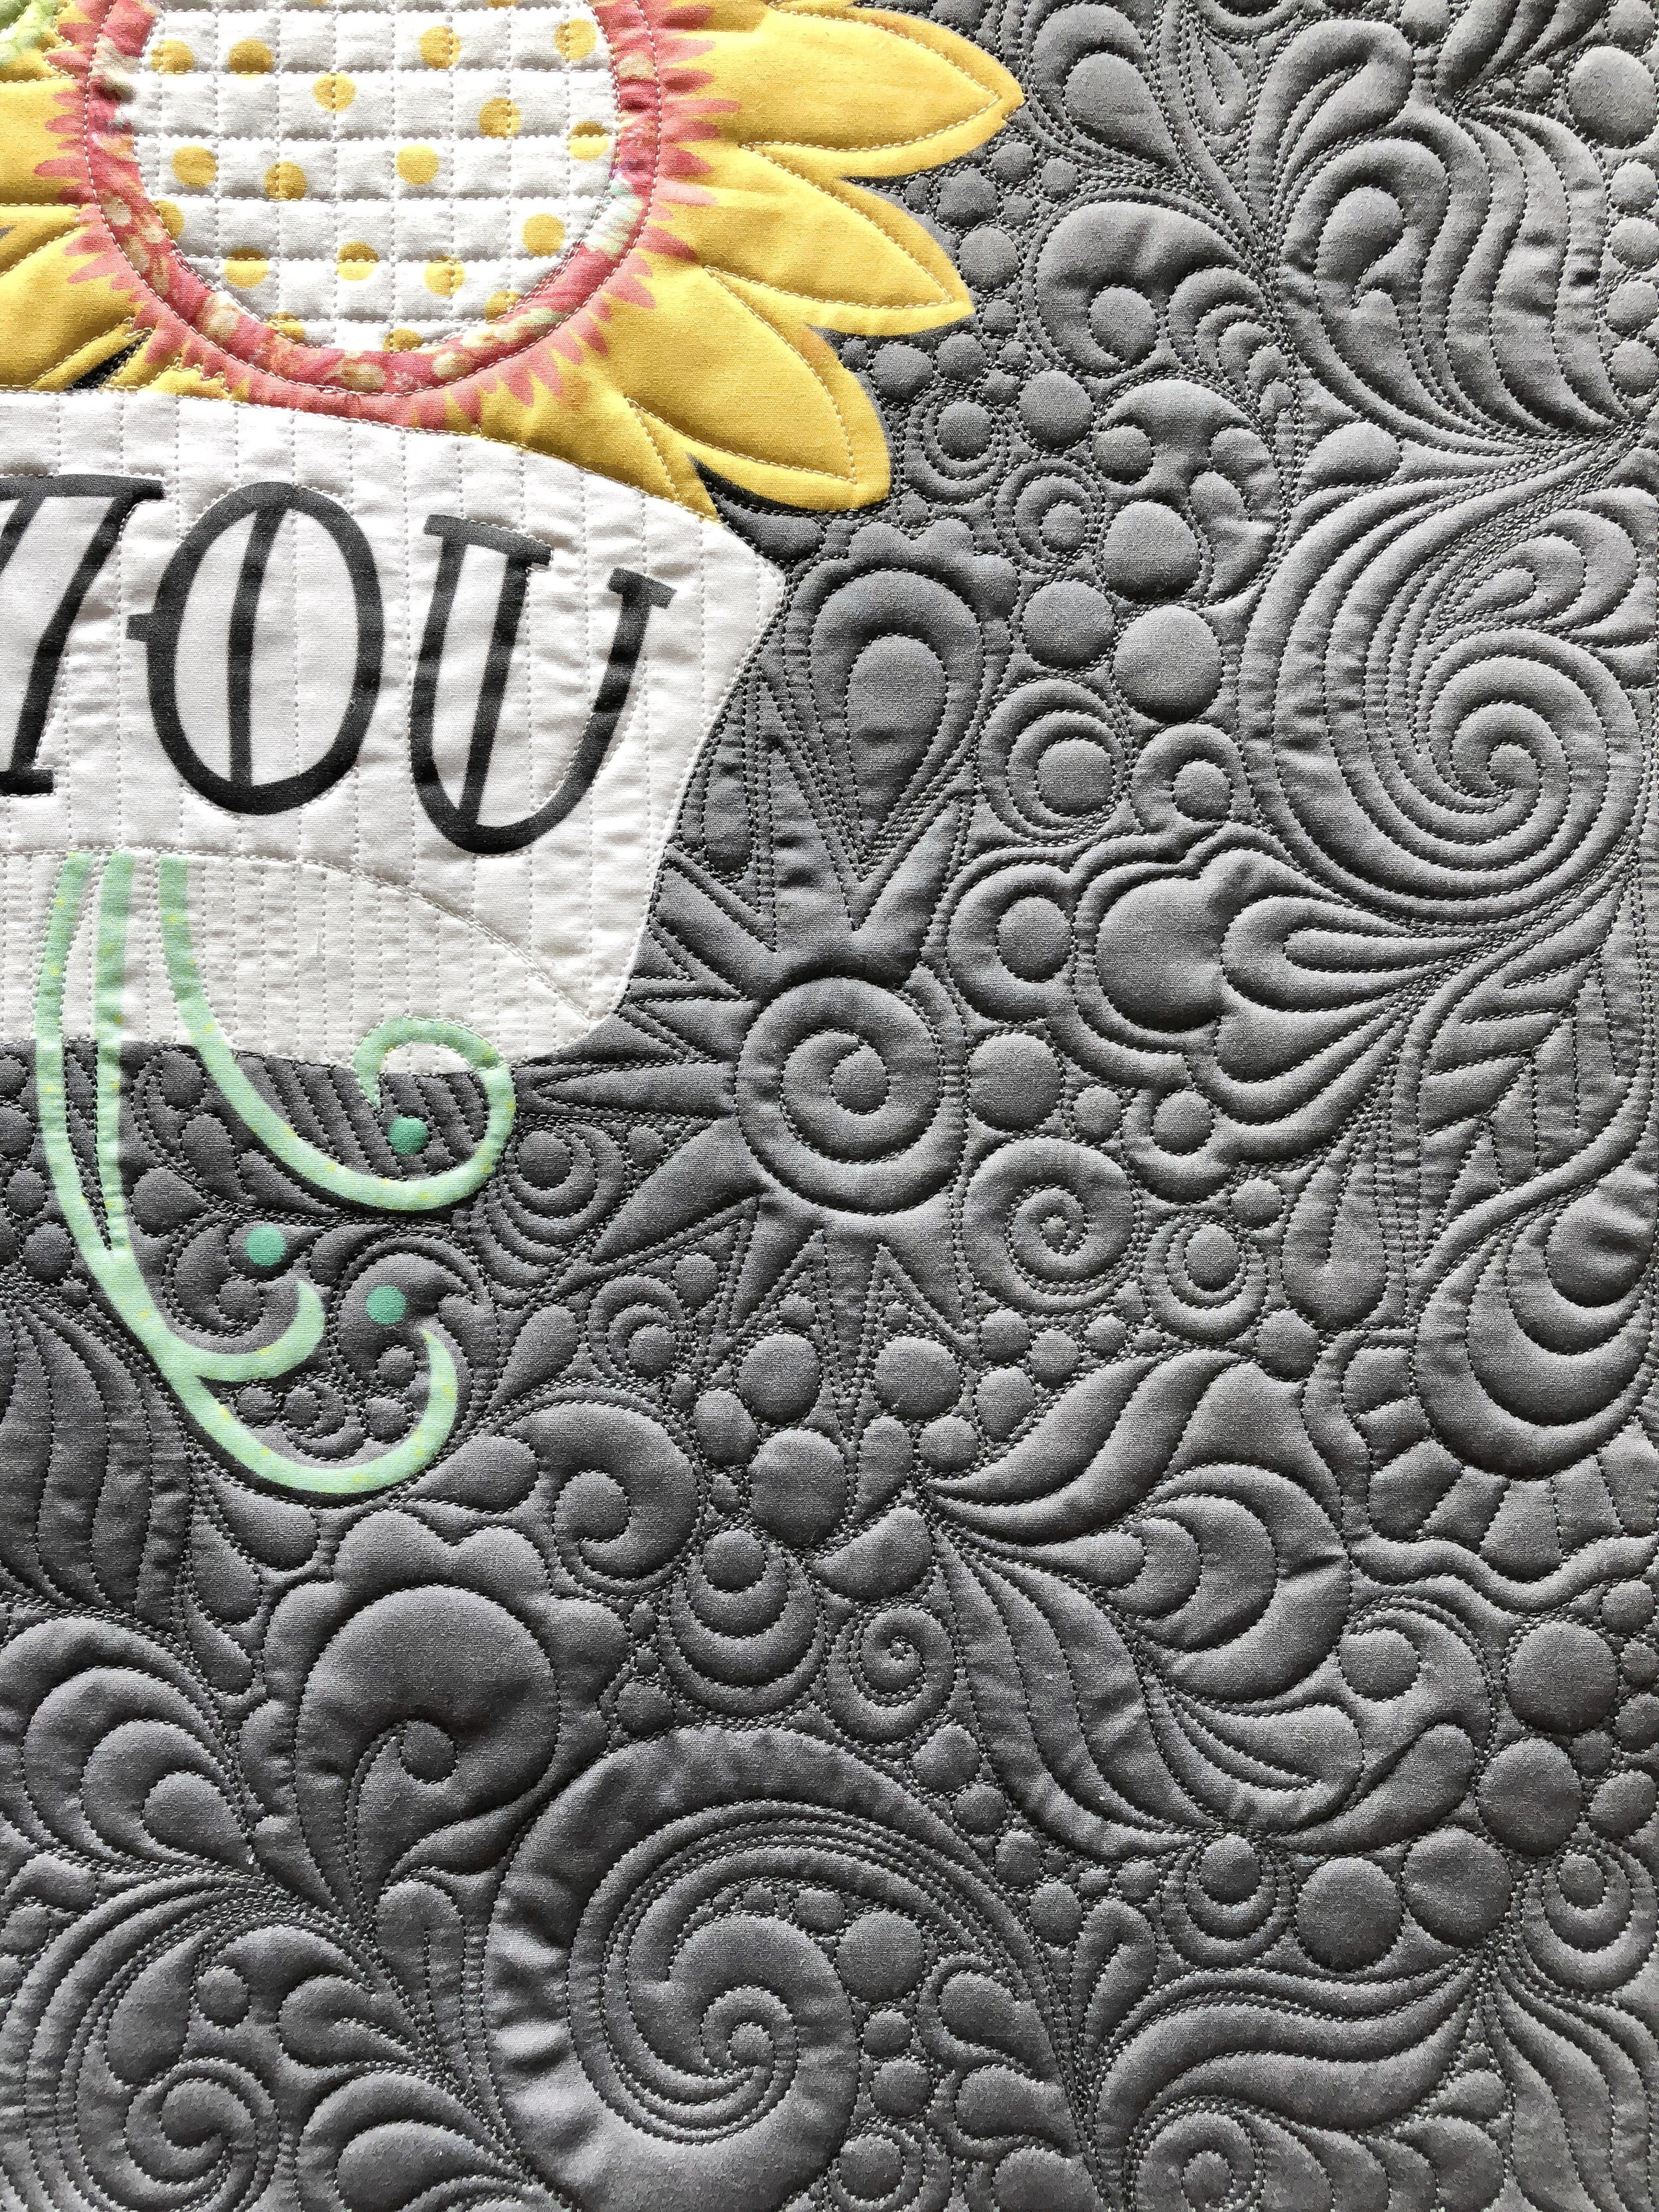
A last side angle view...
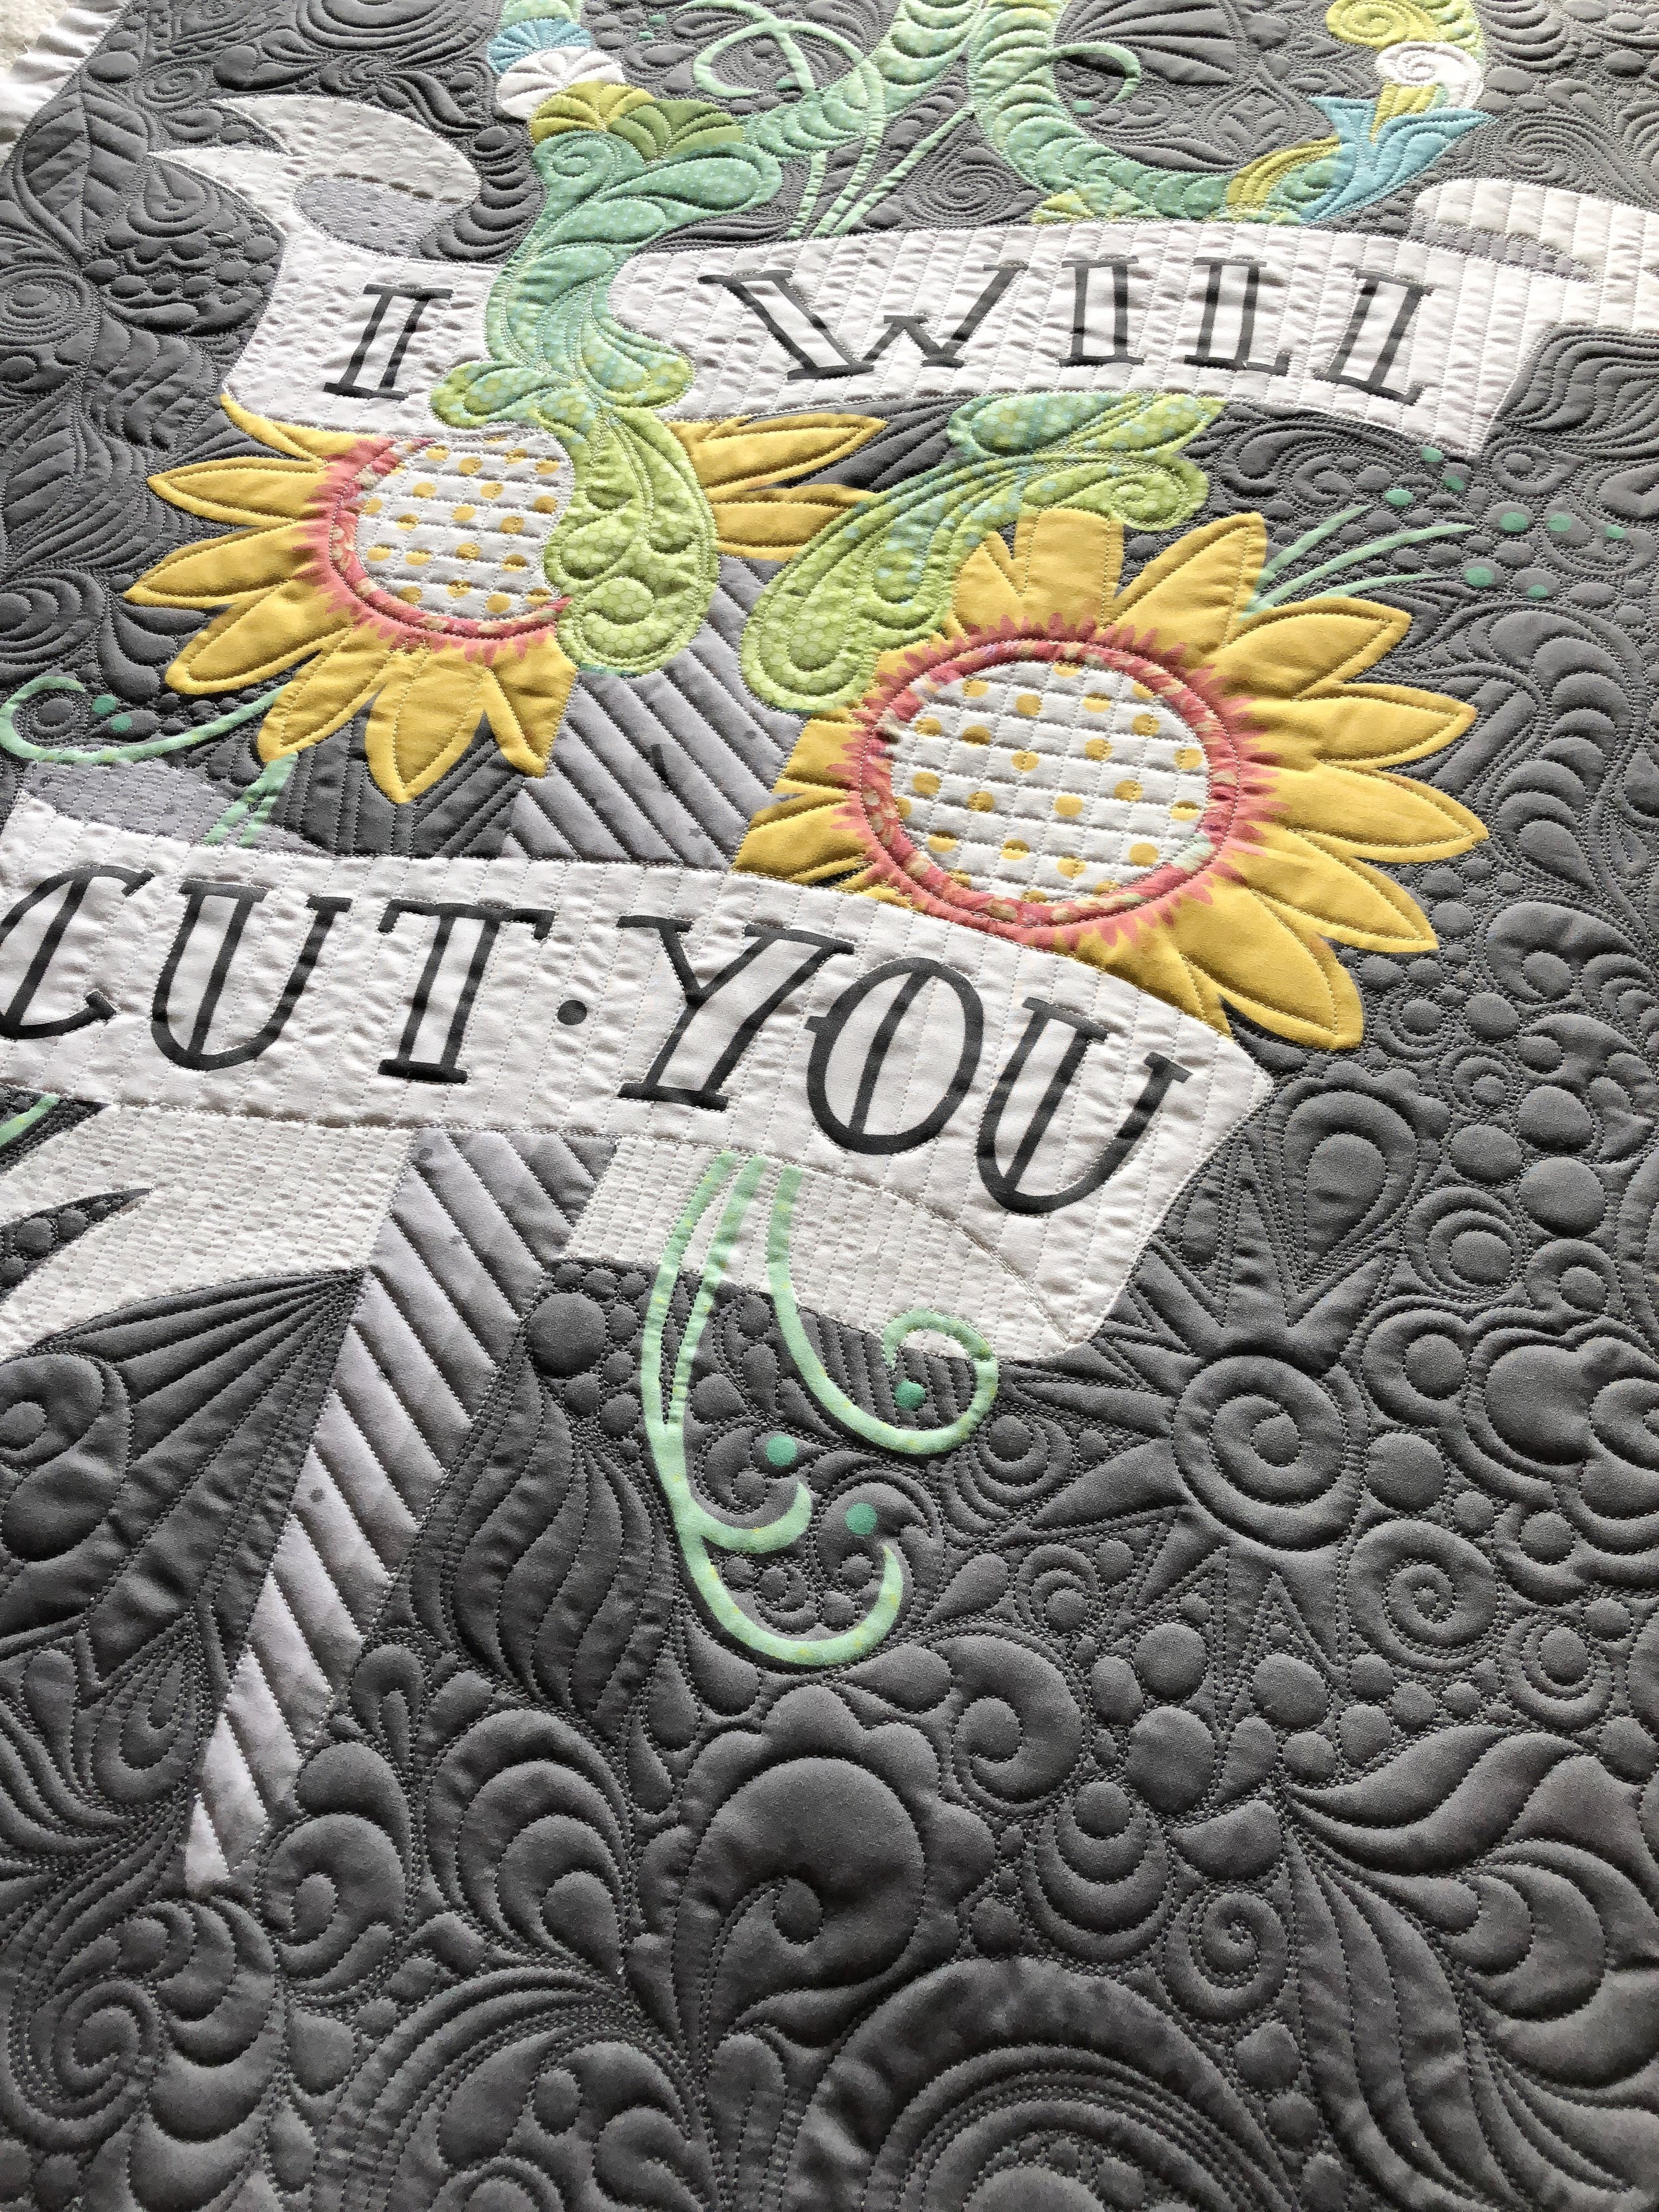
Each of these quilts are going to be available in kits, check back with https://lasercutquilts.com/ after quilt market.
Thank you for stopping by!! I love what I do, and I appreciate you stopping by to check it out.
Happy Quilting!! - Leisha

“Around the Pumpkin Patch”
This lovely runner is another one of Laser Cut Quilts beautiful patterns, it’s called Around the Pumpkin Patch and is available on their website. https://lasercutquilts.com/shop

I used an 8020 cotton poly blend batting and two different threads, a green and cream from Perma Core.

I also used at least three of my Circle2™ machine quilting rulers, to quilt all these fabulous curves.
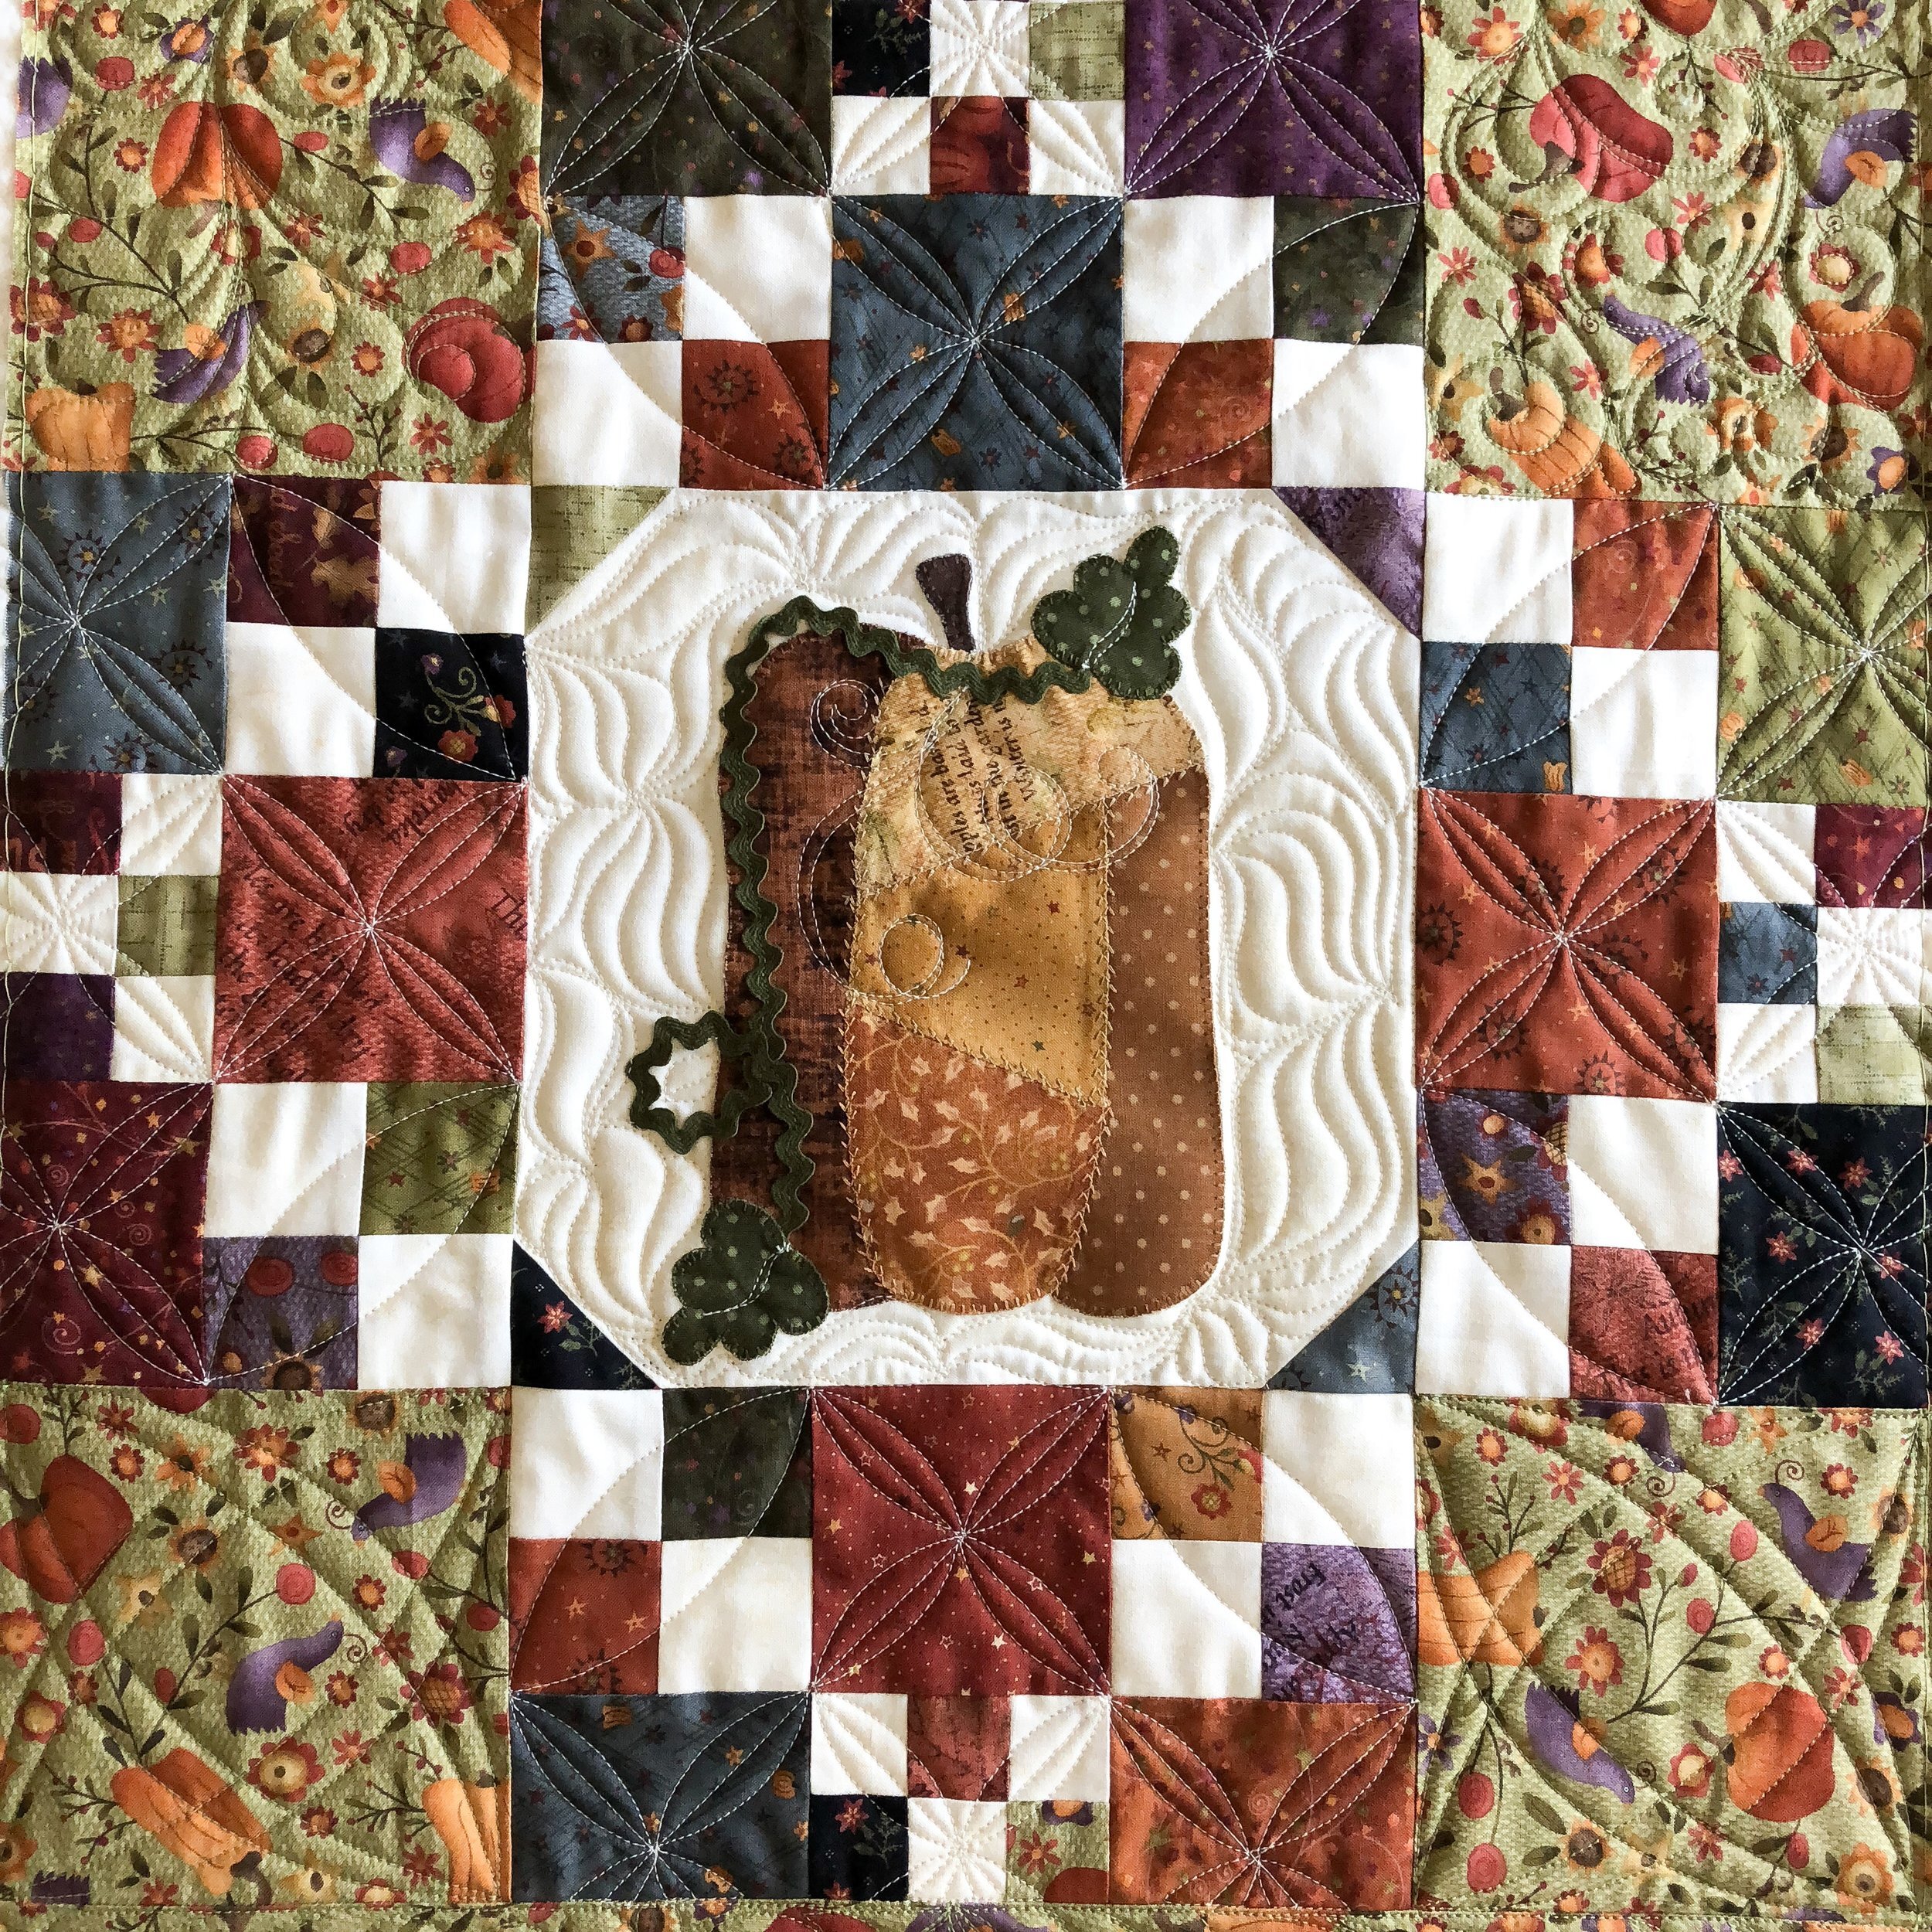
Here is a look of the full set of my Circle2™ rulers, stacked and ready for you to use in your quilting. They come in clear or green acrylic. Go to my shop and check them out... https://www.quiltingit.com/shop/?category=Rulers
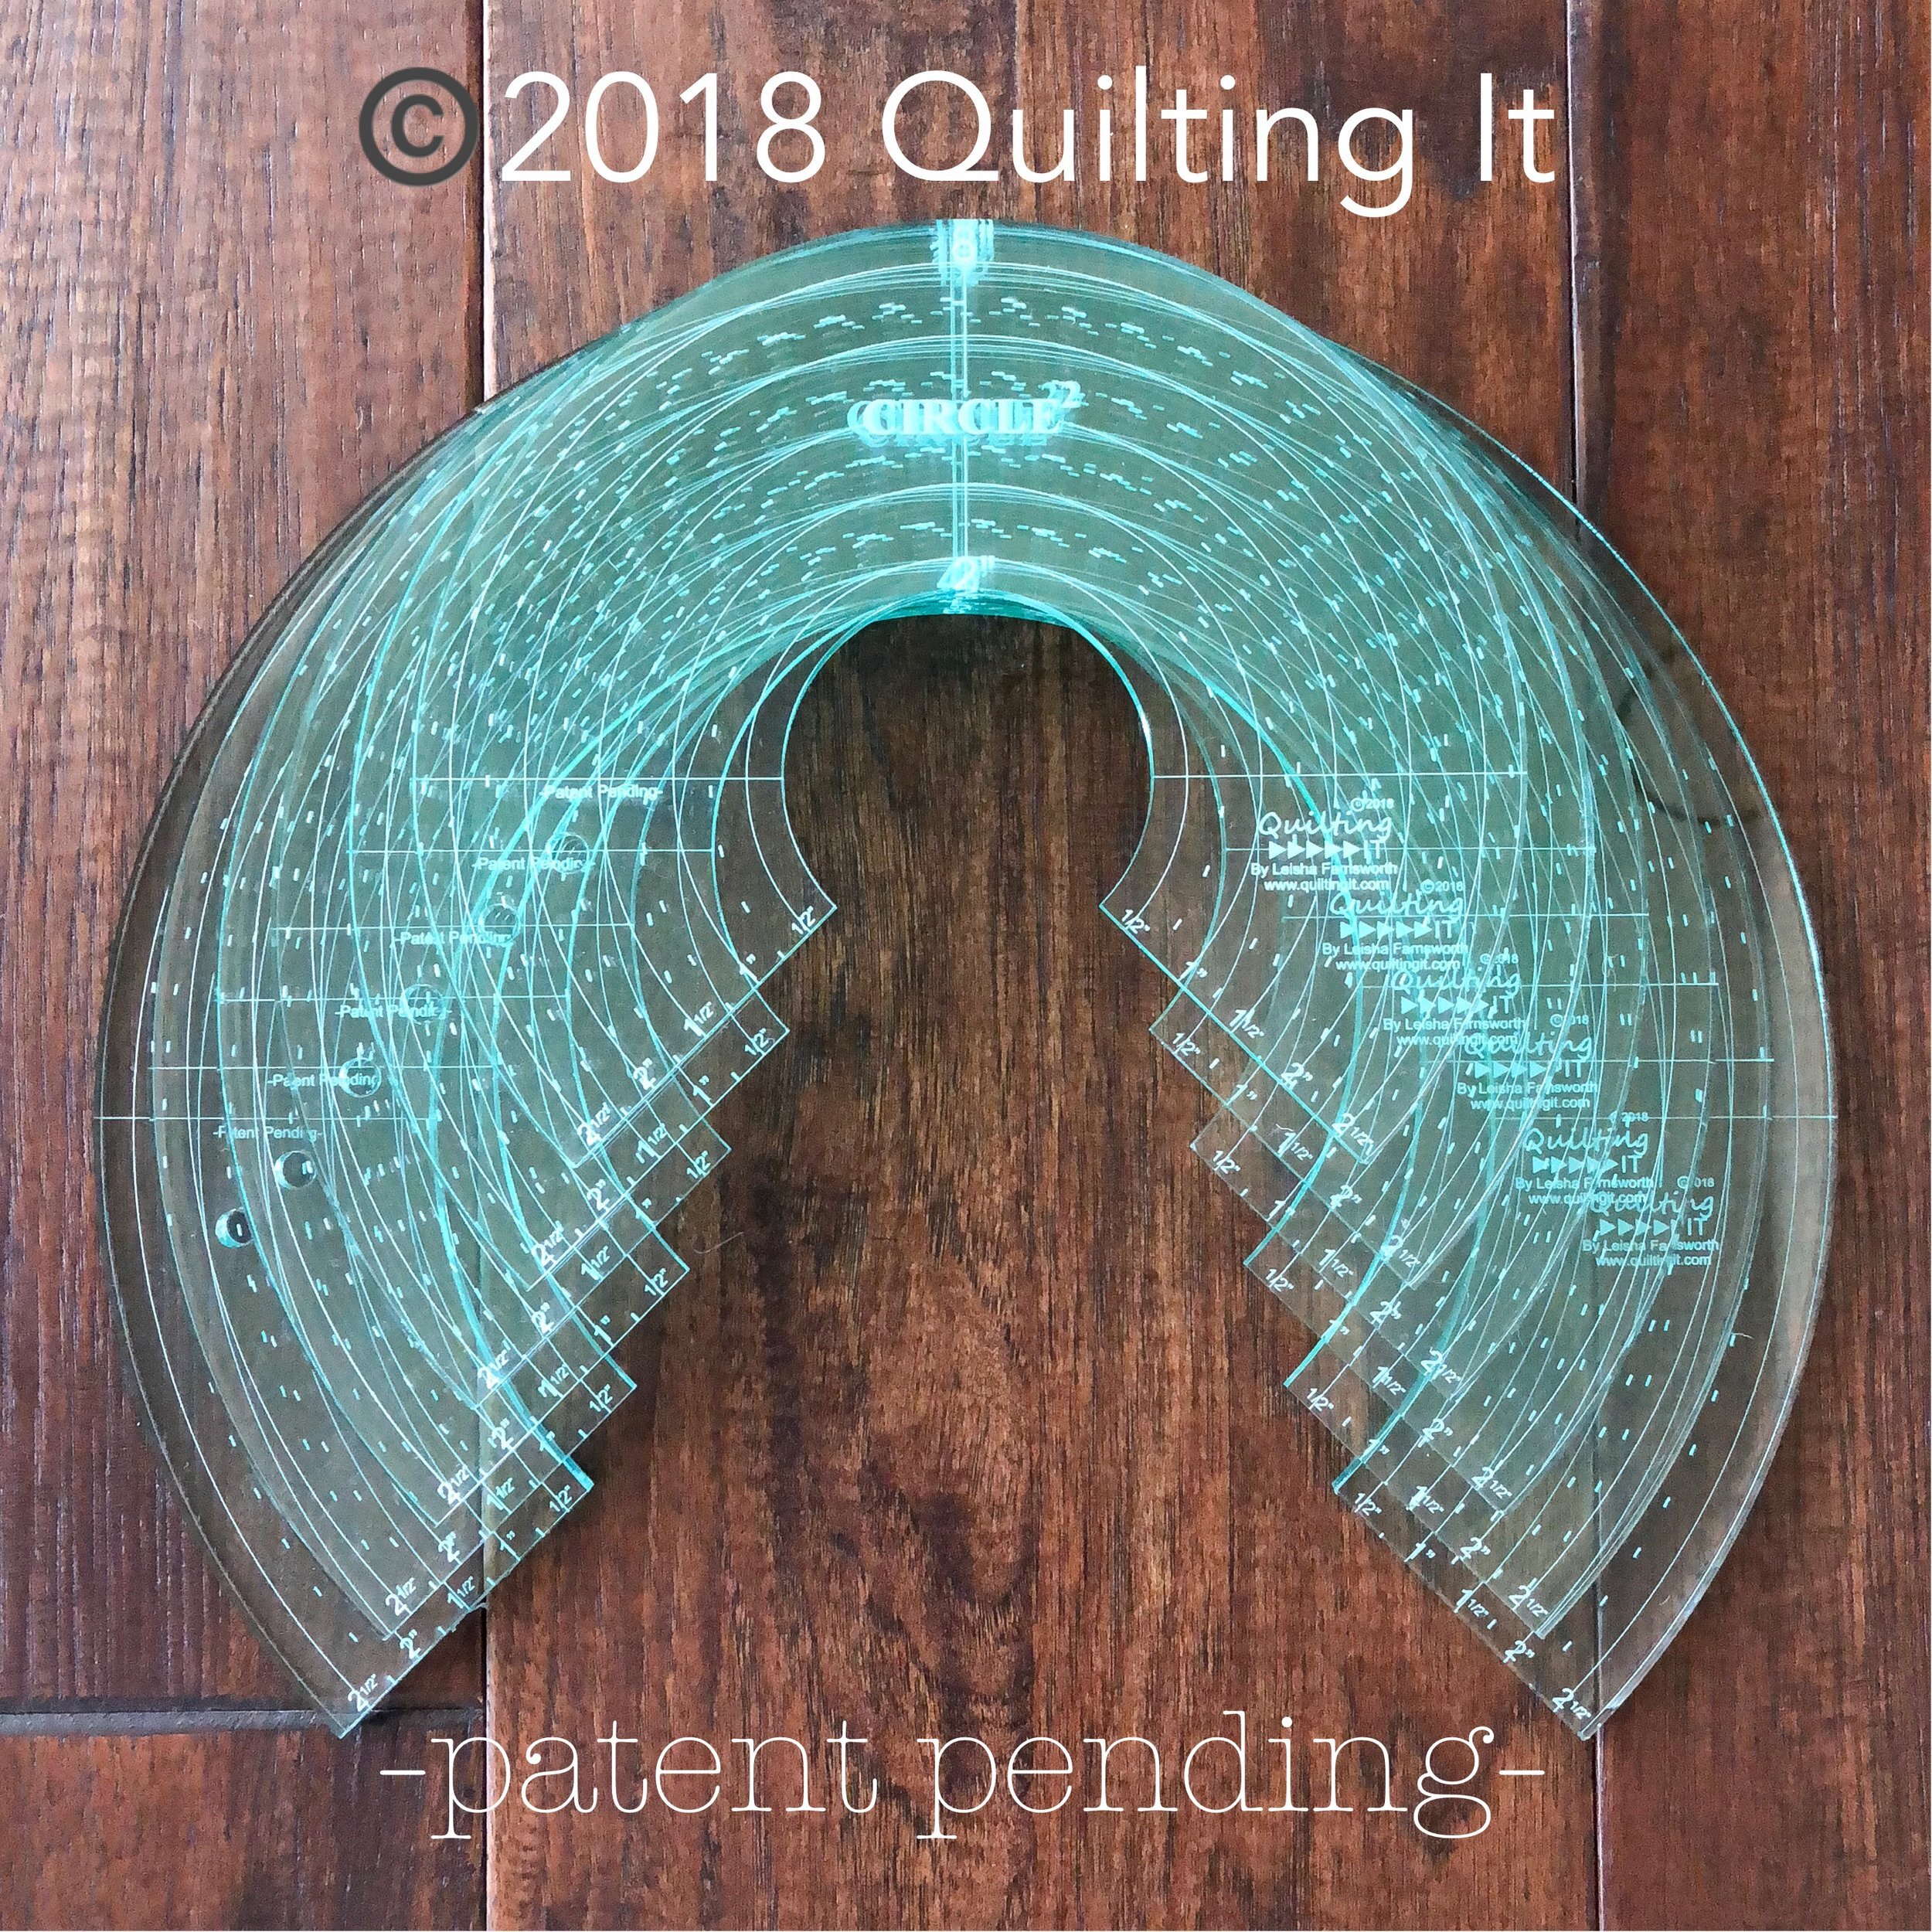
I’m not sure which ruler I used where...this was several quilts ago. I know I used the 13”/7” ruler for the quilting in the triangle ends to the runner. I know I also used the 2”/8” and the 3”/9” rulers for some of the smaller orange peel curves...but I can’t quite remember which circles I used on the larger curves. Which is a great reason to get a set. You never know which curve or circle is going to fit the best!!

I love the mix of the small and medium sized orange peels.
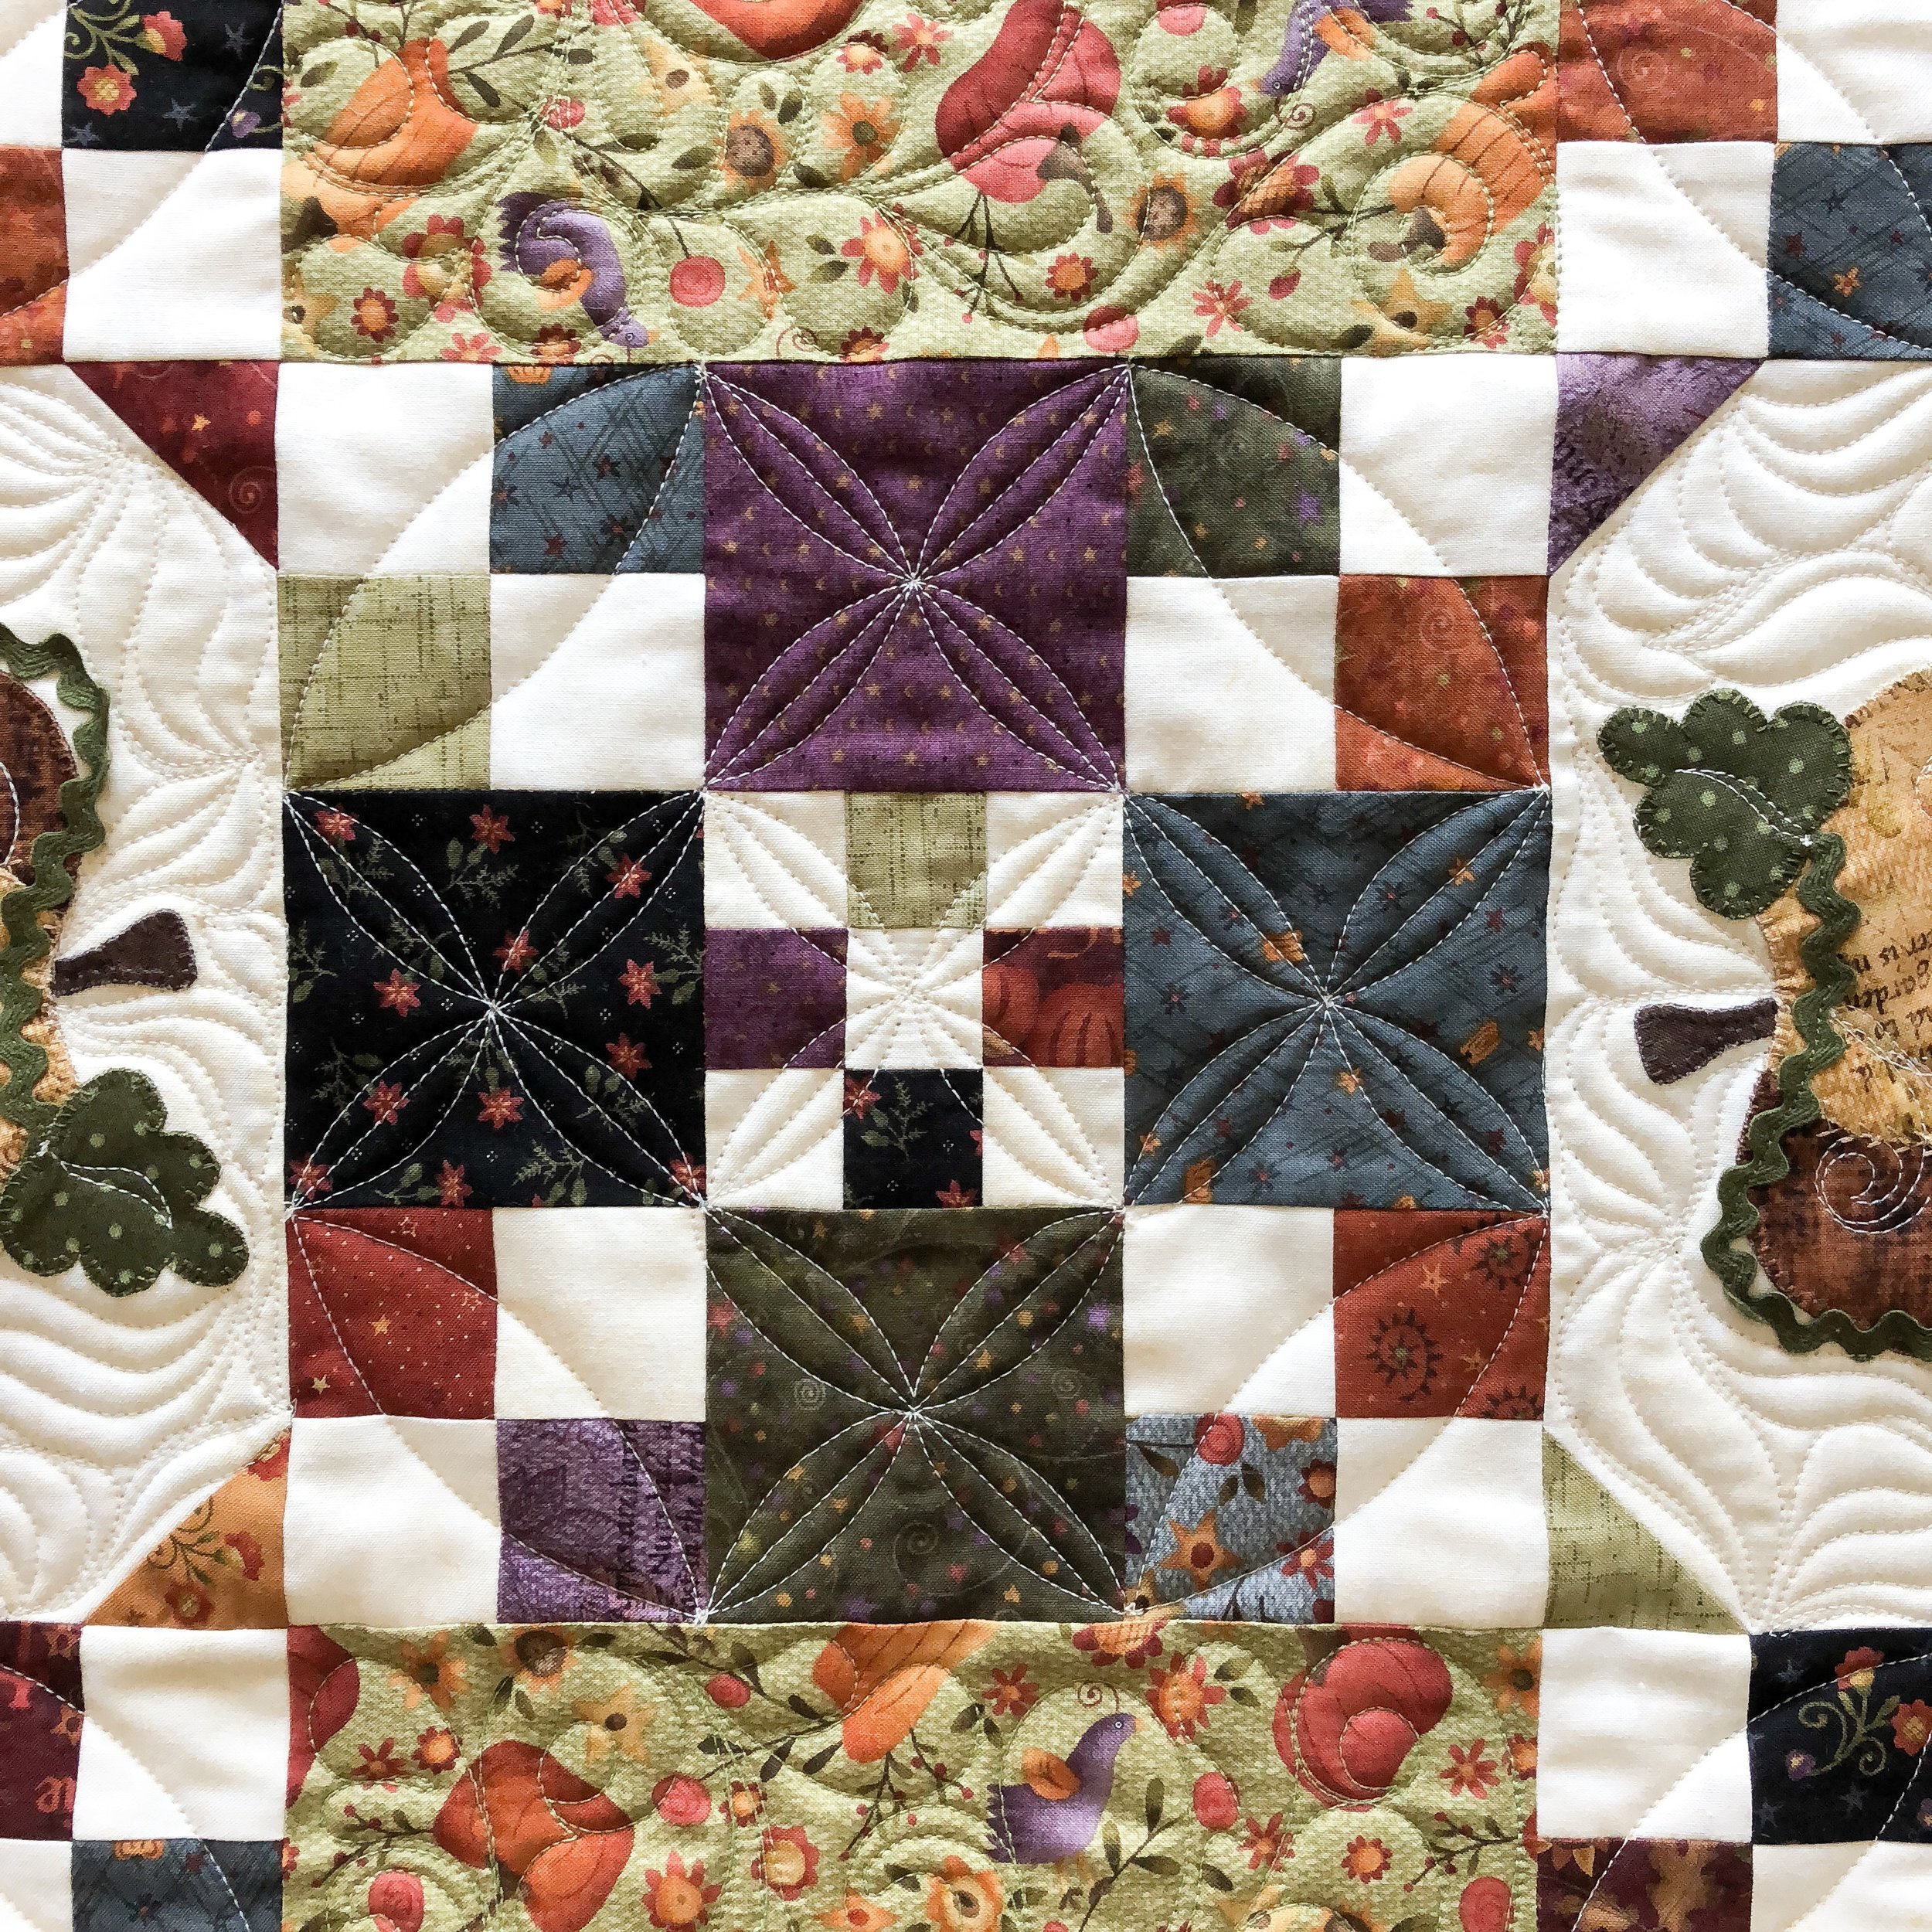
A double crossed orange peel for these corner blocks is just something a little unique...it’s fun to see what a little curve can create. I used one of my rulers...I can’t remember if it was the 7”, 8”, or 9”.
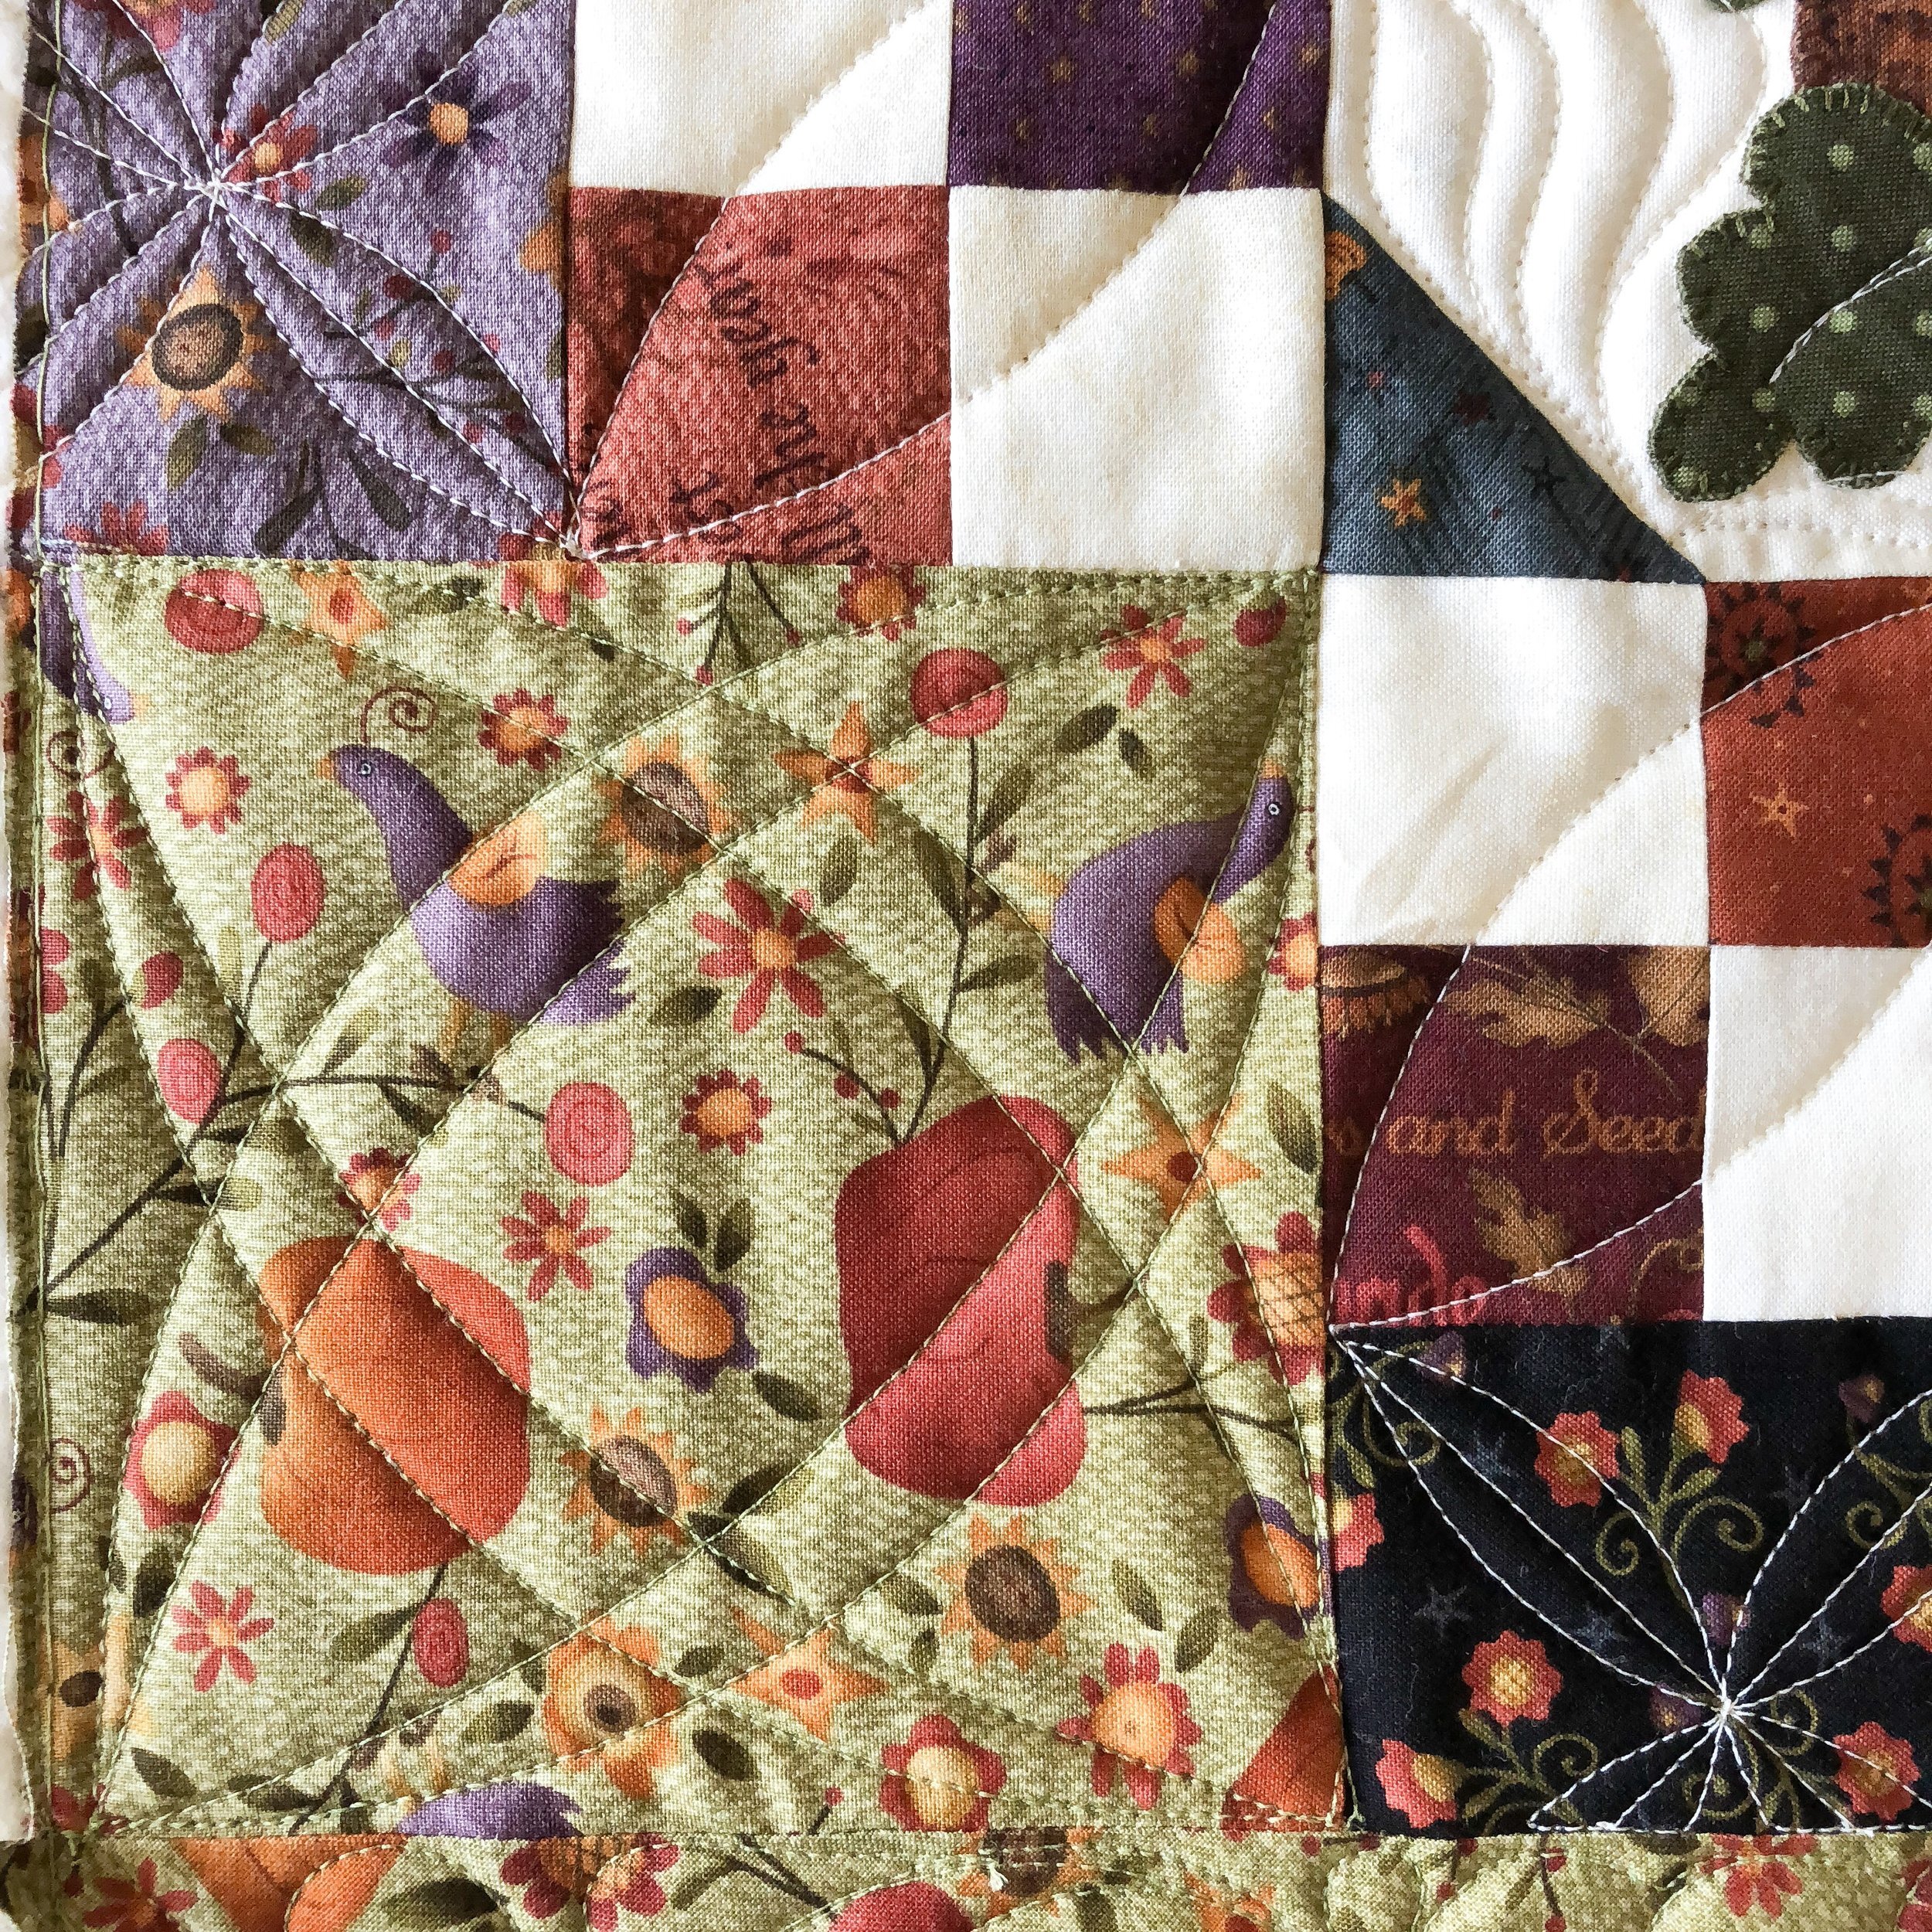
I wanted to dress up the edge triangles with a little cross hatched curve, and then I decided to fill the curves with a swirly feather.

Keep coming back for more Laser Cut Quilts designs...there are lots of fun ones, still coming. https://lasercutquilts.com/shop
happy quilting!!
-Leisha

Barbara’s Lets Talk Turkey table topper!
Barbara made this beautiful Lets Talk Turkey table topper that is available on Quilting Daily’s website, for her daughter!! We’ve had the most beautiful fall here in northern Utah. Leaves changing, and lots of sunshine!! For me, quilting fall themed projects is one of my fav’s!
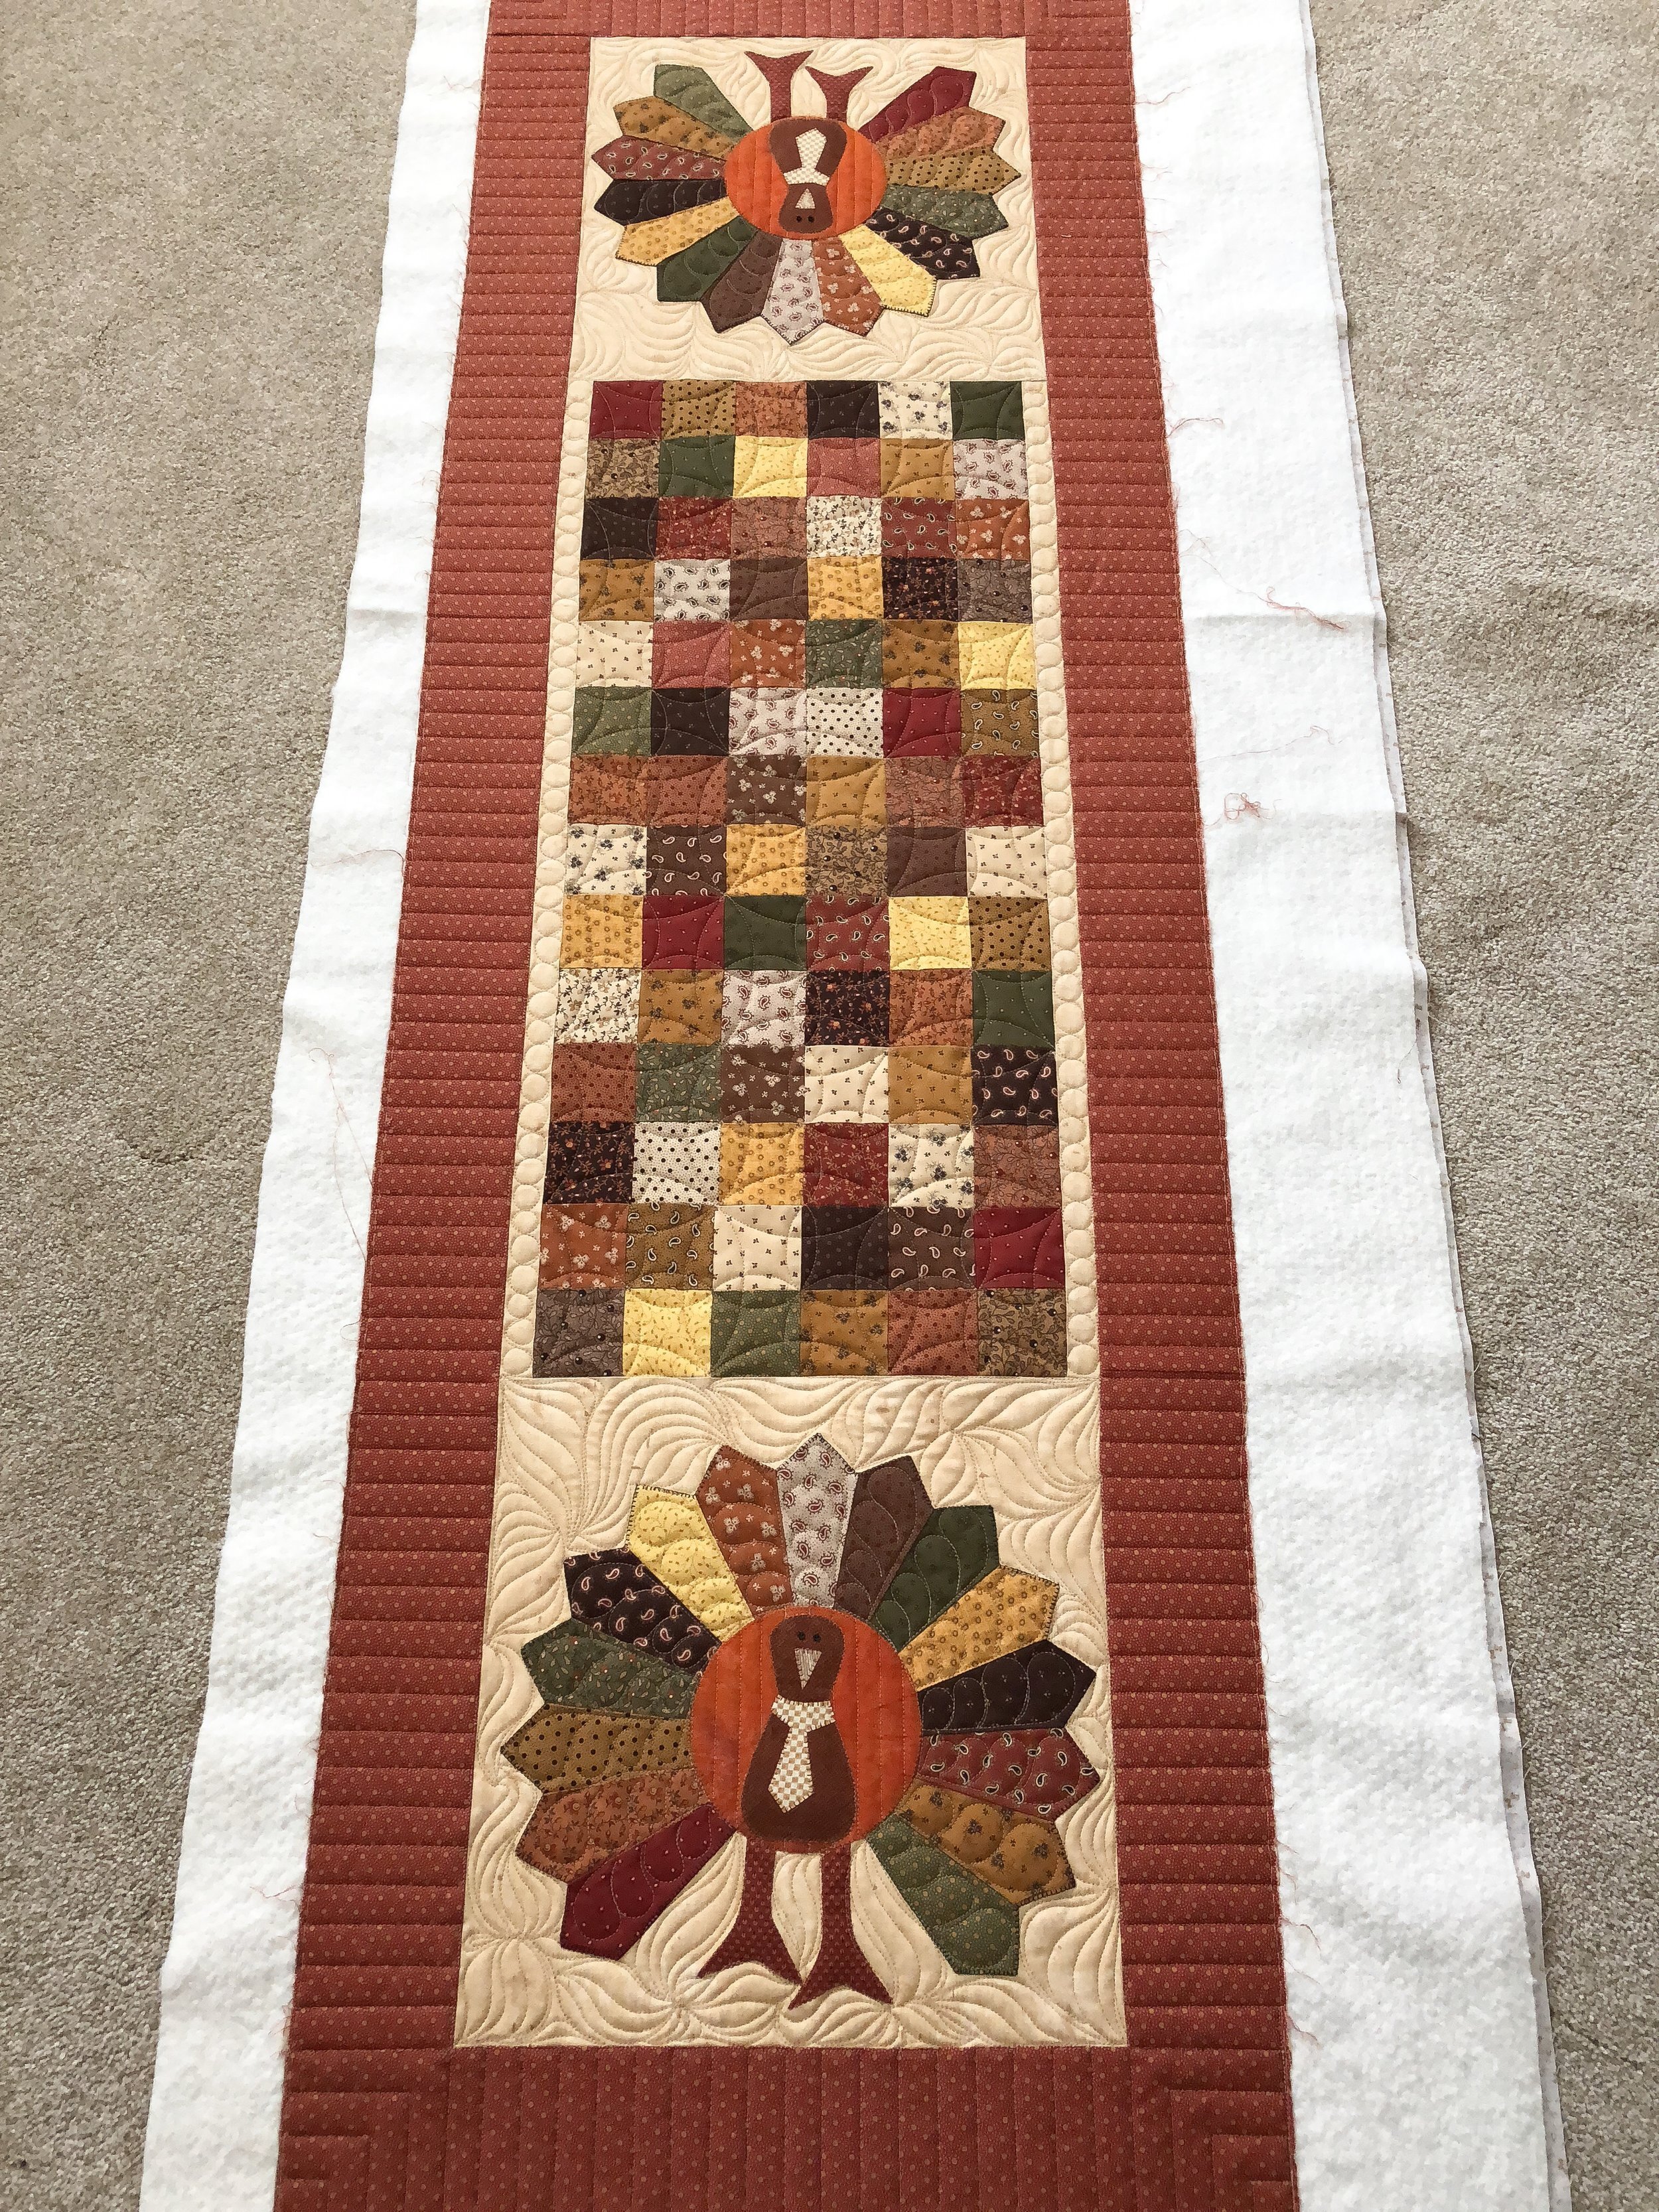
This is going to be perfect across a long beautiful table!!
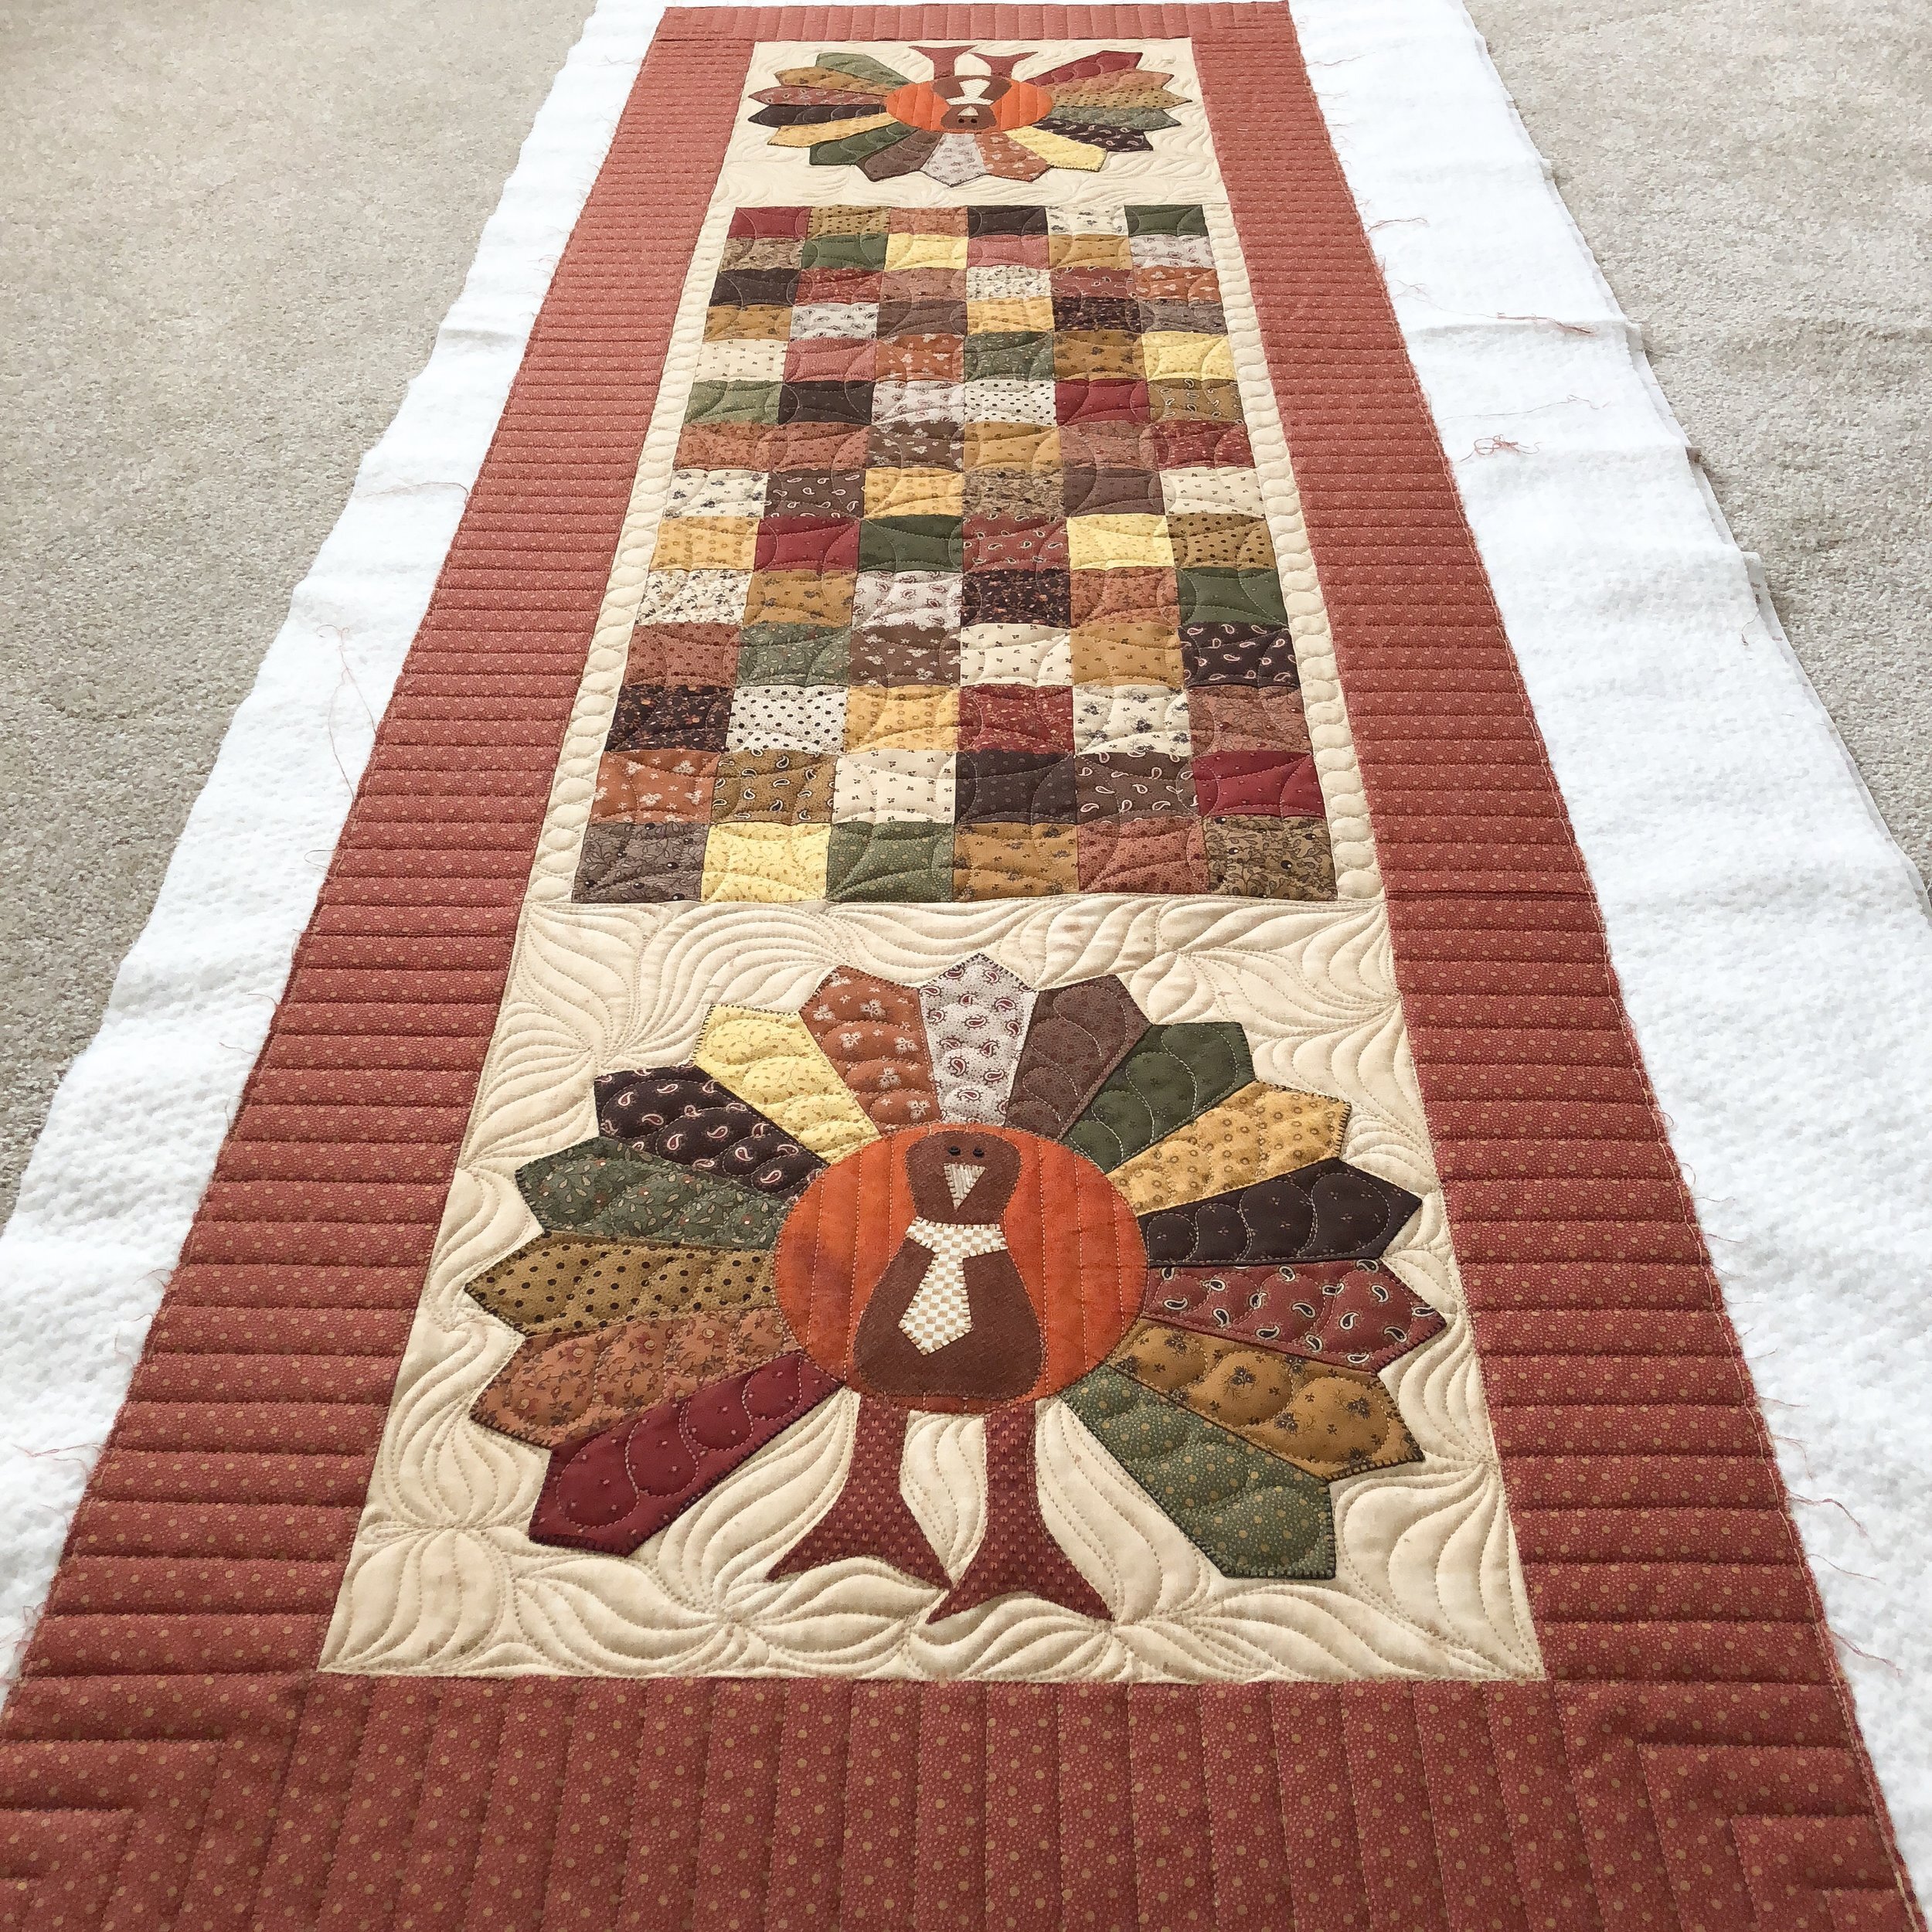
I love creating different textures in my quilting...lines, pebbles, curves, grass, and feathers.
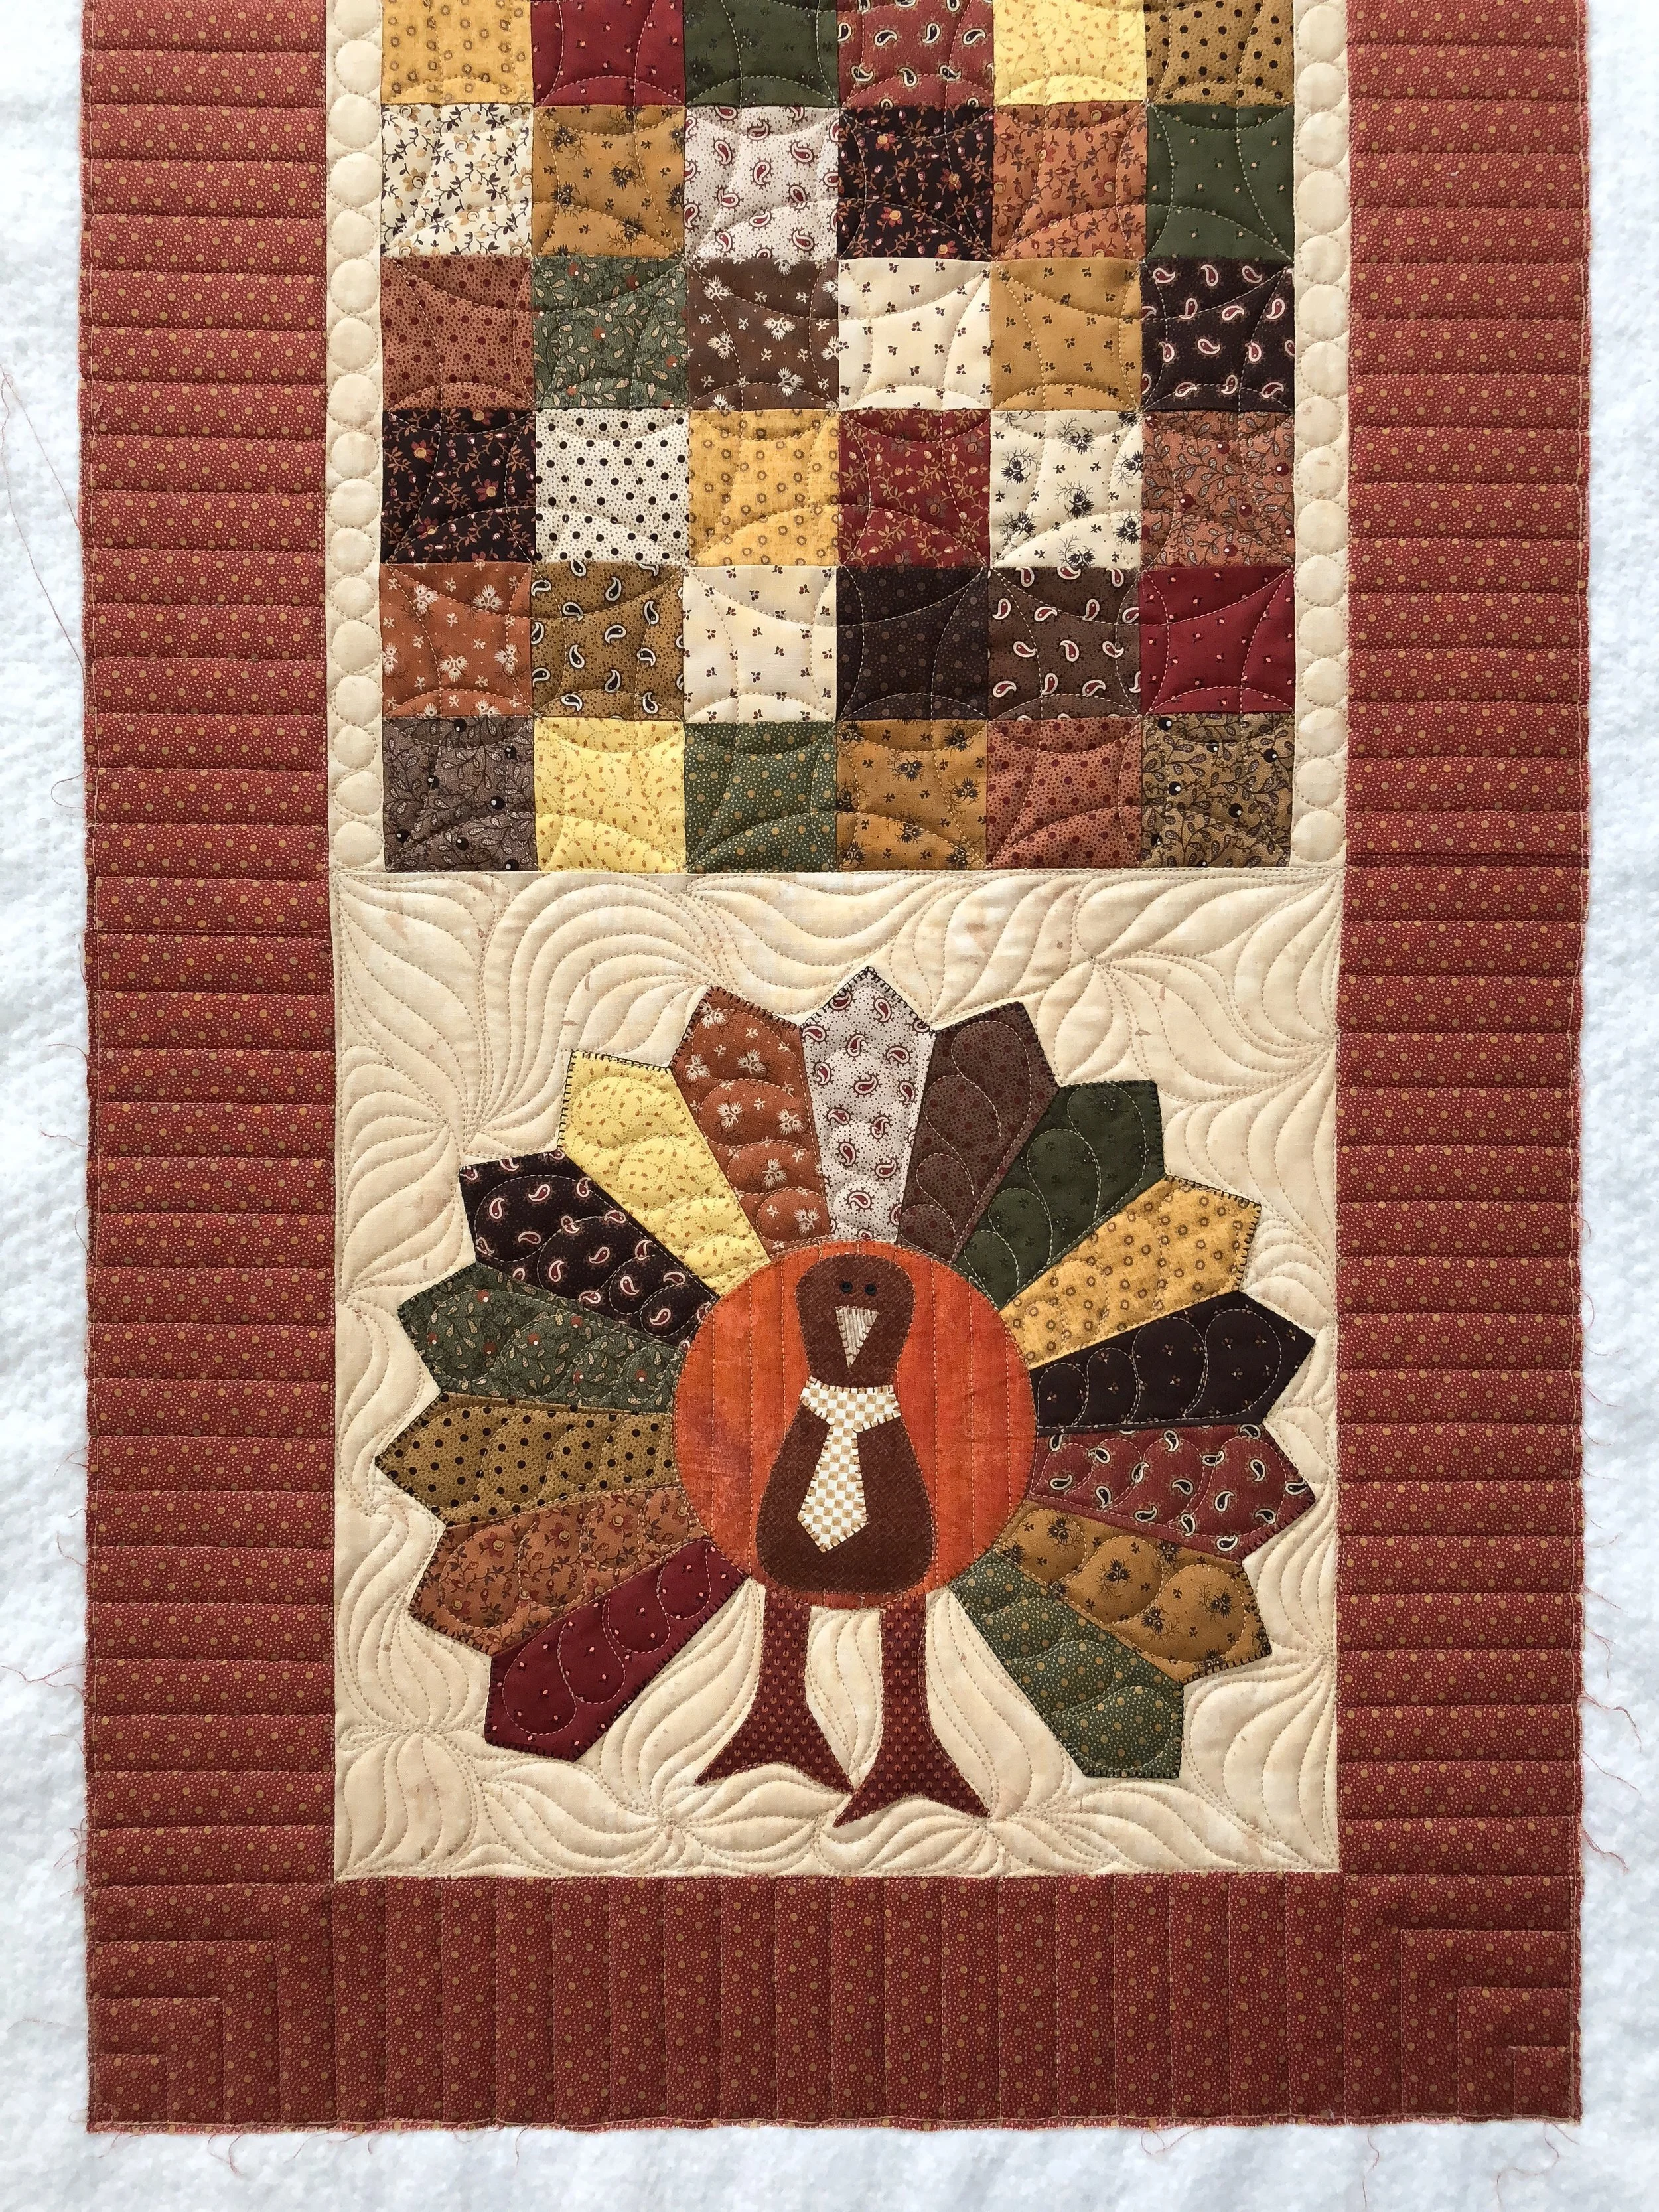
I used a tan thread to quilt the entire runner, 30 Tex Perma Core from A&E. I also used my favorite Winline 8020 cotton/poly blend batting.

Here is a great tutorial on continuous quilting, and I used two of my Circle2™ machine quilting rulers, to quilt the design above, in the squares.
Head on over to my YouTube channel to see more tutorials... https://www.youtube.com/user/QuiltingIt
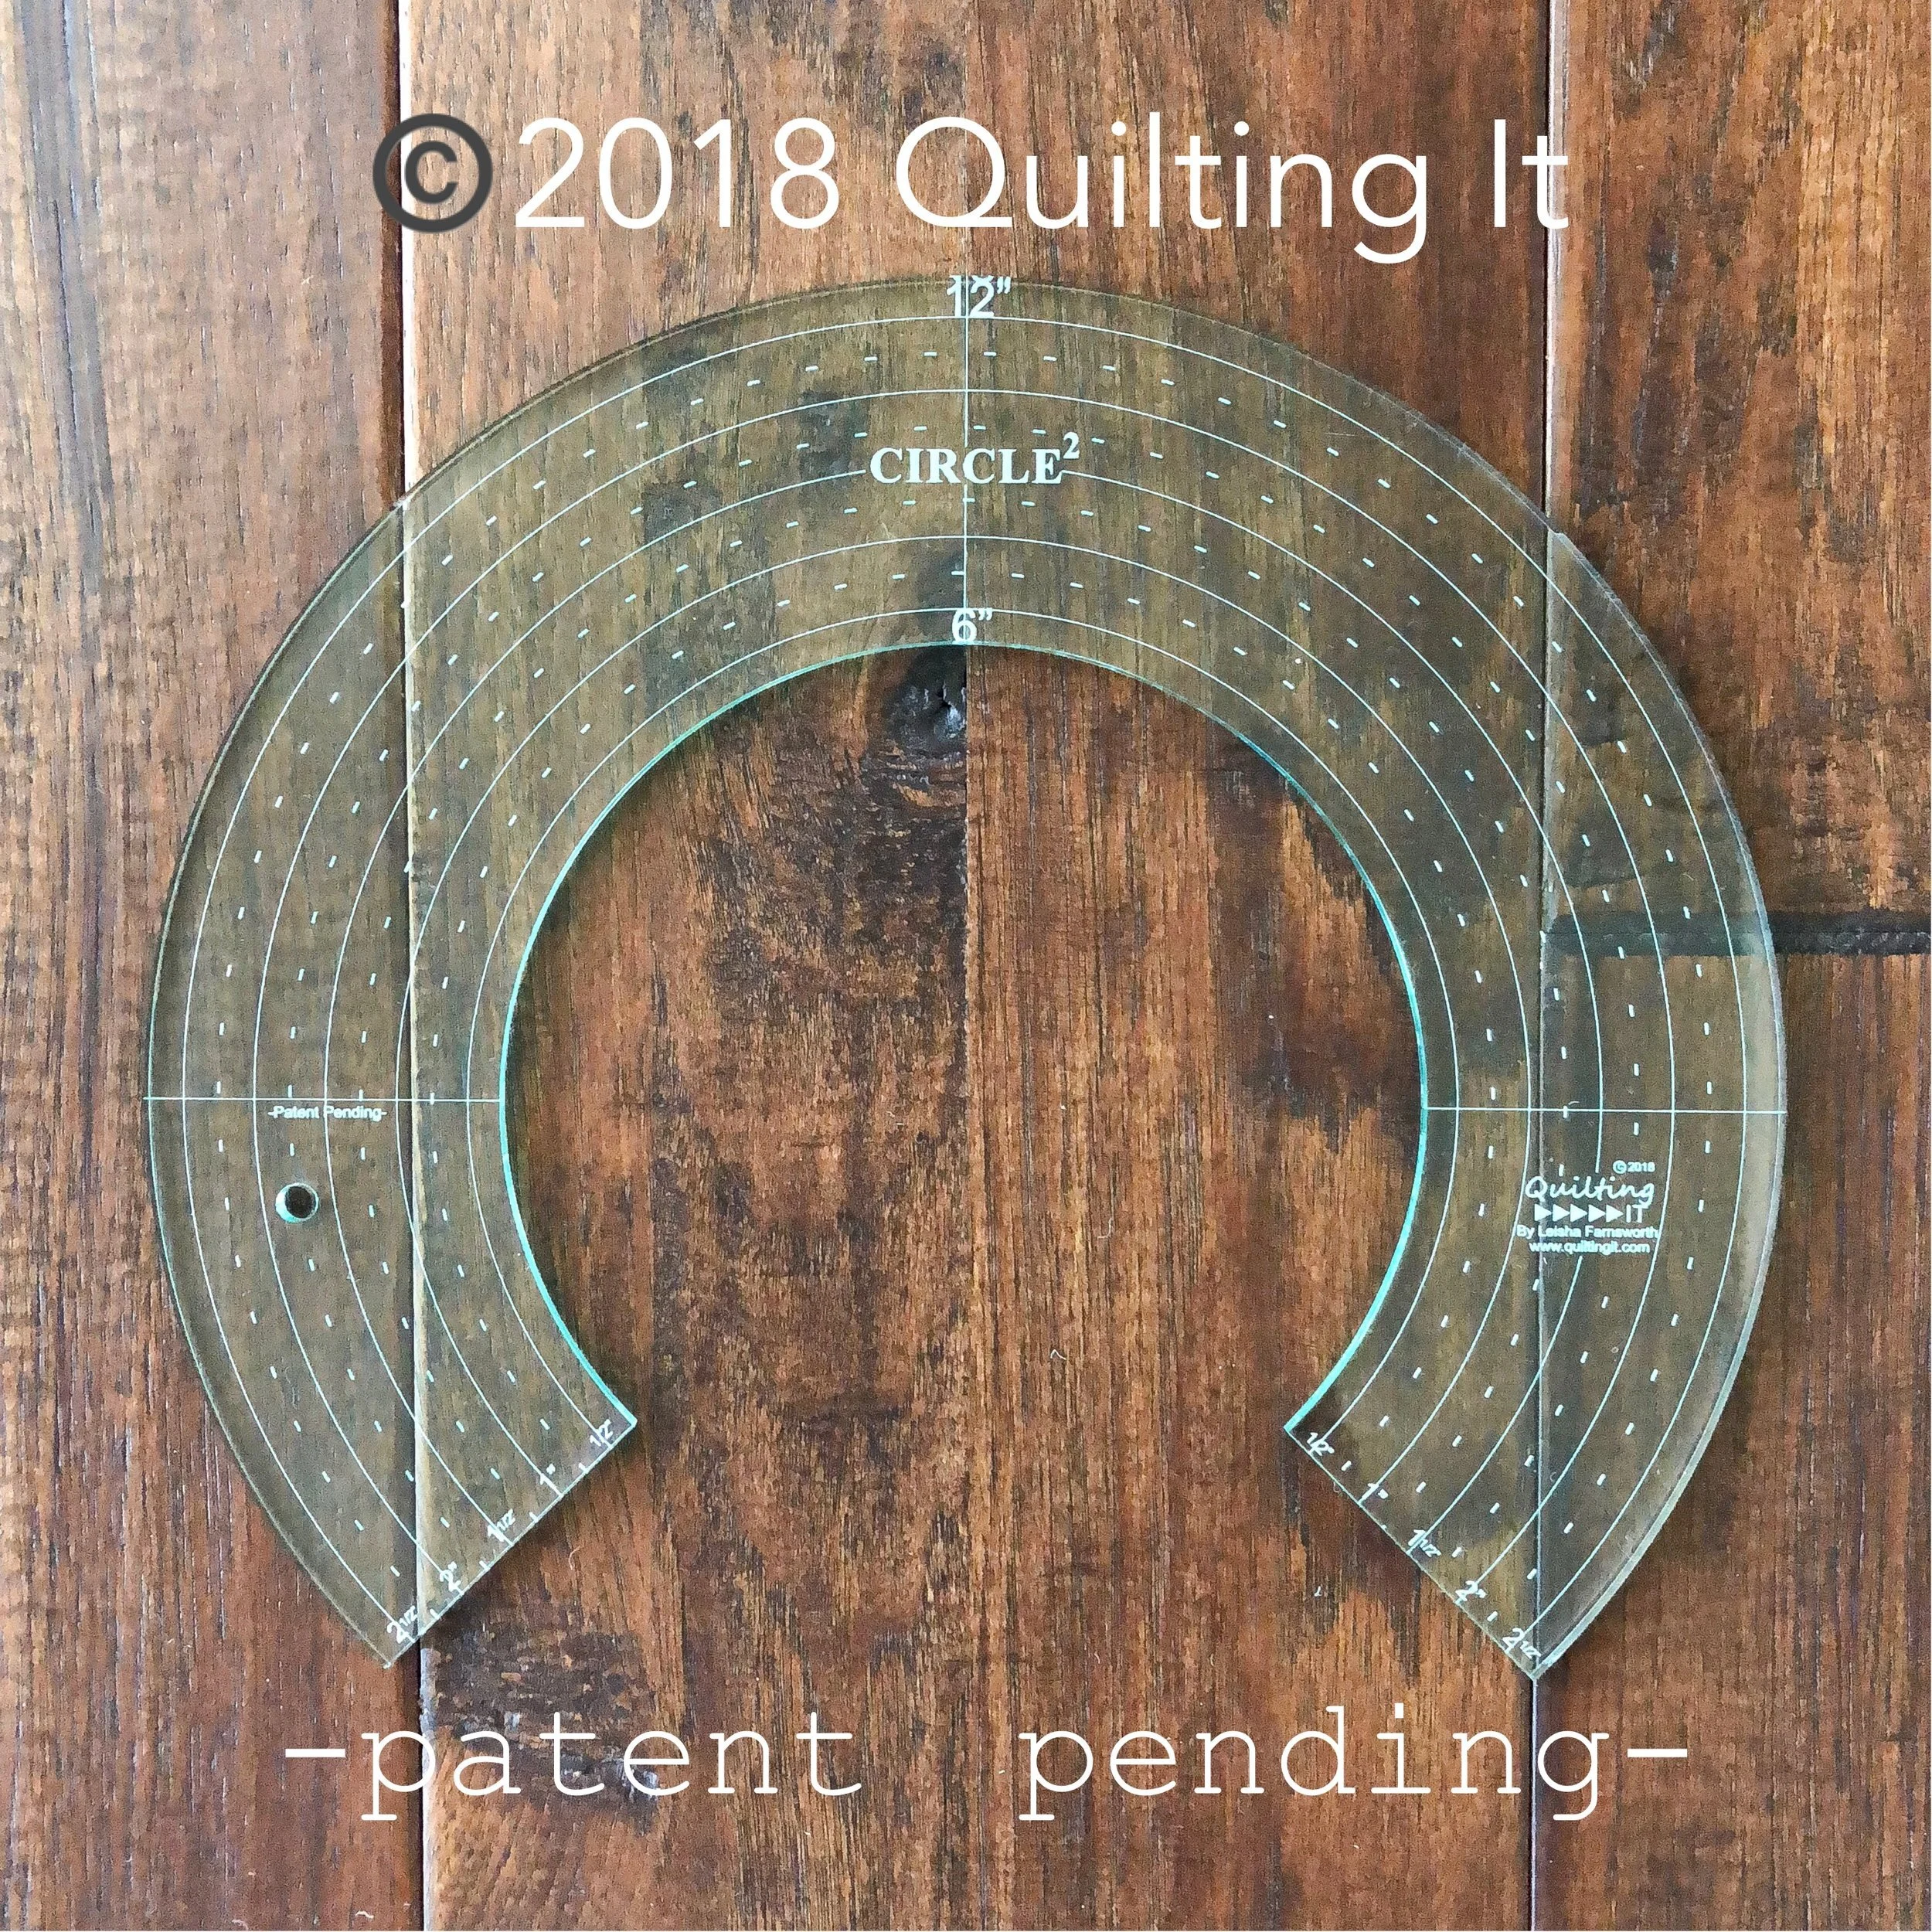
These are the two rulers that I used, shown in the video above. They also come in clear acrylic. Go here: https://www.quiltingit.com/shop/?category=Rulers
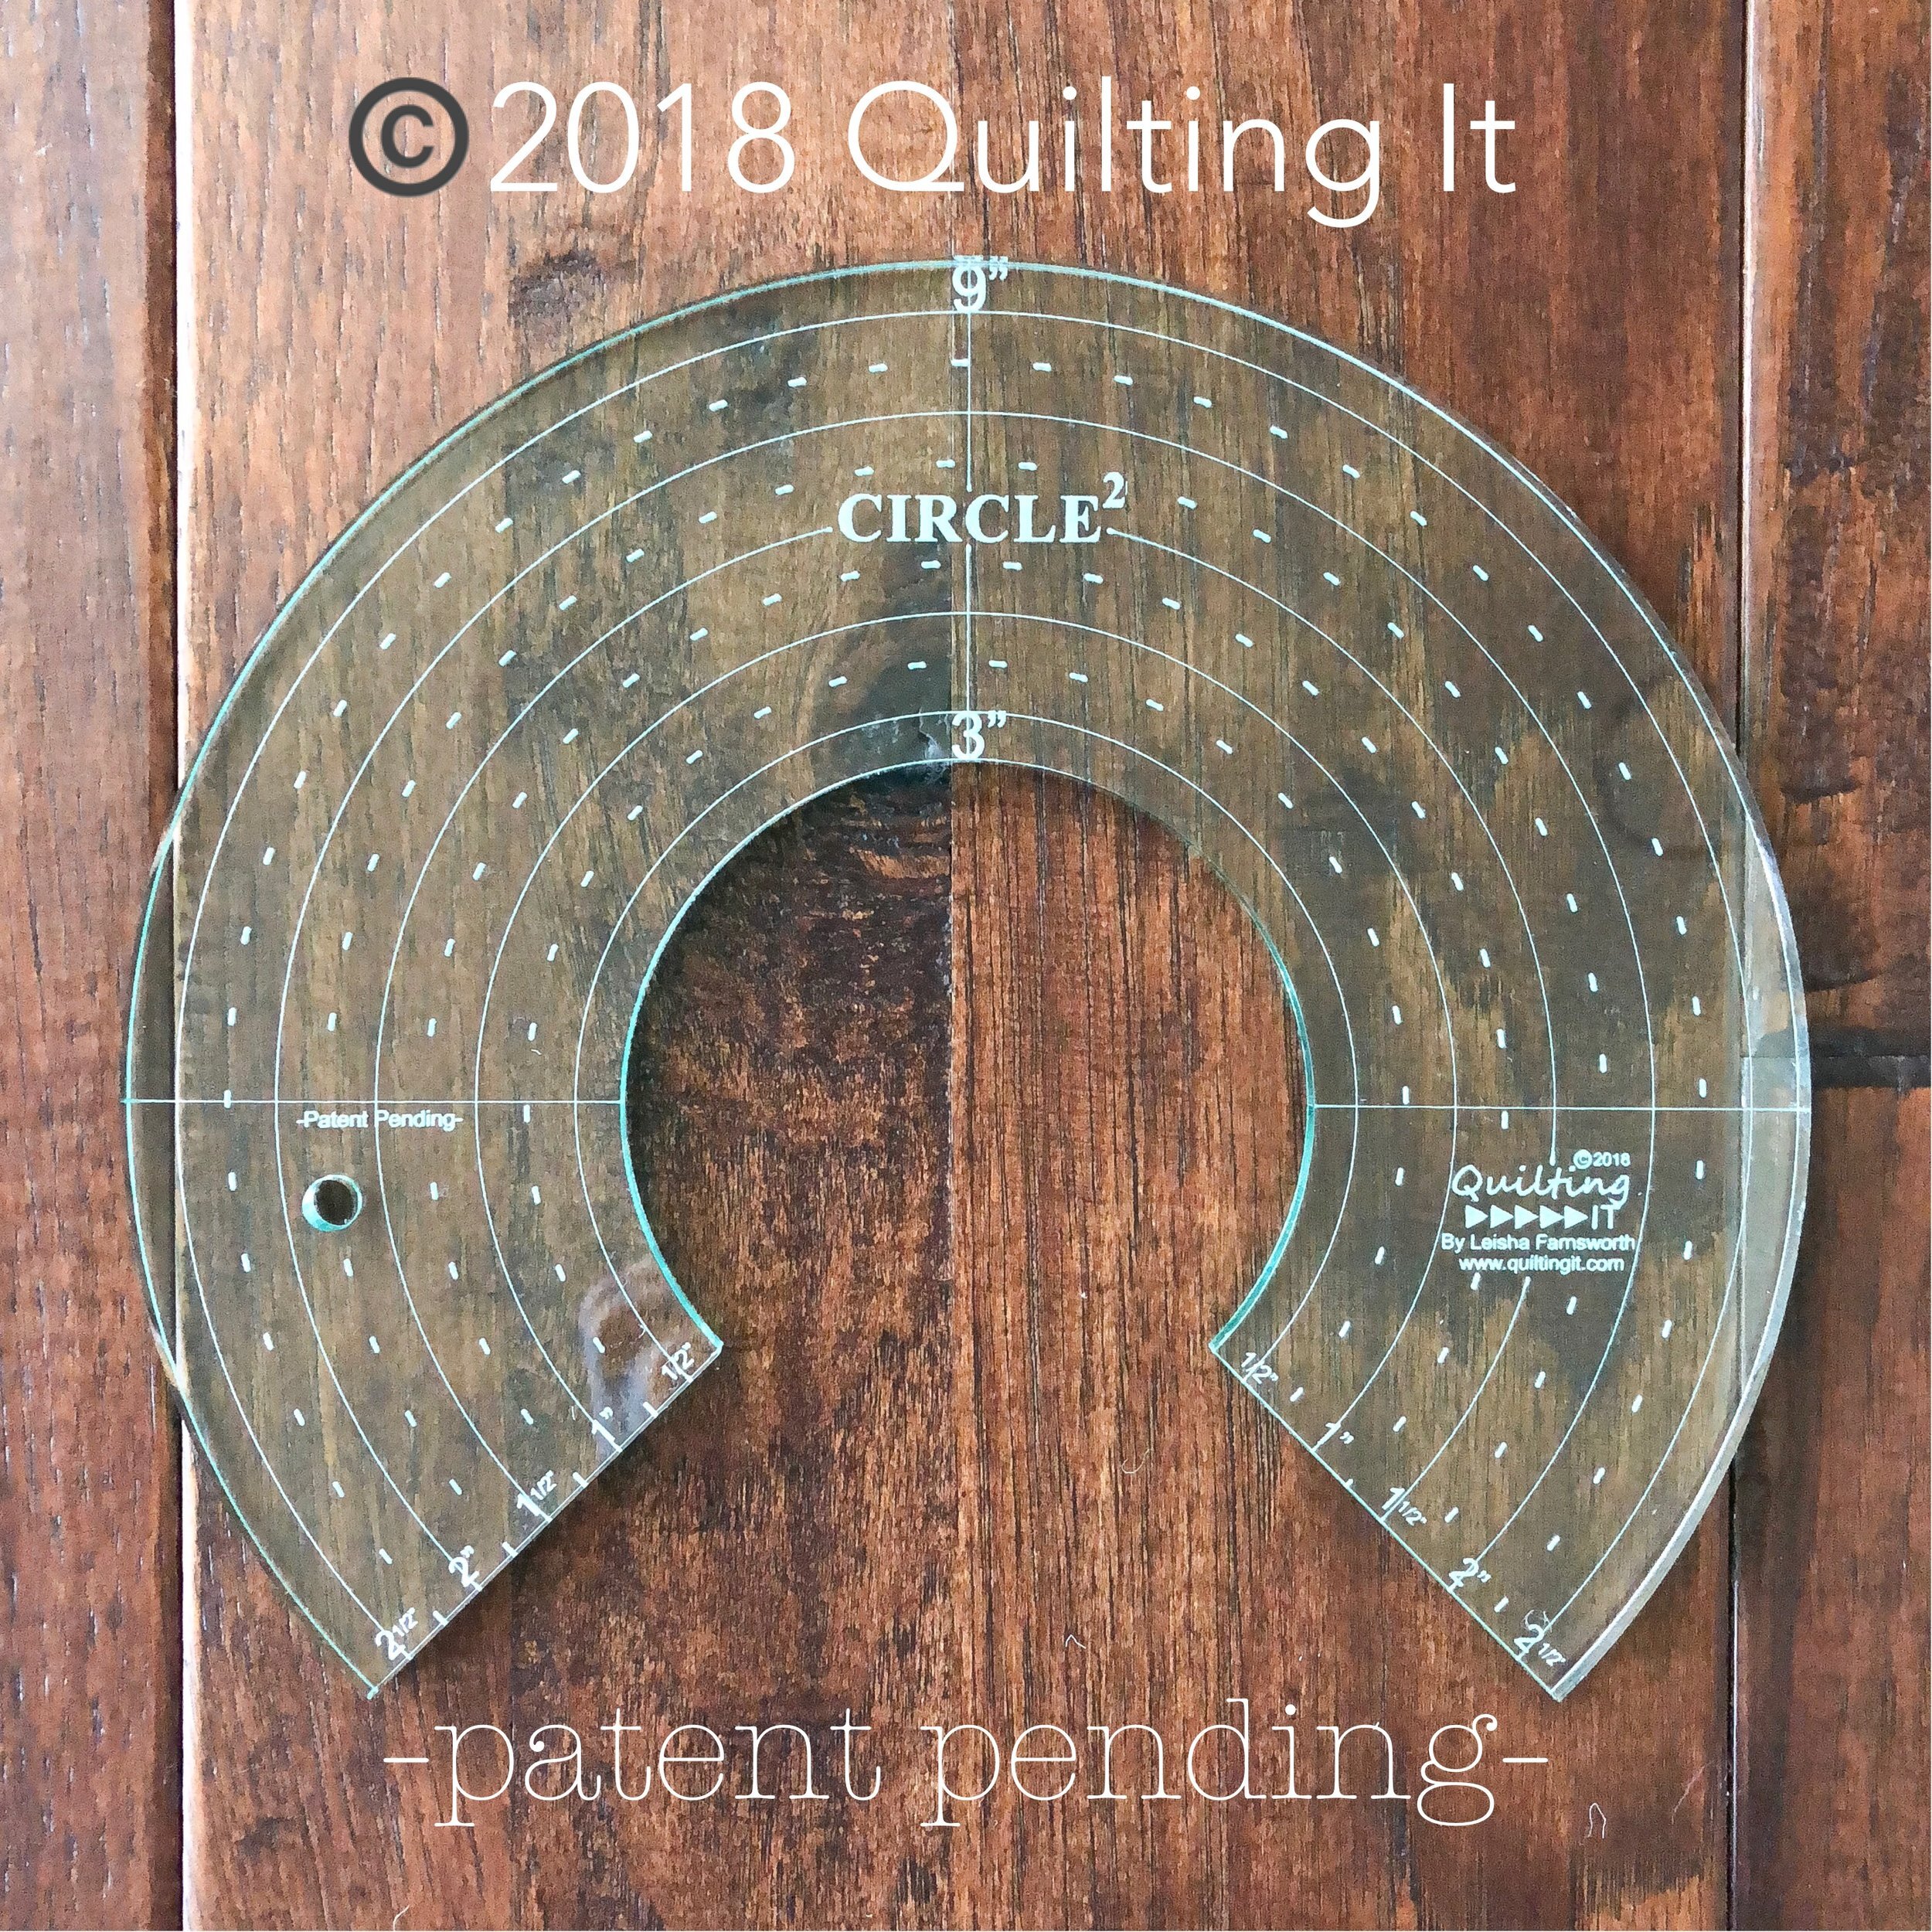
I love the double orange peel design in the center of these simple two inches squares, and it’s easy!! Love using these rulers.

I used the 8” Edge ruler from Linda at thequiltedpineapple.com to quilt the lines and do the corner design...check the video below on how to use rulers.

A quick video on how to do this step down corner, without having to mark anything. It’s all about using the lines on the ruler.
Thank you for stopping by!!
happy quilting!!
- leisha